DNCA Server
DNCA
Install Order
graph LR
  A(<b>Portal</b>) ==> B(<b>Reporting</b>) ==> C(<b>Replay</b>) ==> D(<b>Processing</b>) --> E(<b>HBR</b>) --> F(<b>DNCA</b>);
The approach to any Discover DNCA installation (including upgrade) occurs using an ordered three-phase approach.
- Pre-installation check 60%
- Initial DNCA installation 25%
- DNCA upgrade 15%
It is important that each of these phases is complete in turn to ensure the system is optimally installed and free from issues. The following steps facilitate the 3-phase approach. The % listed with each phase is an approximate order of magnitude in effort / time.
Prior to the DNCA installation, the current system requirements documentation should be reviewed for software support levels. Using unsupported software levels may lead to unexpected installation and in-use errors, HCL Software support may be limited or refused.
The DNCA software must be installed using the root user account. During the installation process, the dncauser account is created. At software runtime, the dncauser account runs the DNCA processes regardless of the user that started them. Do not use the sudo root user for installation.
Pre-Installation OS Steps
OS Verification
Any application coredumps will be saved to the following directory, /var/lib/systemd/coredumps, whilst it is likely that this directory will never be used, any coredump may be large and should be catered for in disk/partition sizing.
-
Access the server with the true root user.
-
Sizing provided in advance (by your aligned HCL BP, TA or PSS) for the solution will indicate a total disk size for the DNCA server. The % figure listed below approximates the disk allocation by
serveries/applications/foldersrequired by Discover.The DNCA installation will require at least two separate folders listed below, create these directories/partitions now and in accordance with your organisations standards:
- /usr/local/dncauser (20%)
- /var/log/discover (45%)
Additional resources that make up total disk allocation. Any organisational utilities that you may require as standard should be in addition to the total disk size provided.
- OS and Client requirement standards (15%)
- /var/lib/system (20%)
-
Using the following steps, confirm that the server's specifications meet the sizing requirements / recommendations (OS, CPU Cores, Physical memory, Disks, Network) outlined in the current system requirements. You should also ensure that these are in accordance with the sizing carried out by the HCL Discover team.
Requirements Command Example Output OS: cat /etc/*release9.5 CPU cores, (value of 'processor' + 1): cat /proc/cpuinfo16 Physical memory (RAM), (value of 'MemTotal'): cat /proc/meminfo16107460kB Disk partitions: df -hNetwork interfaces (NIC): ifconfig -aens192 Network interface specs (speed, etc.): ethtool
Tip
Note down command outputs for your organisation's records.
Upload RPMs
From your My HCLSoftware downloaded software location, upload the DNCA RPM packages to a temporary location on the DNCA server, e.g., /tmp. You will require rpm's: Unica_Discover_Setup and Unica_Discover_Setup_12_1_x, where x is the current version or version you are licensed to use.
SELinux must be disabled at this point. Not doing so will result in the DNCA processes being unable to generate core dumps if needed and warning messages returned at process start-up time in both the Linux terminal and DNCA console.
Disable SELinux
- Verify the status of SELinux, issue the command, sestatus
- Disable the SELinux configuration file, using vi (or revise for your preferred editor) to issue the command at the terminal,
vi /etc/selinux/config - Change the SELINUX value to, disabled
- Reboot the server using the command
sudo shutdown -r now - When the server is available after reboot, verify the status of SELinux, issue the command, sestatus, it should now be disabled.
Disable Firewall
Linux based firewalls need to be disabled at this point, this can be achieved using either suitable option outlined below.
Disable Firewalld
- Check the status, issue the command,
firewall-cmd --state -
If the firewall is enabled/running then issue the commands,
systemctl stop firewalld,systemctl disable firewalldandsystemctl mask --now firewalld. -
At this point reboot the server by issuing the command
sudo shutdown -r now
Disable iptables (alternative)
This is an alternative approach to disabling the firewall, it is only necessary if you did not use the approach above.
-
Check the status, issue the command,
service iptables statusservice iptables saveservice iptables stopchkconfig iptables off -
At this point reboot the server by issuing the command,
sudo shutdown -r now
Update Manager
At a later stage in the DNCA installation we will need to install the RPM packages that were uploaded in a previous step to a temporary location. Confirmation that an update manager (e.g. Yum) is required to ensure the process can access a Linux repository entitlement server and automatically download any prerequisite libraries/packages.
Below is an example of the error message returned if no update manager is available:
https://packages.microsoft.com/yumrepos/azure-cli/repodata/repomd.xml: [Errno 12] Timeout on https://packages.microsoft.com/yumrepos/azure-cli/repodata/repomd.xml: (28, 'Connection timed out after 30001 milliseconds')
Trying other mirror.
This system is not registered with an entitlement server. You can use subscription-manager to register.
Where organisations have alternative methods or do not allow entitlement subscription servers to be registered with update managers, the required packages need to be installed prior to the DNCA package install.
If required for verification, the list of required packages for a specific rpm installer can be automatically produced by issuing the command,
rpm -q --requires -p Discover-DNCA-XXXX-1.YYYY.ZZZZ.rpm | fgrep -v rpmlib | sort -u | while read x; do rpm -q --whatprovides ${x}; done | sort -u
| Key | Description |
|---|---|
XXXX |
DNCA build number |
YYYY |
Linux distribution |
ZZZZ |
Architecture |
Most versions of Linux include an automated RPM repository system that can find and update the missing RPMs. RHEL uses the YUM repository system.
As part of a 32-bit operating system installation, these packages must be installed already.
You must manually install them for 64-bit installations. While the 64-bit versions of these libraries are automatically installed, the 32-bit versions are required by DNCA and must be available on the installation media.
- Confirm that the telnet tool is installed, issue the command, yum install telnet.
Communication Ports
Prior to these installation steps you will have been supplied with a list of communication ports to be opened (also referred to in the Server to server communication section), these ensure that the DNCA, processing servers, report servers and others can successfully communicate.
-
Ensure that the TCP port 1966 (or 1967 for secure communication) is open for communication with the HBR / Processing servers. Issue the command, cat /etc/services
-
Ensure that the TCP ports 8080 and/or 8443 on the DNCA server are open to allow access the DNCA console remotely in later steps.
DNCA installation
At this point, the pre-installation OS checks / configuration are complete, and the installation can now take place.
Install the DNCA RPM package
- Issuing the YUM or RPM commands from within the temporary upload ( /tmp ) location,
yum install discover-DNCA-<nnnn>-<rrr>.<distro>.i386.rpm
or
rpm -ivh Discover-DNCA-<nnnn>-<rrr>.<distro>.i386.rpm
The YUM update manager will take care of downloading and installing all dependent libraries. The software installation will be placed by default into the /usr/local/dncauser location regardless of update manager used.
| Key | Description |
|---|---|
<nnnn> |
Build version number; for example, 12.1 |
<rrr> |
LRPM revision number. The revision numbers are usually single digit numbers. |
<distro> |
Identifier for the Linux© distribution, such as "RHEL n" for Red Hat Enterprise Linux release n. |
rpm -ivh is where i is used for the package install and the vh is for verbose hashed output.
e.g., yum install discover-dnca-12.1-4.RHEL8.x86_64.rpm
Using YUM or RPM (as appropriate) to install the DNCA software to a custom location, not /usr/local/dncauser.
yum install --prefix=/opt/Discover Discover-DNCA-<nnnn>-<rrr>.<distro>.i386.rpm
or
rpm -ivh --prefix=/opt/Discover Discover-DNCA-<nnnn>-<rrr>.<distro>.i386.rpm
The force option may be required or used when installing the DNCA .rpd distributions, e.g. rpm -ivh --force Discover-DNCA.... rpm
dncauser File Limit
Increase the core file size limits for the dncauser account.
Edit the security limits configuration file and make configuration changes for the dncauser only, issue the command, vi /etc/security/limits.conf. Add the entries on separate lines and save the file:
dncauser hard core unlimited
dncauser soft core unlimited
This gives the dncauser account permissions to create dump core files. The below error would otherwise be returned in UI:
Warning
/usr/local/dncauser/bin/discover: line 349: ulimit: core file size: cannot modify limit: Operation not permitted /usr/local/dncauser/bin/discover: line 220: ulimit: core file size: cannot modify limit: Operation not permitted
If your organisation requires a finite number to be used it is possible to assign a specific size to the dncauser limits required by the installation. The above new limits.conf entries for dncauser should include a value in kilobytes (kb) instead of unlimited, e.g., dncauser hard core 2048
Enable capture log
-
Enable the capture log, after enablement ensure that the log is being successfully written to,
/var/log/discover/capture.log. -
Issue the command,
vi /etc/rsyslog.conf.Add the following entry on a separate line to the file:syslog.conf. filelocal0.* /var/log/discover/capture.log -
Restart the rsyslog service by issuing the command,
systemctl restart rsyslog.
DNCA initial start-up
After the DNCA rpm installation is complete, the initial start of the DNCA must be completed as the true root user. Using this user allows the DNCA to set several system kernel variables by using the sysctl cmd, which is available as root only.
- Change to the /usr/local/dncauser/bin folder
- Issue the following command,
discover start
Successive DNCA process starts can be run as the non-root dncauser user. each successive.
To run the DNCA as dncauser user, issue the following command(s), discover stop, su dncauser and discover start
Info
It is expected that most DNCA processes will fail to start at this point. Complete the below configuration steps.
Remote Access DNCA Console
To access the DNCA console use the servers name, over http/https and on port 8080/8443, e.g., http://dncaserver.hclcx.com:8080/ or https dncaserver.hclcx.com:8443/
Initial access will highlight a message The Local IP Address of this DNCA has been added to the list of Servers for the SSL Pool.
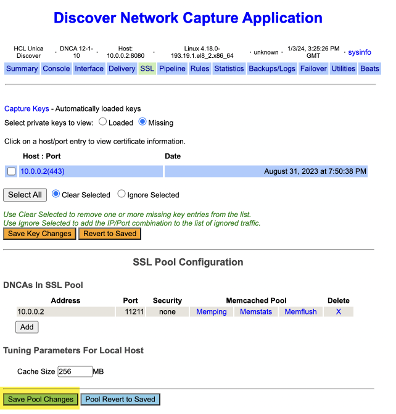
- If not already on the SSL tab, select the SSL tab and Save Pool Changes.
- Restart the DNCA as described earlier.
![]()
Console - Delivery
-
Define the delivery peer (Target Recipients) and test connectivity using the 'ping' feature accessible from that tab.
-
Set the Delivery Mode to 'Even Distribution'
-
In the section Use Discover Transport Service as Time Source set the following parameters:
Host or Address IP address or FQDN of the Discover Reporting server Port 1966 or 1967 for secure communication -
In the section Deliver Statistics to Discover Transport Service set the following parameters and Save Changes:
Enabled Host or Address IP address or FQDN of the Reporting server Interval (seconds) 60 Port 1966 or 1967 for secure communication 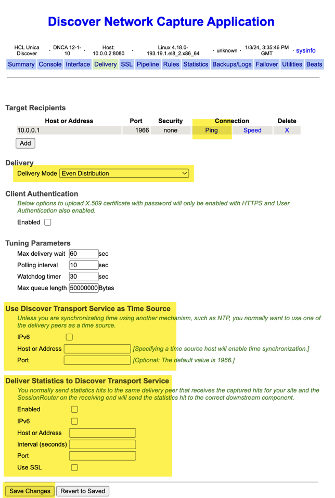
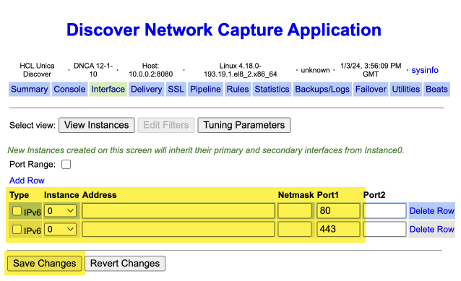
Console - Interface
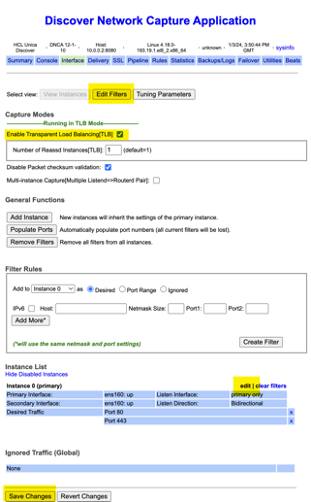
- In the section View Instances check Enable Transparent Load Balancing tick box.
-
At the bottom of the page, click the Edit link for Instance 0. This is required to ensure that the name of the selected network interface shows up as 'Primary Interface' in the console.This is also reflected in the
/usr/local/dncauser/etc/dcx-conf.xmlfile, e.g. the file will contain the following as an example:dcx-conf.xml<PrimaryInterface>eth0</PrimaryInterface>Key Description Primary Interface eth0 Listen Interface primary only Secondary Interface None Listen Direction Bidirectional Desired Traffic Port 80 and 443 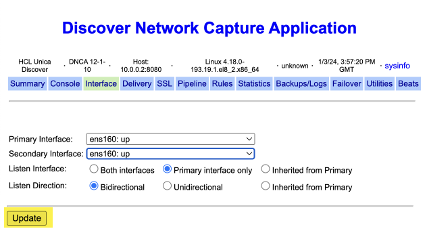
Warning
Interface host addresses should not contain any prefixes such as http or https, and should contain the IP or host name only. Any prefix listed will thrown an error in the capture.log.
-
In the section 'Edit Filters', specify the IP 'Address' along with Port number - this is mandatory for the initial install.
DNCA - Pipeline
-
In the section 'Pipeline Settings', set the number of pipeline instances as required. The best practice is to set this as number of CPU Cores minus 1.
-
In the section 'Data Sessioning', the 'Use Sessioning' tick box should be checked as enabled.
PHP configuration limits
The DOM post and file upload sizes require Increase from their default within the PHP configuration supporting the DNCA server.
-
Make a backup of the php.ini configuration file by issuing the following command,
cp /usr/local/dncauser/etc/php.ini /usr/local/dncauser/etc/php.ini.bak. You may choose other preferred backup filenames and file locations. -
Edit the original file by issuing the command, vi /usr/local/dncauser/etc/php.ini
-
Increase the value of
post_max_sizefrom 8M to 50M -
Increase the value of
upload_max_filesizefrom 2M to 50M -
Restart the DNCA processes by issuing the following commands,
discover stop allthendiscover start all.
Grant the httpd executable the CAP_NET_BIND_SERVICE capability
Run the following command in the terminal: setcap CAP_NET_BIND_SERVICE=+eip /usr/local/dncauser/bin/httpd
The command setcap CAP_NET_BIND_SERVICE=+eip /usr/local/dncauser/bin/httpd is used to grant the httpd executable the CAP_NET_BIND_SERVICE capability, specifically in a way that allows it to bind to privileged ports (ports below 1024) even if it's not running with root privileges. This is often necessary for web servers like Apache, which typically listen on port 80. The +eip part of the command means effective and permitted.
- setcap: This is the command-line utility used to set or modify capabilities of files.
- CAP_NET_BIND_SERVICE: This capability allows a process to bind to a socket address that is part of the privileged port range.
- +eip: This specifies that the capability should be granted in both the effective and permitted sets.
- /usr/local/dncauser/bin/httpd: This is the path to the httpd executable.
DNCA start
-
Start the DNCA processes by issuing the following command,
discover start all. -
Check that all DNCA processes are running by issuing the
discover pscommand. The expected output is as per the screenshot below, seeing multiple running instances of those processes is possible based on configuration.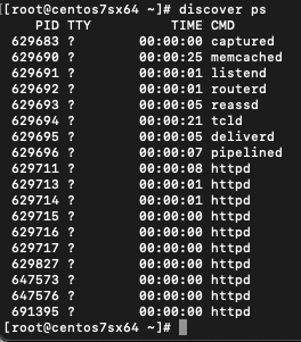
-
Validate that /var/log/discover/capture.log is error-free and that all processes appear as running in the DNCA console, Summary tab.
DNCA optional configuration
Privacy rules
Add privacy rules as required via the DNCA console 'Rules' tab, this is the preferred method of creating and updating privacy rules at the DNCA server level. Alternatively, the /usr/local/dncauser/etc/privacy.cfg file stores the privacy rules and can be edited manually.
Great care should be taken when doing this as it may result in DNCA errors/failure.
Enable secure console access
In high security situations it may be desirable to disable non-secure HTTP access to the DNCA web console using the following steps:
-
Modify the file
/usr/local/dnca/etc/runtime.confas belowruntime.conf filehttpd_port_enable="NO" httpd_portssl_enable="YES" -
Restart the DNCA processes by issuing the following commands,
discover stop all,discover statusanddiscover start all. -
Issuing the command, discover status should show the DNCA running and the DNCA web console being accessible via the secured port 8443 ONLY.
Enable web console user authentication
In addition to securing the web console access to only HTTPS, it may also be desirable to restrict console access with a username and password, by default access is open.
-
Access the DNCA web console http://
:8080/index.php -
Issue the command vi /usr/local/dncauser/etc/runtime.conf to edit the configuration file responsible for authentication. Search for: httpd_userauth_. Add or modify the below entries, saving the file after modification:
runtime.conf filehttpd_userauth_enable="YES" httpd_userauth_realm="DNCAv2" httpd_userauth_require="valid-user" httpd_userauth_type="Basic" -
Create a strong new user and password by issuing the following command,
/usr/local/dncauser/bin/htpasswd -mb /usr/local/dncauser/etc/discover-web.users <youradminuser> <yourstrongpassword> -
Restart the DNCA processes by issuing the following commands,
discover stop all,discover statusanddiscover start all.
Offloading SSL Encryption
SSL offloading is the process of switching the SSL / TLS-based encryption from incoming traffic before it reaches it's next destination, in this case the DNCA software. Review the Implementing SSL offloading page before continuing.
systemd Startup Script
The DNCA need to be up and running in order to pass data into the pipeline. The following is only an example discover_start.service file, it should be created in the /etc/systemd/system/ directory to enable correct start / restarts after system power-off or resets. You may decide to achieve this differently.
- Ensure you are logged in as root, if not switch to root user using the sudo su - command
- Create the file discover_start.service using nano /etc/systemd/system/discover_start.service. You can use any file editor
-
Paste the contents below and save the file
discover_start.service[Unit] Description=Start Discover Services on Startup After=network.target [Service] Type=oneshot RemainAfterExit=yes ExecStart="/usr/local/dncauser/bin/discover" start all ExecStop="/usr/local/dncauser/bin/discover" stop all TimeoutStartSec=300 [Install] WantedBy=multi-user.target -
Execute the commands:
- systemctl daemon-reload
- systemctl enable discover_start.service
- systemctl start discover_start.service
DNCA Upgrade
The DNCA upgrade process will move a DNCA based install (12.1.0 or later version) to a greater release, e.g., 12.1.13.
Info
It is important at this stage to have a core functioning and *error-free DNCA at upgrade time. It is noted that an upgrade may be required to address errors/bugs in the current running version being upgraded. As similarly noted previously, the DNCA must be upgraded using the�root�user account. Do not use the sudo root user.
-
Access the server with the true root user.
-
Upload the DNCA RPM package in a temporary location onto the server. e.g.,
\tmp\Discover_DNCA_RPM\discover-dnca-12.1-4.RHELX.x86_64.rpm -
Issue the following command to stop the DNCA processes,
discover stop all. -
Check that all DNCA processes are stopped using the
discover pscommand. -
Using the following commands, backup the DNCA home directory, e.g.,
mkdir /tmp/DNCA_Backup_<DATE>
cp -rf /usr/local/dncauser/ /tmp/DNCA_Backup_<DATE>
Upgrade the DNCA
- Run the command
rpm -Uvh Discover-DNCA-<nnnn>-<rrr>.<distro>.i386.rpm
- Run the command
rpm -Uvh is where U is used for the package upgrade and the vh is for verbose hashed output. Note the U is capitalised.
| Key | Description |
|---|---|
<nnnn> |
Build version number; for example, 12.2 |
<rrr> |
LRPM revision number. The revision numbers are usually single digit numbers. |
<distro> |
Identifier for the Linux© distribution, such as "RHEL n" for Red Hat Enterprise Linux release n. |
The force option may be required or used when installing the DNCA .rpd distributions, e.g. rpm -Uvh --force Discover-DNCA �. rpm
-
With the command
discover start all, start the newly upgraded DNCA processes post-upgrade. -
Verify all DNCA processes are running by using the
discover pscommand. -
Successive DNCA process starts post-upgrade can be run as the non-root dncauser user. To run the DNCA as dncauser user, issue the following command(s),
discover stop,su dncauseranddiscover start. -
Start the DNCA processes by issuing the following command,
discover start all. -
Verify again that all DNCA processes are running by using the discover ps command as before. The expected output is as per the screenshot below, seeing multiple running instances of those processes is possible based on configuration.
-
Validate that /var/log/discover/capture.log is error-free and that all processes appear as running in the DNCA console, �Summary� tab.
-
Finally, access the DNCA console use the server�s name, over http/https and on port 8080/8443, e.g.,
http://dncaserver.hclcx.com:8080/orhttps dncaserver.hclcx.com:8443/.
Validate that all configuration was untouched across the different tabs (Delivery, Interface, Rules, etc...) and that all processes appear as running in the 'Summary' tab.
Success
Your upgrade is now complete.