Basic Events
Additional reference documentation
In addition to this guide, Discover events are formally discussed as part of the online documentation and should be seen as the primary source for up to date and correct information.
What are Events?
Event values are defined when the Event is created and can capture any information that is available at that point in the user's session. Some examples include the URL of the referring page, the price quoted to the customer, the hit number of the page, the number of products in the customer's basket, or the IP address of the customer.
Nearly anything that appears in the session up to that point can be used as an Event value.
How Do I Create Events?
Events are created in the Event Manager within the Discover Portal, through which they are automatically added to the processing server. Discover evaluates real-time data against the pattern matching conditions in the processing server; when those conditions are met; the corresponding information is recorded.
Once you've created an Event, it is automatically added to the Event Selector lists throughout the Discover Portal:
- Search,
- Report and KPI Configuration,
- Alerts,
- Active Events etc.
Event timing
Events are NOT retrospective, this is due to the timing of the events creation and when the processing server has the event to evaluate against. Payload data that has already been processed and in the pipeline prior to an event being created will not subsequently be re-evaluated. If the event is created during payload data being processed in the pipeline, only the events matching conditions from the point of creation will be evaluated.Reporting is based on events and subsequently will only display data from the time the event was created onwards.
Designing Events
Event creation requires both analysis and creativity because there are typically multiple ways to create an Event. Choosing the best one requires both familiarity with your organisation's website / app including some practice. Throughout this guide, you'll practice creating Events that monitor different situations.
Events are used for so many Discover functions it is essential to have a good naming convention to help with understanding what the Event is used for and to help in locating the Events.
It is also important to keep Events updated so that they reflect the most recent code on your organisation's website. If they are not maintained, they will not fire accurately.
Naming convention
It is strongly advisable to agree event naming conventions in advance of any non-test deployments.
The Thought Process
Prior to any event creation, as a business user or analyst you should employ a thought process in advance of any work to ensure not only that your needs (addressing a scenario or KPI) are met, but also that the output delivers useful value in support of the business.
Start with the goal
The greatest goals deliver the most value, and become the most powerful customer use cases.
As an example of this thought process, think through the following in advance of working with the 'Event Wizard', preferably as part of a holistic view of how the event supports your overall scenario and customer use case:
- How will the event be used?
- What do you want to measure?
- Where in the Session is the data?
- How should the event be counted?
More about this thought process is discussed later in the section Event Methodology.
Event Wizard
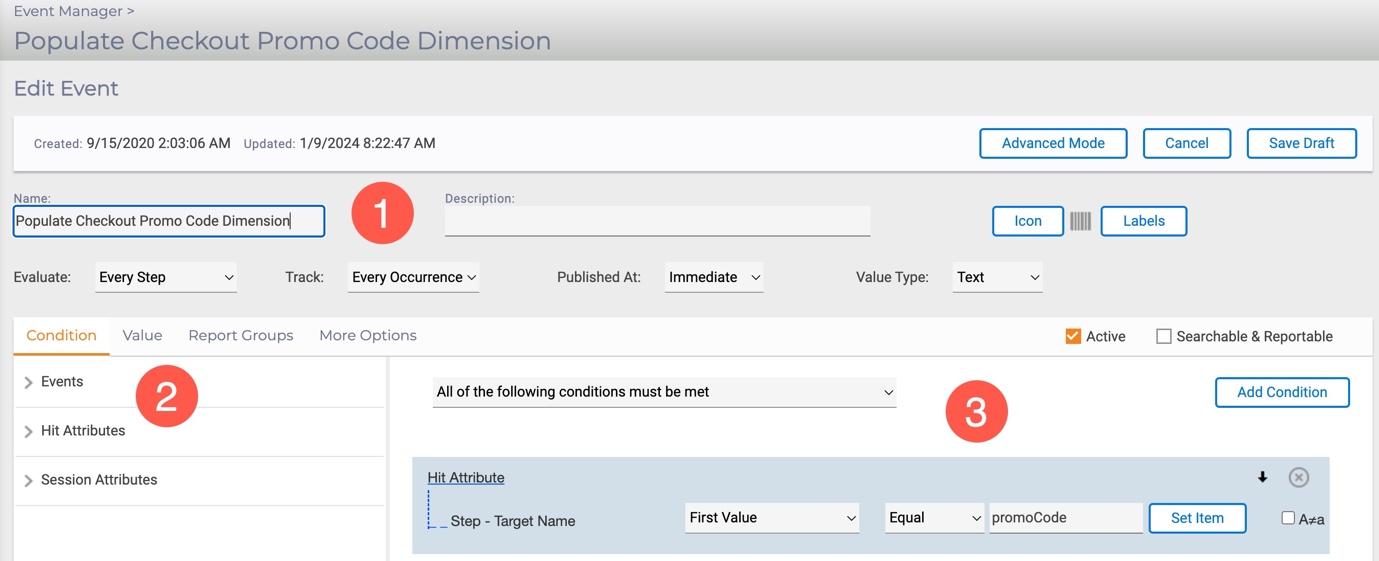
The 'event wizard' is the Portal function for creating and editing events. It has a Summary section and four tabs, one for each of the three steps of the event creation process, including a More Options tab providing fine tuning of event control .
You can navigate between the steps as you wish, but it's easiest to create the event using the steps in order.
| Area | Description |
|---|---|
| Summary (1) | Each event has a summary header that helps you identify the event by its 'Name', 'Description', and an 'Icon' that will display in session lists, typically shown after a search request or drill down via a report.You can assign multiple 'Labels' to an Event, which will help you find events within the 'Event Manager' and 'Report Builder' functions.The 'Evaluate' options specify at what point the system should look for the conditions of the event, which value to track and the values type. |
| Condition (2) | All events are defined by a set of conditions (one or more) that determine when the event should evaluate (or occur). Conditions can be text strings on the current hit or the presence of other events in the session. This first step is where you define those conditions. |
| Value (3) | When an event evaluates, it saves a value. The second step allows you to define this value, by default simply counts the number of times the event occurred. Additional value options include numeric or text values from the session, such as the login ID, policy number or purchase amount. |
| Report Groups (RG) | An event also can save 'Dimension' values at the time it evaluates. These Dimensions allow segmentation (or categorisation) of report data by those values. |
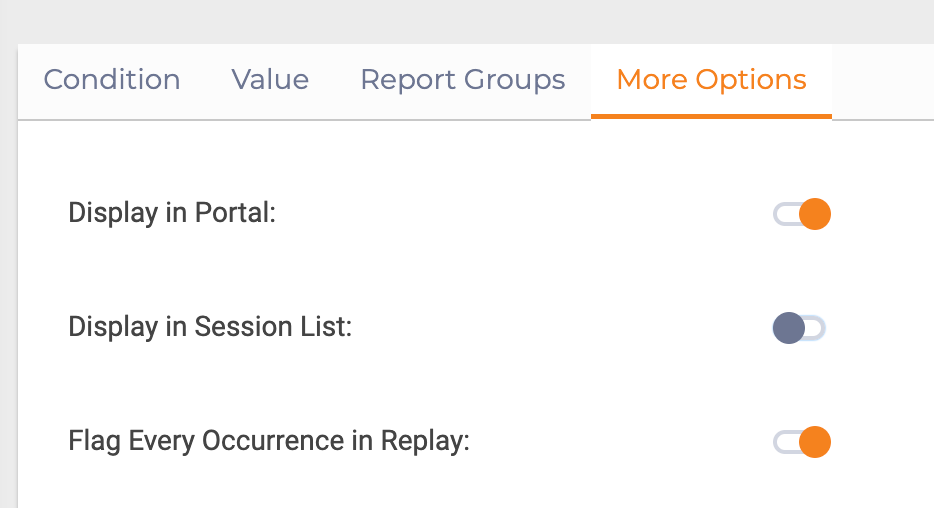
| More Options | Depending on the event\'s purpose, you can configure whether the data it returns will be available in the Portal, Replay, other functions of the system and applications. |
| Integration with Replay | The 'Event Manager' is integrated with the 'Advanced Replay' function, this provides a simple creation process of events (and hit attributes) from a sample session provided. You can simply highlight an event condition within the replayed session using the right-mouse menu, this feature is described later in this section. |
Activity - Basic Event Creation Walkthrough
In this section of the guide, we will walk through 'events' to track promotional codes.
The Scenario
As a business analyst working with the digital team, you need to understand the number of visitors (your customers) that are using promotional codes (aka, promo codes). This is part of a wider marketing analysis of how effective the organisations promotion's strategy is.
Requirement Create an 'event' to populate a 'report' that answers the question from the team: How many promo codes are being used daily and what are they?
In Preparation Think through these questions and answers, be clear about how you would answer them:
- How will the Events be used? The description above indicates the events will be used to count the total number of coupon codes seen and track their values.
- What do you want to measure? The final 'report' will track all sessions with promotional codes for day.
- Where is that data displayed within a session? Because all events are based on text within visitor sessions, we need to determine what text will indicate that this event occurred. On every hit in a user's session there is a parameter called promoCode which contains the promotional code for that hit. This parameter is only used for one purpose, so it is a good value to use for our report.
- How should the Event be counted? Because we want to report all coupon codes entered, will need to count every time this event occurs. It is possible that coupon codes have a certain organisational format, e.g. vivre-april1234, denoting the company name, month, and code. We could count only valid or invalid coupons, coupons by code or month, however in this exercise we will count all sessions with coupon codes.
Create a Sample Session
For event creation to occur, it is a best practice to use sample visitor session data that includes behavioural traits you need to build events from. To enable this, visit the example website and complete the following:
- Navigate to product categories and place items in the basket.
- Search for an item, use the word 'ben sherman' or 'isobaa', these should cause a 0 results message.
- Navigate to the checkout page and enter a promotional code 'jan24-10off' this again should result in an error message.
- Return to the homepage and finish.
The data from your visit to the example site will now be located in the 'Active Sessions' area of Discover. Sessions move from the Active state to Complete as a normal process, the session may be located in the Complete Sessions area depending upon the timing of how quickly you access the Discover Portal.
Because it is likely that a few sessions are listed within the Active or Complete sessions list you can just click the 'Search' button to list the sessions as shown below. The session created is expected to have the highest Hit value.
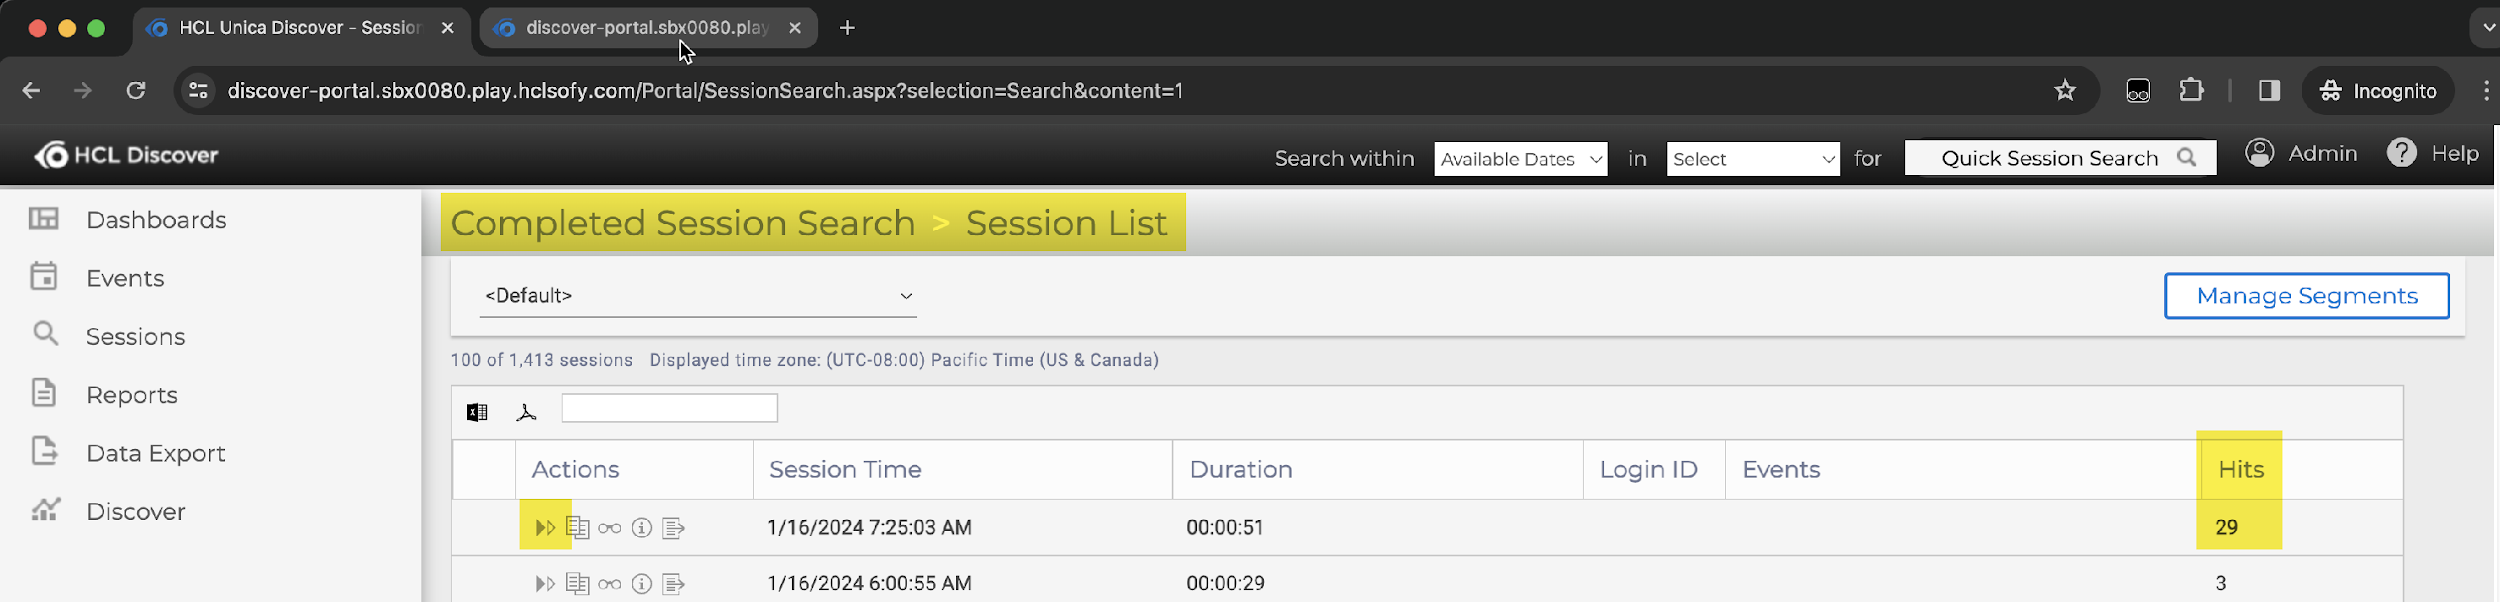
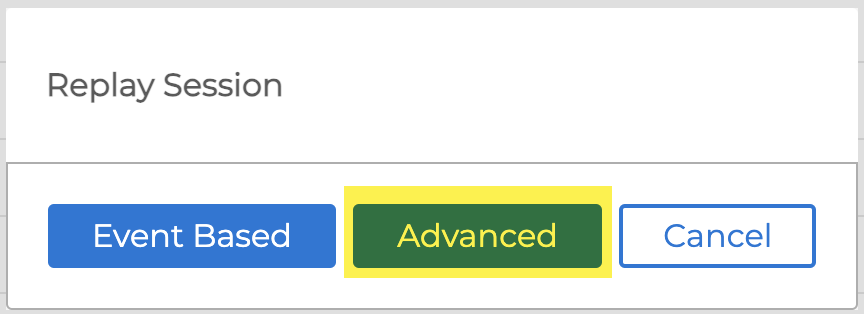
Select one of the sessions from the session list page, click the 'replay' icon highlighted in the Actions column above and select Advanced when prompted.
In the following section event creation will be shown through using an example session and the built-in right-click options within the replay window. This is not the only process to create an 'event', or it's supporting hit attributes, session attributes or other events. Other approaches will be shown in later sections.
Create the Events
Within 'Advanced Replay' locate the content (Promotional code jan24-10off ) needed for the event by clicking the 'Filter By' button and expanding all pages and interactions. The 'Navigation' menu now displays all the visitor (UI) user interactions listed in the sequence they occurred, scrolling down within the navigation will locate the promotional code.
Click the UI navigation row for the promotional code as shown and click the 'Request' button.
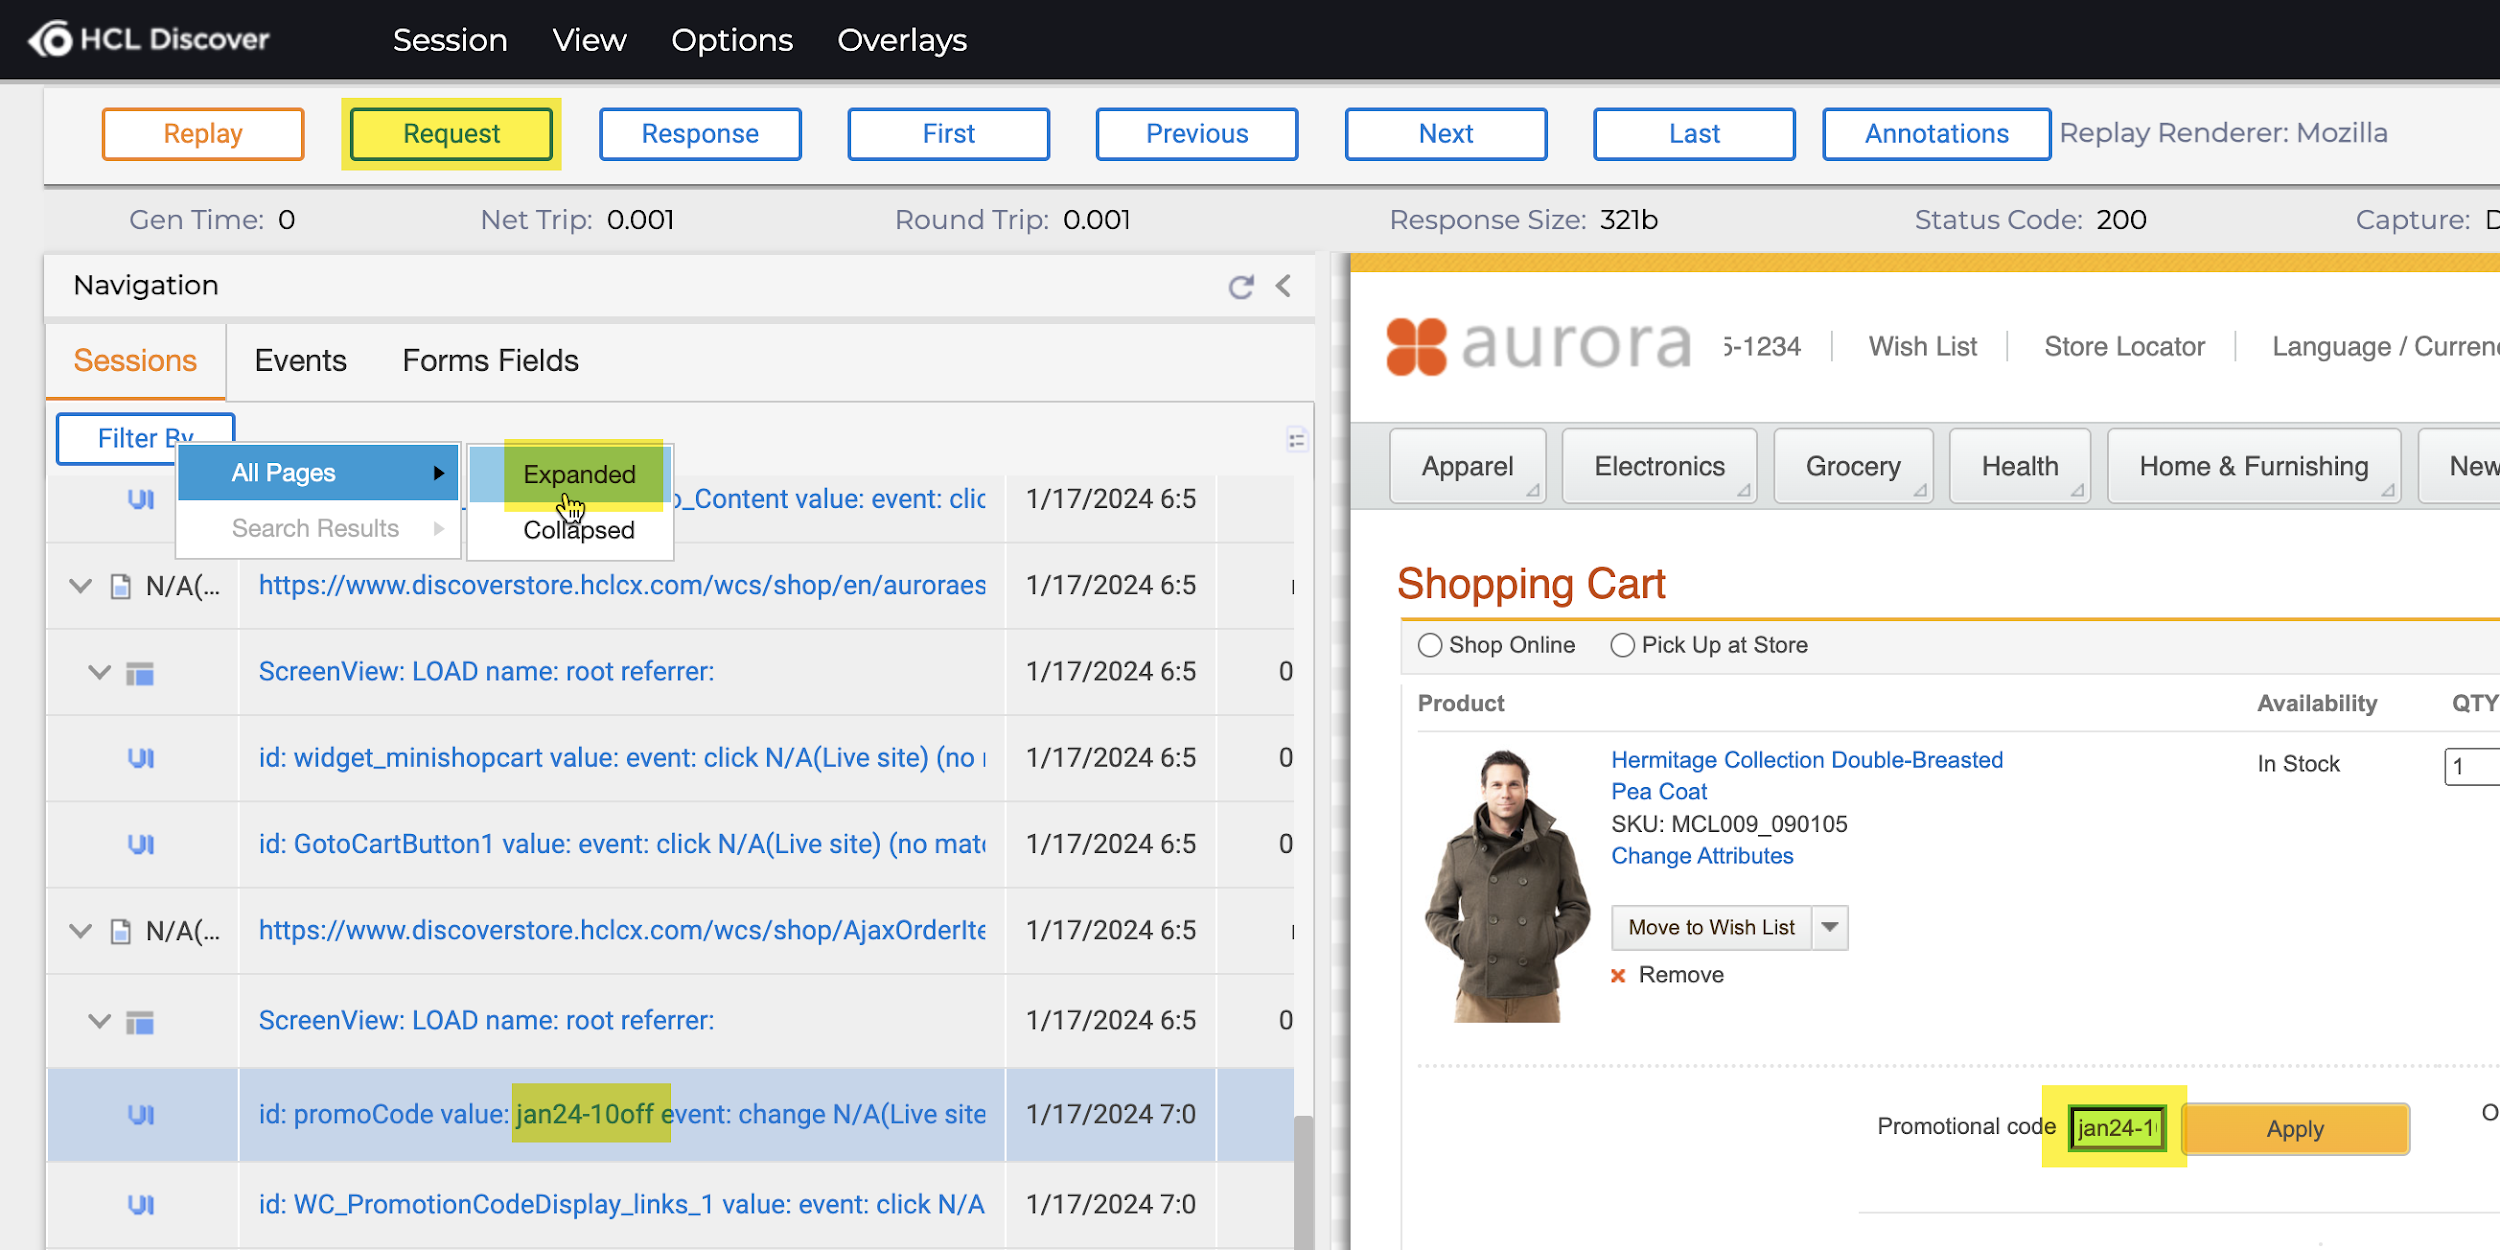
Select the UI row with the promotional code listed and click the 'Request' button.
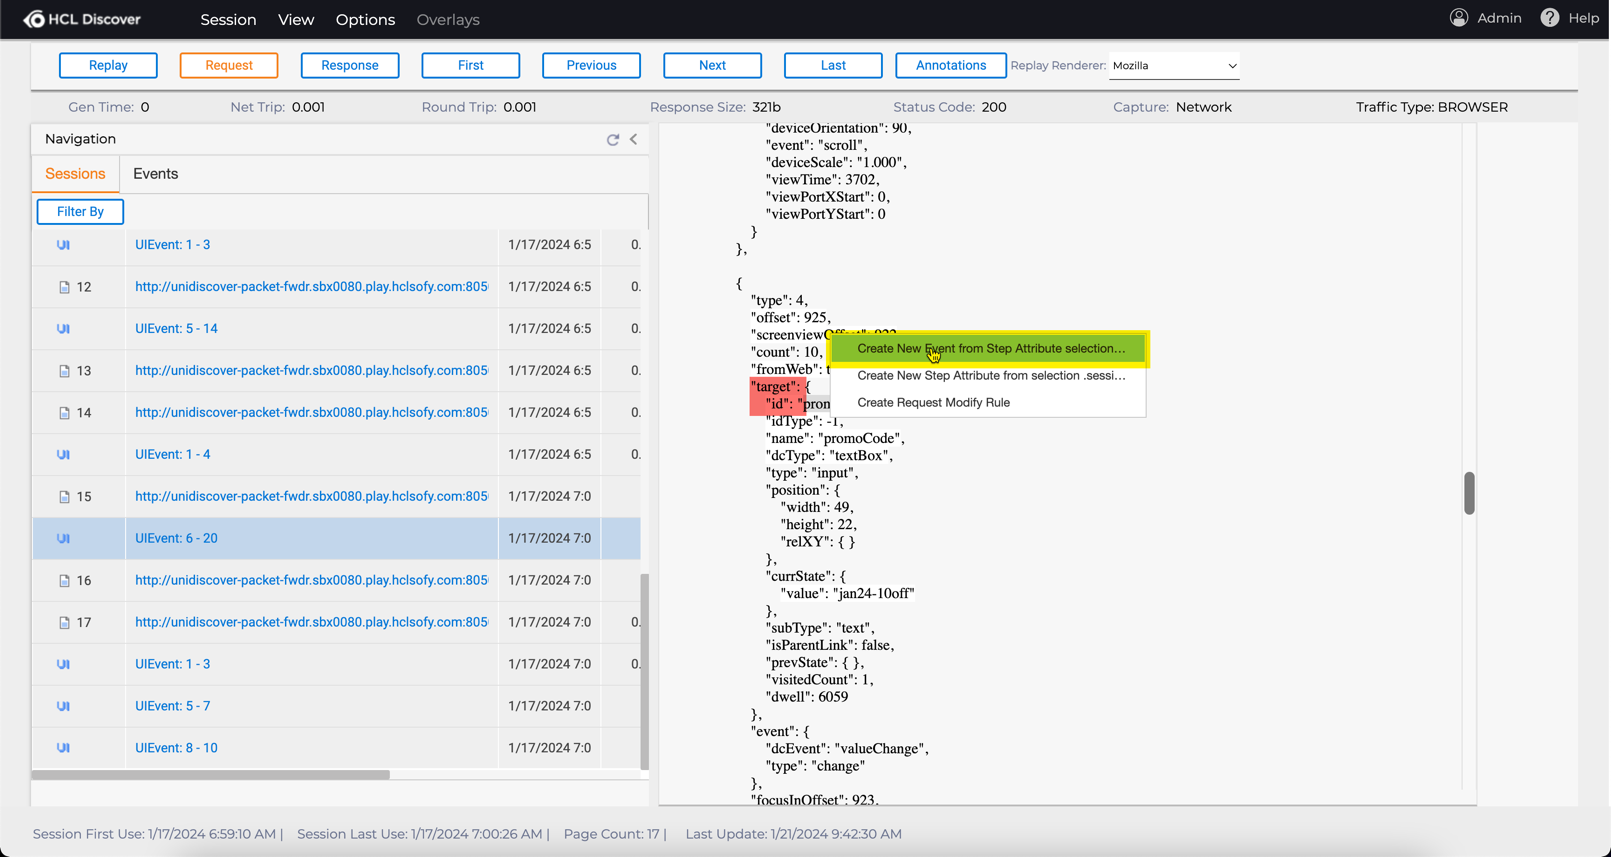
Click the 'Click here to view Step Attributes' link in the right-hand pane to reveal the structured list (aka JSON) of the visitor interaction with the page. Locate the promotional code by scrolling further down, right-click the "target" : "id" in the screenshot below to display the create menu. Click the 'Create New Event from Step Attribute Selection' option.
Configure Event One
Change the Name of the event to include your initials and 'Guide -- Promotional Code, e.g., SC -- Guide -- Promotional code.
Edit the Description to describe what the event does, such as Captures the value of the promotional code entered at checkout.
Click the Icon List button to change the icon that is used to identify this event when listed in the 'Session List' views. The icon is a useful visual representation that the event has occurred, it should be used to identify key or major events only.
Remove the 'Default' label by clicking the 'Label' button, add a new label called Guide.
Select 'Every Step' in the 'Evaluate:' dropdown, and 'Every Occurrence' with the 'Track:' dropdown. The 'Value Type' should be 'Text'.
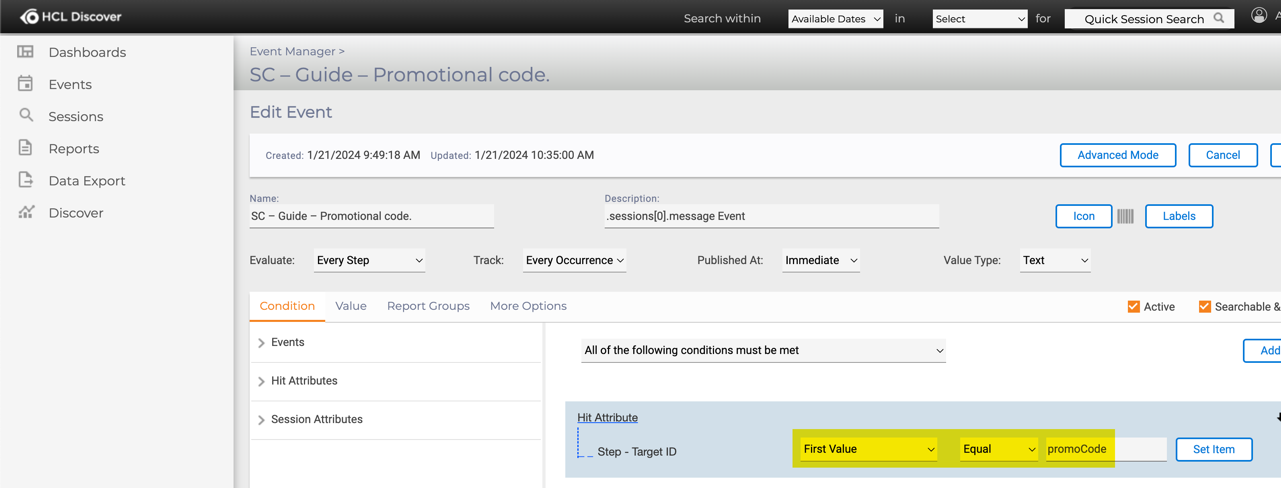
Update the Hit Attribute to reflect the screenshot above, the First Value should Equal the text promoCode. This means the first 'target.id' value seen by the step must equal the text value entered, in this example promoCode.
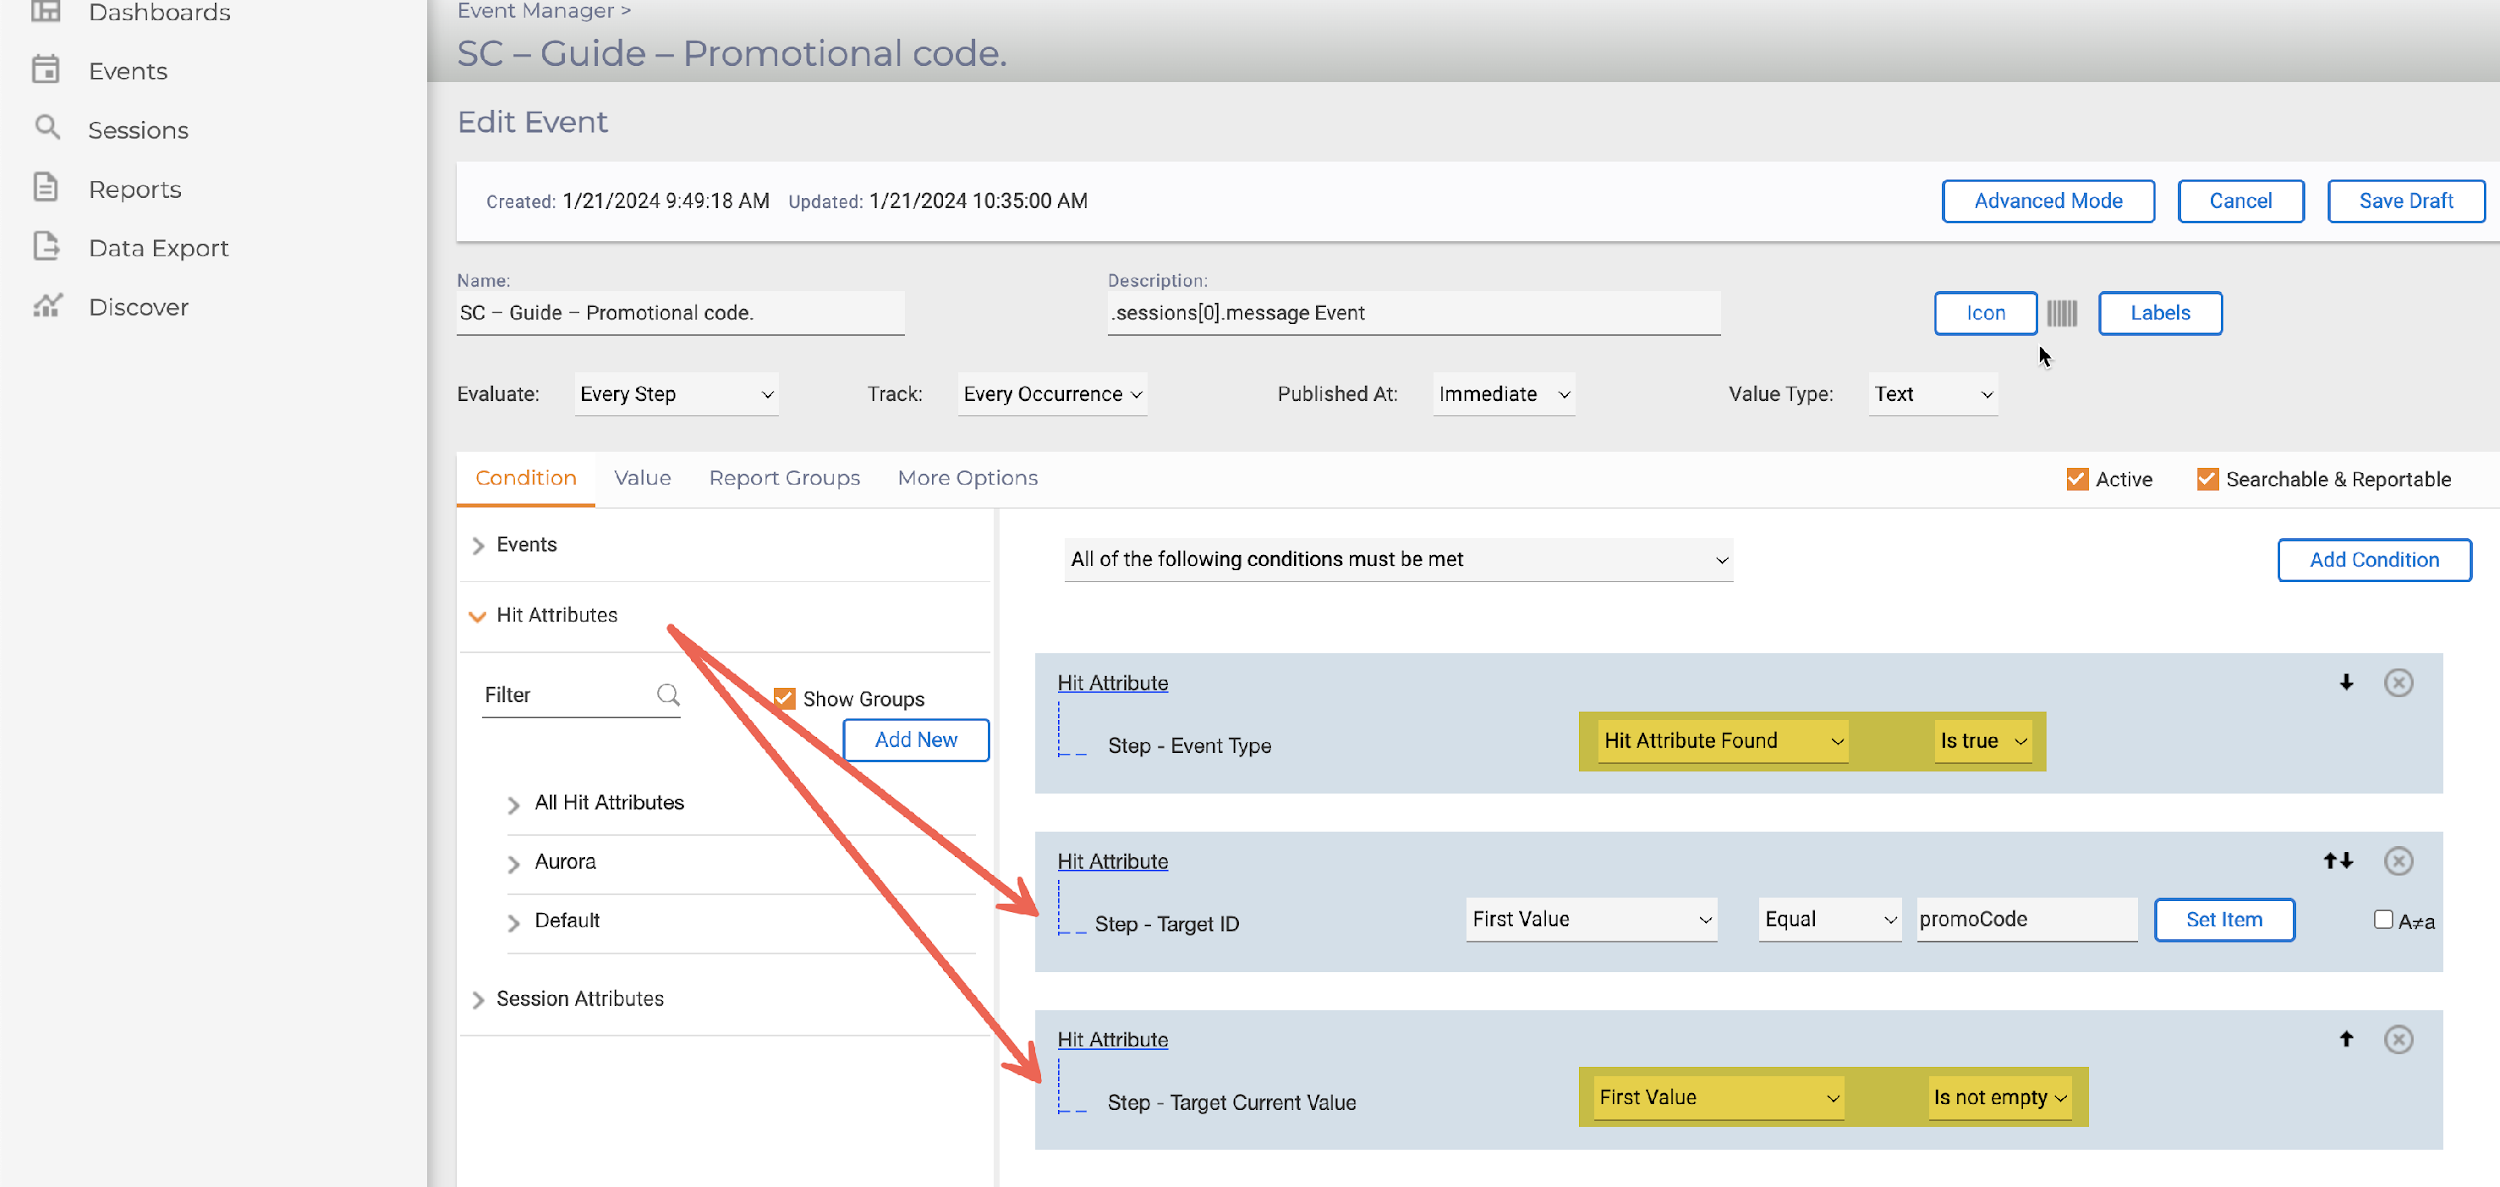
It is best practice to introduce further 'conditions' as additional resilience to locating the content required. From the 'Condition' menu, add the step attributes 'Event Type' and 'Target Current Value', configuring them as the screenshot above. Click Save Draft.
Search filter
Use the Filter search to locate the step attribute, typing a few characters of the name narrows the list quickly.
ADD SOMETHING TO STORE currentValue - this is missing.
As a result, the new 'event' just created appears in the 'Event Manager' list, it is [highlighted in a light red]{.mark} colour. This means it is in draft and must be committed to the processing server before any data can be accrued.
Click 'Save Changes' to commit this new 'event' to the processing server so it starts accruing data. Optionally, enter comments but click 'Commit' to complete the process and start accruing data.
Configure Event Two
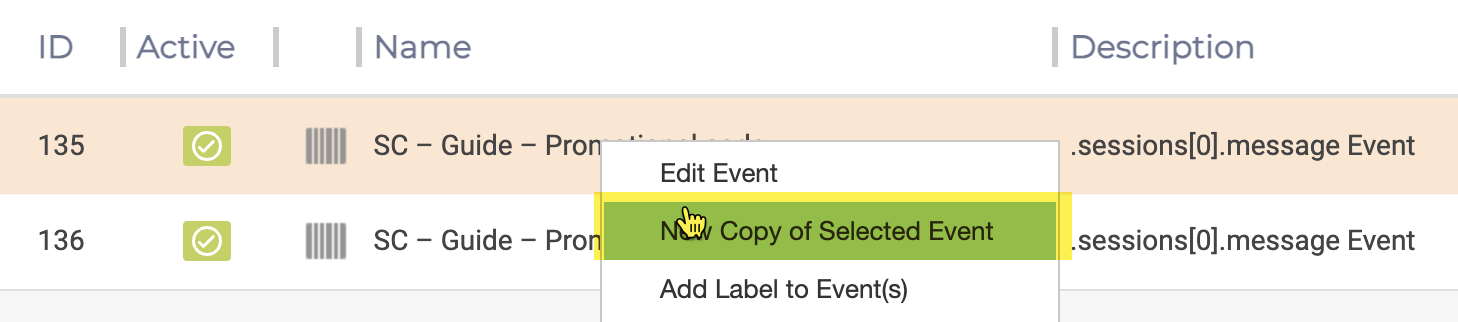
From the list view of the Event Manager, select the 'event' just created. Right-click and select 'New Copy of Selected Event'.
Change the 'Name' of the event to include your initials and 'Guide -- Promotional code count, e.g., SC -- Guide -- Promotional code count.
Edit the 'Description' to describe what the event does, such as Counts the number of sessions that include a promotional code at checkout.
Select 'Every Step' in the 'Evaluate:' dropdown, and 'Every Occurrence' with the 'Track:' dropdown. The 'Value Type' should be 'Count Only. This will remove any value being tracked in the 'Value' tab.
Click the 'More Options' tab and deselect the 'Display in Session List:', this will remove this event from being seen in the session list column 'Events', it is not needed as the previous event will be shown.
As a result, the second 'event' created appears in the 'Event Manager' list, it is [highlighted in a light red]{.mark} colour. This means it is in draft and must be committed to the processing server before any data can be accrued.
Click 'Save Changes' to commit this new 'event' to the processing server so it starts accruing data. Optionally, enter comments but click 'Commit' to complete the process and start accruing data.
Event Tester
The event tester is accessed via several different views or functions within the Portal, however currently not the Event based Replay function:
| Area | Description |
|---|---|
| Event Manger | From the horizontal menu navigation within the Event Manager view, the Event Tester can be accessed. No session can be sent to the Event Tester from here, however any existing test sessions previously saved will be shown.  |
| Session List | Within the session list 'Actions' column, the current rows session may be sent to the Event Tester directly. 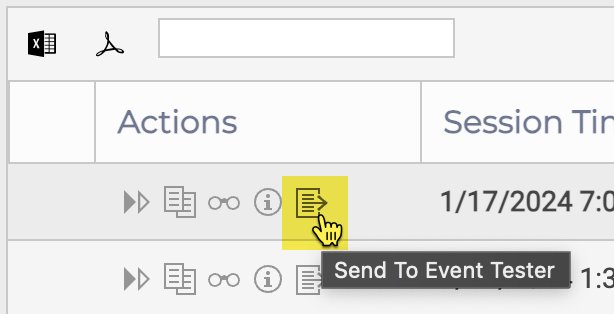 |
| Advanced Replay | From the session menu you can send the current session to the Event Tester. Alternatively, you can save the session as a file directly from here and upload them for later to use within the Event Tester. 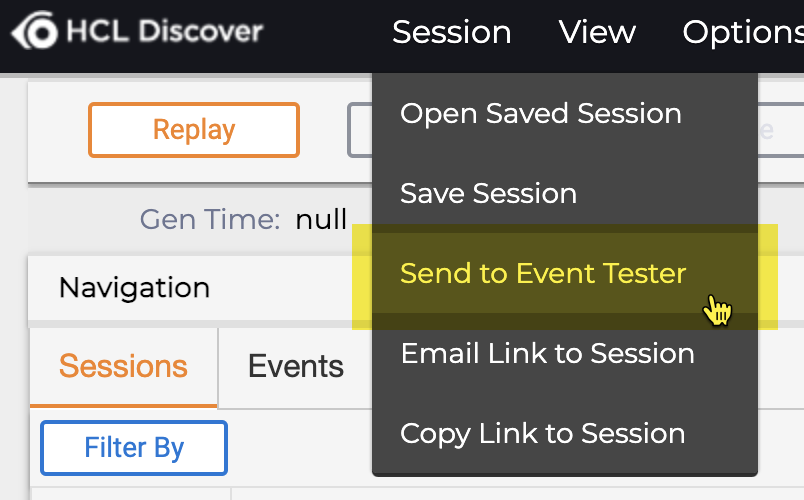 |
The typical flow when using the event tester:
flowchart TB
  A((**START**)) --> B(Event Manager) -- Create Event --> C(*draft* Event)
  C -- Validate --> D(Event Tester)
  E(Session) -- Send --> D
  C -- Save --> E(**EVENT**)
  C -- Save --> D
  E --> F((**END**));
Testing events using this approach can save significant time and effort as opposed to waiting for data to flow through your events without a testing step. With events being a significant foundational component of Discover, e.g., linked with Reports, Dashboards, Alerts, Notifications, ... it is important to ensure the data accrued in these events is as expected.
Event Validation
An event does not start accruing data until it is saved to the processing server through the event wizard discussed previously. Events can be edited at any time, however, to preserve data integrity it is a best practice to be certain the event is capturing the information you intend before saving it.
The Event Tester allows you to test that the data you expect from your visitor session is being accrued correctly, this can be done before fully saving the event (e.g., saved as draft.)
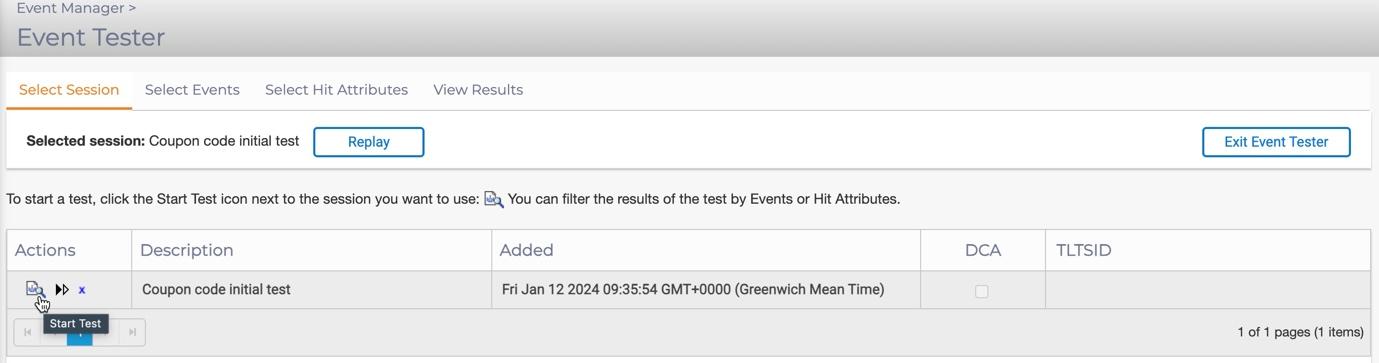
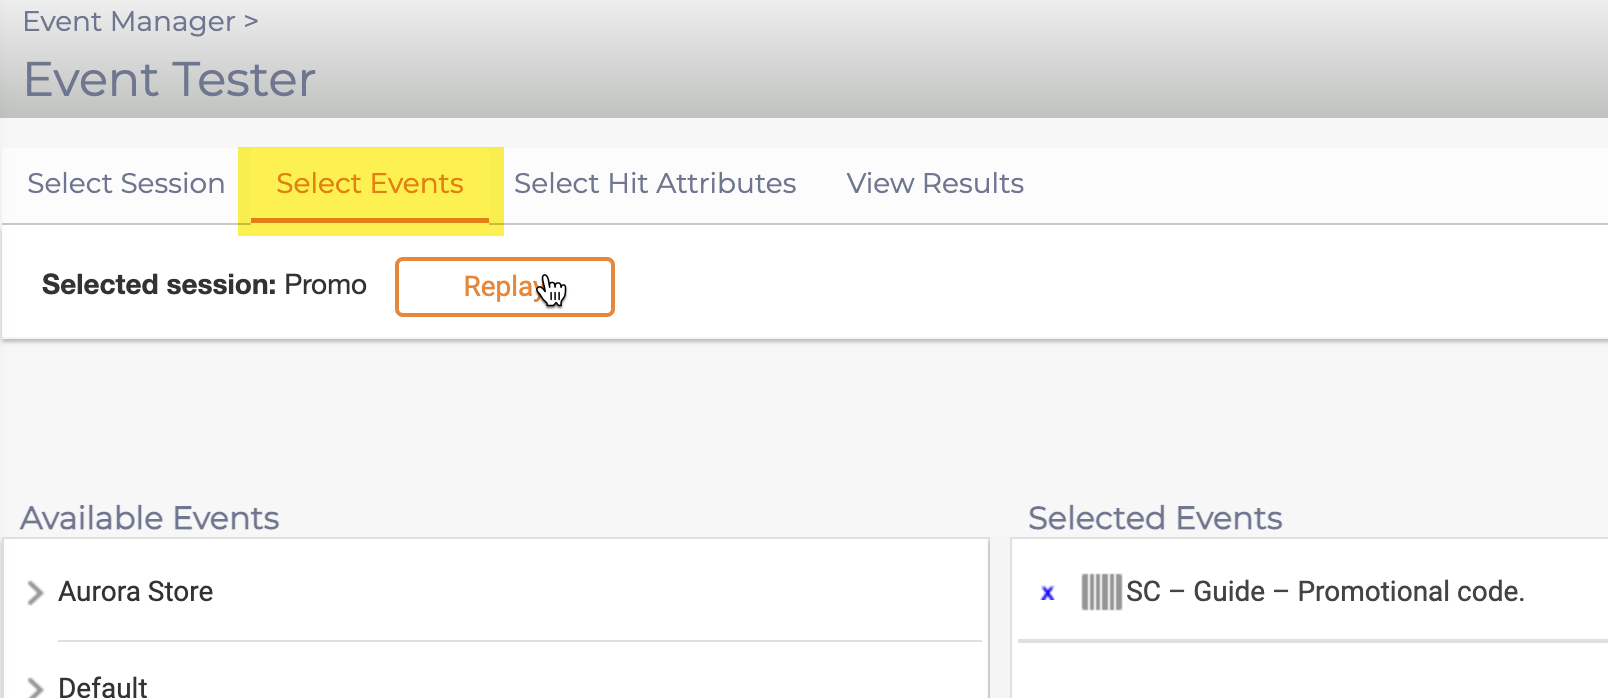
Select Session
On this first tab within the 'Event Tester', select which session to test the events against. You may have multiple sessions listed in the select session tab.
Click the 'start test' icon to activate the session for testing.
Session naming
It is helpful to name sessions with a descriptive name, e.g., 'Coupon code entered at checkout' as you may well have many sessions listed in the event tester 'Select Session' tab view.
Once a session has been started, select the events to test against. All events are tested at once, and you can filter which results are displayed on the next tab.
Select Events and Hit Attributes
There are no limitations to how many events can be selected, however the more events you select, the longer the execution time will be. Clicking an event label will add all events associated with that label for testing. There is a search filter available to locate your event(s), or you can navigate to your events using the labels listed.
Importantly, the result of an 'event' depends entirely on the 'Hit Attribute(s)' aka HA's it uses, our example replies on three.
HA's may be created automatically when an 'event' is created or may be created independently and then incorporated into events.
Not working as expected?
If your Event is not working as expected, it may be due to the behaviour of the HAs which it depends upon.
The 'event tester' evaluates the session against all 'events' and 'HAs' by default if the label is clicked, otherwise they are specified individually. The Select Events and Hit Attributes tabs allow you to further include or exclude 'events' and 'HAs' data in the View Results tab.
View Results
The View Results tab shows the results of your configured test filtered based upon the options defined:

Event test results are displayed by Event/Hit Attribute or Hit/ URL, this option is a toggle display selection.
| Key | Description |
|---|---|
| Event / Hit Attribute | Shows the results by event and HA, sorted alphabetically by name. When toggled, the URL where the Event or Hit Attribute occurred is displayed. Any Report Group dimension values recorded. |
| Hit / URL | You may also view the results by Hit/URL, which will show which Events or Hit Attributes fired on each page in the session. |
| View by Labels | This groups the results by the labels assigned to them. To view by Event or Hit Attribute names, uncheck the View by Labels check box. |
| Include Zero-Count Items | Every Hit or URL in the session will be displayed regardless of whether any of the selected Events or Hit Attributes fired on it. Un-checking this box excludes zero-count Hits or URLs from being displayed. |
Event counts
An 'event' may occur multiple times within a session, however the results from the 'event' that will be used depend on the 'events' settings.
The 'Limit Event Results to Tracked Occurrence' check box provides the option to display only the 'event' result that will be tracked. The distinction between these settings will be discussed later in this guide.
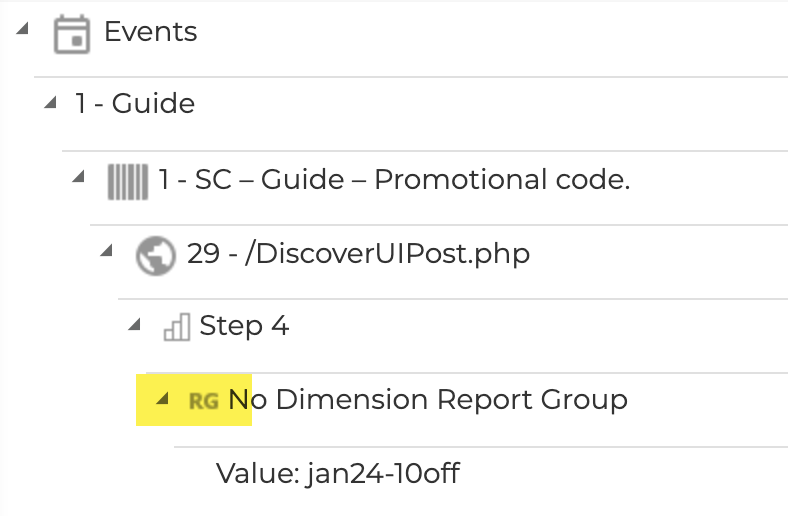
Click the 'Expand All' button to open the test groups below or click on individual triangles signs to reveal the results.
The RG denotation stands for 'Report Group', it displays the details of the facts that are recorded when the 'event' occurs, such as the value of the 'event' and any 'Dimension' values are recorded.
Reports Groups
Report groups enable segmentation and will be discussed further in future activities. |
No report data
If an event occurs however no report data is associated with the event, the Value: Count Only or TLT\$NULL indicates the event counted.
Let's Practice
Follow the steps below to test the Promotional Code 'event' created.
- From the Event Manager, click the 'Event Tester' button to open it.
- The session used to create the 'event' should be available. Click the 'Start Test' icon next to it.
- Confirm your 'event' is under the 'Selected Events' pane. If it is not listed:
- Use the search filter or expand the label tree to locate your new 'event'
- Click your 'event' to move it to the right pane.
- Click the 'Select Hit Attributes' tab to view the HAs associated with your 'event'.
- Click the 'View Results' tab. Experiment with the different viewing options to see how they change the displayed results.
- Click the 'Exit Event Tester' button to return to the Event Manager.
What else?
Think about the test scenario, what else would be useful to track? How might the events business impact be expanded?
Let's Practice
It's a great idea now to take the time now to practice what you have learned so far.
Tip Event Icons
What are Event Icons?
Event icons are visual representations to identify events occurring within a visitors session, they are displayed in the session list for ease of view as well as other product locations. These icons are really useful to quickly recognise the type of event that has occurred, and its status, making it easier to monitor and analyse visitor sessions.
Event icons can be useful to limit the need to replay a visitor session as the icons describe what has happened.
Benefits of Using Event Icons
- Quick Identification: Icons provide a visual cue that helps in quickly identifying the type and status of events.
- Improved Analysis: By using icons, users can easily spot patterns and anomalies in visitor sessions show in the session list.
- Enhanced Reporting: Icons make reports and dashboards more intuitive and easier to understand.
By effectively using event icons, you can streamline your workflow in Discover and gain deeper insights into your visitor journeys.
Types of Event Icons
Standard Event Icons: These icons represent pre-defined events that are commonly seen in Discover. They include:
- Page View: Indicates a page view event.
- Click: Represents a click event on a specific element.
- Form Submission: Denotes a form submission event.
- Error: Highlights an error event during a session.
Custom Event Icons: You can create custom icons to represent specific events within your business not easily represented by the built-in icon list. These icons can be designed to match the style of the standard icons but with unique identifiers.
Using Event Icons
Event icons are used in various parts of Discover, including:
- Event Manager: Where you define, edit, test, and organize events. Icons help in quickly identifying the type of event being managed.
- Session Replay: During session replay, event icons appear on the timeline to indicate when specific events occurred, allowing for easy navigation and analysis.
- Reports and Dashboards: Icons are used in reports and dashboards to visually represent event data, making it easier to interpret and act upon.
Creating and Managing Event Icons
- Defining Events: In the Events tab of the Discover Event Manager, you can define new events and assign appropriate icons to them.
- Editing Icons: You can edit existing event icons to better suit your needs. This includes changing the icon image or updating the event conditions.
- Testing Events: Use the Event Manager to test events and ensure that the icons correctly represent the event conditions.