Processing Server
Install Order Install Order
graph LR
  A(<b>Portal</b>) ==> B(<b>Reporting</b>) ==> C(<b>Replay</b>) ==> D(<b>Processing</b>) --> E(<i>HBR</i>) --> F(<i>DNCA</i>);
Prerequisites
Review the prerequisites in advance of installation / configuration.
Anti-virus software may impact performance, if this is identified exclude the folder <Discover_Home_Directory>\Log folder
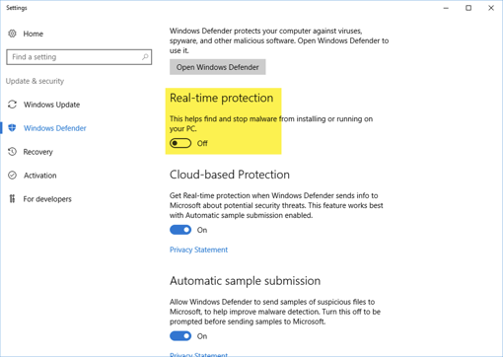
Disable the Windows Defender Real-Time Protection feature temporarily during installing
TCP ports should be opened, refer to the Server to Server Communication guide
Install prerequisite .Net Desktop (x86 and x64), and ASP.Net Hosting Bundle as outlined in the install reference documentation
SSL certificate is required for the Portal server access over HTTPS
Pre-installation tasks
-
Access the server with Administrator rights.
-
Confirm that the server's specs meet the sizing requirements/recommendations e.g., OS, CPU Cores, Physical memory, Disks, Network.
-
Upload the Discover installation files, including the following to a onto the server in a temporary location, e.g.,
C:\HCL_Discover_Source\Install files
- DataExport installers
- SessionArchiving installers
- FixPacks, Patches, HotFixes
Tip
Session Archiving and their associated SessionArchiving installers should not be uploaded/installed unless specifically identified as a solution requirement. When identified as a requirement, session archiving is typically used in conjunction with separate archiving server(s).
-
Disable the 'Windows Defender Real-Time Protection' feature.
-
Disable the 'User Access Control' feature.
-
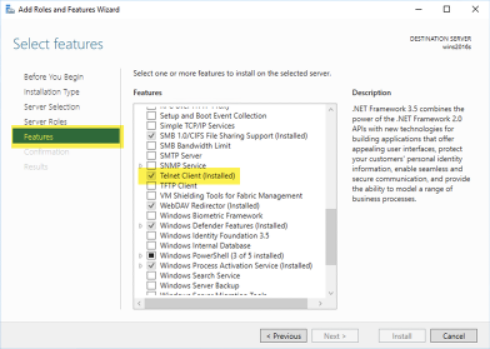
Install the 'Telnet Client' feature.
-
Typically,
x:\HCLDiscover\facilitated the installation directory, however this is not mandatory and for your organisation to decide upon. It is however prudent to keep the directory short and at the root drive level. -
As with the previous step, decide upon the canister data directory. e.g.,
x:\Canister -
Again, as with the previous step, decide upon spool directory, e.g.,
x:\HCL\Unica Discover\Spool\Warning
Prior to any installation It is key that servers are pre-configured with a DNS-managed fully qualified domain name (FQDN) such as myserver.mydomain.com.Should no managed DNS be available at installation time, host files can be used but should not be a long term or production level solution. Additionally, if FQDNs can only be provided after installation using short names and or host files, were given at a later stage and installation was completed based on entries in the hosts file, amend with DNS managed FQDN's once available (see below Windows Registry entries)
Windows RegistryHKEY_LOCAL_MACHINE\SOFTWARE\WOW6432Node\Unica Discover\Components\ PORTALSERVER = REP_SERVER_01.MYDOMAIN.COM HKEY_LOCAL_MACHINE\SOFTWARE\WOW6432Node\Unica Discover\Components\ ?PROCESSINGSERVERS = ?CAN_SERVER_XX.MYDOMAIN.COM HKEY_LOCAL_MACHINE\SOFTWARE\WOW6432Node\Unica Discover\Components\ STATLOGGERSERVER = REP_SERVER_01.MYDOMAIN.COM HKEY_LOCAL_MACHINE\SOFTWARE\WOW6432Node\Unica Discover\Components\ TMSSERVER = REP_SERVER_01.MYDOMAIN.COM HKEY_LOCAL_MACHINE\SOFTWARE\WOW6432Node\Unica Discover\DataStore\SearchServer\ PortalServer = REP_SERVER_01.MYDOMAIN.COM HKEY_LOCAL_MACHINE\SOFTWARE\WOW6432Node\Unica Discover\DCMgmtSrv\ MasterServer = REP_SERVER_01.MYDOMAIN.COM -
Within the Discover 12.2.x installation directory, using Notepad or a similar text editor, edit the file
/DISK1/SOURCEFILES/Ctree/Common/Server/ctsrvr.cfg. Add the two entries below to the end of the file:ctsrvr.cfg fileCPU_AFFINITY 0,1,2,3 COMPATIBILITY NO_FLUSH_DIRCOMPATIBILITY NO_FLUSH_DIRcan be required when the canister directory is installed on another non network-attached drive.Greater than 4-CPU cores?
This step may expose an error when deploying on a Processing server with greater than 4-CPU cores.
In the Windows Event logs: Invalid server configuration keyword specified See CTSTATUS.FCS for details In the CTSTATUS.FCS file: User# 00002 LICENSE NOTICE: * * * * * * * * * * * * * * * * * * * * * * c-treeACE is licensed for 4 CPUs, but 8 CPUs have been detected in the host machine. Either upgrade the c-treeACE license to support a greater number of CPUs or bind c-treeACE to specific CPUs using the CPU_AFFINITY configuration keyword. User# 00002 CPU license limit exceeded: Stopping database engine.
Discover installation 12.1.0 (base)
-
Right-click on 'DCSetup.exe' and select Run as Administrator. In some circumstances it may be required to unblock that file (right-click on 'DCSetup.exe', select 'Properties', click on the 'Unblock' button)
- Install Processing Service
- Install Transport Service
Start all Discover services using the provided script, you may have to start Discover Search Server manually
- At this point validate the state of any errors shown in the Windows Event logs, these should be noted and addressed.
- Check the health of the Search Server at
http://localhost:19000/ - Validate that DCMaint.log is error-free, located in the
x:\Program Files (x86)\HCL\Unica Discover\Logs directory. - Validate the list of defined Session Agents using the Discover Pipeline Status utility
-
Stop all Discover services using the script provided, you will note in the Services viewer that the Discover Management Server service and the Transport Service need to be stopped manually.
-
Using your organisations naming standards, take a backup of the Discover home directory, e.g.,
x:\HCL Backup\Discover 12.1.0HKEY_LOCAL_MACHINE\SOFTWARE\WOW6432Node\Unica Discover
If upgrading a Discover environment where the Transport service's pipeline has been customised take a backup of the files DiscoverCaptureSocket.cfg and DCMaint.cfg located under <Install_Path>\.
Post installation / deployment
Privacy Rules
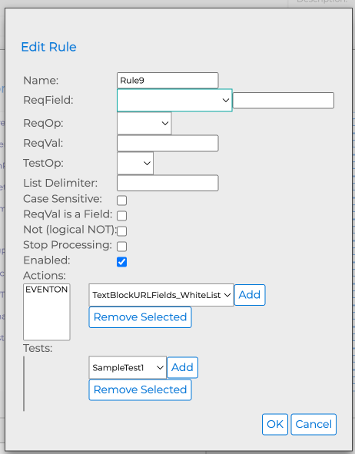
EVENTON
The rule below must be added to the Privacy.cfg file either on the Processing server(s) or on the HBR server(s), however not both. The EVENTON rule enables DOM response (from request/response) events to function.
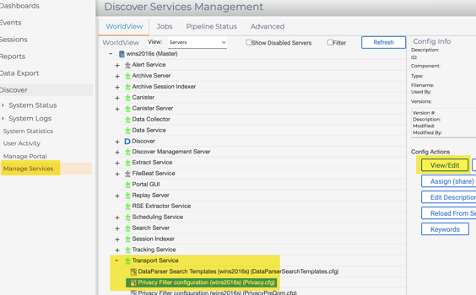
Access the Discover Managed Services (DMS) portal, https://<fqdn>/Portal/DMS.aspx
-
Login, access the Discover > Managed Services menu.
-
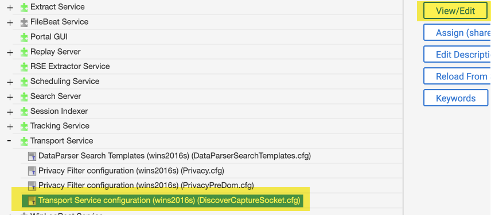
At the Transport Service (Worldview tab), Transport Service Configuration, click View/Edit.
-
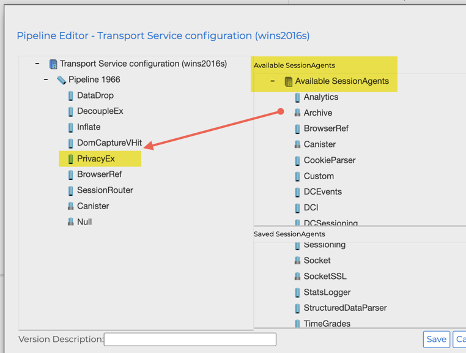
Locate the PrivacyEx session agent in the list of available agents. Drag the PrivacyEX agent to the Transport Service Configuration Pipeline xxx. Ensure that the PrivacyEx session agent is located as per the screenshot, its order is important as this is the order of pipeline execution.
-
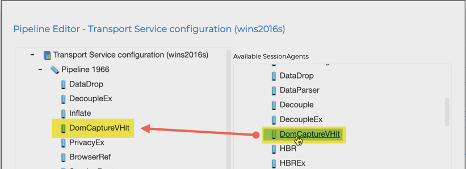
Locate the DomCaptureVHit session agent in the list of available agents. Drag the DomCaptureVHit agent to the Transport Service Configuration Pipeline xxx. Ensure that the DomCaptureVHit session agent is located as per the screenshot, its order is important as this is the order of pipeline execution.
-
Expand the Transport Service in the Worldview tab and select the Privacy Filter Configuration, click View/Edit.
-
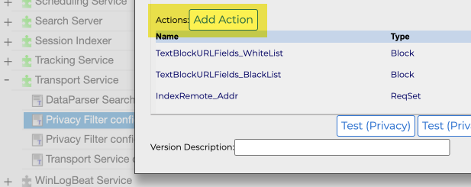
Click the Add Action button. Here you will specify an action that will set a string currently configured from FALSE to TRUE.
-
Create the action as shown in the screenshot below. The Replace String: should be set to
DISCOVER_DC_EVENTON=TRUE, click OK to finish.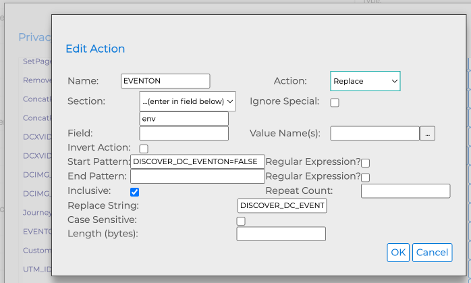
-
Scroll to the top of the Privacy Filter Configuration window, in the Rules section, click the Add Rule button.
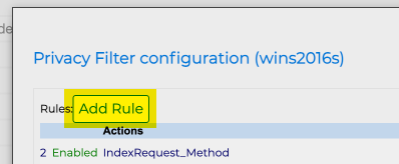
-
Add the rule as per the screenshot below. The rule name / number will be pre-defined (it can be re-defined as required but must be unique). Ensure the rule is enabled. Click OK to finish.
RealURL
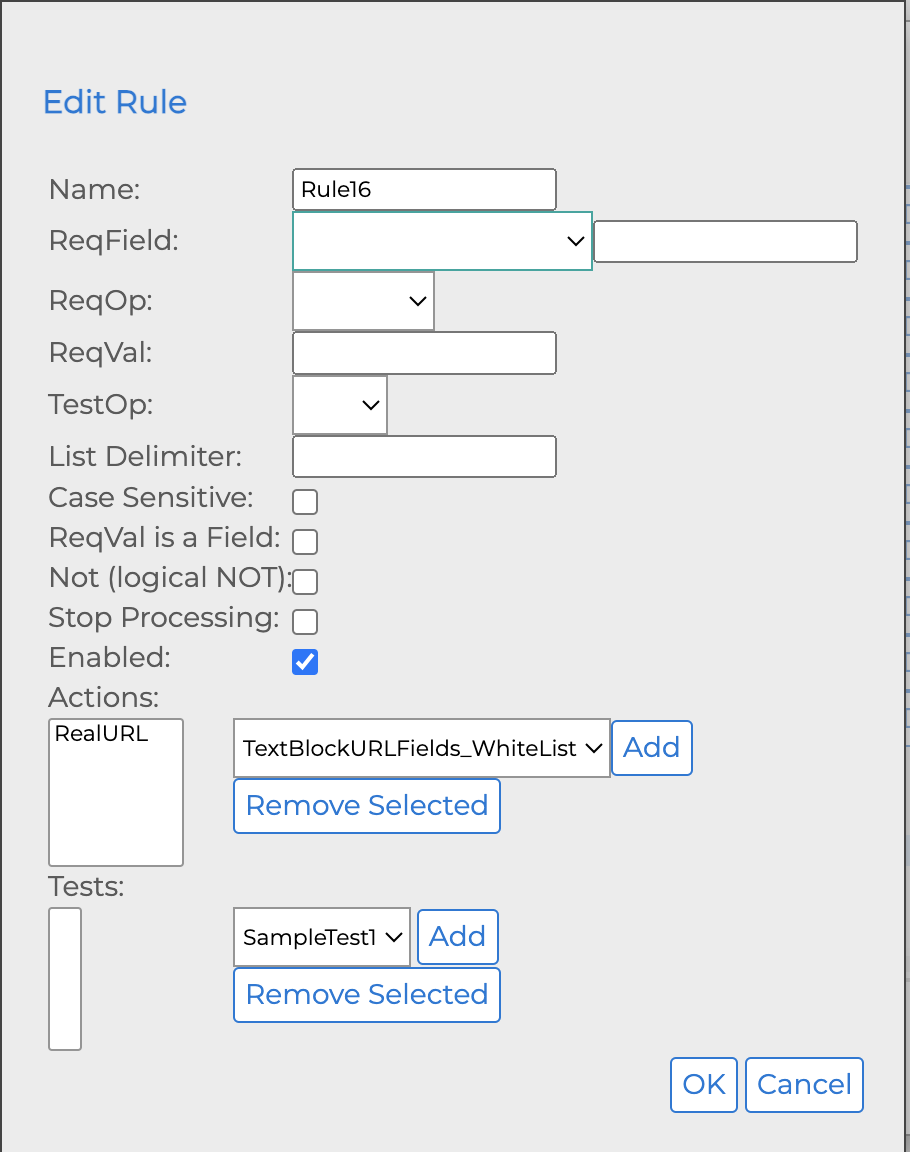
The rule below must be added to the Privacy.cfg file either on the Processing server(s) or on the HBR server(s), however not both. The RealURL rule takes the actual page URL and places it into the env section of the Request payload, replacing the targetpage URL.
Access the Discover Managed Services (DMS) portal, https://<fqdn>/Portal/DMS.aspx
-
Login, access the Discover > Managed Services menu.
-
Expand the Transport Service in the Worldview tab and select the Privacy Filter Configuration, click View/Edit.
-
Click the Add Action button. Here you will specify an action that will replace a value with the URL from
HTTP_X_DISCOVER_PAGE_URL. -
Create the action as shown in the screenshot below. The Field String: should be set to
HTTP_X_DISCOVER_PAGE_URL, click OK to finish.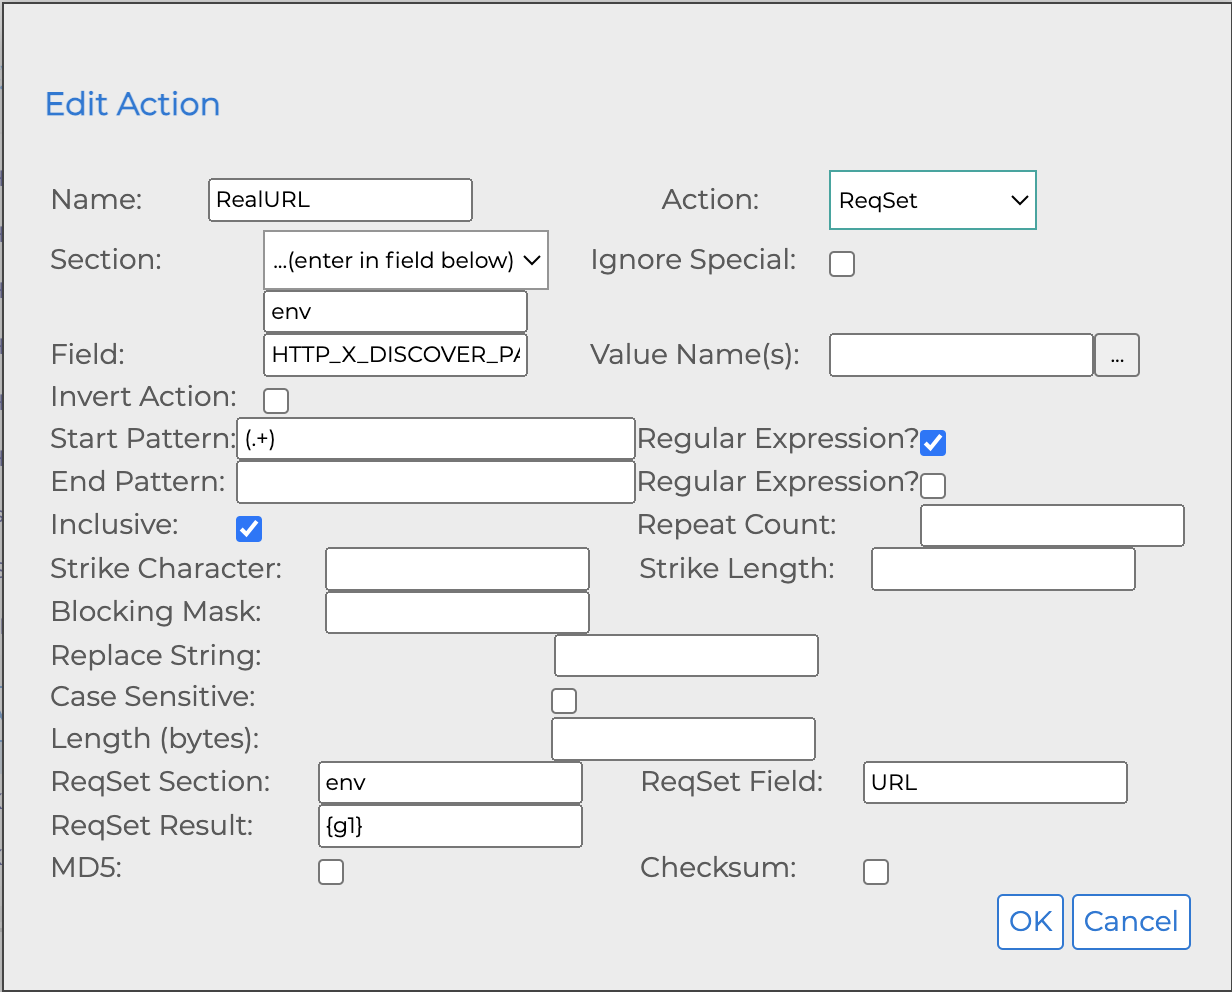
-
Scroll to the top of the Privacy Filter Configuration window, in the Rules section, click the Add Rule button.
-
Add the rule as per the screenshot below. The rule name / number will be pre-defined (it can be re-defined as required but must be unique). Ensure the rule is enabled. Click OK to finish.
Optional Steps
For ease of access when working with the Discover server, add the following directory locations to the Windows Explorer Quick Access toolbar:
<HCL_Discover_Home_Directory>\<HCL_Discover_Home_Directory>\Logs\
Additionally, adding the following application shortcuts to the Windows Taskbar may be useful as they will be frequently used:
- Windows Command Prompt (with Administrator access)
- Services
- Event Viewer
- Notepad (or other suitable text editor)
- Regedit
- Discover Pipeline Status utility:
<Discover_Home_Folder>\?DiscoverCaptureStatus.exe - Start Discover Services:
C:\Program Files (x86)\HCL\Unica Discover\CanSvcs.exe -start -all -f "<Discover_Home_Folder>\CanSvcs.cfg" - Stop Discover Services:
C:\Program Files (x86)\HCL\Unica Discover\CanSvcs.exe stop -all -f "<Discover_Home_Folder>\CanSvcs.cfg" - Restart Discover Services:
C:\Program Files (x86)\HCL\Unica Discover\CanSvcs.exe restart -all -f "<Discover_Home_Folder>\CanSvcs.cfg"