Advanced Events
What are Advanced Events?
Previously described, Events are created to capture any information that is available up to the point in the user's session when the event executes.
Advanced Events are available to extend the level of sophistication and or complexity to what can be achieved with events through the use of scripting.
Advanced Events can be used to cater for numerous requirements across many different use cases, some examples of these are:
- Understanding time taken between specific events, for example a checkout flow or registration process.
- Calculating a value cost, for example customer sign-in failure cost due to call centre or email contact.
- Generating a score for user behaviours, for example a visitor accessing specific pages, content or performing certain interactions (clicks, movement, time, etc..)
- and many more ...
How Do I Create Advanced Events?
In the same way non-scripted events are created with the Event Manager, advanced events are created similarly through the UI.
At a minimum the event will require a Name, however at this point a basic event can be converted to an advanced event by clicking the Advanced Event button.
Converting an event will reveal the JavaScript window and Event Code menu items associated as shown in the screenshot below.
| (1) Event Code | The Event Code menu of options provides a simplified approach to including components of the solution within the JavaScript window, including: - Current Events & Reports Groups -- these are those existing from the basic event- Other Events and Report Groups- Hit Attributes(default)- STEP Attributes (not that evaluate on STEP needs to be selected), these appear under Hit Attributes.- Session Attributes |
| (2) JavaScript Event Window | All events are defined by a set of conditions (one or more) that determine when the event should evaluate (or occur). Conditions can be text strings on the current hit or the presence of other events in the session. This first step is where you define those conditions. |
The current configuration of the basic event is changed to its equivalent function in JavaScript as shown below. The function name is generated from the even name and appended with a unique ID. This should not be changed.
// Generated by Discover Event Manager
// NOTE: Do not change event name

function CUST\$E_VALIDATION_ERROR\_\_638647647764421062()
{
// Set fact for Report Group: No Dimension Report Group
\$F.setFact(\"CUST.F_E_VALIDATION_ERROR\_\_638647647764421062\", \"TLT\$NULL\");
}
The default event code above can read as follows:
function CUST\$E_VALIDATION_ERROR\_\_638647647764421062()
| Code | Description |
|---|---|
CUST\$E\_ |
Custom Event E=Event |
VALIDATION_ERROR\_\_ |
Event Name |
638647647764421062() |
Event ID uniquely generated |
\$F.setFact(\"CUST.F_E_VALIDATION_ERROR\_\_638647647764421062\", \"TLT\$NULL\");
| Code | Description |
|---|---|
| \$F.setFact | Return and set the event Fact F=Fact |
| (\"CUST.F_E_VALIDATION_ERROR__638647647764421062\", | Event Name |
| \"TLT\$NULL\"); | Returned value |
Best Practice for Event Creation
When creating advanced events you will be configuring and writing JavaScript code, as such there is the potential to introduce errors that cause the code to not be saved or not to execute properly. Using the Event Tester as described previously is a way to identify this as it will cause an error message to be resolved.
As far as possible it is best practice to start any event by adding your conditions and then switching to advanced mode, this provides the benefit of allowing the system to generate correctly the code required. The code can then be subsequently edited to suit.
As an example, the following event looks for the Error Code capture event and also the existence of the value 1234, it then stores the Error Code capture value which will be 1234.
When switched to advanced mode the event condition and values stored are converted to JavaScript, the two event conditions (hit present, hit value) and event value (Error Code capture) for storing.
The default code syntax generated from the non-scripted event is formatted as a typical IF / THEN statement. The conditions are the IF statement, the Value AND Report together are the THEN statement. No strict formatting / programming guidelines are enforced.
// Generated by Discover Event Manager
// NOTE: Do not change event name

function CUST\$E_VALIDATION_ERROR\_\_638647753911672028()
{
If (\$F.getLastFact(\"CUST.F_E_ERROR_CODE_CAPTURE\_\_638436301984097615\").HitNumber == \$H.HitNumber
    && \$F.getLastFact(\"CUST.F_E_ERROR_CODE_CAPTURE\_\_638436301984097615\").Value.toUpperCase() == \"1234\")
    {
    // Set fact for Report Group: No Dimension Report Group
    \$F.setFact(\"CUST.F_E_VALIDATION_ERROR\_\_638647753911672028\", \$F.getLastFact(\"CUST.F_E_ERROR_CODE_CAPTURE\_\_638436301984097615\").Value);
    }
}
Referencing Event Values
When an event occurs it stores a value as previously described, values stored are written into Facts. A fact is a combination of an event and the reports groups associated with the event.
Each event is automatically assigned the No Dimension Report Group as shown in the code above. If the event Error Validation has Report Groups 1, 2, and 3 associated with it, there are actually 4, facts for that event: 1-3, and the No Dimension Report Group, which is hidden on the event as Report Group 0.
In JavaScript, when you reference an event in another event, the reference is the written facts from that event and not the event itself.
Objects Type Identifiers
As shown above there are several type identifiers available in when using events in Advanced mode:
- E = Events
- P = Custom Hit or STEP Attributes
- H = System Hit Attributes
- S = Session Attributes, both system and custom
- F = Facts which are a combination of Event and Report Group
Syntax for Events
The default syntax for event code generated from the event editor GUI is a big IF/THEN statement. The Conditions are the IF statement, the Value AND Report together are the THEN statement. There is no strict requirement that code be an IF/THEN statement however.
Sample Adv. Events
Simple Maths
The goal of this example function is to calculate the total amount by simply adding a subtotal and tax within the construct of an advanced event code. The type of function can be particularly useful in scenarios where you need to ensure accurate calculations of financial transactions, such as generating totals from order line items or similar.
Example Event Script
function E_MATH_SAMPLE_1234() {
    var subtotal = $P["P_SUBTOTAL_1234"].firstValue();
    var tax = $P["P_TAX_5678"].firstValue();
    subtotal = parseFloat(subtotal);
    tax = parseFloat(tax);

    // Confirm that both variables are numbers
    if (isNaN(subtotal) || isNaN(tax)) {
        return;
    }

    var total = subtotal + tax;

    if (total >= 500) {
        $F.setFacts("E_MATH_SAMPLE_1234");
    }
}
Function details
-
Retrieving Values: The function starts by retrieving the values of
subtotalandtaxfrom predefined parameters (P_SUBTOTAL_1234andP_TAX_5678). These values are expected to be strings. -
Parsing Values: It then converts these string values to floating-point numbers using
parseFloat. This step is crucial to ensure that mathematical operations can be performed on these values. -
Validation: The function checks if either
subtotalortaxisNaN(Not-a-Number). If either value isNaN, the function exits early (return), ensuring that invalid inputs do not proceed to the calculation step. -
Calculating Total: If both values are valid numbers, the function calculates the total by adding
subtotalandtax. -
Setting Facts: Finally, if the total amount is greater than or equal to 500, the function sets a fact (
E_MATH_SAMPLE_1234).
By using this or similar functions in advanced events, event creators can ensure that any financial calculations are accurate and automated, reducing the risk of reporting errors.
Tracking Time
Tracking time within process steps
It is often a requirement to understand the time taken between two steps of a process. You may want to know how long on average do people dwell on a step that may be particularly complex and have the potential for validation errors or be difficult for non native language visitors.
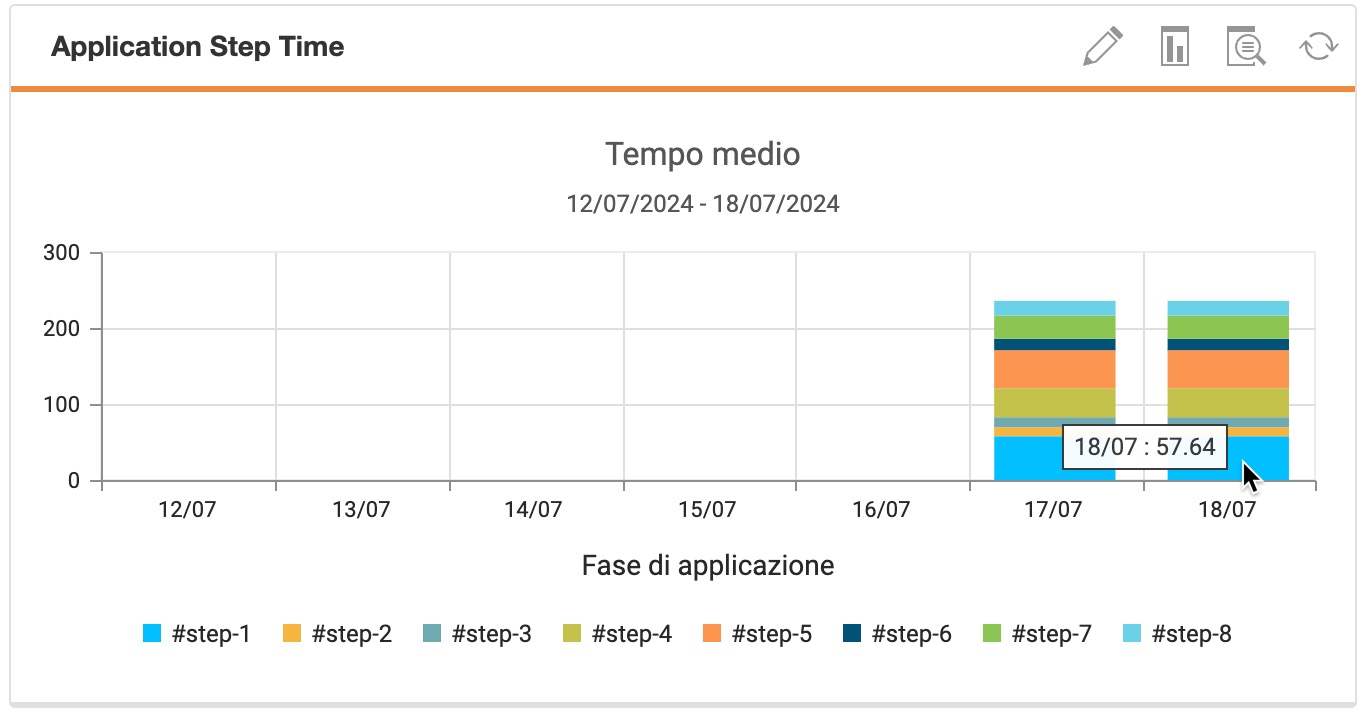
An example, this may be between two pages in a form shown below, between the LOAD (when the page is instantiated) of the ScreenView called #step-4 and the UNLOAD before #step5’s LOAD.
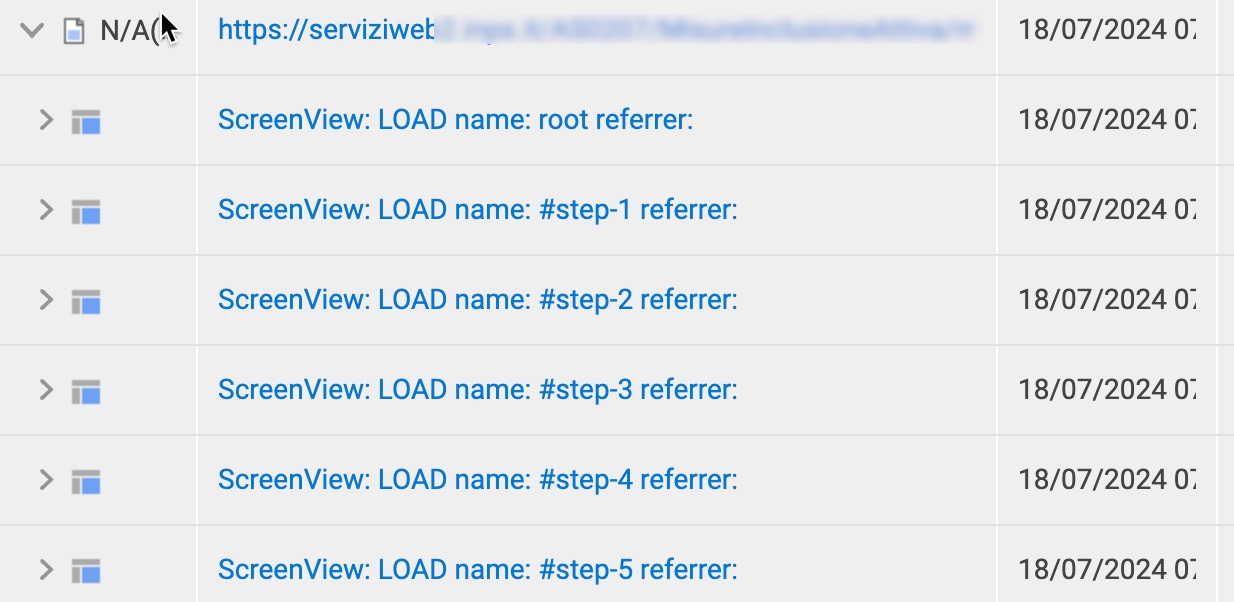
To achieve this an advanced event is required because we require a calculation. Additionally we need to have the Step - ScreenView as a dimension of the advanced event and to track the value of Step - ScreenView Offset, both step HA’s are available to be used by default.
The event below is:
| Evaluate | Track | Published | Value Type |
|---|---|---|---|
| Every Step | Every Occurrence | Immediate | Numeric |
| Value | Dimension | ||
| Step - ScreenView Offset | Step - ScreenView |
At the non-scripted event UI (aka Basic Event), add the HA Step ScreenView Type, set the first value to equal UNLOAD. Set the Value tab to track the Step ScreenView Offset. This basic event configuration will capture the numeric value listed in ALL UNLOAD events.
Select the Advanced button and the configuration will be converted to advanced code, similar to that shown below.
Example Event Script
// Generated by Discover Event Manager
// NOTE: Do not change event name

function CUST$E_STEP1_TIME__638568240936102395()
{
    if ($P["TL.STEP_SCREENVIEW_TYPE"].firstValue().toUpperCase() == "UNLOAD")
    {
        // Set fact for Report Group: No Dimension Report Group
        var steptime = $P["TL.STEP_SCREENVIEW_OFFSET"].firstValue()/1000;

        $F.setFact("CUST.F_E_STEP1_TIME__638568240936102395", steptime);
        $F.setFact("CUST.F_E_STEP1_TIME__638568240936102395_FACT1", steptime);
    }
}
The code is updated with a variable steptime= and the offset value being divided by 1000 (/1000) as the offset time is in milliseconds and should be converted to seconds. The variable is added to the end of the Facts storing the value.
The report is configured as:
| Events | Dimensions | Y-Axis | |
|---|---|---|---|
| Name of your event | Step - ScreenView | Step - ScreenView |
The Y-Axis dimension is filtered to only show the process steps you want to show.
Scoring
Scenario
Site visitors may exhibit different behavior levels when accessing pages, filling out forms or performing actions such as Login, or Form Submit, Video Play, etc ...
Depending upon the needs of the use case or KPI requirements it can be useful to score the interactions individually or as a total experience. A scoring can be valuable figure to align NBA, this may be a communication with the visitor via a marketing source or alignment of business resources / funding in a CX situation.
Example Event Script
// Generated by Discover Event Manager
// NOTE: Do not change event name

function CUST$E_STRUGGLE_SCORE__637932321165998888()
{
    var struggleScore, struggleScoreString,
    deadlinkCount = $F.factCount("CUST.F_E_STRUGGLE_DEADLINK__637927186151909050") || 0,
    rageclickCount = $F.factCount("CUST.F_E_STRUGGLE_RAGECLICK__637810693555747997") + $F.factCount("CUST.F_E_STRUGGLE_RAGECLICK_NEW__637927199870808650") || 0,
    four04Count = $F.factCount("CUST.F_E_STRUGGLE_ERROR_404__637810412052653842") || 0,
    five00Count = $F.factCount("CUST.F_E_STRUGGLE_ERROR_500__637807868012561624") || 0,
    validationCount = $F.factCount("CUST.F_E_STRUGGLE_ERROR_VALIDATION__637810533623270976") || 0,
    excessiveScrollCount = $F.factCount("CUST.F_E_EXCESSIVE_SCROLLING__638203632023764574") || 0;

    struggleScore = deadlinkCount + rageclickCount + four04Count + five00Count + validationCount + excessiveScrollCount;

    if (struggleScore < 10) {
        struggleScore = '0' + String(struggleScore);
    }

    $F.setFact("CUST.F_E_STRUGGLE_SCORE__637932321165998888", struggleScore);
}
Tips
- As with all advanced events, it is best practice to create the event using the UI as much as possible and only converting to Advanced Mode when additional scripting is required. This is particularly useful when several conditions are required.
- The function name and number/id is generated at creation time and should not be modified. Any modification without a full event re-creation will have undesired results.
This function calculates a struggle score based on various user interactions and sets this score as an output event value.
Key component variables in the script are set from other referenced events capturing specific values, e.g. four04Count = $F.factCount("CUST.F_E_STRUGGLE_ERROR_404__637810412052653842"), 500, dead link or other errors. If the value for a referenced value is empty, it is set to zero || 0,.
The struggleScore is a sum of all the individual struggle counts, if the struggleScore is less than 10 it is formatted as a two-digit string and prefixed with 0.
The calculated struggleScore is returned as the event CUST.F_E_STRUGGLE_SCORE__637932321165998888 value.
Login Days
Scenario
It can be useful to calculate the number of days since a visitors last login, storing this value for further use in reports / dimensions. It can be useful for:
- User Activity Tracking: This function is useful for tracking user activity, specifically how long it has been since a user last logged in.
- Engagement Metrics: It can help in generating engagement metrics, identifying inactive users, and triggering re-engagement campaigns.
- Security Monitoring: It can be used for security purposes, such as flagging accounts that haven't been accessed for a long time.
Question
This example is to calculate Login days, but could there be other Login related events for reporting? Login attempts? or Login duration?
Example Event Script
// Generated by Discover Event Manager
// NOTE: Do not change event name

function CUST$E_AOB_COLLECT_LAST_LOGIN_NUMBER_OF_DAYS_E_FPS_NUM__635479788683942502() {
    if ($P["CUST.P_AOB_COLLECT_LAST_LOGIN_DATE_AND_TIME__635479788582694608"].patternFound() && $H.URL.toUpperCase() === "/IDPPROXY/EXECUTOR/CUSTOMER") {
        const origDate = new Date($P["CUST.P_AOB_COLLECT_LAST_LOGIN_DATE_AND_TIME__635479788582694608"].firstValue());
        const today = new Date();
        today.setHours(0, 0, 0, 0);

        const diffInMs = Math.abs(today - origDate);
        const daysDiff = Math.floor(diffInMs / (24 * 60 * 60 * 1000));

        $F.setFact("CUST.F_E_AOB_COLLECT_LAST_LOGIN_NUMBER_OF_DAYS_E_FPS_NUM__635479788683942502", daysDiff);
    }
}
Tips
- As with all advanced events, it is best practice to create the event using the UI as much as possible and only converting to Advanced Mode when additional scripting is required. This is particularly useful when several conditions are required.
- The function name and number/id is generated at creation time and should not be modified. Any modification without a full event re-creation will have undesired results.
The function first checks if a specific pattern $P["CUST.P_AOB_COLLECT_LAST_LOGIN_DATE_AND_TIME__635479788582694608"].patternFound() is found in the user's last login date and time data, along with ensuring the current URL $H.URL.toUpperCase() === "/IDPPROXY/EXECUTOR/CUSTOMER" in the event matches a specific target URL (/IDPPROXY/EXECUTOR/CUSTOMER).
Date Calculation:
- Retrieves the original login date.
- Sets the current date to midnight (00:00:00) to ensure accurate day difference calculation.
- Calculates the absolute difference in milliseconds between the current date and the original login date.
- Converts this difference from milliseconds to days.
Finally, the daysDiff stores the calculated number of days since the last login in a fact for reporting purposes.
Grouping Data Patterns
Scenario
It can be a useful requirement to group or aggregate visitor data by a label against a predefined set of patterns, the example below is for IP ranges by groups but this could also be useful for:
- Activities
- Email Domain
- Entry to the Site
- ...
Question
This example is grouping or aggregating a users data for comparison to a data table, but can you think of other related uses?
Example Event Script
// Generated by Discover Event Manager
// NOTE: Do not change event name

function CUST$E_GROUP__634916041725704920() {
    if ($P["TL.REMOTE_ADDR"].patternFound()) {
        var group = "Public";
        var IP = $P["TL.REMOTE_ADDR"].firstValue();

        // Dictionary of IP patterns and their corresponding groups
        var ipPatterns = {
            "((206.108.(41|40).\\d{1,3})|(199.16.140.(6[4-9]|7[0-9]))|(199.187.152.(3[2-9]|4[0-7]))|(208.240.243.170)|(199.16.136.(20[2-9]))|(199.16.140.(2[4-9]|3[0-1])))": "Group-A",
            "216.34.61.\\d{1,3}|64.41.181.\\d{1,3}|64.14.(28|29).(3[3-9]|[4-5][0-9])|216.205.83.([1-5][0-9]|6[0-2])|180.179.206.(104|163|90)": "Group-B",
            "208.83.(10[4-9]|11[0-1]).\\d{1,3}": "Group-C",
            "67.221.(34.15(0|1|3|7)|33.4)": "Group-D",
            "209.200.(12[8-9]|1[3-8][0-9]||19[0-1]).\\d{1,3}": "Group-E",
            // Add other patterns here...
        };

        // Iterate through the dictionary and check for matches
        for (var pattern in ipPatterns) {
            if (IP.match(pattern)) {
                group = ipPatterns[pattern];
                break;
            }
        }

        // Set fact for Report Group: No Dimension Report Group
        $F.setFact("CUST.F_E_GROUP__634916041725704920", group);
    }
}
Tips
- As with all advanced events, it is best practice to create the event using the UI as much as possible and only converting to Advanced Mode when additional scripting is required. This is particularly useful when several conditions are required.
- The function name and number/id is generated at creation time and should not be modified. Any modification without a full event re-creation will have undesired results.
The group results stores the compared group name value from the table the data matched.
Output Options
Setting custom output for XPath options
Websites provide visitors with selections or options that display in the page as radio buttons or similar with long titles. The titles may be required as dimension, but may not display neatly in a report. Additionally, capturing the visitor's selection of an option is only possible using the response document, sometimes with only the XPath to use and an identifier, e.g. no HTML identifier (id=option-one).
This example describes an approach to address all these obstacles.
In the screenshot below, four options exist with the second being selected. The HTML text is available in the response document, however is not fit for the purpose as the visitors selection cannot be captured.
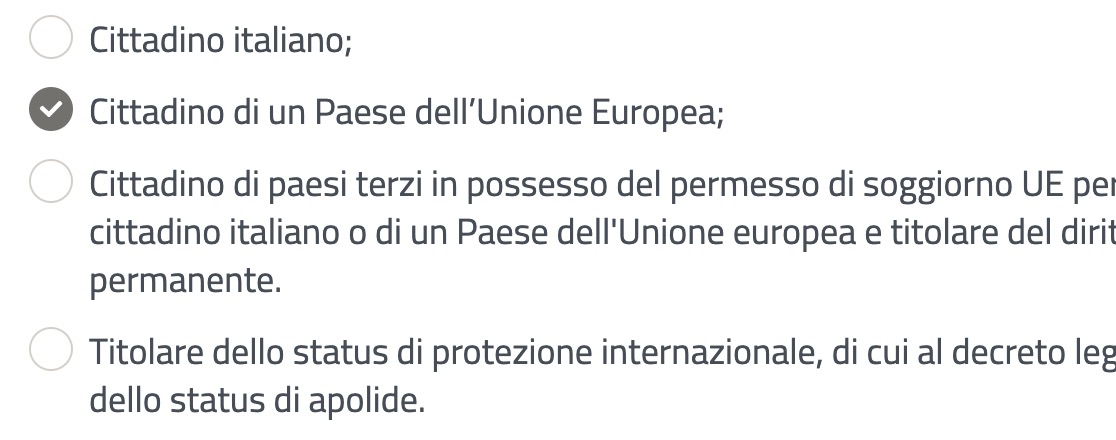
The request document for this step (where the selection happens) does however provide the visitors click for tracking. However, as shown below, the XPath target.id is the only unique way to easily identify the option clicked as no HTML ID is provided in this case. This is why an advanced event is required.
                {
                    "timestamp": 1719409847199,
                    "type": 4,
                    "offset": 112417,
                    "screenViewPath": "/AS0207/MisureInclusioneAttiva/main",
                    "screenviewOffset": 15733,
                    "count": 52,
                    "fromWeb": true,
                    "target": {
                        "id": "[[\"step-4\"],[\"div\",2],[\"div\",0],[\"fieldset\",0],[\"label\",1],[\"div\",0],[\"ins\",0]]",
                        "idType": -2,
                        "dcType": "ins",
                        "type": "ins",
                        "position": {
                            "width": 22,
                            "height": 22,
                            "relXY": "0,0"
                        },
                        "isParentLink": false,
                        "visitedCount": 1,
                        "dwell": 0
                    },
                    "event": {
                        "dcEvent": "click",
                        "type": "click"
                    },
The [\"label\",1] reflects the visitor selection of option two in the screenshot, [\"label\",0] would be the previous option, etc ...
To capture usable visitor sections an advanced event is required because we require to translate the XPath labels into something understandable.
The event below is:
| Evaluate | Track | Published | Value Type |
|---|---|---|---|
| Every Step | Every Occurrence | Immediate | Text |
| Value | Dimension | ||
At the basic event UI, add the HA Step Event Type, set the first value to equal CLICK. Add a HA Step Target Type, set the first value to equal INS. Add a HA “Step Target Id”, set the first value to equal the XPath value, repeat this last step three further times ensuring the [\"label",x] increments 0, 1,2 and 3 for the four options.
Set the Value tab to track the Step ScreenView Offset. This basic event configuration will capture the numeric value listed in ALL UNLOAD events.
Select the Advanced button and the configuration will be converted to advanced code, similar to that shown below.
Example Event Script
// Generated by Discover Event Manager

// NOTE: Do not change event name
function CUST$E_CITIZENSELECTION__638568114610207787()
{
    if ($P["TL.STEP_EVENT_TYPE"].firstValue().toUpperCase() == "CLICK"
        && $P["TL.STEP_TARGET_TYPE"].firstValue().toUpperCase() == "INS"
        && ($P["TL.STEP_TARGET_ID"].firstValue().toUpperCase() == '[["STEP-4"],["DIV",2],["DIV",0],["FIELDSET",0],["LABEL",0],["DIV",0],["INS",0]]'
            || $P["TL.STEP_TARGET_ID"].firstValue().toUpperCase() == '[["STEP-4"],["DIV",2],["DIV",0],["FIELDSET",0],["LABEL",1],["DIV",0],["INS",0]]'
            || $P["TL.STEP_TARGET_ID"].firstValue().toUpperCase() == '[["STEP-4"],["DIV",2],["DIV",0],["FIELDSET",0],["LABEL",2],["DIV",0],["INS",0]]'
            || $P["TL.STEP_TARGET_ID"].firstValue().toUpperCase() == '[["STEP-4"],["DIV",2],["DIV",0],["FIELDSET",0],["LABEL",3],["DIV",0],["INS",0]]')
    )
    {
        var citizenshipSelect = "";

        if ($P["TL.STEP_TARGET_ID"].firstValue().toUpperCase() == '[["STEP-4"],["DIV",2],["DIV",0],["FIELDSET",0],["LABEL",0],["DIV",0],["INS",0]]'){
            citizenshipSelect = "Italian Citizen"
        }
        if ($P["TL.STEP_TARGET_ID"].firstValue().toUpperCase() == '[["STEP-4"],["DIV",2],["DIV",0],["FIELDSET",0],["LABEL",1],["DIV",0],["INS",0]]'){
            citizenshipSelect = "EU Citizen"
        }
        if ($P["TL.STEP_TARGET_ID"].firstValue().toUpperCase() == '[["STEP-4"],["DIV",2],["DIV",0],["FIELDSET",0],["LABEL",2],["DIV",0],["INS",0]]'){
            citizenshipSelect = "Foreign Citizen"
        }
        if ($P["TL.STEP_TARGET_ID"].firstValue().toUpperCase() == '[["STEP-4"],["DIV",2],["DIV",0],["FIELDSET",0],["LABEL",3],["DIV",0],["INS",0]]'){
            citizenshipSelect = "International Protection"
        }

        // Set fact for Report Group: No Dimension Report Group
        $F.setFact("CUST.F_E_CITIZENSELECTION__638568114610207787", citizenshipSelect);
    }
}
Totalling cart SKUs
Scenario
In some retail situations the basket or cart may contain a varied number of products and associated SKUs. It may be required to count the number of SKUs that pertain to a certain pattern or value. Knowing how many of OEM products are sold in an order over non-OEM may be a key KPI metric the business requires.
In this example the basket contains 4 products, VR aka VivreRetail is the name of the OEM:
| Product Desc. | SKU |
|---|---|
| VR Drill | SKU: VR123 |
| VR Hammer | SKU: VR456 |
| VR Screwdriver | SKU: VR789 |
| Other Brand Spanner | SKU: OTHER001 |
Example Event Script
// Generated by Discover Event Manager
// NOTE: Do not change event name
function CUST$E_COLLECT_NUMBER_OF_SKUS_FROM_CART__638084405096549241()
{
    if ($P["CUST.P_COLLECT_VR_SKU_FROM_CART__638077459434139565"].patternFound() && ($P["CUST.P_COLLECT_VR_SKU_FROM_CART__638077459434139565"].firstValue().toUpperCase() != "") && $P["TL.TLT_CUI_URL"].firstValue().toUpperCase().indexOf("/WCS/SHOP/AJAXORDERITEMDISPLAYVIEW") >= 0)
    {
        // Set fact for Report Group: No Dimension Report Group
        $F.setFact("CUST.F_E_COLLECT_NUMBER_OF_SKUS_FROM_CART__638084405096549241", $P["CUST.P_COLLECT_VR_SKU_FROM_CART__638077459434139565"].matchCount());
    }
}
Tips
- As with all advanced events, it is best practice to create the event using the UI as much as possible and only converting to Advanced Mode when additional scripting is required.
P_COLLECT_VR_SKU_FROM_CART__638077459434139565the name and number/id is generated at creation time and should not be modified. Any modification without a full event re-creation will have undesired results.
The advanced event script checks if the pattern CUST.P_COLLECT_VR_SKU_FROM_CART__638077459434139565 is found in the cart, this references a Hit Attribute detailed below. This is done using the Discover patternFound() method.
The scripts ensures that the first value of the pattern is not an empty string by converting the value to uppercase and comparing it to an empty string. The script checks if the URL contains the substring /WCS/SHOP/AJAXORDERITEMDISPLAYVIEW using the indexOf() method.
Hit Attribute Hit Attribute configuration:
- Name: Collect VR SKU from Cart
- Search in: Response
- Use: Use Start Tag/End Tag
- Start Tag:
<span class="product_sku"> - End Tag:
</span><br> - Use RegEx:
:.*
The Hit Attribute is capturing all values from the basket meeting the criteria and only keeping the characters after the colon : by using the regular expression.
If all the above advanced event script conditions are met, the script sets a fact CUST.F_E_COLLECT_NUMBER_OF_SKUS_FROM_CART__638084405096549241 with the count of matches found for the pattern CUST.P_COLLECT_BOSCH_SKU_FROM_CART__638077459434139565.
In this case, the pattern CUST.P_COLLECT_VR_SKU_FROM_CART__638077459434139565 would match the VR items, and the matchCount() would return 3, as there are three VR OEM SKUs in the basket.