Offloading SSL
Introduction
SSL offloading is the process of switching the SSL / TLS-based encryption from incoming traffic before it reaches it's next destination, in this case the DNCA software. This is typically put in place to dedicate the intensive encryption / decryption task to a dedicated device or service, such as an LBA to perform the operations.
The offloading device (LBA or other) intercepts the encrypted HTTPS traffic, decrypts it, and then forwards the unencrypted HTTP traffic to the web server on the DNCA. This process is called SSL Termination and is a common method for internal networks that are considered secure.
Key reasons for implementing SSL offloading are:
- Improved Server Performance, due to task intensity
- Enhanced Scalability, high traffic bottlenecks
- Simplified SSL Certificate Management, reduces error when maintaining
- Enabling Intelligent Traffic Management and Security, advanced visibility of traffic inspection
Options
Offloading SSL traffic when posting data to the DNCA can be achieved using two approaches, the second (2) approach is described in detail as the first (1) approach is more commonly known within infrastructure / operational teams.
Approach
Routing traffic to the DNCA, with or without SSL is fully within the remit of the business using / implementing HCL Discover. The approach described here is documented as tested both with HCL demonstration systems and with some customers, however not officially supported due to it being outside the software's remit.
- The first route is to offload SSL traffic prior to it hitting the DNCA server
- This is typically done on a load balancer or similar
- The traffic would then be routed to the DNCA server from the Load Balancer as HTTP traffic
In some situations offloading SSL prior to traffic reaching the DNCA server is not possible, in this case an alternative solution described here maybe used to offload SSL on the DNCA server but prior to the traffic being picked up by the DNCA software.
SSL Termination at the DNCA
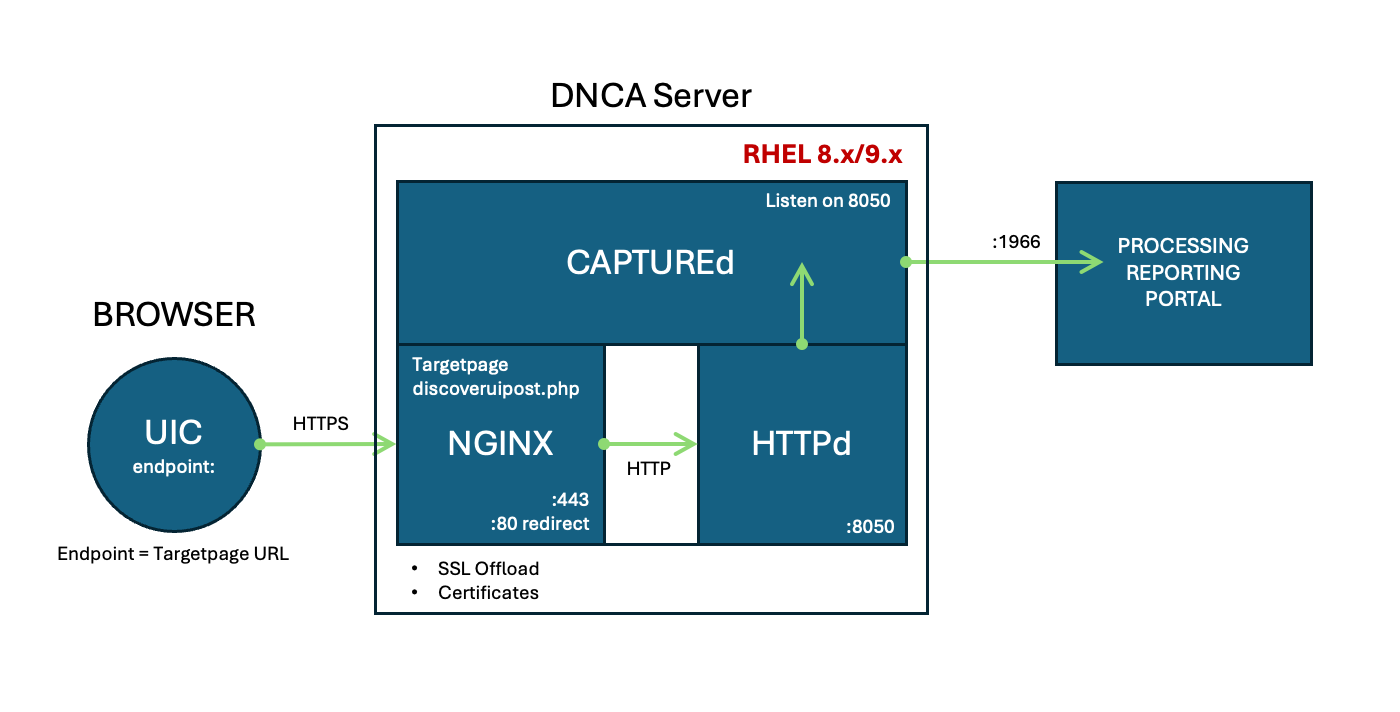
Option two (2) requires the installation of NGINX which will be used to proxy and offload SSL prior to forwarding onto itself to be picked up by the Apache HTTP server and DNCA software.
SSL Certificates
Ensure the SSL certificate .crt and .key file for the domain where the DiscoverUIPost.php page is located are placed in the DNCA server /var/www/ directory.
Install NGINX
Overview Diagram
Configure NGINX
At the terminal on the DNCA server, install NGINX with the following command: sudo yum install nginx
-
Using a suitable editor (nano) make the following configuration changes after issuing the following command at the terminal:
sudo nano /etc/nginx/nginx.conf -
Comment out the existing
server {}config section and add the following, ensuring you amend theserver_nameto the domain used for the target page (DiscoverUIPost.php) and ensuring the thessl_certificateandssl_certificate_keyare updated with the correct file names:nginx.conf#-----Custom Config-----# # Config for DiscoverUIPost server { listen 443 ssl; server_name domain; ssl_certificate /var/www/fullchain.crt; ssl_certificate_key /var/www/privkey.key; ssl_protocols TLSv1.2 TLSv1.3; # TLS 1.2 ciphers – strong, forward secrecy, AEAD only ssl_ciphers 'ECDHE-ECDSA-AES256-GCM-SHA384:ECDHE-RSA-AES256-GCM-SHA384:ECDHE-ECDSA-AES128-GCM-SHA256:ECDHE-RSA-AES128-GCM-SHA256:ECDHE-ECDSA-CHACHA20-POLY1305:ECDHE-RSA-CHACHA20-POLY1305'; ssl_prefer_server_ciphers on; # TLS 1.3 cipher suites ssl_conf_command Ciphersuites TLS_AES_256_GCM_SHA384:TLS_AES_128_GCM_SHA256:TLS_CHACHA20_POLY1305_SHA256; # Security extras ssl_session_timeout 1d; ssl_session_cache shared:SSL:50m; ssl_session_tickets off; # OCSP stapling ssl_stapling on; ssl_stapling_verify on; resolver 1.1.1.1 1.0.0.1 valid=300s; resolver_timeout 5s; # Only response to the DiscoverUIPost.php file. Allow all origin access (*). Pass through the RealIP address. # Proxy all requests to http://127.0.0.1:8050 location ~* /DiscoverUIPost.php { add_header 'Access-Control-Allow-Origin' '*'; add_header 'Access-Control-Allow-Credentials' 'true'; add_header 'Access-Control-Allow-Headers' '*'; # add these three lines to set REMOTE_ADDR to the real client ip proxy_set_header x-Host $host; proxy_set_header x-real-ip $remote_addr; proxy_set_header x-forwarded-for $proxy_add_x_forwarded_for; proxy_pass http://127.0.0.1:8050; } } # Listen on port 80 (HTTP), issue a 301 and redirect to HTTPS server { listen 80; return 301 https://$host$request_uri; } -
Save changes and exit.
Configure Apache
-
Using a suitable editor (nano) make the following configuration changes after issuing the following command at the terminal:
sudo nano /usr/local/dncauser/etc/httpd.conf -
Comment out the existing
<VirtualHost>config section and add the following:httpd.conf# Discover Target Page Config Listen 8050 NameVirtualHost *:8050 <VirtualHost *:8050> ServerName localhost.localdomain ServerAlias localhost.localdomain DocumentRoot /var/www/ <Directory /var/www/> Satisfy Any </Directory> ErrorLog /var/log/discover/error.log </VirtualHost> -
Save changes and exit.
Data Capture Interface
Follow the steps below to make changes to the capture interface configuration on the DNCA Portal.