Dimensions
Definition
Dimensions are a way to segment Event data, both in Reports and in searches. They capture what's going on within a session at the time an Event fires by saving specific data as a Dimension value that's associated with the Event. Within Reports, these Dimensional values display commonalities among sessions; while searching, they enable you to narrow Event searches by specific session traits.
Any data that can be an Event value can also populate a Dimension value. When an Event occurs, the Dimensions that are assigned to that Event also capture values at that point in the session. The important thing to remember is that Dimensions act like a snapshot of in-session data at the time the Event occurs.
For Reporting
Dimensions enable you to view commonalities across sessions. For example, a Report on the number of completed purchases per day could be segmented by Dimensions to display common billing states, coupon codes, traffic types, etc. In this case, billing state is one Dimension, coupon code is another and traffic type is a third Dimension. Each captures its value at the time the Completed Purchase Event fires. The resulting Report can be filtered or segmented by any of these Dimensions to display specific data requirements.
Dimensions function in Report Groups, meaning that you can 'slice and dice' a Report's data segment by multiple Dimensions if those Dimensions are in the same Report Group. For example, if the Billing State and Coupon Code Dimensions are in the same Report Group, you would be able to view the coupon code distribution by state.
Limitations to Dimensions
Report Groups have a limit of four Dimensions per group, and an Event can be associated with up to four multiple-Dimension Report Groups. However, there is no limit to how many single-Dimension Report Groups are assigned to a single Event. The four(4) Dimension limit on Report Groups simply restricts how many variables you can filter the data by at once.
If a Report contains multiple Events, such as in a ratio or comparison Report, the Events must have the same Dimensions assigned to them. This ensures that when you filter the Report data, that filter can be applied correctly to the entire data set.
New Dimension
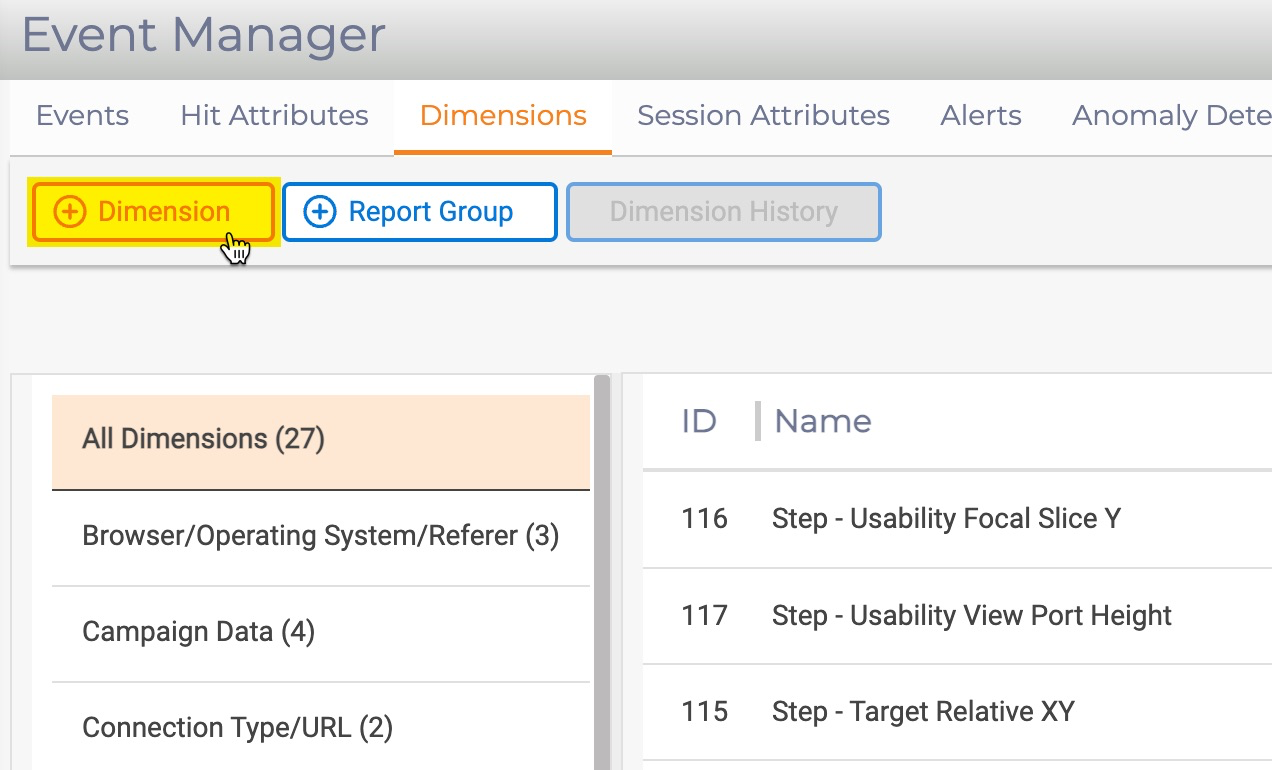
Dimensions Tab in Event Manager
Selecting the Event Manager > Dimension displays a list of all dimensions created. On the left is the Report Groups Panel.
Warning
Remember that Last Value in Session refers to the last value that occurred prior to this Event occurring.
From the Event Manager > Dimensions tab, select the + Dimension button and complete the following fields.
| Key | Description |
|---|---|
Name |
The Dimension name should indicate its purpose as it is visible in multiple locations throughout the UI, e.g., Dimension lists views, Report Group views, Event Quick View windows and many others. |
Description |
A description should include any further information that helps distinguish or clarify the dimension. |
Populated By |
Dimensions can be based on Events, Hit Attributes or Session Attributes. Clicking the 'Select' button opens a window with additional options.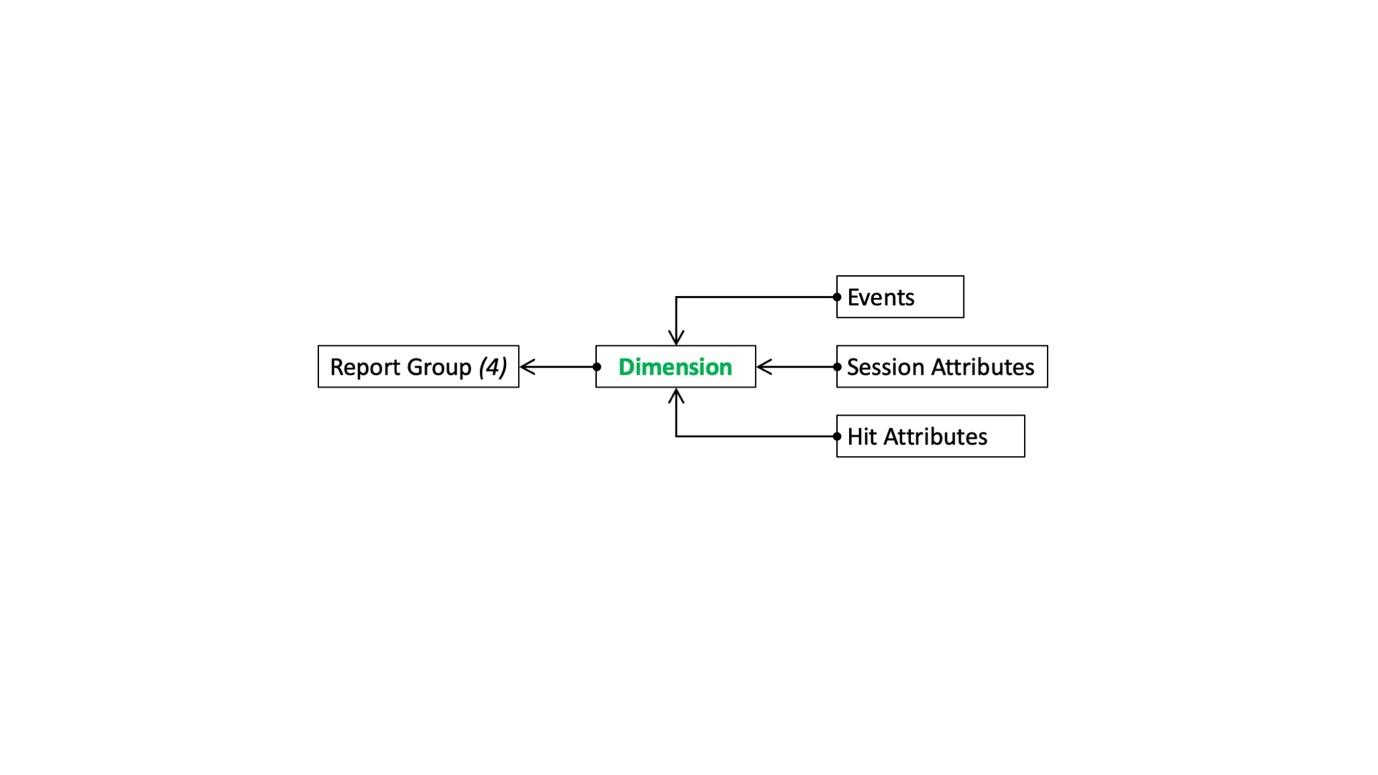 As a best practice and for timing purposes, it is best to use other Events as the Dimension value, however not mandatory. As a best practice and for timing purposes, it is best to use other Events as the Dimension value, however not mandatory. 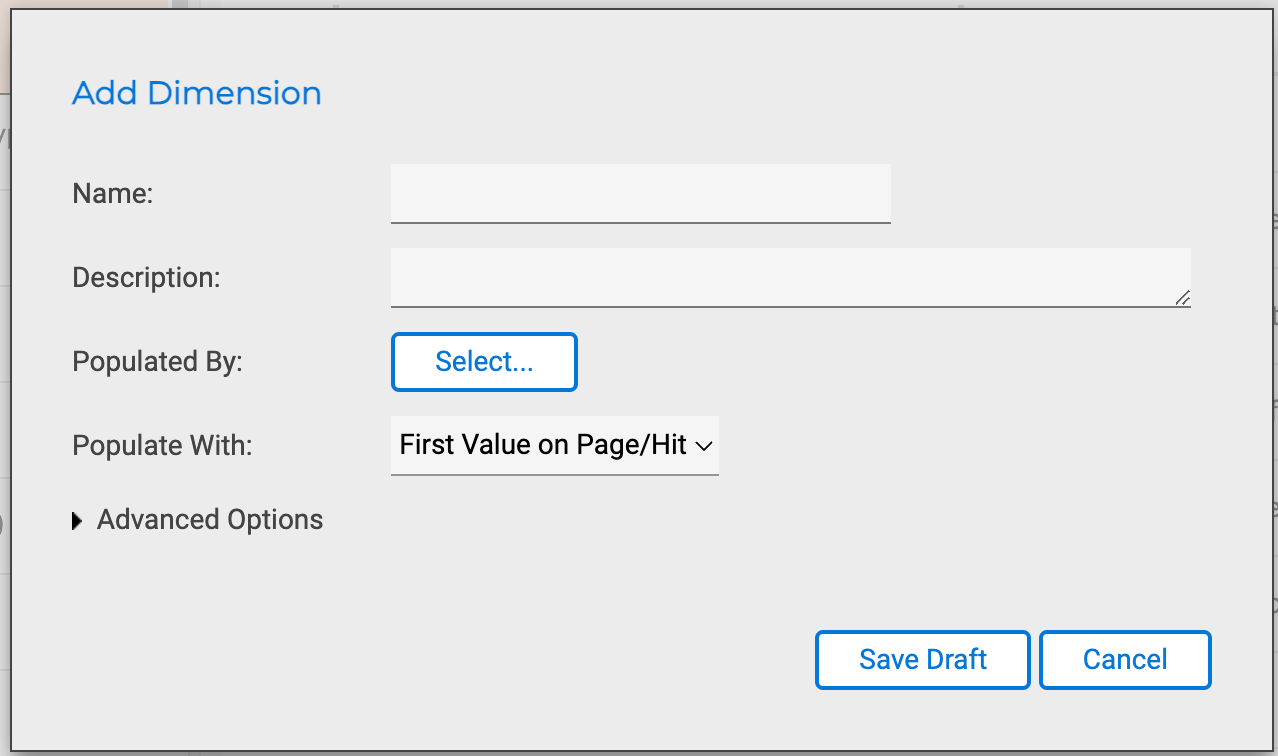 |
Populate With |
Dimension values can be up to 450 characters in length. Values that are longer than this limit are truncated, which may impact dimensions populated by hit attributes that match long character strings in the session data. |
The options in this drop-down change based on how the Dimension is populated in the Populated By step above. 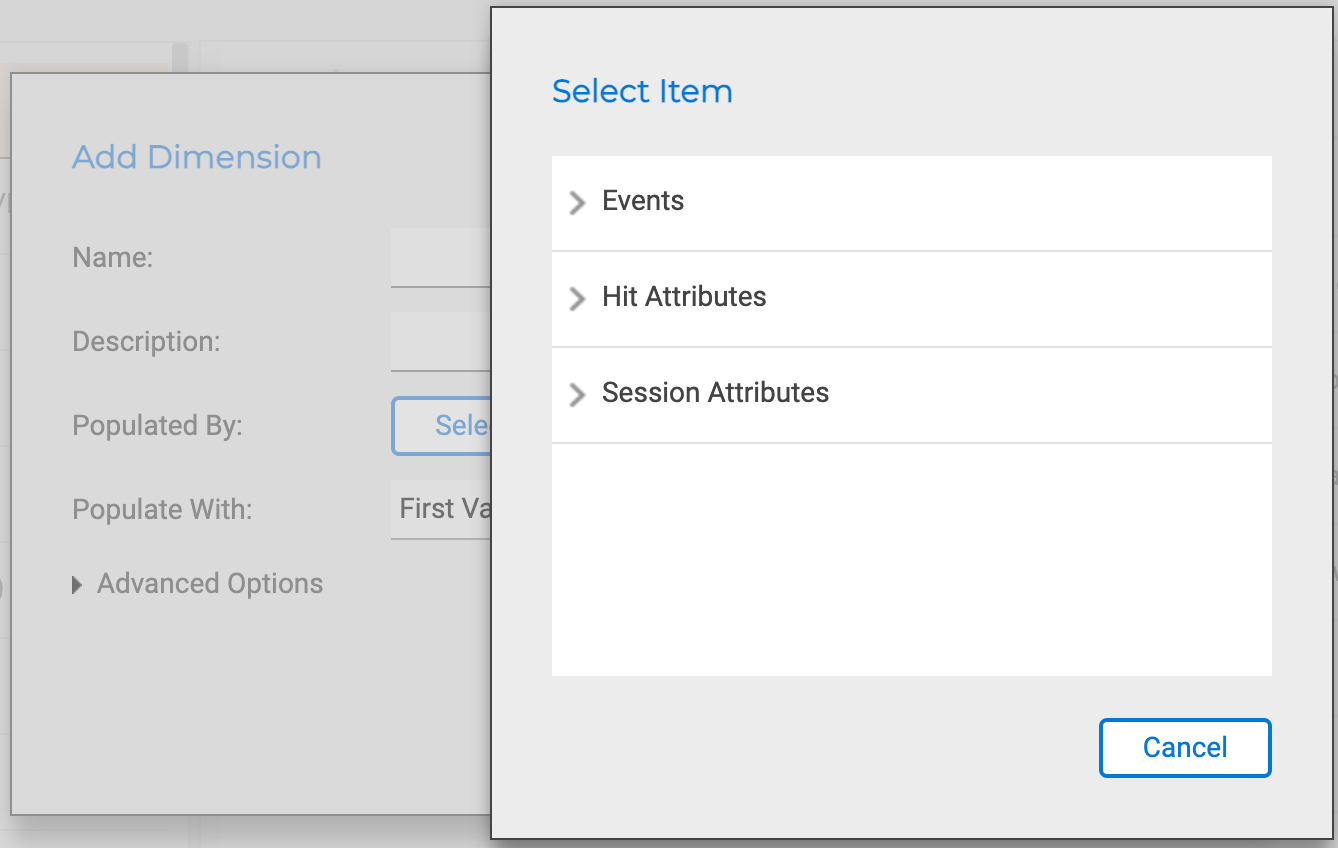 Options for Events or Session Attributes are 'First Value in Session', 'Last Value in Session' or 'Current Count in Session'. Options for Hit Attributes are 'First Value on Page/Hit' or 'Last Value on Page/Hit'. Remember that Hit Attributes only refer to the [current hit,]{.underline} this selection an approach to choose between multiple instances on that hit. Options for Events or Session Attributes are 'First Value in Session', 'Last Value in Session' or 'Current Count in Session'. Options for Hit Attributes are 'First Value on Page/Hit' or 'Last Value on Page/Hit'. Remember that Hit Attributes only refer to the [current hit,]{.underline} this selection an approach to choose between multiple instances on that hit. |
|
Advanced Options |
Advanced options allow you to manage how and what dimension values are recorded. |
Click Save Draft to save the new Dimension.
New Report Group
A Report Group allows 'event' data to be filtered and segmented by multiple Dimensions at once. Only Dimensions that are in the same Report Group can be used in this way.
The process of creating a new 'Report Group' is simple. Click the '+ Report Group' button to launch the interface to define the report group and add dimensions.
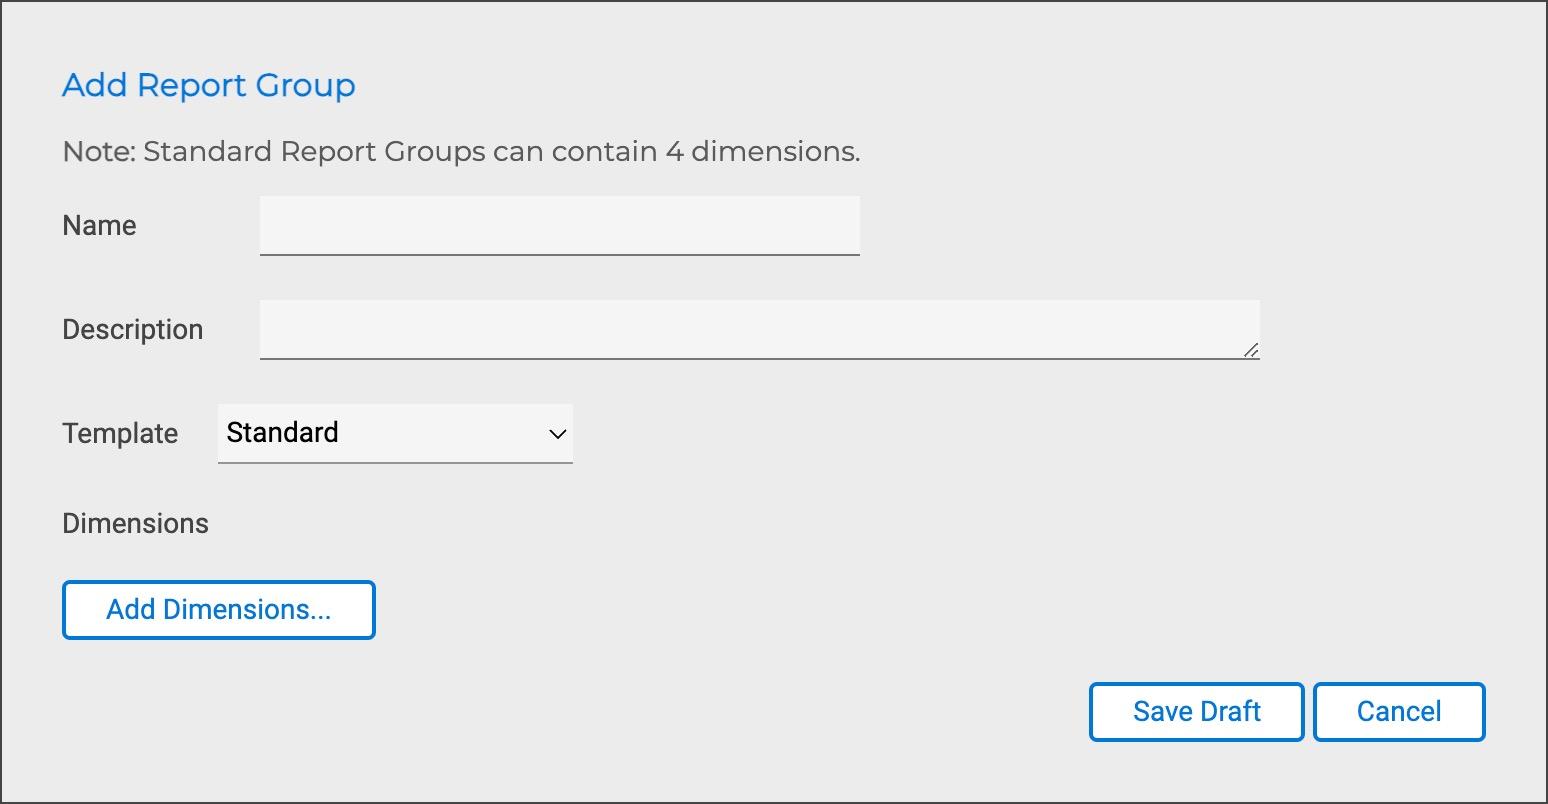
| Key | Description |
|---|---|
Name |
The Report Group name should indicate its purpose as it is visible with the Dimension list view and when building/viewing reports. |
Description |
A description should include any further information that helps distinguish or clarify the report groups use. |
Dimensions |
Up to four linked dimensions (see figure 28) for each report group, these are added one at a time. 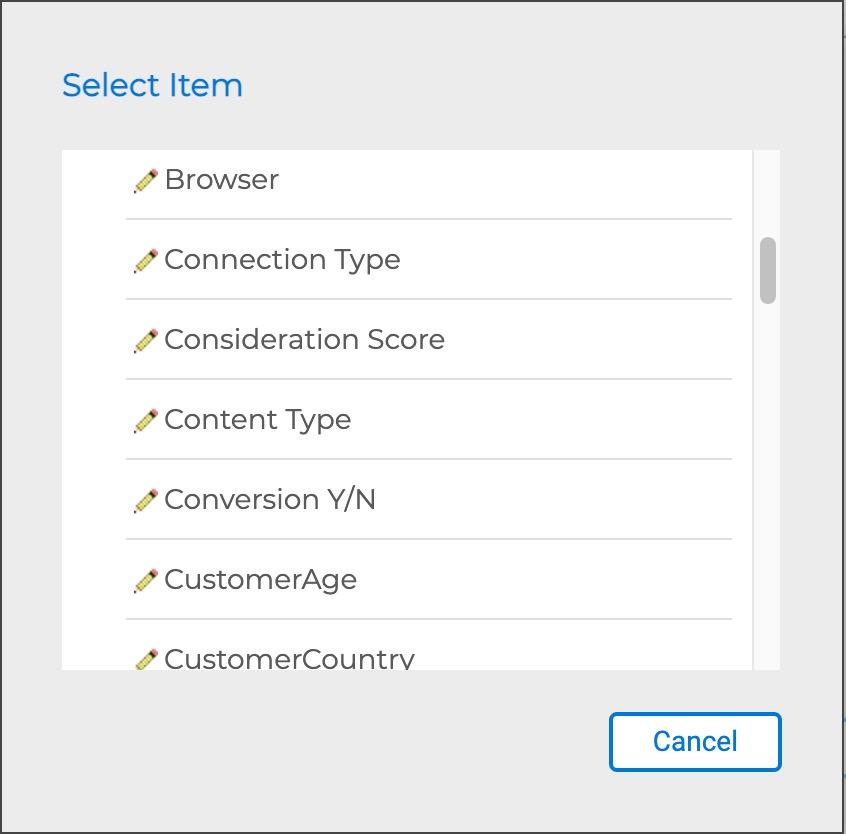 |
Click Save Draft to save the new Report Group.
Activity - Dimension and Report Group Walkthrough
Scenario
The business analysts working with the digital team have been tracking the promotional codes used by visitors to the website through an event created previously. To further support the need for mobile responsive design-work, the percentage of mobile device usage is required related to this.
Requirements
Using the existing event previously created, create a new Report Group and with dimensions to segment the event data by mobile device type.
As a reminder review the previous events preparation, think through the following, some may be required for this activity:
- What Report Groups and/or Dimensions are needed for this?
- What Hit Attributes, Dimensions and Events already exist for me to use?
- What Hit Attributes, Dimensions and Events need to be created?
- How should I build the Report?
Create the Dimensions
Within Event Manager > 'Dimensions' click the ' + Dimension' button to create a new segmenting dimension.
Configure the Dimension One
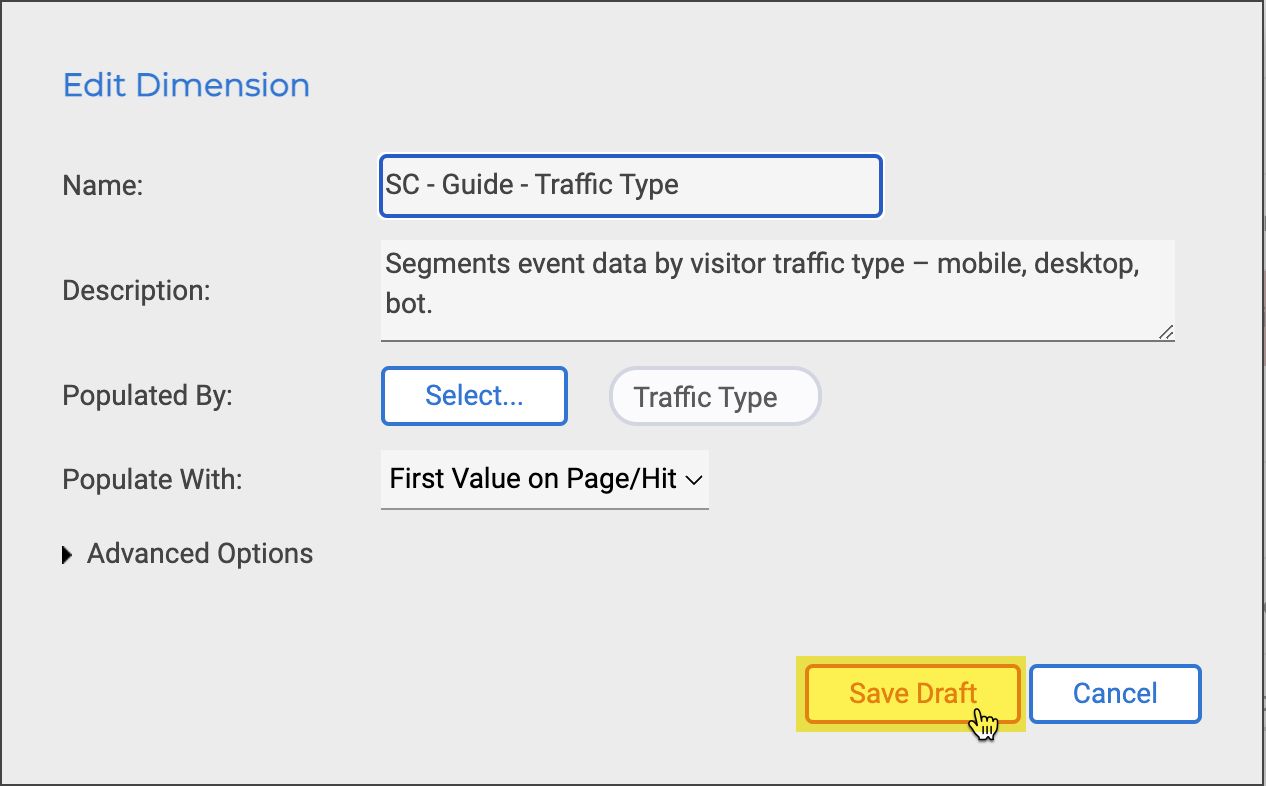
Change the Name of the dimension to include your initials and Visitor Traffic Type, e.g., SC -- Guide -- Visitor Traffic Type.
Edit the Description to describe what the dimension does, e.g., Segments event data by visitor traffic type -- mobile, desktop, bot.
Click the button Select... to populate the 'Dimension' with an event. This may be an Event, Hit Attribute or Session Attribute, however only one.
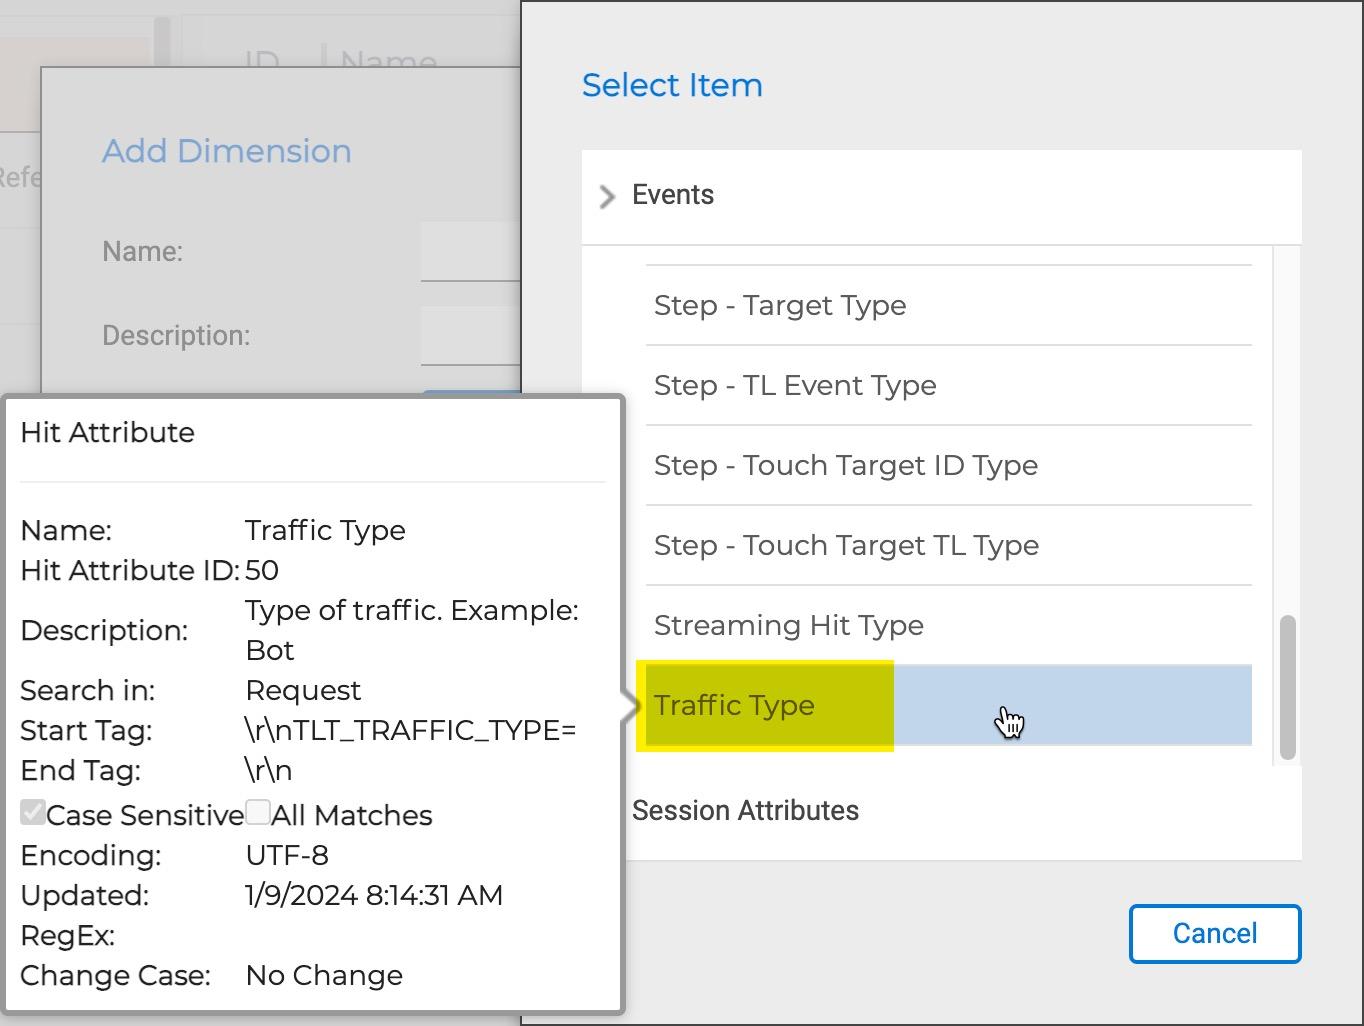
Expand the Hit Attributes navigation with the arrow icon. Using the Filter, type the word 'type' this will filter the Hit Attributes and reveal the Traffic Type at the end of the list. Select the Traffic Type option.
The default option for Populate with is First Value on Page/Hit, the alternative option is Last Value on Page/Hit, both are suitable for this scenario as it is expected that the First and Last value will be identical. Select the default option and click Save Draft.
Configure the Dimension Two
Unlike Events, it's not possible to create a Dimension from an existing one. From the Event Manager > Dimensions click the +Dimension button to create a new segmenting dimension.
Change the Name of the dimension to include your initials and Promo Code Value, e.g., SC -- Guide -- Promotional Code Value.
Edit the Description to describe what the dimension does, e.g., Populated with the promotional code value.
Click the button Select... to populate the Dimension with the event previously created as Guide -- Promotional code.
Potential error
Be careful to not use the wrong event, this may cause a cyclical reference error. A warning will be displayed when adding to an 'event'.
Select the default option for Populate with as First Value on Page/Hit. Click Save Draft.
Create the Report Group
Within Event Manager > Dimensions click the +Report Group button. The previous steps are saved as draft currently and will be committed to the system after the report group has been created.
Configure the report Group
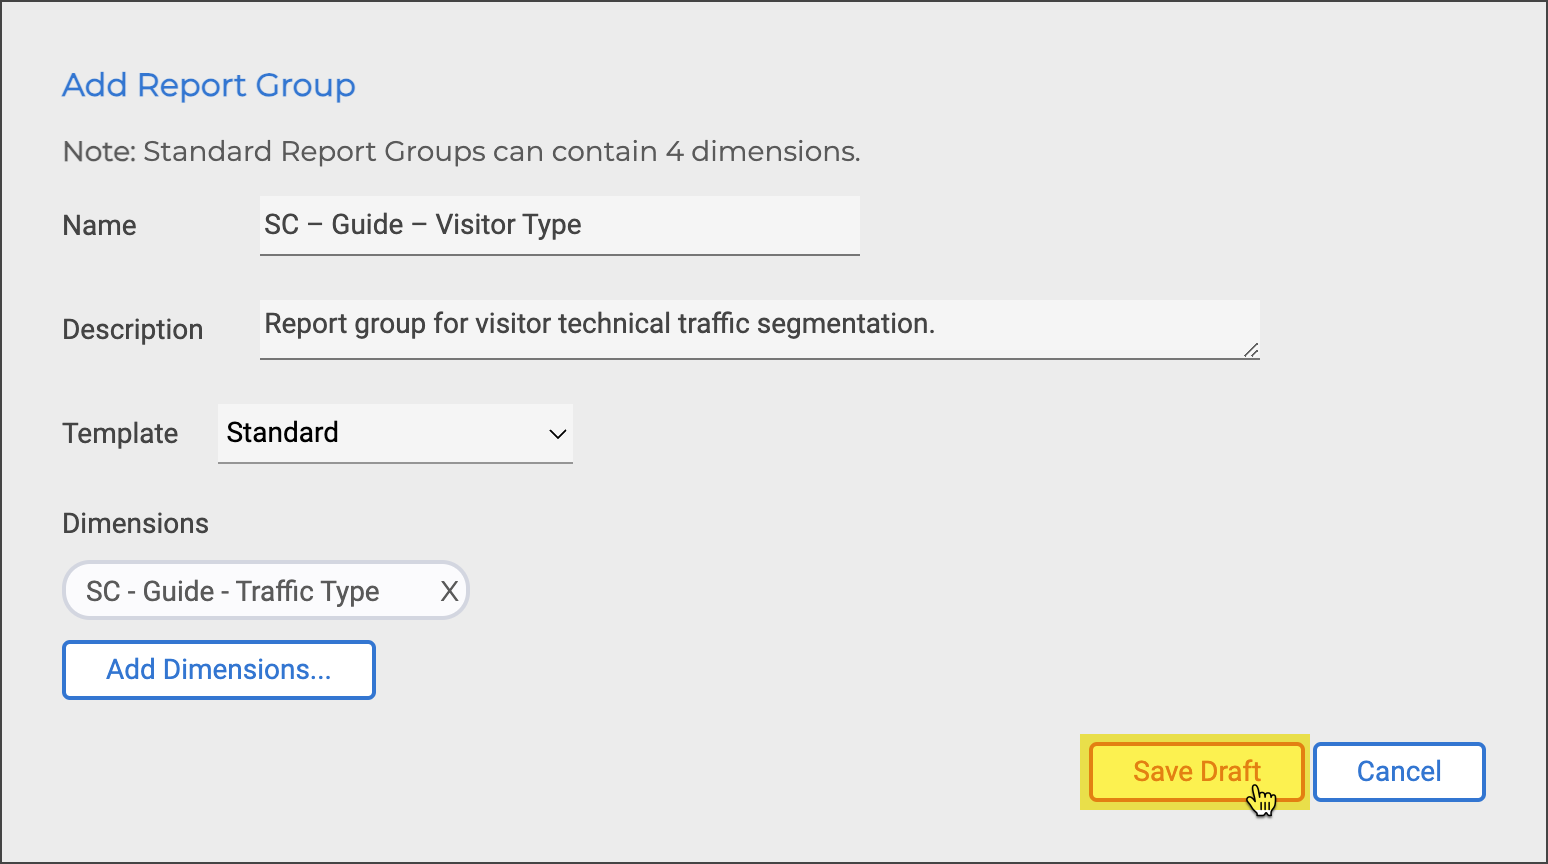
Change the 'Name' of the report group to include your initials and 'Visitor Type, e.g., SC -- Guide -- Visitor Type.
Edit the 'Description' to describe what the report group does, e.g., Report group for visitor technical traffic segmentation.
Dimension removal
It's important to note that when a Dimension is added to a Report Group, this cannot be changed/removed.
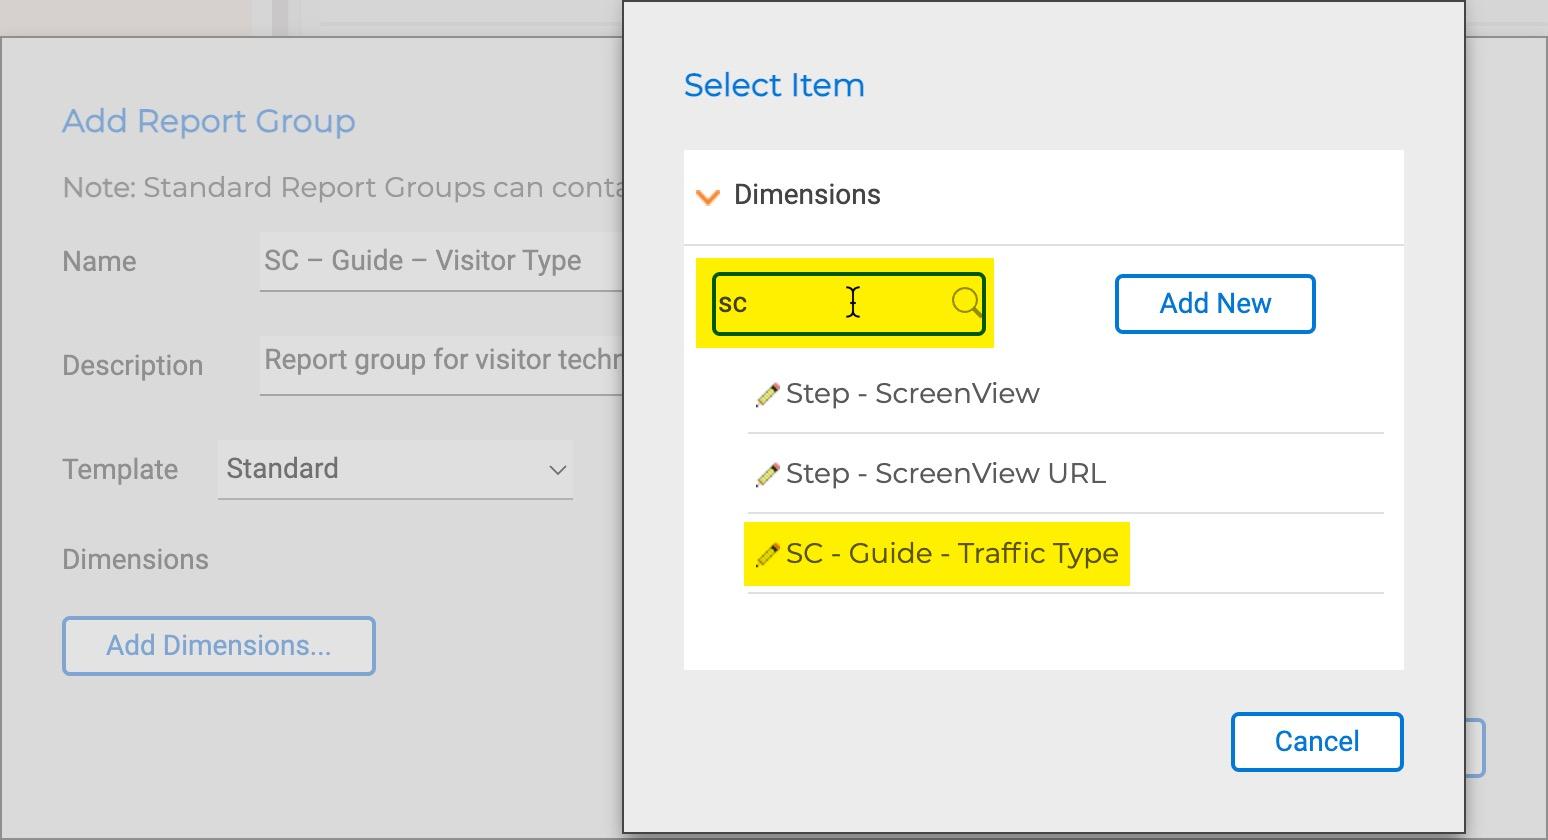
Click the button Add Dimensions... to populate the Report Group with a dimension. As previously described, use the Filter to quickly locate a dimension. Type your initials in the filter to reduce the list and reveal the dimensions required.
Click Save Draft to return to the Event Manager.
Selecting or filtering to the 'report group' created will show the two associated dimensions.

As a result, the new 'dimension' and 'report group' just created appear in the 'Event Manager' list, they are [highlighted in a light red colour.]{.mark} This means they are in draft and must be committed to the processing server before any data can be segmented.
Click 'Save Changes' to commit this new 'dimension' and 'report group' to the processing server so it starts accruing data. Optionally, enter comments but click 'Commit' to complete the process and start accruing data.
Existing data
The data used for segmenting a report must already exist for it to be displayed/used in a report. No segmentation data will show until this is the case.
Updating the Event
The Report Group must be added to an Event to allow for potential segmentation in subsequent reports / dashboards. Whilst there is no limit to the number of report groups that can be added, this may impact performance. Segmentation data will only be available from the point the report group or dimension is add to the event, i.e. sessions that come into the environment after the event is saved.
Within Event Manager > Events locate the previously created event. Locating an event can be achieved by:
- Using the Filter Events field in the horizontal menu.
- Locating within the Labels navigation.
- Locating using the main event list navigation.
As event creation occurs it is increasingly a best practice to use option 1 or 2 as applicable.
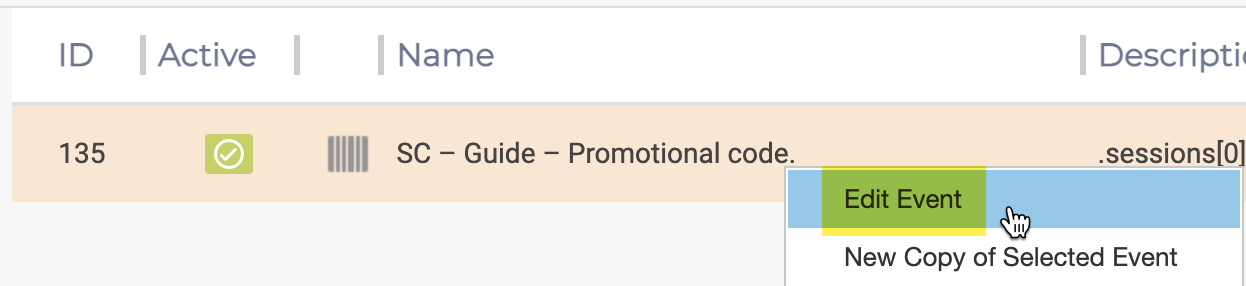
Right-click or double-click the 'event' to edit
Select the Report Groups tab and click the Add report Group button.
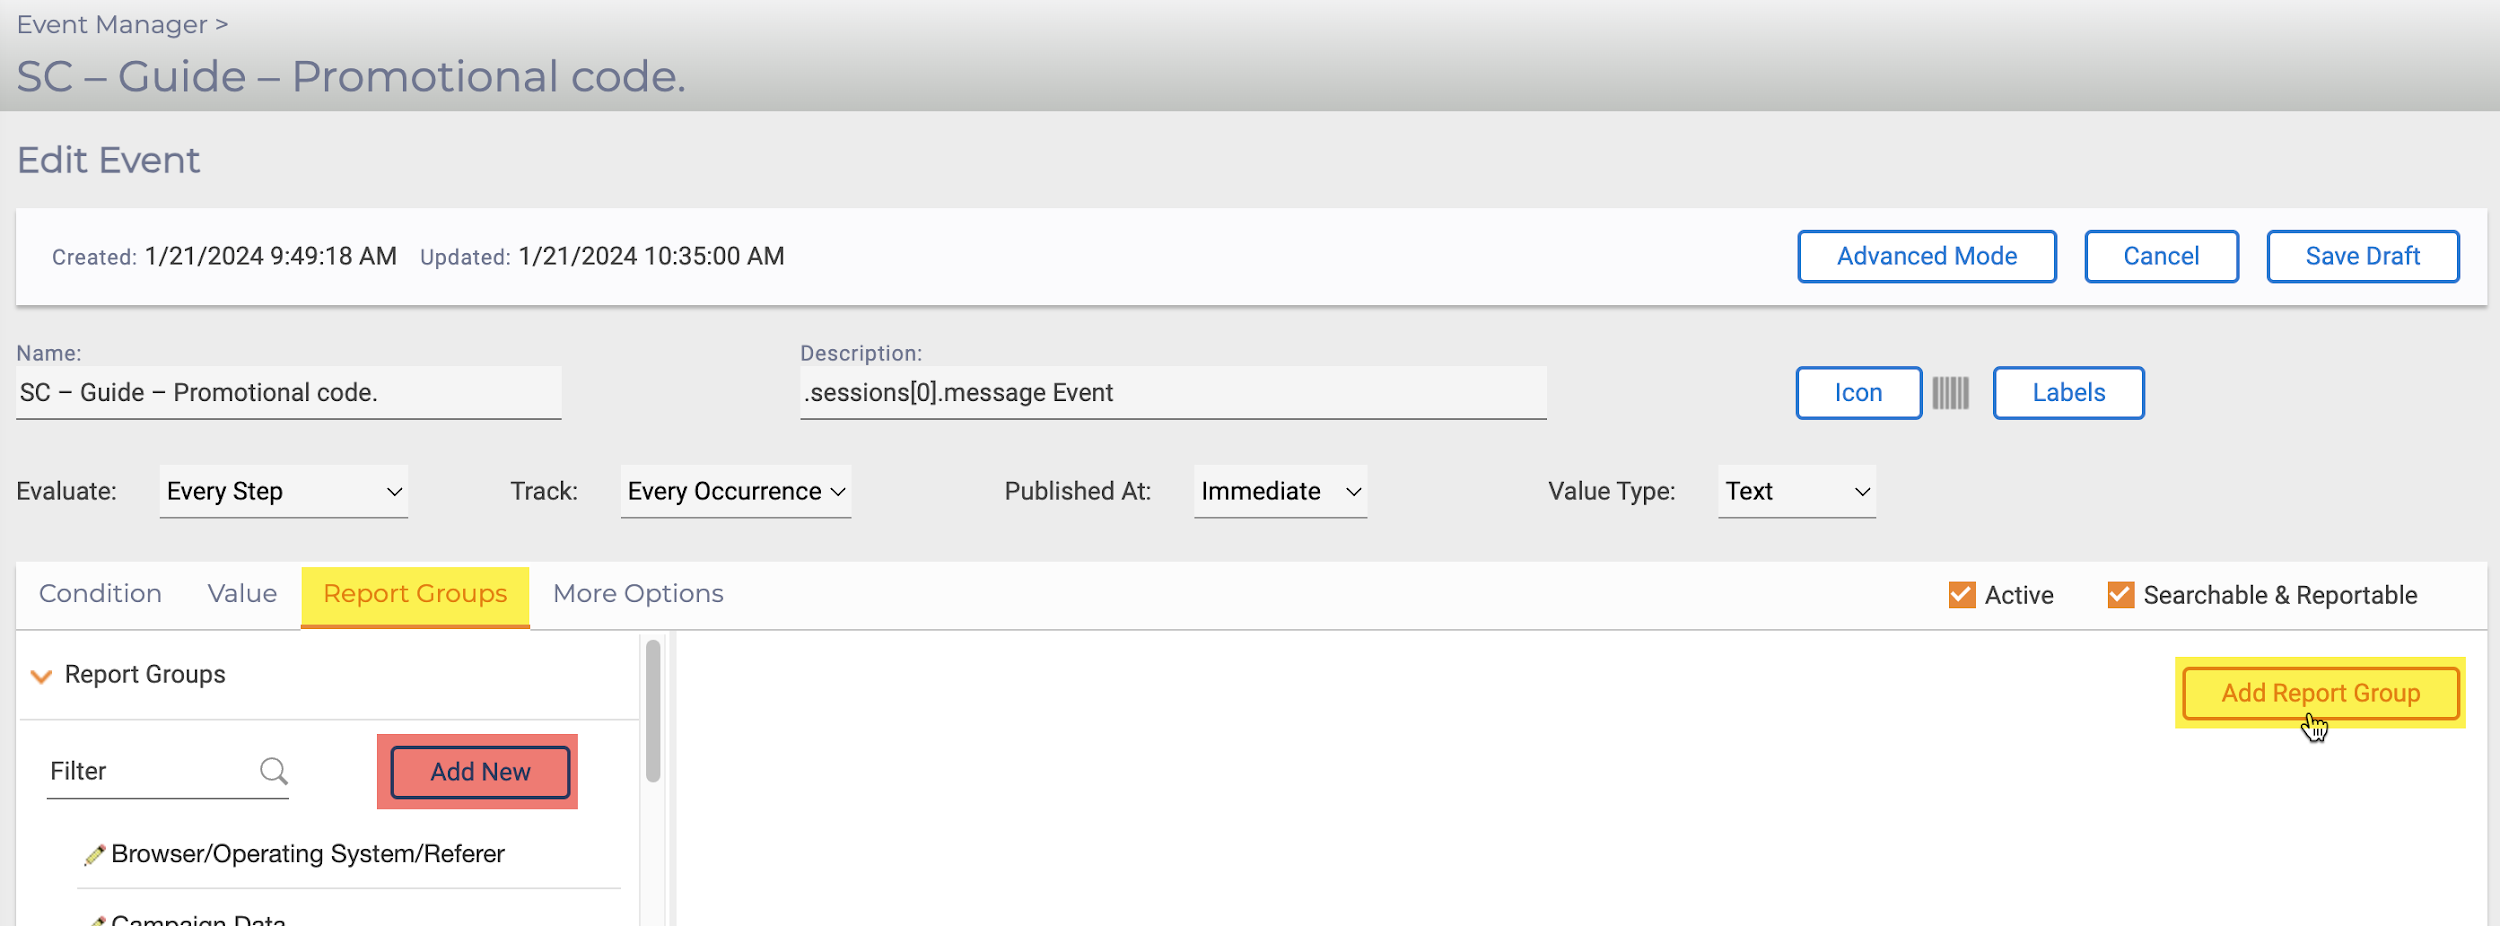
Filter and select the previously created report group.

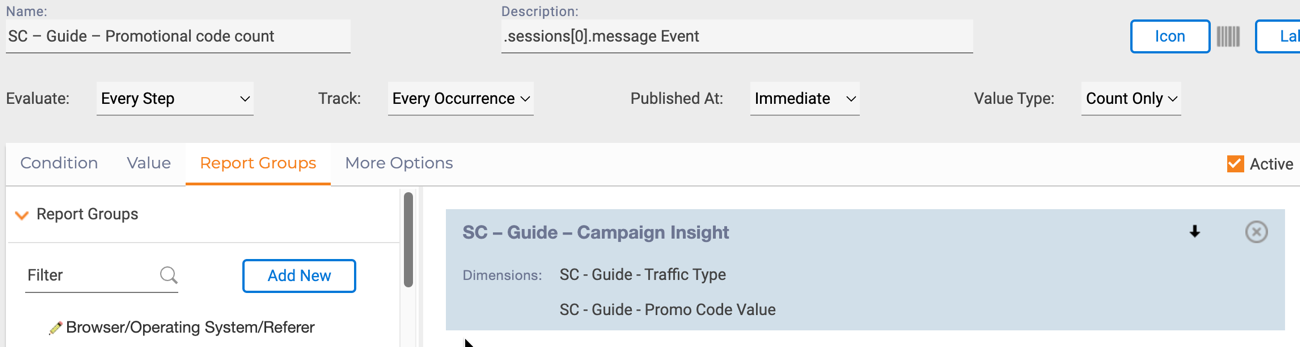
Tip
The Add New button within the above images allows for the creation of a new report group if already not available. This can be useful when dimensions already exist and only require grouping for segmentation needs.
With the Report Group added, click Save As Draft and Save Changes to commit the updates to the 'event'. Any unsaved changes will be highlighted red.