Configuring KeyCloak as an OIDC provider for Connections
Configuring Keycloak as the OIDC provider for Connections involves these steps.
- Creating a realm
-
Within that realm create a client for the Connections web application
- Configure the callback urls for the client
-
Configure a hardcoded
realmNameclaim through the client scope mapper property. - Configure Keycloak connection to LDAP
- [Optional] Create additional clients for Oauth applications mobile and desktop plugins
The realm contains the Keycloak OIDC clients which provide the authentication for Connections entities. The main OIDC client is the client for the Connections web application.
Procedure
- To create the Connections Realm in Keycloak, in the Keycloak admin portal Select realm > Add realm. This documentation references the realm name created here as {realm}.
-
Once created set the realm token properties as appropriate for your deployment via {realm} > Realm Settings > Tokens
To avoid token time-out issues, set the properties Access Token Lifespan and Access Token Lifespan For Implicit Flow to 1 minute less than the WebSphere LTPA timeout.
For example, if the WebSphere LTPA timeout is set to 720 minutes (12 hours):
To avoid token time-out issues, set the properties Access Token Lifespan and Access Token Lifespan For Implicit Flow to 1 minute less than the WebSphere LTPA timeout.
-
Create the Main Keycloak Client for Connections. Click on Keycloak admin portal and select {realm} > Clients.
-
Click Create.
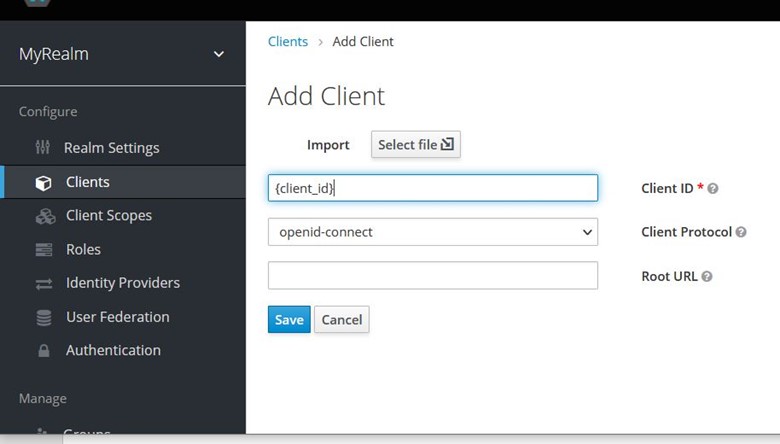
Note
{client_id} will also be used later in the Updating WebSphere to support Keycloak OIDC Authentication for Connections section.
-
As part of the client, define the valid callback urls.
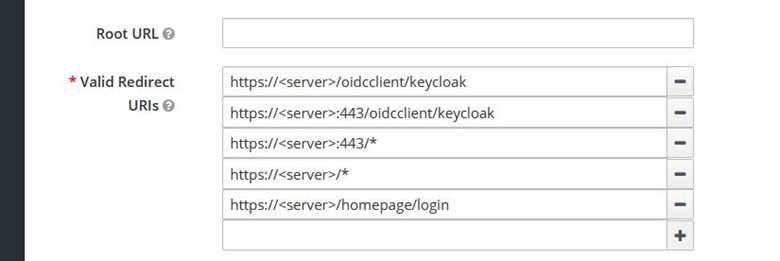
Note
oidcclient/keycloakcorresponds to property values from the WebSphere TAI referenced later. Specifically,oidcclientis the value of the propertyprovider_x.callbackServletContextandkeycloakis the value of the propertyprovider_x.identifier. -
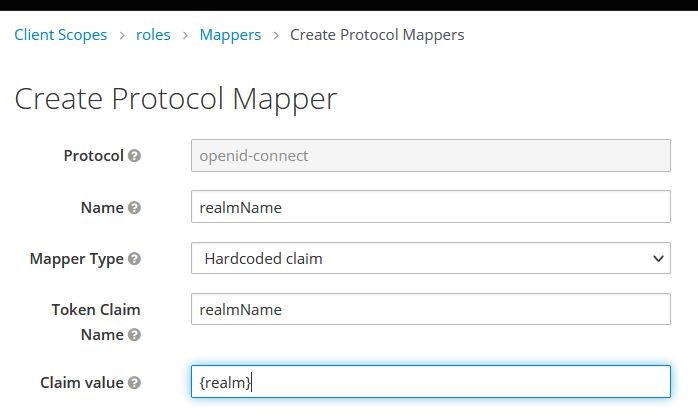
Next create a Client Scope Mapper for realmName in the Keycloak admin portal. Go to {realm} > Client Scopes > roles > Mappers > Create.
-
Click Create.
-
Fill in the following fields with the values below and click Save.
- Name =
realmName - Mapper Type = Hardcoded claim
- Token claim name =
realmName - Claim value =
{realm}
Note
This creates a mapper that provides the realmName as part of the ID and access tokens in the authentication flow. Doing this via the realm's client scope makes it available to all client authentication flows in that same realm, including web (defined above), mobile, desktop, and 3rd-party clients.
- Name =
-
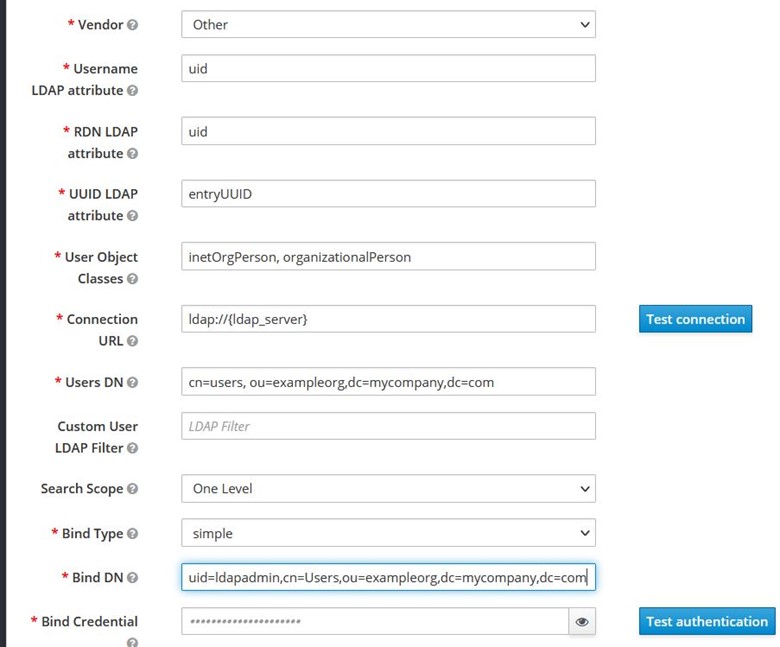
Configuring KeyCloak to connect to the enterprise’s LDAP enables Keycloak to provide authentication for the enterprise's users. Informing Keycloak about the users is simple. To do this, go to {realm} > User Federation > Add Provider in the Keycloak admin portal .
-
Choose ldap and complete the form like the following example.
-
[Optional] Create additional clients for the Connections mobile and desktop plugins applications. Similar to creating the main Connections client, in the Keycloak admin portal go to Clients > Create. Repeat for each client.
See the information and screenshots below for guidance.
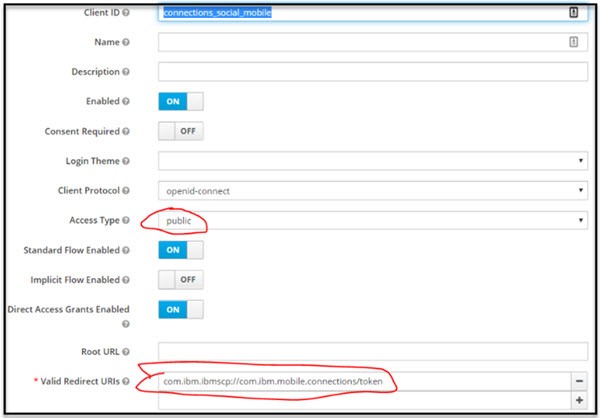
For Mobile Client
The following creates the Keycloak client for mobile, there is additional Connections configuration required to complete enabling mobile access (see later section).
-
Set the values for the following fields as indicated:
- Client ID = connections_social_mobile
- Enabled = On
- Client Protocol = openid-connect
- Access Type = public
- Standard Flow Enabled = On
- Implicit Flow Enabled = Off
- Direct Access Grants Enabled = Off
- Valid Redirect URIs =
com.ibm.ibmscp://com.ibm.mobile.connections/token
-
Under Advanced Settings, set:
- Access Token Lifespan = 60
-
Proof Key for Code Exchange Code Challenge Method = S256
For Desktop Plugins
-
Both Mac and Windows Desktop plugins use the same Keycloak client as the Mobile client defined above. Add the following redirect URI to the Valid Redirect URIs list of the Mobile client:
com.ibm.ibmscp://com.ibm.desktop.connections
If you are supporting older desktop plugins (pre-21.07):
- Add another Keycloak client with Client ID:
conn-dsk-plugin - Other than the Client ID, use the same settings as the mobile Keycloak client.
- Add the following redirect URI to the Valid Redirect URIs list of the
conn-dsk-pluginclient:
com.ibm.ibmscp://com.ibm.desktop.connections
Outlook Add-in:
If you are enabling the Connections Outlook Add-in for your users, you will need to make updates to Keycloak to enable login from the add-in. Update the Mobile client (connections_social_mobile) with redirect URIs.
- Add the Outlook Add-in redirect URL to the Valid Redirect URIs field. The format should be:
https://(addin URI)/auth/callback
For example:
https://my.server.com/outlook-addin/auth/callback
-
Update the Web Origins field to allow CORS origins from the redirect URIs. Either explicitly specify each redirect URI or specify
+to allow all redirect URIs from the Valid Redirect URIs field. -
Update
{realm}settings to ensureX-Frame-Optionsincludesframe-ancestors 'self'. This allows the Outlook Add-in to be loaded in an iFrame.
Parent topic: Enabling Keycloak as an OIDC provider for Connections