Install manually
The manual install process requires copying files into the right locations and restarting some services.
Before you begin:
- Determine the host_name of the server hosting HCL Connections™.
-
Get user access as the HCL Connections installer or higher administrative permissions, on both:
- The host server.
- The WebSphere Application Server Console.
-
Stop the Common WebSphere enterprise application.
-
Log in to the web interface of the WebSphere Application Server Console.
The default address is: https://host_name:9043/ibm/console
-
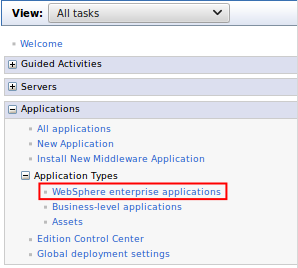
Navigate to Applications > Application Types > WebSphere enterprise applications.
-
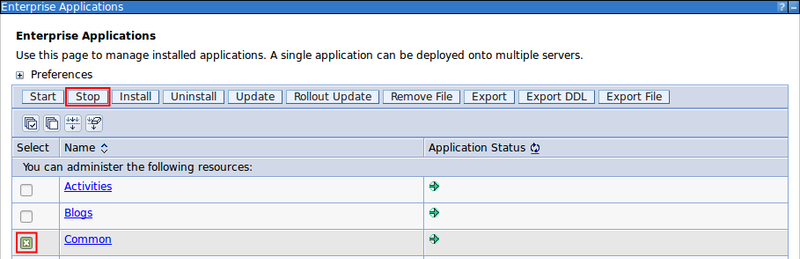
Select the checkbox for Common from the list of applications and click Stop.

-
-
Determine the Connections paths (customization_path and provision_path).
-
Log in to the web interface of the WebSphere Application Server Console.
The default address is: https://host_name:9043/ibm/console
-
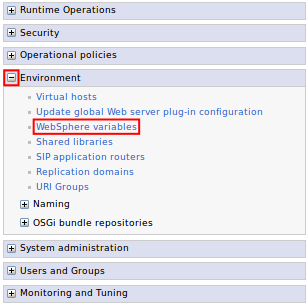
Expand Environment and click the WebSphere variables link.
-
Find the CONNECTIONS_CUSTOMIZATION_PATH in the variables list and record the value which will be referred to as customization_path from this point.

-
Find the CONNECTIONS_PROVISION_PATH in the variables list and record the value which will be referred to as provision_path from this point.

-
-
In the customization_path/javascript directory, create the subdirectory tiny/editors/connections.
Note
If the directory already exists, delete or move the contents to a new folder before proceeding.
-
Install the Tiny Editors for HCL Connections configuration files:
-
Locate the config directory in the uncompressed Tiny Editors for HCL Connections package.
-
Copy the contents of the config directory to the customization_path/javascript/tiny/editors/connections directory.
-
-
Install the Tiny Editors for HCL Connections jar file:
-
Locate the editor directory in the uncompressed Tiny Editors for HCL Connections package.
-
Copy the editor/tiny.editors.connections_version.jar to the provision_path/webresources directory.
-
-
Follow the post-customization steps to ensure the server cache is updated.
-
Start the Common WebSphere enterprise application.
-
Log in to the web interface of the WebSphere Application Server Console.
The default address is: https://host_name:9043/ibm/console
-
Navigate to Applications > Application Types > WebSphere enterprise applications.
-
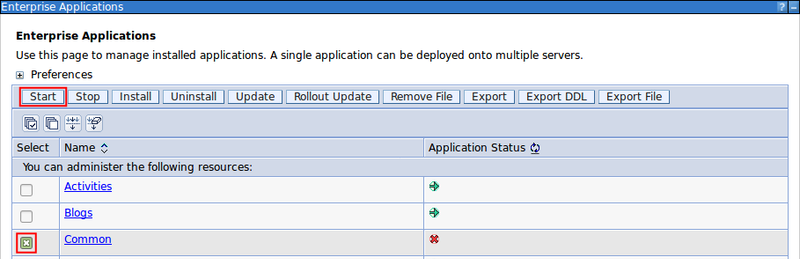
Select the checkbox for Common from the list of applications and click Start.

-
-
Verify the install:
-
Browse to the following URL: http://host_name_and_port/connections/resources/web/tiny.editors.connections/verify.html
If the installation was successful, a confirmation message appears alongside the installed version numbers.
-
Browse to the edit screen for a wiki or blog.
If the installation was successful, the Tiny editors will be loaded.
Note
If Tiny Editors for HCL Connections is not available, restart the Common enterprise application to force a cache update.
-
Parent topic: Installing Tiny Editors integration