Securing Redis traffic to Orient Me (Windows)
If your deployment runs HCL Connections™ on Windows, secure Redis traffic by creating a tunnel between Connections on Windows and the Orient Me services for Homepage (running on Linux). This is an optional, but recommended step.
These instructions explain how to create the SSH tunnel using PuTTY configured to run as a service. Install PuTTY on each WebSphere Application Server node running the Connections server.
Setup Up SSH Key Pair and Configuration on Connection server:
-
Create an SSH key pair using a strong algorithm such as ed25519.
-
Open PuTTYgen.
-
Choose key type EdDSA, select 255 bits, click Generate and move mouse around to generate the key.
-
Click Save private key, give it a name (for example, id_ed25519)
-
Note the key in "Public key for pasting into OpenSSH authorized_keys file" and save it to a file called
id_ed25519.pub.
-
-
Create a SSH tunnel session entry.
-
Open Putty.
-
In Category, click Session, enter
user@remote_hostnamewhereuseris the account on the remote system that will accept the SSH tunnel connection.remote_hostnameis the host name or IP address of the Kubernetes worker node (or the external load balancer in HA setup), make sure the "Connection Type" is SSH, enter a name of your choice in the "Saved Sessions" section. -
In Category, click Connection > SSH > Tunnels.
The Source port will be 30379 (default port) and for convenience, this example uses the same port as the destination.
For "Source Port", enter the Redis port and for "Destination", enter
127.0.0.1:<port>. In the default case, 127.0.0.1:30379. Press "Add" and you will see something like this: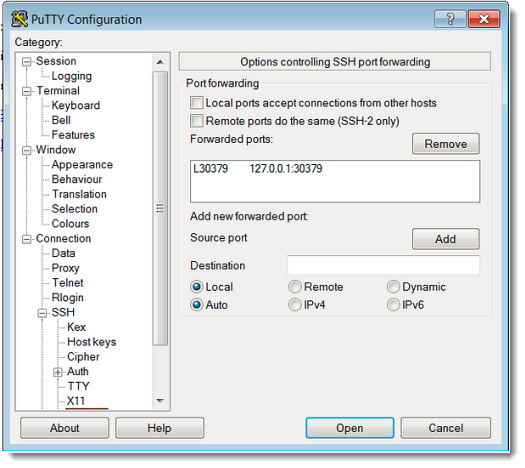
-
Click SSH > Auth > Credentials, provide the saved private key file for authentication.
-
In Category, click Session, select the saved session entry and click "Save" to ensure the changes will be loaded in the future.
-
Configure SSH Key Authorization
Manually copy the contents of id_ed25519.pub from the WebSphere node to the <user home>/.ssh/authorized_keys file on the server that listens 30379. It is typically the external load balancer (for example, HAProxy server) in the HA set up or the Kubernetes worker in a single node environment. The user should be the account that will accept the SSH tunnel connection.
Start the SSH Tunnel
-
In PuTTY on the WebSphere node, select the saved session entry, click Open. Accept the host key if prompted.
A PuTTY session launches.
-
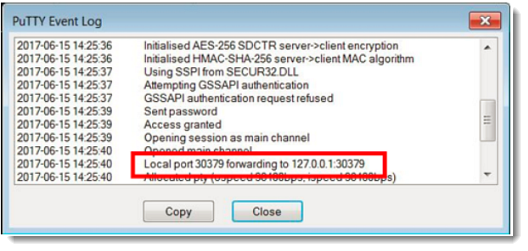
To confirm the tunnel is started properly, right-click on the PuTTY window title and select Event Log.
If the tunnel has been set up correctly, the log will contain an entry informing you of local port forwarding.
Test the tunnel connection
-
Open a Command prompt on the WebSphere node.
-
Start a Telnet session to connect to the tunnel.
telnet 127.0.0.1 30379
Note
When connecting to Redis using telnet, you may not see any response or prompt and the screen can appear blank. This is a normal behaviour. You can still type the Redis auth <password> command to authenticate. Redis will respond once it receives a valid command.
Follow the steps in Validate SSH Tunnels Are Working starting from authenticating with the Redis server to validate that traffic is flowing properly via the SSH tunnel.
Repeat these steps to create SSH tunnel to all WebSphere Application Server nodes.
Parent topic: Enabling and securing Redis traffic to Homepage