Incident Management
Swarming Collaboration Channels for Real-Time Incident Resolution
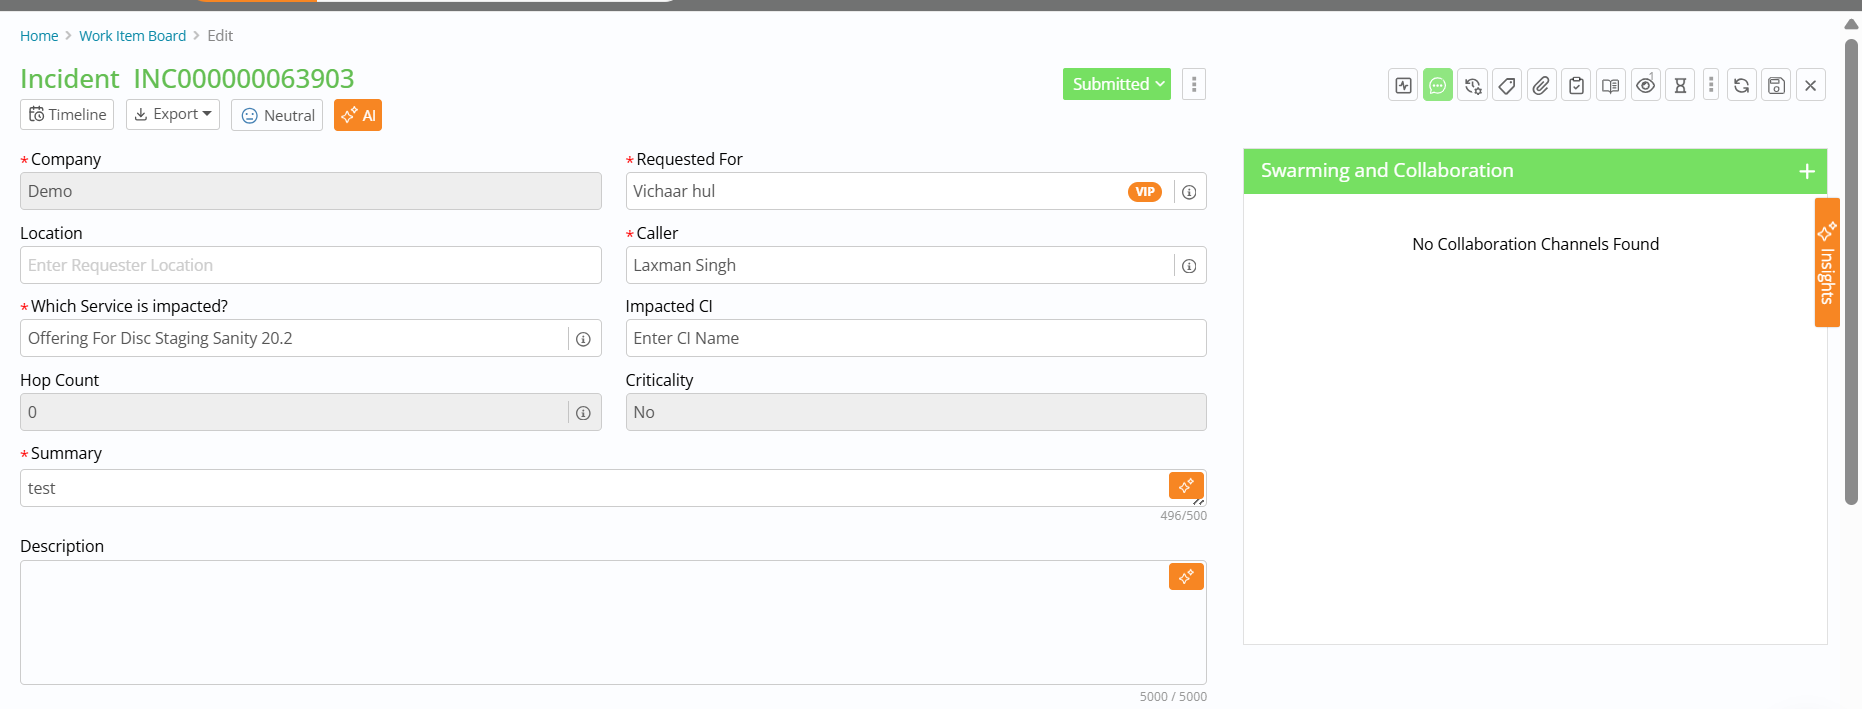
The new Collaboration (Swarming) feature lets incident teams create real-time communication channels (for example Technical, Business, Leadership) directly from the Incident page in BigFix Service Management, on tools such as Slack.
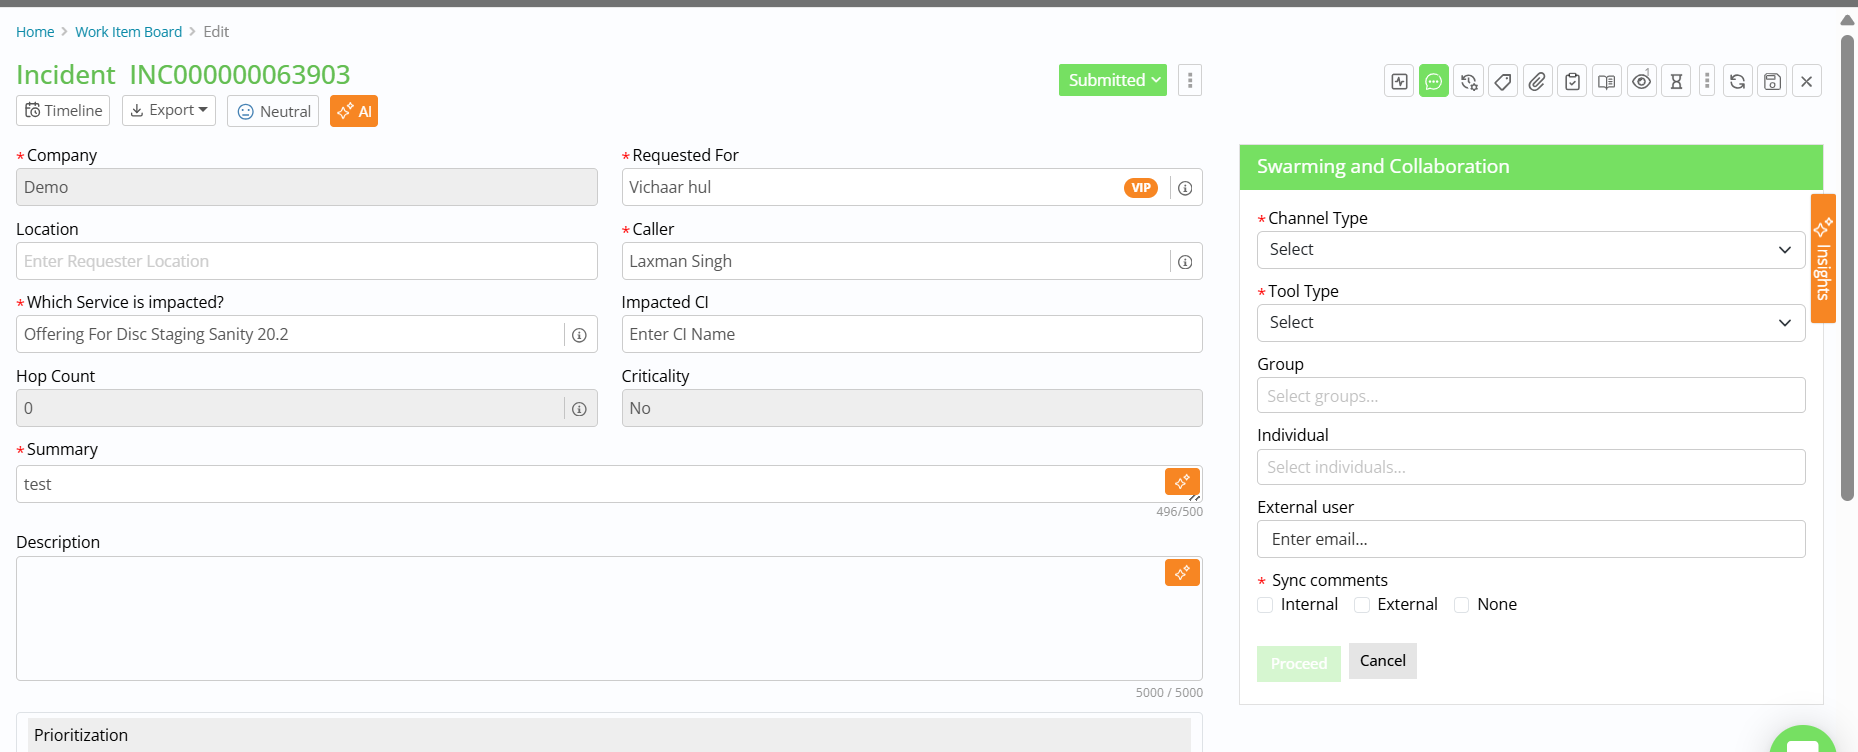
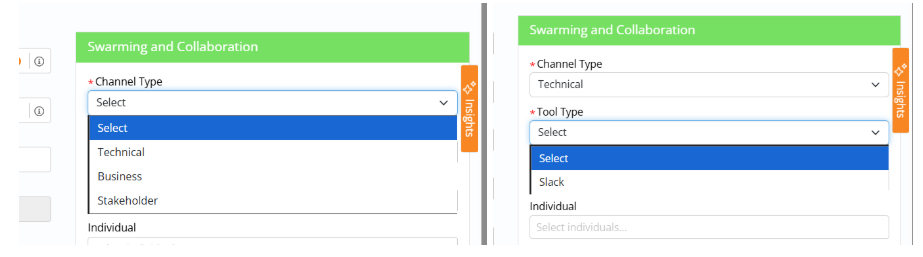
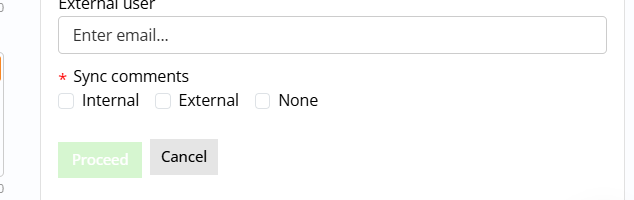
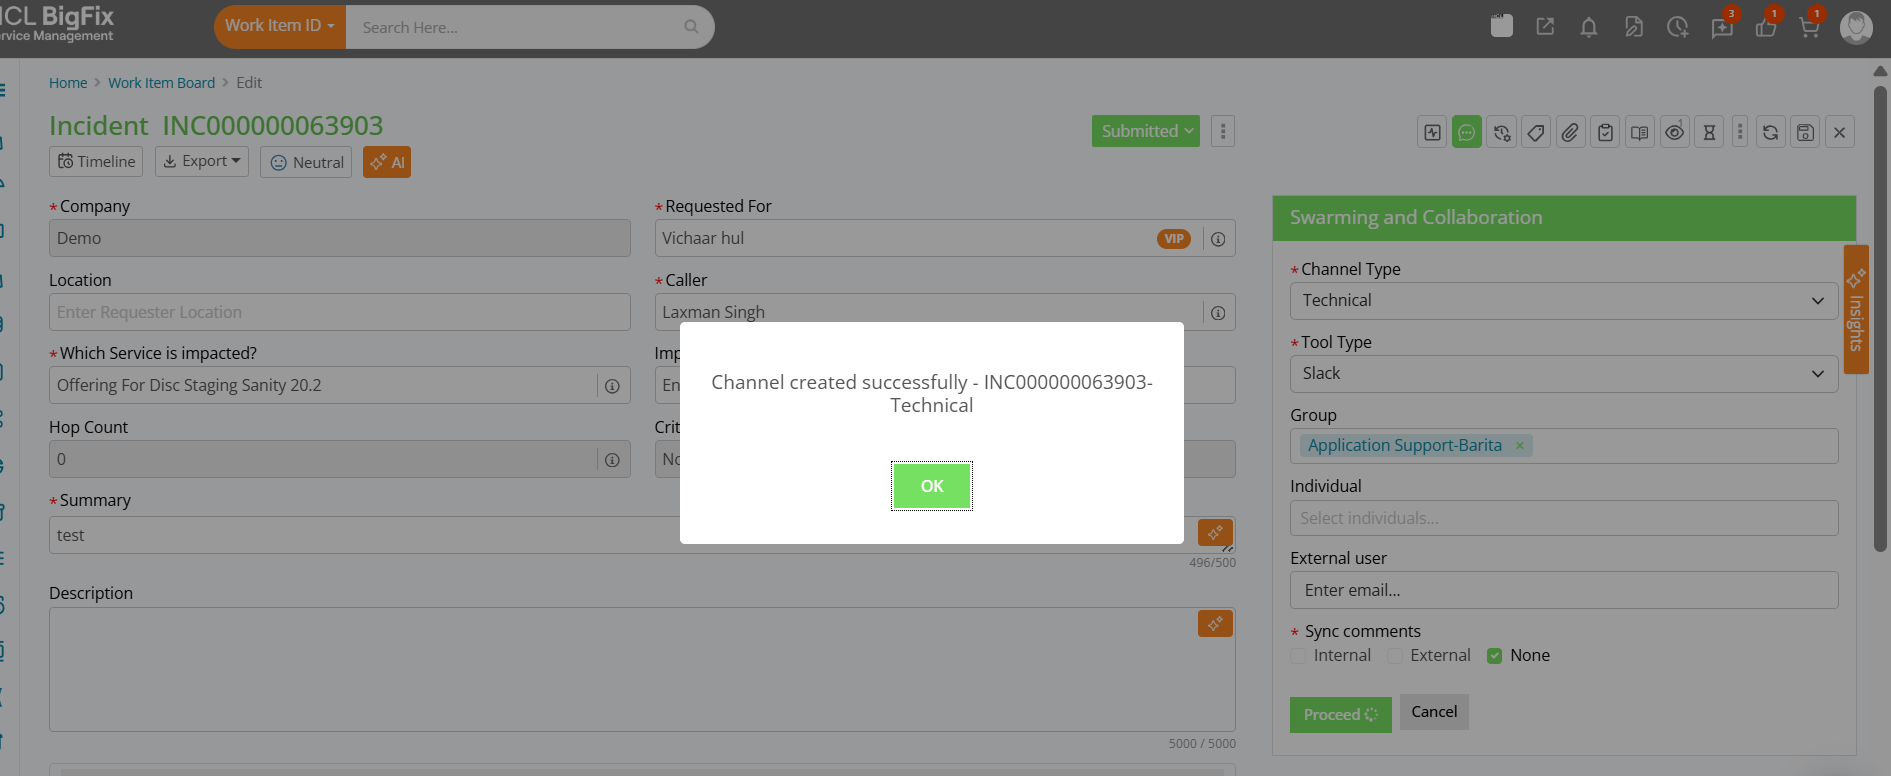
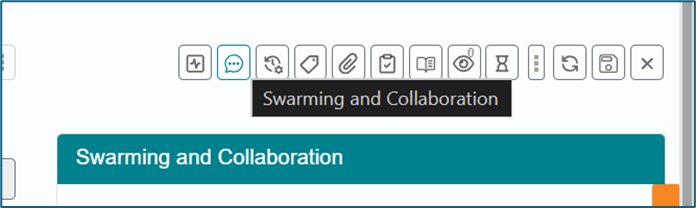
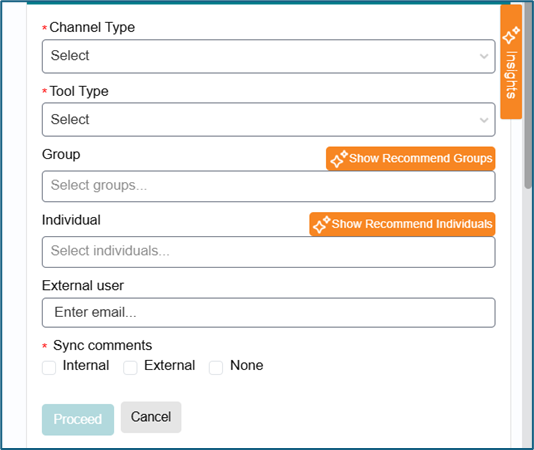
From the Work Item Board, authorized roles (Incident Manager, Incident User, CIM, Service Desk User) open the Incident Edit page, click the Collaboration icon, and use the Add Channel window to choose a Channel Type, Tool Type (currently Slack), add members (groups, individuals, and optional external users), and define comment sync options (Internal, External, or None) before clicking Proceed.
The system auto-generates a channel name in the format IncidentNumber–ChannelType (for example INC000009987-Technical), sends the creation request to Slack, stores the returned channel ID, auto-adds the selected members, and posts key incident details into the channel; duplicate channels of the same type for the same incident are prevented.
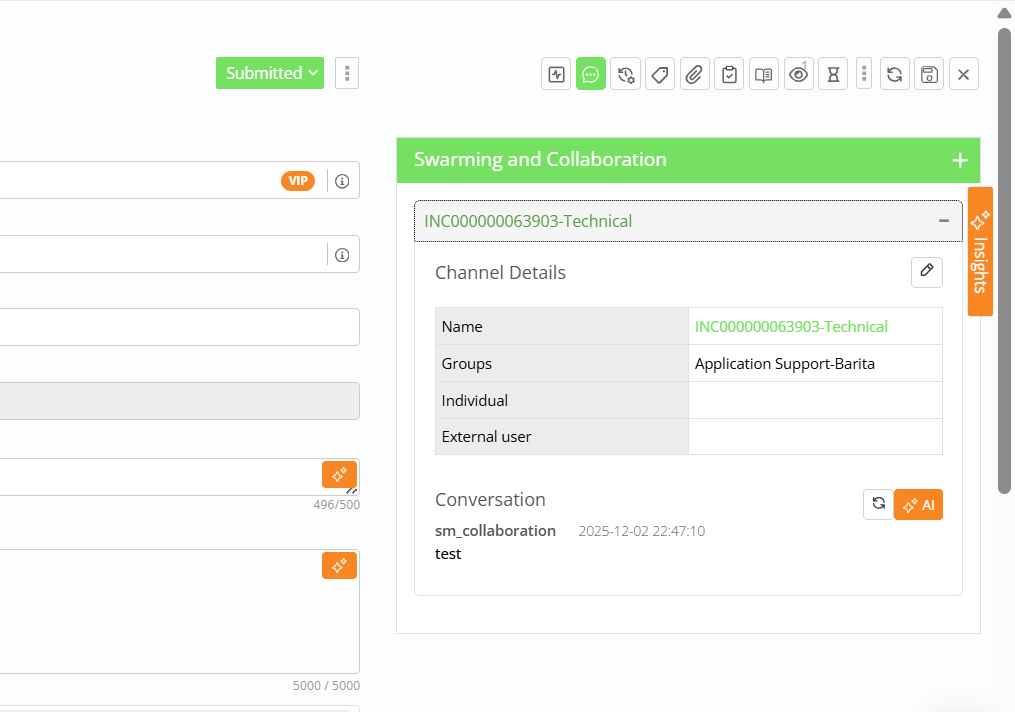
Once a channel exists, users can open it in the tool to edit certain properties and work with live conversations. Channel Type and Tool Type become non-editable after the external channel ID is generated, but members can still be added or removed, comment sync rules can be adjusted (admin-controlled), the External user setting can be updated, and summarization actions are available.
The Conversation section shows messages from Slack in read-only mode with username, user ID, timestamp, and message text, and a Refresh button pulls the latest messages from the external system so the BigFix Service Management view stays up to date.
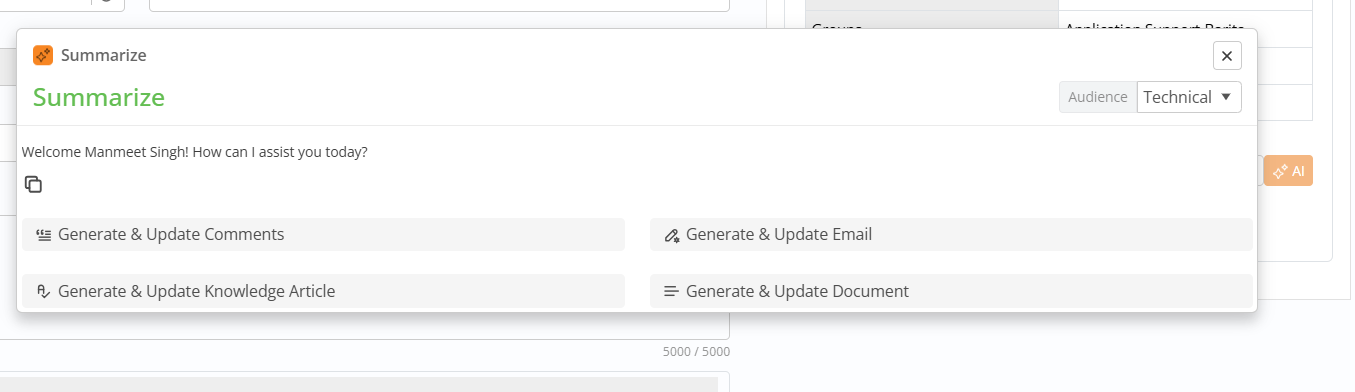
Swarming channels support AI-powered summarization and flexible comment sync. Users can trigger summarization to see the entire channel conversation condensed into readable text, choose between different summary types (such as short or detailed), translate the summary if needed, and post it back as an incident comment.
A configurable Comment Sync section lets admins define whether Internal comments, External comments, both, or None are synced to Slack: if Internal is checked, internal comments sync; if External is checked, external comments sync; both checked syncs both; selecting None disables all sync and disables the other two options, with the rules applied both at channel creation and update time.
BigFix Service Management supports multiple channels per incident (for example separate Technical, Business, and Leadership channels), each with its own membership, conversation history, summaries, and comment sync settings, and only channel types marked as company-specific in Foundation are offered to users. When members are added, Slack sends invitation emails automatically, and BigFix Service Management’s Notify option can send reminders via the Notification Engine to prompt users to join the channel. When the incident is closed in BigFix Service Management, D2C notifies Slack and all channels linked to that incident are archived, preventing unused channels from remaining active while preserving an end-to-end collaboration trail tied to the ticket.
Swarming Recommendation for Incidents
This feature helps support users quickly collaborate with the right teams while handling incidents. The system enables users to use AI to recommend the best groups and individuals for faster resolution.
Swarming Team Recommendation: End users can use AI to recommend Groups and Individuals for collaboration to resolve the ticket. This helps users to get help from the right experts, resolve incidents faster.
This feature can be used by:
- Incident Manager
- Incident User
- Service Desk User
To use the feature:
Step 1: Open Incident
- Go to Work Item Board
- Search and open the required Incident ticket
Step 2: Open Collaboration Window
- On the right side of the page
- Find and click the Collaboration window
- The window will open
Step 3: Select Options;
Choose
- Channel Type (e.g., Teams, Slack, etc.)
- Tool Type
Step 4: Get AI Recommendations (Manual Action)
Users must manually click buttons to get recommendations:
For Groups- Click “Recommend Group”.System suggests relevant support groups based on past data
For Internal Members- Click “Recommend Individual”. System suggests suitable team members
For External Members- User can manually add external users if required.
Step 5: Review & Modify (Optional)
Users can Accept suggestions. Add or remove users manually
Step 6: Start Collaboration
Click Proceed
Swarming starts and continues as per the existing process. The AI recommendations are manual (link-based). The suggestions are based on Past incidents, Data training.
Recommendations depend on Historical data and training.
Users can always edit recommendations.
Editable Custom Attributes Post-Closure
Administrators can now configure which Incident custom attributes remain editable and addable after an Incident reaches a terminal status (Closed, Cancelled). This capability addresses real-world scenarios where additional information needs to be captured or updated after ticket closure without requiring ticket reopening.
A new company-specific admin property "Post-Closure Custom Attribute Update" controls this behavior:
- Stores the list of custom attributes allowed for post-closure editing and addition
- Contains an Enable/Disable flag to activate the feature per company
- Accessible only to users with administrator role
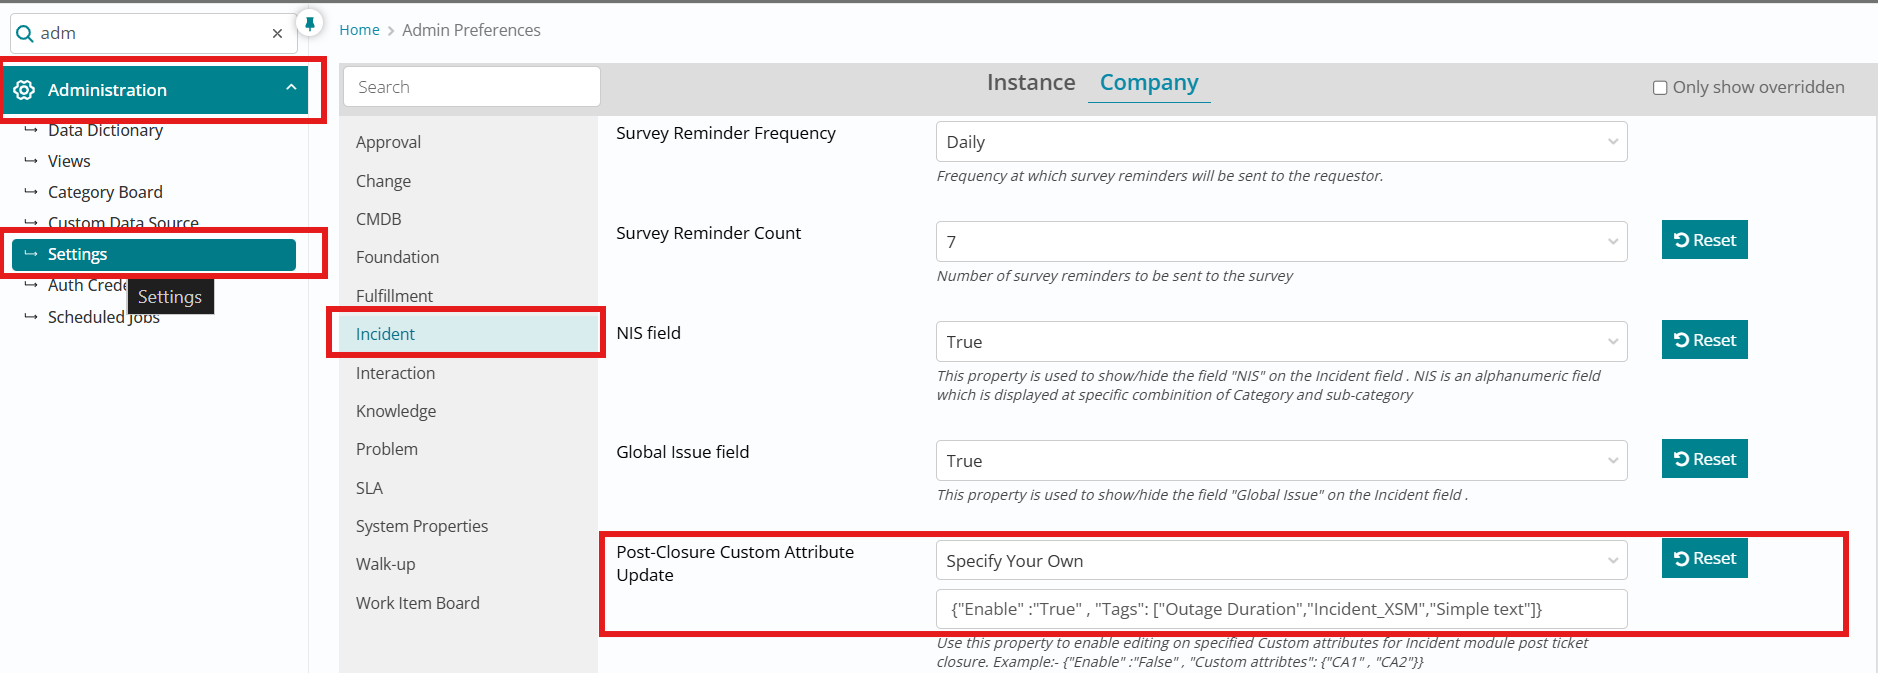
Administrators must set Enable = True if they want to allow the support users to edit Custom attributes at terminal status otherwise set the attribute as False. Administrators also must mention the exact Custom attribute(s) labels which can be edited or added post closure separated by comma in case there are multiple.

This enhancement improves operational flexibility by enabling post-closure data collection for compliance, analytics, or quality management purposes without disrupting the ticket lifecycle or requiring complex workarounds.
UI Behavior on Incident Form (Terminal Status)
-
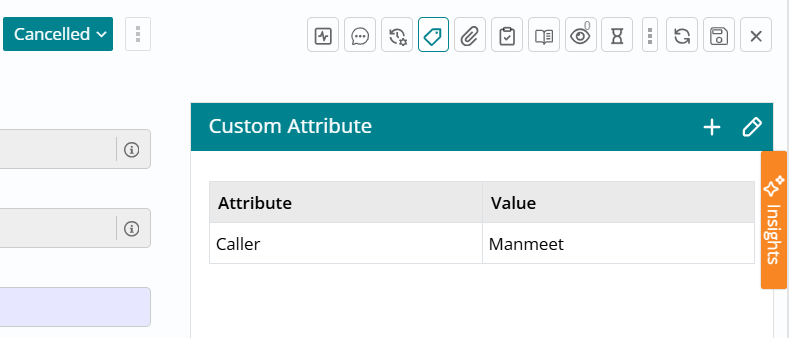
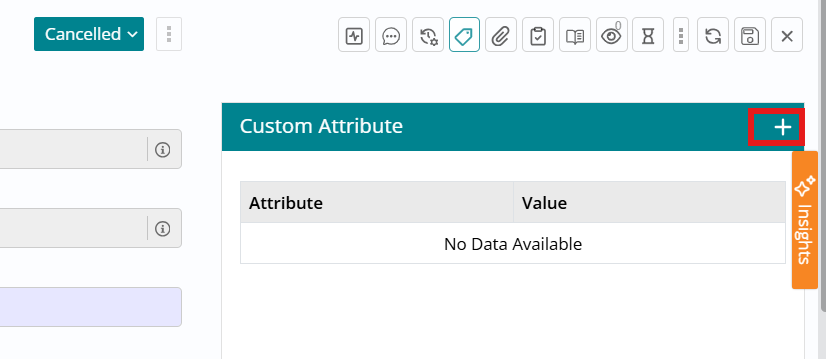
Custom Attribute Section Header
On the Incident form, in the Custom Attributes section header (when Incident is in terminal status) now two new icons are displayed to the Incident Support Users:
- Edit icon (for editing existing custom attributes).
- “+” icon (for adding new custom attributes).
- Editing Custom Attributes (Post-Closure)
When the Incident is in a terminal status:
Upon clicking the Edit icon in the custom attribute section header.- All existing custom attributes are displayed as usual.
- Only attributes which are mentioned in the admin property are editable.
- All other attributes in the section remain read-only.
- Changes are validated as per existing custom attribute validations.
- Valid changes are persisted at the backend in Incident table
- An audit log entry is created for each modified field
Note:Editing is available only when the Incident is in terminal status.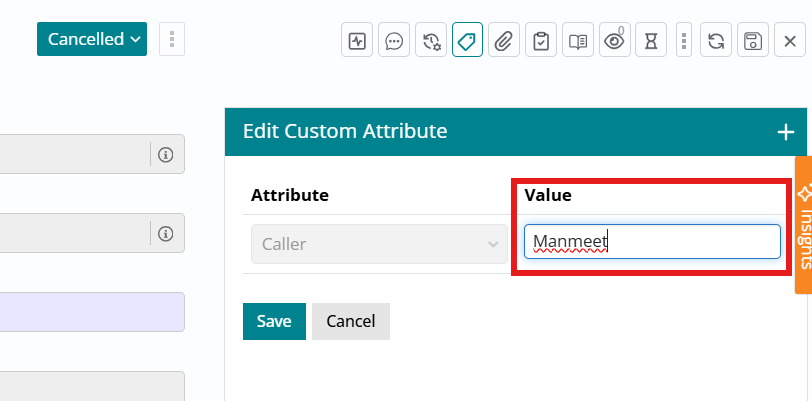
-
Adding Custom Attributes (Post-Closure)
When the Incident is in a terminal status:
- A “+” icon is visible in the custom attribute section header.
- On click, system opens a dropdown listing custom attributes that:
- Belong to the Incident module.
- Are configured in the admin property.
- Are not already added to this Incident.
- Users can then save the Custom attributes which are persisted at the backend.
-
Data Persistence and Audit Logging
On Save (edit or add) in terminal status:- All updated values are stored in the existing tables
- The Change is captured in audit and an audit log entry per attribute changed or added.
-
Security and Permissions
- Only users with appropriate Incident update permissions can:
- Edit allowed custom attributes in terminal status.
- Add allowed custom attributes in terminal status.
- No changes are allowed if the user lacks writing permission, even if the attribute is configured in the admin property.
- Audit entries must always capture the actual user performing the change.
- The validation “Unable to Modify Cancelled/Closed tickets" has been bypassed for only Custom attributes update when the admin setting value “Enabled= True”
- Only users with appropriate Incident update permissions can:
Parent- Child Assignment Group Synchronization
When enabled by administrators, changes to the Assignment Group on a parent incident can automatically update the Assignment Group on all related child incidents, ensuring consistent ownership and reducing manual reassignment overhead in complex incident hierarchies.
Parent-Child Auto Update Property
A new company-specific configuration property controls synchronization behavior for three attributes:
- Status (default: Yes) - Status changes on parents can update child incident statuses
- Support Group / Assignment Group (default: No) - Controls whether Assignment Group synchronizes
- Support Individual / Assignee (default: No) - Controls whether individual assignee synchronizes
Administrators configure this property using JSON format at the company level, enabling granular control over which attributes propagate from parent to child tickets.
Synchronization Rules
When Support Group is enabled and a parent incident's Assignment Group changes:
- System identifies all child incident tickets belonging to the same company that are not in terminal status
- Updates their Assignment Group to match the parent
- Child incident status automatically changes to "Submitted" per existing functionality
- Peer incidents are not affected; only true child incidents are updated
Support Individual Behavior
The interaction between Support Group and Support Individual settings determines assignee handling:
- If Support Individual = "No" and Support Group = "Yes": Child incident's Assignee is cleared when Assignment Group changes
- If Support Individual = "Yes" and Support Group = "Yes": Child incident's Assignee is copied from parent when Assignment Group changes
Admin Configuration Options
The Parent-Child Auto Update property governs how synchronization works at company level:
Status Configuration:
- If set to "Yes": Status changes on the parent incident can automatically update the status on child incidents
- If set to "No": Status changes on the parent incident will not auto-update child incident statuses
Support Group Configuration (Assignment Group):
- If set to "Yes": Child incidents' Assignment Group is automatically updated when the parent's Assignment Group changes
- If set to "No": Child incidents' Assignment Group will not change when the parent's Assignment Group changes
Support Individual Configuration (Assignee):
- Controls whether the Assignee field propagates from parent to child
- Interaction with Support Group setting determines whether Assignee is cleared or copied
All Sync Options Disabled:
If the property is configured so that Status = "No", Support Group = "No", and Support Individual = "No", then changes to the parent incident's Assignment Group, Status, and Assignee will not automatically propagate to child incidents.
Conditions and Limitations
To avoid unexpected behavior and performance issues, the following rules apply:
Same Company Only:
- Only child incidents belonging to the same company as the parent are updated
- Child incidents belonging to other companies are not changed
No Terminal Status Updates:
- Child incidents in terminal status (Closed, Cancelled, Completed) are not modified
- This prevents disruption of completed work and maintains data integrity
No Peer Impact:
- Synchronization applies only to direct child incidents, not peer relationships
- Preserves correct incident hierarchy boundaries
Performance Considerations:
- Large numbers of child incidents may impact performance
- Administrators should consider this when enabling the feature for parent incidents with extensive child ticket populations
Audit Trail
All automatic updates to child incidents are recorded in audit logs as System changes, maintaining complete traceability of automated modifications.
The audit log captures:
- Assignment Group changes triggered by parent updates
- Status changes resulting from synchronization
- Assignee modifications (cleared or copied)
- System user shown as the actor, consistent with existing behavior for automatic updates
Benefits
This enhancement streamlines incident management workflows where parent-child relationships represent coordinated resolution efforts:
- Reduces manual reassignment effort for complex incident hierarchies
- Ensures consistent ownership across related tickets
- Improves coordination for multi-team incident resolution
- Maintains accurate workload distribution
- Supports efficient escalation workflows
- Provides complete audit trail for automated changes
- Eliminates risk of orphaned child incidents with outdated assignments
- Enables centralized control of incident ownership through parent ticket management
Configurable "Reported Through" Field
This enhancement lets you configure the Incident Through (Reported Through) field per company, while still providing a default list of values such as EBonding, Monitoring, Walk In, Email, MyService, Integration, Web, Phone, Chat, Service Request, and Virtual Agent. Administrators can add or modify values for the Incident module through configuration (module = Incident, field = ReportedThrough) using key, value, sequence, and an isVisible flag, so options can exist in the backend without showing in the UI.
Functionally, only the configured values appear on the Incident Create/Edit form. Incidents created from Service Catalog set Through to Web, from E2T to Email, from eBonding to the payload value, from alerts to Monitoring, and from the Chat Bot to Virtual Agent. For copied Incidents, the Through field remains editable until the record is submitted; for all other Incidents it becomes read-only after submission, and the same Through value is preserved when creating new Incidents via Copy Incident or Propose Incident from Incident/Problem modules.
| Field | Key | Value |
| ReportedThrough | EBonding | 75 |
| ReportedThrough | Monitoring | 60 |
| ReportedThrough | Walk In | 80 |
| ReportedThrough | 30 | |
| ReportedThrough | MyService | 55 |
| ReportedThrough | Integration | 70 |
| ReportedThrough | Web | 50 |
| ReportedThrough | Phone | 35 |
| ReportedThrough | Chat | 100 |
| ReportedThrough | Service Request | 105 |
| ReportedThrough | Virtual agent | 45 |
Incident Templates
Users who frequently create similar Incidents can now save and reuse pre-defined Incident data through the Templates feature, significantly reducing data entry time and improving consistency across recurring Incident types.
The Templates capability enables users to capture commonly used field combinations as reusable templates, then apply those templates to pre-fill new Incident forms with a single click. This streamlines repetitive Incident creation workflows such as standard maintenance windows, recurring service requests, or category-specific Incidents that share common attributes.
Roles and Entitlements
Two role-based entitlements control template functionality:
Template Owner (template_owner role):
Users with any Incident creation role (Incident User, Incident Manager, Critical Incident Manager, or Service Desk) plus the template_owner role can create and save templates. Template owners can define template accessibility as either Self (personal use only) or Groups (shared with specific assignment groups).
Template User (template_user role):
Users with any Incident creation role plus the template_user role can search for and apply templates they are entitled to use. Entitlement is determined by template accessibility settings—users see templates they own or templates shared with groups they belong to, limited to the Incident module.
This role separation enables organizations to control who can create reusable templates while allowing broader access for template consumption.
Creating and Saving Templates
On the Create Incident page, users with template_owner role access the template creation function through a three-dots icon displayed next to the Search Template field. Clicking this icon reveals the "Save as Template" option.
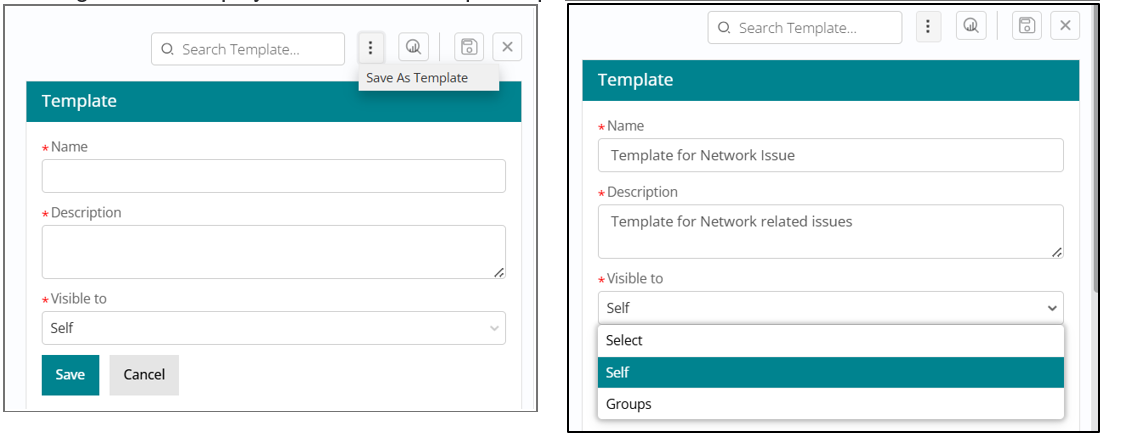
When "Save as Template" is selected, the system captures the current state of the Incident form and presents a dialog prompting the user to specify:
- Template Name – A descriptive identifier for the template
- Description – Details about the template's purpose or use case
- Template Accessibility – Self (personal) or Groups (shared), with Self as the default selection
Templates can be saved at any stage of form completion—even if mandatory Incident fields are not filled or if the form is completely blank. This flexibility supports various use cases, from partial data templates to comprehensive pre-filled forms.
Upon successful save, a confirmation message appears and the template is stored in the templates table with its accessibility settings. The user is automatically redirected to the My Templates view to review and manage their saved templates.
Using Templates During Incident Creation
Users with template_user role access templates through a Search Template field positioned at the top right of the Incident create form. This field displays only templates the logged-in user is entitled to use based on template accessibility settings and group membership.
Template Selection Prerequisites
Fill from template functionality is enabled only after a Company is selected on the Work Item record. If a user attempts to select a template before choosing a company, the system displays an error message instructing the user to select the company first.

Once the Company field is populated, the Search Template dropdown displays the list of available templates filtered to the Incident module and the user's entitlements.

As the user types into the Search Template field, the dropdown dynamically filters template names to match the typed text, enabling fast template discovery in environments with many saved templates.
Important: Applying a template only pre-fills the form. Users retain full control to modify any populated values, add additional data, or adjust fields before saving the Incident record. This ensures templates serve as starting points that accelerate data entry without constraining user flexibility.
Add New User from Incident Form
Support users working in the Incident module can now create new user profiles directly from the Incident form when the Requested For user's profile does not exist in the BigFix Service Management database. This capability streamlines the incident logging process by eliminating the need to navigate to separate user administration screens.
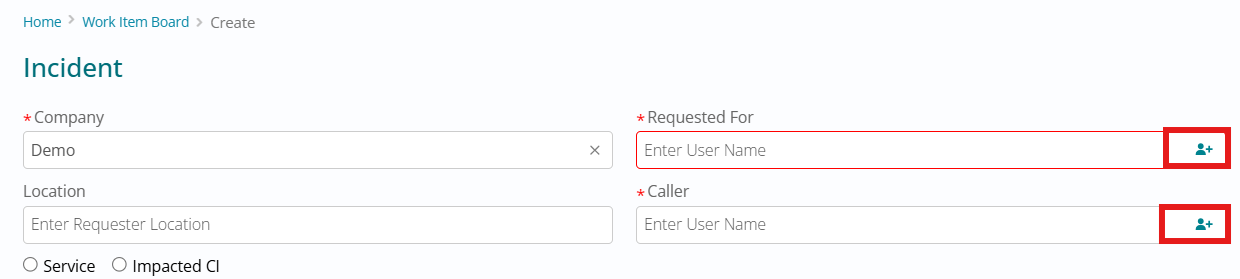
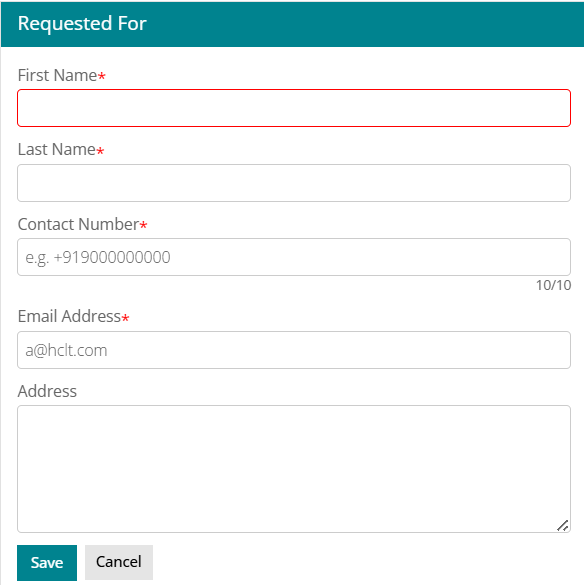
Users access this functionality through an "Add User" icon displayed on the Requested For and Caller fields. Clicking the icon opens a form in the right panel where support users enter the required information to create the new user profile.
Four mandatory fields must be completed: User's First Name, Last Name, Contact Number, and Email Address. Upon save, the new user profile is created for the selected Company as a Guest User with the default role of "Service Consumer". The support user can then immediately select the newly created user in both the Requested For and Caller fields, allowing incident logging to proceed without interruption.
This enhancement eliminates context switching between modules, reduces incident logging time, improves service desk efficiency, ensures consistent user data capture, removes dependency on administrator intervention for urgent incident logging, and supports faster resolution of user issues by eliminating delays in ticket creation.
Global Incident Flag
A new field on the Incident form enables support users to tag incidents as Global Incidents, identifying issues that impact a large user base or span multiple geographies. This capability improves visibility into organization-wide service disruptions and supports coordinated response to widespread issues.
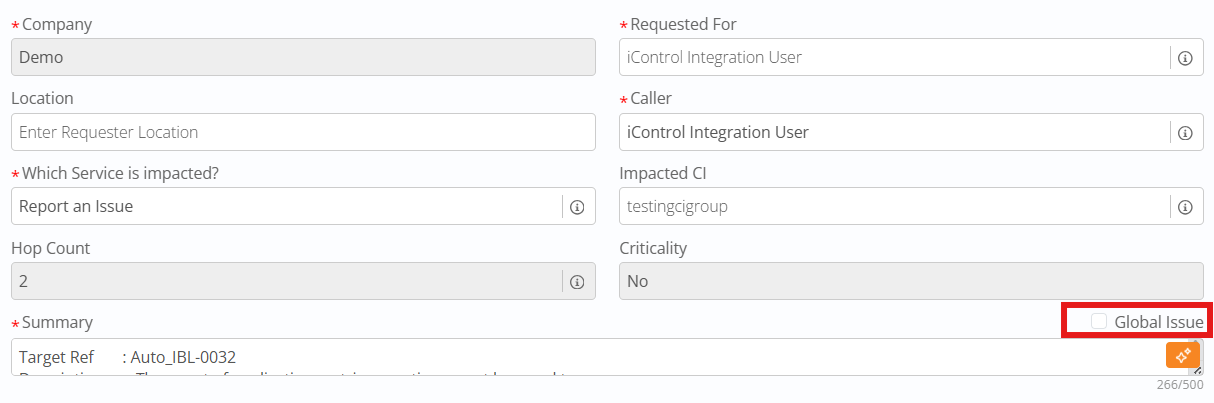
By default, the Global Incident field is set to False for all new incidents. Users may change it to True at any point in the incident lifecycle, except when the incident is in a terminal status (Closed, Cancelled, or Fixed). This ensures accurate historical data while preventing modifications to completed incidents.

The Global Incident column can be added to incident list views through standard list personalization, enabling support teams to quickly filter and identify organization-wide issues when reviewing work queues.
Reports can be created using the Global Incident flag, enabling users to identify Global Incidents and their related child tickets for analysis, trend identification, and impact assessment.
The visibility of the "Global Issue" field is controlled by an administrator setting named "Global Issue Field" under the Incident section.
With a default value of False, this property can be set to True to make the Global Issue field visible for specific tenants that require this capability.
Auto-Resolve Related Incidents on Problem Closure
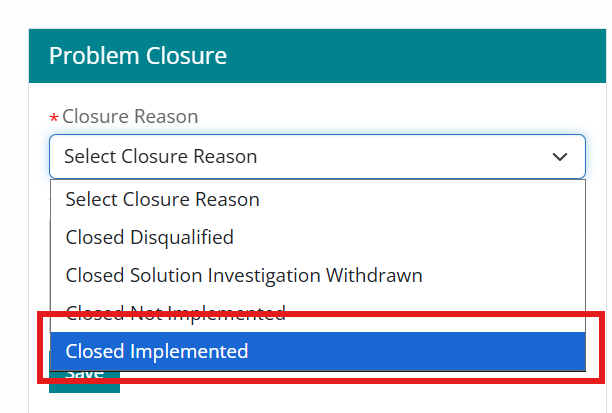
This enhancement allows tenants to automatically update and resolve all open related Incidents when a Problem ticket is permanently resolved with Closure Reason = “Closed – Implemented.”
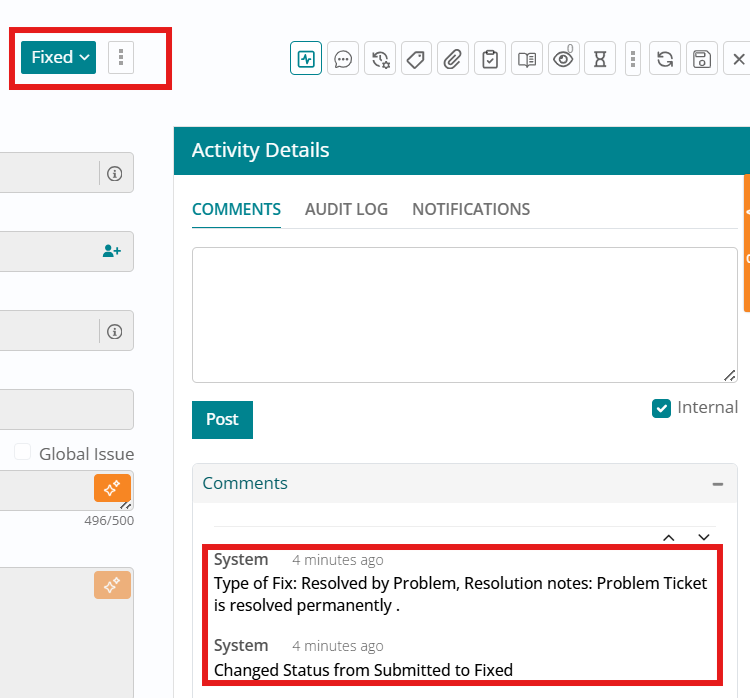
When enabled, the system identifies all open Incident work items linked via Related Work Items to that Problem and, on closure, sets each Incident’s status to Fixed, populates the Incident Resolution fields with default values (Type of Fix = Resolved by Problem), and copies the Problem’s closure/resolution notes into the Incident’s Resolution Notes, after which the Incidents follow the existing closure workflow (for example, direct closure or auto-closure from Fixed). This behavior applies only to the Problem Management and Incident Management modules, affects only open related Incidents (closed/cancelled Incidents are ignored), and is triggered exclusively when the Problem is closed with the “Closed – Implemented” reason.
Control over this automation is provided via an admin property “Update related Incidents on Problem Closure”, configured per tenant/company in BigFix Service Management admin settings.
When this property is set to true, the automation is active: closing a Problem as “Closed – Implemented” copies its closure notes to all open related Incidents’ Resolution Notes and sets their status and Type of Fix accordingly; when set to false (the default), no automatic updates occur, and support users must manually resolve or close related Incidents regardless of how the Problem is closed.
If the Problem is closed with any other closure reason (for example, not Closed – Implemented), no automatic updates are performed on related Incidents irrespective of the property value, leaving teams free to manage them case by case.

For support users, this feature shifts some responsibilities while preserving governance. To leverage the automation, they must ensure all relevant Incidents are correctly linked to the Problem, enter clear and complete closure/resolution notes in the Problem (since these will appear on the Incidents), and then close the Problem with Status = Closed and Closure Reason = Closed – Implemented.
If an Incident did not update, users are advised to check that it was still open at the time of Problem closure, properly linked, closed with the correct reason, and that the admin property is set to true; organizations preferring full manual control can keep the property at false so the linkage remains informational only, with no automated status changes.

Add New User from Incident Form
This enhancement lets support users in the Incident module create a new user in Foundation directly from the incident form when the Requested By or Requested For user does not exist. By clicking the Add User icon on these fields, a side panel opens where the agent enters the mandatory details: First Name, Last Name, Contact Number, and Email Address.
On saving, a new profile is created for the selected company as a Guest User with the default Service Consumer role, and the newly created user becomes immediately selectable in both Requested By and Requested For (Caller) fields.
.png)
.png)
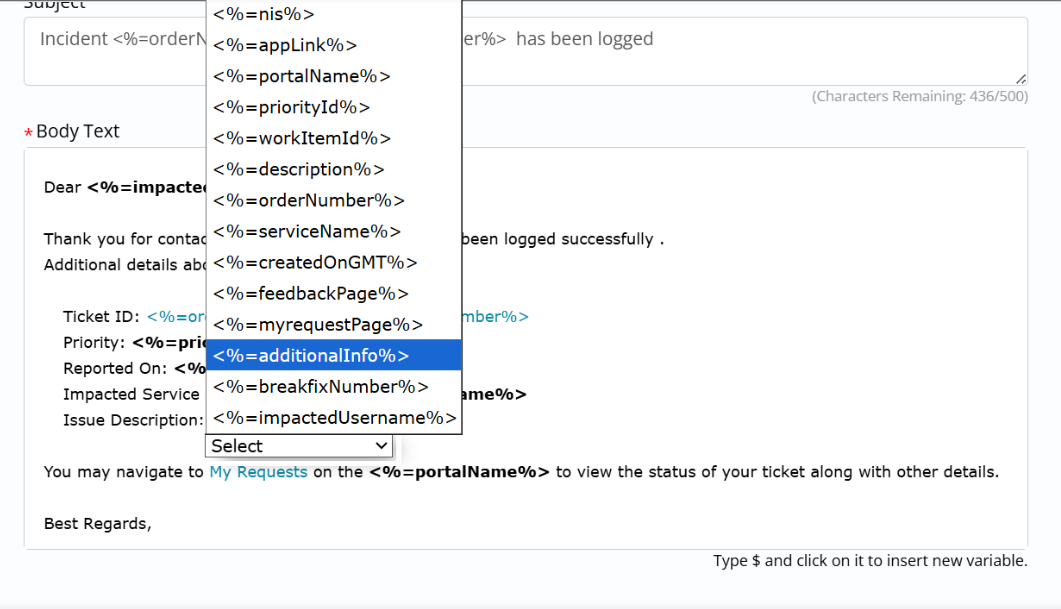
Use 'Additional Information' in Incident Notification Templates
The Additional Information field available to notification admins when designing or editing incident email templates. The field has now been added across all incident notifications, and admins can update default templates or create custom ones that include this attribute as needed.
A new template variable, <%=additionalInfo%>, is now exposed for use in custom email templates for the following notifications:
- Incident Submitted – Notify Assignment Group
- Incident Reassigned to a Group – Notify Assignment Group
- Incident Fixed – Notify Requestor
- Incident Submitted – Notify Requestor
- Incident Submitted – Notify Assignment Group (Requested For)
- and Incident Submitted – Notify Requested For.
This ensures any additional context captured on the incident is consistently communicated to both requestors and assignment groups in notification emails.
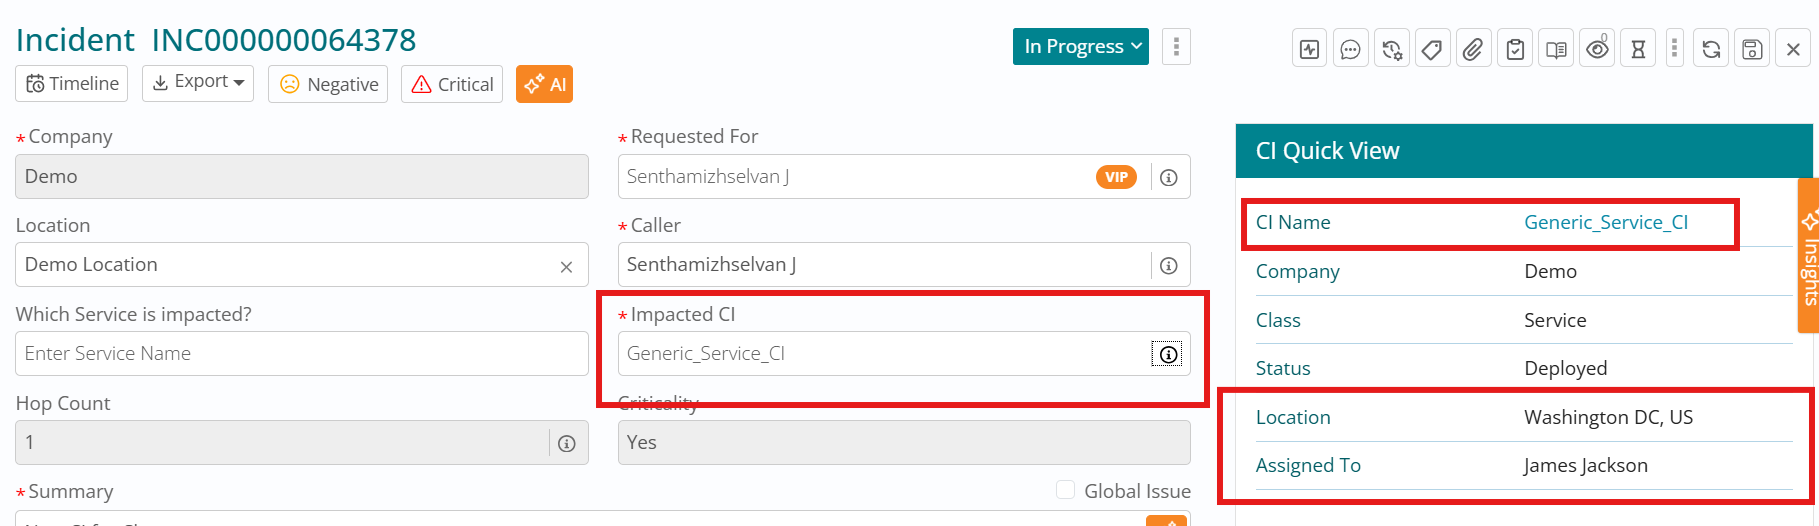
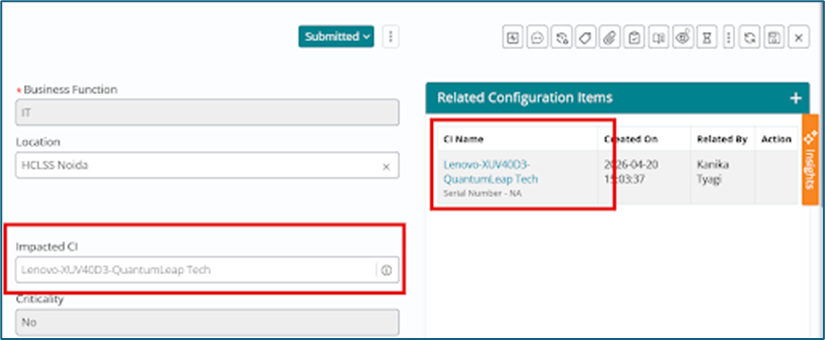
Enhancements to Impacted CI Field on Incident Form
On incident form (work item board), specifically in the Impacted CI field, when we search for an existing CI and populate it, an information icon is visible and upon clicking it, a CI Quick View opens towards the right of the screen. This CI quick View has been enhanced to show the details Location and Assigned To along with the existing details like - CI Name, Company, Class, and Status.
When this CI quick view opens upon clicking the information icon against a populated Impacted CI field on the incident form, then the first detail in this quick view is CI Name. Hyperlink to the CI Name attribute has been added such that when it is clicked upon, the CI record / form opens in a new tab.
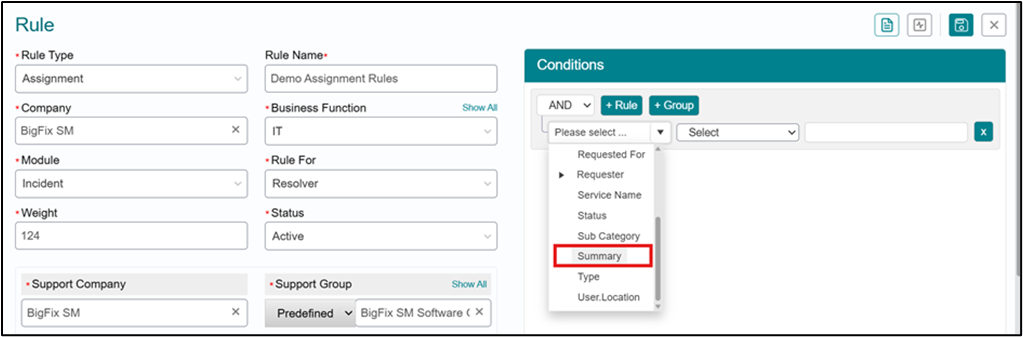
Automatic Routing basis Keyword in Incident Summary
Here we define the requirements and process design for implementing automated ticket routing for incidents within the BigFix Service Management platform based on the Incident’s Summary.
The business objective is to ensure incidents are automatically routed to specialized support teams with appropriate technical expertise, reducing manual triage effort and improving first-contact resolution rates. Currently, support agents manually review incoming tickets and assign them based on content analysis, which introduces delays, increases risk of misrouting, and creates dependency on agent availability
Summary Field Attribute for Rules Condition Builder - The system shall add the Summary field from the Incident module as an available attribute in the Rules Condition Builder interface, enabling rule admins to create conditions based on summary field content.
Users with appropriate permissions shall be able to create all rule types, specifically assignment rules, using the Summary attribute as a condition parameter
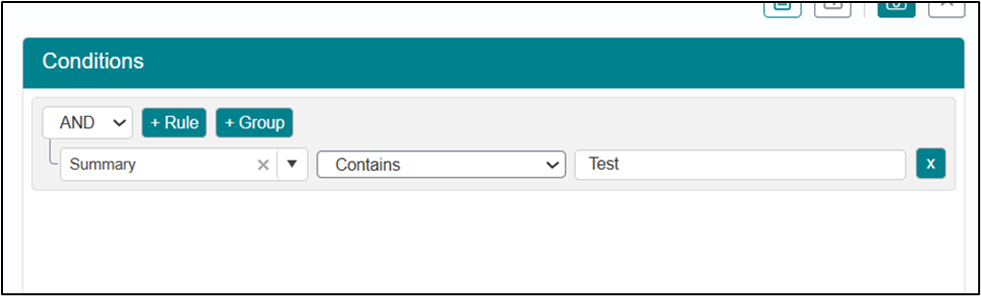
Contains Operator Support - The system shall support 'Contains' operator for Summary field evaluation, enabling substring matching for keyword detection
Rule Execution Timing - The assignment rule shall execute immediately upon ticket creation or upon summary field modification before ticket submission.
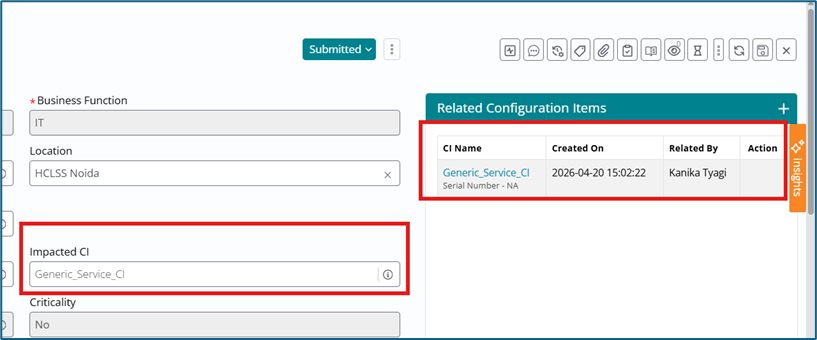
Updated Impacted CI Reflected in related CIs
When an Incident is created with an Impacted CI, it correctly appears in Related CI.
However, when the Impacted CI is updated/changed, the new CI does not get reflected in Related CI, which is incorrect behavior.
When Impacted CI is updated:
- The system now ensures that updating the Impacted CI triggers the necessary WI–CI relationship update via CMDB,.
- Related CI section reflects the latest Impacted CI (i.e., the relationship shown is updated/replaced to the new CI, rather than accumulating multiple CIs).
Business/User Impact
- Prevents stale or incorrect Related CI information after Impacted CI edits.
- Restores expected CI traceability for Incident records, aligned with CMDB relationship integrity.
Mandatory "Caused by Change" and "Caused by Fulfillment" fields on Incident Form
Introducing mandatory "Caused by Change" and "Caused by Fulfillment" fields on Incident form to be filled on its resolution
Benefits:
- Prevents “Fixed” incidents that are known to be caused by a Change or Fulfillment/Service Request but have no relationship created.
- Enables reporting/analytics like “Incidents caused by changes”.
- Mandatory questions on Incident
Functional Requirements
- Mandatory questions on Incident
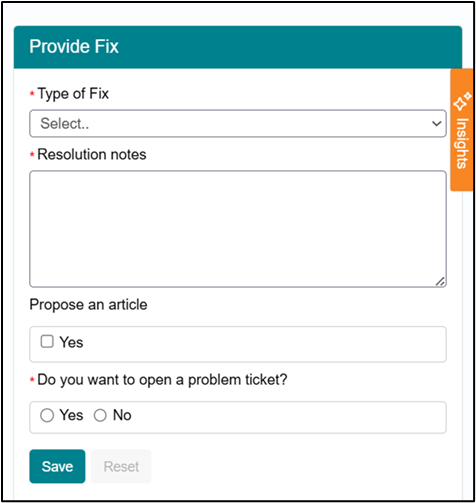
Addition of two mandatory radio-button fields on Incident:
- Caused by Change?
- Caused by Fulfillment?
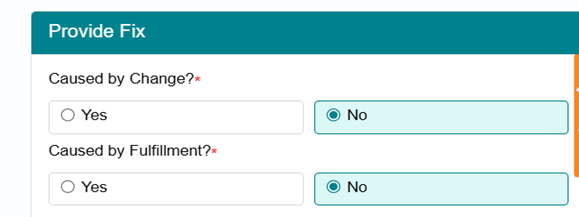
Field type: Radio button, values Yes/No, default = No
Mandatory timing: Must be answered before moving Incident to “Fixed”.
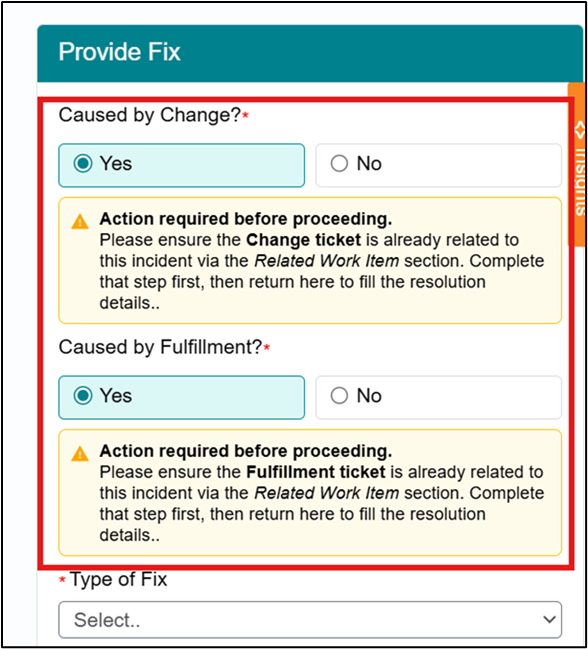
- Mandatory reference when “Yes”
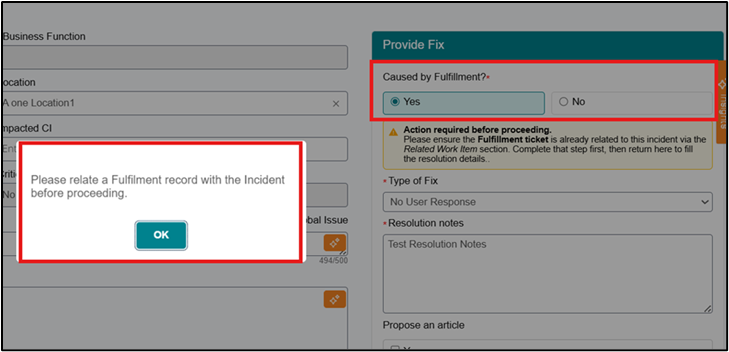
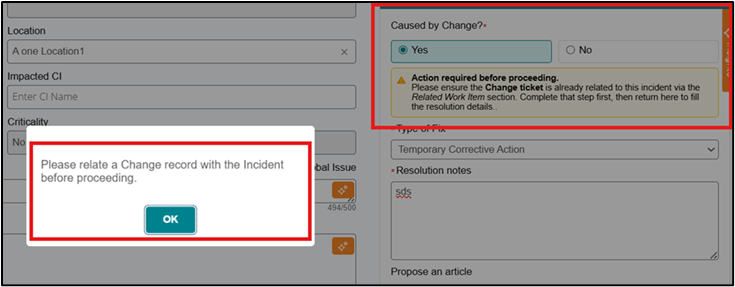
If user selects Yes for either field:
- The system must enforce a mandatory linkage (relationship) between Incident
and:
- Change record, and/or
- Fulfillment record
Validation: Block transition to Fixed until a valid record is related in the Related WI section
- Behavior when “No”
If user selects No for both:
- No relationship enforcement needed.
- Incident can proceed to Fixed.
- Company-configurable visibility
- Fields must be visible only if enabled via admin setting
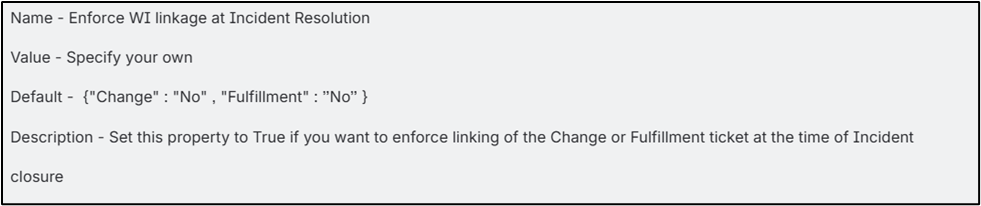

“Yes/No” values are case-insensitive
If admin setting is set to No for both Change and Fulfillment then no fields are visible on UI as shown below-
- System validations implemented
- If “Yes” is selected but the relationship is missing, a user-facing error is displayed prompting relationship creation.
Data & reporting
Added:
- “Caused by Change?” and “Caused by Request?” values in main Incident list
- The relationship is stored and audited .
- Can be added in Incident reports manually if needed by admins via reporting engine tool

Validation Rules
- If Caused by Change = Yes → require Incident has at least one related Change work item.
- If Caused by SR = Yes → require Incident has related Fulfillment record
- If a user attempts to move to Fixed without required relationships → block and display error message.
Important notes
- If “Yes” is selected but the relationship is missing, a user-facing error is displayed prompting relationship creation.
- Data & reporting
- Added:
- “Caused by Change?” and “Caused by Request?” values in main Incident list
- The relationship is stored and audited.
- Prevents “Fixed” incidents that are known to be caused by a Change or Fulfillment/Service Request but have no relationship created.
- Enables reporting/analytics like “Incidents caused by changes”.
Duplicate Tickets Prevention from Email Auto-Replies
This enhancement improves the E2T (Email-to-Ticket) integration for NE-D2C by intelligently handling out-of-office (OOO) and other automated replies so they no longer create duplicate or unwanted tickets. Previously, when a user sent an email to the E2T mailbox, the system created a ticket and then sent a notification back to the user, whose auto-reply would be received again and processed as a new request, resulting in noise, manual cleanup, and reduced efficiency.
The new behavior introduces logic to detect such auto-generated responses and prevent them from being treated as fresh ticket requests.
To enable this control, an environment variable named block_auto_replies has been introduced, configured with the value Auto-Submitted: auto-generated so the system can reliably identify automatic responses at the header level. When an email hits the E2T mailbox, the system checks the message headers against this variable, along with existing mailbox filter properties, and if a match is found the email is ignored instead of creating a ticket. This ensures that the first user email still creates a ticket and sends a confirmation, but subsequent auto-replies no longer generate duplicate records.
When users reply to an existing email, the system will: Identify the correct ticket - Update the same ticket & Not create a new ticket.
How it Works now (Email to Ticket):
Every ticket email now contains Watermark ID. This Watermark acts like a unique reference number for that ticket.
When you send an email: If you are replying to an existing ticket email; System reads the Watermark ID Finds the correct ticket, Updates it with your reply on comment section.
If you send a fresh email (no Watermark ID)-
- System treats it as a new request
- A new ticket is created
Benefits
- Prevents duplicate tickets when users reply to existing ticket emails.
- Keeps conversations attached to the correct record for better tracking.
- Reduces manual cleanup and improves service desk efficiency.
Email-to-Ticket Reply Handling
This feature improves how the system handles incoming emails.
Earlier, Emails without a watermark always created new tickets. But now, the system can also update existing tickets using the ticket number in the subject line avoiding duplicate tickets and improves usability.
1. When Watermark is Present
- System reads the watermark (Email Communication ID)
- Finds the correct ticket
- Updates the same ticket
This is the highest priority logic
2. When Watermark is NOT Present
The system checks the email subject line, finds the ticket number (example:
INC0001234) & Checks if the ticket exists.
| Condition | System Action |
|---|---|
| Ticket number found & exists | Update existing ticket |
| Ticket number not found | Create new ticket |
In case there are Multiple Ticket Numbers in Subject
Example:
Re:
        INC0001234 | INC0005678 issue update
The System will Pick only the first ticket number (in case of this example: Update INC0001234)
Sender Validation (Important)
Before updating any ticket, the system checks: Is the sender authorized user? Does the sender belong to the same or allowed company?
If validation fails:
- Ticket will NOT be updated
- System may create a new ticket or ignore (based on configuration)
Key Benefits of this feature include:
- Reduced duplicate ticket creation
- Improved email handling efficiency
- Better user experience
- Works even when watermark is missing
Important Rules
- Watermark logic always has higher priority
- Subject line is used only if watermark is missing
- First ticket number is considered if multiple exist
- Sender must be authorized and valid