Administration Enhancements
Centralized Authorization Service
This document summarizes the key concepts for the HCL BigFix Service Management (BFSM) Authorization Service.
The evolution from a decentralized to a centralized authorization model is driven by the limitations of the legacy system.
In the legacy system, authorization is enforced locally within each microservice.
| Component | Description |
| Authorization Enforcement | Embedded/Local Scope within each microservice (e.g., Domain Service X, CMDB service, D2C service). |
| Access Control | Hardcoded on the UI and within all APIs. |
This decentralized approach leads to significant challenges:
- Rigid and Hardcoded Security Logic: Authorization rules are hardcoded into front-end forms (for UI visibility) and individual API codebases, preventing a unified security view.
- Operational Inefficiency and Scalability Issues: Updating rules requires manual code enhancements, making the system non-scalable.
- Performance and Reliability Risks: All authorization requests land on the domain service, creating a performance burden and risk of service degradation during high traffic.
The future state involves centralized and configurable access controls managed by a dedicated Authorization Service
| Component | Description |
| Authorization Enforcement | Centralized/Configurable via the Authorization Service. |
| Access Control | Hardcoded access controls are removed from APIs and made configurable via the Authz service. |
| UI Control | Configurable role-based access on forms via the UI builder. |
The key benefit is that the Authorization Service acts as a central check: Is the request authorized? Authorized requests are then passed to the domain services.
Key Benefits of Centralized Service- Source-Level Blocking (The "Shield"): RBAC via the central Authz engine enables a "Fail Fast" mechanism. Unauthorized requests are blocked immediately at the entry point (API Gateway/Authz), significantly reducing load on downstream domain services.
- Accelerated Delivery for Custom Access Control: Access control enhancements follow a streamlined 2-step process: Configure pages via UI Builder, then Decouple/Remove legacy hardcoded checks from the API layer.
The service uses two main access control models and a comprehensive security model.
RBAC and ABAC| Concept | Definition | Logic | Advantage/Limitation |
| RBAC (Role-Based Access Control) | Access permissions are granted strictly based on the user's Job Function or Title. | "I am a [Role], therefore I can [Action]." | Broad & Static; access cannot be restricted based on specific data scenarios. |
| ABAC (Attribute-Based Access Control) | Access permissions are granted based on Contextual Attributes (User, Record, and Request data) combined with logical conditions. | "I can [Action] IF my [Attribute] matches the record's [Attribute]." | Fine-Grained & Dynamic; allows surgical precision (e.g., "Managers can edit their own department's data when status is 'Draft'). |
The 360° Security Model
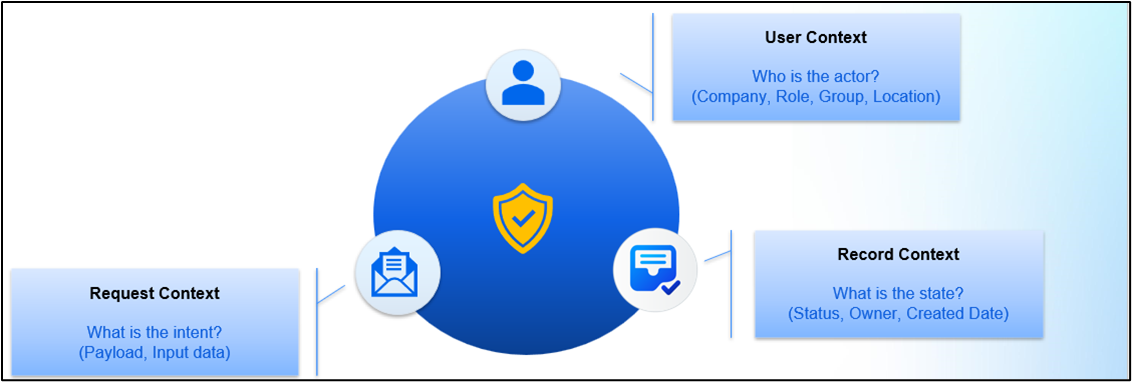
True authorization ensures every transaction is contextually safe by evaluating three contexts simultaneously:
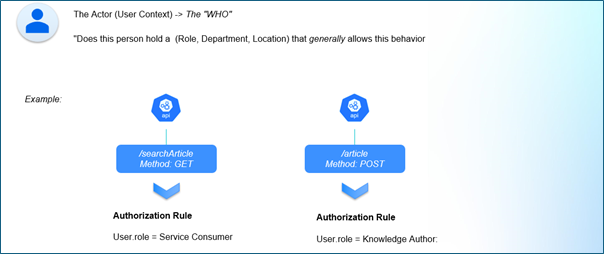
- User Context (The "WHO"): Who is the actor? (e.g., Company, Role, Group, Location).
- Request Context (The "INTENT"): What is the intent? (e.g., Payload, Input data).
- Record Context (The "STATE"): What is the state of the data being touched? (e.g., Status, Owner, Created Date).
The User Context
The Request Context
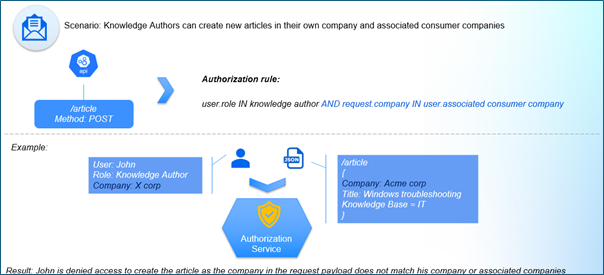
The Record Context
Resource Registry
A resource is any digital asset or data entity that requires an access decision. It is the "target" of an authorization policy.
| Registry Type | Resource Category | Impact |
| Resource Registry | API | Supports Granular Rules for specific actions. |
| Data Dictionary | Table | Supports table-based rules. |
API-to-Table Mapping
Core Concept: Unified Resource Mapping.
Instead of treating every API as an isolated endpoint, each API is mapped to its underlying data source (database table). This anchors authorization to the Data Asset, not just the network endpoint.
This mapping provides Immediate Value (Context-Aware Policy Authoring) and Future-Proofing by setting the foundation for:
- Table-as-a-Resource: The table becomes the primary protected unit.
- Policy Deduplication: A single table-based rule will automatically cover all related API endpoints ("Write Once, Protect Everywhere").
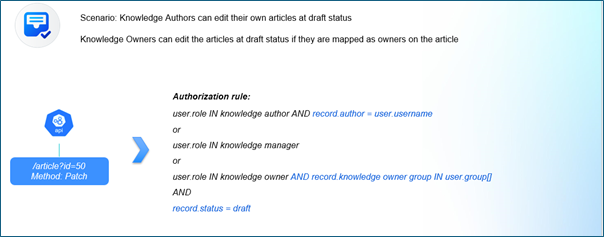
As an admin, you may need to restrict edit access so that Knowledge Owners can only update the articles they are mapped to. This can be achieved by creating an authorization rule in the system.
Steps to Create the Rule
- General Info: Provide the Company, Business Function, Rule Name, and a clear Description for the rule.
- Role Mapping: Select the role(s) for which this rule is being created.
- In this use case, select the role Knowledge Owner.
- API Selection: Choose the API on which the rule will apply.
- To filter APIs, select the Service (Knowledge), the Table in context (Article), and the Method (Patch, for updates).
- From the filtered list, select the API that provides edit access for articles: /sxkm/article.
- Pre-requisite
- Effect: Decide whether the rule should Allow or Deny access.
- For this use case, select Allow.
- Status: Use this field to activate or deactivate this rule.
- Define Conditions: Specify the condition(s) that must be met for the rule to
apply.
- Condition: User.Group Contains Record.Knowledge Owner Group
Outcome
This rule ensures that:
- The logged‑in user must have the role Knowledge Owner.
- The user must belong to a group that is mapped to the article’s Knowledge Owner Group.
If both conditions are satisfied, the user will be allowed to edit the
article.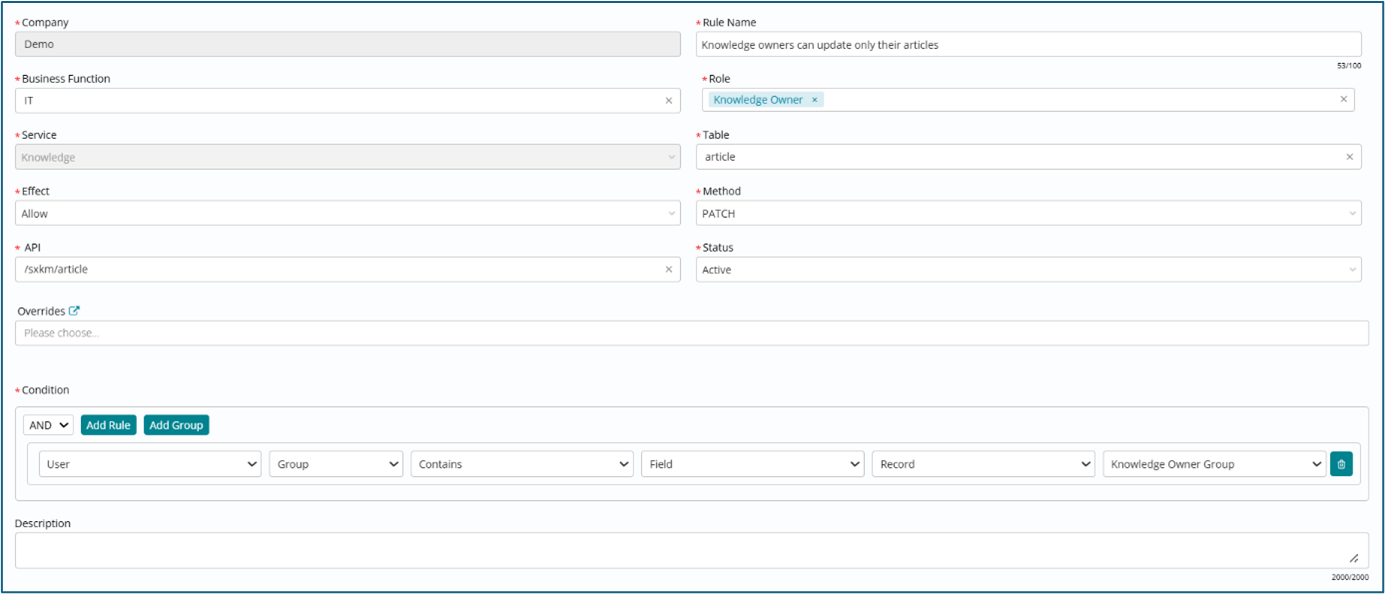
- In the v27 release, authorization rules can be created for Knowledge service. In order to configure authorization rules for other services, please raise an enhancement request.
- Pre-requisite - The API should be already registered as a Resource and mapped with a Table. For any new API requirements, please raise an enhancement request.
Custom Role and Authorization Rule Mapping
Step 1: Define a new role and associate specific authorization rules with it.
A new 'Role' menu is now available under the Foundation module. Admins can view all system roles and create new custom roles tailored to specific company needs.
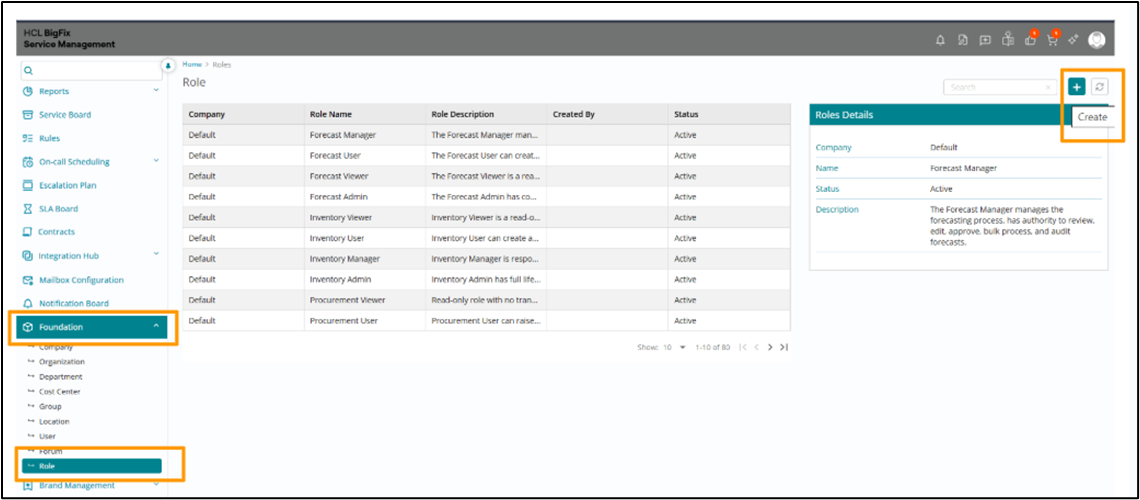
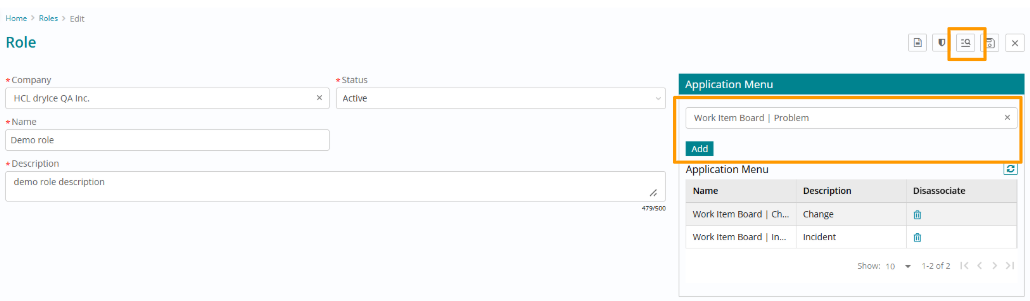
Admins can assign these roles to users and groups, and define the user experience by mapping specific Application Menus to the custom roles, controlling the access of different modules for users.
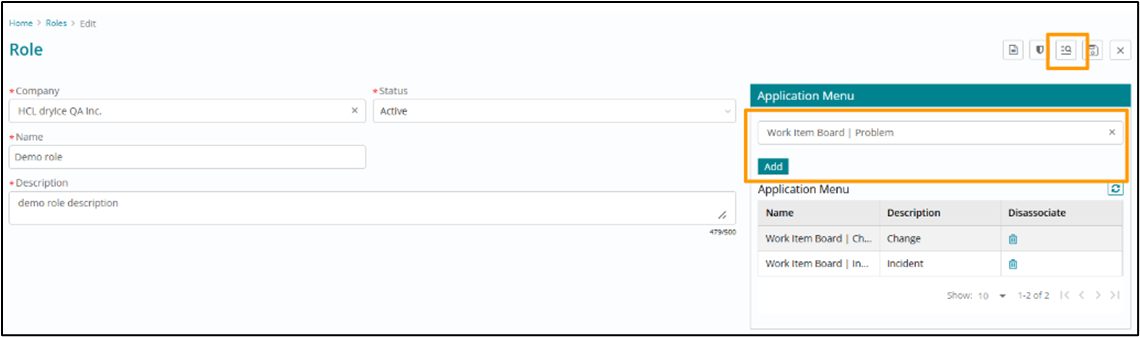
Step 2:
Pre-requisite: Super Admin role.
To grant access to the forms, navigate to UI Builder->Interactive screen and map the custom roles to them.
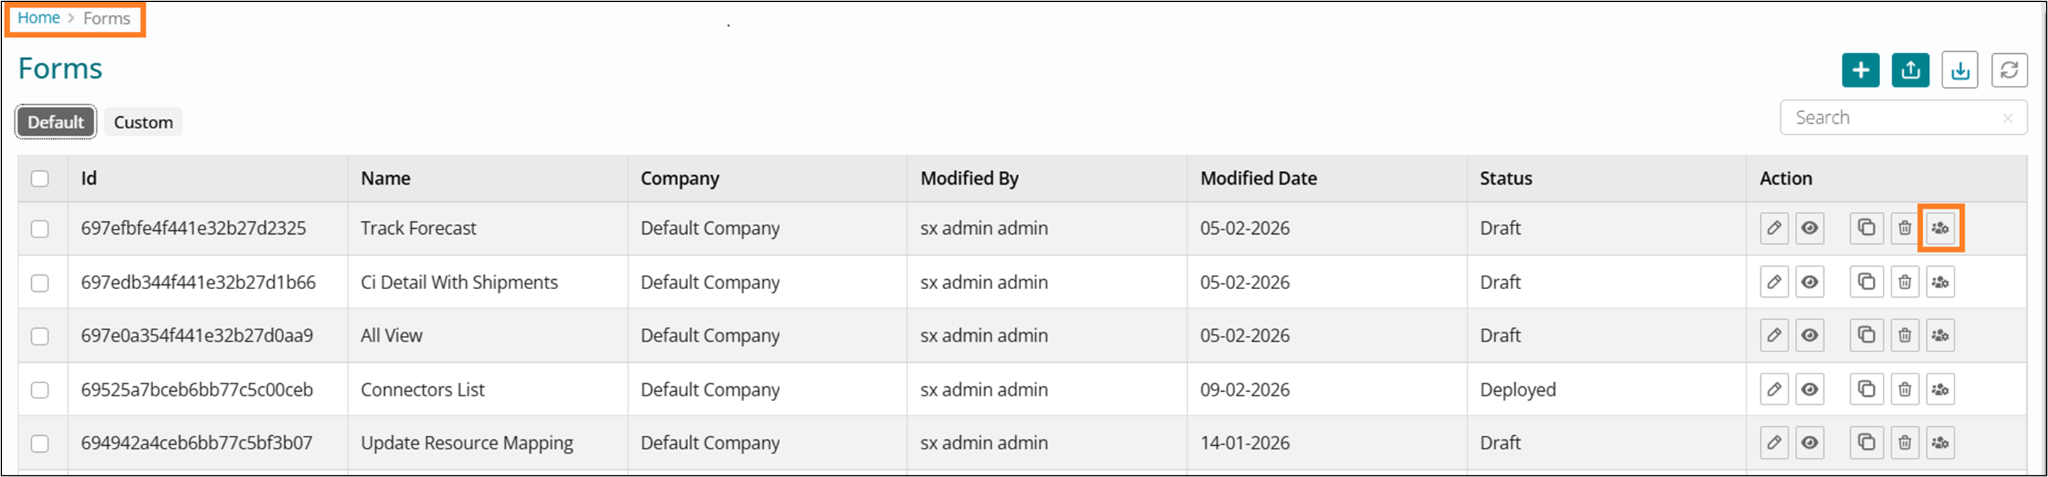
Step 3:
Pre-requisite: Authorization Admin role.
Go to Authorization -> Rules menu to create a new authorization rule.
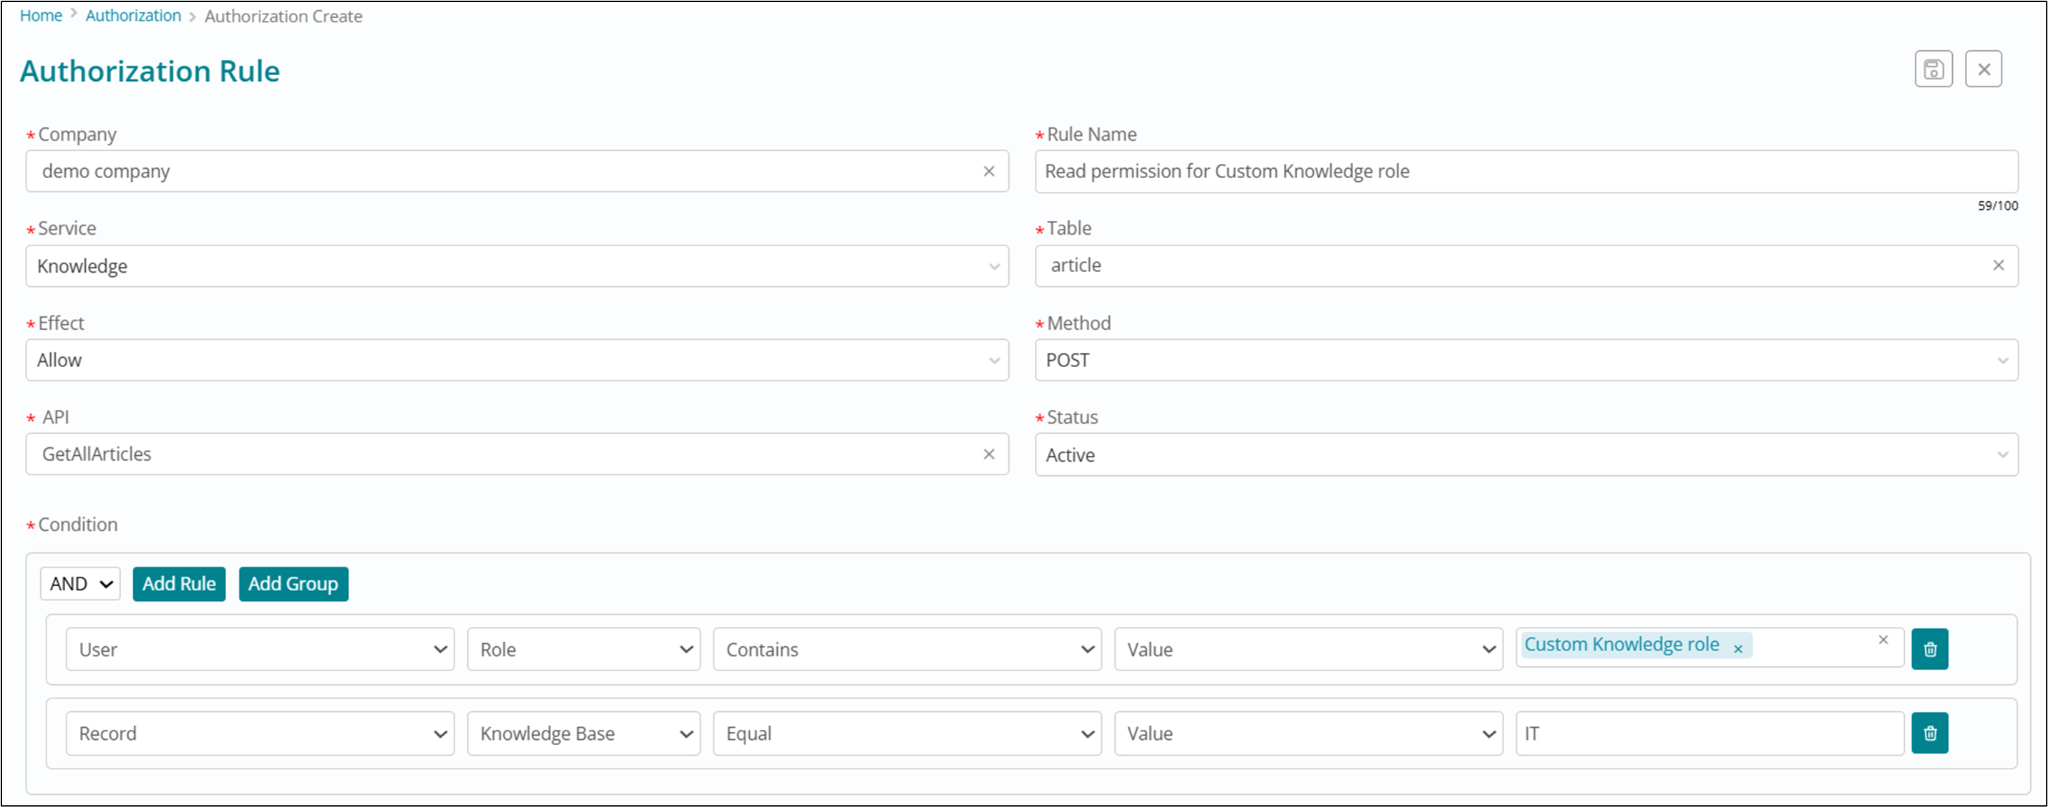
In the v27 release, custom roles and authorization rules can be created for Knowledge service. In order to configure custom roles and authorization rules for other services, please raise an enhancement request.
Authorization Rule Override for Privileged Roles
We are introducing the ability for administrators to override default authorization (AuthZ) rules, allowing you to establish custom, company-specific access policies. This provides greater flexibility and control over permissions within your instance.
Who can override:
- Super Admins: Can override product default rules to create:
- Instance-wide rules: Designated with "Default" company scope.
- Company-specific rules.
- Standard Admins: Can create company-specific rules only.
Rule Resolution Priority:
When the system checks for a rule, it now resolves permissions based on the following hierarchy (highest priority first):
- Company Rules
- Instance Rules
- Product Default Rules
How to Override a Rule:
How to Override a Rule:
- In the AuthZ rule list view, select the product default rule you wish to customize.
-
Click the 'Override' action in the preview section
Figure 1. Authorization Rules 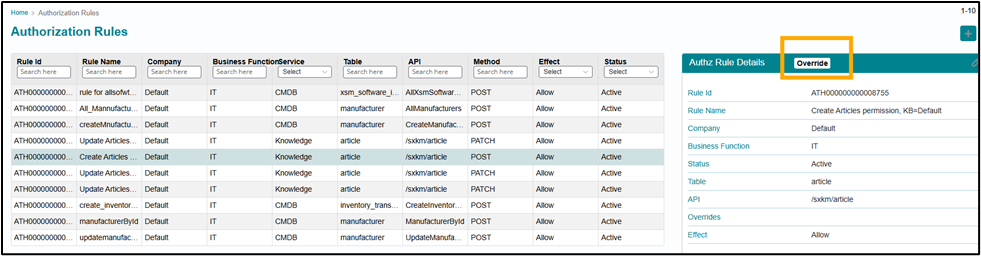
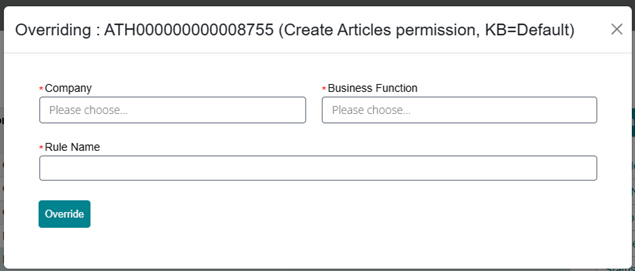
- In the pop-up window, select the target Company and Business Function.
- Enter a new, unique name for the custom rule and click Override
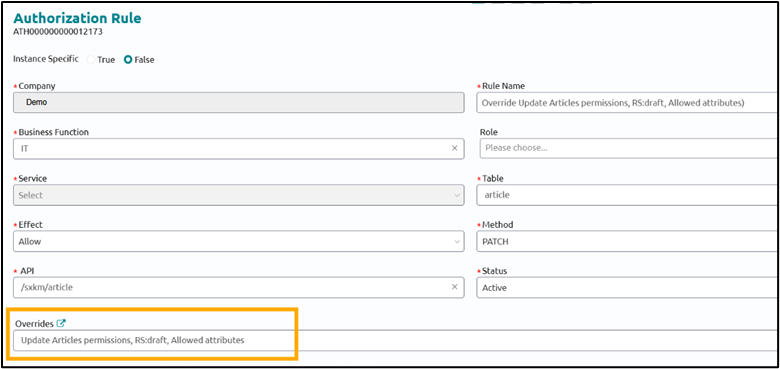
The new rule will be created as a copy of the original default rule. For tracking purposes, the 'Overrides' field will automatically populate with the name of the original product default rule.
Introduction of the 'Is Anything' Operator in AuthZ Rules
A new "Is Anything" operator is added to Authorization (AuthZ) rule conditions. This operator allows administrators to define rules that bypass standard data restrictions, ensuring that high-privilege roles maintain full access even when they also hold more restricted roles.
Previously, if a user had both a "Super Admin" role (unrestricted) and a standard "Admin" role (restricted by company), the system would apply the company restriction to both roles. By using the "Is Anything" operator, you can now ensure the Super Admin's "Allow All" logic takes precedence, resolving potential access conflicts.

Introduction of the 'Role' Attribute on AuthZ Rules
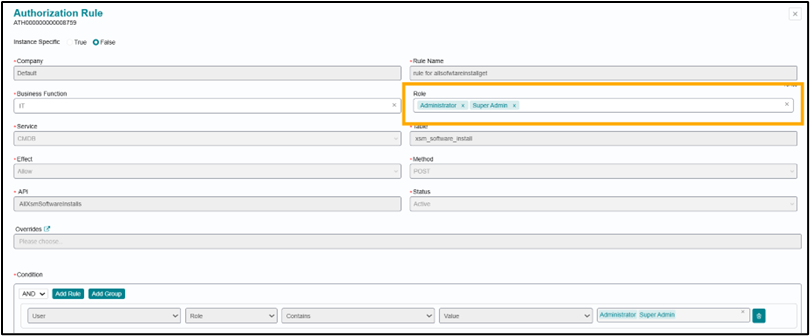
A new 'Role' attribute has been added to Authorization (AuthZ) rules to enable precise filtering based on user roles.
Administrators can specify one or more roles during the rule drafting process. When the system evaluates these rules, it will match them against the user's assigned roles, ensuring that only applicable rules are executed for each user.
Configurable User Types
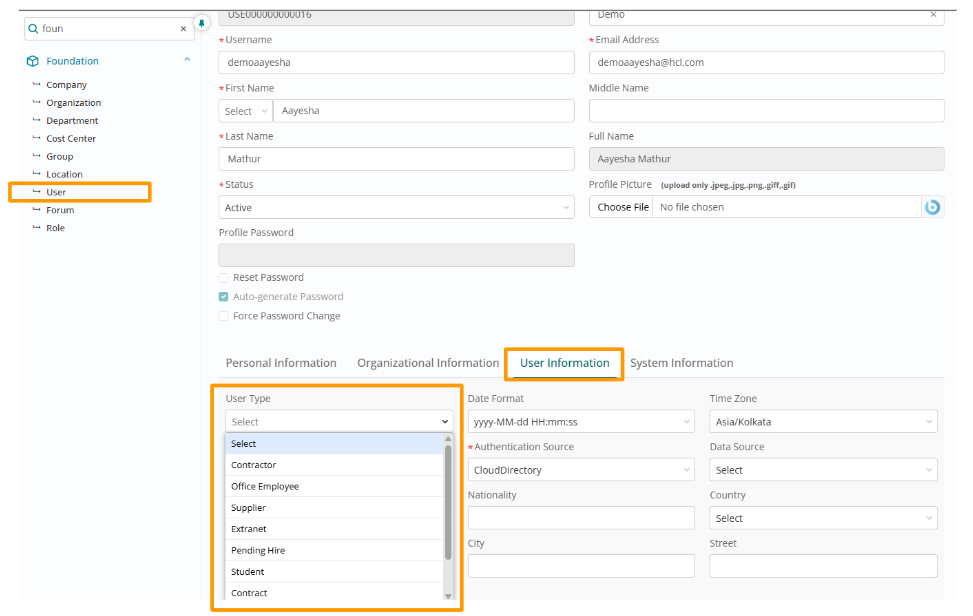
Administrators can now define and configure company-specific User Types to better fit organizational needs. This customization capability allows each company within a multi-tenant environment to establish user classifications that align with their unique operational requirements.
User Types are configured via the company menu list API, providing programmatic control over user type definitions.
If company-specific user types are configured, the system's default user types will no longer be available for that company. Default user types remain accessible only when no company-specific types have been defined.
Organizations can create user types such as "External Consultant," "Temporary Staff," "Vendor," "Contractor," or any other classification relevant to their workforce structure and service delivery model.
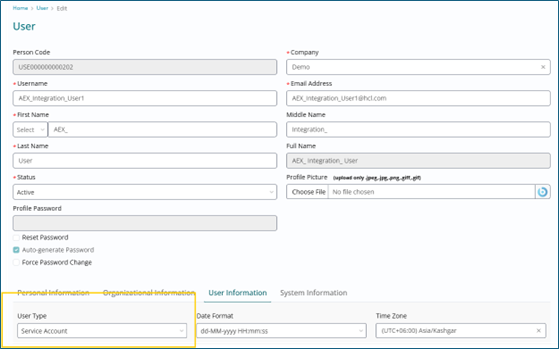
New 'Service Account' User Type
A dedicated 'Service Account' user type has been introduced, intended for use in system integration use cases. Use this user type whenever an integration requires a user ID to access or perform actions in the system. This ensures controlled access, consistent automation, and audit-friendly records.
In this release, the following use case has been implemented using this user type which comes in use for event monitoring system integrations -
When an incident is being created through a ‘Service Account’ user type (i.e. alerts through an event monitoring system), for a valid CI from the CMDB table, the Incident Location will be auto populated as the Location of the CI.
For other such integration specific requirements, enhancement requests can be raised.
Default 'Template User' Role
The 'Template user' role is now assigned automatically upon user profile creation, streamlining the onboarding process and improving new user experience.
This automatic role assignment grants users’ immediate access to existing templates for Incident, Change, and Fulfillment processes without requiring manual administrator intervention. Users can begin creating service requests using pre-defined templates as soon as their account is provisioned.
By eliminating the need for manual role assignment during user provisioning, IT teams can reduce onboarding time and ensure consistent access policies across the organization. This is particularly valuable for enterprises with high user turnover or frequent contractor engagements.
Enhanced Location Picker
The user experience when associating a Location with a User Profile has been improved to ensure accurate selection and reduce data quality issues arising from ambiguous location names.
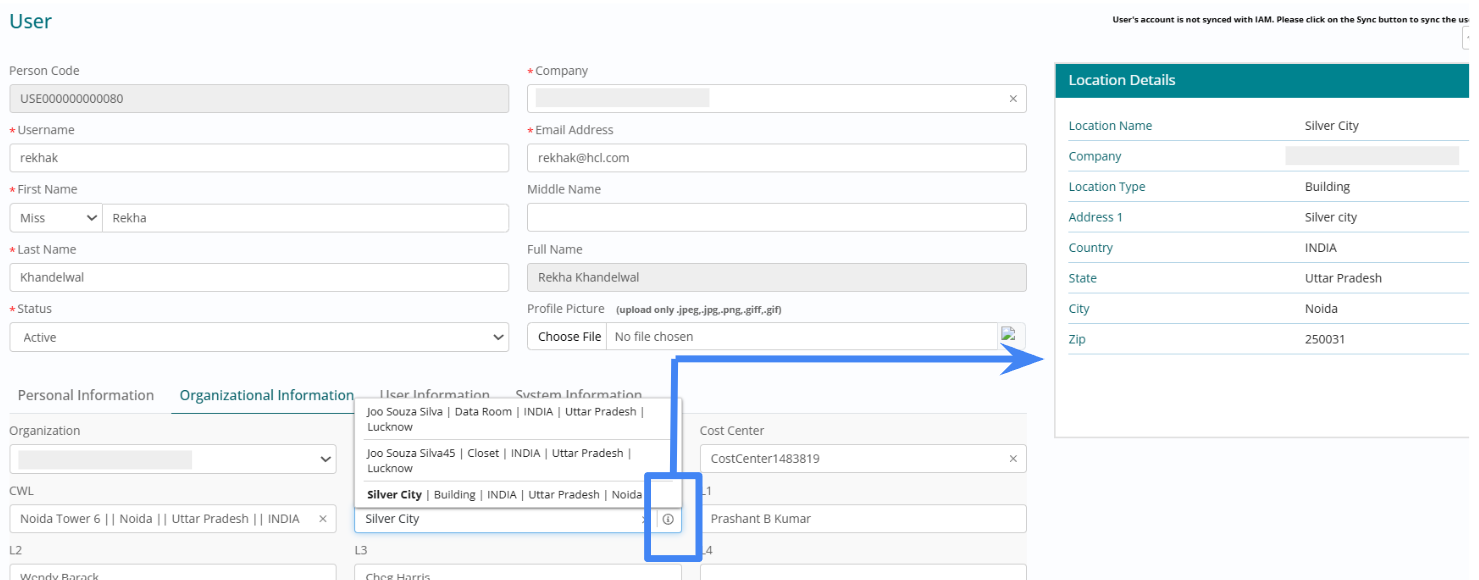
Context-Rich Search: When searching for a location, the dropdown now displays comprehensive identifiers in the format: Location Name | Location Type | Country | State | City. This helps users distinguish between similarly named locations (such as multiple "Main Office" entries across different regions).
Post-selection, an information (i) icon appears next to the field. Clicking this icon reveals the complete details of the selected location record, including Company association, full Address, Zip Code, and Description.
These enhancements reduce location misassignment errors, improve reporting accuracy for location-based analytics, service assignment rules, and compliance requirements.
SCIM Auto-Provisioning for Organizations & Departments
The SCIM (System for Cross-domain Identity Management) user creation and update process has been enhanced to automatically generate missing organizational hierarchy data, eliminating synchronization failures and reducing manual administrative overhead.
Organization Auto-Creation: When a SCIM request references an organization that does not exist in Active status for the specified Company, the system automatically creates a new Organization record.
Department Auto-Creation: If a department does not exist in Active status for the specified Company and Organization combination, the system automatically creates the required Department record.
While multiple records may share the same name across different companies or in different status states, the system ensures only one record remains Active per company at any given time.
More details around SCIM Integration can be found in the SCIM Integration Documentation.
Company-Scoped Data Uniqueness
Uniqueness constraints for Employee Number on the user table, and for Location, Organization, Department, and Cost Center names are no longer enforced at the Instance level. This represents a significant enhancement for multi-tenant deployments and managed service provider (MSP) environments.
These values must now be unique only within their specific Company context. Two different companies sharing the same instance can use identical Employee Numbers, Location names, Organization names, Department names, or Cost Center names without triggering conflicts or validation errors.
Multi-Tenant Benefits:
- Managed Service Providers (MSPs) hosting multiple client companies on a single instance
- Enterprise conglomerates with autonomous subsidiaries maintaining independent naming conventions
- Global organizations where regional entities prefer localized naming standards
Department Name Character Limit
The character limit for Department names has been increased from 150 to 250 characters to accommodate longer naming conventions often required in complex organizational structures.
Modern enterprises frequently use detailed department names that include geographical indicators, functional descriptions, and organizational hierarchy information (e.g. North America Sales Operations - Enterprise Accounts - Financial Services Vertical). The expanded character limit ensures these comprehensive naming conventions can be captured without truncation.
Group Name Character Limit
The character limit for Group names has been increased to accommodate 75 characters, providing administrators with greater flexibility in creating descriptive group names.
In cases where group names exceed typical display space, the UI may render only the first 30 characters in list views to maintain layout integrity. However, the complete name is visible on hover, ensuring users can always verify the full group identity before making selections or assignments.
Custom Roles Configurability
A custom role management capability has been introduced, enabling administrators to create granular, company-specific roles that match organizational access requirements and security policies.
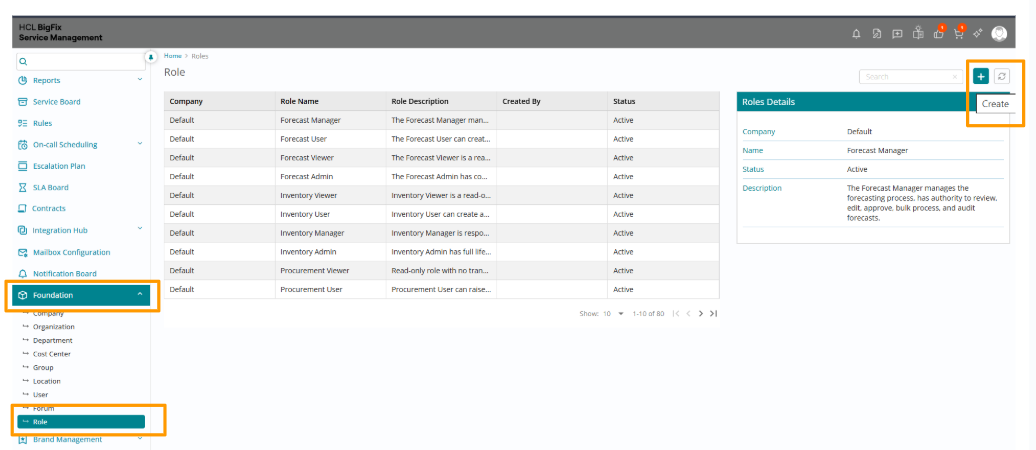
A new 'Role' menu is now available under the Foundation module, providing a centralized interface where administrators can view all system roles and create new custom roles tailored to specific company needs, workflows, and compliance requirements.
Administrators can assign these custom roles to individual users and groups, providing flexible access control that adapts to organizational changes.
Administrators define the user experience by mapping specific Application Menus to custom roles, controlling which modules, services, and capabilities are accessible to users holding each role.
To maintain platform stability and ensure upgrade compatibility, built-in system roles remain read-only. Only custom roles can be edited or deleted.
Comprehensive audit logs capture all Role creation events and track changes to Role Name, Description, and Status.
Beyond menu-level access, Administrators can configure Authorization Rules to define specific data privileges (Read, Write, Delete) for custom roles. These rules enable fine-grained control over which records users can view, modify, or remove based on attributes such as company, department, or category.
Important Notes:
- UI Form Access: If an application menu is associated with a role, it will be available to users having that specific role. However, access to the individual UI forms within these menus must also be configured for the role through UI Builder. This two-level access control (menu + form) ensures comprehensive security.
-
Current Scope: Custom roles are currently applicable only to the Knowledge
Management module. Access to the following menus is fully functional:
- Knowledge Articles
- Knowledge Base
- Article Type
- Knowledge Feedback
- Flagged Articles
- Feedback Tasks
Scheduled Jobs Configurability
A new ‘Scheduled jobs’ menu is added under the Administration module. Admins can view all product default scheduled jobs and create new company specific jobs as well.
New jobs can be created for existing APIs. For any new use case requiring new API development, please raise an enhancement request.
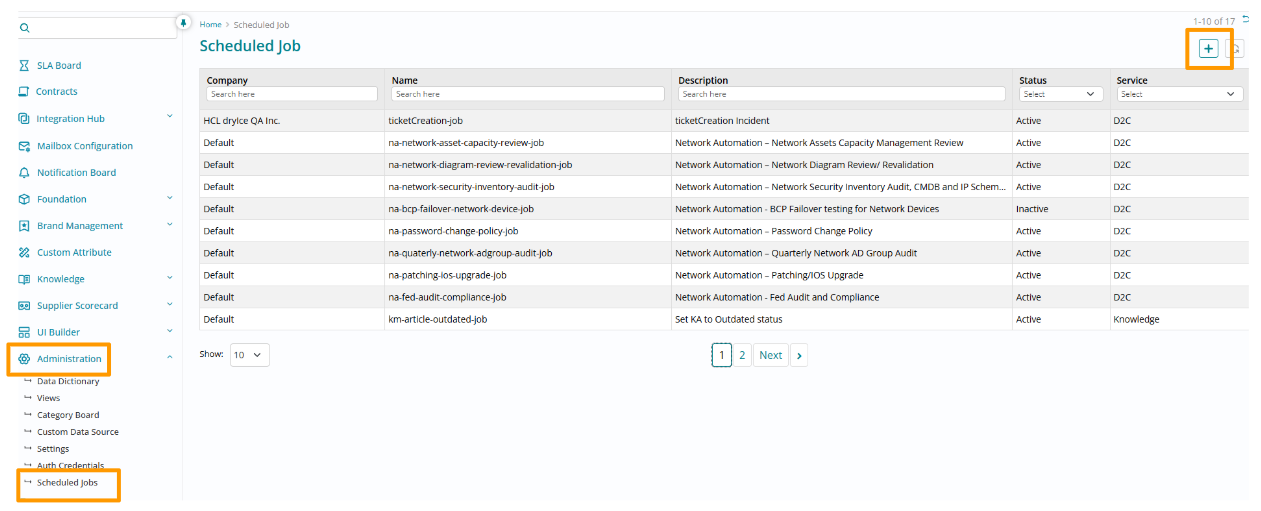
Example Use Case: Scheduled Job to Mark Articles Outdated After Expiry
As an admin, you may want to automatically mark articles as Outdated once their expiry date has passed. This can be achieved by creating a scheduled job in the system.
Steps to Create the Job
- General Info: Define the Company, Name, and Description to identify the job.
- Service Context: Select the target Service. For this use case, select Knowledge.
- API Configuration:
- Choose the HTTP Method as PATCH for our use case.
- The system will filter and display available API endpoints based on the selected Service and Method. For this use case, select the API: /sxkm/article/ArticleScheduler.
- Provide the API payload.- {"timeFormat":"minutes","timeToExpiry":0,"toStatus":"35"}(This ensures that once the expiry date has passed, the article status is updated to Outdated — represented by status code 35.)
- Scheduling: Enter a standard Cron expression in the Frequency field to
define when the job runs.
- In this example, we want the job to run once every day. Use the appropriate cron expression ( 0 0 * * *).
- Visit this site to know more details about cron expressions.
- Status: Use the dropdown to mark the job as Active or Inactive as needed.
Outcome
This scheduled job runs daily and ensures that articles are automatically transitioned to the Outdated status if their expiry date has passed, helping maintain content accuracy and lifecycle management in the Knowledge Service.
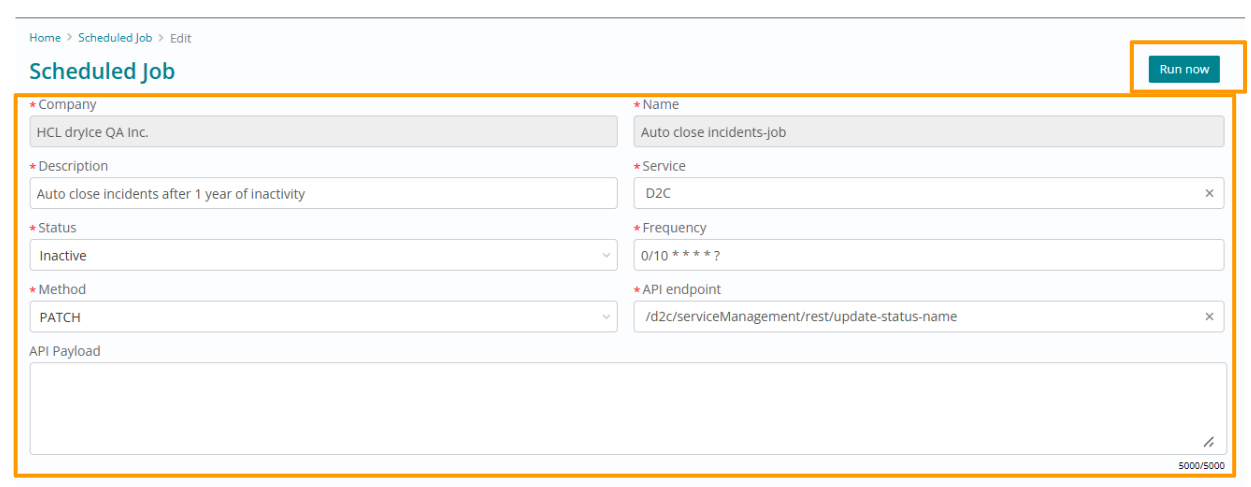
On-Demand Execution - In addition to the automated frequency based execution, a ‘Run Now’ button is available to trigger the job on adhoc basis.
Parent Visibility for Custom Attributes
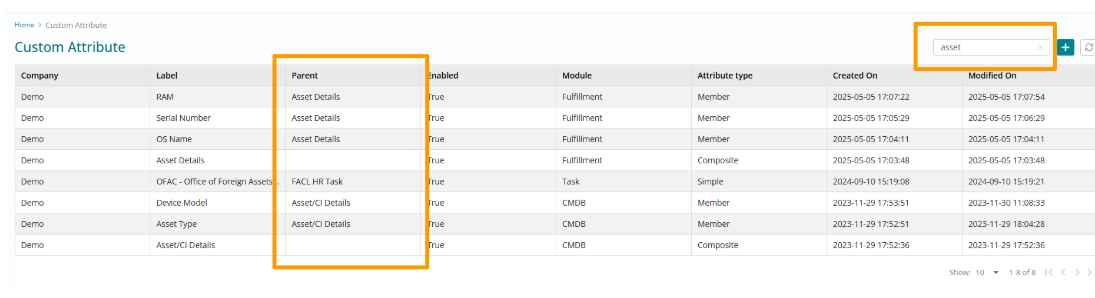
Enhanced visibility has been added to the Custom Attributes management interface to help administrators understand and navigate complex attribute structures, particularly for Checklist and Composite attribute types.
A new Parent column is now displayed on the Custom Attributes List View. This column identifies the primary parent attribute under which specific Checklist member attributes or Composite member attributes are defined, making the attribute hierarchy immediately visible.
Search by Parent is enabled, allowing administrators to quickly find all related attribute members belonging to a specific parent attribute.
SCIM Auto-Provisioning for Organizations & Departments
The SCIM user creation and update process has been updated to automatically generate missing data for Organization and Department fields.
Organization Auto-Creation: A new Organization record is automatically created if one does not currently exist in an Active status for the specified Company.
Department Auto-Creation: A new Department record is automatically created if one does not currently exist in an Active status for the specified Company and Organization.
While multiple records may share the same name, the system will ensure only one remains Active per company at any given time.
Case 1: If Organisation/Department name does not exist in the system for the company, then a new record is created.
Case 2: If Organisation/Department name exists in the system but in Inactive status for the company, then a new record is created in Active status.
In the connector APIs [api/saveOrganizationDetail, api/saveDepartmentDetails], updates to Organizations and Departments are now through the Organization Code and Department Code respectively, rather than their names.
Payload details -
{
 "id": 0,
 "dept_name": "",
 "orgn_name": "",
 "company_name": "",
 "status": "0",
 "dept_code":""
}

{
 "id": 0,
 "orgn_name": "",
 "company_name": "",
 "status": "0",
 "orgn_code":""
}
More details around SCIM Integration can be found below in SCIM Documentation.
SCIM Integration: BFSM Application with Okta IDP
Overview
The BFSM application supports user provisioning and deprovisioning via the [System for Cross-domain Identity Management (SCIM) 2.0] (https://tools.ietf.org/html/rfc7644 ) protocol. This enables automated user lifecycle management from Okta Identity Provider (IDP) to BFSM, ensuring user data is synchronized and up-to-date.
SCIM Endpoints in BFSM
The following SCIM endpoints are exposed by BFSM:
| Endpoint | Method | Description |
| /api/scim/v2/Users | POST | Create a new user |
| /api/scim/v2/Users/{id} | GET | Retrieve user by ID |
| /api/scim/v2/Users/{id} | PUT | Update user by ID |
| /api/scim/v2/Users/{id} | DELETE | Deactivate user by ID |
| /api/scim/v2/Users | GET | List users (with filters) |
All endpoints require a valid xsmauth access token in the `Authorization` header.
Supported SCIM Operations
- User Creation: Okta can create users in BFSM.
- User Update: Okta can update user attributes in BFSM.
- User Deactivation: Okta can deactivate users in BFSM.
- User Query: Okta can query users for synchronization.
Prerequisites
- BFSM application deployed and accessible over HTTPS.
- SCIM endpoints enabled and reachable from Okta.
- An xsmauth client details for authenticating and authorizing SCIM requests by Oauth2 mechanism.
Okta SCIM Provisioning Configuration Steps (Handled by Okta team)
- Create a SCIM Integration in BFSM
-
Ensure the SCIM endpoints are live and accessible.
- Generate or configure an access token for Okta to use.
-
- Add BFSM as a SCIM App in Okta
-
In Okta Admin Console, go to Applications > Applications.
-
Click Create App Integration.
-
Choose SAML 2.0 (for SSO) or OIDC as needed, and complete the wizard
-
After creation, go to the app’s Provisioning tab.
-
- Configure SCIM Connection
-
In the Provisioning tab, click Integration.
-
Set SCIM connector base URL to your BFSM SCIM endpoint base, E.g.: https://<your-sx-domain>/fdn/api/scim/v2
-
Set Unique identifier field for users to email or as required by BFSM.
-
Set Supported provisioning actions (Push New Users, Push Profile Updates).
-
For Authentication Mode, select Oauth2.
-
Enter the following details to use xsmauth access token for Authorization
-
E.g.:
Access token endpoint URI: https://<your-xsmauth-url>/realms/<realm-name>/protocol/openid-connect/token
Authorization endpoint URI: https://<your-xsmauth-url>/realms/<realm-name>/protocol/openid-connect/auth
Client ID: <xsmauth-client-name>
Client Secret: <xsmauth-client-secret>
-
-
- Test Connection
-
Click Test Connector Configuration to verify connectivity.
-
- Assign Users/Groups
-
Okta team will assign users or groups to the BFSM application in Okta.
-
Okta will automatically provision, update, or deactivate users in BFSM via SCIM.
-
- Attribute Mapping
-
In the Provisioning tab, configure attribute mappings between Okta and BFSM SCIM fields as needed.
-
-
Ensure BFSM endpoints are accessible from Okta (no firewall or network issues).
-
Verify the xsmauth access token is valid and has not expired.
-
Use Okta’s System Log for error details on provisioning events
-
Check BFSM application logs(Foundation Microservice) for SCIM request/response details.
-
Foundation ms in BFSM app also maintains a log table which can be used to detect anomalies while provisioning or deprovisioning events.
-
Okta SCIM App Integration Guide (https://developer.okta.com/docs/api/openapi/okta-scim/guides/scim-20/ )
-
SCIM 2.0 Specification (https://tools.ietf.org/html/rfc7644 )
Keyboard Shortcuts for Faster, Accessible Navigation
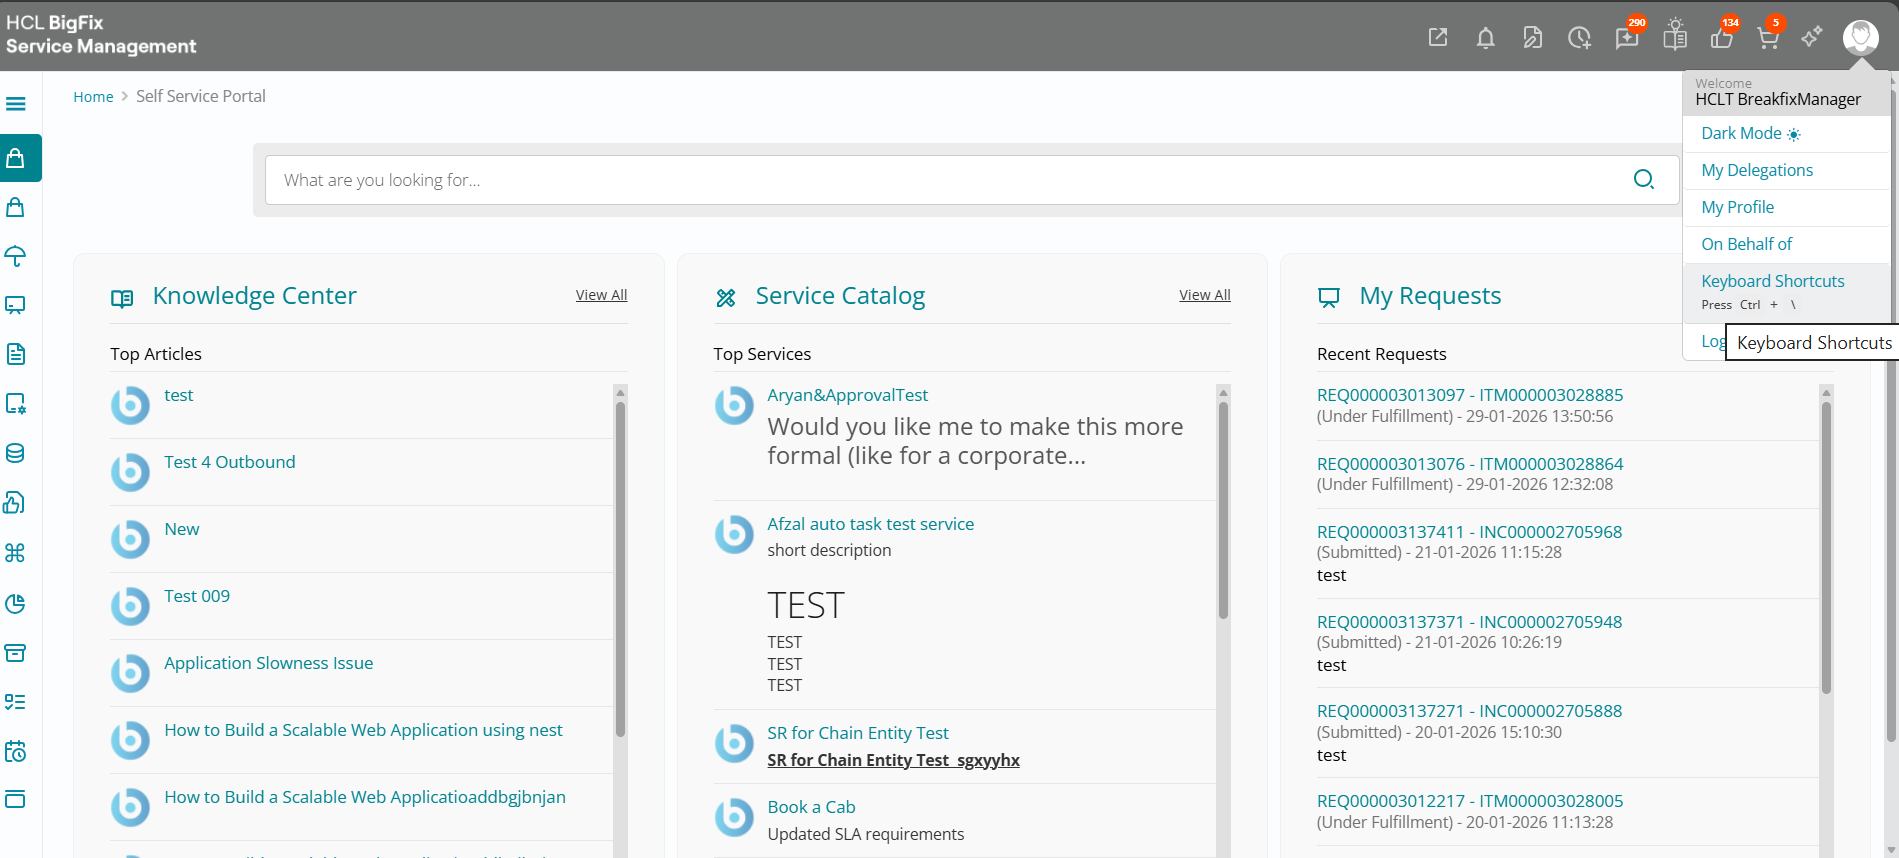
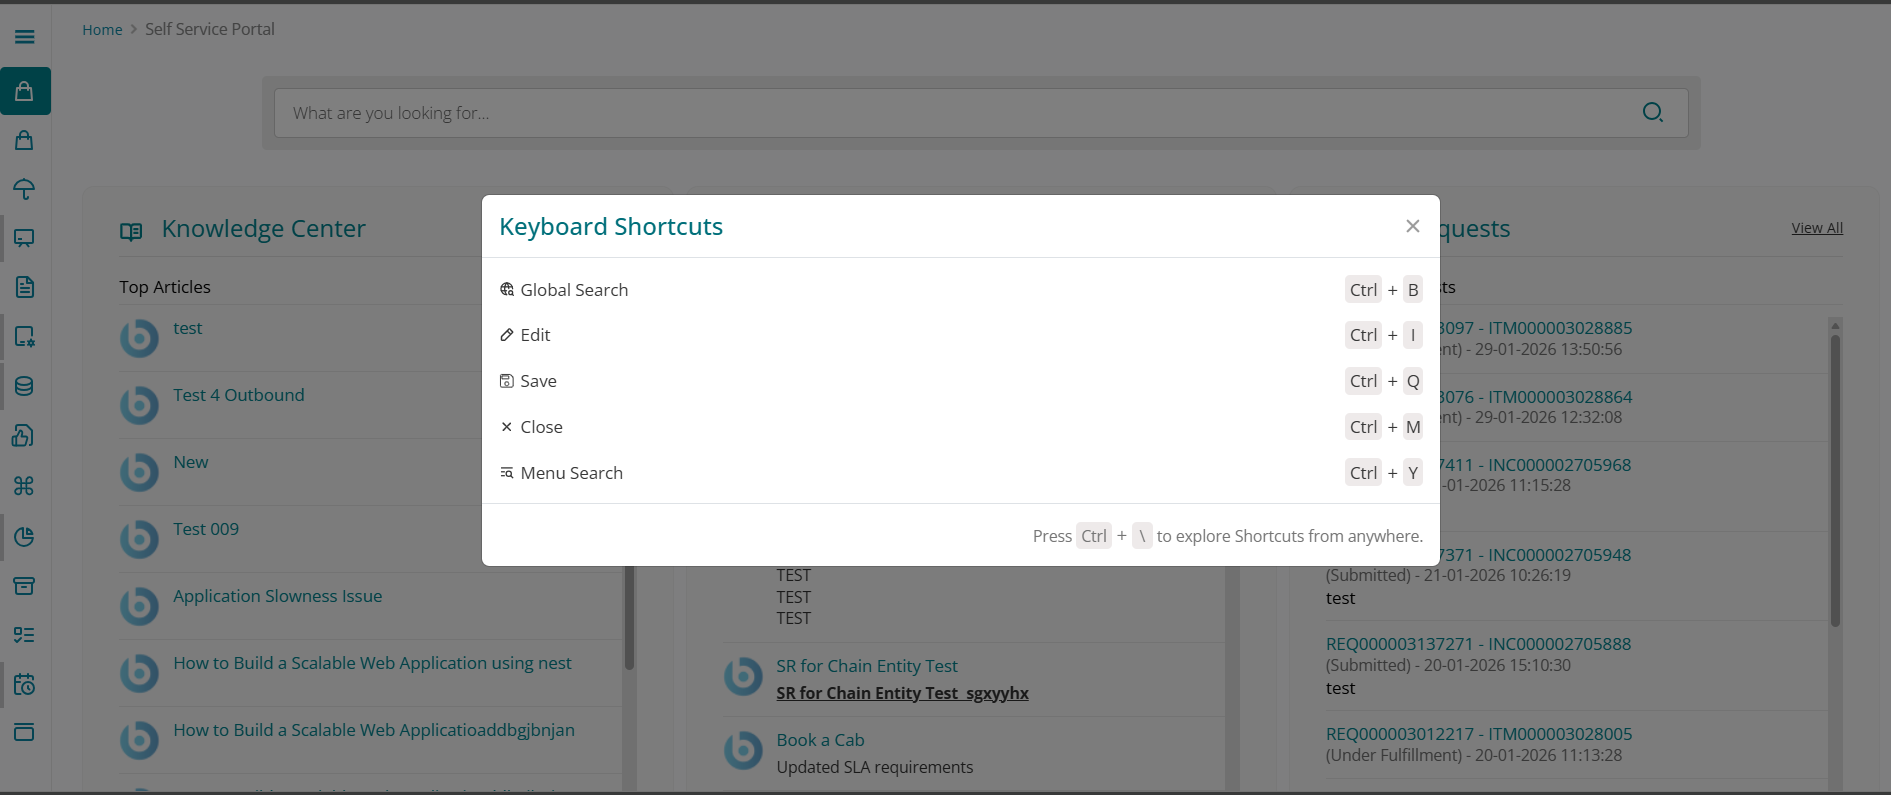
Introducing keyboard shortcuts that reduce clicks and navigation steps, improving efficiency, productivity, accessibility, and overall user satisfaction. Users can now perform actions such as saving (for example, using Ctrl + Q instead of scrolling to the Save icon), approving changes, refreshing compliance status, or switching between CI and patch views more quickly using the keyboard, which is especially helpful for power users and those who prefer or require keyboard-driven interaction.
From the portal, users can view all available shortcuts in the section, with a clear list of mappings for both platforms: on Windows all shortcuts are correctly prefixed with Ctrl, and on macOS they are correctly prefixed with Control, giving the product a more enterprise-grade and efficient feel.
Set Default Notification Time Zone at Company or Instance Level
This enhancement lets administrators define a preferred time zone for all default notifications at the company or instance level, instead of relying on GMT as a fixed default. By configuring a single baseline time zone, all timestamps in system-generated notifications—across patching, compliance, and change-related alerts—are displayed consistently for users, regardless of their local settings.
Admins configure this under Settings → Company → System Properties, where they select the time zone in which notifications should be sent. The notification engine then reads this setting and applies it automatically before sending any notifications, ensuring that all outgoing messages use the chosen company-standard time zone.
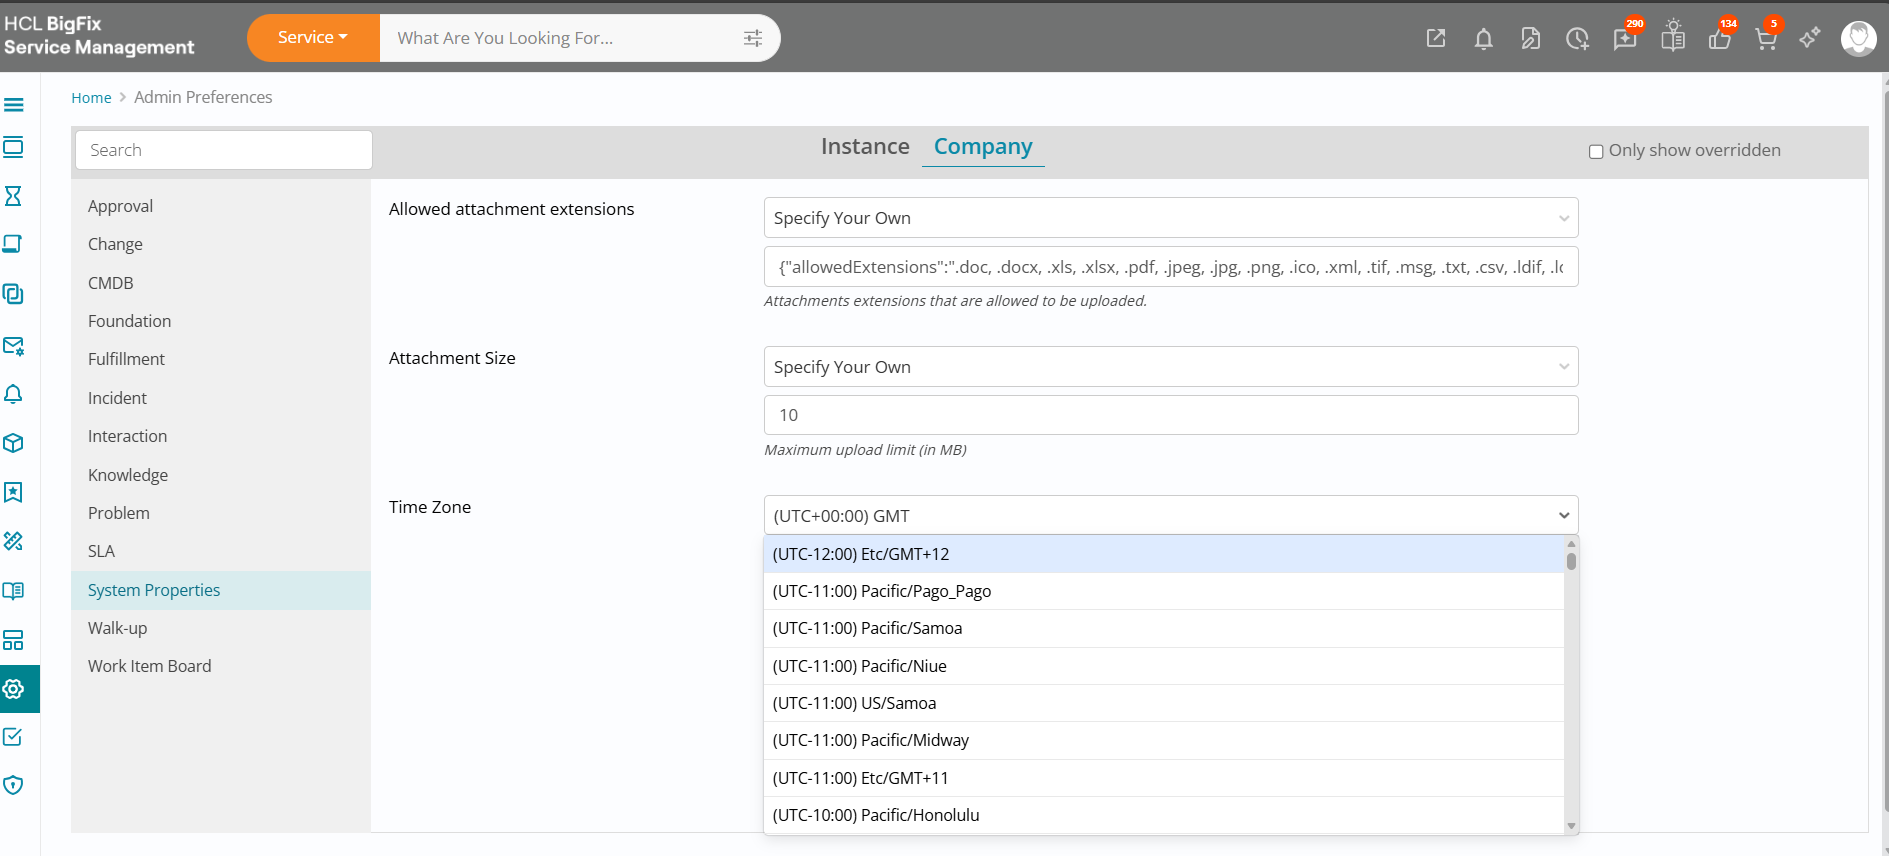
This delivers multiple benefits: consistency across the organization, easier governance and auditing (as logs and reports align to one time zone), a better end-user experience with no manual time conversion, and more effective planning and management of change windows and other time-bound activities.
Branded Notification Borders and Footers
This enhancement lets you align system notifications with your organization’s branding by automatically applying the primary brand color to the notification border and footer. Once configured, notifications across the product inherit this color, delivering a more consistent and professional look that clearly reflects your brand rather than a generic system style.
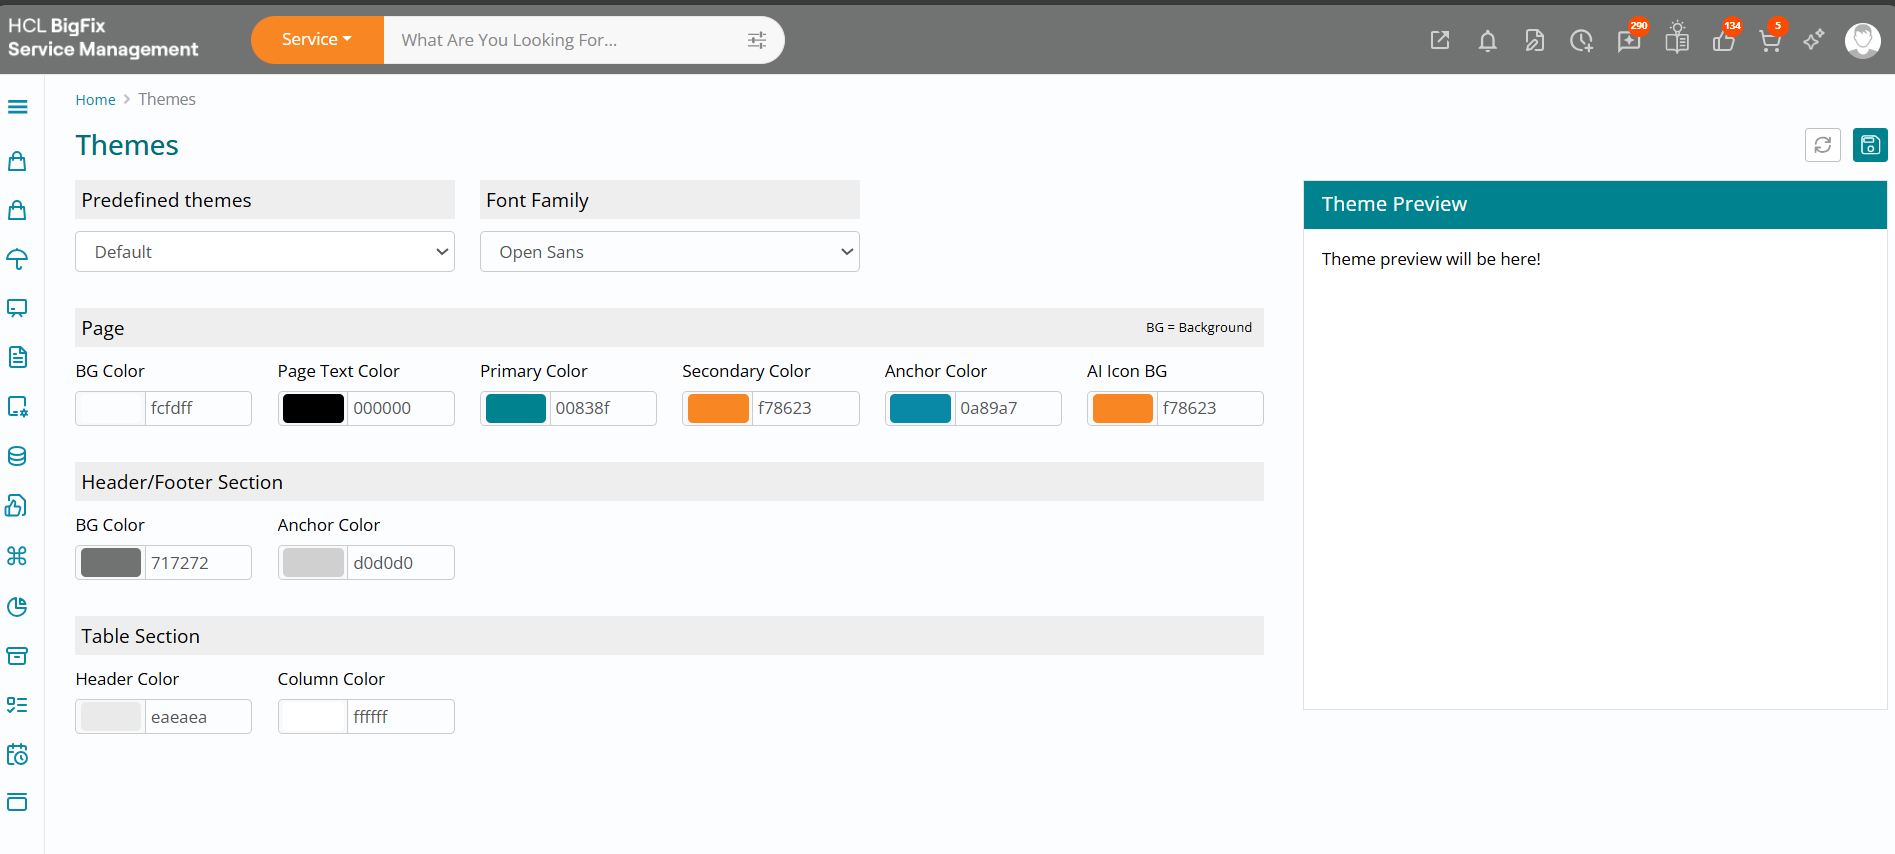
Admins enable this by navigating to Brand Management from the main navigation and selecting the Primary color according to corporate brand guidelines; notifications then automatically pick up this color for their header and footer areas. Key benefits include stronger brand consistency, a more polished interface, better user recognition of in-product notifications versus external alerts, improved engagement with important messages, and easier adherence to enterprise governance and design standards.
Restrict data dictionary access for Rules Admin and Administrator roles
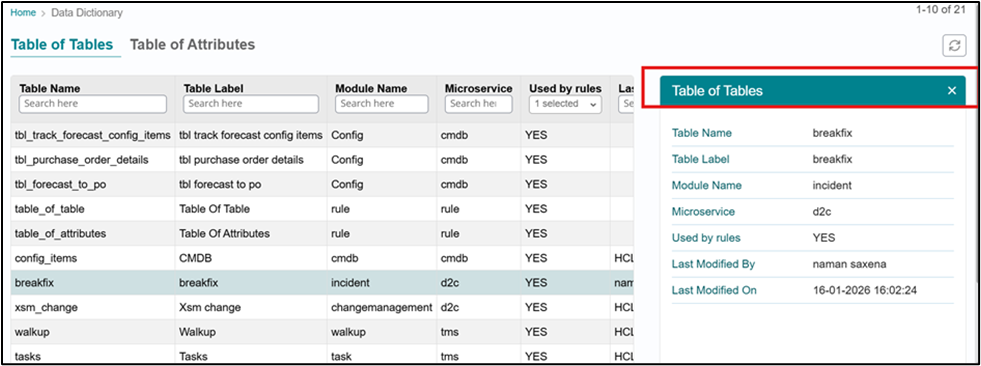
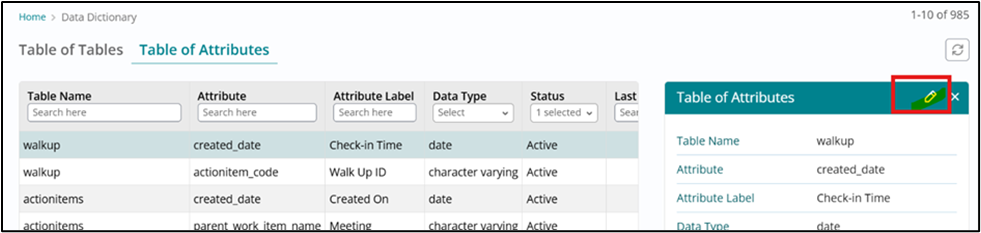
To ensure data integrity and configuration safety by restricting modification of Data Dictionary entries (specifically TOT and TOA attributes) to only Super Admins, while allowing Rules Admins and Administrators to view the content they need for reference and rule configuration.
Functional Process as per roles
- Rules Admin & Administrator
- Can navigate to the Data Dictionary list page.
- Can search, filter, and open records in the right panel (or equivalent read-only view).
- Cannot see any Edit icon/link/button.
- Cannot open the full edit page for any Data Dictionary entry.
- Have read‑only access for both TOT and TOA records.
- Super Admin
- Have full create / edit / view access to the Data Dictionary.
- Can edit default TOT and TOA attributes.
- Can create new Data Dictionary entries where permitted by existing platform rules.
View-only List Access for Rules Admin and Administrator
- Description: Rules Admin and Administrator roles shall have view-only access to the Data Dictionary list page.
- Details:
- They can see all records they are currently allowed to see (e.g., TOT, TOA).
- They can apply filters/search as per existing behavior (read-only operations).
Refer Screenshot from Administrator and Rules Admin(TOT)
Refer Screenshot from Administrator and Rules Admin(TOA):
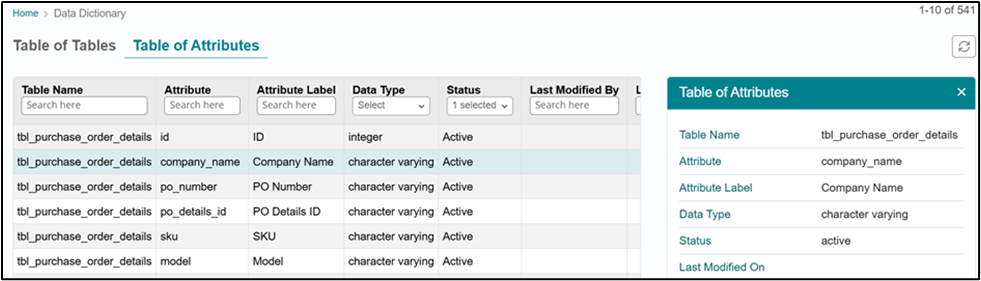
Refer Screenshot from Super Admin:
Custom attributes Label Length Increased to 250 Characters
Here we have increased the character limit for custom attribute labels, also referred to as custom attribute questions, from 50 characters to 250 characters. The limit increase will be implemented at the foundation level, but corresponding UI improvements are required so long labels remain readable and user-friendly across all Work Item pages.
The main focus of this requirement is the Support user experience while adding, selecting, viewing, and saving custom attributes with long labels on Work Items.
Foundation Requirements
- Increase custom attribute label character limit from 50 to 250 characters.
- Ensure validation, storage, and retrieval support the expanded label size.
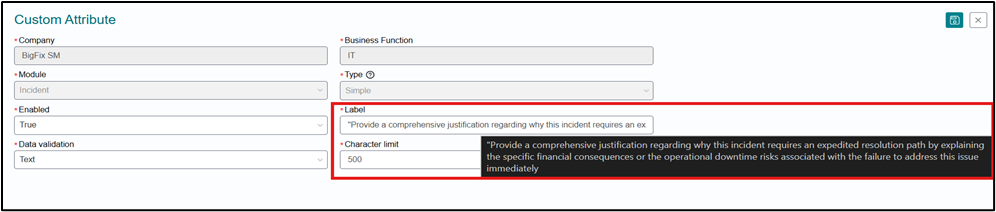
UI Behavior on WIB
While Adding Custom Attributes
-
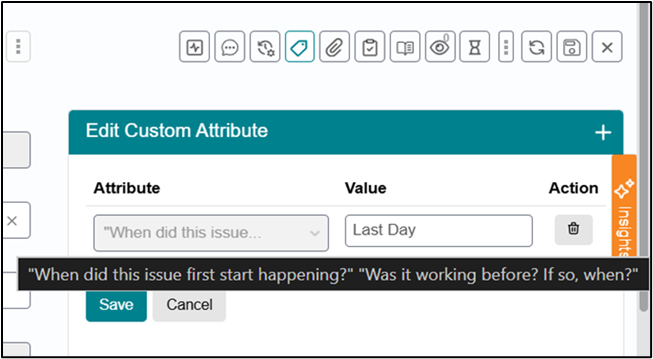
The dropdown or selection control supports display of longer custom attribute questions via Tool Tip
-
The tool tip allows users to easily view and distinguish long questions during selection.
-
If the question exceeds the single-line visible area, the text is truncated with ellipsis after the fixed number of characters that fit in one row.
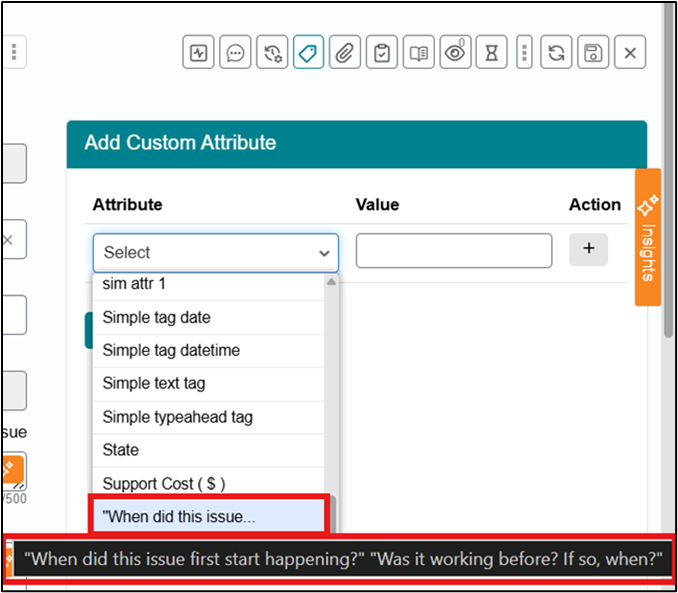
Once Selected
- The Custom attribute label gets truncated with ellipsis in a controlled and consistent manner.
After Save on Work Item Pages
- Long custom attribute questions renders cleanly on all Work Item pages.
- Truncation with three dots should be used where a one-line fixed area is required.
- A tooltip is available so the support user can access the complete question text after saving.
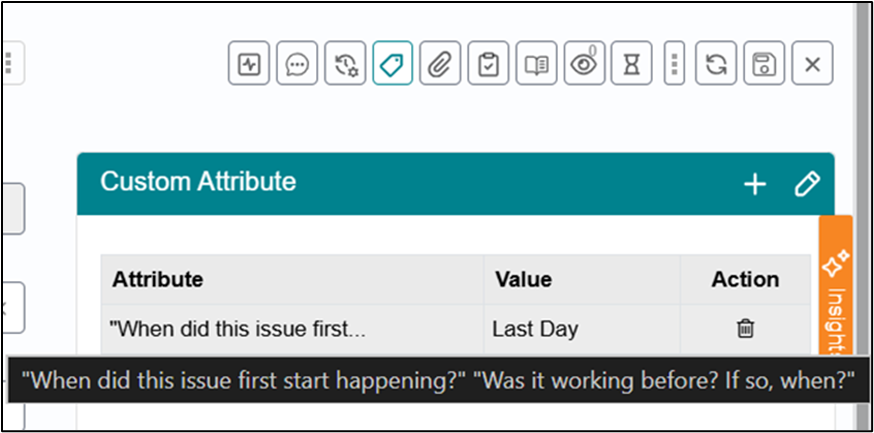
Edit Custom attributes also displays the tooltip on Custom attribute label selected :