Change Management
Configurable "Reason for Change" Field
Static "Reason for Change" values in the Change module have been transformed into company-configurable menu lists, enabling administrators to align change categorization with organizational change management frameworks and terminology.
Previously, the Reason for Change field contained a fixed set of values that, while covering common change drivers, did not accommodate every organization's specific terminology or change classification schemes. Administrators now have complete flexibility to add, modify, or hide these values to match ITIL frameworks, organizational change models, or industry-specific requirements.
This enhancement strengthens change management by aligning categorization with ITIL or custom frameworks, improving analytics and compliance, making reports more meaningful for stakeholders, preserving historical data during schema changes, and supporting independent schemes for each tenant in shared environments.
Default data is as below :
| Module | field | key | value |
| Change | ReasonForChange | Project Implementation | 10 |
| Change | ReasonForChange | Small Enhancement | 15 |
| Change | ReasonForChange | CSI Implementation | 20 |
| Change | ReasonForChange | Maintenance | 25 |
| Change | ReasonForChange | Bug Fix / Patch Deployment | 30 |
| Change | ReasonForChange | Warranty Fix | 35 |
| Change | ReasonForChange | Vulnerability Patching | 40 |
| Change | ReasonForChange | Regulatory / Compliance Requirement | 45 |
| Change | ReasonForChange | Business Continuity | 50 |
| Change | ReasonForChange | Capacity Implementation | 55 |
| Change | ReasonForChange | Software Update | 60 |
| Change | ReasonForChange | Infrastructure Upgrade | 65 |
| Change | ReasonForChange | External | 70 |
| Change | ReasonForChange | Decommission | 75 |
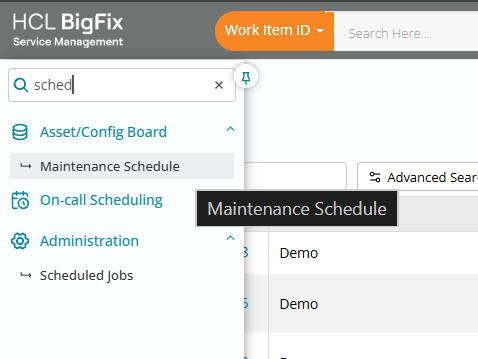
Maintenance and Freeze Window Conflict Warnings
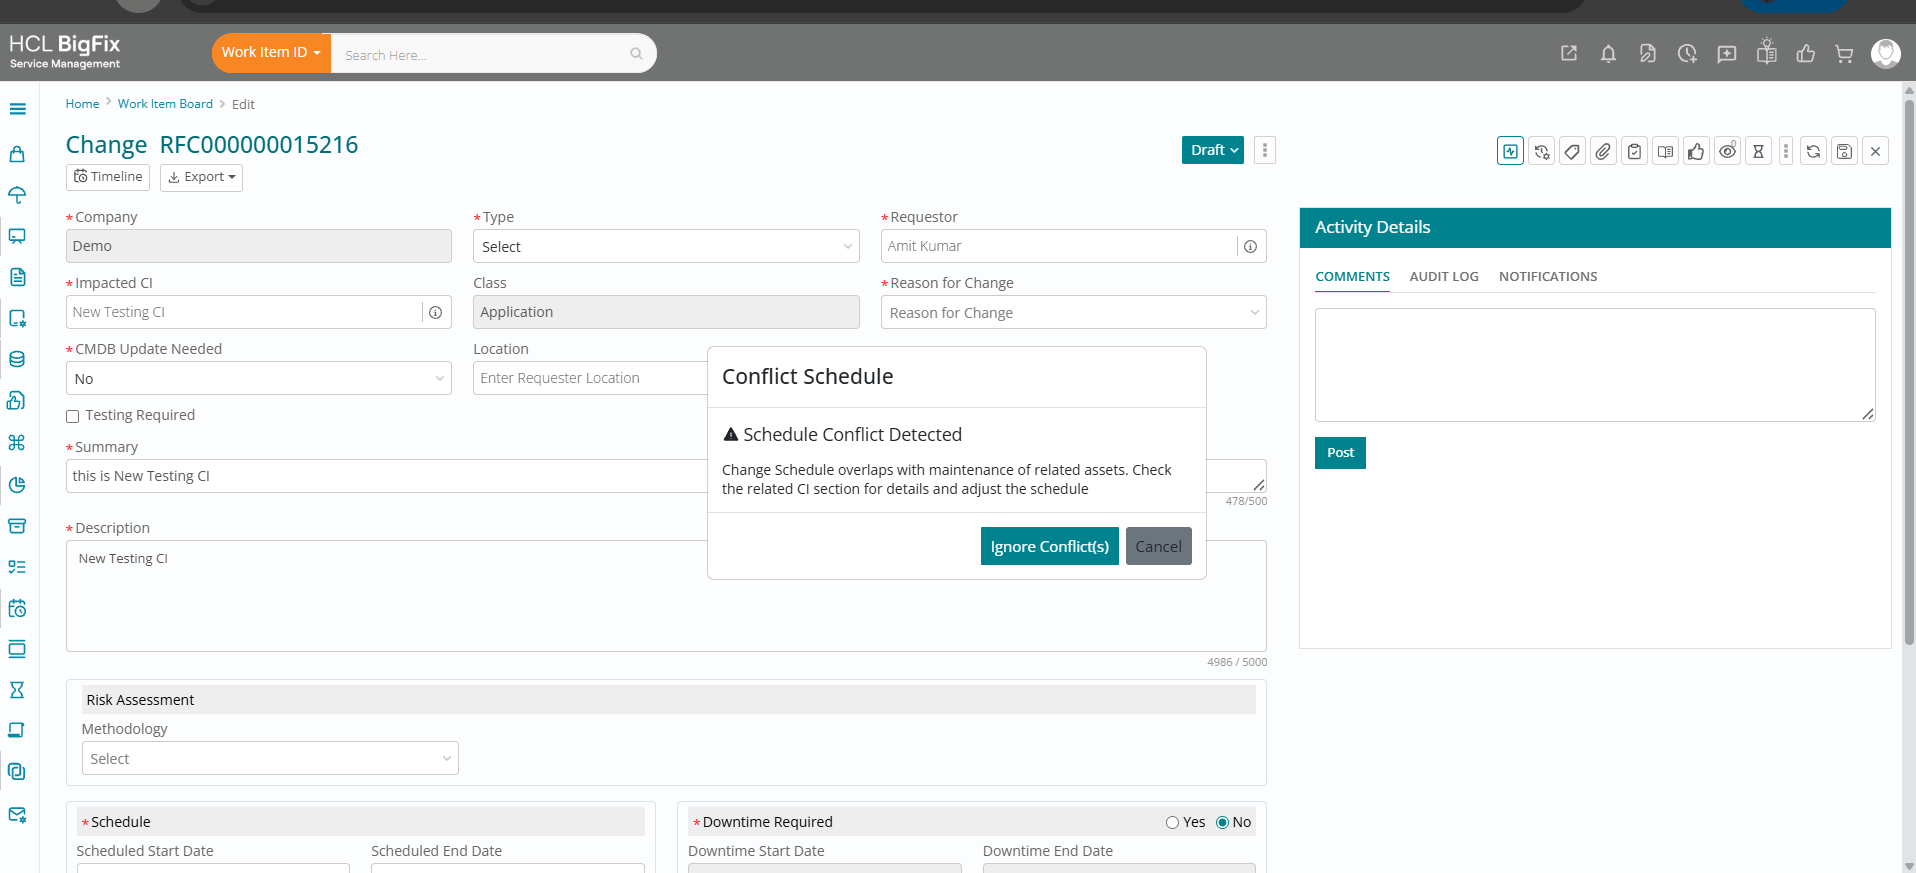
The new enhancement introduces intelligent validation of Planned Start and End dates on the RFC form against configured maintenance and freeze (blackout) windows for the selected Configuration Items (CIs). When a change is created, the system automatically evaluates whether the schedule fully complies with the allowed maintenance window and whether it overlaps with any freeze window, then displays a clear warning message whenever a conflict is detected.
This helps change managers and implementers avoid risky scheduling and improves overall governance without blocking legitimate emergency work (users can still proceed by choosing to ignore the conflict where allowed).
Maintenance window validation ensures that change schedules are aligned with approved service downtime for each CI. The system checks if the entire change schedule falls within the configured maintenance window and raises a warning whenever any part of the planned change lies outside that window, while remaining silent when the schedule is fully inside. This behaviour is supported by clearly defined rules and scenarios (for example, partial overlap before or after the maintenance window always triggers a warning), giving change coordinators predictable and consistent guidance at planning time.

Freeze (blackout) window validation prevents changes from being scheduled during high-risk or business-critical periods configured for each CI. Whenever the planned change dates overlap with a freeze window, the system displays a warning if there is any overlap at all and does not show a warning only when there is no overlap with the blackout period. This allows organizations to protect critical periods such as month-end closures or peak trading hours, while still giving full visibility to change owners before they submit or approve an RFC.
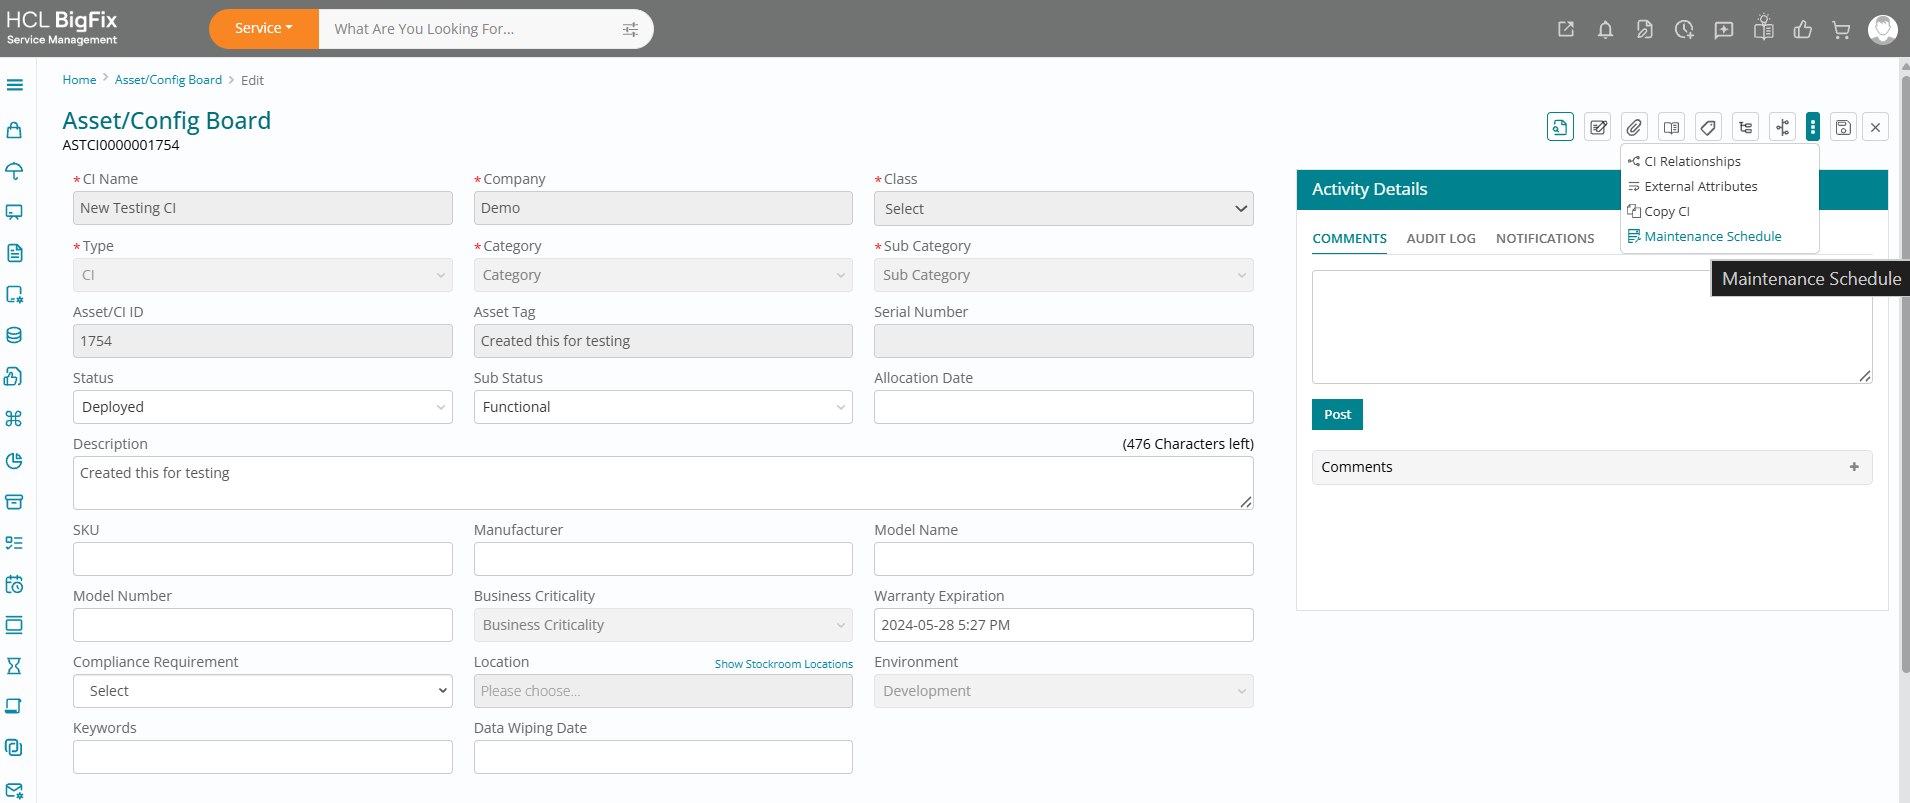
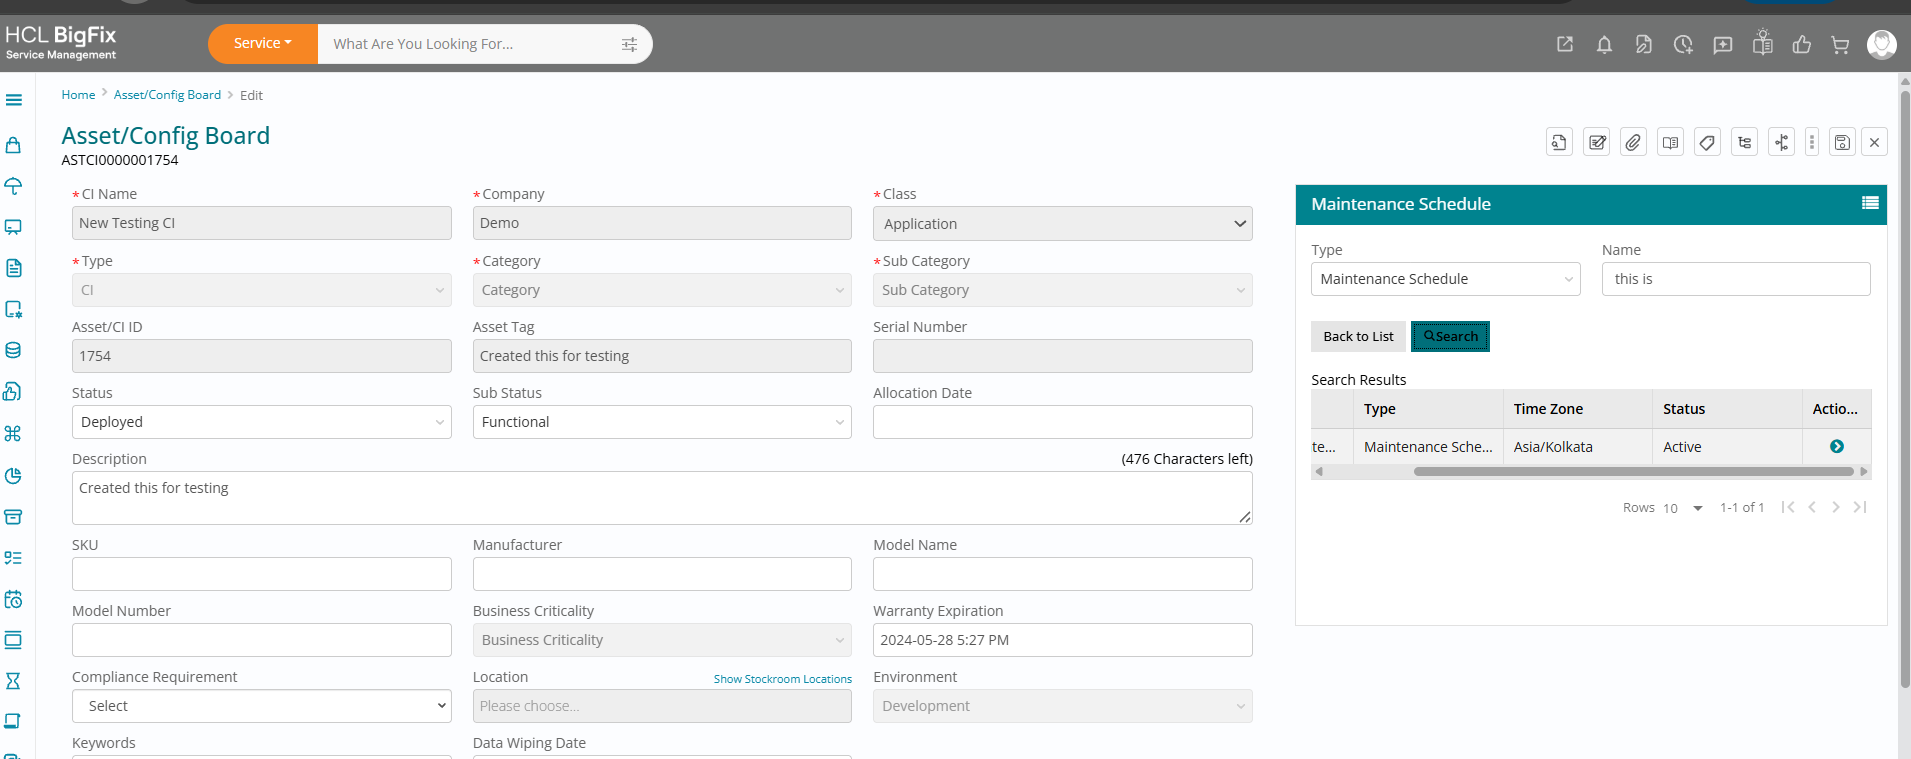
To further support decision-making, the enhancement also adds schedule visibility for all related CIs directly from the RFC form. For each related CI with configured schedules, a view option lets users quickly open a pop-up displaying its maintenance and freeze/blackout windows, or a message indicating that no schedule is configured, so they can assess impact across the full technical stack before finalizing the change.
A guided workflow helps users select the CI, enter planned dates, review any warnings, and adjust the schedule or proceed as needed, improving both compliance and user experience.
Change Calendar with Maintenance and Freeze Windows
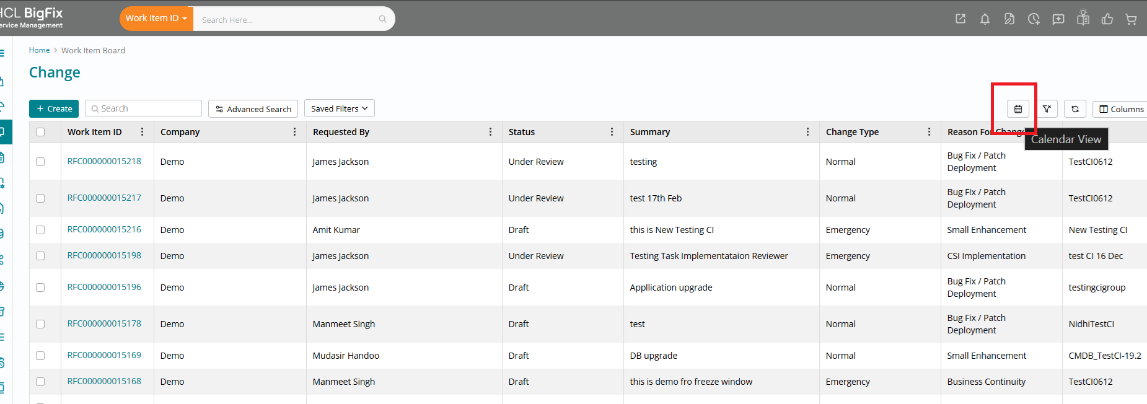
The Change Calendar view provides a monthly, weekly, and daily visual view of all planned Change activities, including Change records, Maintenance Windows, and Freeze (blackout) Windows for all CIs. It opens from the Change Work Item Board by clicking the calendar icon on the top-right, which launches the calendar in a new window in Month view by default.
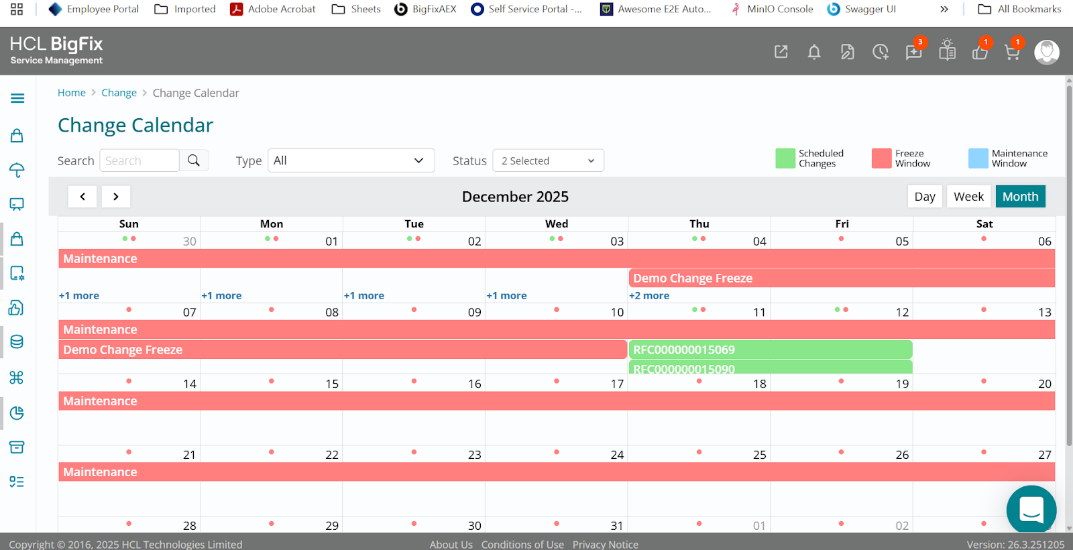
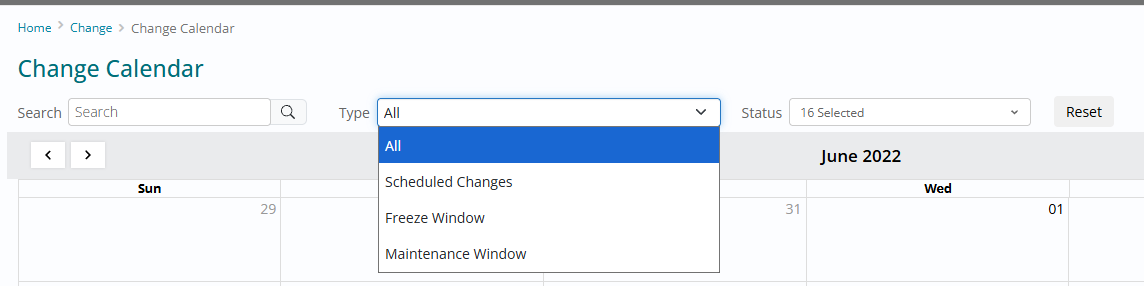
Entries are color-coded for quick recognition: Green for Change Records (RFCs with Scheduled and Under Implementation status by default), Blue for Maintenance Windows, and Red for Freeze Windows, with a legend on the top-right of the calendar. Users can switch between Day, Week, and Month views, use a Type filter (Scheduled Change, Maintenance Window, Freeze Window) and a Change Status filter (shown when All or Scheduled Changes is selected), and click Reset to return to default filter values.

The search bar lets users find entries by Change Number, Maintenance Schedule Name, or Freeze Schedule Name, with matching entries highlighted or filtered. Hovering over an entry shows ticket or schedule name, exact start and end dates, and a short summary (truncated with dots if long), left-aligned and formatted according to the user’s date settings.
Clicking a Change Number opens the Edit Change page, while clicking a Schedule Name opens the Edit Schedule page (based on permissions).
This enhancement helps teams quickly understand upcoming changes, avoid conflicts with maintenance and freeze periods, and take action directly from the calendar using filters, search, hover details, and click-through navigation.
Configurable Multi CI Approval Visibility at Company Level
A new company-level configuration, EnableMultiCI, has been introduced to give administrators control over whether the “Approval on Multi CI” checkbox is visible on the Change form. This foundation-level property is defined per company, allowing each organization to independently decide if Multi CI Approval should be enabled or disabled for its change management process. By default, the setting is disabled (False), so the Multi CI approval option remains hidden unless explicitly turned on.

When Enable Multi CI is set to False, the “Approval on Multi CI” checkbox is completely hidden from the Change form and users cannot select or use Multi CI Approval. This ensures that organizations that do not follow a multi-CI approval process maintain a clean, simplified UI for their change users. Once the property is set to True, the checkbox becomes visible, enabling change teams to leverage Multi CI Approval for relevant change records.

Administrators can configure this behaviour directly from Foundation → Configuration → Settings, where the Enable Multi CI property is available at the company level. After updating the property value and saving, the change takes effect immediately for the selected company, without requiring additional deployment steps. This makes it easy to pilot Multi CI Approval with specific companies or roll it out gradually across the tenant.

On the Change form, when Enable Multi CI is True, the “Approval on Multi CI” checkbox is visible to all roles (change manager, user, and viewer), while remaining editable only for change managers and change users. The capability applies to all change types except Standard Change, ensuring that routine, low-risk changes remain streamlined and do not require multi-CI approval configuration. This enhancement gives organizations more granular control over how multi-CI approvals are used, aligning the UI and behaviour with their governance model.
Tenant-Specific Risk Assessment and Change Type Visibility
Brought in the ability to hide the “GBP Risk Assessment” option from the Risk Assessment Methodology dropdown on the Change form for specific tenants that use a customized risk assessment model. For those tenants, the GBP Risk Assessment choice is removed from view so that users only see the approved methodology, while other tenants remain completely unaffected by this change.
Change Managers, Requesters, and other change users in the configured tenant will now work with a focused list of risk assessment options aligned to their governance model.
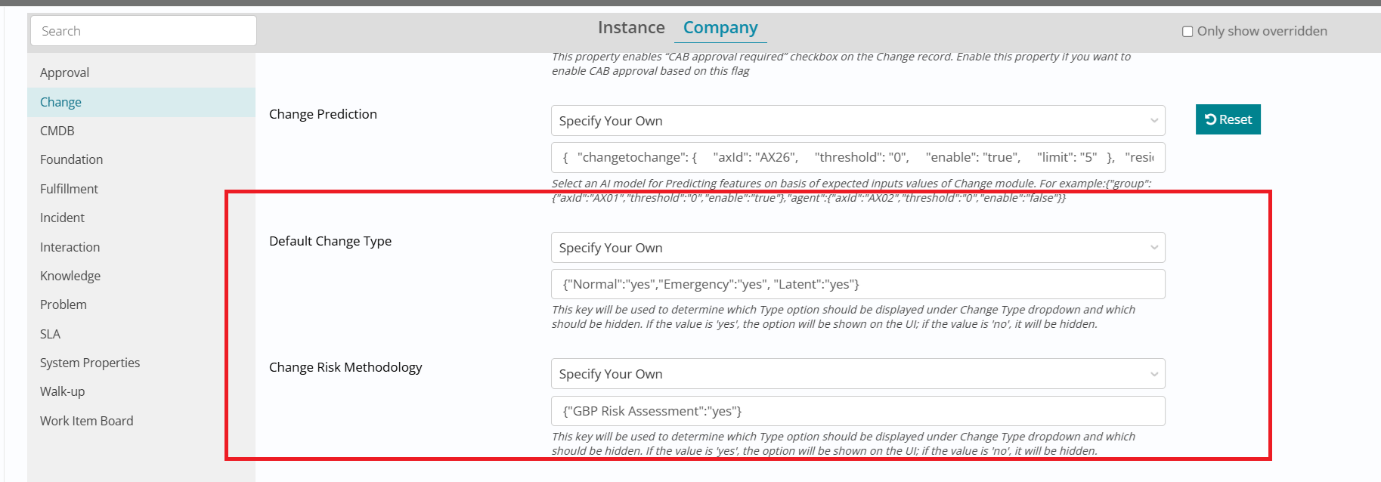
Administrators can manage this behavior via Admin Preferences → Change module, where they can toggle a Yes/No configuration under Change Risk Methodology to control whether the GBP option is shown or hidden. Once configured, they can verify the outcome by creating a new Change and confirming that the Risk Assessment Methodology dropdown no longer displays “GBP Risk Assessment” and instead only lists the customized option.

In addition, the enhancement adds configuration to hide the “Latent” change type from the Type dropdown when creating new Change Requests, for clients that do not use this category. Admins can control visibility under Admin Preferences → Change module by adjusting the Yes/No values in the “Default Change Type” configuration ensuring that “Latent” is excluded while all other relevant change types remain available. Change Requesters and Change Managers in the configured environment will see a simplified Type dropdown that reflects only the change types adopted by their organization.

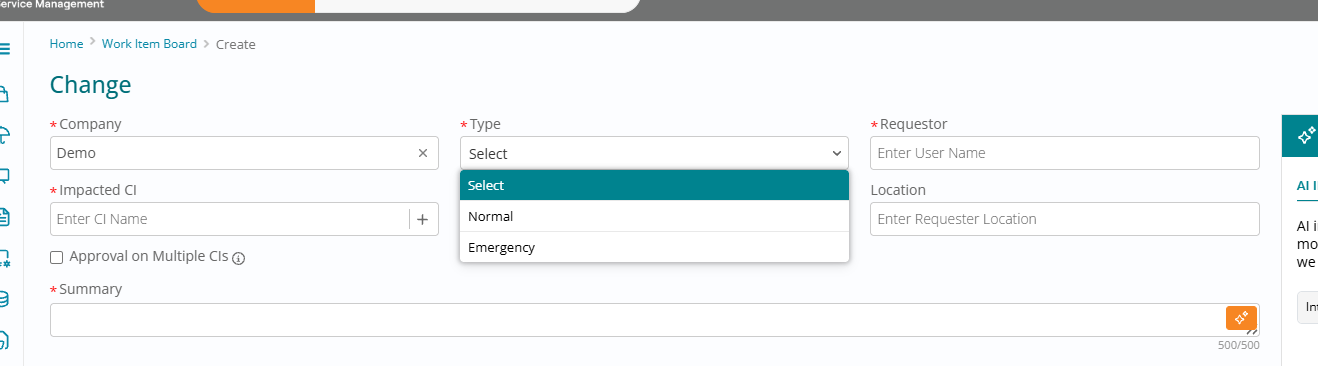
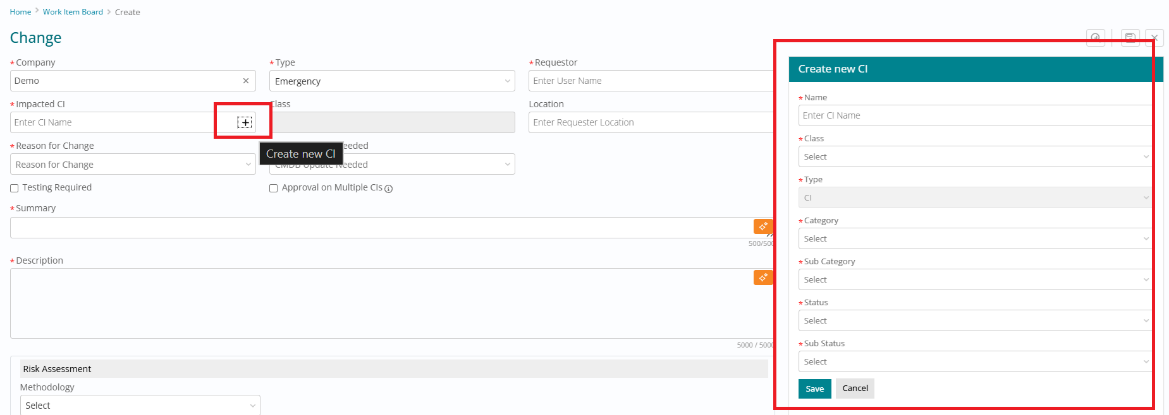
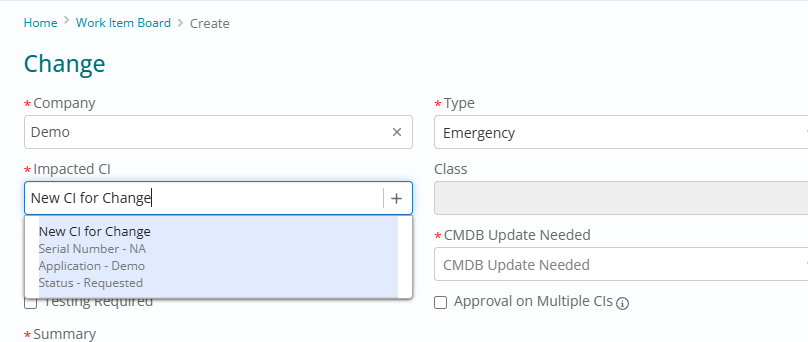
Create a New CI Directly while Raising a Change
This enhancement allows Change Managers and Change Users to create a new CI directly from the Create Change page, without needing separate CMDB access. While creating a change, users select the Company, go to the Impacted CI field, and either search for an existing CI or click the “+” (plus) icon to add a new one when the required CI is not available. The “+” icon is visible only on the Create Change page, ensuring CI creation is tightly controlled within the change workflow.
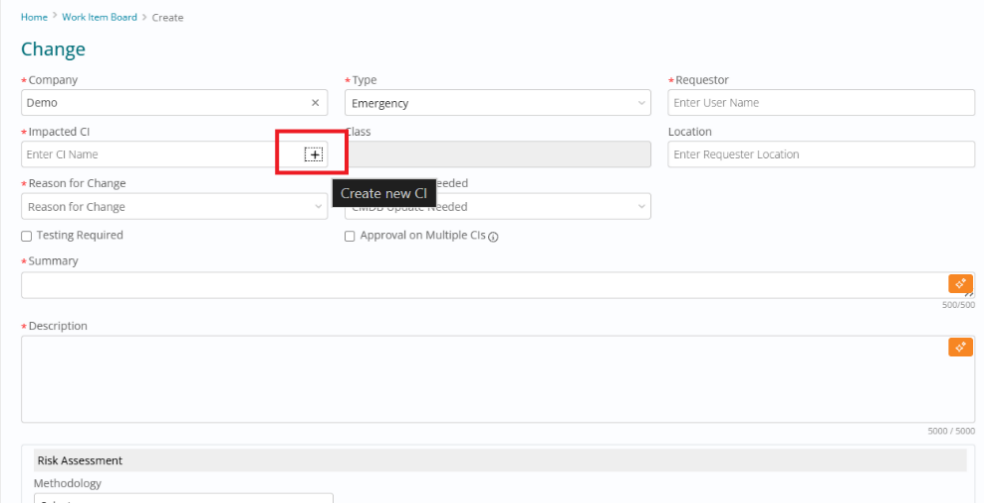
Clicking the “+” icon opens a Create New CI panel on the right side of the screen, which shows only the required fields so creation is quick and guided. Users fill in Name, choose Class, keep Type (pre-set to CI), and select Category, Sub Category, Status, and Sub Status (Sub Status options appear only after a Status is selected), while the Is External flag is hidden and automatically set to No by the system.
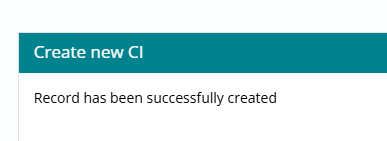
After reviewing, users click Save and the system creates the CI with the chosen status and sub-status, returning clear messages for success (“Record has been successfully Created”), failure (“Record failed to create”) or duplicates (“Record already exists”).
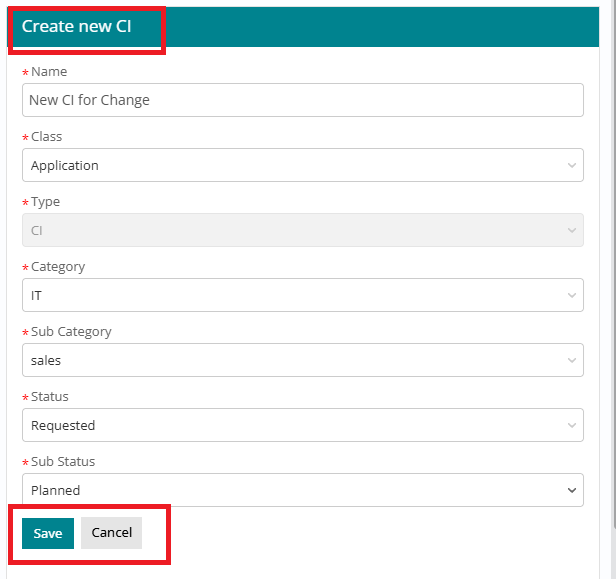
Once created, the new CI becomes immediately searchable under the Impacted CI field on the Change form, so users can select it and continue submitting the Change request without leaving the page. Key reminders include: CI creation is supported only while creating a Change, Sub Status is available only after selecting a Status, and no separate CMDB page access is required for these users, reducing friction while maintaining control over CI data.
Enhanced "Requested For" Search on Work Item Board and Advanced Search
We have upgraded the Requested For field so it behaves like the Assignment Group search on the Work Item Board (WIB) and across Advanced Search. Previously, Requested For could only return users from the self company; it now also includes users from associated consumer companies, making it much easier to select the correct end user across multi-company environments.
The enhanced behavior is available across all applicable modules—Incident, Request, Change and Problem—and is consistent whether you’re using Advanced Search or any Work Item Board view (All, Assigned to Me, Assigned to My Groups, etc.).
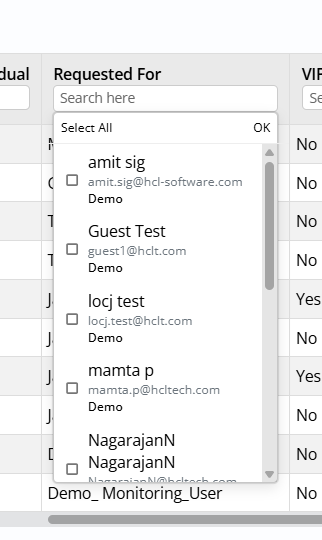
The Requested For field now supports typeahead search and multi-select, similar to Assignment Group. As you start typing a user name, the system dynamically displays matching users from both your own company and associated consumer companies, and you can select multiple users from the dropdown. Each chosen user appears as a selected item, and you can easily add or remove users, enabling more flexible filtering and targeting when analyzing work items.
The search interface for Requested For follows the same pattern as Assignment Group for a familiar experience. The dropdown includes a search box at the top, a scrollable user list, checkbox-based multi-selection, optional Select All, and an OK button to confirm the final selection set. This consistent interaction model reduces training effort and makes it straightforward to filter by one or many requestors in a single step.
In Advanced Search, the new behaviour means you can now search and filter results for users across both self and consumer companies and use multi-select to include multiple Requested For users at once in a single query. This significantly improves reporting, queue analysis and troubleshooting scenarios where work is performed for multiple customer organizations but needs to be viewed and filtered through a single Work Item Board or reporting view.
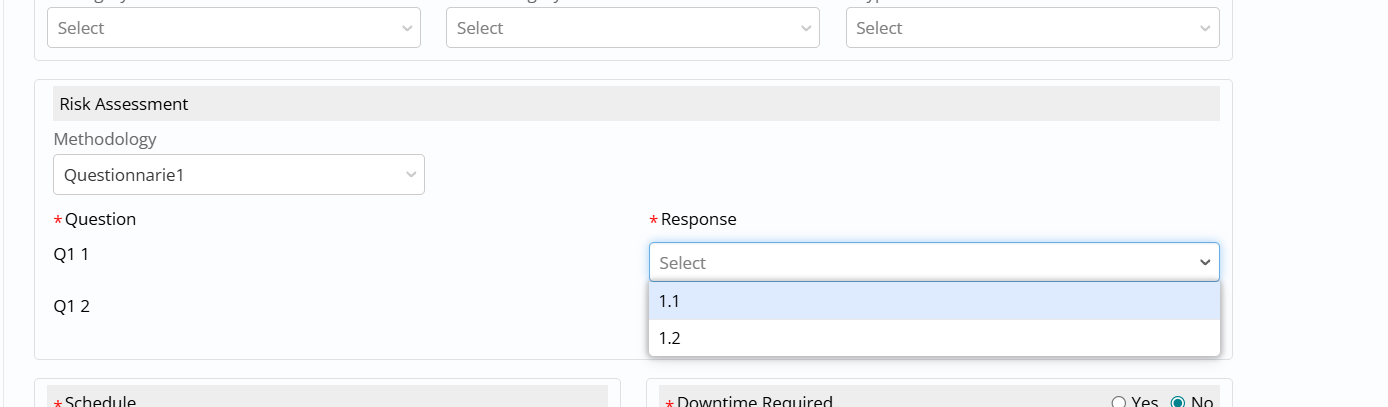
Sequenced Drop-Down Answers in Customized Change Risk Assessment
Sequencing is now applied to drop-down answers in the customized Risk Assessment Questionnaire in the Change module, so options appear in a predefined, logical order instead of an arbitrary list. Each answer (and question, where configured) has a sequence number, ensuring consistent presentation such as High → Medium → Low when those values are sequenced as 1, 2, and 3.
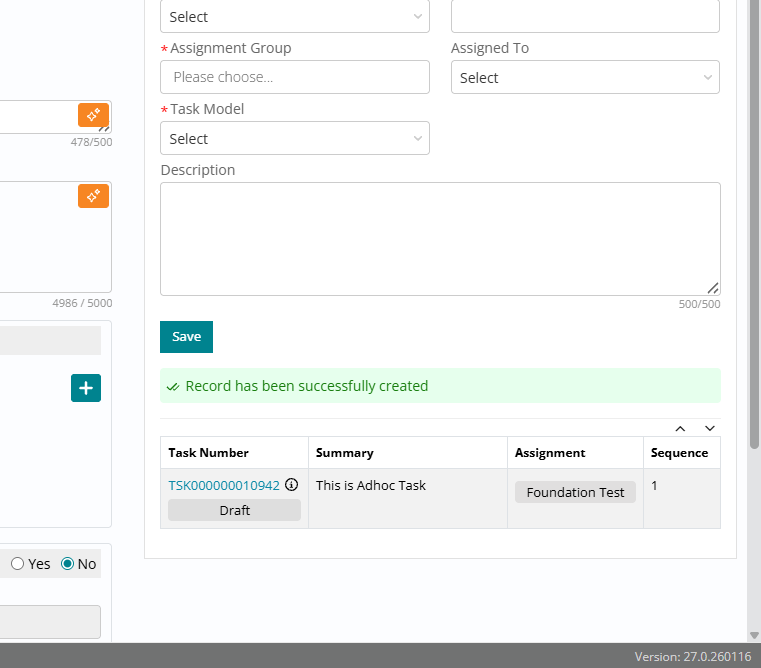
Flash Messages for Ad-hoc Task Creation
This enhancement introduces an immediate pop-up flash message whenever a support user creates an Ad-hoc task from the Task section of any Work Item. Earlier, after clicking Save, there was no confirmation and users had to scroll down to the task list to verify if the task was created; the new behavior improves usability by giving instant feedback on success or failure
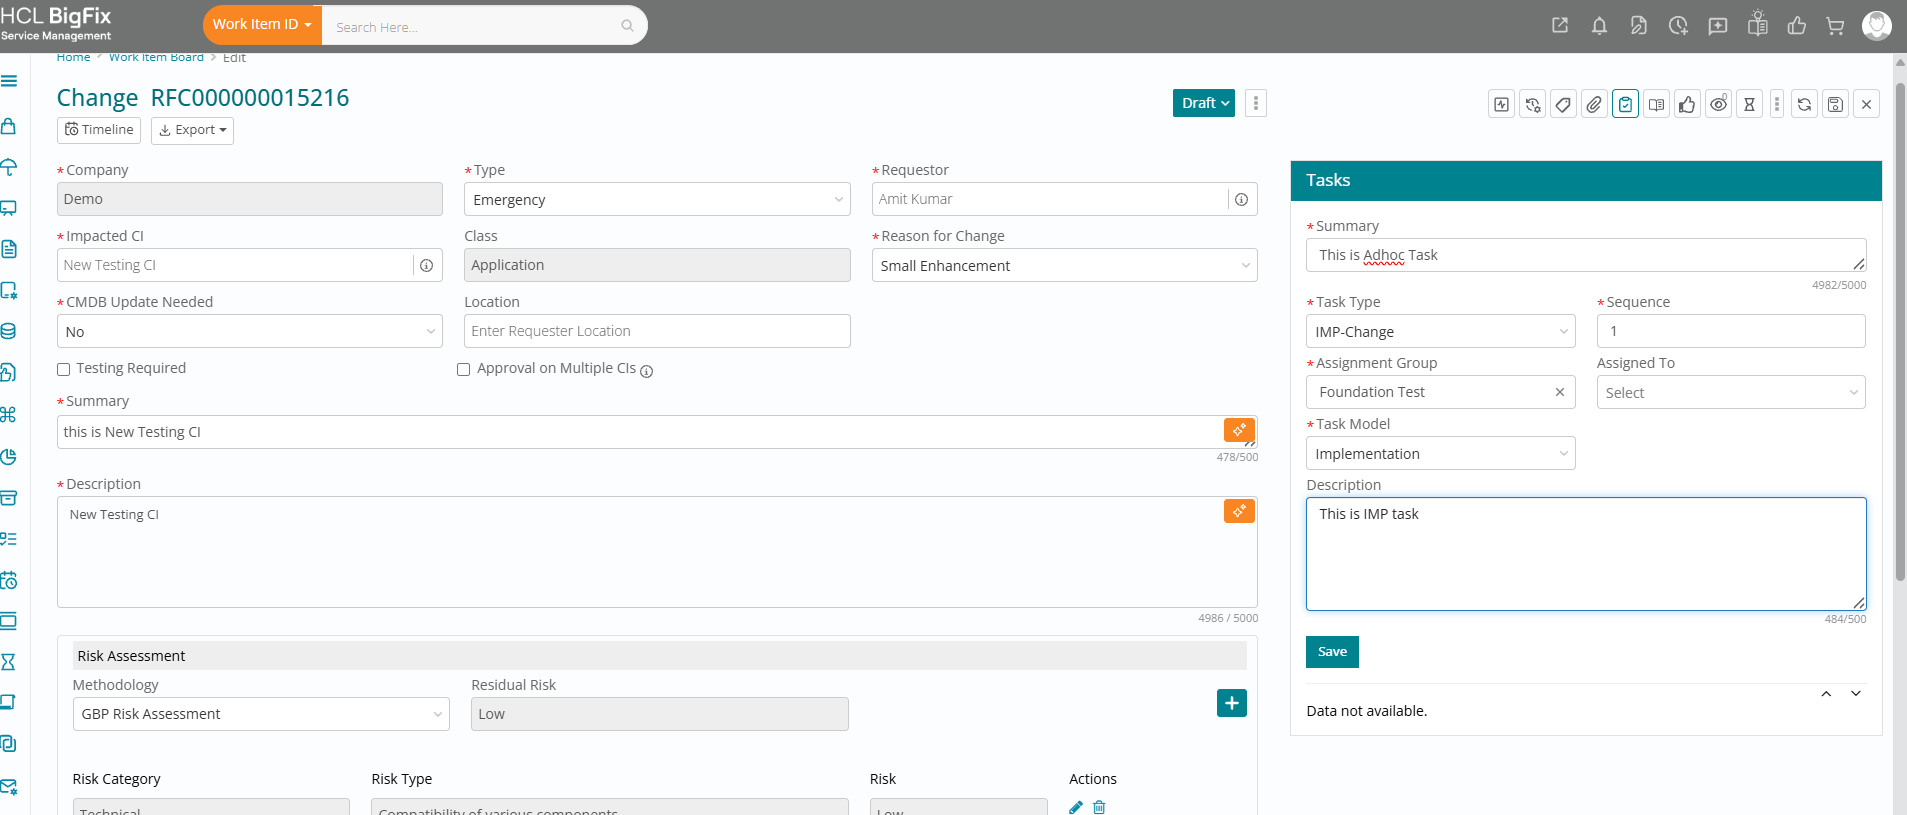
The pop-up appears when a support user creates an Ad-hoc task from the Task section on any Work Item and clicks Save. On success, a pop-up is displayed with the message “Task has been successfully created” along with an Ok button; clicking Ok closes the pop-up, and the newly created task is visible in the Task section.
If the Ad-hoc task creation fails, a pop-up appears with the message “Something went wrong”, prompting the user to retry the action. If the problem persists, the user is advised to contact the system administrator or raise a support ticket for investigation, ensuring errors are clearly surfaced instead of silently failing.
To use this capability, users simply open the required Work Item, navigate to the Task section, click Create Ad-hoc Task, enter the required details, and click Save, then wait for the pop-up confirmation. This behavior is consistent across modules accessed via the Work Item Board, so Ad-hoc task creation now always provides clear, on-screen confirmation of the outcome.
Change Implementation Task Governance
We have introduced time-window based governance for “Implementation” tasks in Change Management so that implementation work cannot proceed before the parent Change’s scheduled start time and task dates remain consistent with the change schedule.
At a high level, the requirement ensures:
- Implementation task planned dates are auto-derived from the parent Change schedule.
- Status progression is blocked before the planned start date (but other edits are still allowed).
- If the Change schedule is replanned, task dates are re-synced.
- Logic works across manual tasks, auto-created tasks (templates/task plans), and eBonding/MCP-created tasks
Scope (what is / isn’t included):
- Included:
- Applies to Standard, Normal, and Emergency changes
- “Implementation task becomes active once change enters scheduled start time” is catered, but only based on scheduled time .
- Explicitly NOT included
- Approvals-based gating (i.e., “only after final approvals”) is not included . It means if approvals are still pending and the change window starts, the task may proceed .
- Test Task becomes active after Technical Approval is not part of this requirement.
Functional behavior:
Restrict “working” before Change window (status-only restriction)
Before the task planned start date (i.e., before the Change scheduled start time copied into the task):
- Users can still edit non-status fields: Summary, Description, Dates, Comments, Assignment etc.
- Status transitions are blocked and throw an error: “Task cannot proceed before Planned Start Date”
- Cancel is allowed even before the window.
Date synchronization on Change replan
- When a Change is replanned, Implementation and Generic task expected/planned dates are synced to the latest Change scheduled dates.
Auto-populate Implementation task start/end from parent Change
- For Implementation tasks (manual / auto / eBonding), planned Start/End inherit from parent Change scheduled Start/End automatically.
- Users may edit dates, but only within the Change window constraints.

Adhoc task date population logic
When tasks are created ad-hoc under a Change:
- If created before Change window starts : → task start = change scheduled start, task end = change scheduled end
- If created after change scheduled start but still within window : → task start = current time, task end = change scheduled end

Validate date modifications are within window
- Task start date cannot be modified to a value before Change Scheduled Start Date
- Dates must respect the Change implementation window limits.Users can update task dates only within the Change Window
Prevent early status transition (Draft → anything)
- Draft → Assigned/InProgress/etc. is blocked if attempted before the task planned start date (which is driven from the Change schedule).
Mandatory Related Ticket Before Change Submission
This feature allows admins to enforce linking any ticket (Work Item) to any change request before submission. Admins can now enforce mandatory linking of a Work Item (Incident, Fulfilment, Change, or Problem) before a Change Record can be submitted for approval.
This replaces the previous Emergency-only Incident linking setting and extends control to Normal, Emergency, and Latent change types.
Before:
- Only Emergency Changes could enforce Incident linking — no other change types were covered.
- There was no way to enforce linking for Normal or Latent change types.
- The admin setting was labelled "Enforce Incident linkage with Emergency Change".
Now:
- A single admin setting now controls linking enforcement for Normal, Emergency, and Latent change types independently.
- Admins can specify which Work Item types (Incident, Fulfilment, Change, Problem) are required per change type.
- The admin setting is renamed to: Enforce Work Item linkage with Change record
- Submission is blocked at the point of review if the required link is missing.
The enforcement toggle defaults to OFF for all existing and new customers.
No change in behaviour until an Admin actively enables it.
For Admins — Configuring the Setting
- Go to Company Settings in BigFix SM.
- Locate the setting: Enforce Work Item linkage with Change record under Change section
- Enable enforcement per change type (Normal / Emergency / Latent) as needed.
- For each change type, select which Work Item types must be linked (Incident, Fulfilment, Change, Problem).
- Save the configuration. The rules take effect immediately for all new submissions.
Default value - Specify your own
{“Normal” : {“Enforce” : “No” , “WI” : [“Incident” , “Fulfillment” , “Change” , “Problem” ] } , “Emergency” : {“Enforce” : “Yes” , “WI” : [“Incident”] } , “Latent” : {“Enforce” : “No” , “WI” : [“Incident” , “Fulfillment” , “Change” , “Problem” ] }}

For Support Users — Submitting a Change
- Create or edit your Change Record as normal.
- Before submitting for review, link the required Work Item in the Relations section.
- Submit for review. If the required link is present, submission proceeds normally.
- If the link is missing, an error message appears and the submission is blocked.
The linked Work Item is automatically captured in the Comments of the Change Record.
RULES & VALIDATIONS
- Enforcement is OFF by default — admins must turn it on for it to have any effect.
- If enforcement is OFF for a change type, the existing warning popup behaviour remains unchanged.
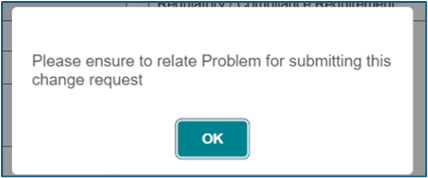
- When enforcement is ON and no Work Item is linked, this error appears: "Please ensure to relate Incident / Fulfilment / Change / Problem for submitting this change request" (actual Work Item types shown are based on admin configuration).
- The error blocks form submission — the Change cannot proceed to review until the link is added.
- Any supported relationship type between the Work Item and the Change Record satisfies the requirement.
Enforcement applies only at submission — users can save drafts without linking (link before submit)
If a Change type has enforcement ON but no Work Item types configured, contact your Admin.
Submission will be blocked and cannot proceed without the correct configuration in place.
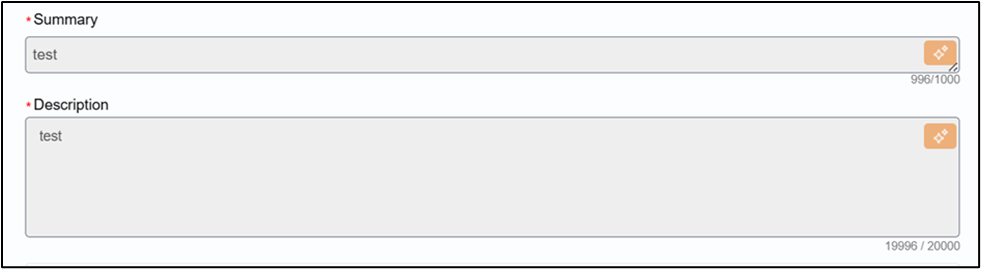
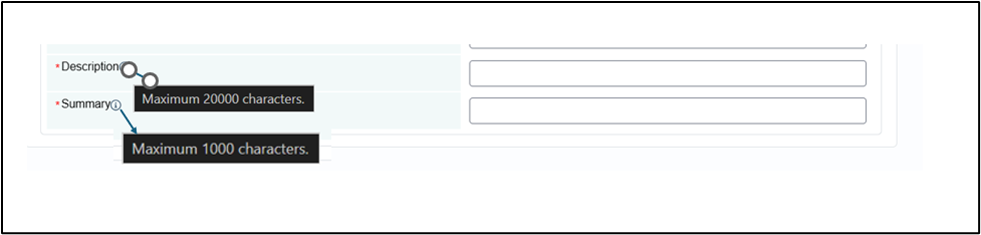
Change Form Summary and Description Character Limit Increase
The current Summary and Description fields in the BFSM Change Module supports a character limit of 500 and 5000 Characters respectively , which is insufficient for users who need to send detailed notifications. Hence increase in the character limit from 500 to 1000 for Summary and 5000 to 20000 for Description field .
Previous Behavior
| Area | State |
| Character limit | 500 for Summary and 5000 for Description |
| Module coverage | Change module |
Updated Behavior
| Area | State |
| Character limit | 1000 for Summary and 20000 for Description field |
| Module coverage | Change module from WIB and Standard change form Catalog page |
| UI support | Field must allow entry and display of up to 1000 characters for Summary and 20000 characters for Description |
| Backend support | Backend field type must be changed to Text for both Summary and Description |
Create page

Edit page
Standard Change form
Test Task Dates auto Copied from Change Form
This content is related to how test start and end dates now work automatically — and what rules apply when you create or edit test tasks and is for anyone who works with the Change module in BigFix Service Management (BFSM):
- Change User
- Change Manager
- Implementation User
- Implementation Manager
- Service Desk
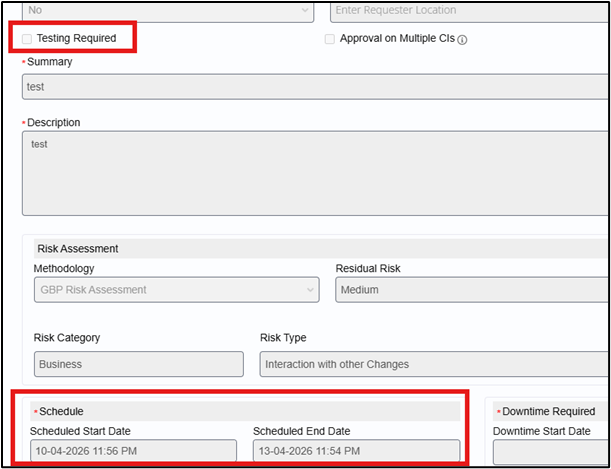
What's New?: Earlier when user selected Testing Required on a Change Request, user had to manually enter the same test dates again on each Test Task. This was time-consuming and chances of error were high. For default tasks, the dates were copied from the Change Schedule rather than Testing dates .
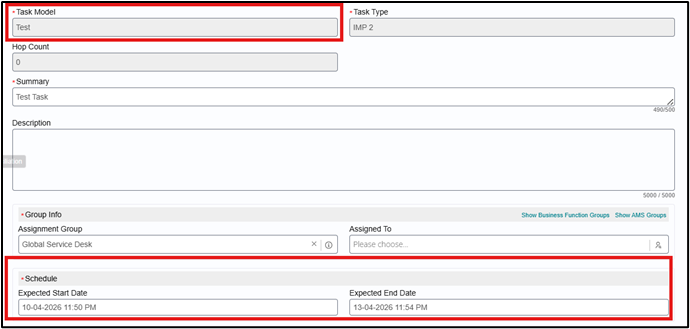
BFSM automatically copies the Test Start and End Dates from the Change form to all Default Test Tasks
The Test Tasks cannot start before the mentioned Planned Start Date on the Test Task form.
So now, When 'Testing Required' is checked
- The Testing Window date fields (Test Start Date and Test End Date) appear on the Change form.
- When you save the Change, System automatically copies those dates to the Planned Start and Planned End on all Default Test Tasks.
On Change Form then Testing required is checked , dates are copied on Test task as displayed below:


When 'Testing Required' is NOT checked
- No change to how things worked before.
- Tasks use the Change Schedule dates.
- You can start or end tasks at any time — no extra validations
Test Date validation Rules :
Rule 1 — No Past Dates
- You cannot enter a past date for Test Start or Test End Date on the Change form.
- This applies to both Normal and Emergency change types.

Rule 2 — Test Task Dates Must Stay Within the Testing Window
- If you manually edit the Planned Start or Planned End date on a Default Test Task, the date must fall within the Testing Window set on the Change form.
- If it doesn't, you will see this error: "Test Task Planned Dates should fall within Change's Testing Window"

Rule 3 — You Can't Start a Test Task Early
- A Test Task cannot be started before the Testing Window Start date and time.
- If you try to start it too early, a popup message will appear telling you it cannot be started before the testing schedule.
- You can close a Test Task at any time after it has been started — even before the Planned End Date.
Rule 4 — Closed Tasks Can't Be Edited
- You can only edit Planned Start and Planned End dates while the task is in an active (non-terminal) status.
- Once a task is Closed, Cancelled, or Completed, the dates are locked.
Rule 5 — Test Task must be closed first before starting Change Implementation( Same as before)
- Only after Test Task is completed, other tasks can be closed and Change can proceed
- Task closure should strictly follow this sequence: Test → Implementation & Generic → CMDB
-
As per existing functionality, without closing Test Task, tasks of other models (Implementation/Generic/CMDB) should not be allowed to close
These date rules only apply to Default (auto-generated) Test Tasks.
Ad-hoc Test Tasks you create manually are not affected — they work the same as before due to the fact that Test tasks can be created at any point in time of Change life cycle
Who Can Edit Test Task Dates:
| Role | Can Edit Test Task Dates? | Notes |
| Change User | Yes — within Testing Window | Cannot edit in Terminal Status |
| Change Manager | Yes — within Testing Window | Cannot edit in Terminal Status |
| Implementation User | Yes — within Testing Window | Cannot edit in Terminal Status |
| Implementation Manager | Yes — within Testing Window | Cannot edit in Terminal Status |
| Change Viewer | No — read only | No edit access to any dates |
| Service Desk | Yes — within Testing Window | Cannot edit in Terminal Status |
If a Change ticket has already been created and you update the Testing Required dates afterwards, those changes will NOT automatically sync to the Test Tasks.
The above point applies to all task types — Default, Ad-hoc, and tasks without Testing Required.
Action required: Manually update the Planned dates on each affected Test Task.
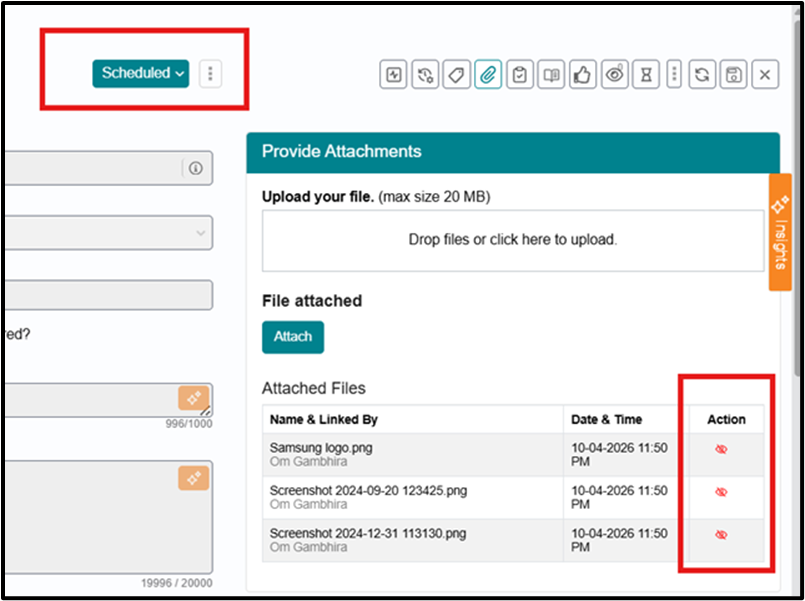
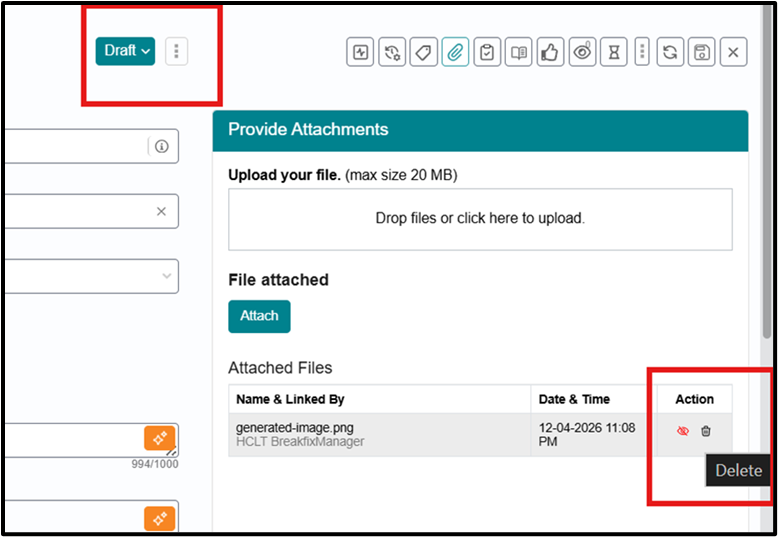
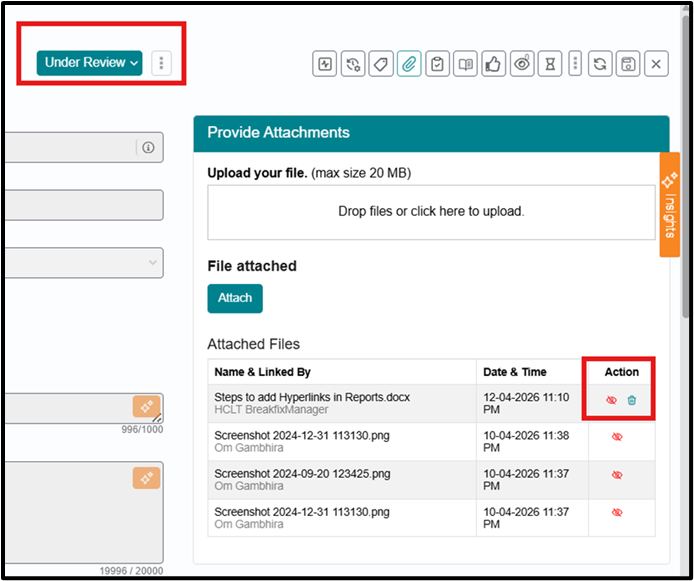
Prevent Attachment Deletion after Change Approval
To ensure that once an approval has been given, attachments cannot be deleted from the change ticket after the first approval.
Updated Process Flow
Pre‑Approval (Before Under Review):
- Change ticket is created and remains in a pre‑approval status (e.g., Draft, Submitted,
Pending Approval).
- Users with existing permissions can Add attachments & Delete attachments.
- Attachment behavior is unchanged from today.
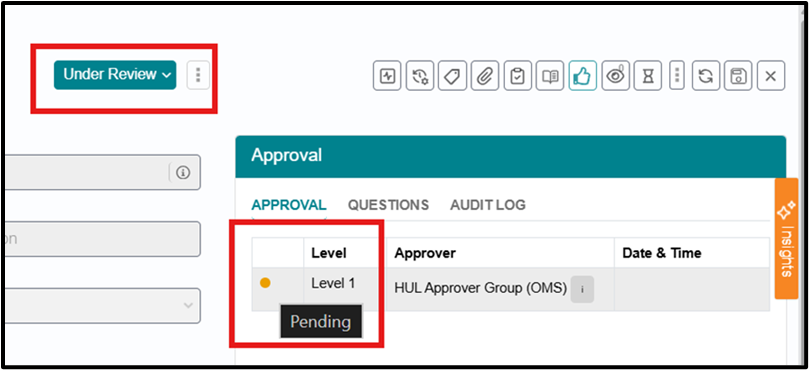
At First Approval / Under Review:
- First approval is granted for the change as per existing approval workflow.
- Change transitions to an Under Review state (or equivalent approval‑granted state defined in workflow).
- System locks deletion of all attachments on the ticket:
- Delete icon/actions are removed or disabled in the UI.
- Backend/API requests to delete attachments for this change are rejected.
Post‑Approval (Under Review, Scheduled, Referred Back):
- Users may add new attachments for additional evidence or implementation
details.
For all attachments (existing and new), users cannot delete any attachment once the change is in Under Review or any later status where approval level 1 has been granted.
This includes scenarios where Ticket is moved directly to Scheduled due to absence of formal approvals & Ticket is Referred Back after having been approved.
- Allow Adding New Attachments After Approval
Adding new attachments after approval is allowed for approved changes.
New attachments can be added while the change is Under Review, Scheduled, or Referred Back. Once added, these new attachments are also subject to the no‑delete rule for that change.
Preserve Pre‑Approval Behavior
- Before any approval has been granted, attachment behavior remains unchanged.
- Users with existing permissions can add and delete attachments as they do today.
At Under Review pre-approval -
Role Coverage
The restriction on deleting attachments post‑approval applies to all roles, including at minimum:
- Change User
- Change Implementation User
- Change Implementation Manager
- Change Manager
- Approver
- Service Desk
Change Plan and Related Records Outbound to External ITSM
This feature ensures that all change plan details (Validation, Test, Back-Out, Implementation) are automatically sent from BFSM to the customer’s ITSM system. It removes manual effort and ensures complete information is available for change management, improving consistency and traceability of change requests across systems.
Now, plan details are automatically included in the outbound payload.
All plan types and descriptions flow to the customer ITSM system.
No manual intervention required for sharing plan information.