Manage Data Sources
This section describes how to specify the data source and how the data is processed for automation and analysis in an organization.
To create a data source, perform the following steps:
- Log in with Organization Admin user.
- On the main menu bar, click Configuration 🡪 Manage Data Sources.
- On the Manage Data Sources screen, click
 .
.Figure 1. Data Sources 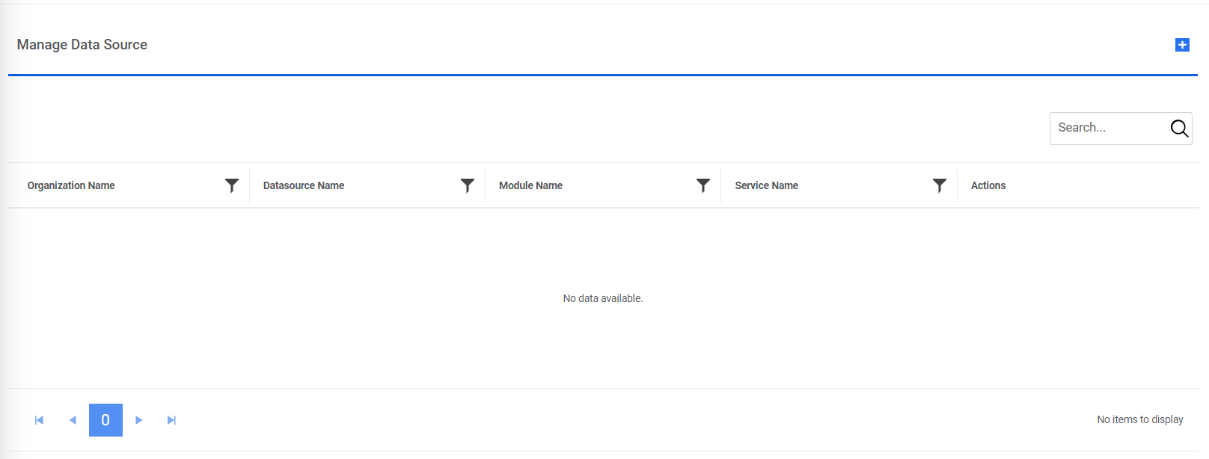
- The Manage Data Source page appears with the following tabs:
- Data Source
- Fetch Data Configuration
- Release Rules Configuration
Figure 2. Organization Details 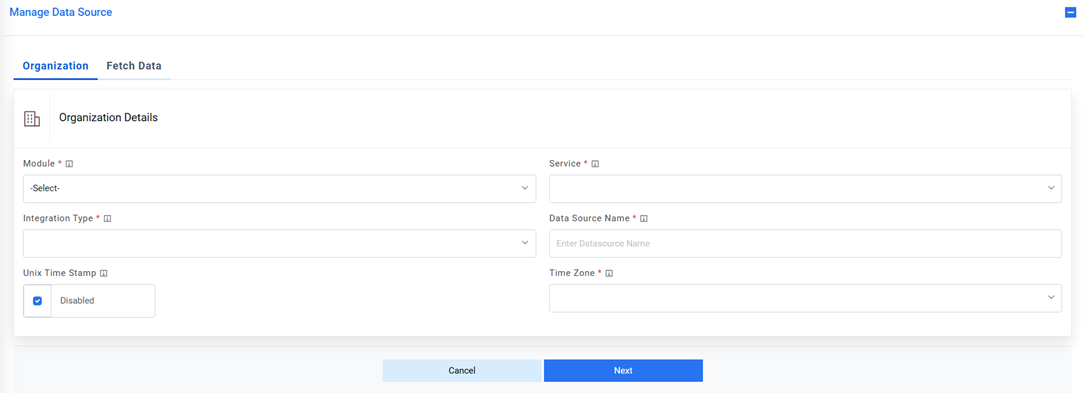 Note:Release Rules Configuration is only applicable for the following Module types- Incident Management, Change Request Task and Service Request Task. This tab will not be activated for other module types.
Organization Details
Users can set up organization details, for which the data source will be created, by performing the following steps:
- On the Organization tab, Select a module where the organization brings the data from the data source in iAutomate, from the Module field.
- Upon selection of the Module, the following two additional input parameters will
be populated. Select the appropriate option
- Closure: Check this option if you want product to manage the ticket closure updates instead of the RBA tool. In this scenario, an additional tab “Close Rules Configuration” will be activated for providing further details, steps for which are mentioned later.
- InProgress: Check this option if you want product to manage the tickets in
progress status updates instead of the RBA tool. In this scenario, an additional tab
“InProgress Rules Configuration” will be activated for providing further
details, steps for which are mentioned later.
Figure 3. Select Organization Details 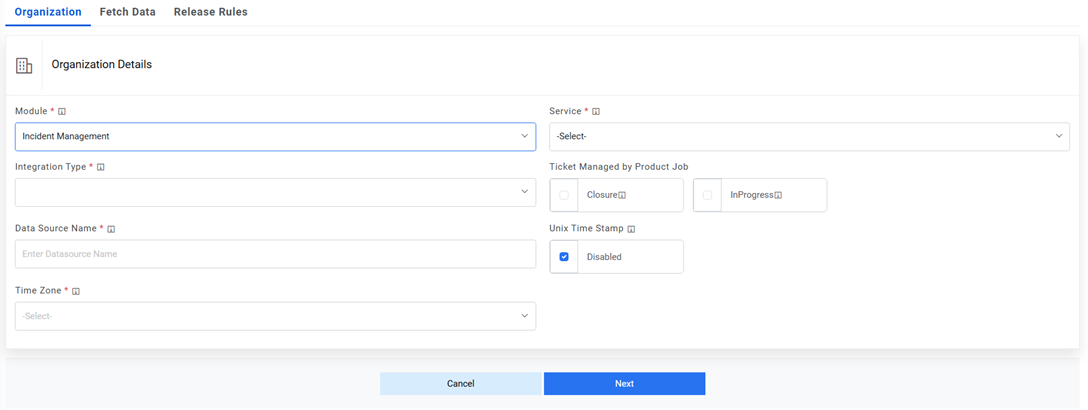
- Select a service, with which iAutomate is integrated and pulls data for automation, from
the Service field. Upon selection of service, the below 2 options are populated:
- Attachment: Check this option if you want to use the product’s API to Upload/Download attachment of ServiceNow.
- Assignation: Check this option if user wants to use the assignation feature
of the product where the configuration is done for assigning the ticket to separate
user/group.
Figure 4. Select Organization Details (Cont.) 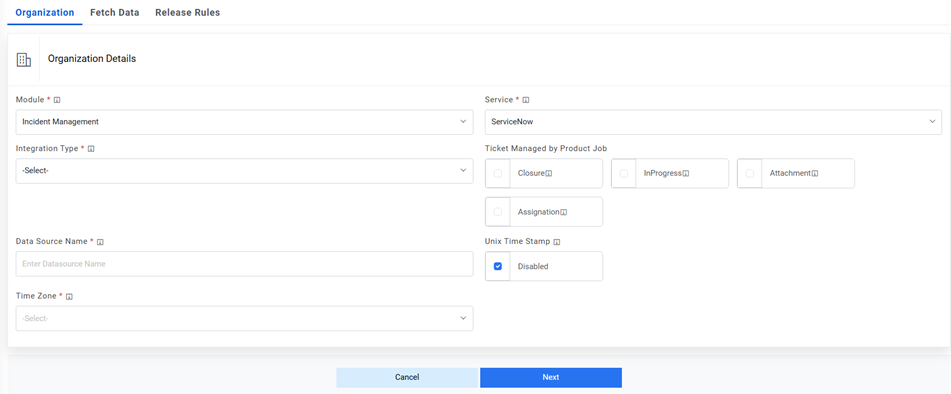 Note:The attachment option is available if selected Service is servicenow. Assignation is visible if selected service is either ServiceNow or servicexchange.
Multiple source types are available.
- Select the integration method to integrate between iAutomate and the selected service type from the Integration Type field.
- Provide the data source name.
- Select the time zone in which ITSM tool API return data.
- Unix Time Stamp: By default, its disabled but if ITSM provides response in different time format such as UNIX then this needs to be unchecked.
- Click Next to update the data source details.
Figure 5. Select Organization Details (cont.) 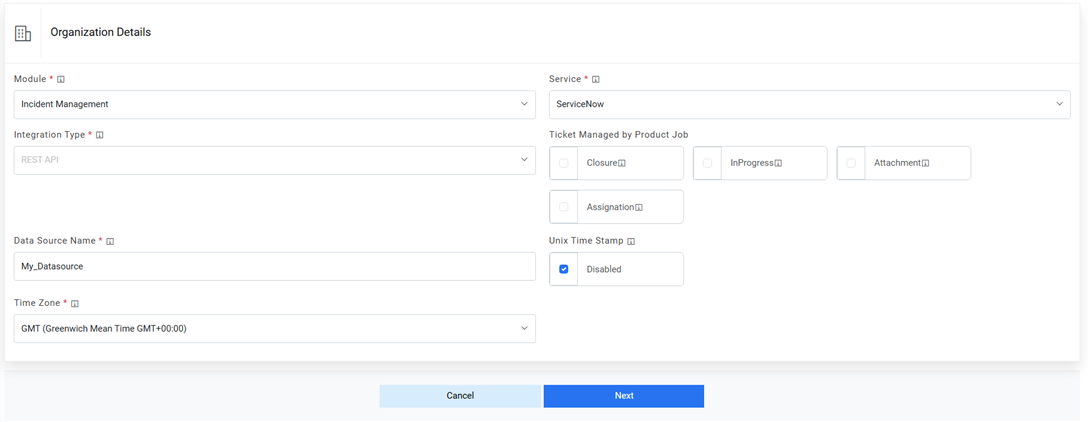 Note:All fields marked with an asterisk (*) are mandatory.
Fetch Data Configuration
Users can configure a method for fetching data from the data source by using the following steps:
- On the Fetch Data Configuration page, type the URL of the selected service type in the URL field to fetch data.
- This URL contains the placeholders that display the parameters based on the applied
clause such as the number of records to be fetched, query type, date on which the data is
fetched, and the order by and so on. It depends on the URL or API provided by the
tool.
Figure 6. Fetch Data Configuration 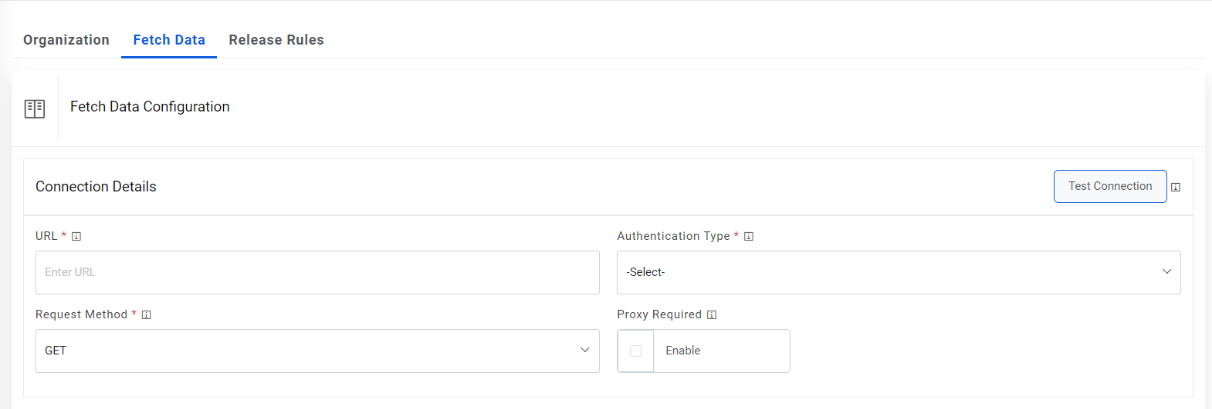 Note:The user can apply multiple clauses into the URL to display only the required parameter into the placeholder. Once you hit the URL, only the placeholders with a hashtag will be displayed with the associated parameters in the URL Path Parameters column. Whenever a user wants to change the data to be filtered, always change the logic in the URL to get the specific parameters.
 - Select the Authentication Type. iAutomate supports the following types of
authentications:
- WindowsAuth
- OAuth2
- BasicAuth
- Certificate Based Auth
Figure 7. Authentication Types 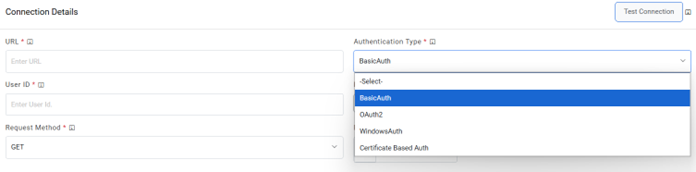
- Selection of Windows / Basic Authentication requires only Username and
Password.
Figure 8. Authentication Type (Windows / Basic) 
- Selection of Certificate based Auth requires CRT file location and Key file location of
the certificate.
Figure 9. Authentication Type (CRT / Key file location) 
- Selection of OAuth2 authentication type, users needs to provide the below
details:
- Type the Authentication URL.
- Type the Username and Password.
- For password, click on Add Password button next to it. If the password is available in
plaintext, then select Input type as Input Text and enter the password in Value field.
Else if it is available in Azure Key Vault then select Input Type as Azure Key Vault and
then select any of the configured details from the value field. Else if it is available in
any Key Vault such as CyberArk or Secret Manager then select Input Type as CyberArk or
Secret Manager and then select any of the configured details from the value field.
Figure 10. Password in Plaintext .jpg)
Figure 11. Password from Key Vault (CyberArk) .jpg)
Figure 12. Password from Secret Manager .png)
Figure 13. Password from Azure Key Vault .jpg)
Figure 14. Authentication Type (OAuth2) 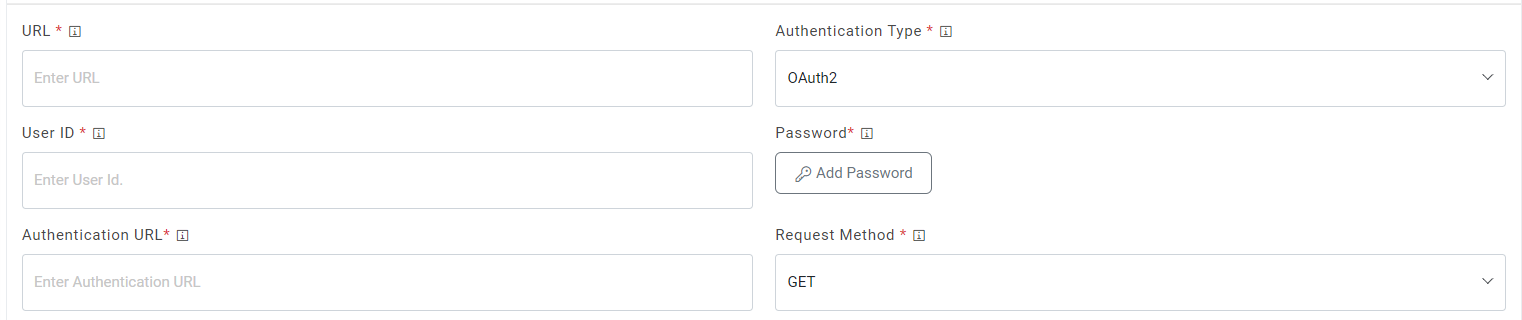
- Select Request Method as GET, PUT, POST or PATCH.
- Select Proxy Required if the environment needs access to content from data sources outside the firewall.
- Click on Test Connection to check accessibility of URL from service. Testing the connection is not mandatory, you can still create Data source.
- To test connection, the URL of ITSM should be whitelisted else it will throw alert stating ‘Use only WhiteListed URL ‘. To whitelist the URL kindly, refer ‘ HCL iAutomate KRS Guide’ .
- If the user has additional parameters, click Add Authentication Parameters under the
Request Authentication Parameters tab.
Figure 15. Add Authentication Parameters 
- Type the ‘Request Header Parameter’.
Figure 16. Request Header Parameter 
- Type the Request Body in JSON format.
- Type the Response Body in JSON format.
- Click Extract Keys . It adds the parameter and lists to the Mandatory page.
- Click Add the Response Parameter if you want to add a new parameter to the
Mandatory page.
Figure 17. Add response Parameter 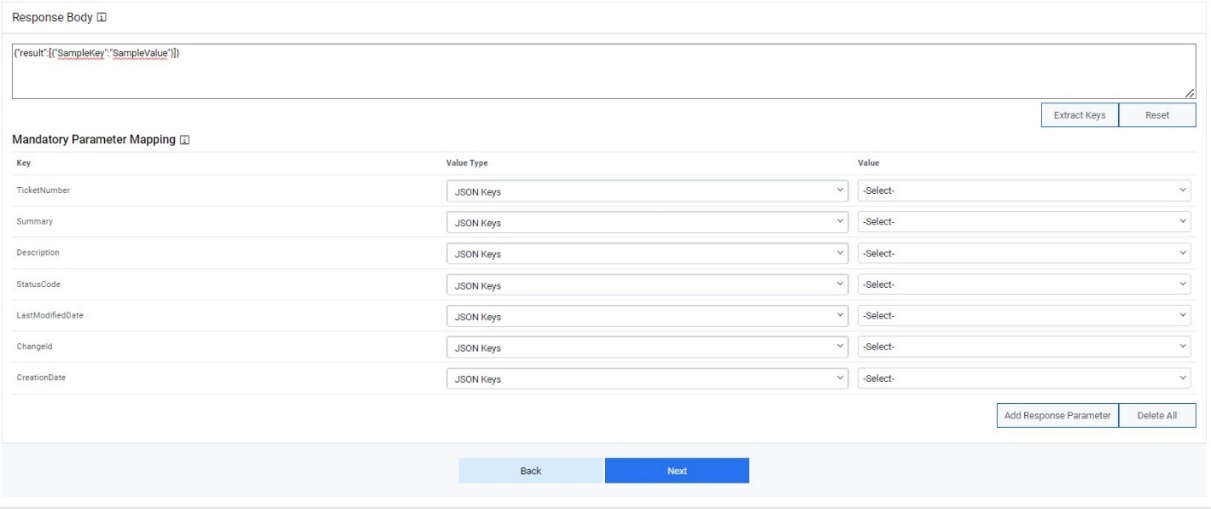
Release Rules Configuration
User can configure a method for releasing the ticket from iAutomate queue by performing the following steps.
- On the Release Rules Configuration page, type the URL of the selected service type in the URL field to release data.
- This URL contains the placeholders that display the
parameters based on the applied clause. It is dependent on the URL or API provided by the
tool.
Figure 18. Release Rule Configuration 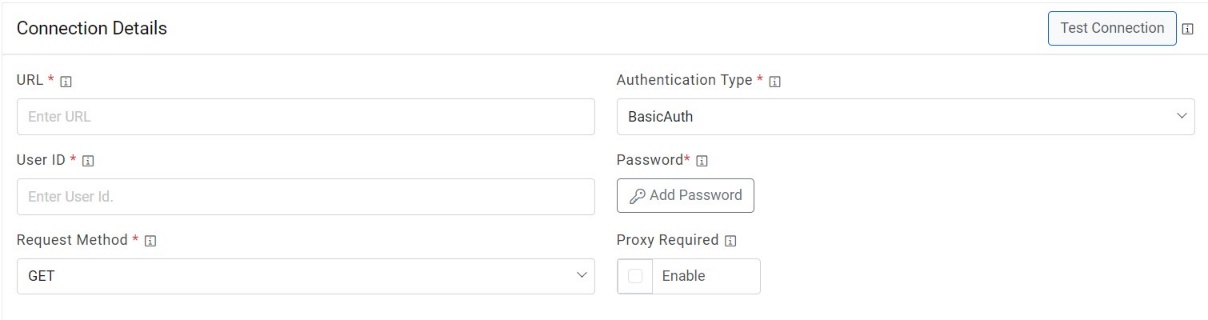 Note:User can apply multiple clauses into the URL to display only the required parameter into the placeholder. Once you hit the URL, only the placeholders with a hashtag will be displayed with the associated parameters in the URL Path Parameters column. Whenever user wants to change the data to be filtered, always change the logic in the URL to get the specific parameters.
 - Select the Authentication Type. iAutomate supports the following types of
authentications:
- WindowsAuth
- OAuth2
- BasicAuth
- Certificate Based Auth
Figure 19. Authentication Types 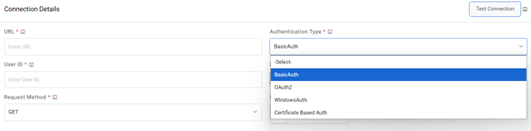
- Selection of Windows / Basic authentication requires only Username and
Password.
Figure 20. Authentication Type (Windows / Basic) .jpeg)
- Selection of Certificate based Auth requires CRT file location and Key file location
of the certificate..
Figure 21. Authentication Type (CRT and Key file location ) 
- Selection of OAuth2 authentication type, users needs to provide the below
details.
- Type the Authentication URL.
-
Type the Username and Password.
- For password, click on Add Password button next to it. If the password is available
in plaintext, then select Input type as Input Text and enter the password in
Value field. Else if it is available in Azure Key Vault then select Input
Type as Azure Key Vault and then select any of the configured details from the value
field. Else if it is available in any Key Vault such as CyberArk or Secret Manager
then select Input Type as CyberArk or Secret Manager respectively and then select any
of the configured details from the value field.
Figure 22. Password in Plaintext .jpg)
Figure 23. Password from Key Vault (CyberArk) .jpg)
Figure 24. Password from Secret Manager .png)
Figure 25. Password from Azure Key Vault .jpg)
Figure 26. Authentication Type (OAuth2) 
- Select Request Method as GET, PUT, POST or PATCH.
- Select Proxy Required if the environment needs access to content from data sources outside the firewall.
- Click on Test Connection to check accessibility of URL from service. Testing the connection is not mandatory, you can still create Data source.
- To test connection, the URL of ITSM should be whitelisted else it will throw alert stating ‘Use only WhiteListed URL ‘. To whitelist the URL kindly refer ‘ HCL iAutomate KRS Guide’ .
- If the user has additional parameters, click Add Authentication Parameters under the
Request Authentication Parameters tab.
Figure 27. Authentication Type (Windows / Basic) .jpeg)
- Type the Request Header Parameter.
Figure 28. Request Header Parameter .jpeg)
- Type the Request Body in JSON format.
Figure 29. Request Body 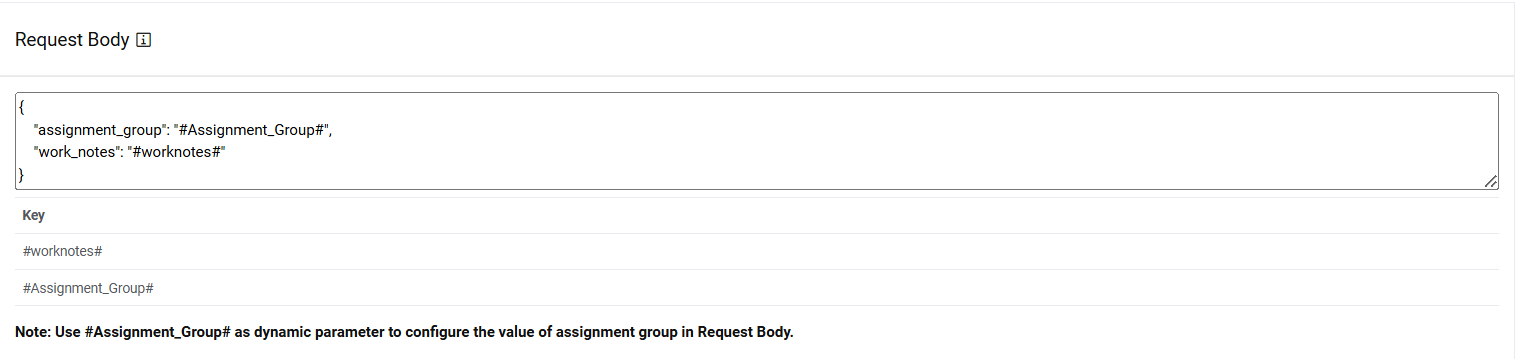 Note:
Note:The values for the parameters will be set in the Mange Rules section.
- Type the Response Body in JSON format.
Figure 30. Response Body 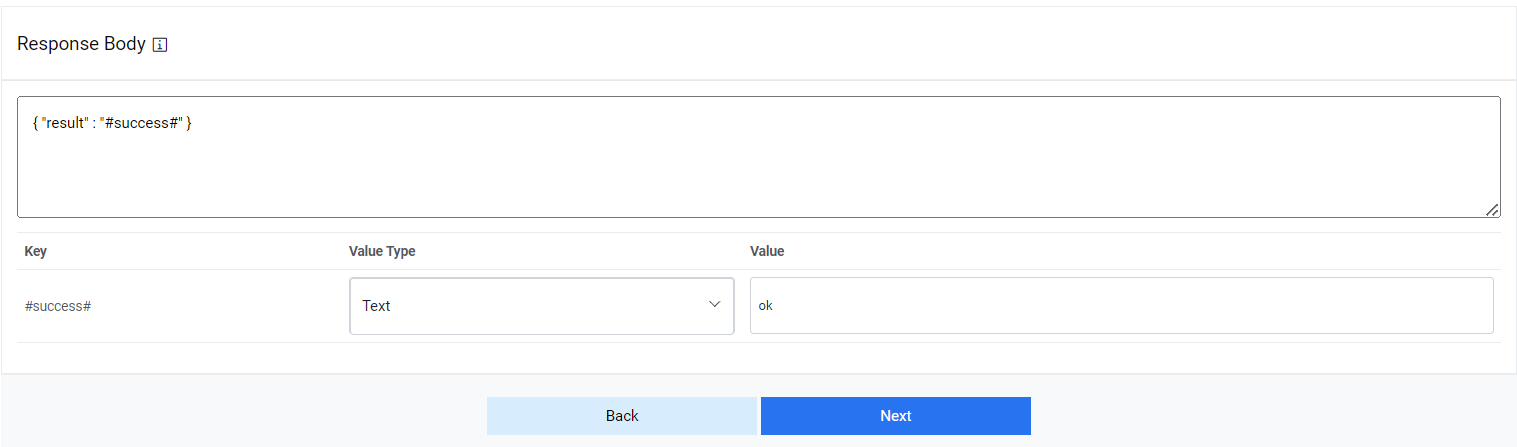
- Click Submit to create the Data Source.Note:All fields marked with an asterisk (*) are mandatory.
Close Rules Configuration
Users can configure the method for Closing the ticket from iAutomate queue by performing the following steps.
- On the Close Rules Configuration page, click on Same as Release if similar configurations as mentioned in “Release Rules Configuration” are required, else proceed ahead.
- Type the URL of the selected service type in the URL field to release data.
- This URL contains the placeholders that display the
parameters based on the applied clause. It depends on the URL or API provided by the
tool.
Figure 31. Close Rules Configuration 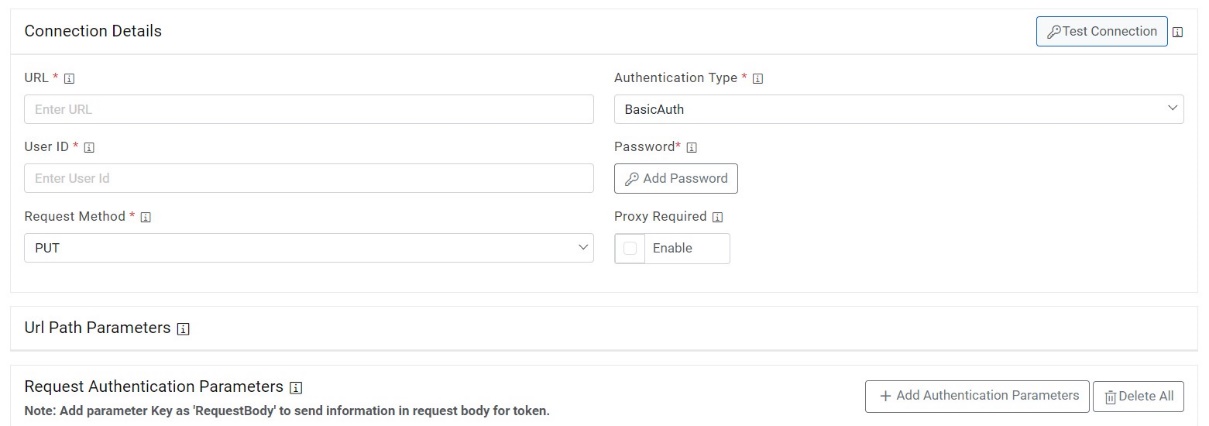 Note:User can apply multiple clauses into the URL to display only the required parameter into the placeholder. Once you hit the URL, only the placeholders with a hashtag will be displayed with the associated parameters in the URL Path Parameters column. Whenever user wants to change the data to be filtered, always change the logic in the URL to get the specific parameters.
 - Select the Authentication Type. iAutomate supports the following types of
authentications:
- WindowsAuth
- OAuth2
- BasicAuth
- Certificate Based Auth
Figure 32. Authentication Types 
- Selection of Windows / Basic authentication requires only Username and
Password.
Figure 33. Authentication Type (Windows / Basic) 
- Selection of Certificate based Auth requires CRT file location and Key file location
of the certificate.
Figure 34. Authentication Type (CRT and Key file location) 
- Selection of OAuth2 authentication type, users needs to provide the below
details.
- Type the Authentication URL.
- Type the Username and Password.
- For password, click on Add Password button next to it. If the password is available
in plaintext, then select Input type as Input Text and enter the password in
Value field. Else if it is available in any Key Vault such as CyberArk or
Secret Manager then select Input Type as CyberArk or Secret Manager respectively and
then select any of the configured details from the Value field.
Figure 35. Password in Plaintext .jpg)
Figure 36. Password from Key Vault (CyberArk) .jpg)
Figure 37. Password from Secret Manager .png)
Figure 38. Password from Azure Key Vault .jpg)
Figure 39. Authentication Type (OAuth 2.0) .png)
- Select Request Method as GET, PUT, POST or PATCH.
- Select Proxy Required if the environment needs access to content from data sources outside the firewall.
- Click on Test Connection to check accessibility of URL from service. Testing the connection is not mandatory, you can still create Data source.
- To test connection, the URL of ITSM should be whitelisted else it will throw alert stating ‘Use only WhiteListed URL ‘. To whitelist the URL kindly refer ‘HCL iAutomate KRS Guide’.
- If a user has additional parameters, click Add Authentication Parameters under the tab
Request Authentication Parameters.
Figure 40. Authentication Type (Windows / Basic) 
- Type the Request Header Parameter.
Figure 41. Request Header Parameter .jpeg)
- Type the Request Body in JSON format.
Figure 42. Request Body 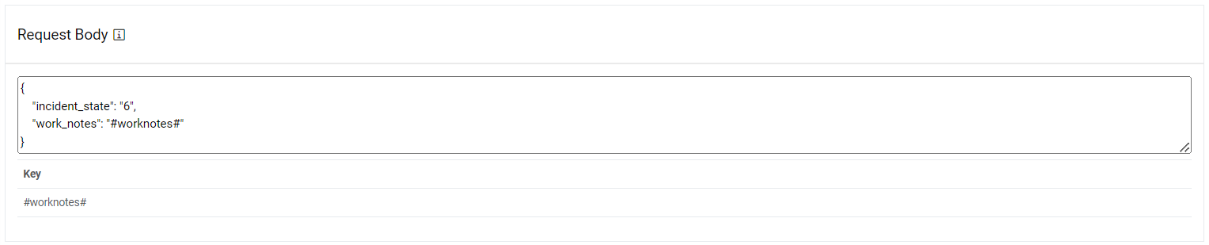 Note:
Note:The values for the parameters will be set in the Mange Rules section.
- Type the Response Body in JSON format.
Figure 43. Response Body 
- Click Next to move to the next section.
Figure 44. Request Header Parameter 
InProgress Rules Configuration
User can configure a method for releasing the ticket from iAutomate queue performing the following steps.
- On the InProgress Rules Configuration page, click on Same as Release if similar configurations as mentioned in “Release Rules Configuration” are required, else proceed ahead.
- Type the URL of the selected service type in the URL field to release data.
- This URL contains the placeholders that display the
parameters based on the applied clause. It is dependent on the URL or API provided by the
tool.
Figure 45. InProgress Rules Configuration 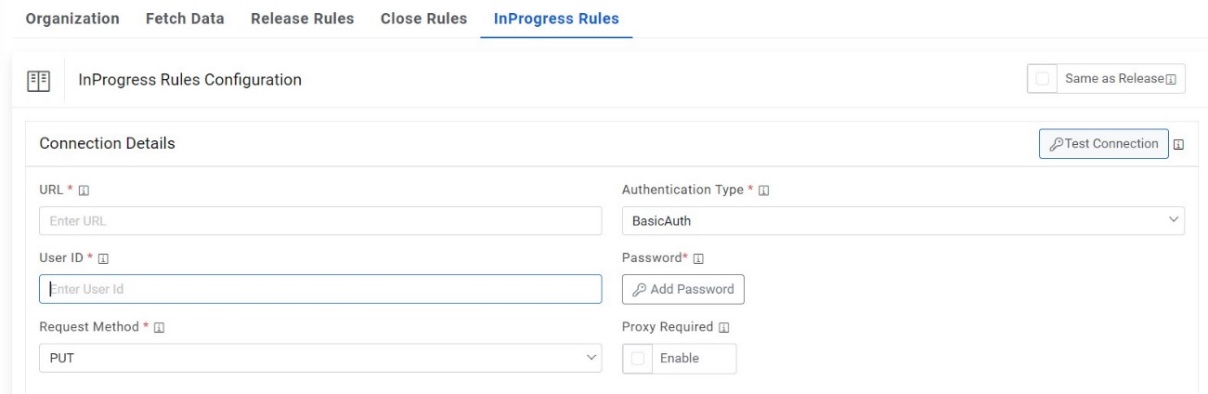 Note:User can apply multiple clauses into the URL to display only the required parameter into the placeholder. Once you hit the URL, only the placeholders with a hashtag will be displayed with the associated parameters in the URL Path Parameters column. Whenever user wants to change the data to be filtered, always change the logic in the URL to get the specific parameters.
 - Select the Authentication Type. iAutomate supports the following types of
authentications:
- WindowsAuth
- OAuth2
- BasicAuth
- Certificate Based Auth
Figure 46. Authentication Types 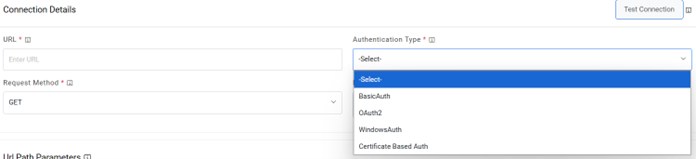
- Selection of Certificate based Auth requires CRT file location and Key file location
of the certificate.
Figure 47. Authentication Type (CRT and Key file location) 
- Selection of OAuth2 authentication type, users need to provide the below
details.
- Type the Authentication URL.
-
Type the Username and Password.
- For password, click on Add Password button next to it. If the password is available in plaintext, then select Input type as Input Text and enter the password in Value field. Else if it is available in Azure Key Vault then select Input Type as Azure Key Vault and then select any of the configured details from the value field. Else if it is available in any Key Vault such as CyberArk then select Input Type as CyberArk and then select any of the configured details from the value field.
Figure 48. Password in Plaintext .jpg)
Figure 49. Password from Key Vault (CyberArk) .jpg)
Figure 50. Password from Secret Manager .png)
Figure 51. Password from Azure Key Vault .jpg)
Figure 52. Authentication Type (OAuth2) 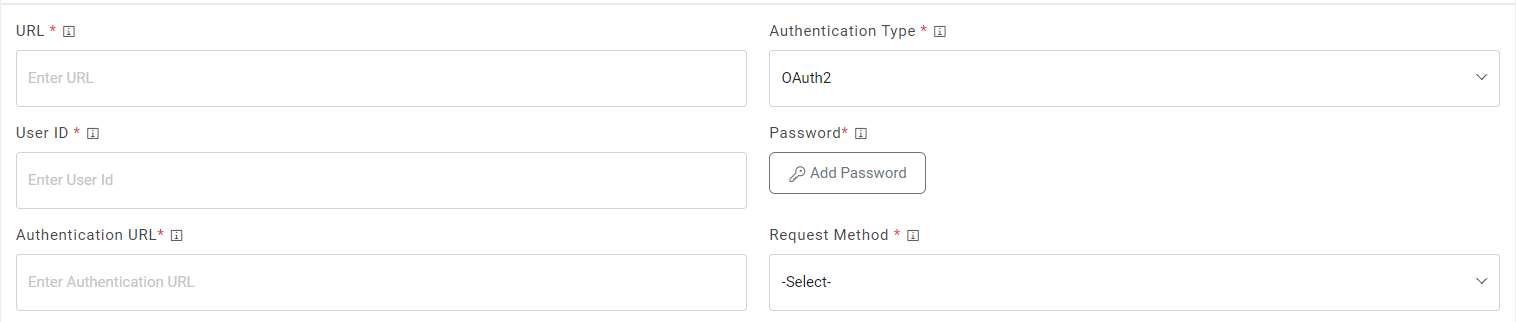
- Select Request Method as GET, PUT, POST or PATCH.
- Select Proxy Required if the environment needs access to content from data sources outside the firewall.
- Click on Test Connection to check accessibility of URL from service. Testing the connection is not mandatory, you can still create Data source.
- To test connection, the URL of ITSM should be whitelisted else it will throw alert stating ‘Use only WhiteListed URL ‘. To whitelist the URL kindly refer ‘HCL iAutomate KRS Guide’.
- If a user has additional parameters, click Add Authentication Parameters under the tab
Request Authentication Parameters.
Figure 53. Authentication Type (Windows / Basic) .jpeg)
- Type the Request Header Parameter.
Figure 54. Request Header Parameter .jpeg)
- Type the Request Body in JSON format.
Figure 55. Request Body  Note:The values for parameters will be set in the Mange Rules section.
 - Type the Response Body in JSON format.
Figure 56. Response Body 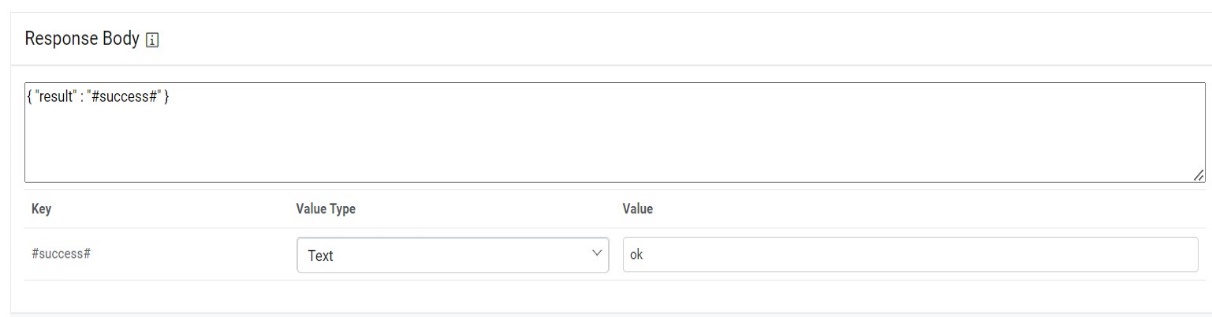
- Click Submit to create the Data Source.
Figure 57. Success Message 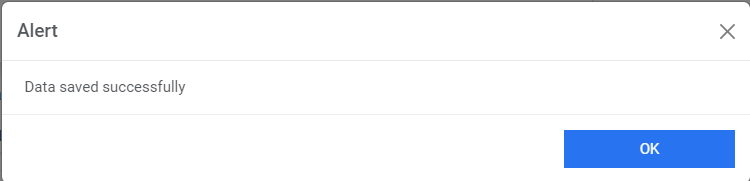
Assignation Rules
Users can configure the method for assigning the ticket from iAutomate queue by performing the following steps.
- On the Assignation Rules Configuration page, click on Same as Release if similar configurations as mentioned in “Release Rules Configuration” are required, else proceed ahead.
- Type the URL of the selected service type in the URL field to release data.
- This URL contains the placeholders that display the parameters based on the applied
clause. It depends on the URL or API provided by the tool.
Figure 58. Assignation Rules Configuration  Note:Users can apply multiple clauses into the URL to display only the required parameter into the placeholder. Once you hit the URL, only the placeholders with a hashtag will be displayed with the associated parameters in the URL Path Parameters column. Whenever a user wants to change the data to be filtered, always change the logic in the URL to get the specific parameters.
 - Select the Authentication Type. iAutomate supports the following types of
authentications:
- WindowsAuth
- OAuth2
- BasicAuth
- Certificate Based Auth
-
Figure 59. Authentication Types 
- Selection of Windows / Basic authentication requires only Username and Password.
Figure 60. Authentication Type (Windows / Basic) 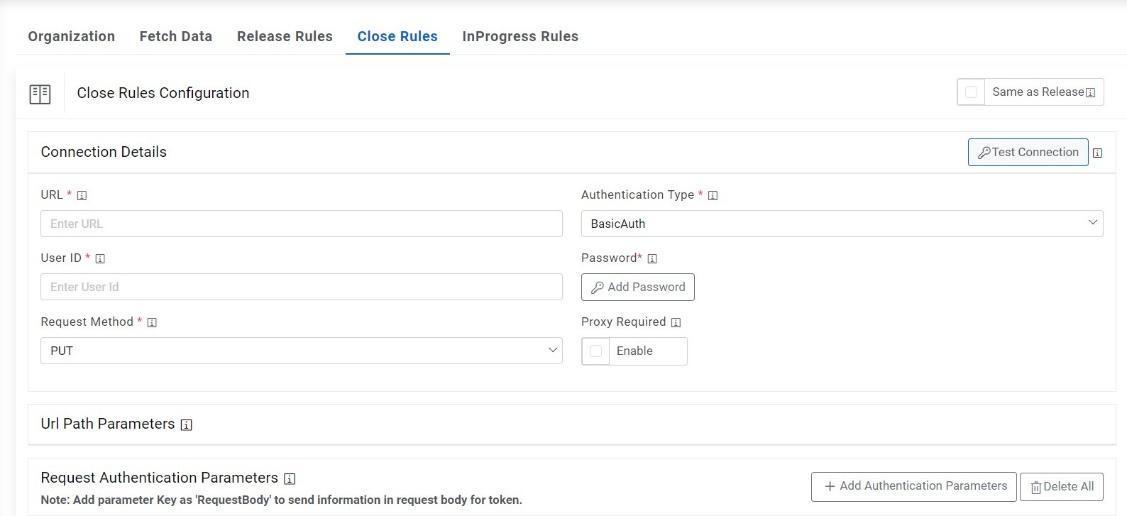
- Selection of Certificate based Auth requires CRT file location and Key file location
of the certificate.
Figure 61. Certificate based Auth 
- Selection of OAuth2 authentication type, users needs to provide the below
details.
- Type the Authentication URL.
- Type the Username and Password.
- For password, click on Add Password button next to it. If the password is available
in plaintext, then select Input type as Input Text and enter the password in Value
field. Else if it is available in any Key Vault such as CyberArk or Secret Manager
then select Input Type as CyberArk or Secret Manager respectively and then select any
of the configured details from the Value field.
Figure 62. Password in Plaintext 
Figure 63. Password from Key Vault (CyberArk) 
Figure 64. Password from Secret Manager 
Figure 65. Password from Azure Key Vault 
Figure 66. Authentication Type (OAuth 2.0) 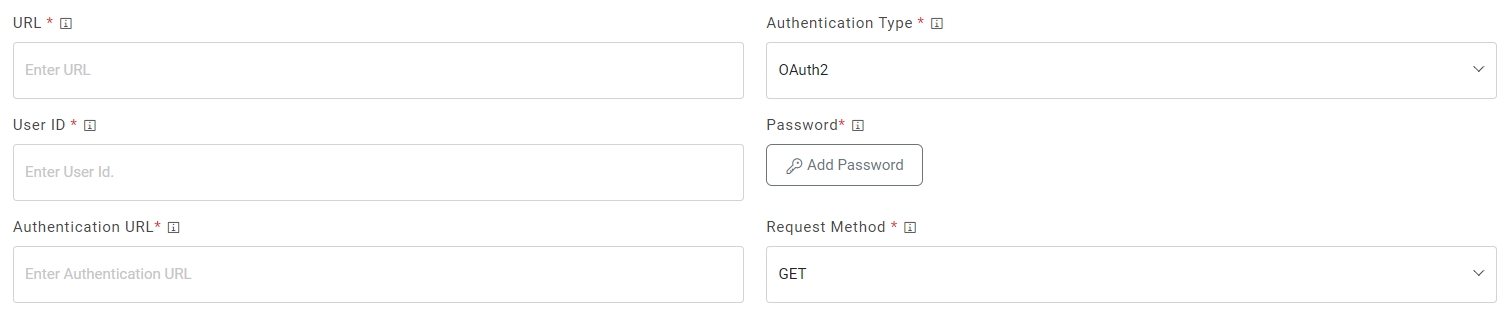
- Select Request Method as GET, PUT, POST or PATCH.
- Select Proxy Required if the environment needs access to content from data sources outside the firewall.
- Click on Test Connection to check accessibility of URL from service. Testing the connection is not mandatory, you can still create Data source.
- To test connection, the URL of ITSM should be whitelisted else it will throw alert stating ‘Use only Whitelisted URL ‘. To whitelist the URL kindly refer ‘HCL iAutomate KRS Guide’.
- If a user has additional parameters, click Add Authentication Parameters under the tab
Request Authentication Parameters.
Figure 67. Authentication Type (Windows / Basic) 
- Type the Request Header Parameter.
Figure 68. Request Header Parameter 
- Type the Request Body in JSON format.
Figure 69. Request Body  Note:The values for the parameters will be set in the Mange Rules section.
 - Type the Response Body in JSON format.
Figure 70. Response Body 
- Click Next to move to the next section.
Figure 71. Request Header Parameter 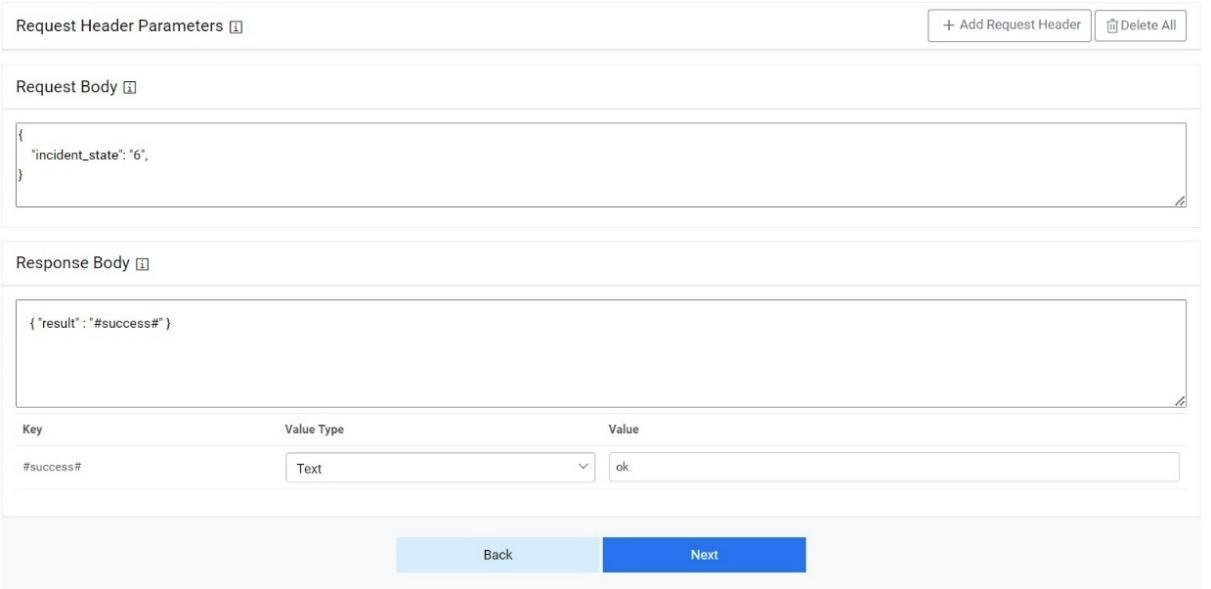
Attachment Rules
Users can configure the method for using the Download/Upload attachment APIs to download and attachment or upload it on Service Now.
- On the Attachment Rules Configuration page, click on Same as Release if similar configurations as mentioned in “Release Rules Configuration” are required, else proceed ahead.
- Type the URL of the selected service type in the URL field to release data.
- This URL contains the placeholders that display the parameters based on the applied
clause. It depends on the URL or API provided by the tool.
Figure 72. Attachment Rules Configuration 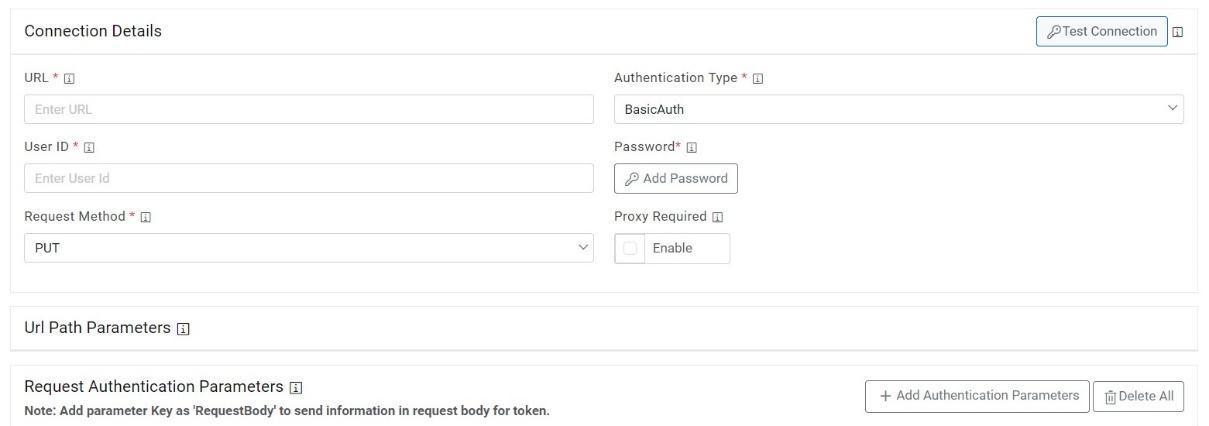 Note:User can apply multiple clauses into the URL to display only the required parameter into the placeholder. Once you hit the URL, only the placeholders with a hashtag will be displayed with the associated parameters in the URL Path Parameters column. Whenever user wants to change the data to be filtered, always change the logic in the URL to get the specific parameters.
 - Select the Authentication Type. iAutomate supports the following types of
authentications:
- WindowsAuth
- OAuth2
- BasicAuth
- Certificate Based Auth
Figure 73. Authentication Types 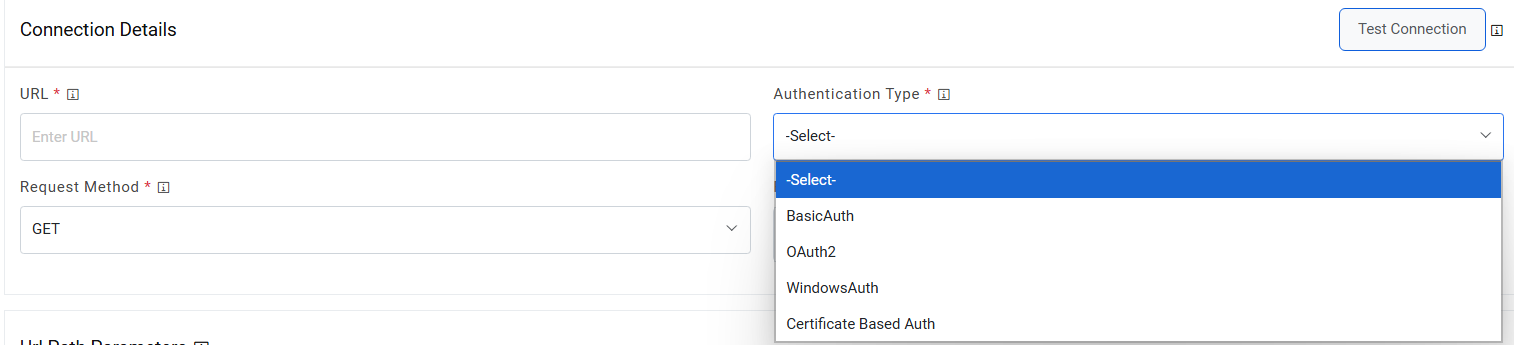
- Selection of Windows / Basic authentication requires only Username and Password.
Figure 74. Authentication Type (Windows / Basic) 
- Selection of Certificate based Auth requires CRT file location and Key file location
of the certificate.
Figure 75. CRT file location 
- Selection of OAuth2 authentication type, users needs to provide the below
details.
- Type the Authentication URL.
- Type the Username and Password.
- For password, click on Add Password button next to it. If the password is available
in plaintext, then select Input type as Input Text and enter the password in Value
field. Else if it is available in any Key Vault such as CyberArk or Secret Manager
then select Input Type as CyberArk or Secret Manager respectively and then select any
of the configured details from the Value field.
Figure 76. Password in Plaintext 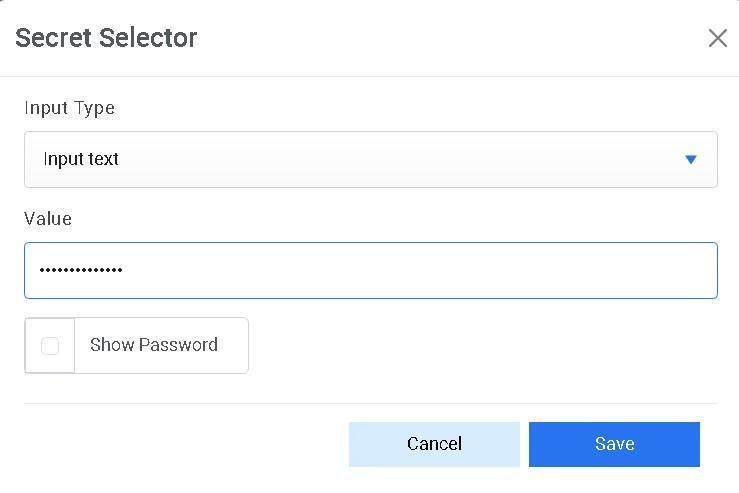
Figure 77. Password from Key Vault (CyberArk) 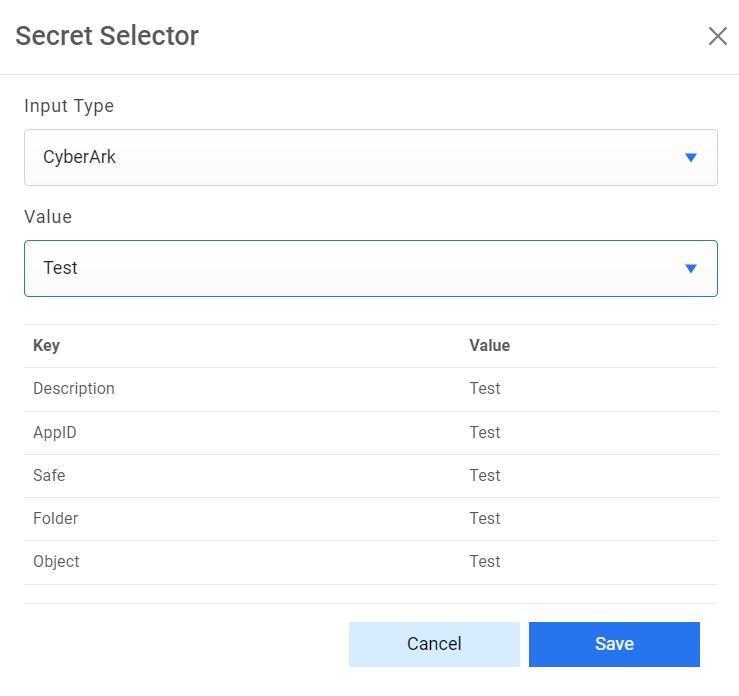
Figure 78. Password from Secret Manager 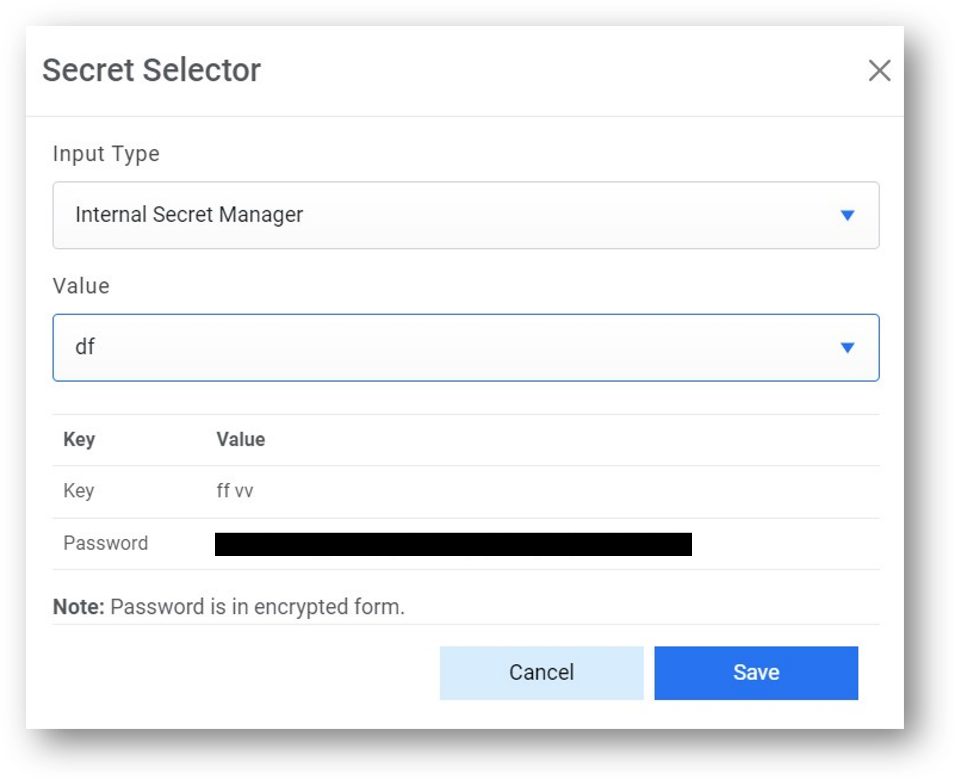
Figure 79. Password from Azure Key Vault 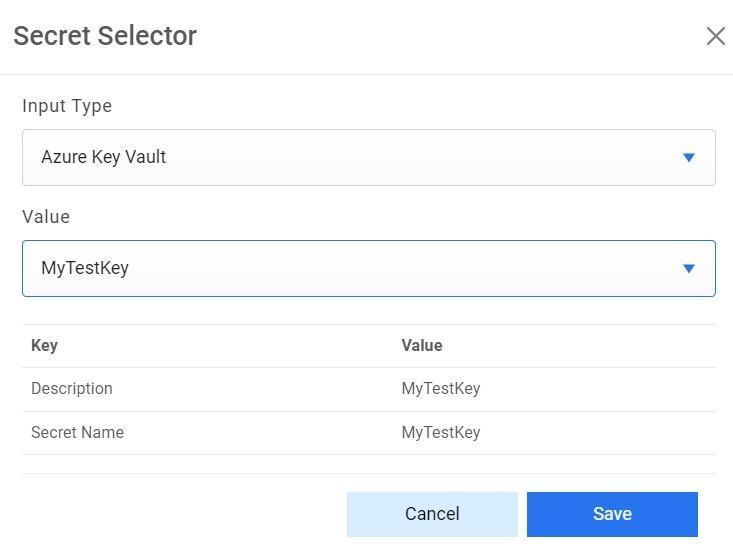
Figure 80. Authentication Type (OAuth 2.0) 
- Select Request Method as GET, PUT, POST or PATCH.
- Select Proxy Required if the environment needs access to content from data sources outside the firewall.
- Click on Test Connection to check accessibility of URL from service. Testing the connection is not mandatory, you can still create Data source.
- To test connection, the URL of ITSM should be whitelisted else it will throw alert stating ‘Use only WhiteListed URL ‘. To whitelist the URL kindly refer ‘HCL iAutomate KRS Guide’.
- If a user has additional parameters, click Add Authentication Parameters under the tab
Request Authentication Parameters.
Figure 81. Authentication Type (Windows / Basic) 
- Type the Request Header Parameter.
Figure 82. Request Header Parameter 
- Type the Request Body in JSON format.
Figure 83. Request Body 
- Type the Response Body in JSON format.
Figure 84. Response Body 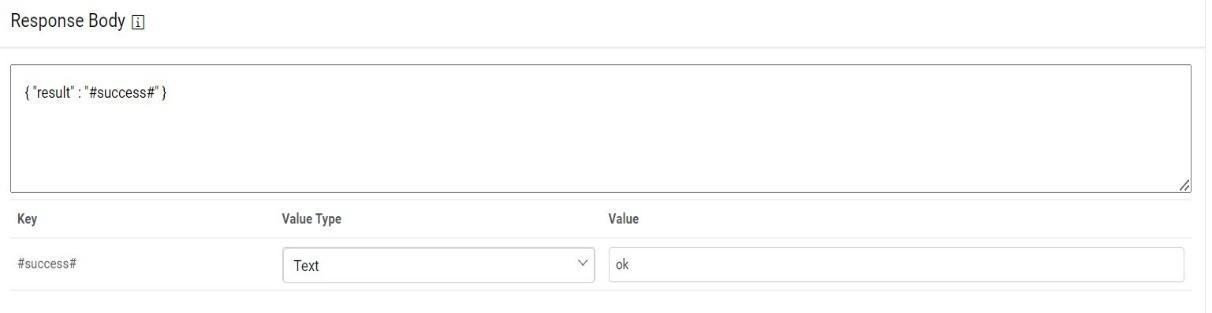
- Click Next to move to the next section.
Figure 85. Request Header Parameter 
View Data Sources
Users can view and manage the data sources configured within organization.
To view and manage data sources, perform the following steps:
- On the main menu bar, click Configuration Manage Data Sources.
- The Manage Data Sources page appears.
Figure 86. View Data Source 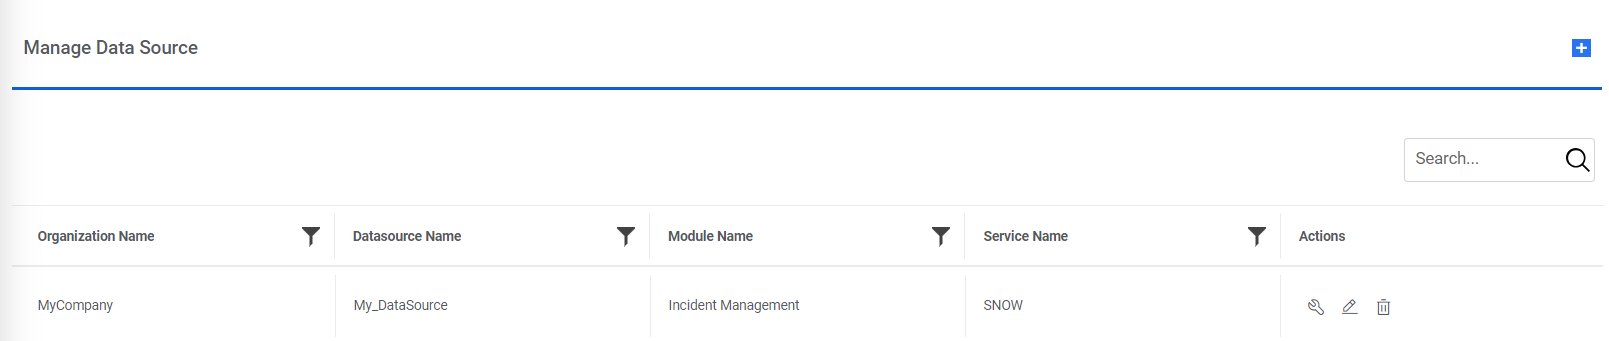
This lists the available data sources in a tabular view with their associated organization, module, and service type. Users can create a new data source by clicking Manage Data Sources. Users can also edit or delete the data source and manage the entry criteria for the data source.
Edit Data Source
Users can open a data source, review the available information, and change the data source details.
To edit the existing data source, perform the following steps:
- On the Manage Data Sources page, click on
 next to the data source user wants to edit.
Figure 87. Edit Data Source .png)
- This redirects you to the Manage Data Sources. Edit the details as required.
- Click Update to commit the changes or click Cancel to discard all changes.
Manage Entry Criteria
Entry criteria are a set of conditions or requirements that must be fulfilled to fetch the data from the data source.
To manage entry criteria, perform the following steps:
- On the Manage Data Sources tab, click
 next to the data source user wants to manage.
Figure 88. Manage Entry Criteria .png)
- The Manage Entry Criteria page appears. You will be prompted to apply the
following conditions:
- Column
- Operator
- Value
- Clause
- Sub-Clause
- Click Save to go to the next screen.
Figure 89. Manage Entry Criteria (Cont.) 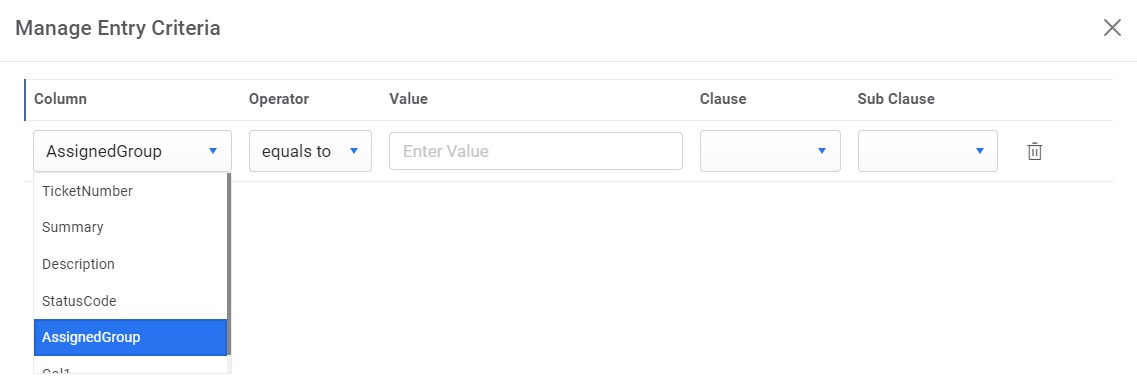
Figure 90. Manage Entry Criteria (Cont.) .jpg)
Figure 91. Manage Entry Criteria (Cont.) 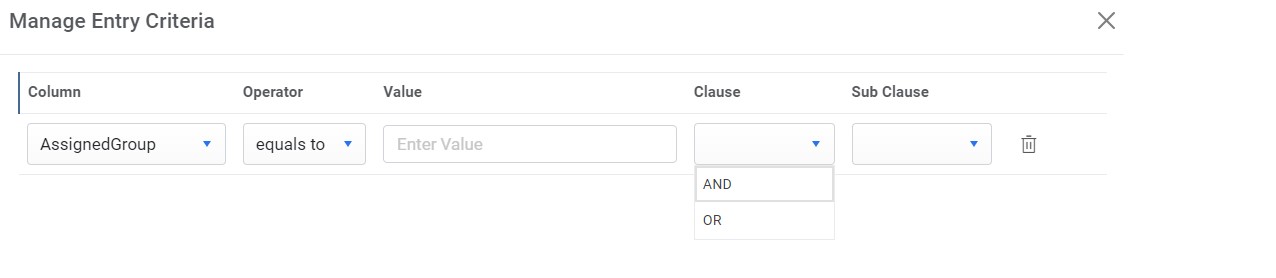
Figure 92. Manage Entry Criteria (Cont.) .jpg)
Delete Data Source
If a data source in an organization is no longer required, the user can delete it by performing the following steps:
- On the Manage
Data Sources tab, click
 to delete the Data
Source.
to delete the Data
Source.Figure 93. Delete Data Source .png)
- Click OK to confirm.
- A confirmation dialog box appears on the screen.