Inbound Email Action Administration
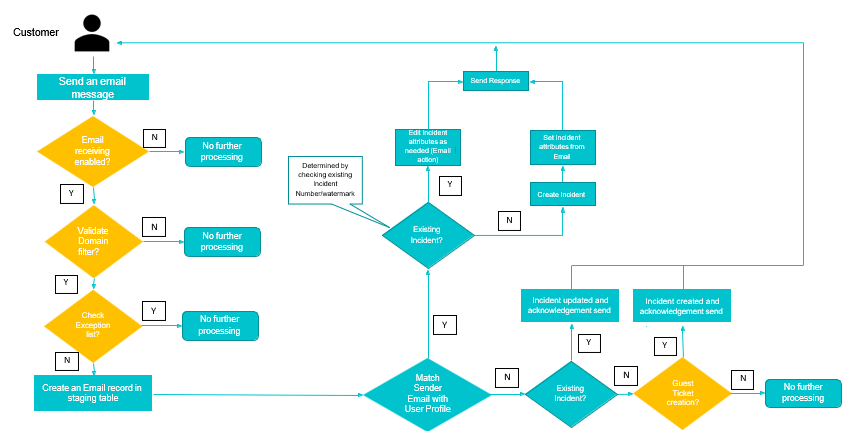
Process Flow
Mailbox Configuration
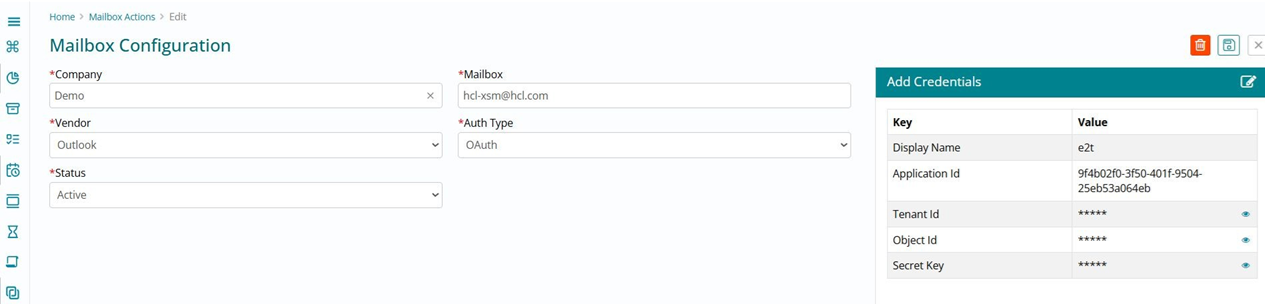
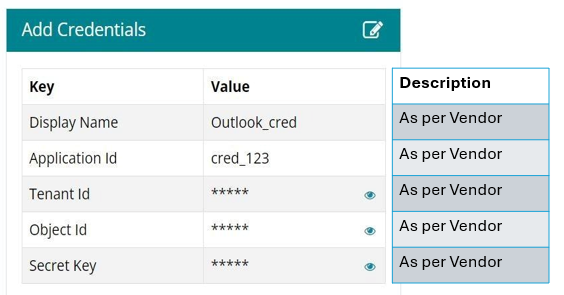
Add Credentials Panel and their Fields Visibility
Action Configuration
There are 3 Types of Actions available
- Mail to Ticket
- Survey
- Approval

Inbound Email Staging
| Field Name | Datatype | Description |
|---|---|---|
| To | String (Max length: 4000 chars) | Contains a comma-separated list of email addresses in the To: field. |
| Copied | String (Max length: 4000 chars) | Contains a comma-separated list of email addresses in the Cc: field. |
| body_text | String (Max length: 8000 chars) | Contains the body of the email as a plain text string. |
| body_html | String (Max length: 8000 chars) | Contains the body of the email as an HTML string. |
| From | String | Contains an email address that depends on the following conditions: - If the address listed in the email Headers field matches an existing user’s Email address, this variable contains the user’s email address.- If the address listed in the email Headers field does not match an existing user’s Email address, this variable contains the address listed in the email Headers field. |
| Subject | String | Contains the email’s subject as a plain text string. |
| Headers | String | Contains details about the sender, route, and receiver as a plain text string in the format of the sending email client. |
| Status | String | Status of Email Staging Record (Received, Processed-created, Processed-updated, Discarded). |
| Work Item Reference | String | Reference of the incident created or updated. |
| Created | Datetime | Creation time. |
Inbound Staging Record Lifecycle

| From | To | Validation Rules |
| Received | Received | When any mail comes into the system, status of the record will be "Received" |
| Processed- created | Status of record will change to "Processed- created" when the record is processed, and an incident has been created. Work item reference should be updated with incident #ID | |
| Processed- updated | Status of record will change to "Processed- updated" when the record is processed, and an incident has been updated. Work item reference should be updated with incident #ID | |
| Discarded | Status of record will change to "Discarded" when the mailbox configuration for that company is done accordingly |
Sender Identification
Match sender’s email with user profile
- If a match is found:
- Impersonates the user when taking action in response to the email.(For eg- post comments, response from customer on pending action)
- If no match is found:
- If system property(Guest ticket creation) is enabled, it will allow creation of ticket
- If system property(Guest ticket creation) is disabled, ticket creation will not happen
- User profile creation (It should be a toggle setting, if it is enabled then guest user creation should be disabled).
Watermark/Record Number
If an inbound message is recognized as a reply or forward system should attempt to match the incoming email with an existing record by looking for a unique watermark in the subject line or message body.
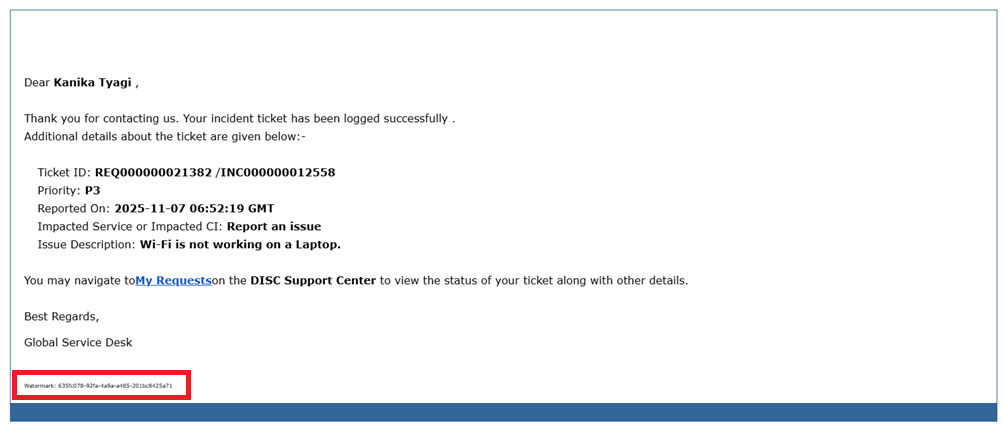
By default, watermarks should be inserted as the last line of outbound messages.
If no watermark is found, system should search the subject and body for a record number.
Steps to Generate Credentials - Google
Create a Project in Google Cloud Console:
- Go to the Google Cloud Console.
- Click on "Select a project" and then "New Project".
- Enter your project name and other details, then click "Create".
Enable the Gmail API:
- In the Google Cloud Console, go to the "API & Services" dashboard.
- Click "Enable APIs and Services".
- Search for "Gmail API" and click on it.
- Click "Enable".
Create Credentials:
- Go to the "Credentials" tab in the "API & Services" dashboard.
- Click "Create Credentials" and select "OAuth 2.0 Client ID".
- Configure the consent screen if prompted.
- Select "Web application" or "Desktop app" depending on your application type.
- Enter the required information and click "Create".
- Save your client_id and client_secret.
Create a Refresh Token Using Browser:
- Implement a script to initiate the OAuth 2.0 flow.
- The script will open a browser window where the user can log in to their Google account and authorize access.
- Upon successful authorization, the user will be redirected to your application's endpoint specified during OAuth setup, and the script will capture the authorization code.
- Exchange the authorization code for access and refresh tokens.