
Manually Importing Vulnerabilities
The Universal Vulnerability Ingestion (UVI) feature allows you to manually upload vulnerability data into the Integrated Vulnerability Remediation (IVR) application in the Bigfix SaaS using a CSV file.
About this task
Prerequisites
- Your endpoints are registered to the root server provisioned for you in SaaS. For more information, see Adding devices to BigFix.
- Your devices are scanned by the relevant scanners so that you can download the vulnerability information as a CSV file.
Importing and Mapping Vulnerability Data
Use the following steps to upload your CSV file, choose whether to merge or replace existing data, and map your spreadsheet columns to the required system fields using the Import Data wizard.
- On the left navigation pane, go to Resolve > Integrated Vulnerability
Remediation to access the IVR application dashboard.Note:By default, the dashboard displays the IVR - Scanner Import view.
- In the upper-right corner of the dashboard, select File Import to switch
to the IVR - File Import page.
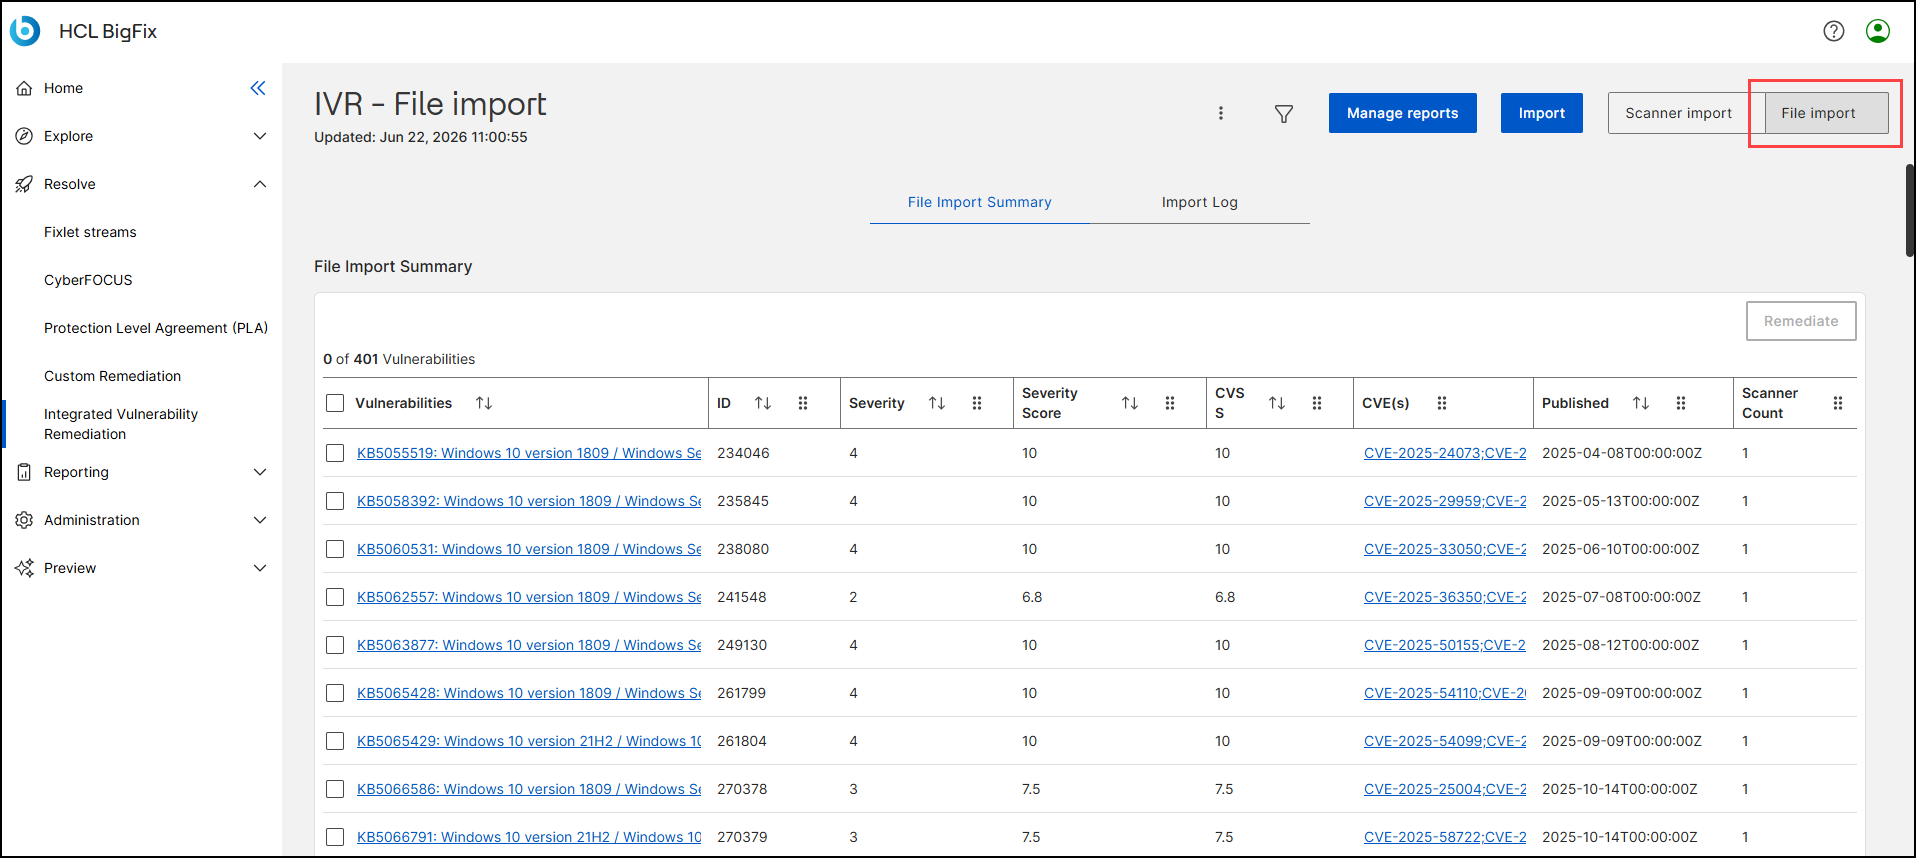
- Select Import to launch the Import Data wizard.Note:The Import button is only available in the File Import view. Manual imports are not supported in the Scanner Import view.

- In the Upload File step, configure the following import
settings:
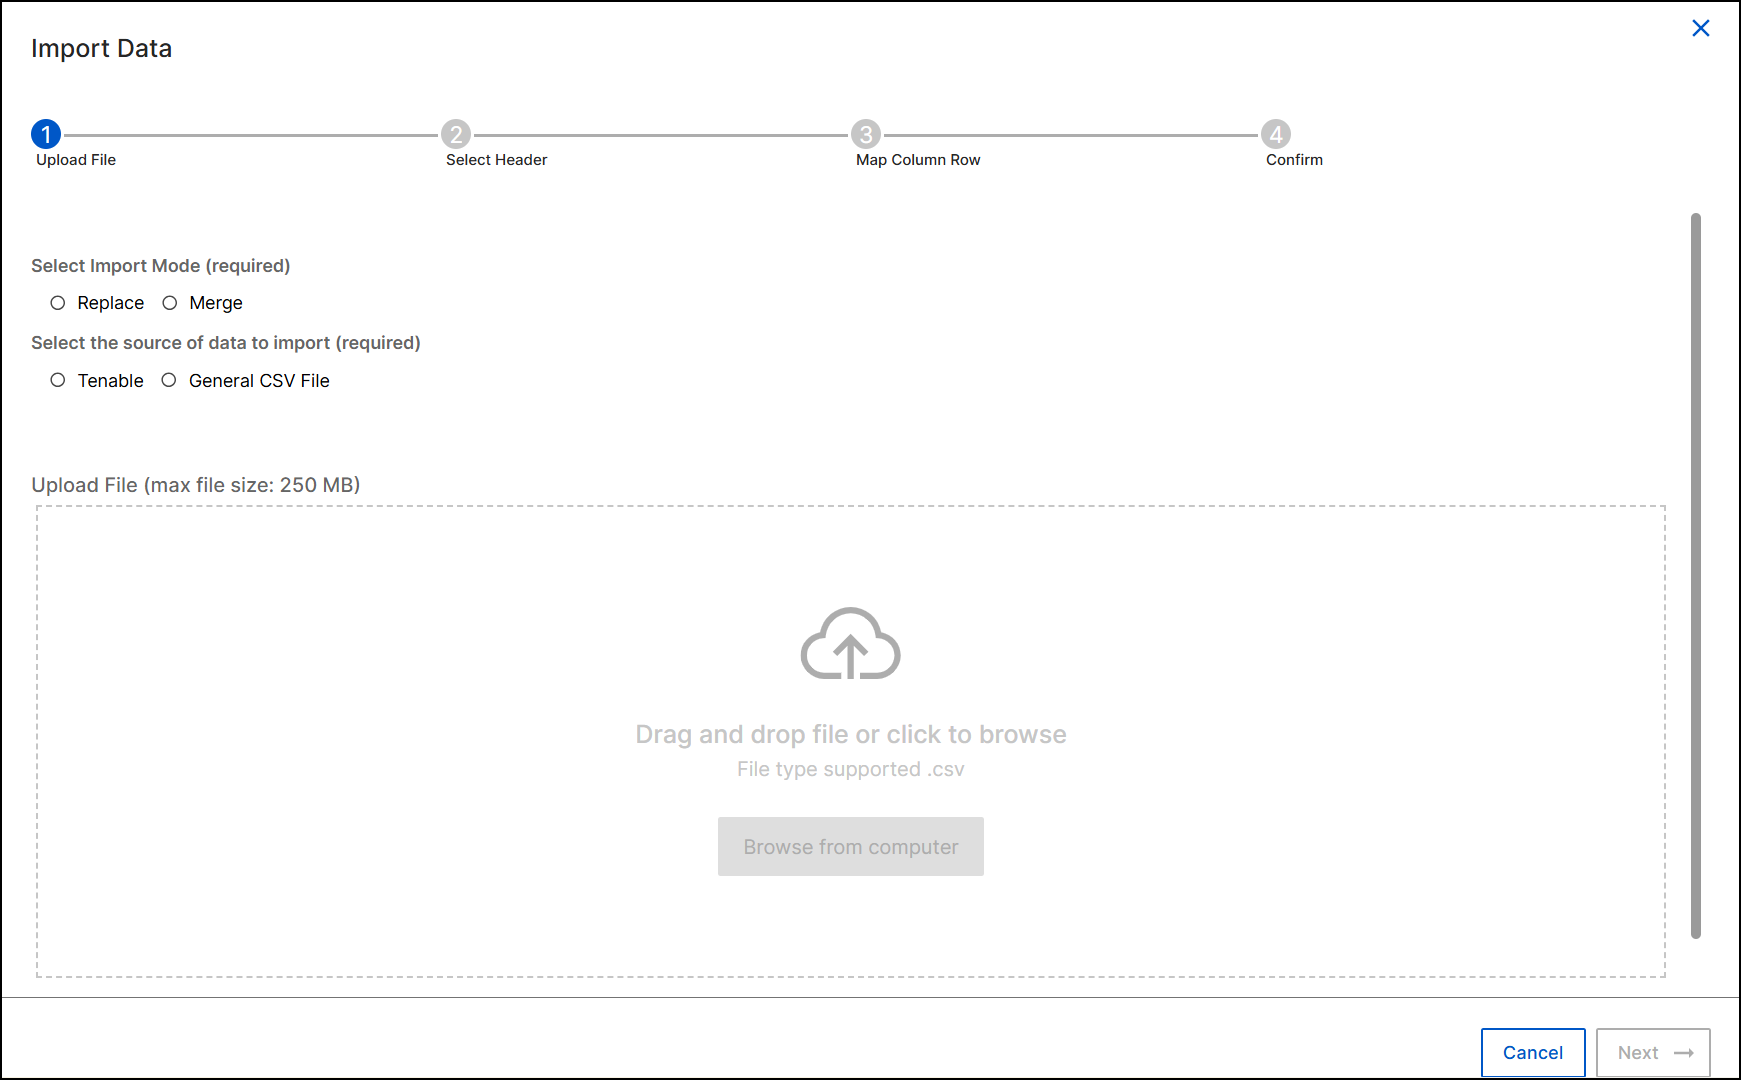
- Select Import Mode: Choose how the system handles the incoming
data:
- Replace: Deletes your previously imported data and replaces it entirely with the new file.
- Merge: Appends new vulnerabilities to your existing
data.Note:You can only select Merge if the new source of data matches your existing, configured data source. If the data sources do not match, you must select Replace.
- Select the source of data to import: Choose either Tenable or General CSV File depending on your data origin.
- Drag and drop your
.csvfile into the upload area, or select Browse from computer to locate the file. Select Next.
- Select Import Mode: Choose how the system handles the incoming
data:
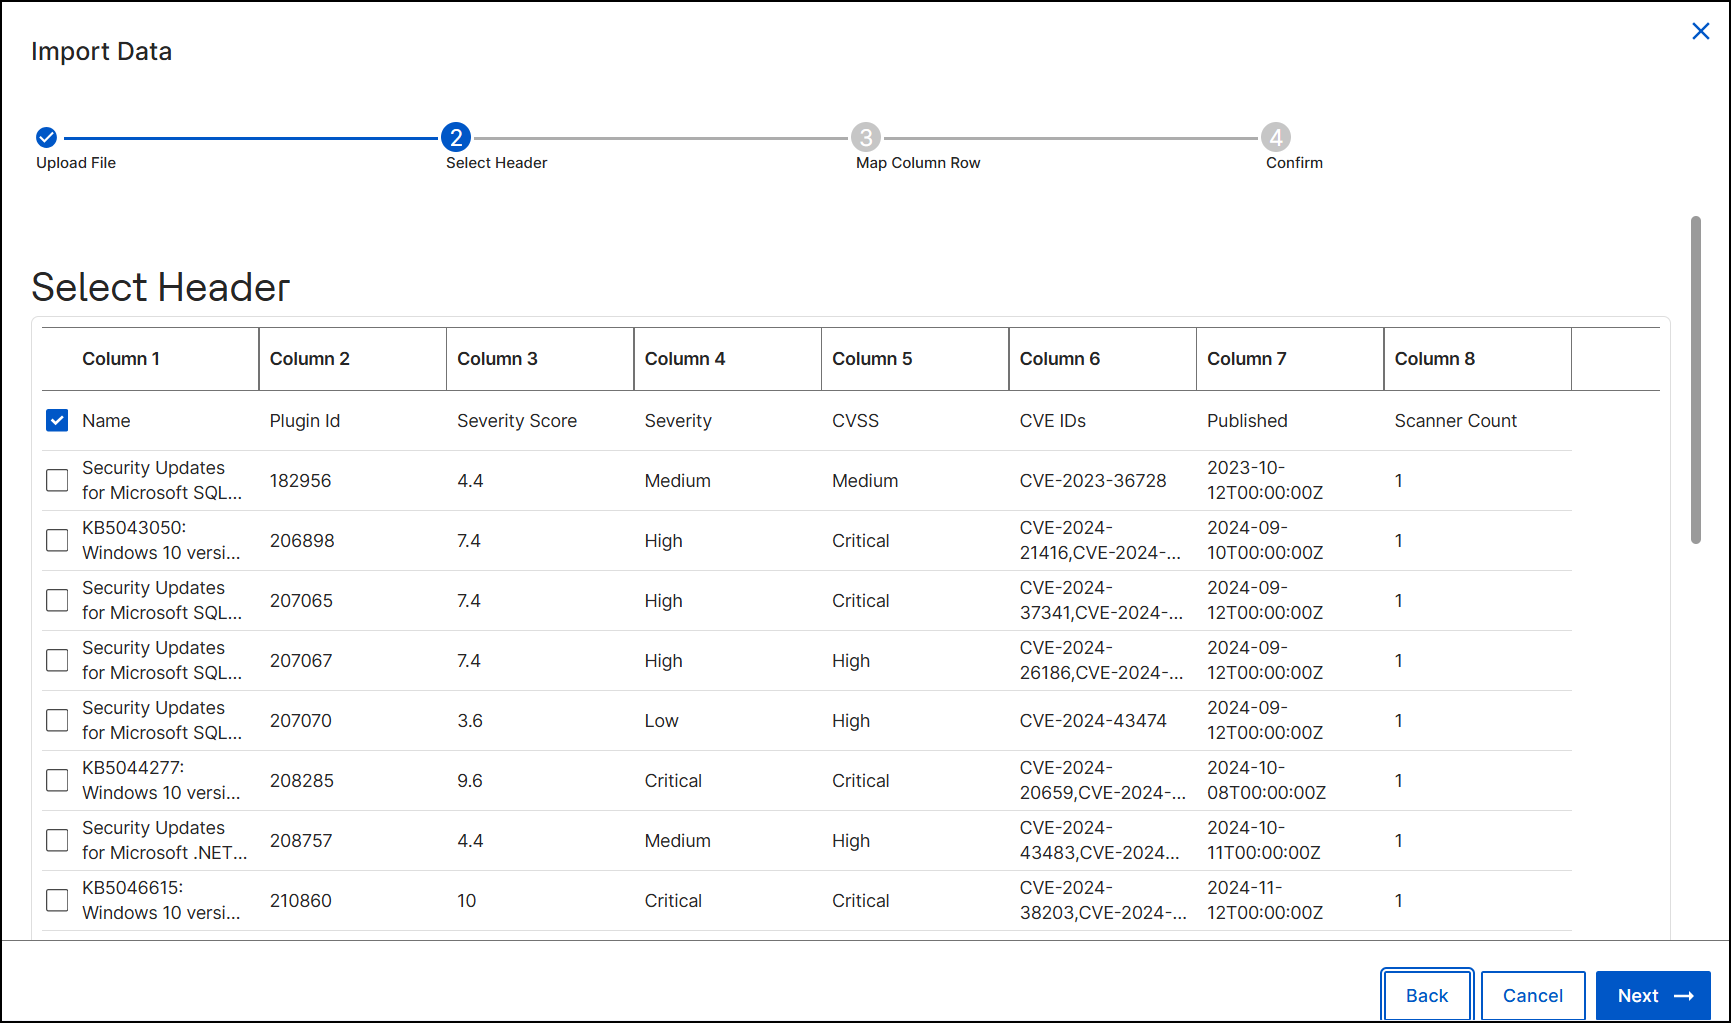
- In the Select Header step, review the data preview table. Select the
checkbox next to the row that contains your column headers. This ensures the
system does not import your header row as a vulnerability record. Select
Next.
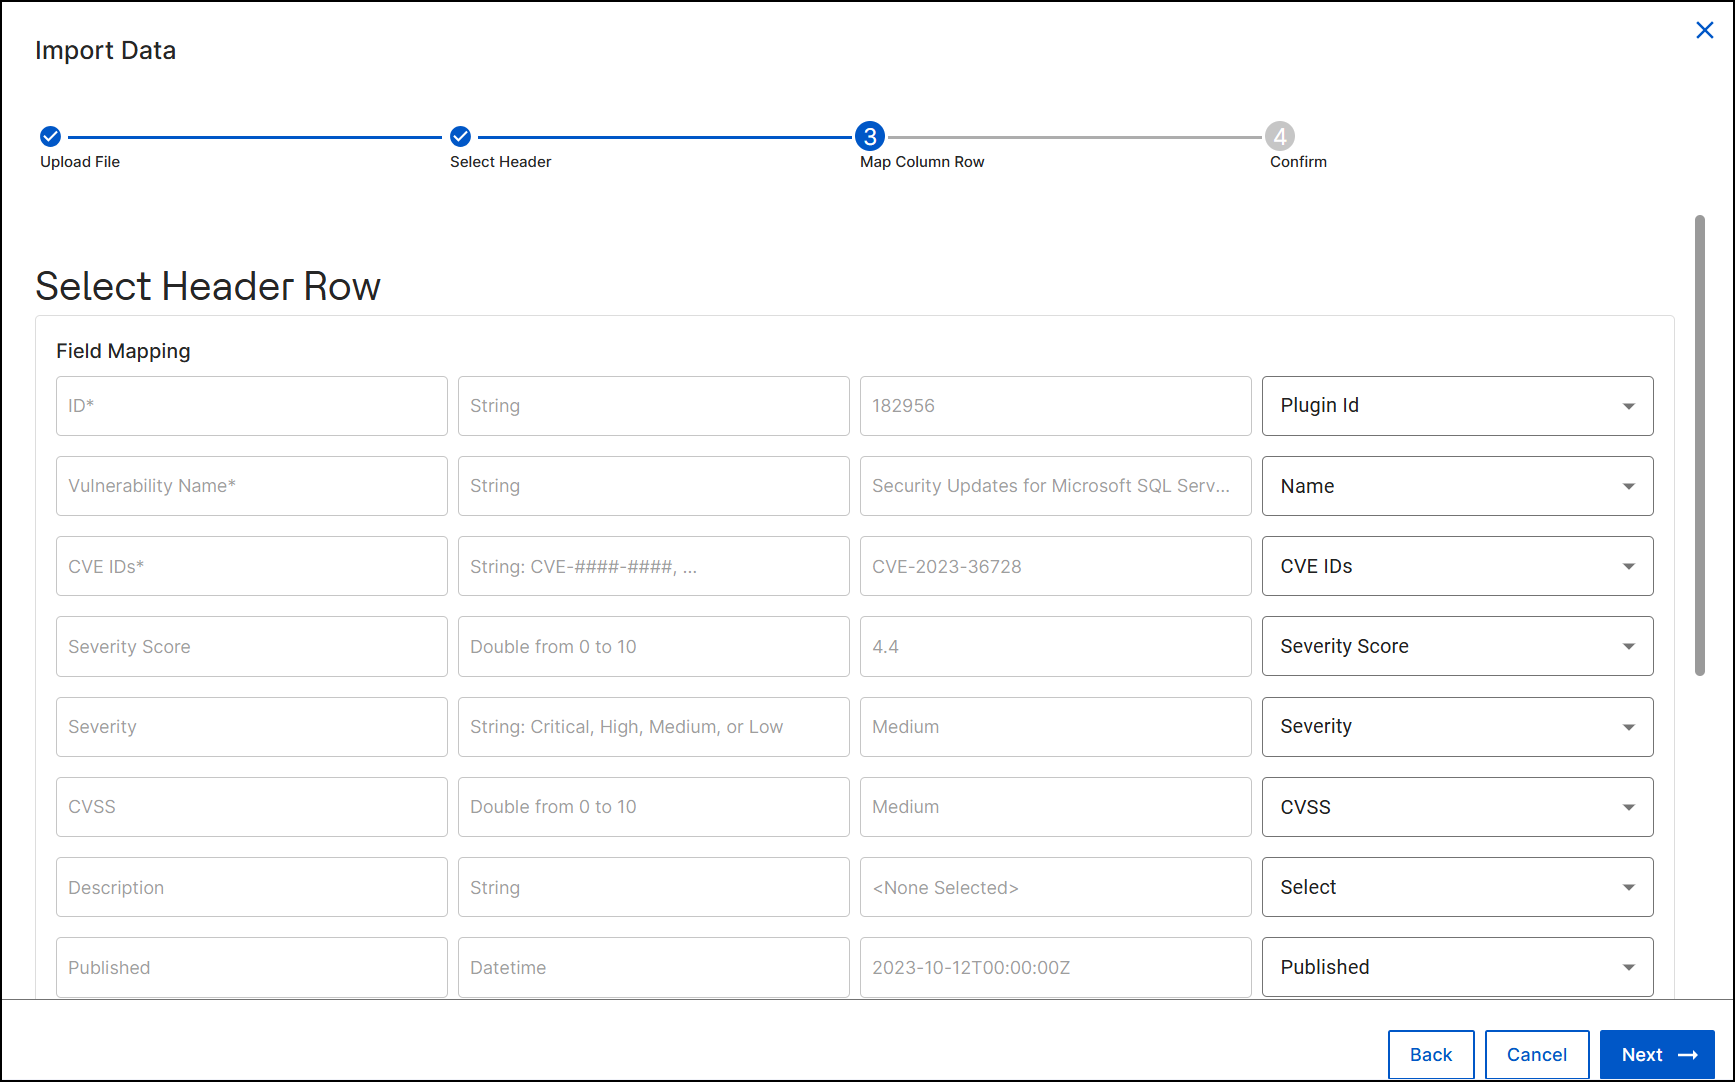
- In the Map Column Row step, map the columns from your CSV file to the IVR
system fields using the dropdown menus. You must map the following required
fields marked with an asterisk (*) to proceed:
-
ID
-
Vulnerability Name
-
CVE IDs
Select Next when mapping is complete.
-
-
In the Confirm step, review the final preview of your mapped data.
Note:Rows with duplicate IDs may be consolidated, and rows with invalid values will be removed. Only column headers mapped to IVR fields are displayed.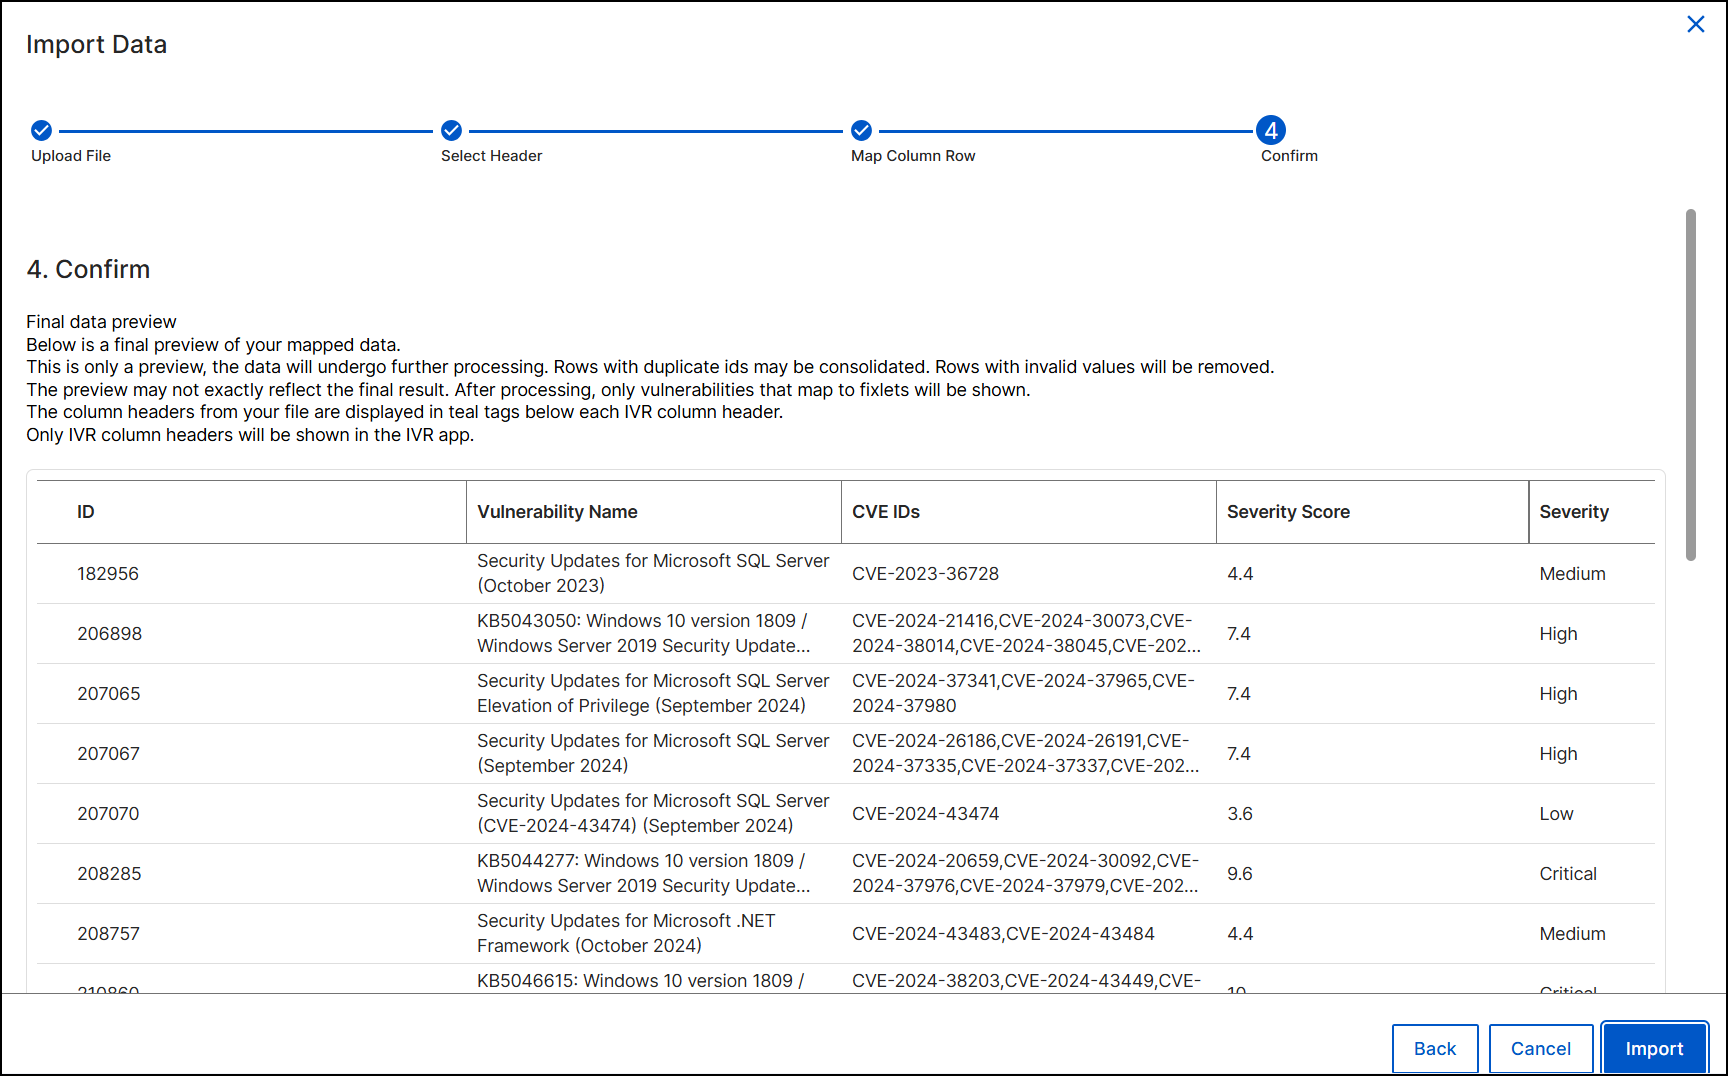
- Select Import to finalize the process. An Import Information toast
notification appears stating, "Please wait... Do not refresh, switch to other
applications, or close the window."Important:Do not navigate away from the page while this notification is displayed. Interrupting the session may cause the import to fail.

When the import completes successfully, a confirmation toast notification appears.
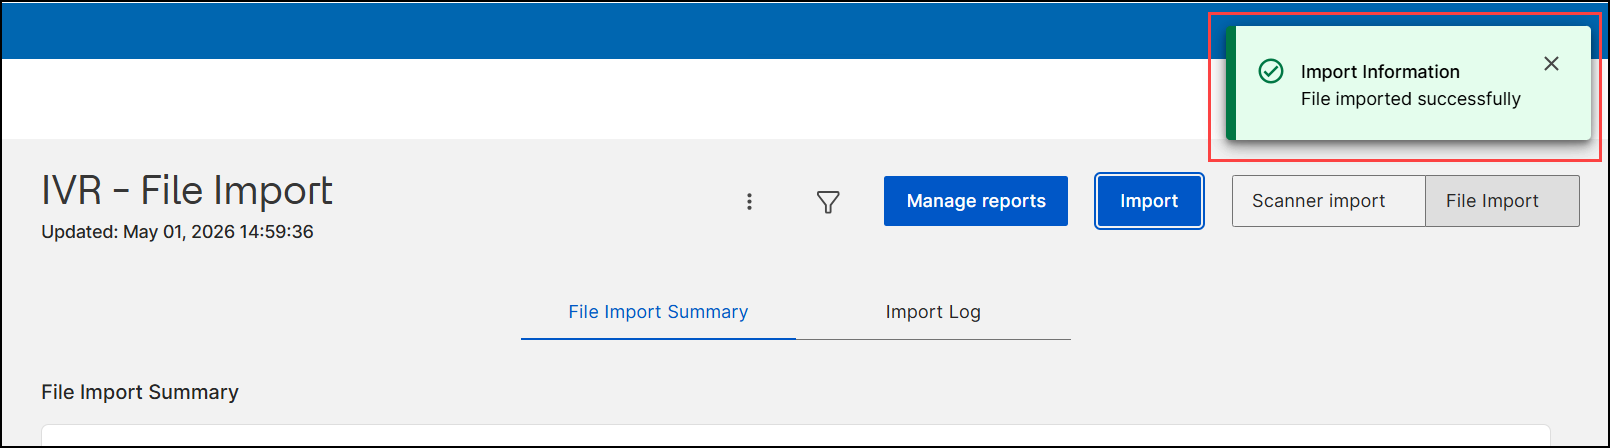
After the import is complete, the vulnerability data populates the File Import Summary section on the page. From this view, you can select the newly imported vulnerabilities and select Remediate to initiate the IVR Remediation Flow.
Monitoring Import Logs
You can track the processing status and view historical import metrics for all manually uploaded files. The Import Log also allows you to cancel an import that is still in progress.
- On the IVR - File Import page, select the Import Log tab.
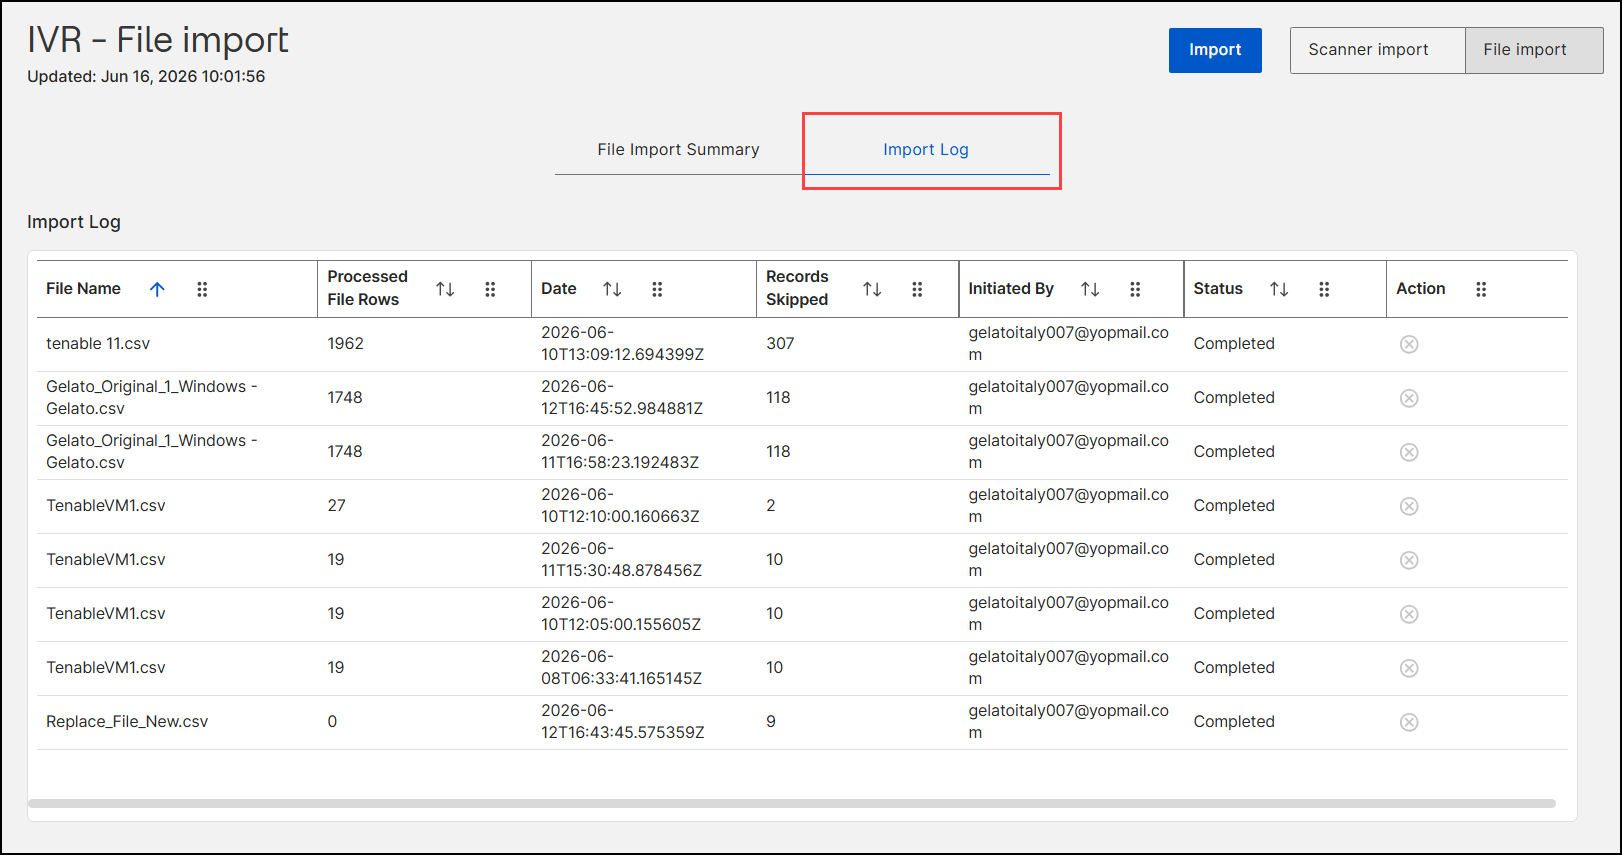
- Review the grid to monitor your imports. The grid provides the following
information for each file:
Column Description File Name The original name of the uploaded CSV spreadsheet. Processed File Rows The total number of valid vulnerability records successfully parsed and imported from the file. Date The timestamp indicating when the import was initiated. Records Skipped The number of duplicate or invalid records that the system skipped during the import process. Initiated By The username or email address of the user who started the import. Status The current state of the import. Values include Inprogress (the system is actively processing the data) and Completed (the data is fully imported and available in the dashboard), Failed (the import could not be completed), and Cancelled (the import was manually stopped before completion). Action Displays a cancel icon (⊗) for each import entry. For imports with a status of Inprogress, the icon is active and allows you to cancel the import. For completed or failed imports, the icon is disabled. - To cancel an Inprogress Import:
- Locate the import with a status of Inprogress.
- Select the cancel icon (⊗) in the Action column.
- In the Cancel import confirmation dialog, select one of the
following:
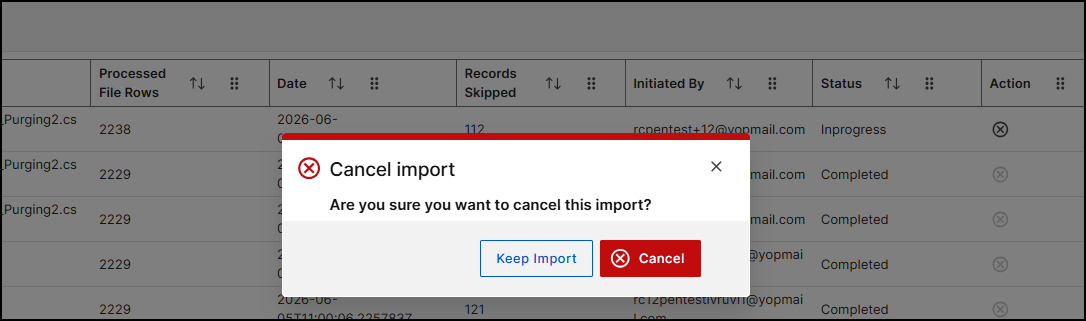
- Cancel: Cancels the import and stops further processing.
- Keep Import: Dismisses the dialog and allows the import to continue.