IVR Remediation Flow
The remediation workflow in Integrated Vulnerability Remediation (IVR) allows you to address vulnerabilities by deploying relevant Fixlets to affected devices. This process is managed through a unified wizard that guides you through selecting content, targeting devices, configuring behavior, and scheduling the deployment. You can initiate the remediation process for multiple vulnerabilities at once from the List View or File Import Summary tab in the main dashboard, or focus on a specific vulnerability from its details page.
Initiating the Remediate Wizard
Perform one of the following actions based on your remediation scope:
- From the IVR Dashboard (Bulk Remediation):
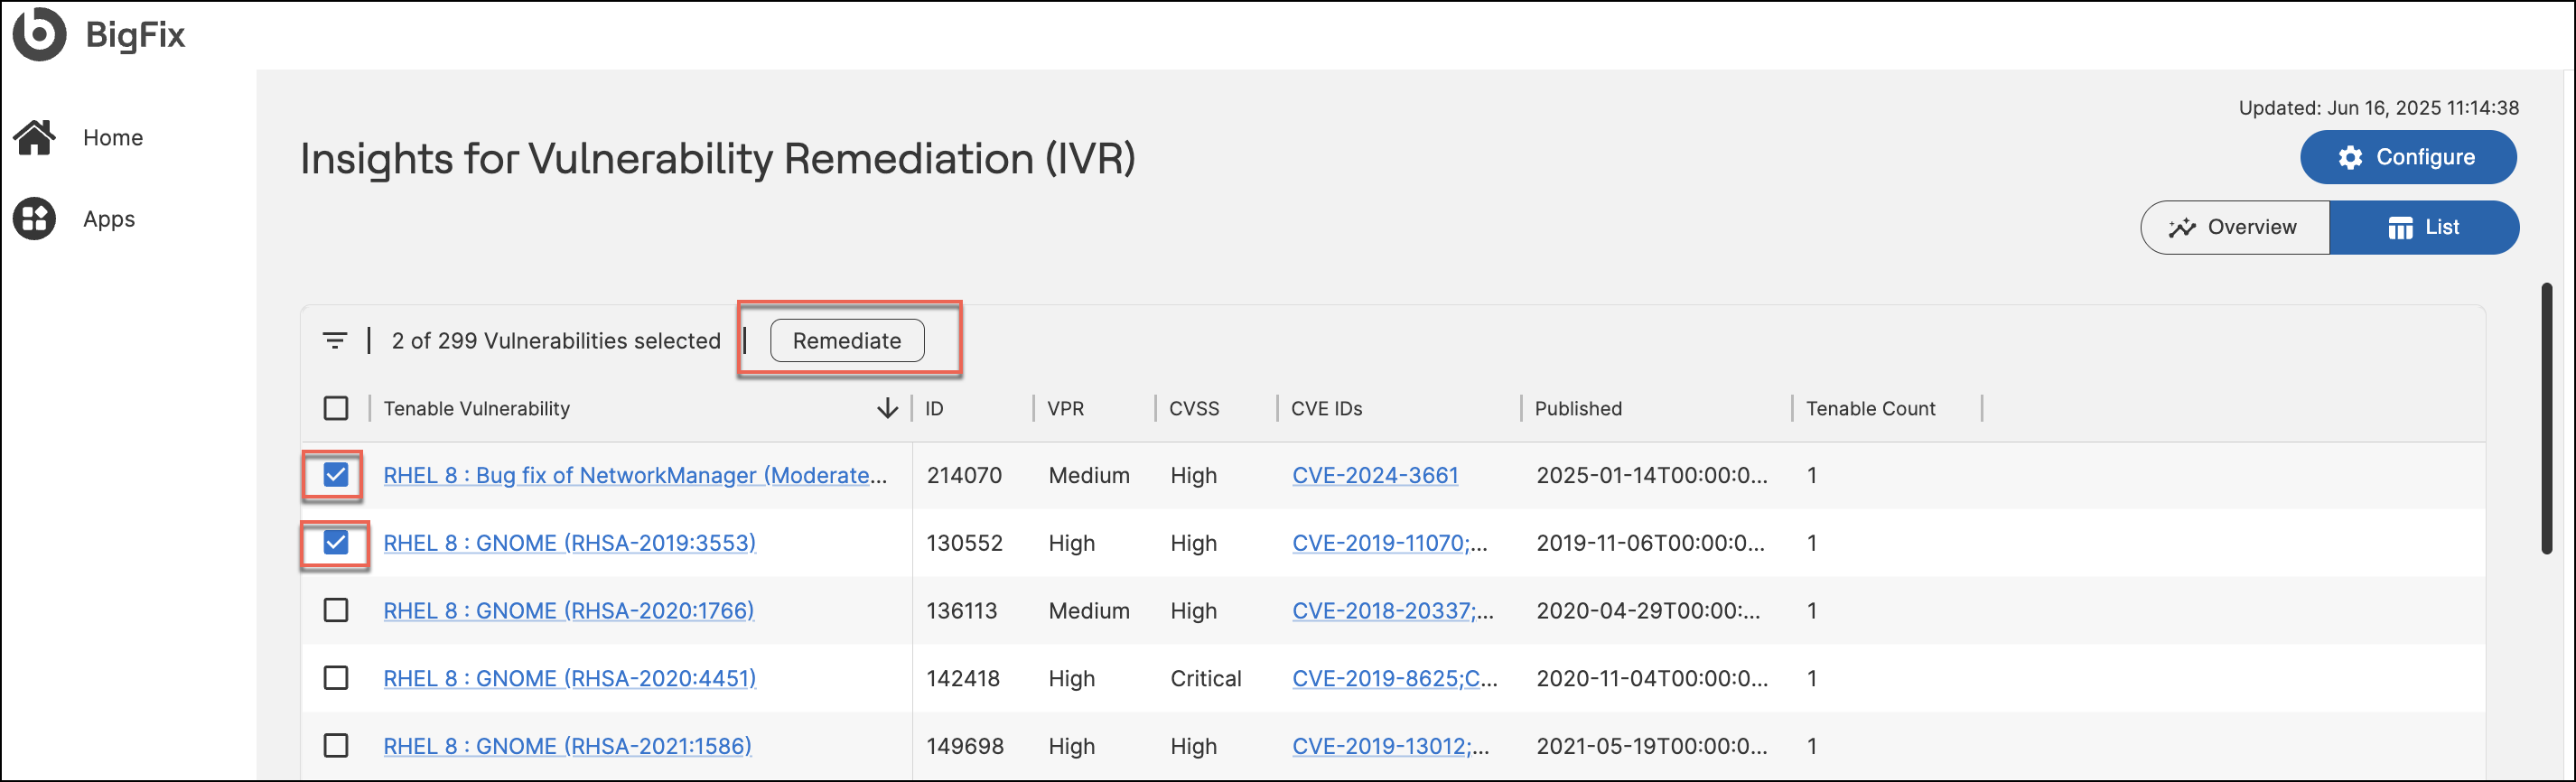
- Navigate to the IVR Dashboard.
- Select either the List View tab (for scanner-imported vulnerabilities) or the File Import Summary tab (for manually imported vulnerabilities).
- Select the checkbox(es) for the vulnerabilities you want to remediate.
- Click Remediate in the upper-right corner.
-
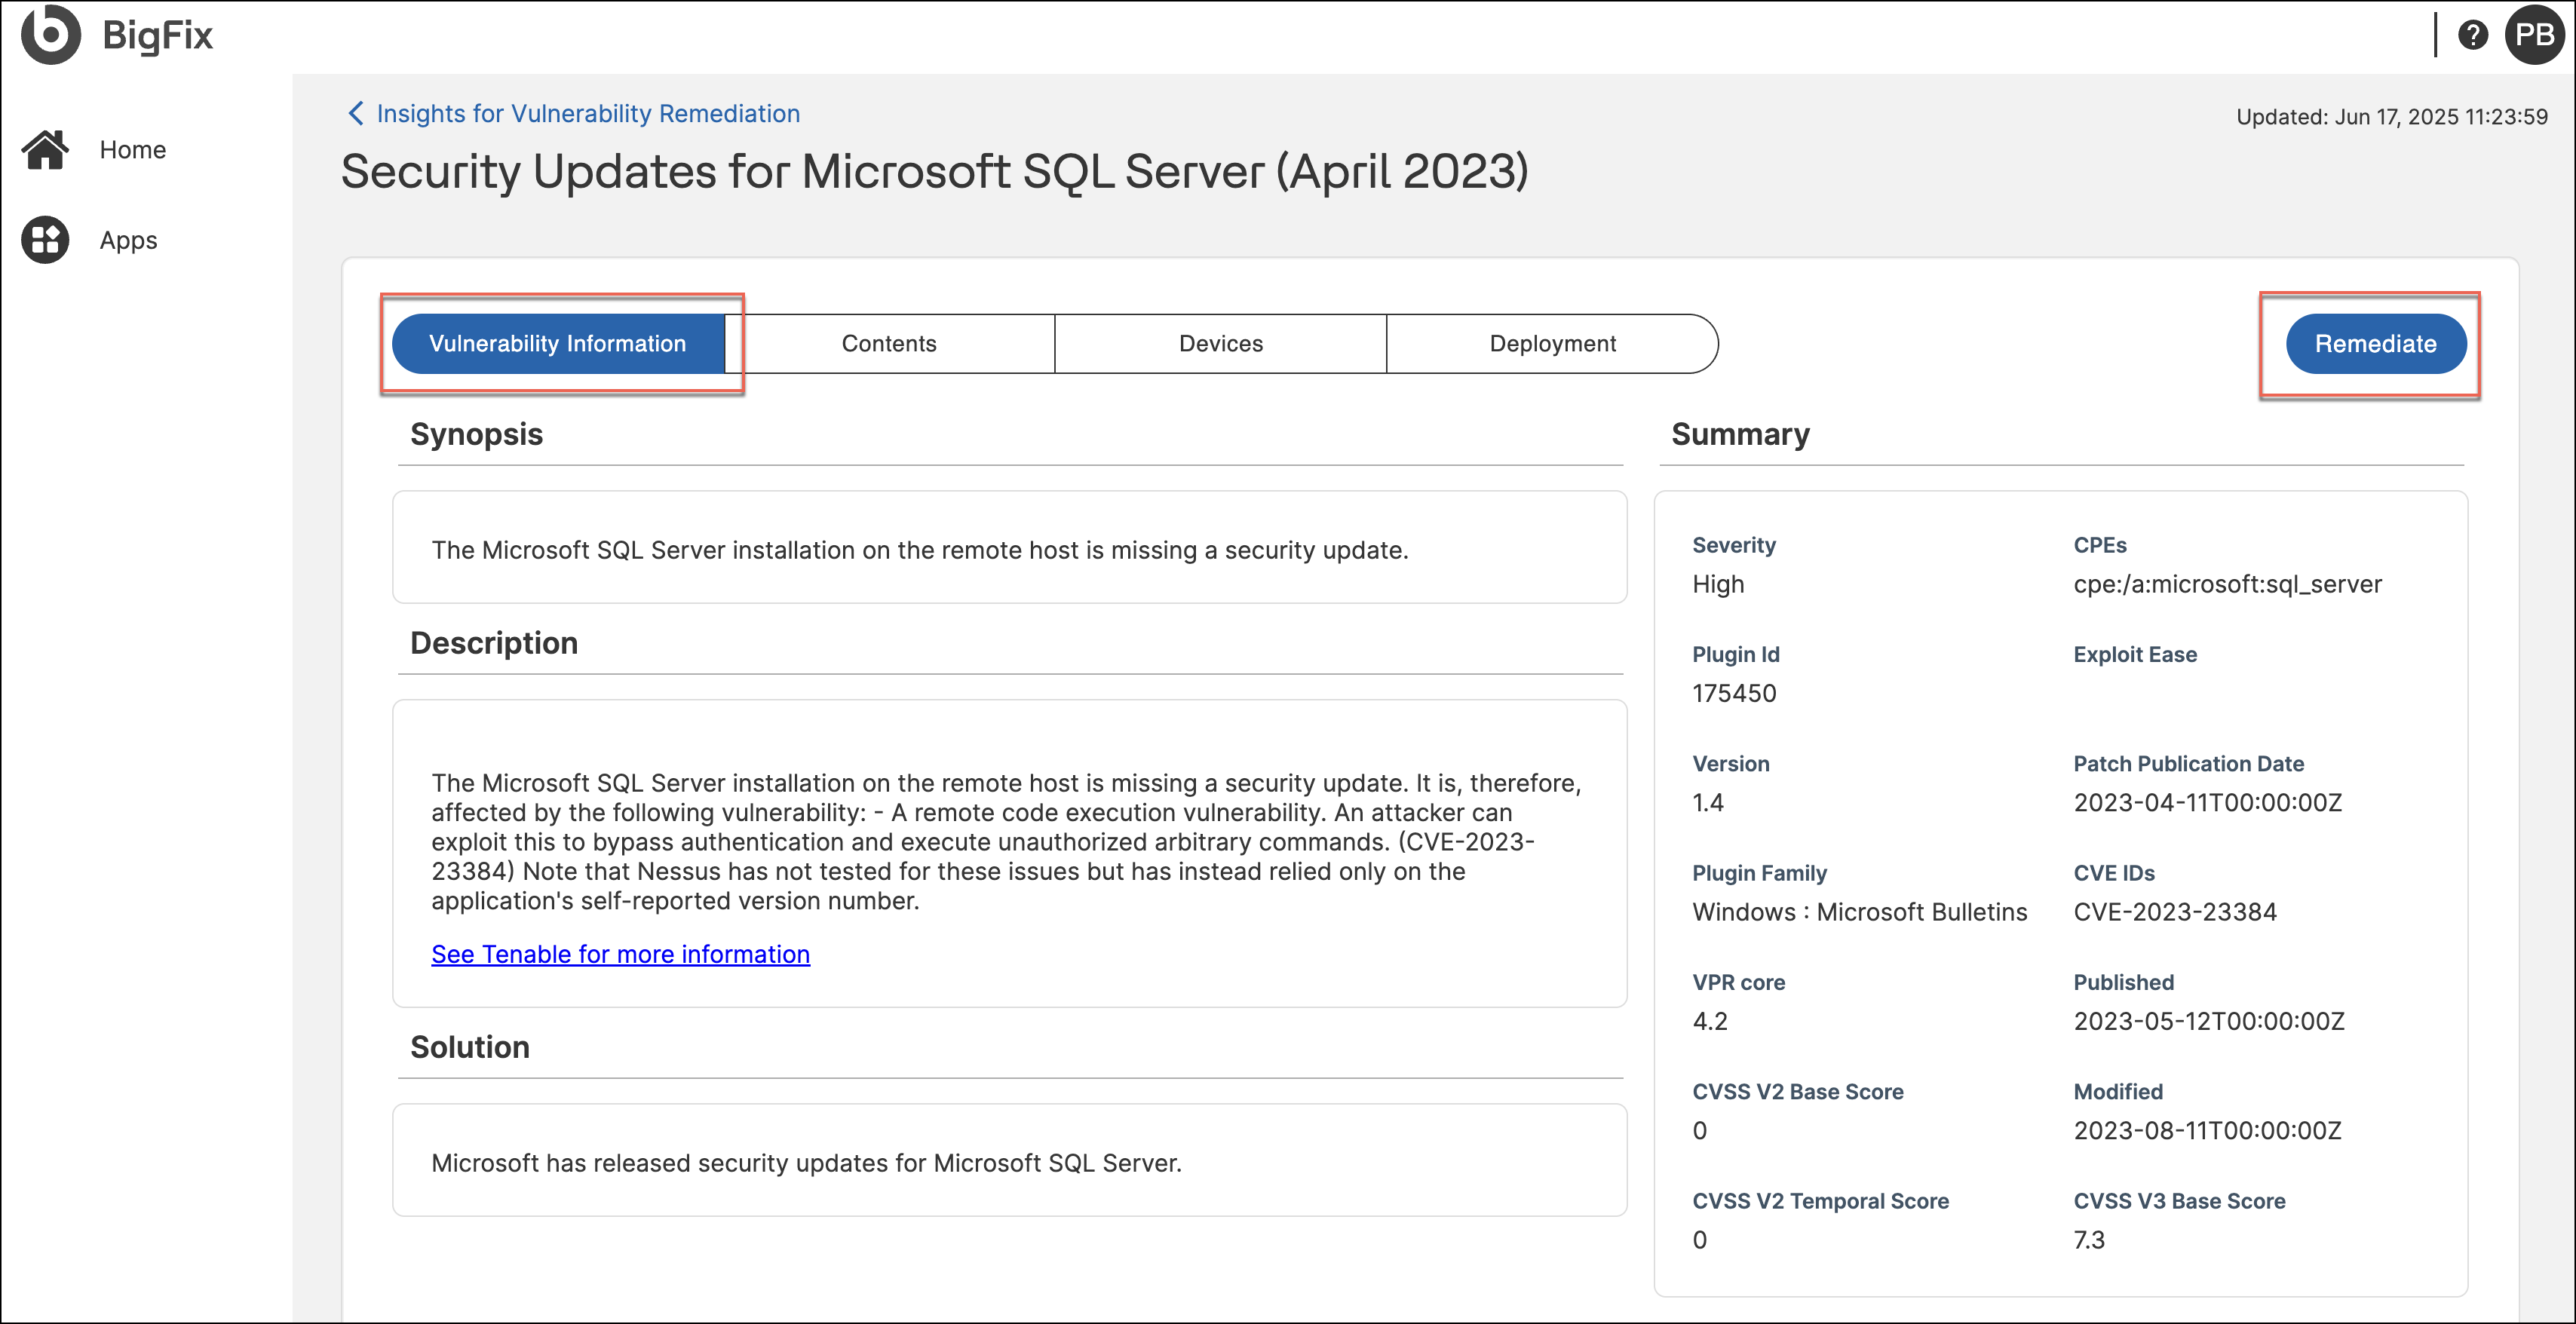
From the Vulnerability Details Page (Single Vulnerability):
- Click the name of a specific vulnerability in the dashboard to open its details page.
- You can manage the vulnerability using the following tabs:
- Vulnerability Information: View high-level details (CVEs,
severity). Click Remediate in the page header to initiate
the wizard for all applicable content and devices.
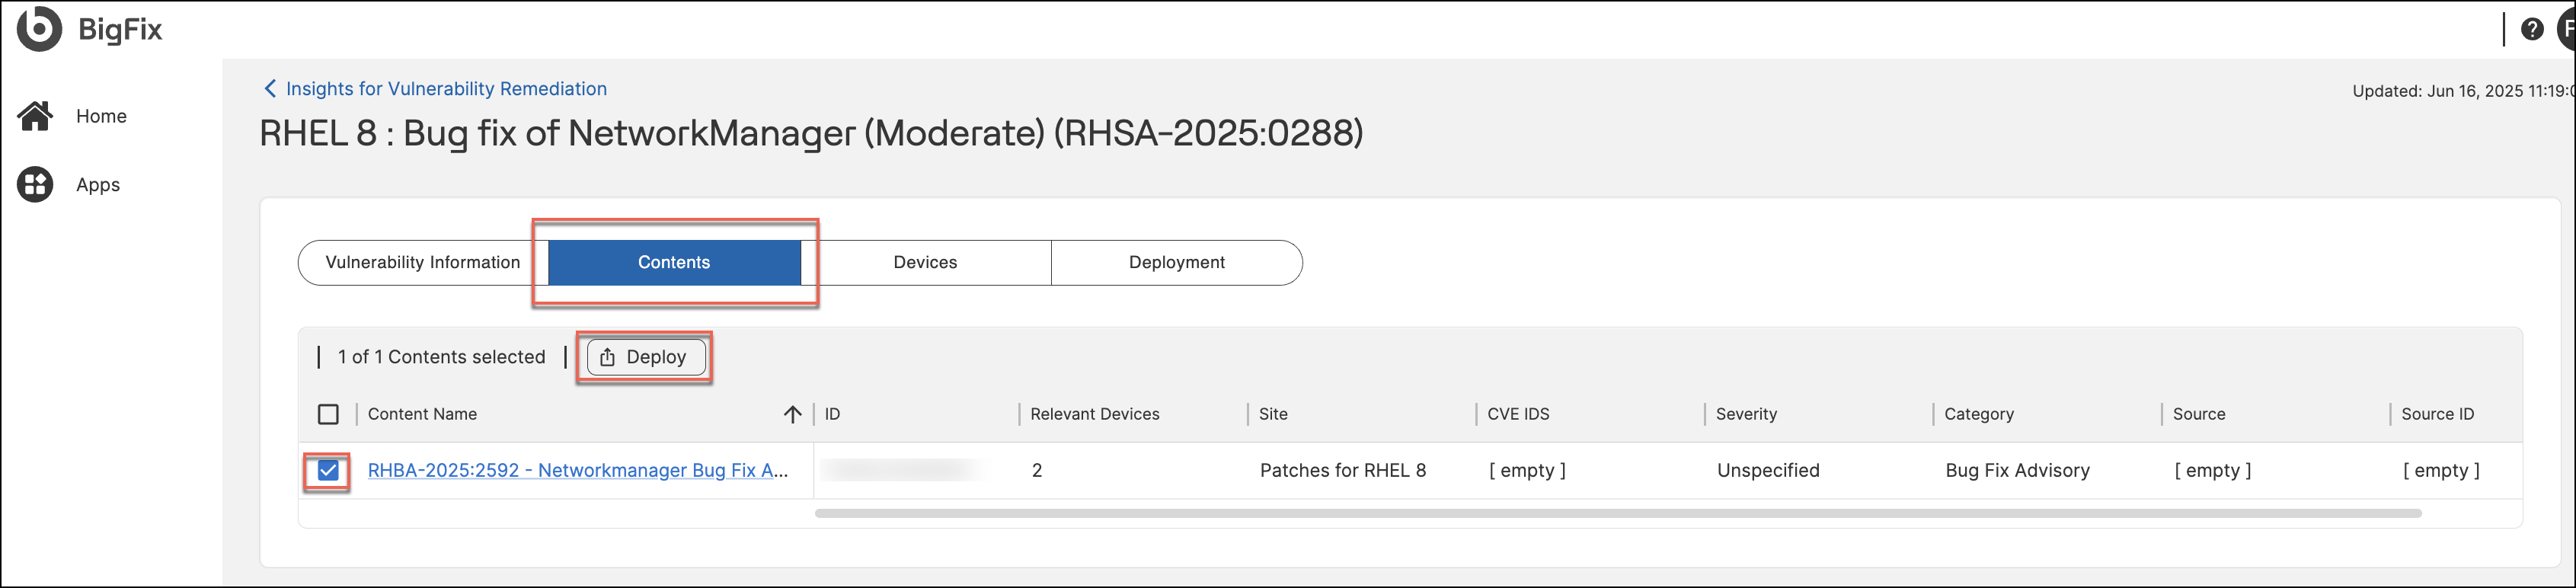
- Contents: Lists specific Fixlets correlated to this
vulnerability. Select the content name to view its details on
the Fixlet Explorer page. Select specific Fixlets and click
Deploy to launch the wizard.
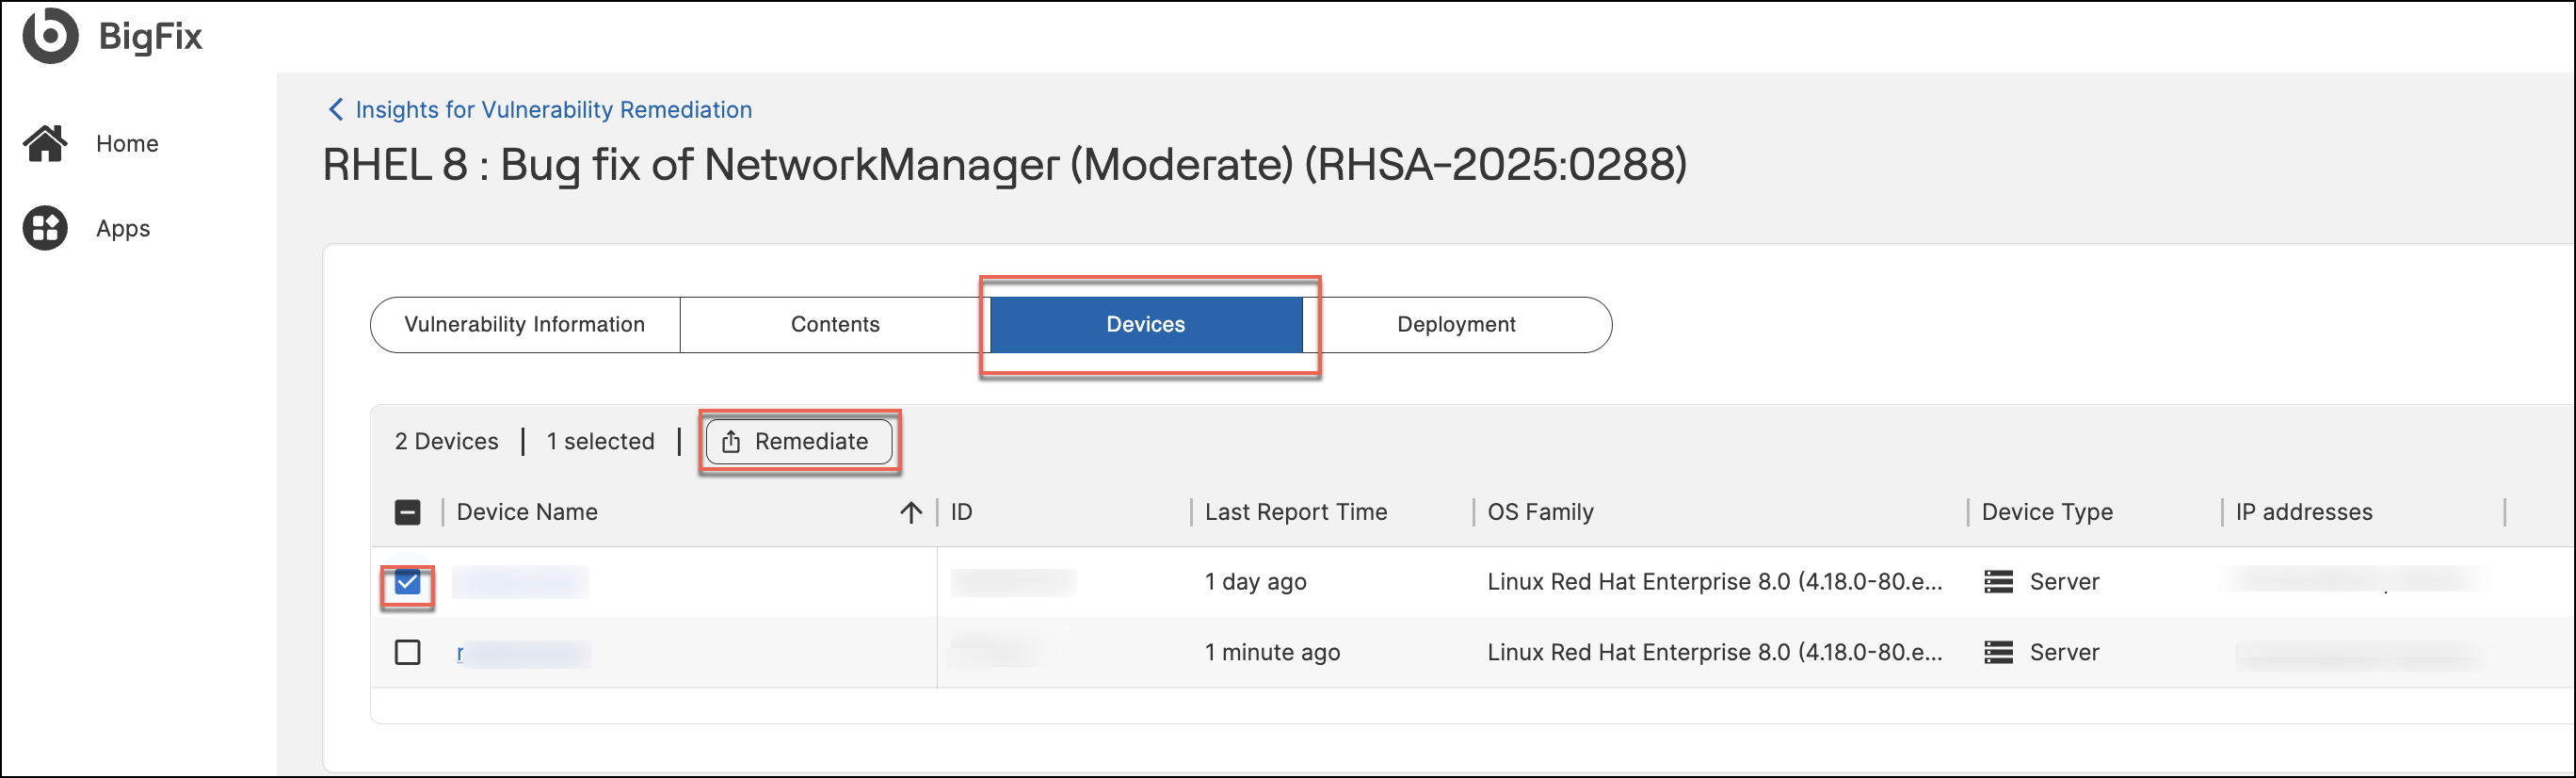
- Devices: Lists the specific endpoints affected by this
vulnerability. Select the device name to view its details on the
Device details page. Select target devices and click
Remediate to launch the wizard for those
endpoints.
-
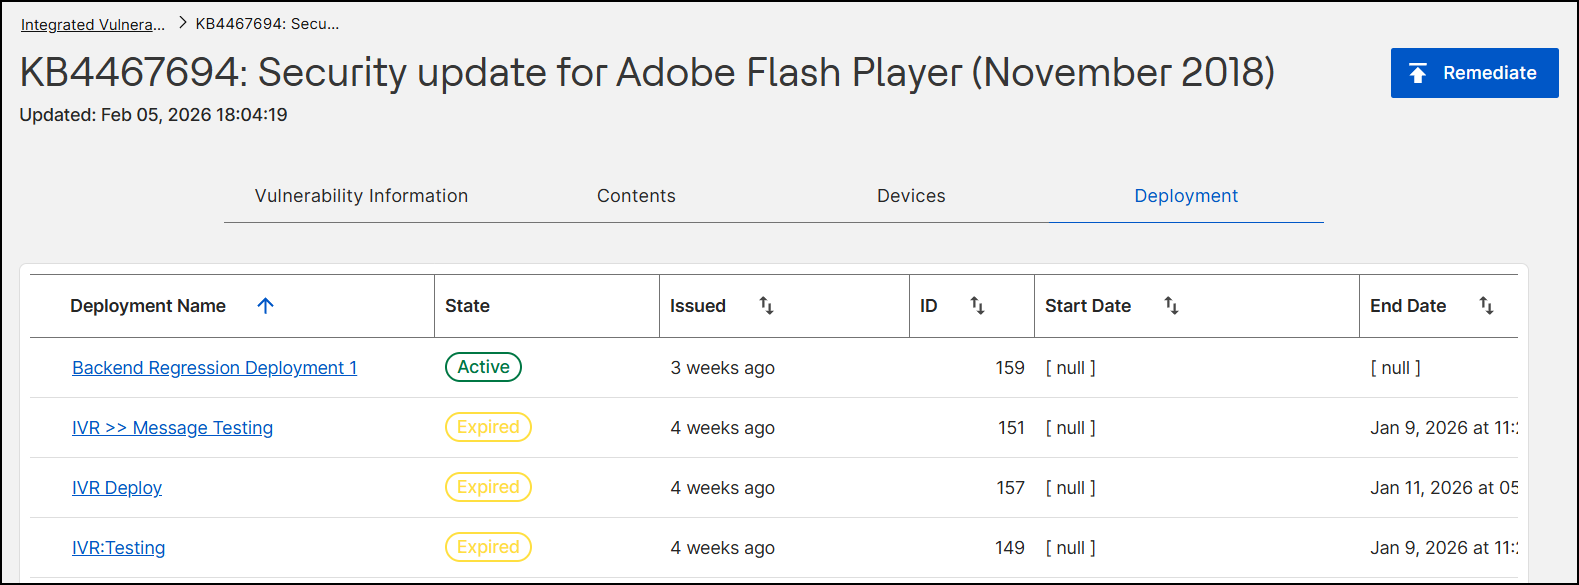
Deployment: Displays the history of all remediation actions previously taken for this specific vulnerability. It lists the Deployment Name, Status (e.g., Active, Completed, Expired), Start Time, and User who initiated the action. Select a specific deployment to view its details on the Deployment details page.
- Vulnerability Information: View high-level details (CVEs,
severity). Click Remediate in the page header to initiate
the wizard for all applicable content and devices.
The Remediate wizard opens, displaying the progression steps: Fixlets, Actions, Devices, Behavior, Schedule, and Summary.
Configuring the Remediation Flow
Follow these steps to configure and submit your remediation deployment:
Step 1: Select Fixlets
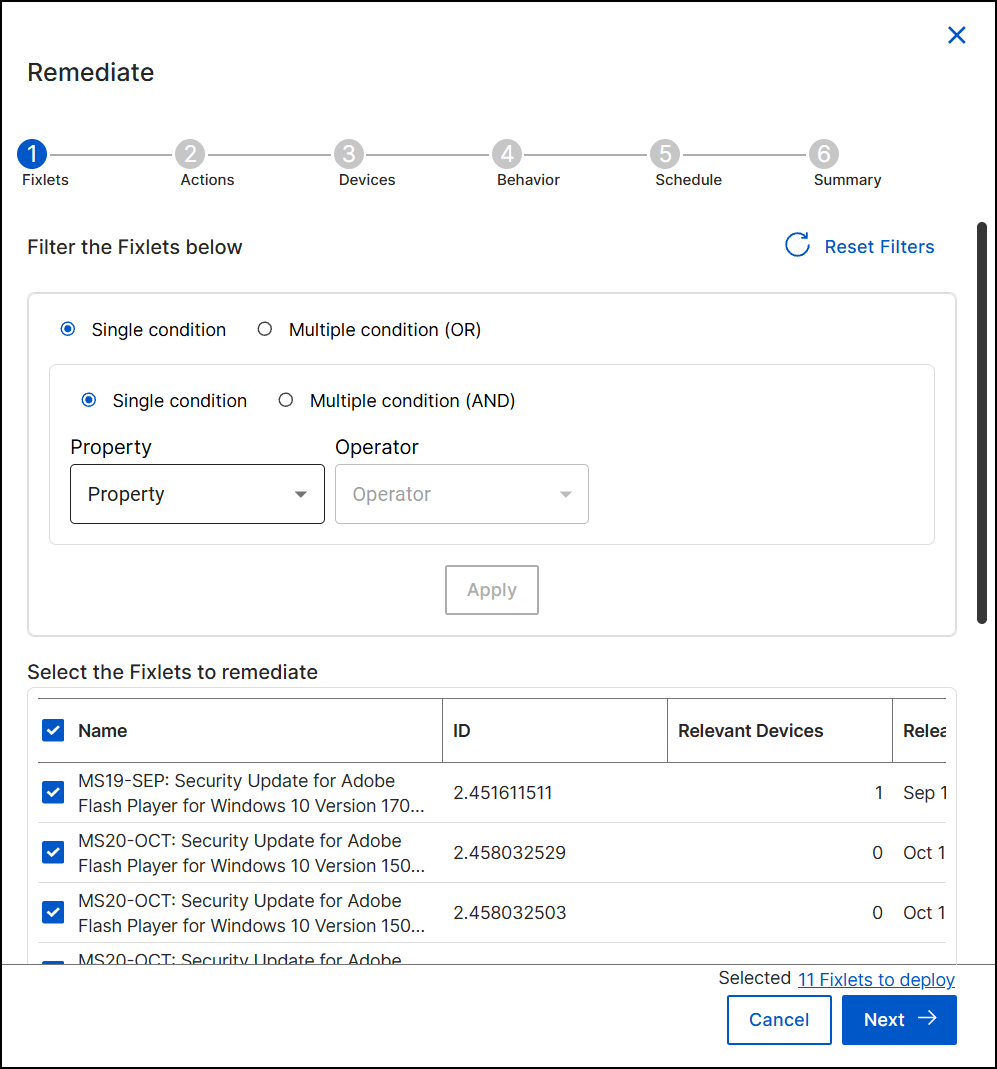
The wizard automatically filters the content to show Fixlets relevant to the selected CVEs.
-
Review Content: Check the Select the Fixlets to remediate table. This displays the details (such as Name, ID, count of Relevant Devices, CVE, and Severity) for each Fixlet.
-
Filter (Optional): If the list is extensive, use the Filter the Fixlets below section to refine the view.
-
Select Single condition or Multiple condition (OR / AND) to define complex logic.
-
Choose a Property and Operator to set your criteria, then click Apply.
-
-
Ensure the checkboxes are selected for all Fixlets you intend to include in this deployment.
-
Click Next to proceed.
Step 2: Configure Actions
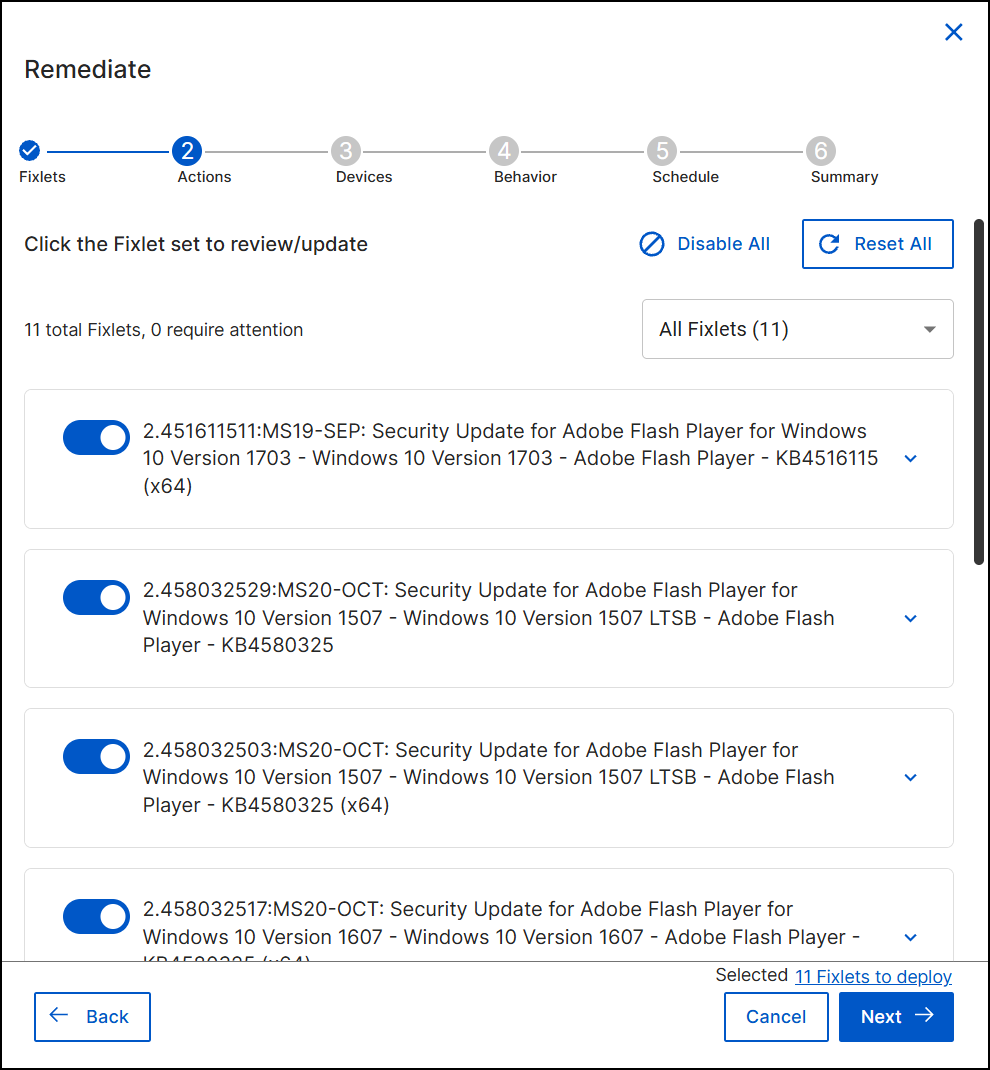
Review and update the specific actions associated with the selected Fixlets.
- View the list of Fixlets. Use the toggle switch next to each Fixlet to include or exclude it from this specific deployment.
- (Optional) Use the Disable All or Reset All buttons to manage the selection in bulk.
- Click Next.
Step 3: Target Devices
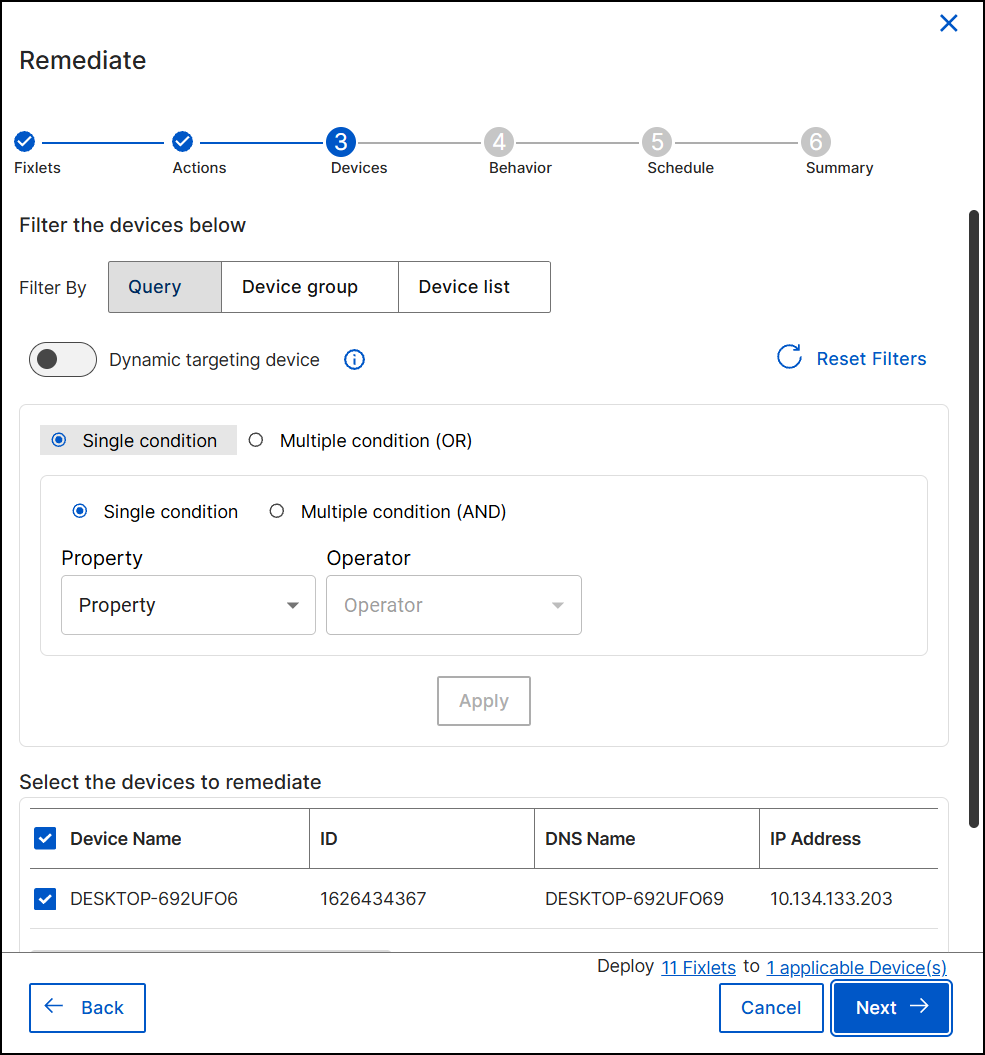
Define which endpoints will receive the remediation. The wizard automatically filters for devices relevant to the selected vulnerability and fixlet(s).
-
Refine Targets: Use one of the following filter tabs to adjust the scope:
-
Query: Apply logical conditions (Single or Multiple) to target devices based on properties.
-
Device group: Select pre-defined device groups existing in your BigFix environment.
-
Device list: Manually select specific devices from a list.
-
-
Dynamic Targeting:
-
Toggle Dynamic targeting device to On if you want the deployment to automatically target any new devices that meet your criteria in the future (e.g., if a new device scans positive for this vulnerability later).
-
-
Review the Select the devices to remediate table to confirm the final list of target endpoints.
-
Click Next to proceed.
Step 4: Set Behavior
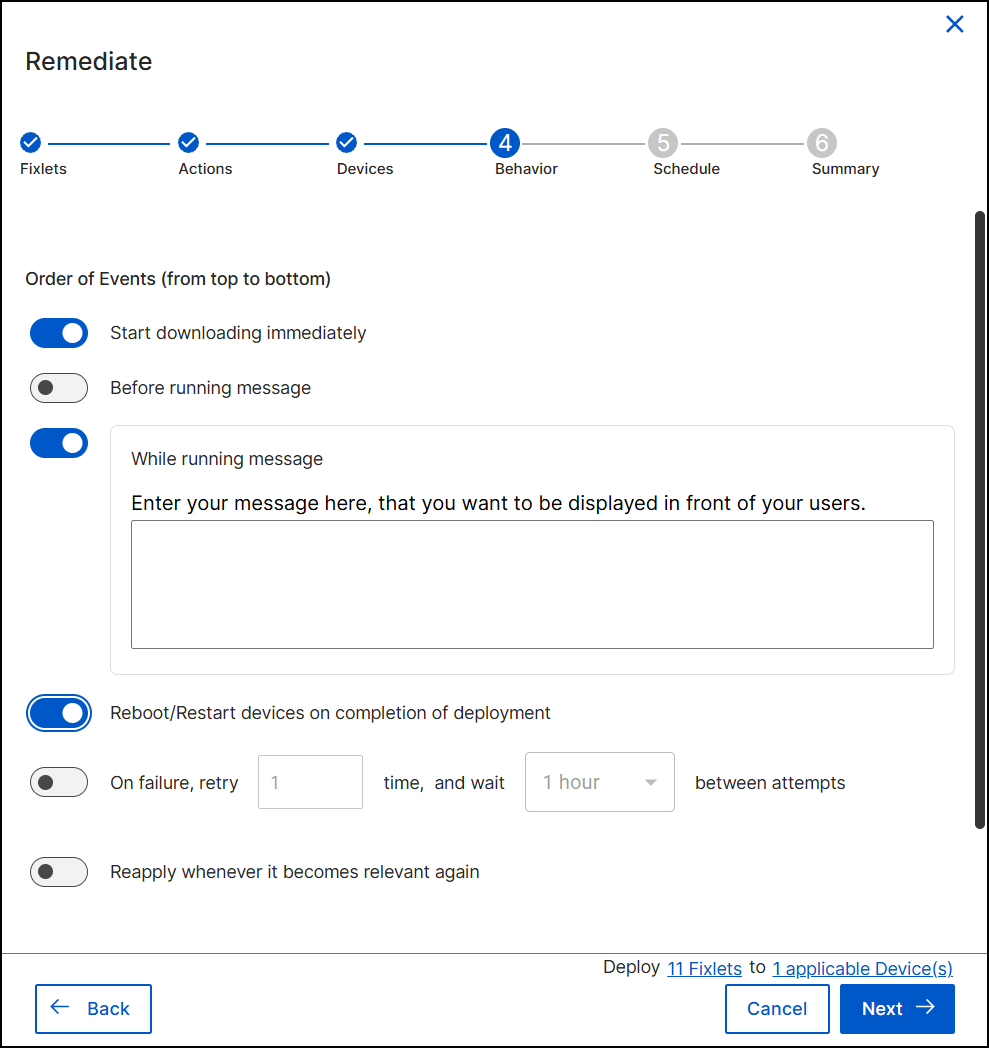
Configure the user experience and post-deployment actions. You can control the sequence by selecting which events to run. The system follows the list from top to bottom, running only the selected ones.
- Start downloading immediately: Select this option to download deployment files immediately regardless of the start time schedule. Pre-cache deployment-related files, transferring them from a vendor's server to a BigFix server before deployment. You can save time when working with large files or a tight maintenance window by completing this part of the job first.
- User Messages:
- Before running message: Select this option to set a message to display on targeted devices before the deployment runs.
- While running message: Select this option to set a message to display on targeted devices while the deployment is running.
- Reboot/Restart devices on completion of deployment: Select this option if the remediation requires a system restart.
- On failure, retry: Select this option to configure automatic retry attempts. Specify the number of retries and the wait time between attempts.
- Reapply whenever it becomes relevant again: Select this option to reapply the action. By default, whenever it becomes relevant again, you can reapply with 1-hour wait between attempts, up to 3 times. You can configure the wait time and the number of attempts as needed.
- Click Next.
Step 5: Schedule Deployment

Define the timeframe and constraints for the deployment.
- Time Zone: Select Client to use the local time of the device or UTC to use Coordinated Universal Time for all devices simultaneously.
- Duration: Use the Start and End toggles to set a specific window. Enter the dates and times in the respective fields.
- Device Schedule: Select one of the following options:
- Run during Agent's configured maintenance window: Restricts deployment to the device's defined maintenance hours. See Setting up device maintenance window for more details.
- Run on all devices, regardless of their configured maintenance window: Overrides local maintenance windows to ensure immediate remediation.
- Custom constraints: Select this to define specific Time constraints (e.g., 10:00 PM - 11:00 PM) or Day constraints (e.g., Saturday only) specifically for this deployment.
-
Click Next.
Step 6: Review and Deploy
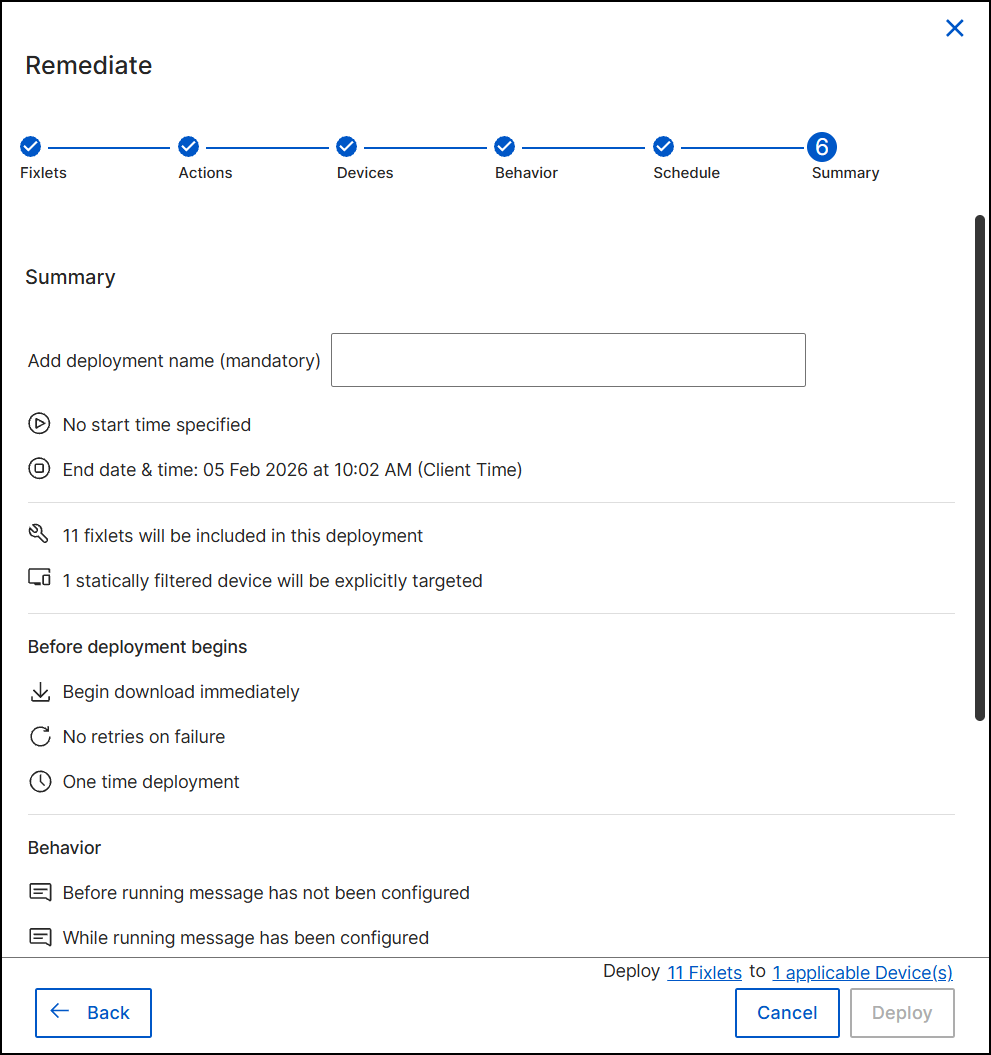
Finalize the configuration.
- Enter a unique name for the operation in the Add deployment name (mandatory) field.
- Review the summary sections (Fixlets, Devices, Behavior) to ensure all settings are correct.
- Click Deploy.
Result: The remediation action is submitted. You can monitor the status of the action (e.g., Active, Expired) and view details by navigating to the Deployment tab on the Vulnerability Details page.
What to do next: Go to Deployment Manager and you can see that the action is deployed. It also displays all the configured remediation flow settings. It shows the devices on which the deployment is being done, and the Fixlets that are deployed.