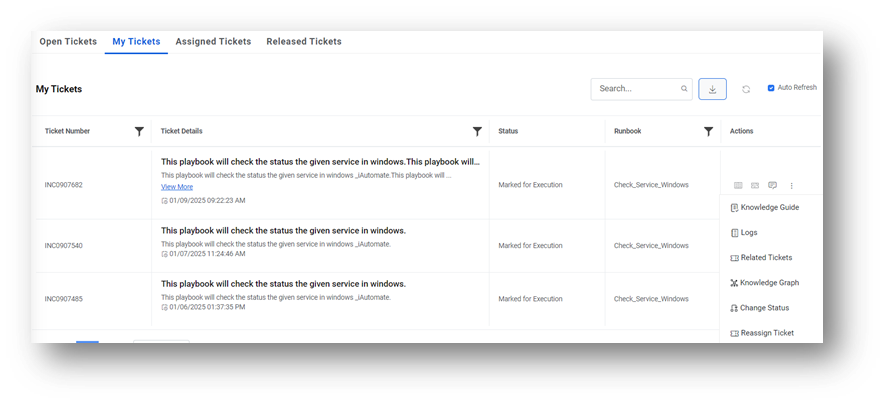
My Tickets
This section describes the user-specific tickets available in iAutomate and how to manage them. Here less important things have been placed inside the three dots drop down on the right side under Action column.
To view and use the My Tickets tab, perform the following steps:
- Select an organization and then select a Module. The specific
tickets for the selected organization and module will appear. The My Tickets tab is
categorized into the following tabs:
Table 3 – All Tickets Sub-sections
Tab Description Tickets - Lists the tickets that are a part of the iAutomate queue and assigned to the current user for execution.
- Lists the consolidated tickets from the In-Process and Failed tabs
In-Process - A subset of the Tickets tab; lists the tickets assigned to the current user for which execution is in process.
- Displays the allocation status of a ticket and the runbook being initiated for it
Failed - A subset of the Tickets tab lists all the tickets assigned to the current user that have failed execution.
- Enables the current user to release the failed tickets from iAutomate.
Note:After successful execution, tickets are automatically moved from the iAutomate queue. The tickets are marked either as resolved or assigned to another group in the ITSM tool based on how the runbook workflow execution is configured in your environment. - Each tab includes columns with the following values:
- Ticket Details: Provides information about a request, including the ticket description, summary, identification number, and the creation date. Selecting a ticket’s Incident ID displays the ticket detail in the Logs tab.
- If the ticket execution is In-Process, the Runbook button is disabled.
- For Failed ticket execution, the Runbook button is enabled. Clicking the
Release button displays a window and lists all the relevant runbooks by their
confidence score. Users can perform any of the
following steps:
- View the last executed runbook with the parameters and run the same runbook again.
- Select a new runbook to execute.
- For more details, see Runbook Execution.
-
Action: Consist of new option view more. Upon clicking on this User can see Knowledge
Guide, Logs, Related Tickets, Knowledge Graph, Change Status, Reassign Tickets.Note:The Action column remains unavailable in the Assigned Tickets tab.Attention:Clicking Release either releases the ticket to the All-Tickets queue (keeping it in the iAutomate queue but removing the allocation of the current user) or to some other group in the ITSM tool based on configured rules. In either case, the allocation of the current user will be removed.
- In the Ticket or In-Process tabs, clicking an incident number displays the
ticket-specific log in the Logs tab, which provides a runtime
update for the selected ticket with the following details:
- Parameter used for execution
- Start date of execution
- End date of execution
- Execution status
- Interaction ID provided by the underlying RBA tool
Figure 1. My Tickets 
- Each tab includes columns with the following values:
- Ticket Details: Provides information about a request, including the ticket description, summary, identification number, and creation date.
- Action: It includes Select Runbook, Release, Chat with us, and View more.
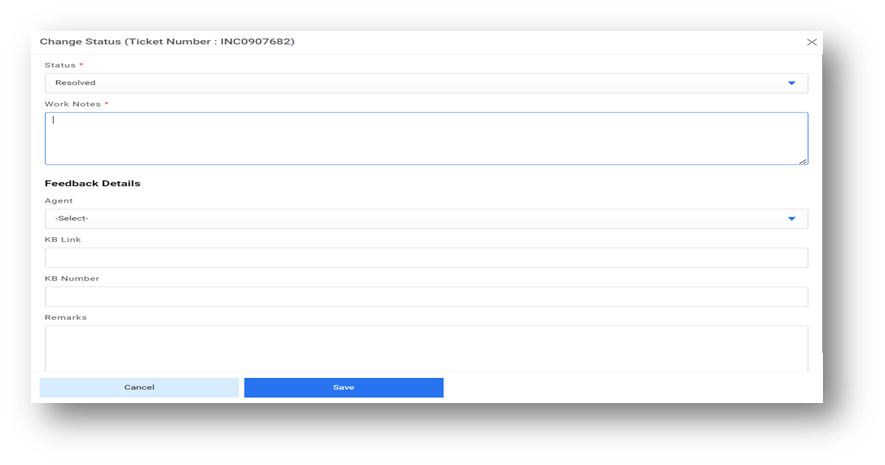
Change Status
In this under Action column Change status has been added. purpose of this is to change the status by writing notes and agent name to Resolved the ticket which depicts that the agent does not want to execute the ticket, or agent simply wants to Resolve the ticket.
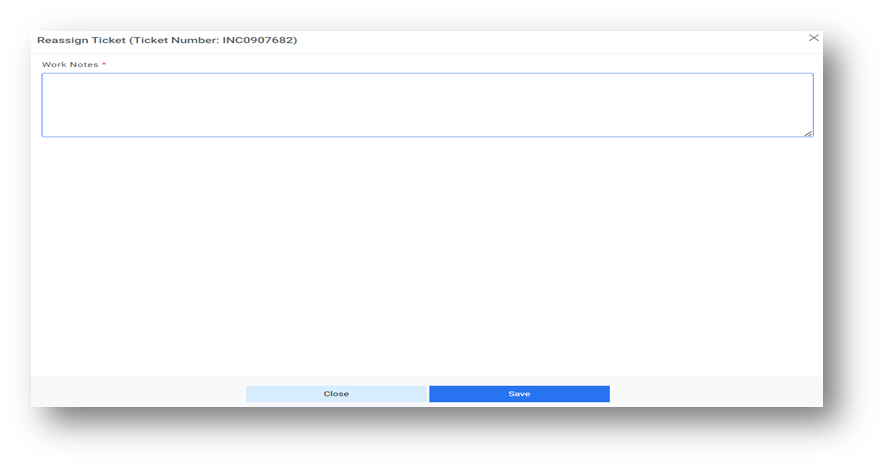
Reassign Tickets
If the user clicks on the Reassign button a pop-up appears and if user clicks on the Save button. Comment gets saved successfully and a message for Successfully saved appears.