
IVR v.5 setup process
This section explains how to set up IVR v.5 after the IVR Retriever is installed. You register IVR with the BigFix UI by running one command on the BigFix UI server, and then complete the configuration in the BigFix UI. Complete the tasks in order.
About this task
Before you begin
- The BES IVR Retriever Service is installed and running. See Install the BigFix IVR Retriever.
- You know the BigFix UI instance admin credentials and the IVR user credentials that you set in the Download Task. The instance admin is the application instance credential created during BigFix UI installation. See Configure Administrative Credentials.
- You have a BigFix UI administrator account that is mapped to a BigFix operator under Manage BigFix access. Use this account, not the instance admin, for Task 2 and Task 3. Administrators can access Application Configuration and all BigFix UI applications. To create one, see Creating a new user. You map the user to a BigFix operator on the Role step.
- You have the following values ready:
Value Where it comes from Where you use it BigFix UI instance admin Created when the BigFix UI was installed Task 1 (--configure-ivr) IVR user (username and password) You set it in the Download Task Task 1, as IVR Admin Username and IVR Admin Password SQL Server user and password Your database administrator Task 2, Database Configuration BigFix UI database host, port, and name Your BigFix UI installation (see Configure Database Settings) Task 2, Database Configuration Tenable Cloud URL, access key, secret key Your Tenable administrator account, API Keys section Task 2, Scanner Datasource configuration
Task 1: Register IVR with the BigFix UI
About this task
Procedure
- On the BigFix UI server, open Command Prompt as an administrator.
-
Go to the BigFix UI command folder.
cd "C:\Program Files (x86)\BigFix Enterprise\BES UI\cmd\bfui" -
Run the registration command.
BFUI.exe --configure-ivr -
Enter the values when prompted.
Prompt What to enter Enter instance admin username / password The BigFix UI instance admin credentials. Enter IVR Server IP Address The IP address of the IVR host. Use 127.0.0.1when the IVR Retriever runs on the BigFix UI server.Enter IVR Server Basic Authentication Port The basic authentication port of the IVR Retriever, for example, 8088.Enter IVR Server mTLS Port The mTLS port of the IVR Retriever, for example, 9022.Enter IVR Admin Username / Password The IVR user credentials that you set in the Download Task. Enter comma separated list of IP SANs for IVR certificate The addresses that the IVR certificate must cover, for example, localhostwhen the IVR Retriever runs on the BigFix UI server. For a separate IVR host, include its IP address. - Check that the output ends with IVR configuration completed successfully. For other BFUI.exe options, see Installation in the BigFix UI Administration Guide.
Results
Task 2: Configure IVR in Application Configuration
About this task
Procedure
- Log in to the BigFix UI as an administrator. See Access and security.
-
In the left navigation pane, select Administration
> Application
Configuration.
Figure 1. Administration > Application Configuration in the BigFix UI left navigation pane 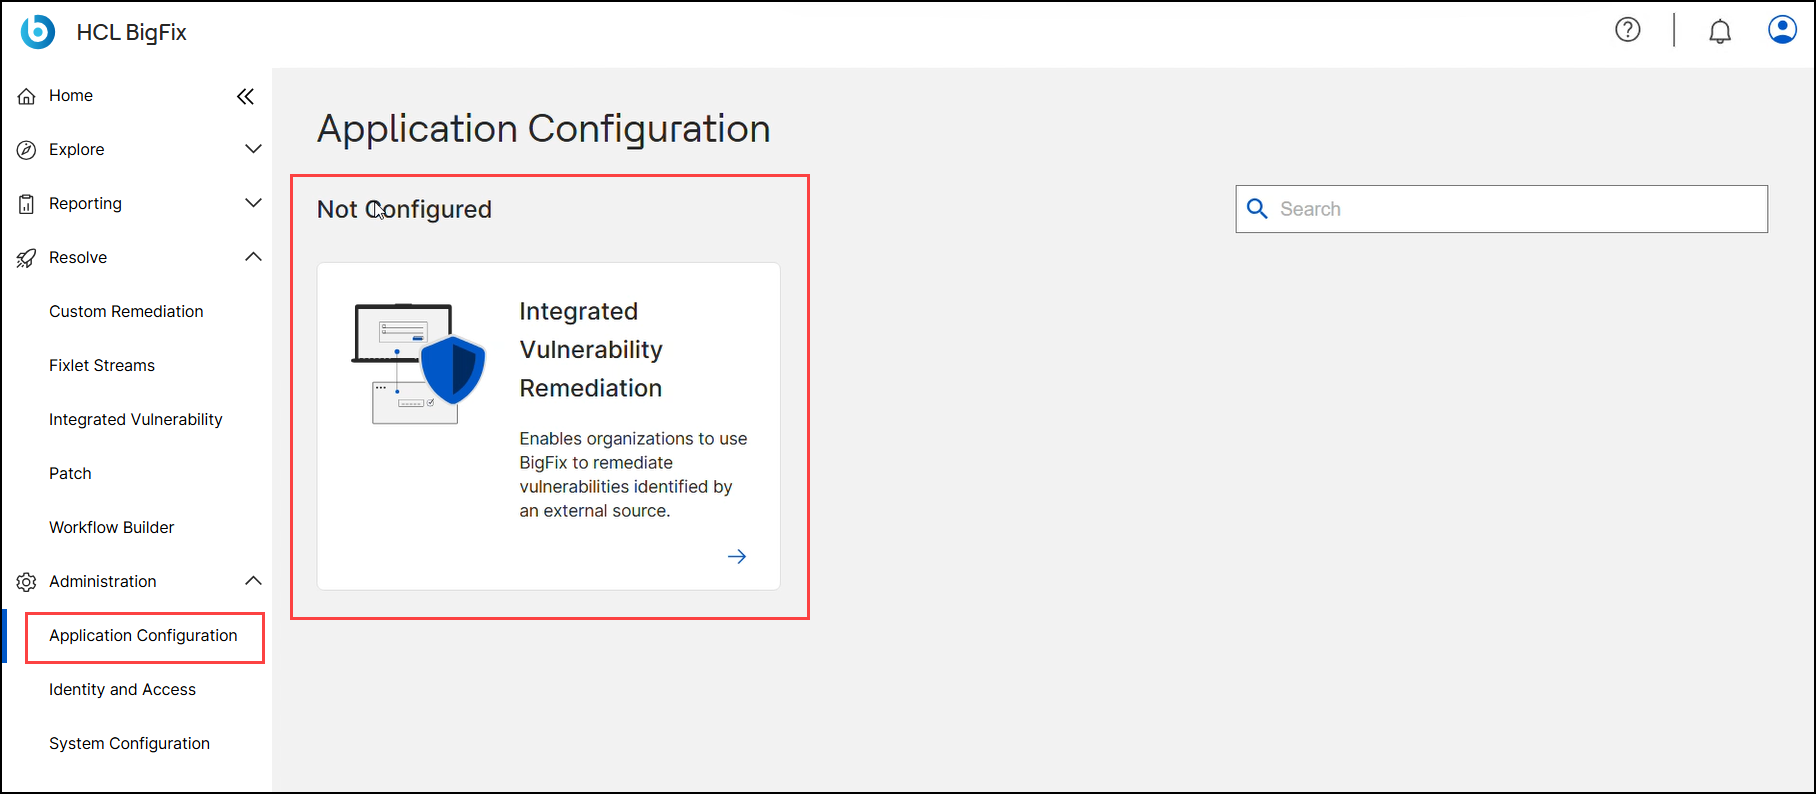
-
Select the Integrated Vulnerability Remediation tile.
The IVR Configuration wizard opens with four steps: Database Configuration, Application configuration, Scanner Datasource configuration, and Summary.
-
On the Database Configuration step, enter the
BigFix UI database values. All fields are required.
Figure 2. Database Configuration step of the IVR Configuration wizard 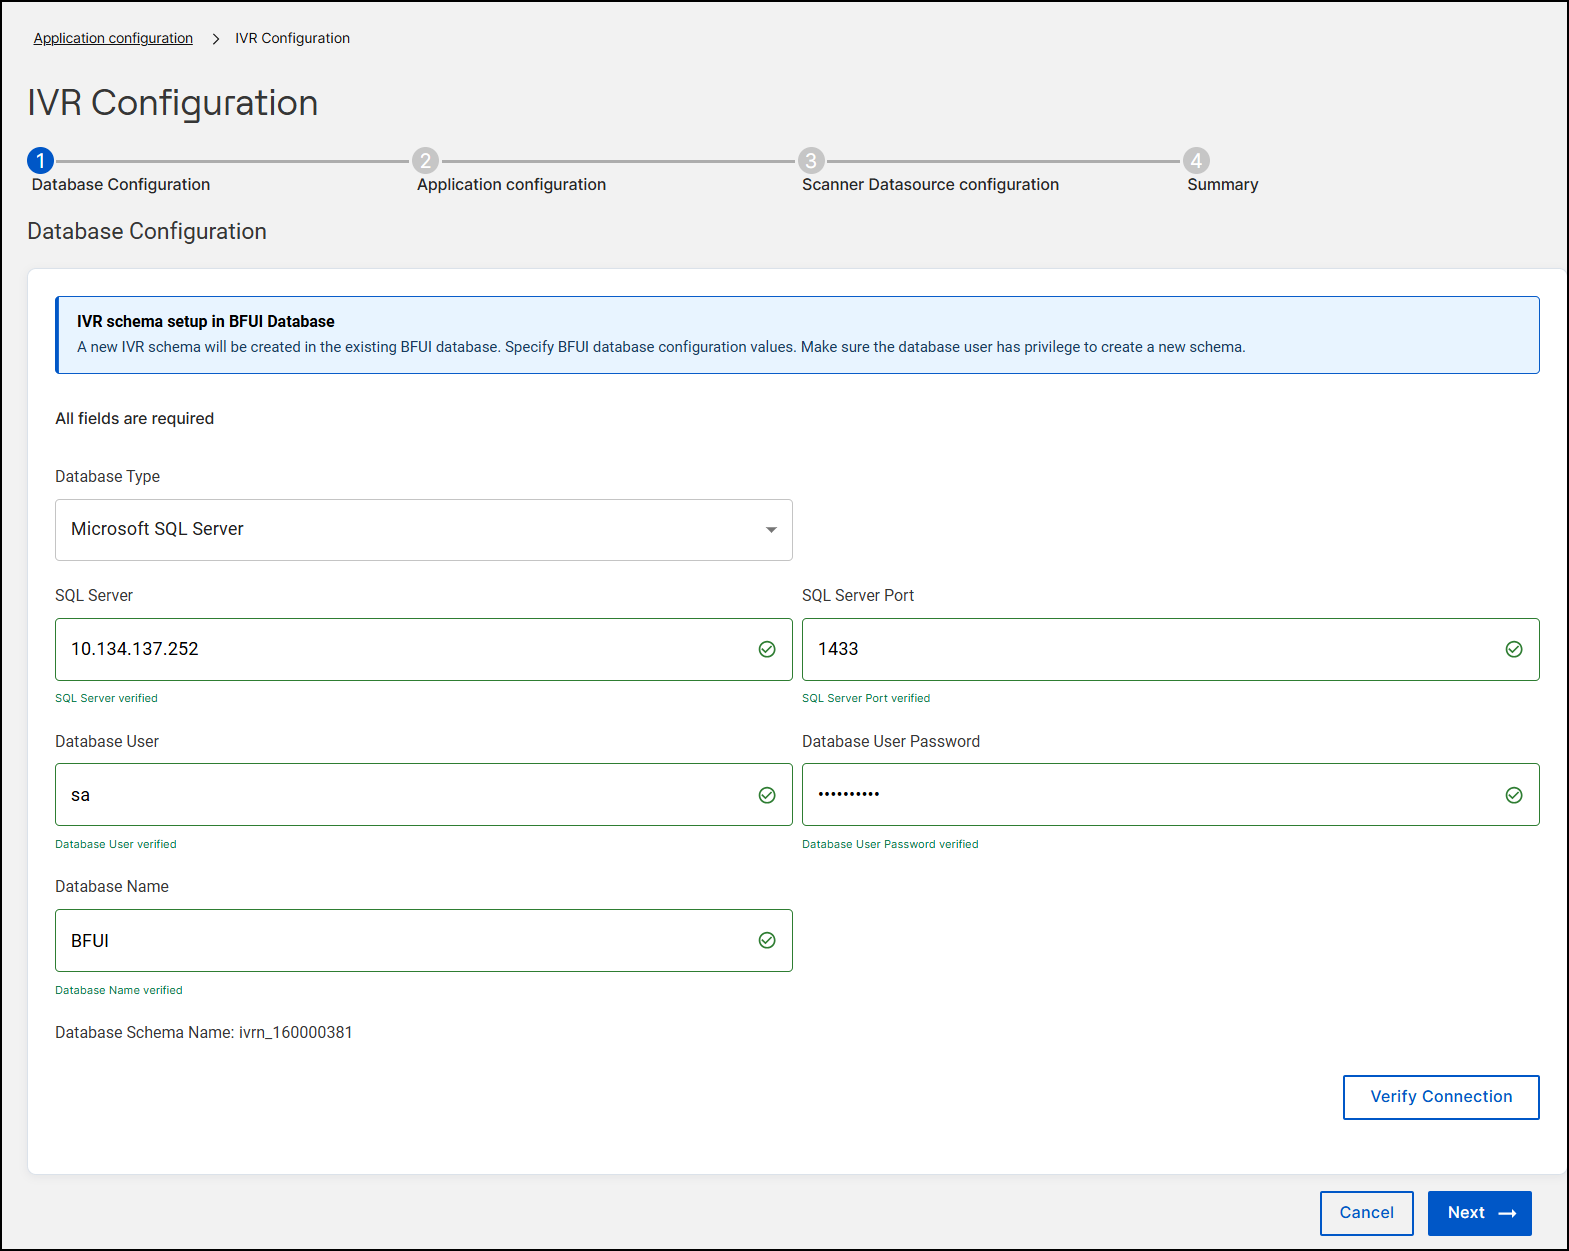 Note:The IVR schema setup in BFUI Database banner reminds you that IVR creates a new schema in the existing BigFix UI database, so the database user must have permission to create a schema.
Field Description Database Type Select Microsoft SQL Server. SQL Server The host name or IP address of the SQL Server that hosts the BigFix UI database. SQL Server Port The SQL Server port, for example, 1433.Database User A database user with permission to create a schema. Database User Password The password of the database user. Database Name The name of the existing BigFix UI database. Use the database that you set when you installed the BigFix UI. See Configure Database Settings. Below the fields, the wizard shows the Database Schema Name that IVR generates, for example,
ivrn_<number>. You can’t change it.If you connect with a DSN instead, enter an ADO.NET connection string. Only Microsoft SQL Server DSN strings are supported, and the database must already exist. For example:
server=10.127.137.71;database=<DATABASE>;user=<USER>;password=<PASSWORD>;port=1433

Server=10.131.121.61;Database=<DATABASE>;Integrated Security=True;Trusted_Connection=True
The second example uses Windows Authentication. In that case, the account that runs the service must have the
db_owneruser mapping on the database.Select Verify Connection. A verified message appears under each field, for example, SQL Server verified. When every field is verified, select Next.
-
On the Application configuration step, enter the
application settings. The application fields are required. For a proxy, only
the proxy host and proxy port are required.
Figure 3. Application configuration step of the IVR Configuration wizard, with a proxy set up 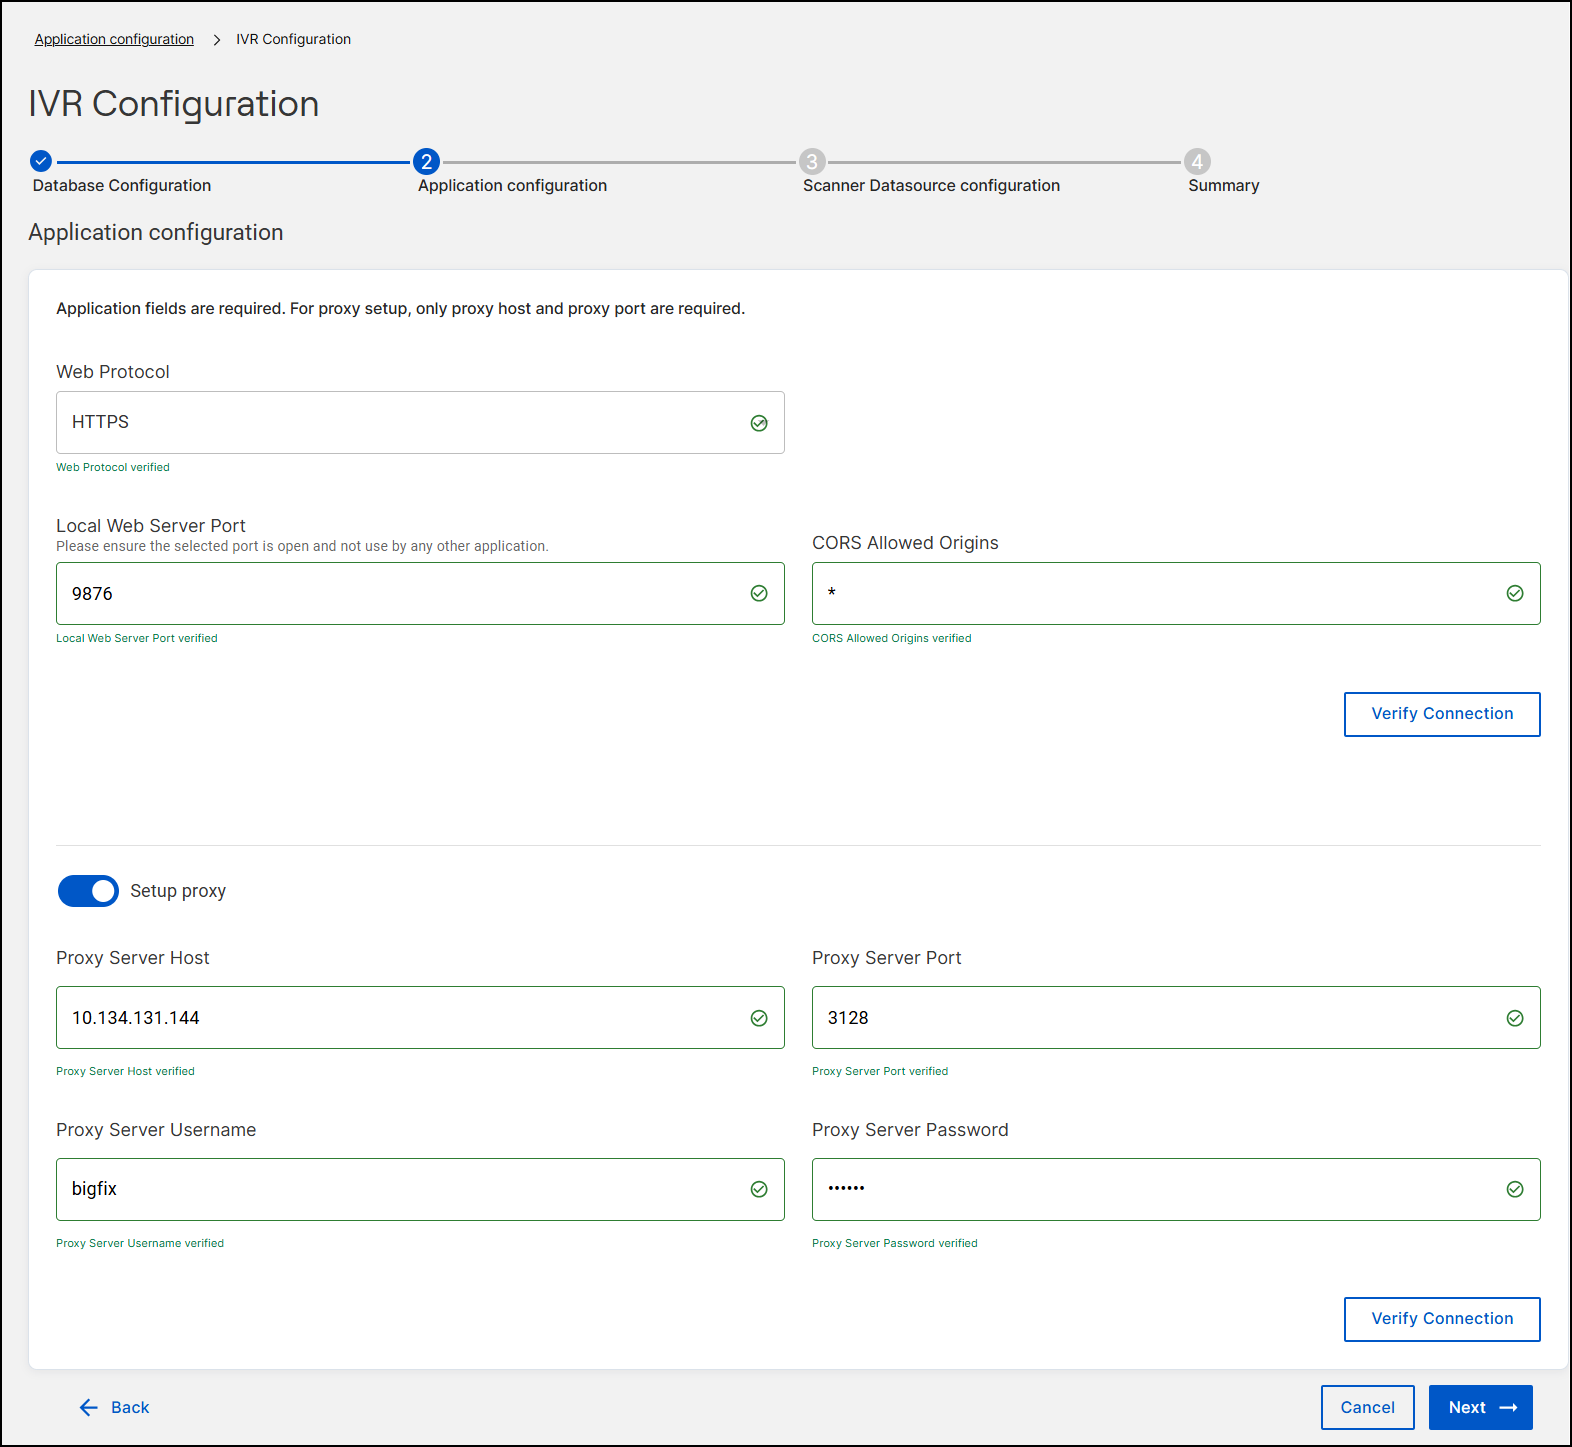
Field Description Web Protocol Select HTTPS. Local Web Server Port The port that the IVR application listens on, for example, 9876. Make sure that the port is open and no other application uses it.CORS Allowed Origins The origins allowed to make cross-origin requests. An asterisk ( *) allows all origins. In production, consider limiting this to your BigFix UI origin, for example,https://<BFUI_HOST>. For general CORS guidance in the BigFix UI, see CORS allowed origins configuration.Select Verify Connection below the application fields. A verified message appears under each field.
If your network routes outbound scanner traffic through a proxy, turn on Setup proxy, and then enter the Proxy Server Host and Proxy Server Port. If the proxy requires authentication, also enter the Proxy Server Username and Proxy Server Password. Then click the Verify Connection button below the proxy fields. When all fields are verified, click Next.
Important:If you change any IVR configuration setting later, such as the application settings, the proxy, the database configuration, or the data source, restart the BES IVR Retriever Service so that the changes take effect. For the procedure, see To change a configuration section in Managing the IVR configuration. -
On the Scanner Datasource configuration step, create
the data source. All fields are required.
Figure 4. Scanner Datasource configuration step of the IVR Configuration wizard 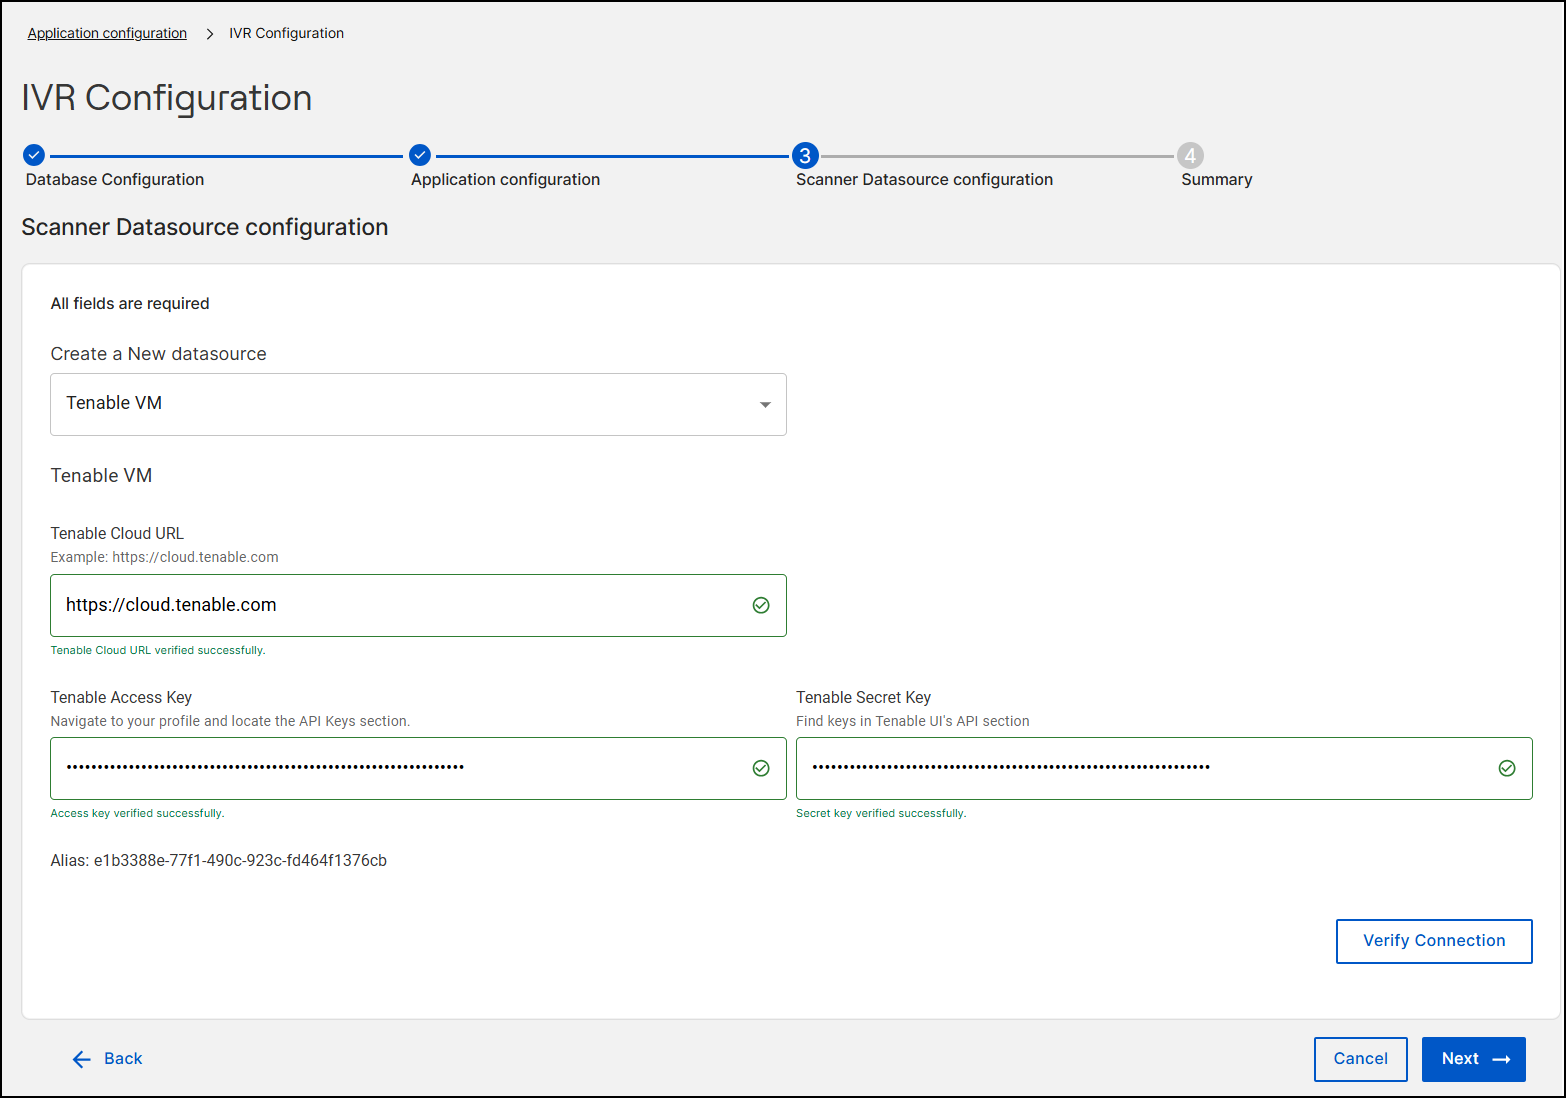
Field Description Create a New datasource Select Tenable VM (Tenable Vulnerability Management, the same platform that you selected as Tenable in the Download Task). Tenable Cloud URL Your Tenable URL, for example, https://cloud.tenable.com. Tenable Access Key The access key from the API Keys section of your Tenable profile. Tenable Secret Key The secret key from the same section. Select Verify Connection. When all fields are verified, IVR shows the data source Alias, a generated identifier that you can’t edit. Select Next.
-
On the Summary step, review your settings, and then
select Finish. To change a value, select
Back.
Figure 5. Summary step of the IVR Configuration wizard 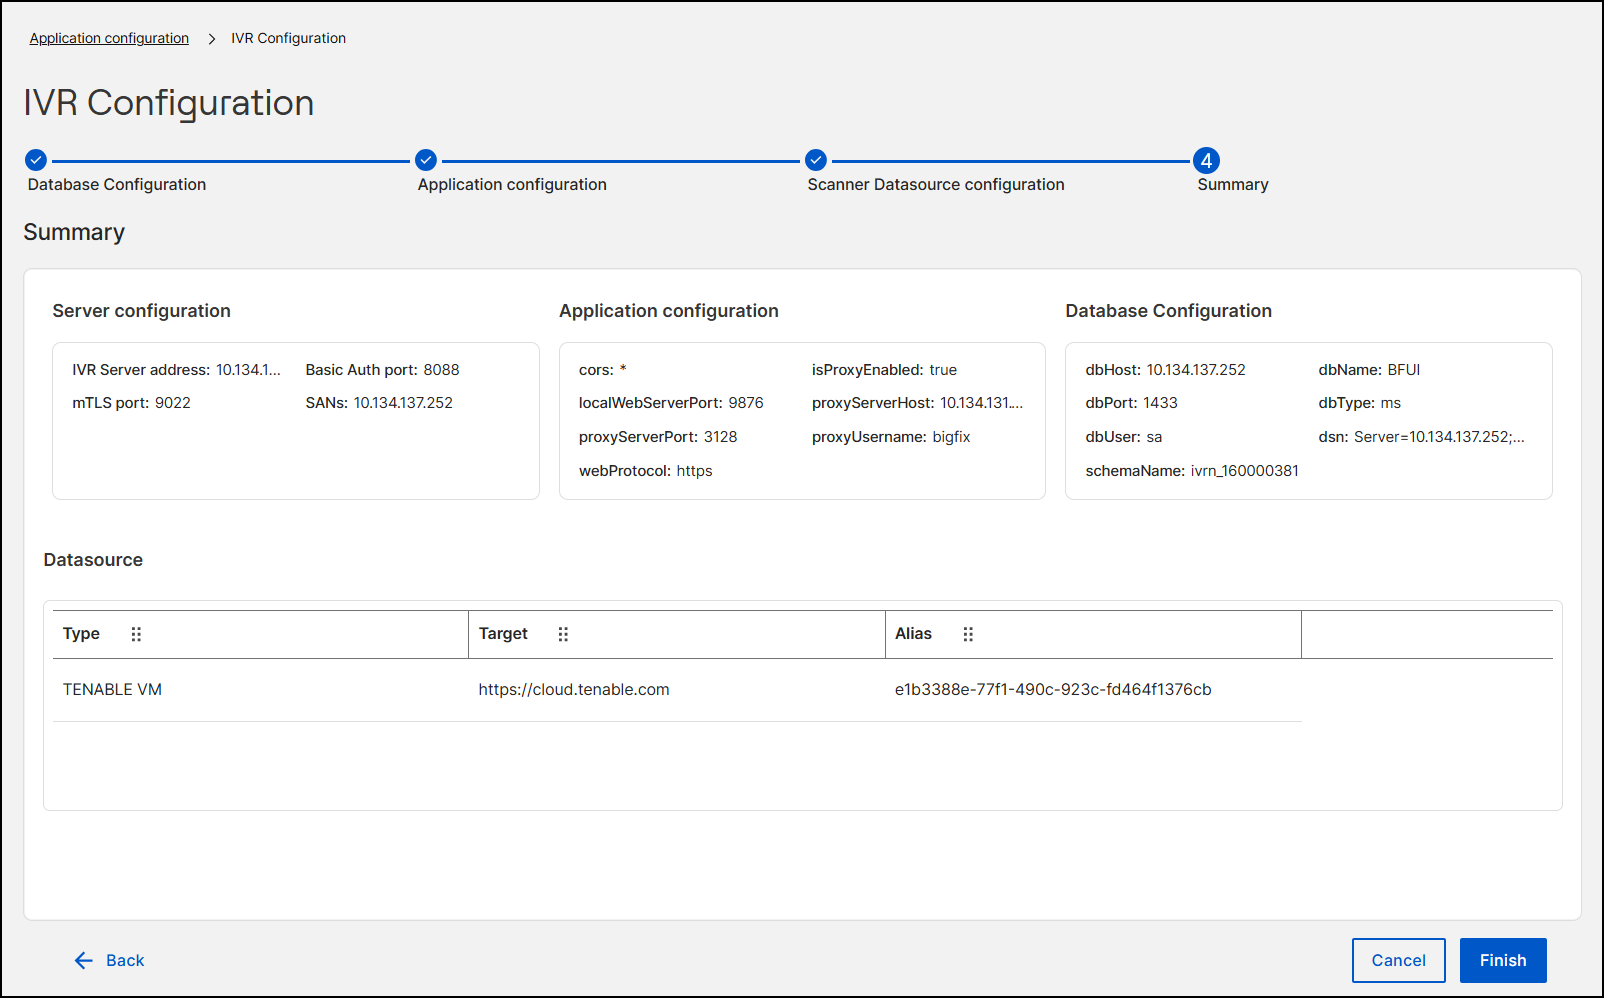
Results
The BigFix UI returns you to the Application Configuration page and starts the IVR background automation processes, including BES asset automation and BES Fixlet automation.
- In progress: While the processes run, IVR pages show IVR automation is in progress. Please wait until it completes. Don't start the wizard again during this time.
- Success: When all processes complete, the IVR tile moves to the
Configured section.
Figure 6. Application Configuration page displays IVR as Configured 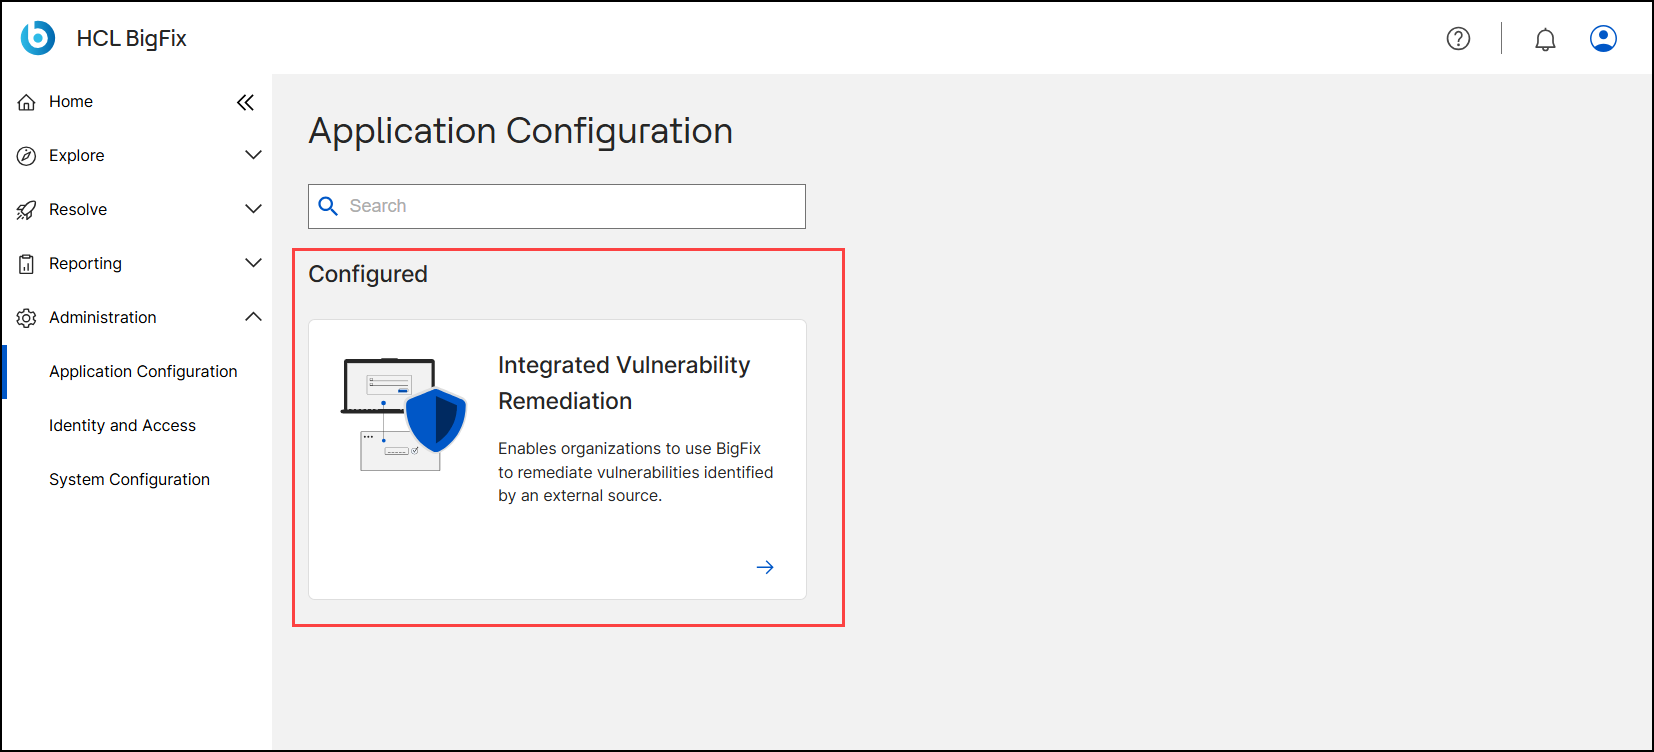
- Failure: If a process fails, the tile stays in Not Configured, and a message reports that the background process stopped unexpectedly. Check the BigFix UI and IVR logs (IVR logs), fix the reported problem, and then open the wizard again and click Finish.
Task 3: Grant IVR access to other users (optional)
About this task
Do this task after IVR is configured. Otherwise, users with the new role see IVR is not configured when they open IVR. Administrators can access all BigFix UI applications. Other users see Integrated Vulnerability Remediation only if their role includes the IVR application.
Procedure
- Log in to the BigFix UI as an administrator, click Administration > Identity and Access, and then select the User & Role Management card. See User & Role Management.
-
On the Roles tab, select Create
role.
The Create new role wizard opens with five steps: Devices, Applications, Permissions, Sites, and Summary.
- On the Devices step, set the devices for the role, and then select Next.
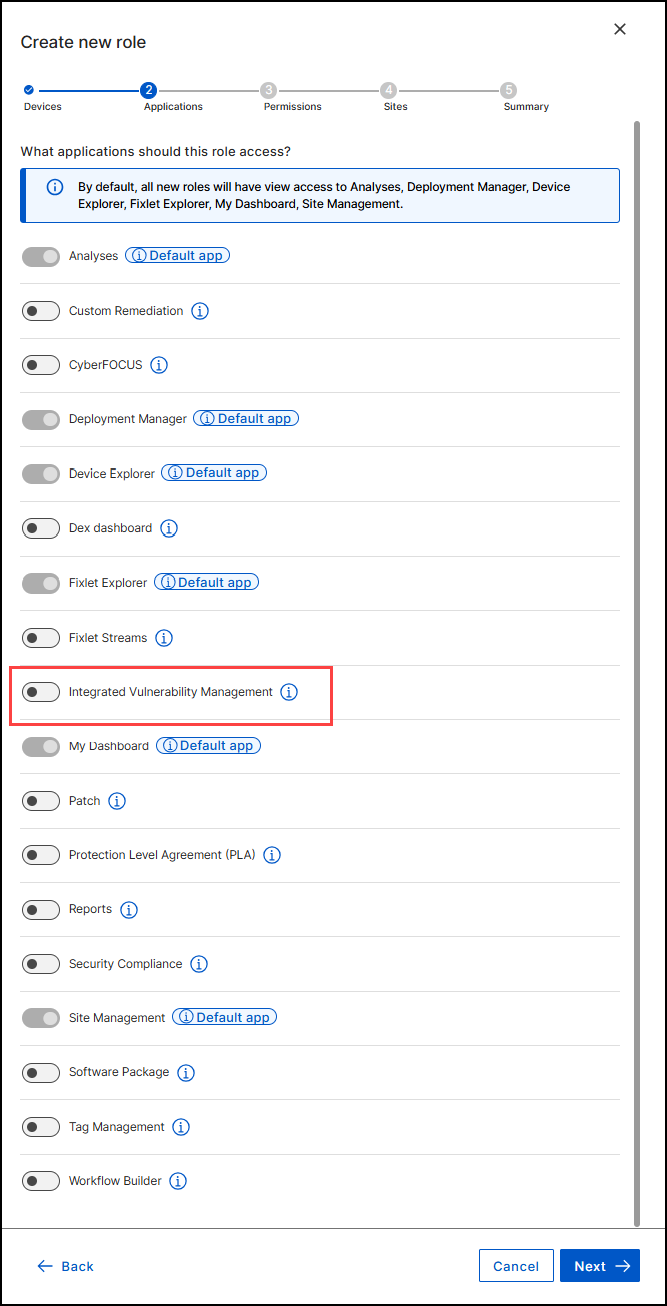
- On the Applications step, turn on Integrated Vulnerability Management. It appears in the list only when the BigFix Insights for Vulnerability Remediation site is enabled.
- Complete the Permissions, Sites, and Summary steps to create the role. See Managing Roles.
-
Assign the role to the users who need IVR. These users see IVR under
Resolve the next time they log in. See Assigning roles to users.
Note:Users can’t turn applications on or off for themselves. Access is controlled by the role.
Verify the setup
About this task
Procedure
- On the IVR host, open services.msc and confirm that BES IVR Retriever Service is Running with startup type Automatic.
-
On the IVR host, confirm that the basic authentication and mTLS ports
that you entered in Task 1 are listening.
For example:
netstat -ano | findstr ":8088 :9022" - On Administration > Application Configuration, confirm that the IVR tile shows Configured.
-
Click Resolve > Integrated
Vulnerability Remediation.
The IVR-Scanner Import page opens with an Updated time stamp.
-
After the first automation run completes, check that vulnerabilities
appear in the Vulnerability view, that devices
appear in the Device view, and that
Last Automation Run shows a time.
If the Device view is empty, check that the IVR Vulnerability Scanner Host ID analysis is activated globally (see Before you begin, step 4 in IVR v.5 Fixlets and Tasks) and returns results for your devices.
- In Explore > Devices, open a device and confirm that the Vulnerabilites tab is present. See Device Details Page.