Add Runbook
Users can add a single runbook into the runbook tool using Add Runbook button or import multiple runbooks together using Bulk Upload option.
Add a Single Runbook
To add metadata for one runbook, perform the following steps:
- On the Manage Runbook screen to add Runbook, click on plus sign,
Runbook Details page appears.
Figure 1. Add Single Runbook 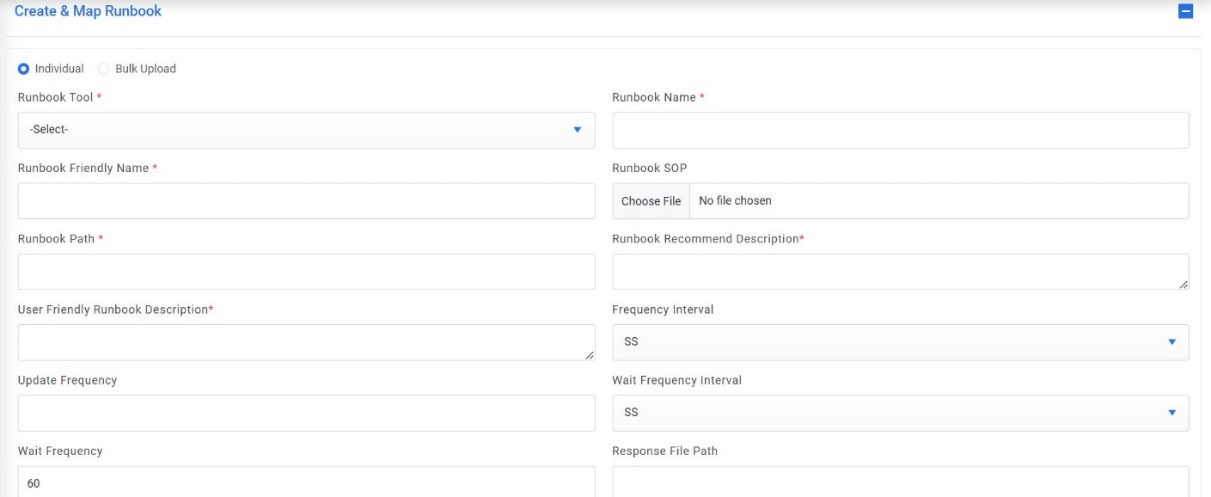
- Select a runbook tool by clicking the drop-down button corresponding to the Runbook Tool field.
- Type a name for the new runbook in the Runbook Name field. This will be referred to by the system at the backend.
- Type a runbook friendly name in the Runbook Friendly Name field to recognize the runbook in your repository. This name will be visible to the end user while getting recommendations and execution.
- Upload Runbook SOP for the runbook in .pdf format.
- In the Runbook Path field, specify the path where the runbook is located within the runbook tool .
- Type the runbook description in the Runbook Recommend Description field to be used during the recommendation process.
- Type a user-friendly description in the User-Friendly Runbook Description field to be shown to the user when selecting the runbook.
- Type the Frequency Interval, which is fixed by the user to fetch the status post runbook execution. This frequency varies with the type of runbook in terms of SS (seconds), MM (minutes), or HH (hours).
- Type the runbook update frequency in the Update Frequency field.Note:Frequency Interval and Update Frequency are interrelated.
- Selecting Runbook Tool type as ‘BigFix’ enables three more fields:
- Response File Path: Type the location of the file from where response is to be read.
- Wait Frequency Interval: Type the Frequency Interval, which is fixed by the user to wait before going to fetch the response post runbook execution. This frequency varies with the type of runbook in terms of SS (seconds), MM (minutes), or HH (hours).
- Wait Frequency: The time interval to wait before going to fetch the response.
- Selecting Runbook Tool as ‘Ansible Tower/AWX’ enables an additional field:
- Organization: The name of the organization with which the tool belongs at Ansible’s end.
- Selecting Runbook Tool as ‘ANSIBLE Inside’ enables four more fields:
- SDK Python Script Location: Location of the core python script of Ansible-Inside that manages the execution of Ansible roles.
- Master Playbook Location: Location that will host the master yaml within the Ansible-Inside setup.
- Ansible Playbook Directory: Location that will host all the ansible roles to be executed within the Ansible -Inside setup.
- Vault Key: The secret key to access the ANSIBLE Inside APIs for added security.
- Selecting Runbook Tool as ‘Ansible CLI’ enables an additional field.
- Master Playbook Location: Location that will host the master yaml within the Ansible-Inside setup.
- Type the runbook tool category in the Category field.
- Type the sub-category of the runbook tool in the Sub-Category field.
- Specify the details of the runbook tool category in the Category Granular Details
field.
Figure 2. Add Single Runbook (Cont.) 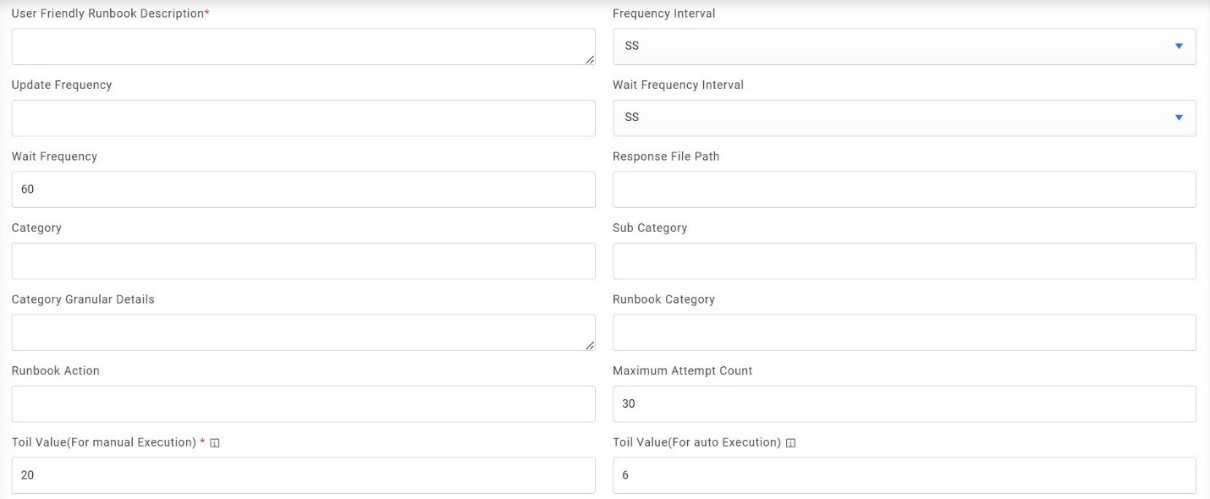
Figure 3. Add Single Runbook for BigFix Tool Type (Cont.) 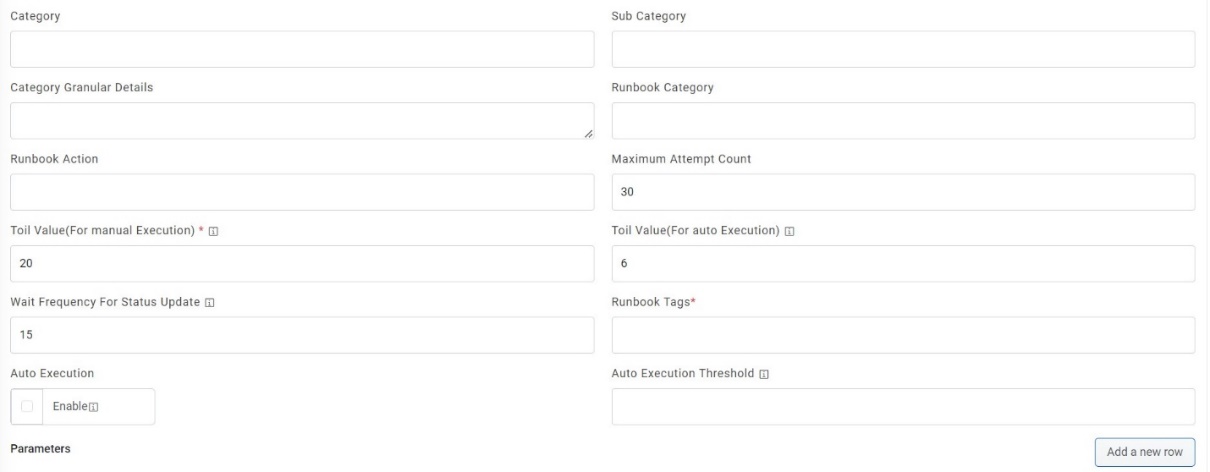
- Type the runbook category in the Runbook Category field.
- Specify the action to be taken by the runbook in the Runbook Actions field.
- Specify the Maximum Attempt Count for the runbook to retry in case of failure.
- Enter the Toil Value (For Auto Execution) which is the maximum manual execution time of runbook (in minutes). By default, it takes the value of the configured Toil Value (For Auto Execution) for the selected runbook tool.
- Enter the Toil Value (For Manual Execution) which is the maximum auto execution time of runbook (in minutes). By default, it takes the value of the configured Toil Value (For Manual Execution) for the selected runbook tool.
- Enter the Wait Frequency for Status Update (in minutes) for the case when RBA is unable to update execution status back to BigFix Runbook AI after successful interaction (in case push notification is enabled).
- Type a tag for the runbook corresponding to the Runbook Tags field and click Add. Added tags appear in a box, below the Add button. Tags allow users to assign keywords to help identify a runbook while ticket parsing. Users can specify multiple tags for a runbook.
- If required, select Enable Auto Execution to enable auto execution of the runbook.
- Provide the Auto Execution Threshold value above which the runbook will be auto executed in auto-execution is enabled for the runbook.
- Once the above values are added successfully, provide the following parameters for
runbook execution while ticket parsing.
- Runbook Parameter Id: Its disabled and is not user editable. Users can only see it while editing any runbook. (Need for API purpose)
- Parameter Name: Specifies the parameter name to be used in a runbook for ticket parsing.
- Parameter Label- Specifies a unique user-friendly name for the parameter to be added.
- Is Mandatory- Select True or False depending on whether the parameter details added are mandatory or not.
- Parameter Description- Describes the parameter.
- Default Parameter Value Specifies the default value for the parameter.
-
Field Type- Specifies the data type to be used in the parameter field. It may
be of the following types:
- Text: The parameter will be saved in plaintext in the database.
- SecureParameter: The parameter will be saved in encrypted form in Database.Note:The SecureParameter has specific significance in the case of BigFix tool where this kind of parameter is passed in a different manner to bigfix.
The parameters which are marked as SecureParameter will be hidden and disabled on Tickets page when runbook is being selected for execution.
- Parameter TypeLists all the parameter types configured in Configure Parameter Type. On selecting the parameter type, BigFix Runbook AI fetches the related data for ticket parsing.
- IsCIBasedParameterCheck this checkbox to see if the parameter is a CI based parameter. It is mandatory to have at least one parameter as CI Based.
- IsReadOnlyParameterCheck this checkbox if the parameter is read only and the user should not be able to change its value wherever parameter is parsed.
- ActionEnables user to add, edit or delete the existing parameter by clicking respective action buttons.
- Click Save to add the parameter.
- Click on ‘Add a new row’ button to add new parameter.
- Click Save to configure the newly added runbook to the selected runbook tool.
Figure 4. Add Single Runbook (Cont.) 
The new runbook is added and listed in a tabular view.
Upload Spreadsheet to Configure Multiple Runbooks
If the user already has a Microsoft Excel spreadsheet with existing runbooks that were written or stored earlier, importing them to the runbook library is easy. Download the .xls file from Download Template button from the Manage Runbook page, update the runbook details, and import it to your system. If this runbook is not required, it can be deleted.
To upload multiple runbooks, perform the following steps:
- To download a template, using the radio button choose Bulk Upload and click on
Download Template button. The template asks for the details described in the Bulk Upload
section.
Figure 5. Add Multiple Runbooks  Note:This functionality allows users to create multiple Runbook together by uploading the required details simultaneously through a single excel document.
 - Fill the details in the downloaded template. See Add a Single Runbook section for
more information.
Figure 6. Add Multiple Runbooks (Cont.) 
- Select a Runbook Tool, then click Choose File.
Figure 7. Add Multiple Runbooks (Cont.) 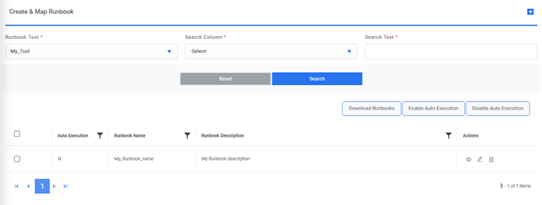 Note:All fields marked with an asterisk (*) are mandatory.
 - The Upload Excel File page appears.
Figure 8. Add Multiple Runbooks (Cont.) 
- Click Choose file to upload the updated .xls file.
- The new runbooks are added and listed in a tabular view.
- To enable/disable the auto execution of multiple runbooks at once, select all the
runbooks for this and click on Enable Auto Execution/Disable Auto Execution button
respectively. Below alert appears.
Figure 9. Add Multiple Runbooks (Cont.) 