
One page checkout
The One Page Checkout streamlines the shopping experience for both B2B and B2C customers by consolidating all the steps required to complete a purchase onto a single, scrollable page. This efficient layout reduces friction in the checkout process, making it quicker and easier for customers to place orders.
Procedure
-
Enable One Page Checkout
- Open Commerce Lab Tools.
- From the left navigation menu, go to .
- All the stores are listed on this page. Double-click on the Ruby store. The tab displays.
- Navigate to the window and select optional integrations and functions to enable schema org metadata for the Next.js store.
- Click the check box to Enable One Page Checkout (when the store is served by Next.js).
- Click the Save button.
The One Page Checkout feature is enabled for both guest and registered users in the Next.js store. - Open the Ruby store landing page and enter your login credentials.
-
Add the desired items to the cart, and click the View full
cart button.
A shopping cart page opens.
- Click the Checkout button.
-
The One page checkout page opens. All required order sections are displayed on
one page:
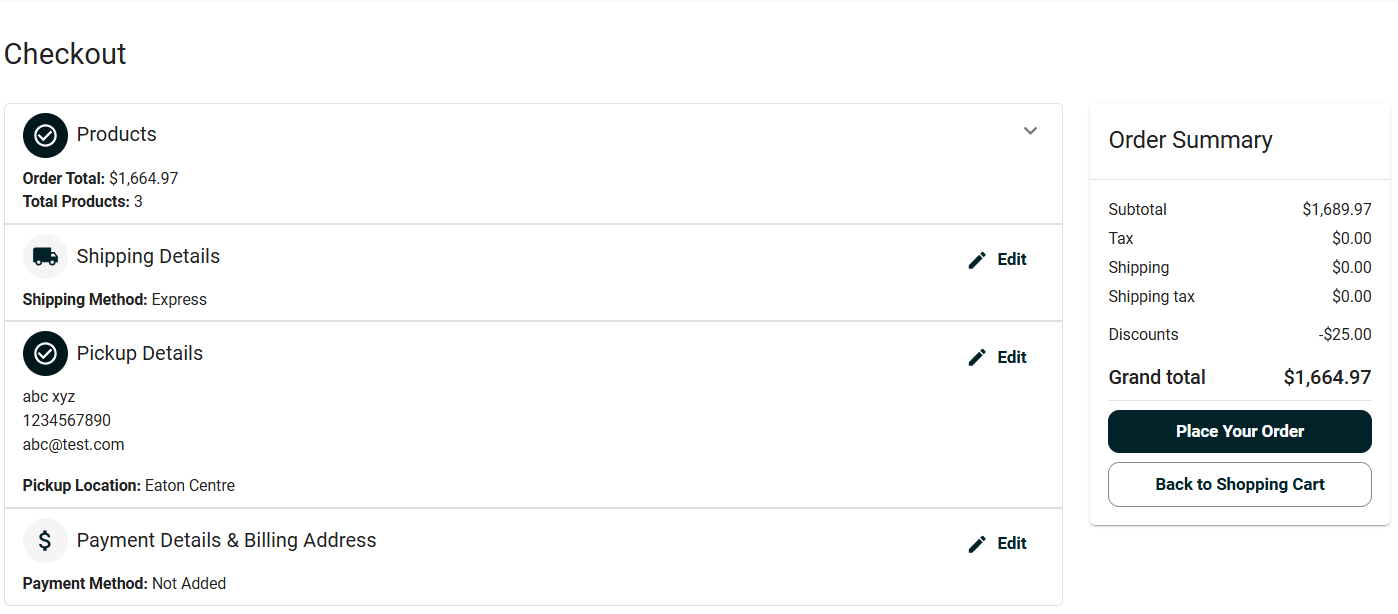 Note: The content is presented on a single, scrollable page and organized using accordion menus for easier navigation and a cleaner user experience.
- Product Details
Each cart item includes item details, delivery type, quantity and price.
To view product attributes, click Show attributes. Attributes include style, finish, assembly and material. - Shipping details
- Click Edit in the Shipping
Details section to change the shipping address
or method.
- To ship to a single address:
- Click Edit and fill in the required fields marked with a * symbol. Enter the address details.
- Select a Shipping Address and Shipping Method.
- Click Save and select this address.
- If you want to cancel, click Cancel.
- Select a Shipping Method.
-
To ship to multiple addresses:
-
Toggle Ship to multiple addresses.
If you want to have different items delivered to different addresses. For more details, see Multiple Shipment for the Next.js store
-
-
- To add a new address:
- Click the + Add New
Address button.
The Add New Address page opens.
- Enter the address details. Fill in the required fields marked with a * symbol.
- Click Save and select this address. A successful message is displayed on the screen.
- If you want to cancel, click Cancel.
- Select a Shipping Method.
- Click the + Add New
Address button.
- To add a new address:
- To ship to a single address:
- Click Edit in the Shipping
Details section to change the shipping address
or method.
- Pickup Details
Choose one of the two pickup options:
- I'll pick it up.
- First Name
- Last Name
- Email Address
- Phone Number
- Someone else will pick it up.
- Pickup person’s Full Name
- Pickup person’s Email
- Buyer’s Full Name
Note: All fields are mandatory.
- I'll pick it up.
- Payment Details and Billing Address
Click Edit to modify payment method or billing information.
-
- If you want to make the payment using a single payment method, select the payment method, Billing Address, and Shipping Method.
- After selecting payment details, click the Save button to review the order details.
- If you want to cancel, click Cancel.
- You can enable the toggle button to Use multiple payment methods if you want to use different payment methods. See Multiple Payment for Ruby storefronts (B2C and B2B) for more details.
-
Note:- Ensure all required fields (marked with *) are completed.
- If any required information is missing, an error message appears: Please correct any errors and fill out required fields marked with a * symbol.
- Product Details
-
Click Place Order to complete the purchase.
Once the order is placed, the order successful message is displayed on the screen.