

Update Windows Registry
Apply Windows Registry changes to one or more devices using Custom Remediation. Upload a Windows Registry (.reg) file or specify registry keys directly - ideal for applying system policies, security settings, or configuration changes at scale.
The Update Windows Registry feature lets IT administrators apply registry changes to one or more Windows devices quickly and securely, without creating a Fixlet or waiting for official content updates. You can import a .reg file or define registry keys directly; BigFix converts the changes into a script that runs silently on targeted devices that meet the targeting criteria.
Update the Windows Registry
From the Custom Remediation app, select Update on the Update Windows Registry card to open the Windows Registry Configuration wizard. The wizard guides you through five steps: Registry, Devices, Behavior, Schedule, and Summary.

- On the Registry step, under What do you want to
do?, select how to provide the registry changes, and then select
Next:
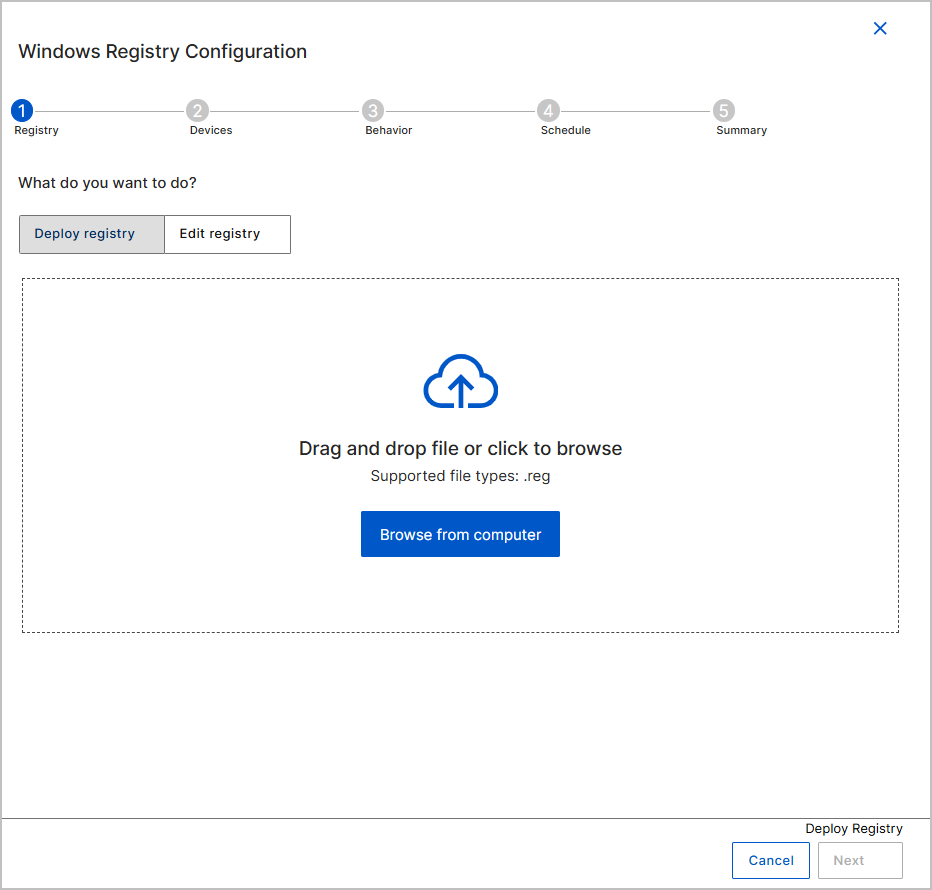
- Deploy registry - Upload a .reg file. Drag and drop the file into the upload area, or select Browse from computer to select the file from your system. Supported file type: .reg.
- Edit registry - Specify the registry changes directly:
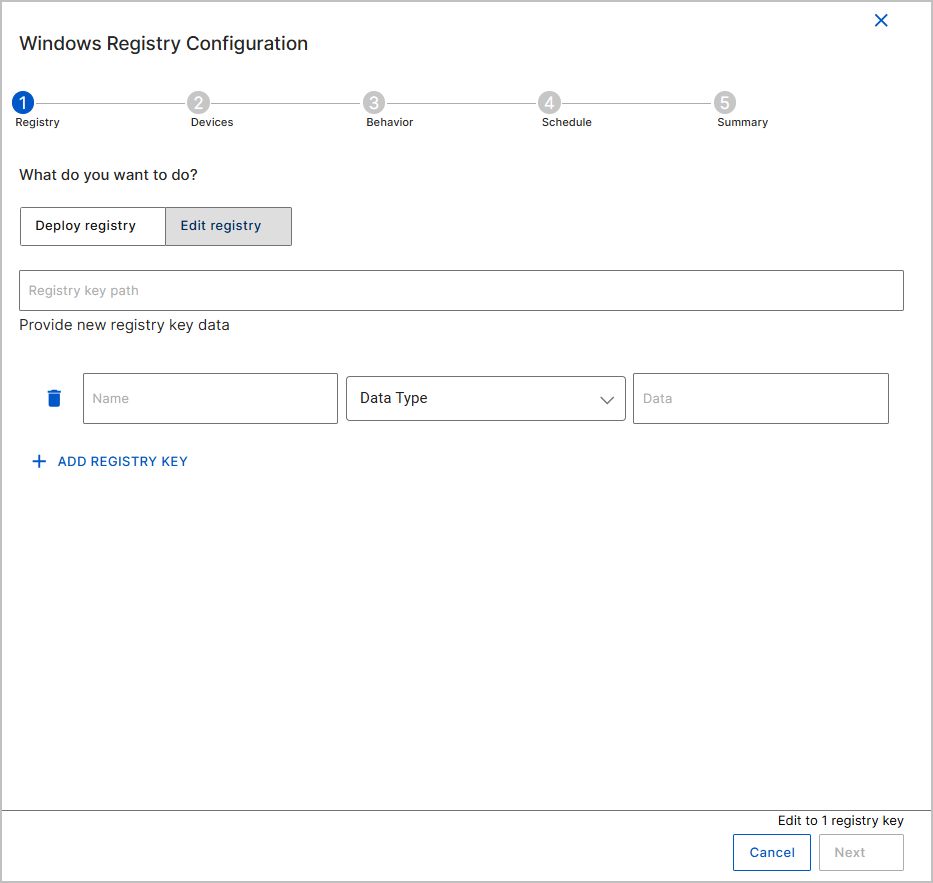
- Enter the registry key path - the full path to the registry key to modify, for
example
HKEY_LOCAL_MACHINE\Software\YourCompany\Settings. - Under Provide new registry key data, enter the data name (for example, EnableFeatureX), select the data type (for example, String), and enter the data value.
- Select ADD REGISTRY KEY to add the key-value pair. To add more entries, select ADD REGISTRY KEY again; to remove an entry, select the delete (trash) icon next to it. All keys run in a single execution sequence on the endpoint.
- Enter the registry key path - the full path to the registry key to modify, for
example
Table 1. Example: multiple registry keys Registry path Name Type Value HKEY_LOCAL_MACHINE\Software\MyAppAutoStartREG_DWORD1HKEY_LOCAL_MACHINE\Software\MyApp\ConfigServerURLREG_SZhttps://example.com - On the Devices step (Filter the devices
below), select the target devices, and then select
Next.

For Filter By, choose one of the following methods:
- Query - Create dynamic filters based on device properties.
- Apply filters using Single condition or Multiple condition (Criteria: AND/OR) options. For more information, see Filtering Data.
- For each condition, select a Property, Operator, and Value.
- Select Reset Filters to clear the filters.
-
(Optional) Turn on Dynamic targeting device toggle button to continuously re-evaluate the targeted devices so that devices matching the criteria are included as they report in.
- Select Apply to evaluate the filters, and then review the Select the devices to remediate table to verify which devices match the criteria. The table shows the Device Name, ID, DNS Name, IP Address, and Last Report Time for each device.
- Device group - Target an existing device group.
- In Type to find groups, search for a group.
- Select one or more groups under Add new groups.
- Select Apply. Select Reset to clear the selection.
- Device list - Select devices manually from the list. This
option allows to input a fixed list of devices where the deployment will be applied.
Devices can be identified using their name, DNS, and IP address.
- Identified by name, DNS, or IP address, with each device on a separate row.
- A maximum of 1,000 devices can be added in a single device list. If you intend to target more than 1,000 devices using device lists for filtering, create separate deployments.
- Select Verify List to confirm the entries, and review the preview of the device list to be targeted.
- Query - Create dynamic filters based on device properties.
- On the Behavior step, configure how the deployment is delivered,
how users are informed, and how failures are handled, and then select
Next. The options under Order of Events (from top to
bottom) are processed sequentially:
- Offer to user - Turn on this toggle to deploy the action as a
BigFix Offer. Note: An Offer lets end users choose and install software, patches, or other actions themselves through a self-service application, instead of having them deployed automatically by an administrator.
- Start downloading immediately - When on, targeted endpoints begin downloading the required payloads as soon as the action is deployed.
- Before running message - When on, the configured message appears to the end user before the action starts, to provide context, warnings, or a request for confirmation.
- While running message - When on and a message is configured, the message appears during execution to show that the remediation is in progress.
- Reboot/Restart devices on completion of deployment - When on, targeted devices restart after the remediation completes if the Fixlet requires it.
- On failure, retry - When on, BigFix reattempts a failed action. Specify the number of retries and the wait time between attempts.
- Reapply whenever it becomes relevant again - When on, BigFix
reapplies the action automatically if it becomes relevant again after the initial
deployment. Select with a to set the wait time between
attempts, and up to to set the maximum number of times. Tip: Reapplying increases the success rate by accounting for temporary issues such as device disconnection or network latency.

- Offer to user - Turn on this toggle to deploy the action as a
BigFix Offer.
- On the Schedule step, define the window during which the
deployment remains in effect, and then select Next. For the
settings, see the Schedule settings table. Select Reset changes to
clear all scheduling fields and restore the defaults.

Table 2. Schedule settings Settings Description Time zone Select the time zone that applies to the start and end times: Client uses each endpoint's local time; UTC uses Coordinated Universal Time. Start Turn on Start to set when the deployment begins, and then select the Start Date and Start Time. If Start is off, the deployment can begin immediately. End Turn on End to set when the deployment window closes, and then select the End Date and End Time. Run during Agent's configured maintenance window Restrict the deployment to devices that have a configured maintenance window. The deployment runs only within those windows. The wizard notes how many currently targeted devices don't have a configured maintenance window; those devices are excluded. Run on all devices, regardless of their configured maintenance window Override maintenance window restrictions. The deployment runs on all targeted devices, whether or not they have a maintenance window configured. Custom constraints Control when a deployment can run by defining specific times and days. - Turn on Time constraints to specify a Start time and End time when the deployment is allowed to run.
- Turn on Day constraints to limit the deployment to one or more days of the week.
- On the Summary step, review a consolidated, read-only view of
every option you selected - device criteria, start and end time, before-deployment
settings, and behavior. This is the final checkpoint before deployment.
- In Action Name, enter a unique, meaningful name that describes the purpose of the action. This name appears in action history, logs, and dashboards, which helps you and your team identify and differentiate actions. Use descriptive terms, such as "Critical patch - May 2026 - Windows devices", for clarity and traceability.
- In Assign tags, add one or more tags:
- To add an existing tag, type to search for it, select it from the list, and then select Add.
- To create a new tag, type the tag name, and then select Add.

- Select Deploy to deploy the action. The message Deployment submitted successfully confirms that the deployment was submitted.