External API
This page explains the simplified ways to configure External APIs and create engagement.
An External API allows seamless integration with a wide range of third-party services, enabling businesses to connect their systems with platforms such as CRMs, IVRs, private ESPs, SSPs, and more. By leveraging this capability, organizations can automate workflows, streamline engagements, and enhance operational efficiency.
Use cases for External API
- CRM Integration: Connect directly with CRMs like Hubspot and Vymo to manage customer relationships seamlessly.
- IVR Integration: Automate communication and deliver immediate responses by integrating with IVR services.
- Private ESP/SSP Integration: Use your own email or SMS service providers to drive engagement while ensuring PII data confidentiality through robust encryption.
- Email Service Provider Integration: Link with email service providers like Mailmodo to enhance email marketing campaigns.
- Facebook and Google Conversion API Integration: Send conversion data from the CDP to Facebook and Google by integrating their conversion APIs.
- Internal System API Integration: Transfer data from the CDP to internal APIs in services like banking, financial services, and insurance, leveraging confidential APIs for smooth operations.
- Lead Submission API Integration: Submit data captured from WhatsApp or other lead forms directly into your lead management system.
Prerequisite
API Docs / API reference docs
Valid authorisation scheme and keys: To integrate with external or internal systems, ensure you have the appropriate authorization mechanism along with the necessary keys, passwords, or tokens, based on your free or paid account with the external system or the internal tech implementation of the API. Your point of contact (POC) from the external vendor or your internal tech team will assist you in acquiring and configuring these credentials.
Configure an External API
To configure an external API, follow the steps below:
-
Navigate to .
- Click +Add New External API , and add the basic details.
- Name: Enter the name for the External API. This name cannot be editable once it is saved.
- Description: Enter the description of your API.
- Channel: Select a channel in which you want the API to communicate with your audience. HCL CDP provides Email and SMS channels for the API to communicate.
Tip: The performance data of these Emails and SMS will be available in the Reports and Journey builder. - Add External API Details.
- HTTP Method: Choose one of the supported HTTP methods���GET, POST, PATCH, PUT, or DELETE���based on the action you want to perform with the API.
- URL: Enter the API���s endpoint URL. If the URL contains path
parameters, define the variables for these parameters. Path parameters
are dynamic parts of the URL that specify a particular resource within a
collection (e.g.,
/users/{userId}).Adding dynamic path parameters in the URL: If you have a path parameter that will change each time you trigger an engagement, you can configure it dynamically by defining the variable in {{variable}}. Here's an example to do it:
 Tip: This URL is custom-made for demonstration purposes
{{Campaign_ID}} is the URL path parameter we declared above and added a default value.
The parameters we add to this variable will be reflected while adding the engagement which can be changed later.

-
Headers: Include Headers to provide the metadata about the request. Common headers that are used while making requests:
- Accept
- Content-Type
- Content-length
- Authorization ( use the necessary authorization keys which may vary according to the APIs)
- User-Agent
- Cache-Control
- Connection
-
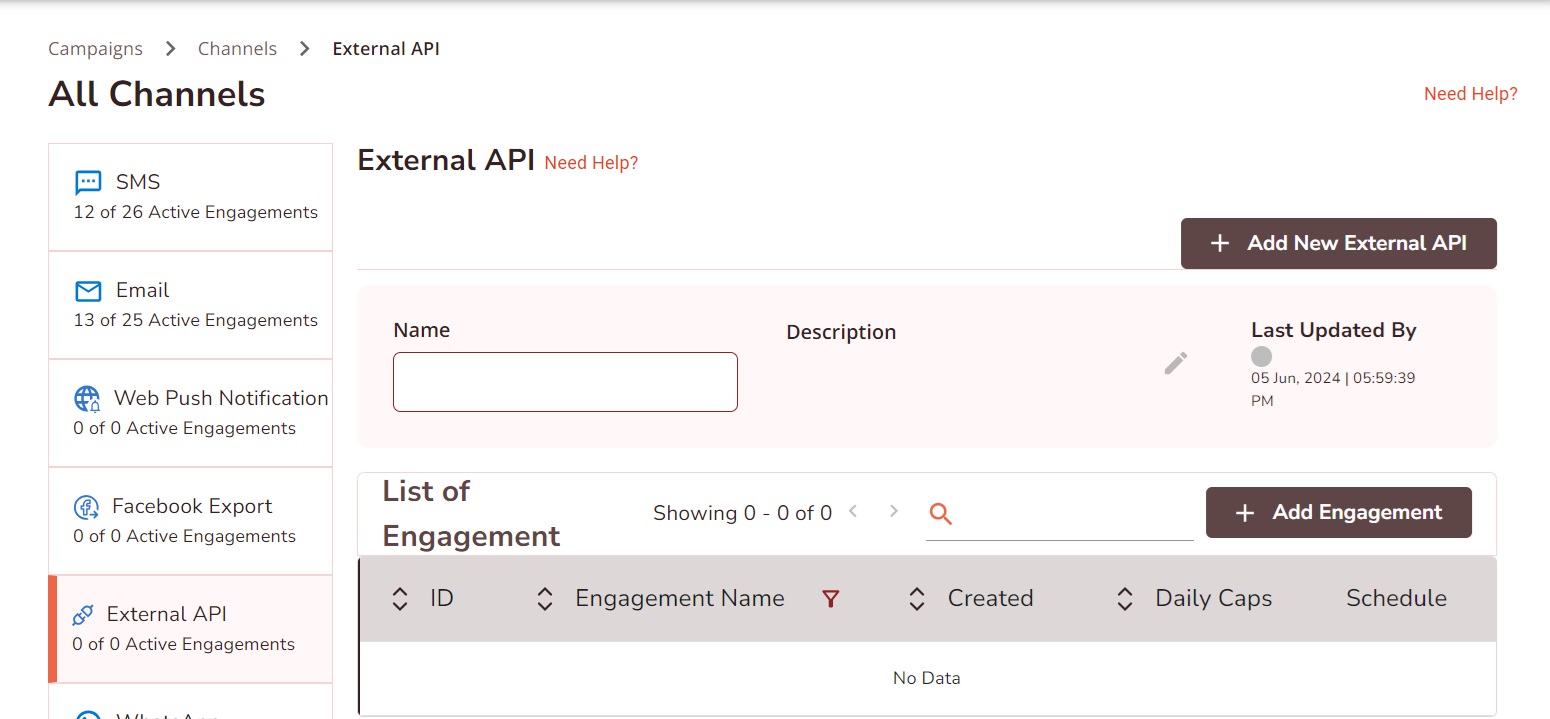
Query Parameter: Query parameters are the key-value pairs provided at the end of the URL which gives additional information to the web server while making the request.
- Payload: Select either the Global Level or Engagement Level option to define the user profile payload details. For more information about Payload, refer Payload.
- In the Optional Field drop-down, select Yes or No. For more information about Optional Field, refer Optional Field.
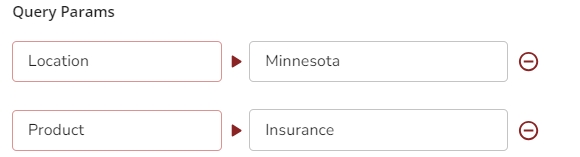
Payload
Paste the payload in the code editor provided. The payload contains the request body that the API requires for execution.
- For GET requests, leave the payload as
None, as they do not include a request body. - For POST requests, include the required payload as defined in the API documentation.
Ensure the payload structure adheres to the API specifications for a successful request.
Sample Payload:
{
    "details": {
        "data": {
            "param1": "Sample value",
            "param2": "Sample value"
        }
    },
    "token": "abc"
}
User can define the payload either at global level or engagement level.
Global Level: In the global level, you define the payload for the API by entering the JSON payload in the code block. Ensure the JSON is valid, as any invalid JSON will trigger an error in the UI. If the payload is correct, a tree view will be deployed. In this view, you can add static or dynamic fields, create variables, and flexibly assign display terms. The tree structure allows you to organize parameters based on parent and child objects, making it easy to assign values.
Engagement Level
At the engagement level, you can define a custom payload tailored to each campaign's specific requirements. This feature enables you to send personalized data for every engagement, offering flexibility to meet diverse campaign needs.
- Personalized Payloads: Customize the payload for each engagement, making it ideal for campaigns with unique data requirements.
- Integration Example: When integrating with platforms like Mailmodo, this flexibility allows you to modify the payload for different campaigns seamlessly.
- Supported Format: Currently, the platform exclusively supports JSON payloads at the engagement level.
{
    "details": {
        "data": {
            "param1": "Sample value", // You can configure these key value parameters by giving name and value which will be displayed in engagement level
            "param2": "Sample value"
        }
    },
    "token": "abc"
}
( This payload is custom-made for demonstration purposes)
- To Configure the parameters in engagement level, pass the variable between double curly braces i.e., {{variable_name}}.
- Enter the display name which will be shown on the UI as the variable alias, when you're creating engagements for the configured API.
- Enter the default value that assigns value to the parameter by default if the
value is not provided by the user, or in the case of Macro when the system fails
to replace it with a value.
Expand the data tree and select a variable name to include a static or dynamic value. Use macros to insert dynamic values. Enter @ in the text box to view the list of macros available. Enter the default value that assigns value to the variable by default, if the value is not provided by the user, or in the case of Macro when the system fails to replace it with a value. For example, to use a user's email address, type @ and select the EMAIL macro from the list.
Optional Field
Optional Field
- If you wish the field to be mandatory, select No.
- Select Yes, if the field needs to be optional. In such a case, you have to define how to handle the payload when that particular key (param1 in the example) is not provided with a value.
Option 1:Send Empty Value (do nothing).
The parameters will be empty, and the default value will be shown here in all the engagements.
The payload will be:
{
"details": {
"data": {
"param1": " ",
"param2": "Sample Value 2"
}
},
"token": "abc123"
}
Option 2:Drop data $#$0
On Choosing drop data, the parent node (Data) will be dropped. The grandparent node (details) and ( Token) will be considered as objects.
The payload will be:
{
"details": {},
"token": "abc123"
}
Option 3: Drop data (Grandparent Node)
On Choosing drop details, the grandparent parent node (Data) will be dropped along with its child ( Data). Only (Token) will be considered as objects.
{
"token": "abc123"
}
Option 4: Drop the whole Object
On choosing to drop the whole object, the entire payload will be dropped and the API won't get triggered.