Creating a Directory Structure on Windows
On Windows, new directories are created using the Windows Explorer.
Try it!
You are now going to create
a folder named Project Sources in the component your-username_tut_elements_vob on
the drive where the integration view is located.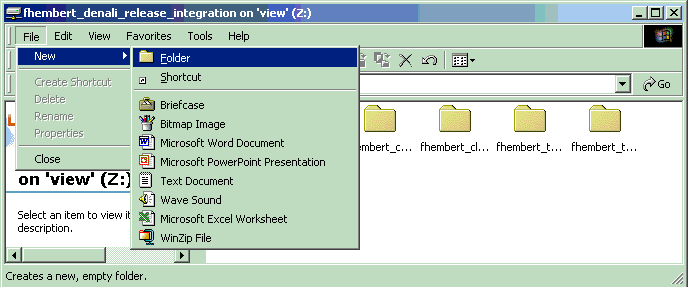
- Double-click the My Computer icon on your desktop.
- Double-click the integration view; it is similar to the following: your-username_denali_release_int on `View' (Z:).
- Double-click the your-username_tut_elements_vob folder to open it.
- Click File > New > Folder and type the name Project_Sources.
- To add the new folder under DevOps Code ClearCase® source control, right-click Project_Sources and select Add to Source Control from the shortcut menu.
- Complete the Add to Source Control dialog box as
follows:
- As the activity to be associated with the creation of the new folder, type: set up folder to hold denali release sources.
- Keep the option Checkout after adding to source control cleared. In the context of the exercise, you do not want DevOps Code ClearCase® to check out the folder after adding it to source control.
- Select the option Preserve file modification time to create a time record for each time the folder is being checked out and then checked in again.
- Click OK to close the dialog box.
The Project_Sources folder is being created and put under source control.
If using a snapshot view, you also need to update your integration view:
- Go to the DevOps ClearCase® Explorer.
- Select the username_denali_release_integration view and press ALT+F5 to update the view.
- In the folders pane, double-click the ucm_tutorial folder where you will see the folder Project_Sources is under source control.
- Close the Windows Explorer.