
Configuring Bitbucket with AppScan on Cloud
Detailed instructions for integrating Bitbucket with AppScan on Cloud.
Prerequisites
- An active Atlassian account (used across Jira and Bitbucket).
- Admin privileges in your Bitbucket Workspace to create OAuth clients.
Set up a Bitbucket workspace and repository
- Log in to Bitbucket:
- At bitbucket.org, click Log in at the top right.
- Enter your Atlassian account credentials.
- If prompted, complete any two-step verification (2FA) configured on your account.
- Create a new workspace to organize your projects and repositories:
- Click your profile avatar at the top right.
- Select All workspaces or click Create workspace directly from the menu.
- Fill in the workspace details:
- Workspace name: Enter an identifiable name (for example, My Team Workspace or John Doe Projects).
- Workspace ID: This auto-generates based on your name and becomes part of your URL (for example, bitbucket.org/workspace-id/).
- Click Create.
- Create a new repository:
- Inside your workspace, click the + (Create) button in the left sidebar or global navigation bar.
- Select Repository.
- Complete the repository creation form:
- Project name: Select an existing project or create a new project container.
- Repository name: Enter your repository name (for example, my-first-repo).
- Access level: Check Private repository to restrict access.
- Include a README?: Select No if you have existing local code to push, or Yes to initialize a new README file.
- Click Create repository.
Create an OAuth client in Bitbucket
OAuth clients are managed at the workspace level and enable secure application
interaction.
- Log in to Bitbucket Cloud and ensure you are in the target workspace.
- Click Settings (gear icon) in the top navigation bar.
- Select Workspace settings from the menu.
- In the left navigation menu under Apps and features, select OAuth clients.
- Click Create OAuth client at the top of the page.
- Fill in the client form fields:
- Name: Give your application a clear name (for example, My Custom Integration App).
- Description: Describe the OAuth client's function. Optional.
- Supported grant types: Check both Authorization code and Client Credentials.
-
Callback URL: Your AppScan Presence-embedded web
application URL plus
/signin-bitbucket. For example,https://my-presence-host-fqdn/signin-bitbucket. - URL: Link to your application or organization website. Optional.
- This is a private client: Keep checked if your client application runs on a secure server capable of maintaining secret confidentiality.
- Under the Scope section, grant the minimum required scopes:
- Account: Read or Email
- Repositories: Read
- Workspace Membership: Read
- Projects: Read
- Pull requests: Read
- Pipeline: Read
-
Click Save.
- Under OAuth clients, click on the client name to expand it and
record your credentials:
- Key: Your
client_id. -
Secret: Click to reveal your
client_secret.
- Key: Your
Generate an Atlassian API token
- Navigate to id.atlassian.com/manage-profile/security and log in with your Atlassian credentials.
- Under API Tokens, click Create API token with scopes.
- Configure the token settings:
- Token name: Enter a descriptive name for the integration token.
- Expiry duration: Choose an appropriate validity duration (for example, 30 days or 1 year).
- Application: Select Bitbucket.
-
Scopes / Permissions: Select required access privileges (for
example,
read:repository:bitbucket).Note:For AppScan Presence only,read:repository:bitbucketis required
- Click Create token.
- Copy the newly generated token value immediately and store it in a secure secret store; it cannot be retrieved again after closing the dialog box.
Integration configuration mapping
Map the retrieved credentials into your
git_connect_settings.json
file:| JSON property key | Source credential field/example | Description |
|---|---|---|
| GitServerName | bitbucket-cloud | Bitbucket cloud |
| GitConnectUrl | https://my-presence-host-fqdn:443" format="html"
scope="external |
The URL of the web application exposed by this AppScan Presence. This is the same value as CallbackURL when you created the OAuth Client. |
| GithubAppId | None | Not applicable for Bitbucket Cloud. |
| GithubAppUrl | None | Not applicable for Bitbucket Cloud. |
| ClientId | Bitbucket OAuth client Key | Unique identifier for the OAuth client. |
| ClientSecret | Bitbucket OAuth client Secret | Secret key generated for the OAuth client. |
| GitPlatformDomain | https://bitbucket.org |
URL for the Bitbucket cloud server. |
| Proxy | 127.0.0.1:8888 | If a proxy is required to connect to the bitbucket cloud server, uncomment this line and provide the proxy details. |
| Active | true | Enable or disable Bitbucket Cloud connection functionality in the AppScan Presence. The default value is false. |
| GitPlatformType | Bitbucket | Name of the configured platform. |
| AccessToken | None | Not applicable for Bitbucket Cloud. |
| GitApiToken | Atlassian API Token | Scoped API token string created in Atlassian Security. |
| GitEmail | Atlassian Account Email | Email address associated with the primary Atlassian account. |
HTTPS is required. In the
kestrel section of
git_connect_settings.json, edit the parameters as follows to
configure your secure connection.Note:
AppScan Presence uses Kestrel to host its web
application. Kestrel is an embedded web server and it can be configured using
the Kestrel section in the configuration file. For more information on the
structure of this server configuration, see Configure endpoints for the ASP.NET Core
Kestrel web server.
| JSON property key | Example | Description |
|---|---|---|
| HttpsInlineCertFile | Https | Uncomment this section. Bitbucket always requires an
https connection. |
| SslProtocols | [ "Tls12", "Tls13" ] | Uncomment this section. |
| Url | https://*:443 (or your default secure port) | The port to be used by the AppScan Presence. |
| Certificate | Certificate details. | |
| Path | <path to .pfx file> | Path of the pfx file. |
| Password | <passwordtoopenfile> | Password to open the pfx file. |
AppScan Presence Bitbucket cloud scanning flow
The flow of scanning a repository from a Bitbucket Cloud using an AppScan Presence:
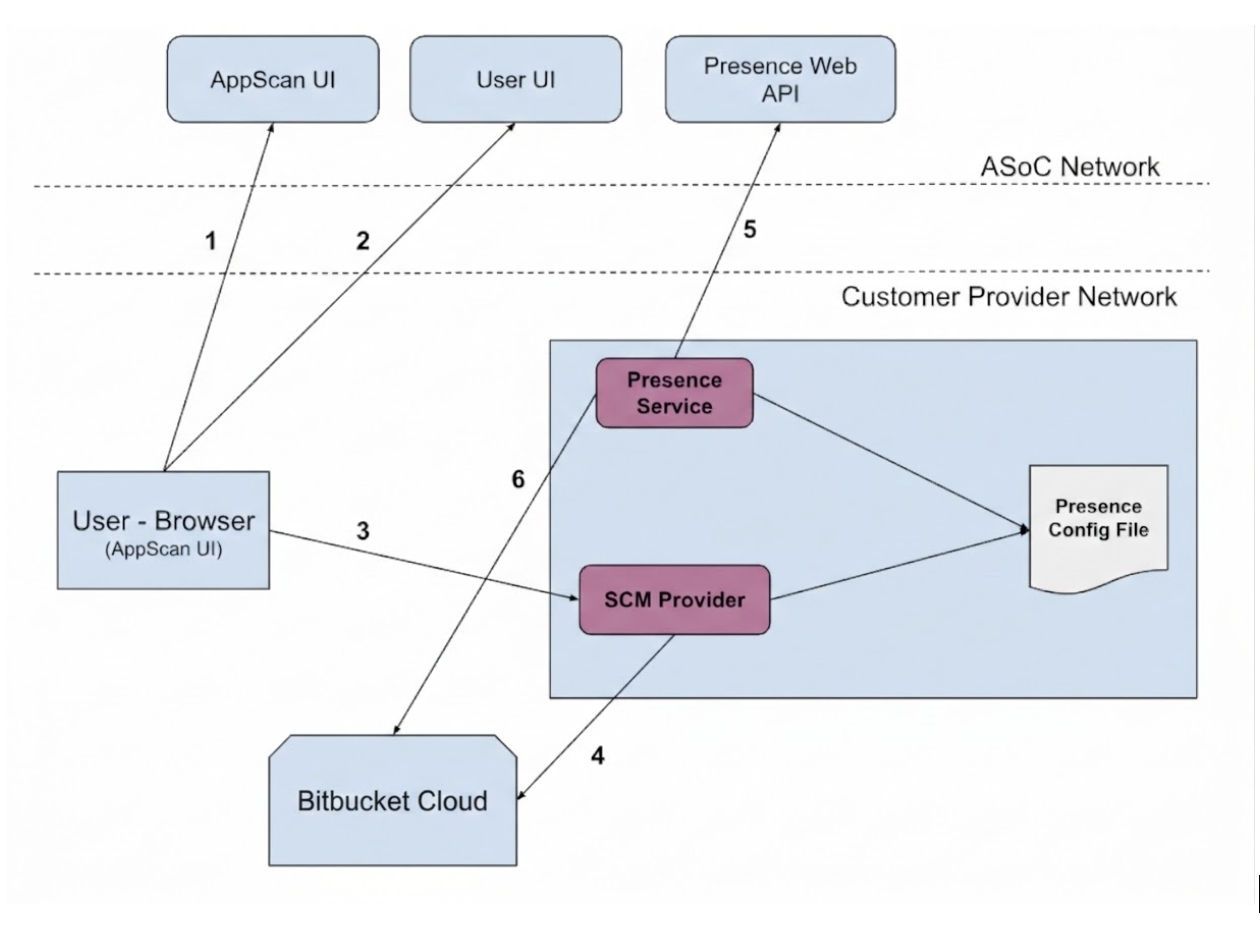
- The user logs in to ASoC. (1,2)
- From ASoC, users select the SCM GitLab and then choose the option Bitbucket. A list of configured enabled AppScan Presences with the connected servers is returned. The user then chooses Presence.
- When the user clicks Authorize presence ASoC opens a new browser tab that points to AppScan Presence (3) which initiates the oAuth Authorization code flow. The user is then redirected to the Bitbucket cloud, logs in, consents to AppScan Presence accessing the Bitbucket account, and then is redirected back to the AppScan Presence with the authorization code.
- AppScan Presence gets the user access token from the Bitbucket cloud (4) and sends it back to the user (3) together with a script that sends the token to ASoC using window.postMessage.
- ASoC uses the Bitbucket access token (3) to get a list of repositories that are accessible by the user and to the Bitbucket OAuth client that is used by AppScan Presence. The user can then choose a repository to scan.
- Before a scan is created for the selected repository, ASoC verifies that the repository is accessible by the user. The AppScan Presence API (3) function RepoSignature creates a signature for the repository details (repository owner and repository name). Once access is verified, the repository details are signed with a private key that is unique for the AppScan Presence. The signature is returned by the API call to ASoC.
- ASoC creates a scan using UsersAPI (2) by provisioning the AppScan Presence ID (Git Connect), the repository details and the signature. UserAPI verifies the signature using a public key associated with the provided AppScan Presence instance. If the validation succeeds, a scan is created for the repository.
- The AppScan Presence service, which polls the AppScan Presence WebAPI (5) for tasks, gets a new task to fetch the scanned repository. The Presence connects to the Bitbucket cloud (6) using access token from config file, fetches the repository as ZIP file, and streams it to the Presence WebAPI (UploadRepo)
- The repository ZIP file is stored in ASoC and can be scanned. When the scan is done, the results are viewed and analyzed in ASoC. The results contain links to the Bitbucket cloud, referencing the relevant lines in the code for triage and remediation. ASoC can open a new tab with the relevant code.