Setting up an AppScan Presence to scan a GitHub repository directly
You can use an AppScan Presence to run static analysis on GitHub Enterprise repositories.
AppScan Presence includes optional support for running static analysis on GitHub repositories from a GitHub Enterprise server using a GitHub App. The GitHub server doesn’t have to be publicly accessible; however, the AppScan user must have network access to the GitHub server and permission to access the repositories in GitHub.
An instance of an AppScan Presence with GitHub scanning enabled can be associated with one GitHub Enterprise server using one GitHub App defined on the server.
- Create and install an AppScan Presence to a folder location
on a private network with access to the GitHub Enterprise server.Note:A single Presence connected to a single GitHub server allows all the users in the organization to scan repositories on that server to which they have access..
- Create a GitHub App on the GitHub Enterprise server.
- Activate and configure GitHub-specific parameters in the AppScan Presence.
- Create the scan.
Create a GitHub App
Review information about GitHub Apps before you begin.
To create a GitHub App to work with the AppScan Presence:
- Log in to GitHub.
- Select , the click New GitHub App.
- Specify the following app parameters:
Parameter Value GitHub App name Your name for the app. Description A description of the app. For example, "ASoC connector to development server." Homepage URL The HCL AppScan on Cloud URL. For example, https://cloud.appscan.com.Callback URL Your AppScan Presence-embedded web application URL plus /signin-github. For example,https://my-presence-host-fqdn/signin-github.Webhook Uncheck Active Repository permissions Contents and Metadata set to Read-only. Account permissions Email addresses set to Read-only. Where can this GitHub App be installed? Any account. - Click Create GitHub App.
- View the GitHub App settings and take note of the following values for
configuring the AppScan Presence.
AppIDAppUrlClientIdClientSecret
Configure and activate an AppScan Presence
- Create a private key for the GitHub App:
- In GitHub Enterprise, under the GitHub App window, click Generate a private key.
- Rename the downloaded file
GitHubAppKey.pemand copy it to the Presence installation folder.
- In the Presence installation directory, locate the
git_connect_settings.jsonfile and open it for editing. - In the
GitConnectOptionssection ofgit_connect_settings.json, edit parameters as follows:Parameter Description Example GitServerNameThe name of the GitHub server. github01GitConnectUrlThe URL of the web application exposed by this AppScan Presence. This is the same value as CallbackURL when you created the GitHub App. https://my-presence-host-fqdn:443GithubAppIdAppId of the GitHub App you created for this connection. 55GithubAppUrlInstallation URL of the GitHub App. https://github01.example.com/github-apps/asocClientIdClient ID of the of the GitHub App. <oauth client id>ClientSecretClient secret of the GitHub App. <oauth client secret>GitPlatformDomainURL for the GitHub Enterprise server. https://github01.example.com ProxyIf a proxy is required to connect to the GitHub server, uncomment this line and provide the proxy details. 127.0.0.1:8888ActiveEnable or disable GitHub connection functionality in the AppScan Presence. The default value is false.true - HTTPS is required.In the
kestrelsection ofgit_connect_settings.json, edit the parameters as follows to configure your secure connection:Parameter Description Example HttpThe protocol to be used by the AppScan Presence. HttpsUrlThe port to be used by the AppScan Presence. https://*:443(or your default secure port)Note:AppScan Presence uses Kestrel to host its web application. Kestrel is an embedded web server and it can be configured using the Kestrel section in the configuration file. For more information on the structure of this server configuration, see Configure endpoints for the ASP.NET Core Kestrel web server. - Install the GitHub App on the account that owns it:
- Open the public link for the app (
GithubAppUrl) in a browser. - Install the app.
Note:It is not necessary to grant access for this installation to the private repositories, but the application should be installed on the account that owns it. - Open the public link for the app (
- Verify that the time settings on the Presence system and the GitHub enterprise server are synchronized.
Once the configuration is set, the Presence can be started (or restarted) and scanning can begin. Logs are written to the console and to log files located under the logs folder.
AppScan Presence GitHub scanning flow
The following illustrates the flow of scanning a repository from a GitHub Enterprise server using an AppScan Presence:
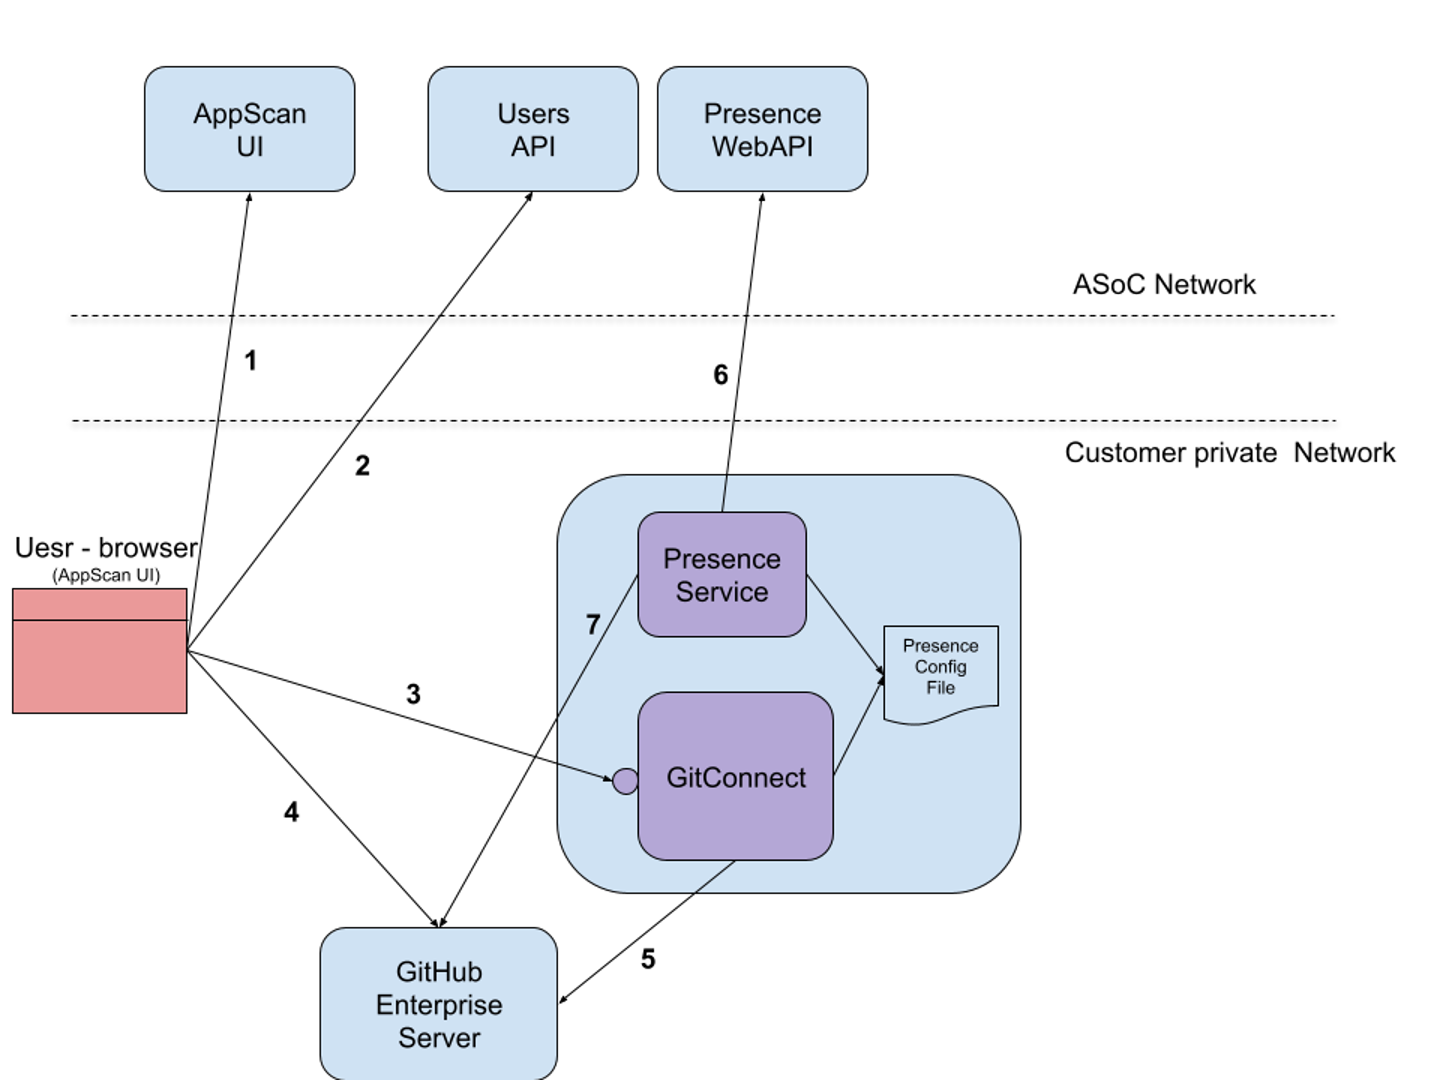
- The user logs in to ASoC. (1,2)
- From ASoC, a list of configured enabled AppScan Presences with the connected servers is returned. The user then chooses the GitHub server to use for the scan. ASoC returns the URL for accessing the AppScan Presence server and the URL to the GitHub server
- When the user clicks Connect to GitHub, ASoC opens a new browser tab that points to AppScan Presence (3) which initiates the
oAuthAuthorization code flow. The user is then redirected to the GitHub Enterprise Server (4), logs in, consents to AppScan Presence accessing the GitHub account, and then is redirected back the AppScan Presence with the authorization code - AppScan Presence gets the user access token
from the GitHub Enterprise server (5) and sends it back to the user (3)
together with a script that sends the token to ASoC
using
window.postMessage. - ASoC uses the GitHub access token (4) to get a list of repositories that are accessible by the user and to the GitHub App that is used by AppScan Presence. The user can then choose a repository to scan.
- Before a scan is created for the selected repository, ASoC verifies that the repository is accessible by the user. The AppScan Presence API (3) function RepoSignature creates a signature for the repository details (repository owner and repository name). Once access is verified, the repository details are signed with a private key that is unique for the AppScan Presence. The signature is returned by the API call to ASoC.
- ASoC creates a scan using UsersAPI (2) by provisioning the AppScan Presence ID (Git Connect), the repository details and the signature. UserAPI verifies the signature using a public key associated with the provided AppScan Presence instance. If the validation succeeds, a scan is created for the repository.
- The AppScan Presence service, which polls the AppScan Presence WebAPI (6) for tasks, gets a new task to fetch the scanned repository. The Presence connects to the GitHub Enterprise server (7) using the associated GitHub App private key, fetches the repository as ZIP file, and streams it to the Presence WebAPI (UploadRepo)
- The repository ZIP file is stored in ASoC and can be scanned. When the scan is done, the results are viewed and analyzed in ASoC. The results contain links to the GitHub Enterprise server, referencing the relevant lines in the code for triage and remediation. ASoC can open a new tab with the relevant code.