Catalogs
This section describes the steps required to request a service catalog. A service catalog serves as a framework to improve service offerings by bringing all the services offered to one place and then redefining them in the context of a dynamic business environment.
- On the main menu bar, click Catalogs.
- The drop-down appears with the following option:
-
Request Service
Figure 1. Request 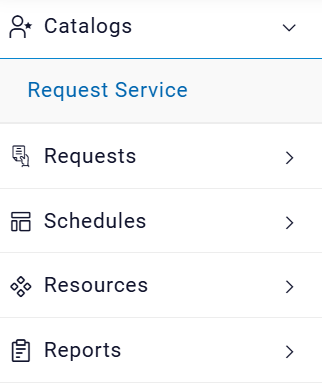
-
Request Service
Request Service Catalog
To request a service in the catalog, the end user needs to follow the steps mentioned under Generic Request Flow. The Generic Request Flow provides the general steps to be followed for all the available catalog(s). By following the generic Request Flow, user will be able to place a request successfully:
Amazon Service Request
To proceed with Amazon Service Request (AWS), a user needs to follow the steps below:
- Select Cloud Account. Only the endpoints which are tagged in RBAC group of User configuration are enabled to Provider admin.
- Select Region, (Lists the geographical presence of native cloud providers).
- Select Service from All Service option.
- Click Request.
Figure 2. Request Service at Organization Level 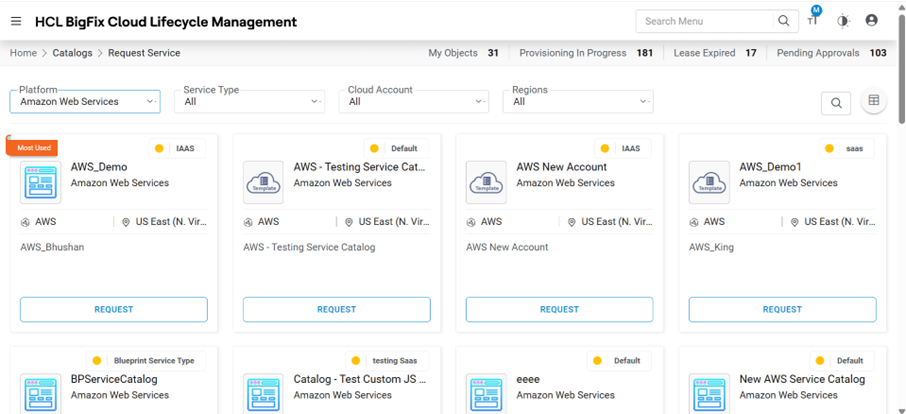
- Most Used: This flag indicates that requests for this catalog item are frequently created. It is configured at the organization level.
- On Service Catalogs page, Select the following fields:
- Select Service from the options displayed, i.e. All Service (it includes all the services given in the catalog), Service Type created by provider and mapped with service catalog.
- Select Cloud Account. Cloud Account will be filtered as per below
criteria:
- User logged in with Requester Role: Only Those Endpoints will be listed, which are allocated to user’s Organization by the Provider admin user.
- User logged with Custom Role having parent role as Requester: Then the tag of the user group should match the tag with Cloud Account configured by Provider admin.
- Select Region.
- Private Cloud: Region at which Private DCs would be located, and resources would be getting consumed.
- Public Cloud: Region selected by the Provider admin at the time of creating the Cloud Account.
- Based on the filter parameters selected in the above points, Service Catalogs will be
listed. Now user can select the catalog and click on Request button.
Figure 3. Cloud Provider Selection (Cont.) 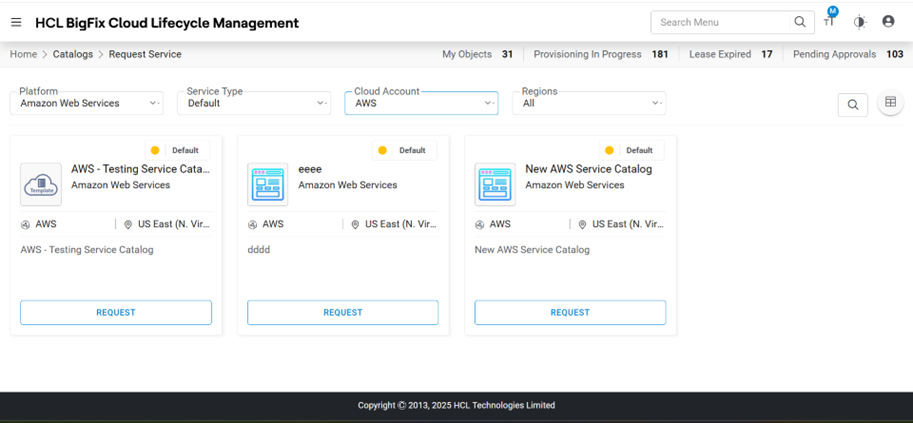
- If Provider has setup the “Maximum number of Instances” greater than 1, then the below
popup will appear, and the requester needs to select the number of instances and click on
Proceed.If provider enabled “Request For” option in service catalog, then “Request For (Email)" option will be visible to requester user to place request on the behalf of other user in same organization.
Figure 4. Request Service Catalog (Cont.) 
- The request service catalog form appears.Note:This is a sample request form for Machine Provisioning. The form, tabs, UI fields may vary depending on the Catalog selection and as per configuration done by provider admin.
- The form is categorized into four categories:
- UI tabs created using form designer
- Additional Storage
- Attachment
- Architecture Diagram
- Tags
UI Tabs Created Using Form Designer
This tab allows the user to manage the general configuration required for requesting cloud services.
- Select Machine Name, Zone, Size, Network Interface, and
SubNetwork Interface for which the user requires the services.
Figure 5. Request Service Catalog 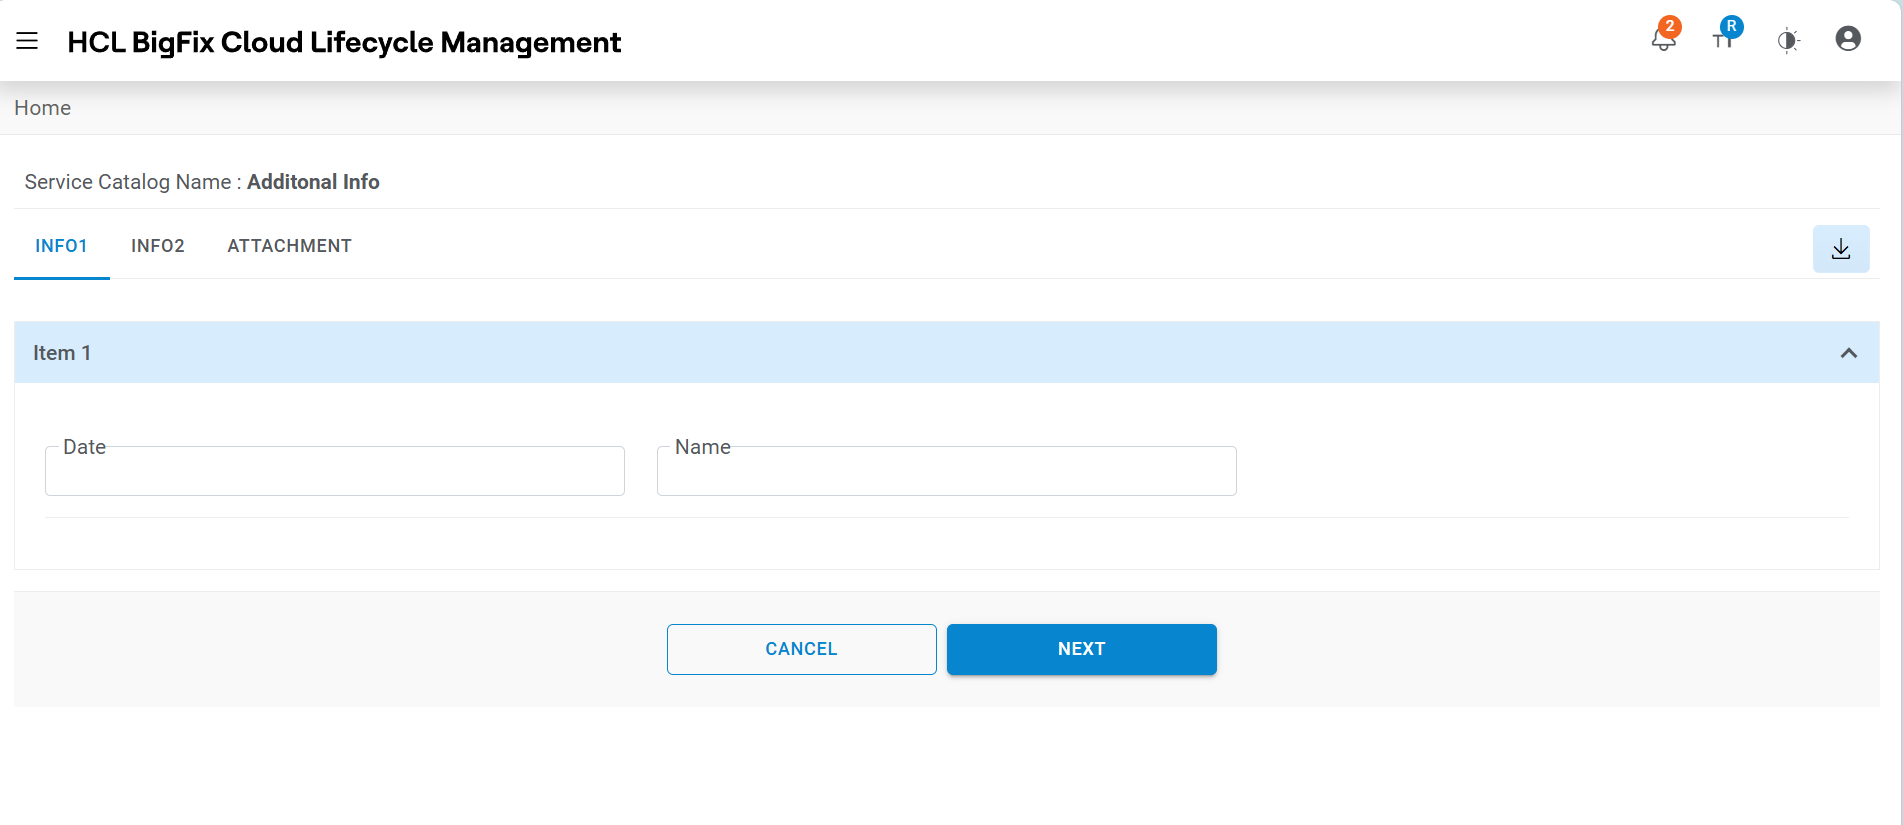
Figure 6. Request Service Catalog (Cont.) 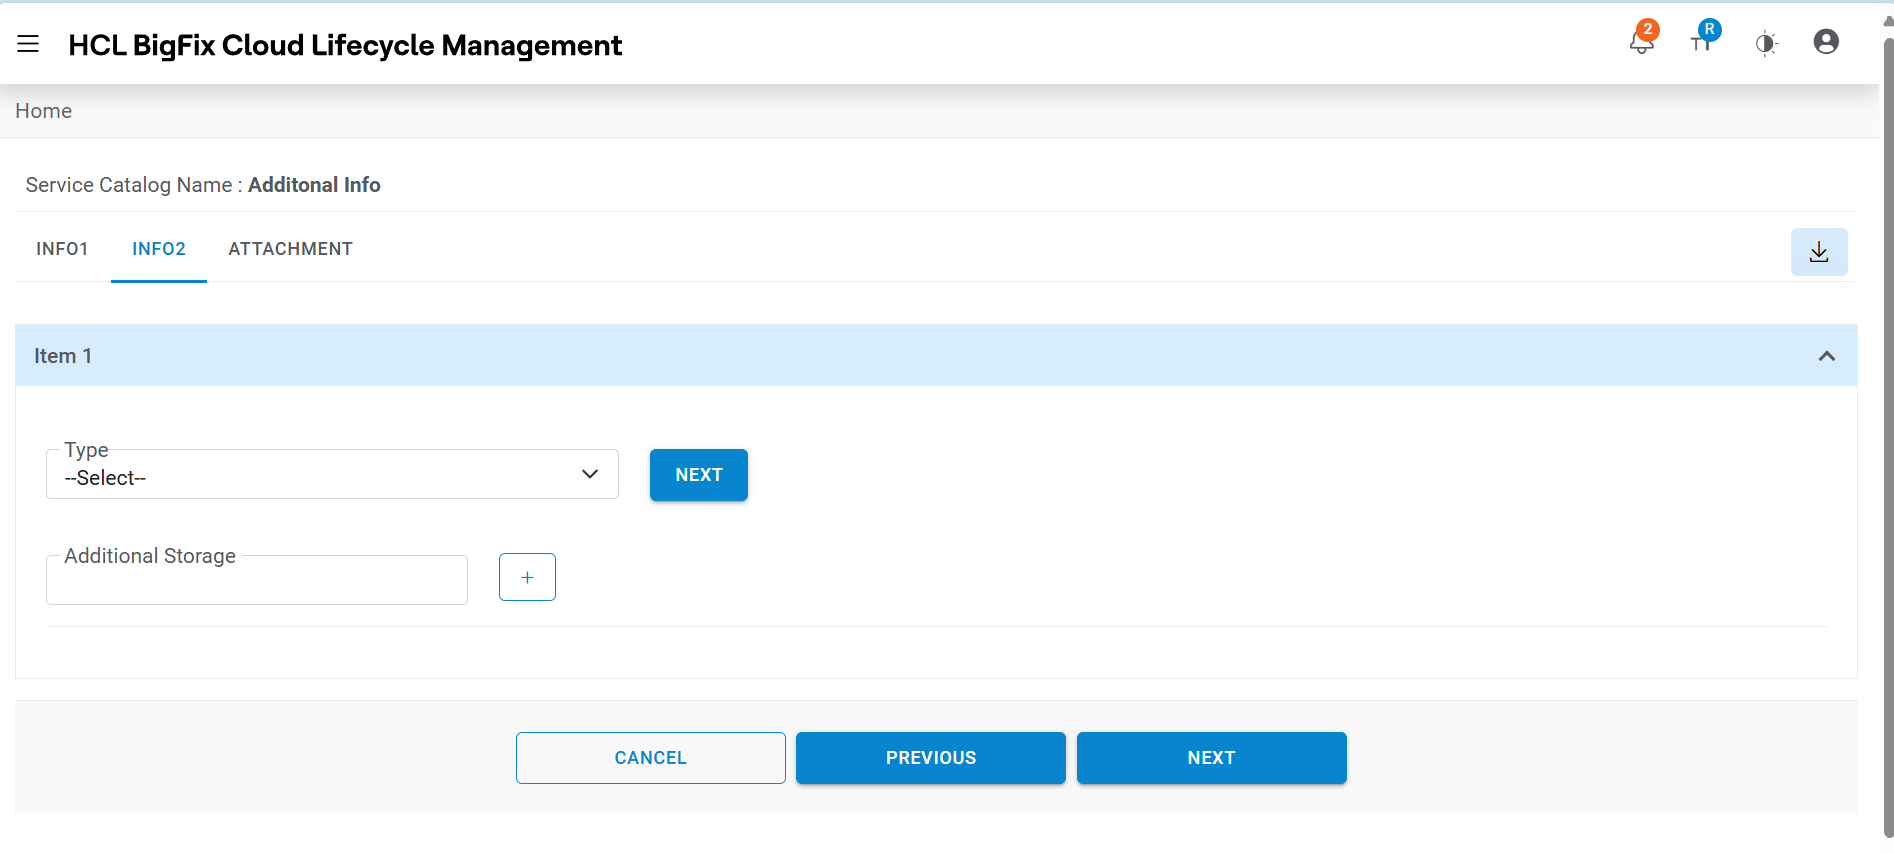
Figure 7. Request Service Catalog (Cont.) 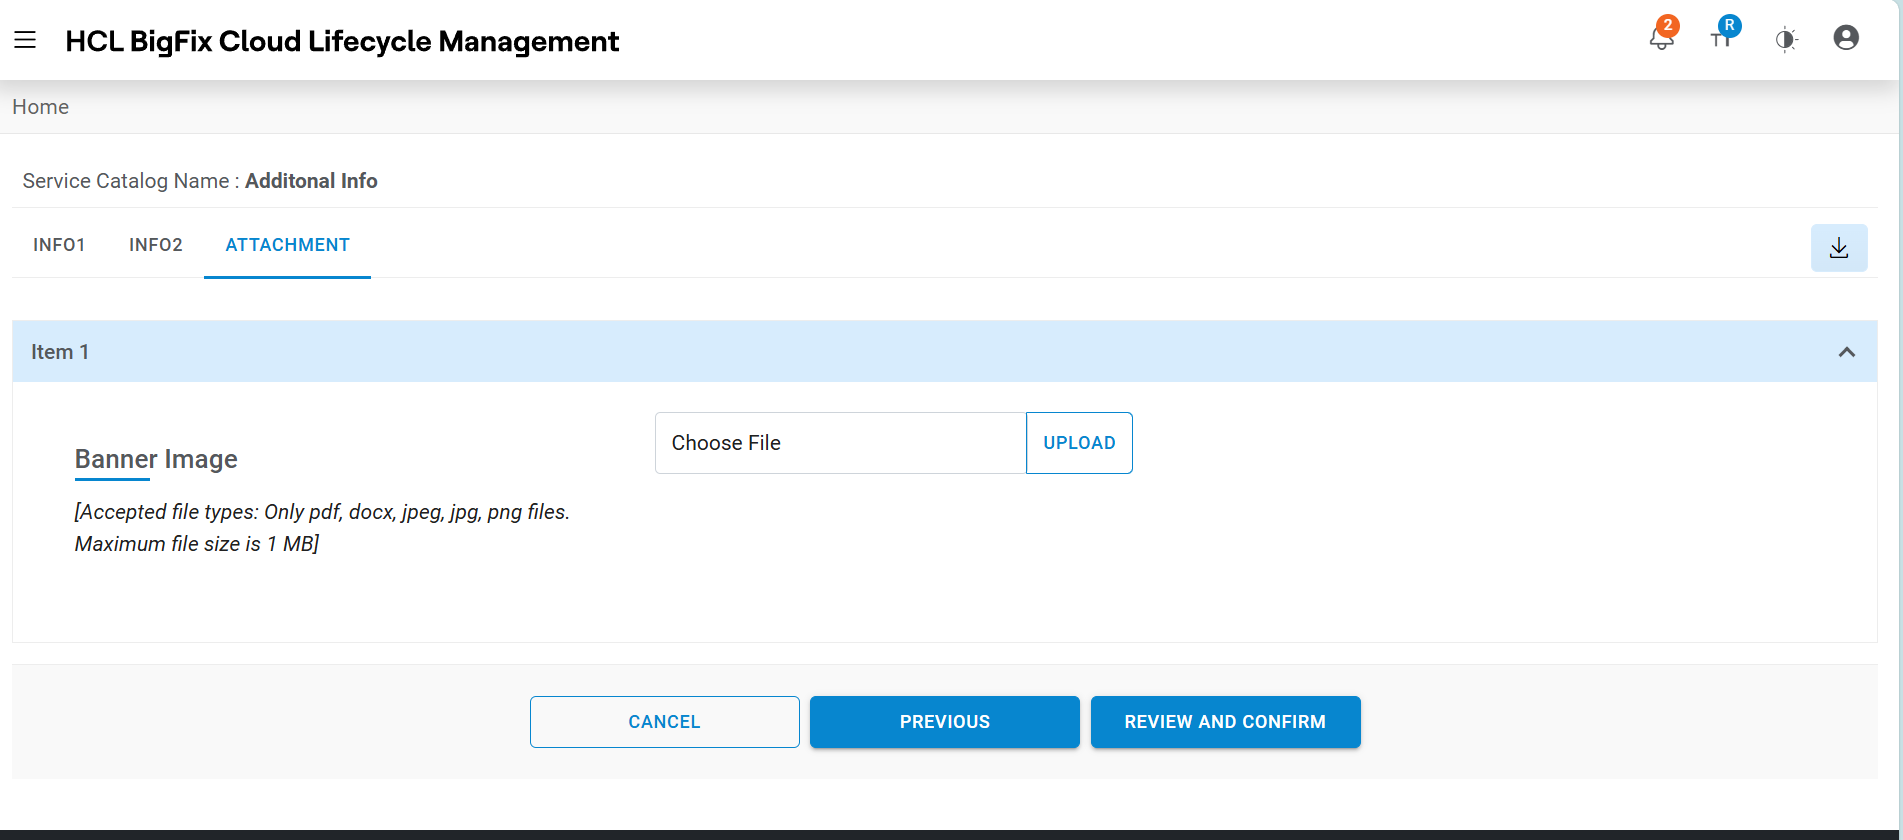
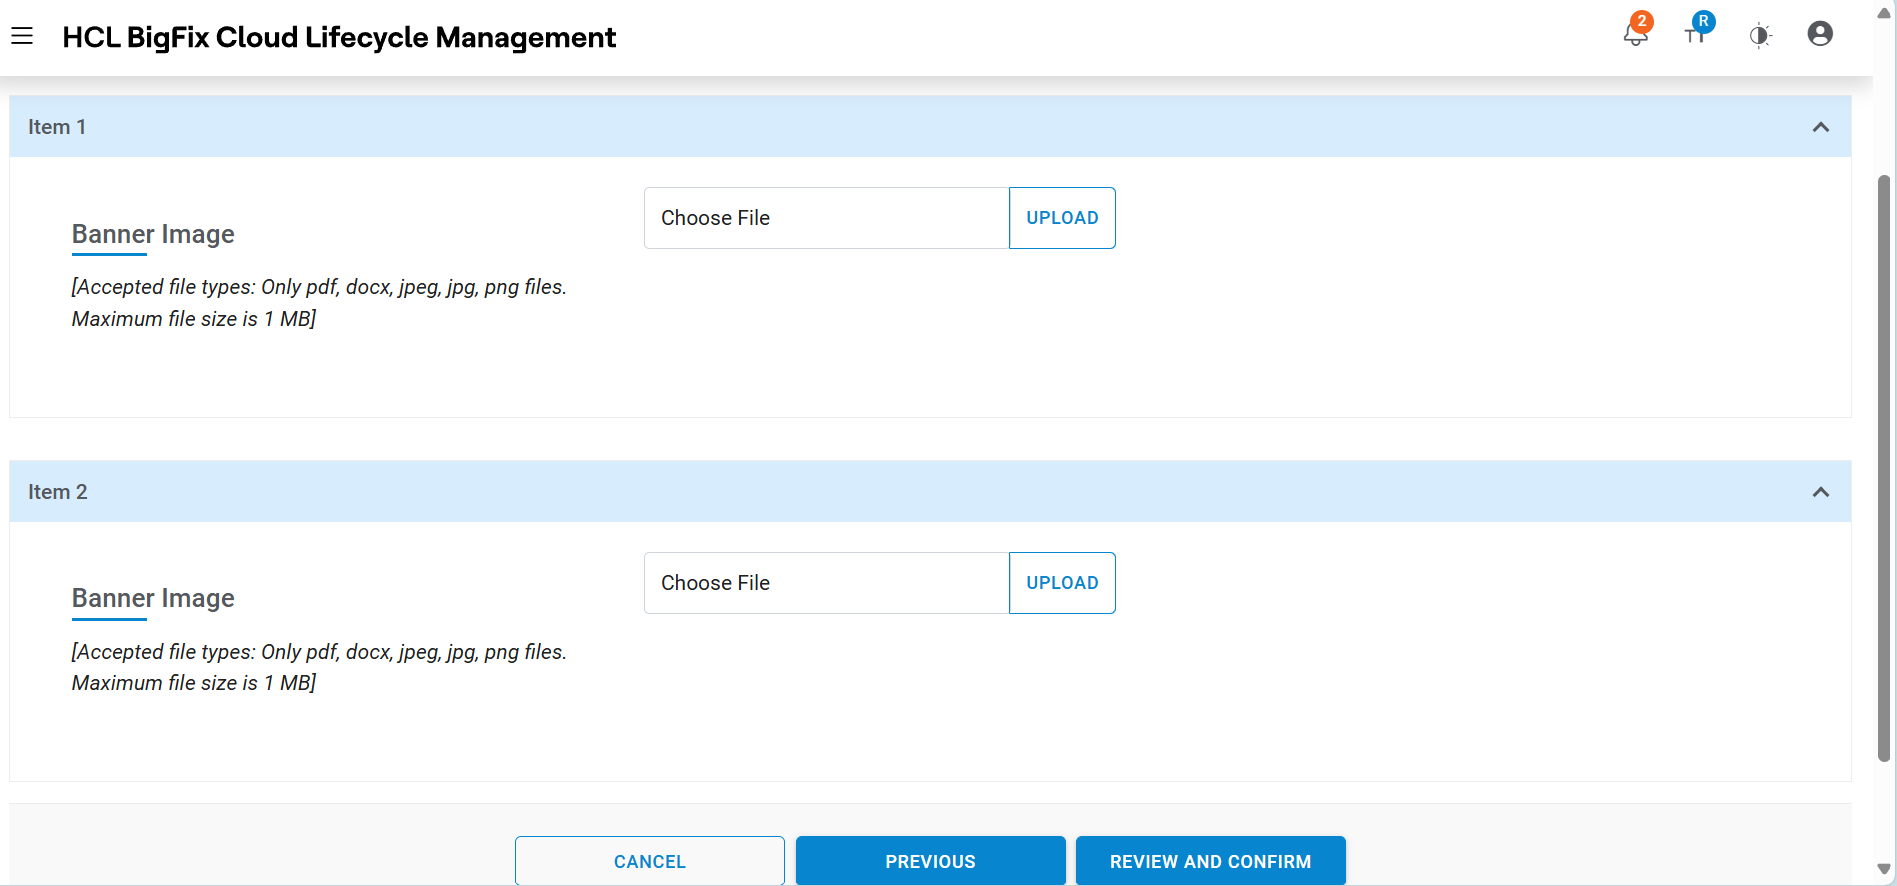
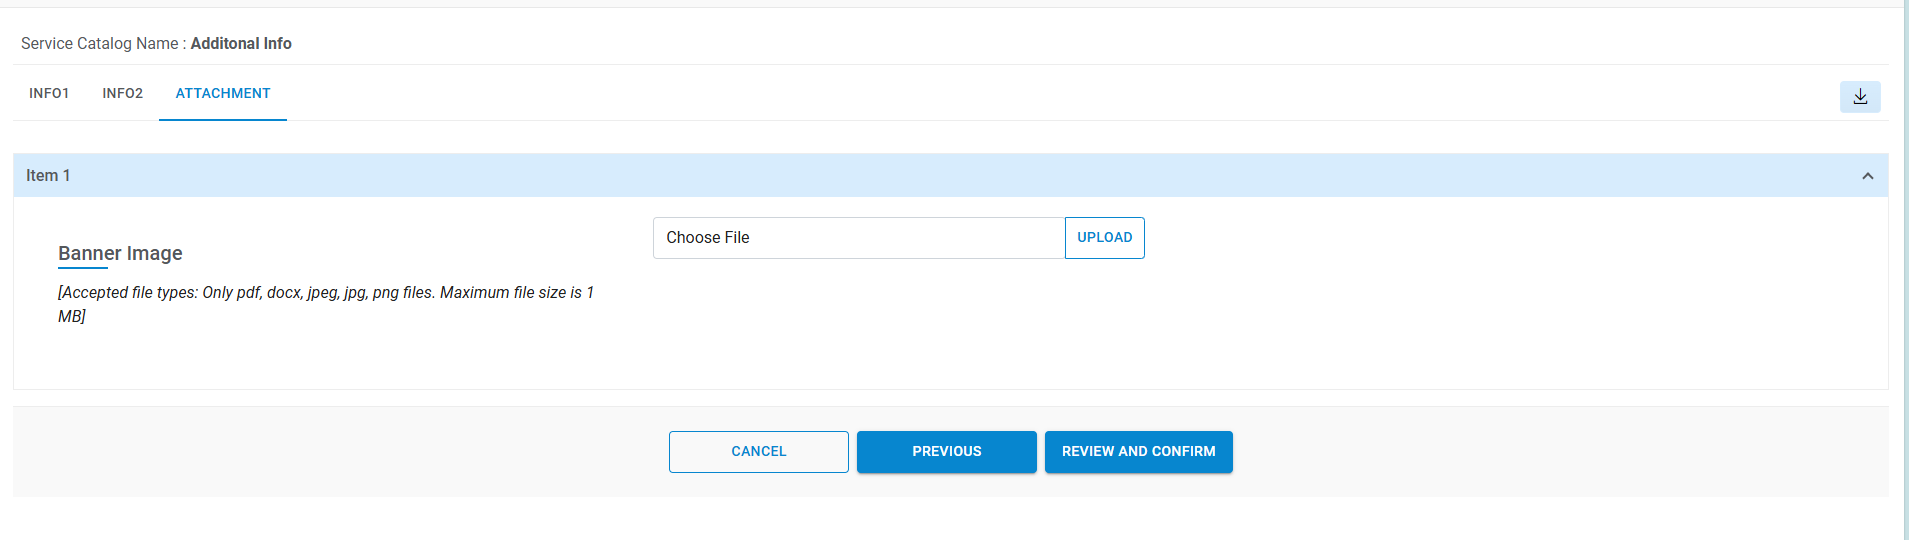
Attachment
This tab will be displayed, if Document Upload is enabled for service catalog by selecting “Allow Document Upload” setting to true on publish service catalog screen.
.png)
As mentioned in the note section, requesters can upload only predefined file extensions and file size should not exceed defined size. Also, the requester cannot upload more than allowed files for each request.
Architecture Diagram
This tab will be displayed, if Architecture Diagram is enabled for service catalog by uploading image for architecture diagram in publish service catalog screen.
So, while placing request user can see the any diagram under “Architecture Diagram” tab.
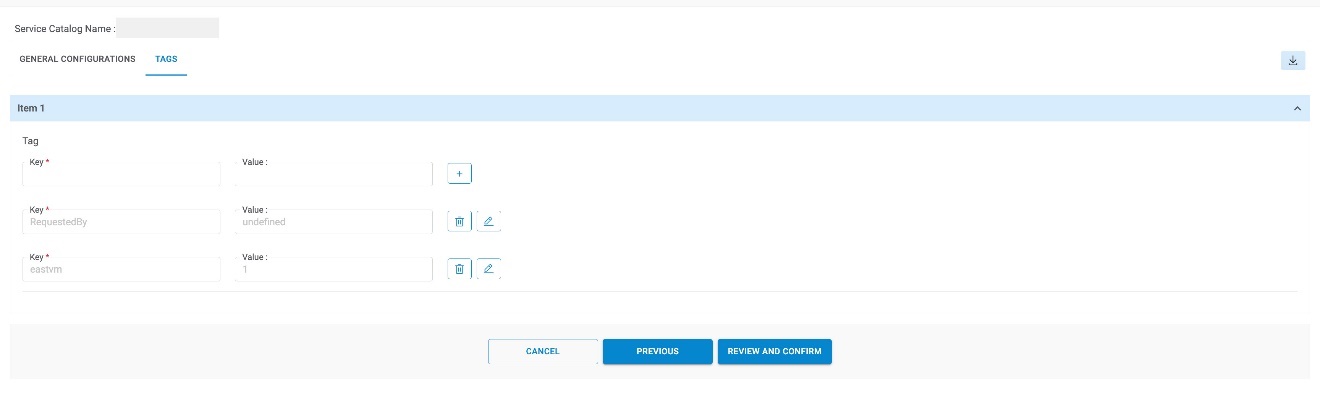
- Enter Key Name for the tag being created.
- Enter Value, to determine whether the machine belongs to test, QA or production environment.
- Click Add (
.png) ).
). - Click Submit.
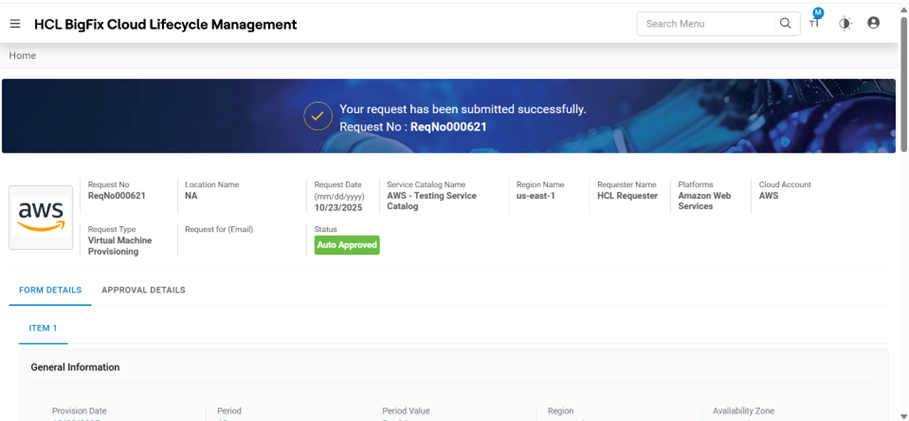
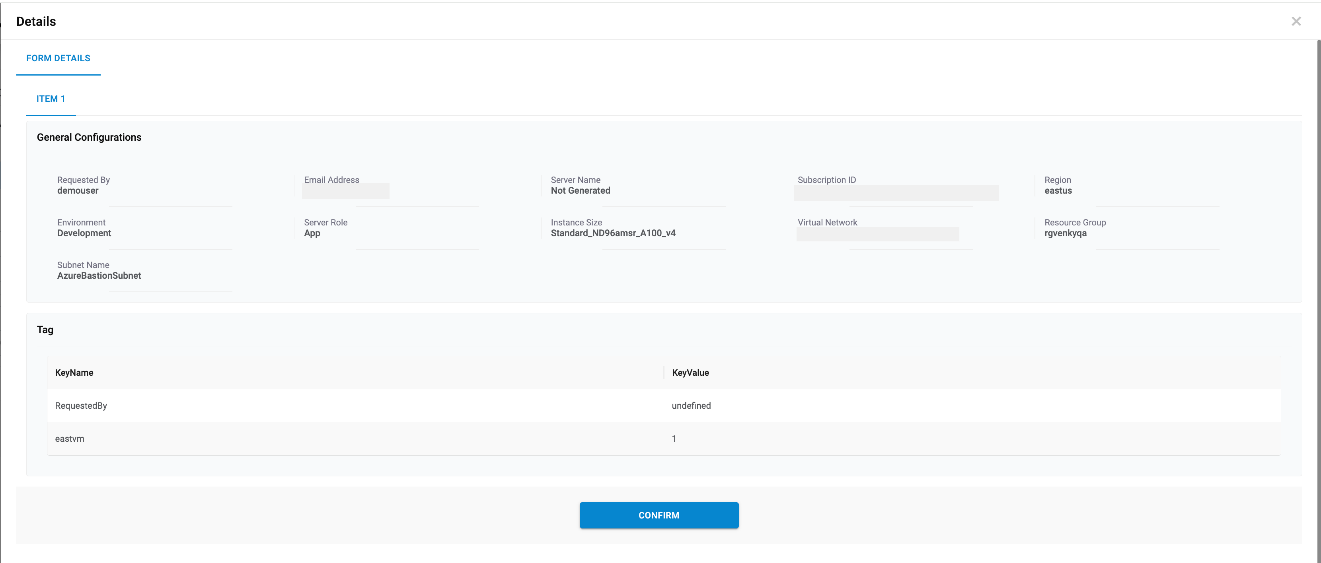
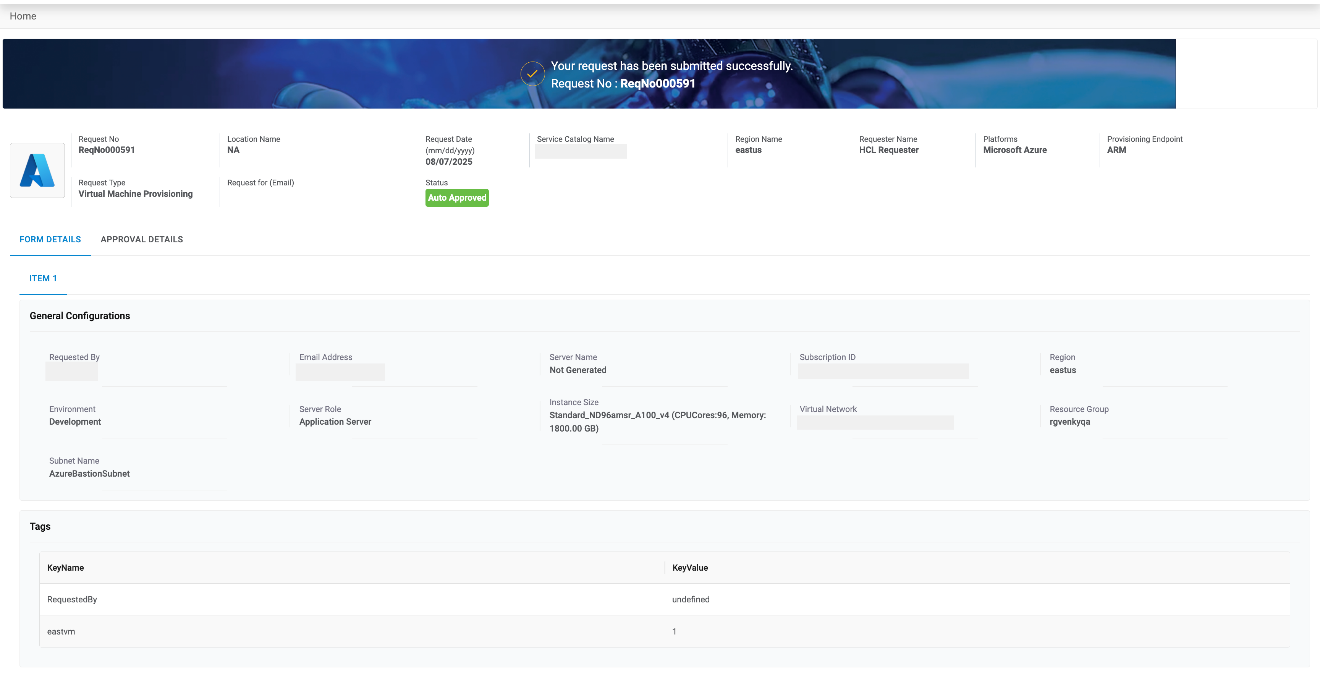
- The Request summary screen appears.
- Click Confirm.
Figure 12. Request Service Catalog (Cont.) 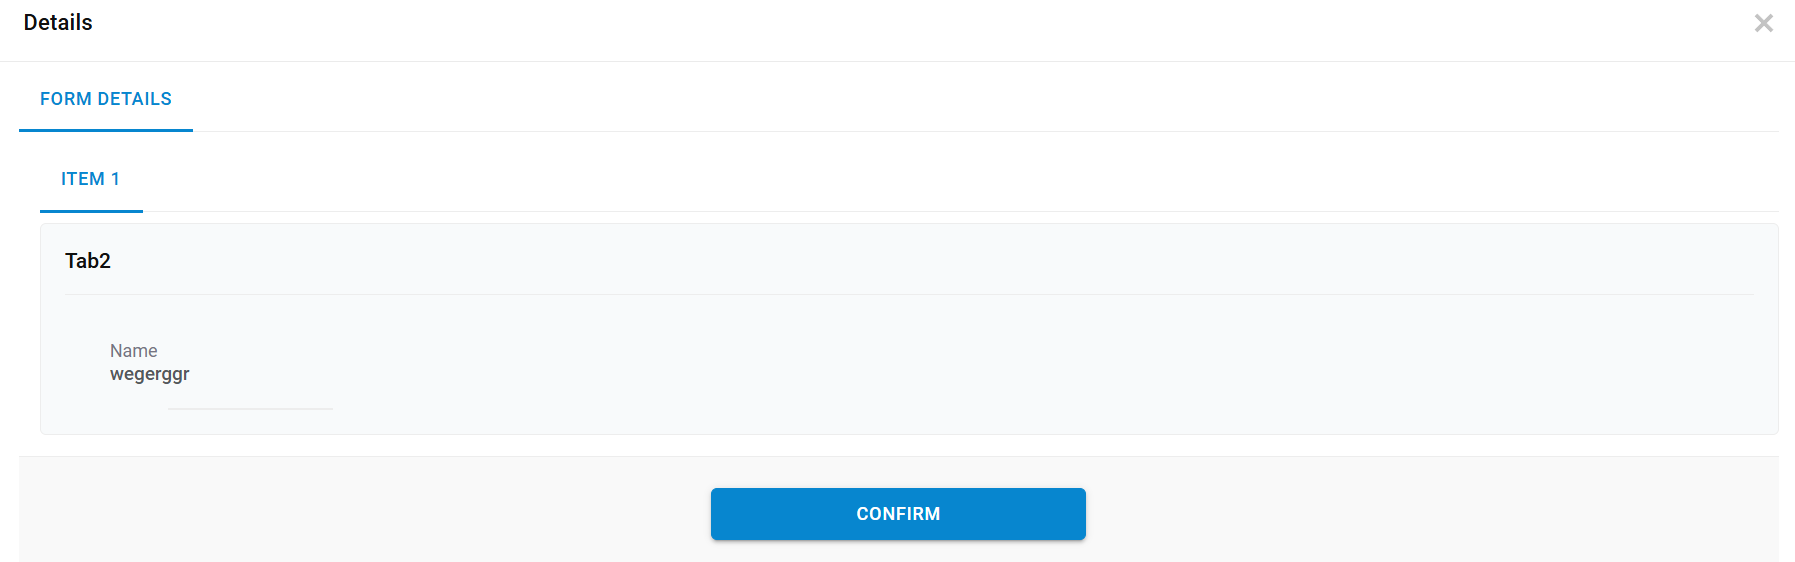
- The order confirmation pop-up window appears.
- Users can request a new service request by clicking New Request.
- Click Close to close the pop-up window.
Figure 13. Request Service Catalog (Cont.)
- Refer to the below table to understand the Approval History mentioned in the above
figure.
Table 1. Approval History Field Description Request ID ID generated after submitting the request Date Approval date gets displayed post approver’s action. Status Status of the request placed Note:All fields marked with an asterisk (*) are mandatory. - Requests are placed successfully.
Virtual Machine Requests
This section explains the steps to process the request for respective cloud providers.
VMware
To proceed with service requests that have VMware as a cloud provider, the end-user needs to follow the steps below:
- Select Cloud Account.
- Only the endpoints which are tagged in RBAC group of User configuration are enabled to Provider admin.
- Select Region.
- Region at which Private DCs would be located, and resources would be getting consumed.
- Select Service from the options being displayed, i.e. All Service (it includes all the services given in the catalog), Service Type created by provider and mapped with service catalog.
- Click Request.
- Select the Number of Instances and click Proceed.
Figure 14. Request Service Catalog (Cont.) 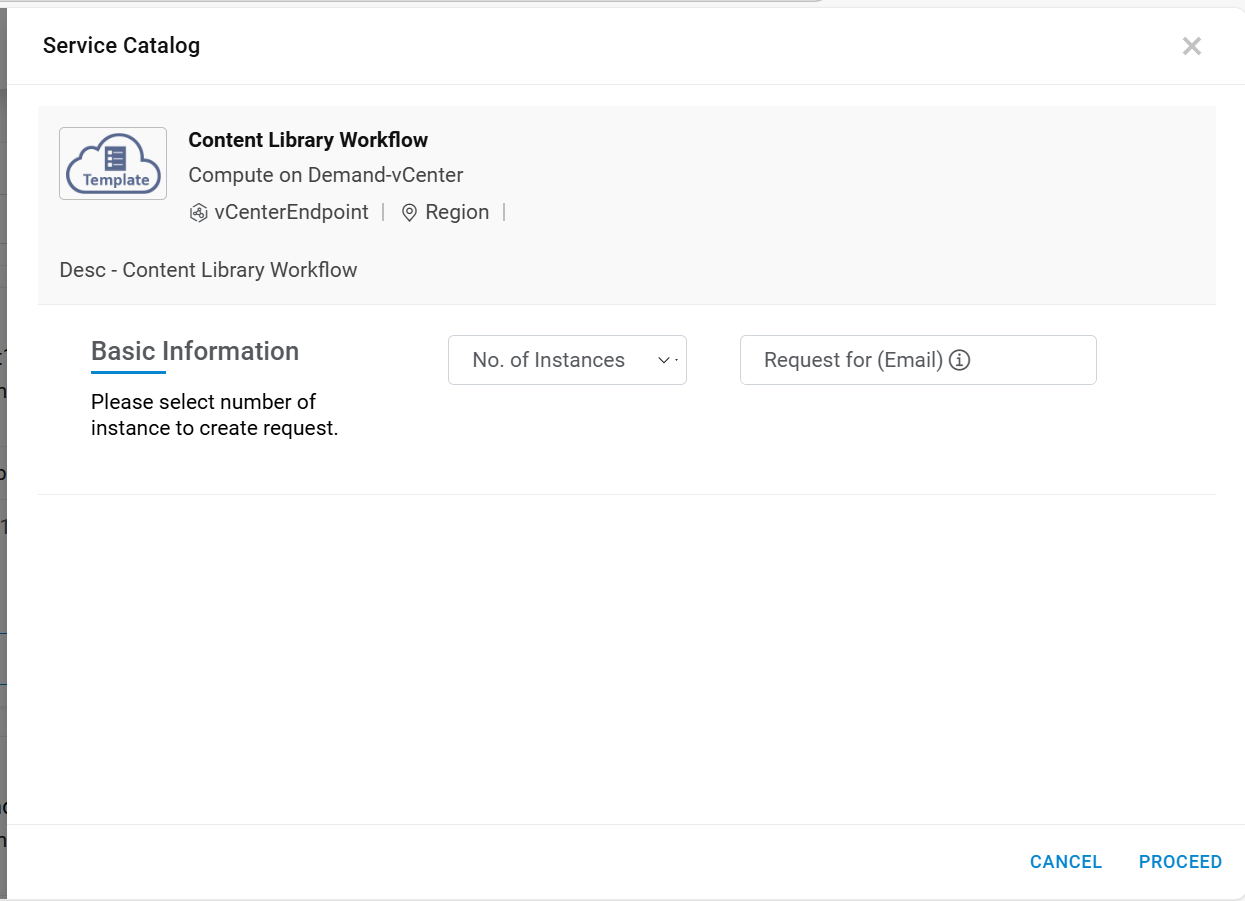
- This displays the Request Form associated with the service catalog to fill in the Information.
- The request service catalog form appears. The form is categorized into two categories:
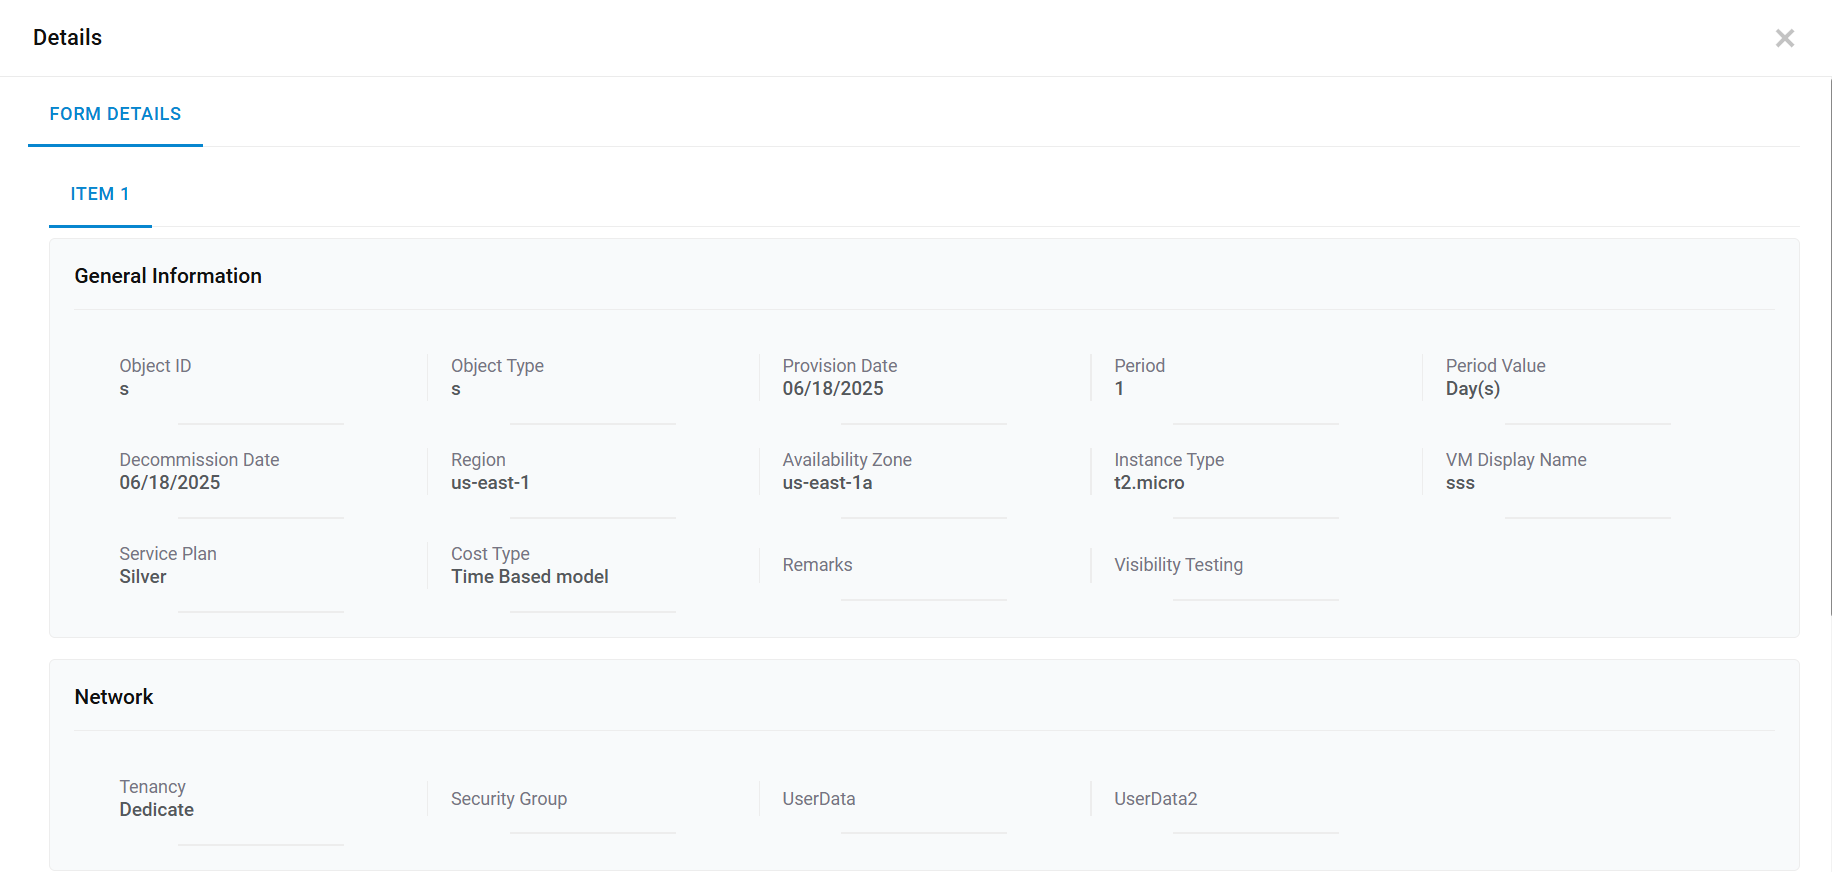
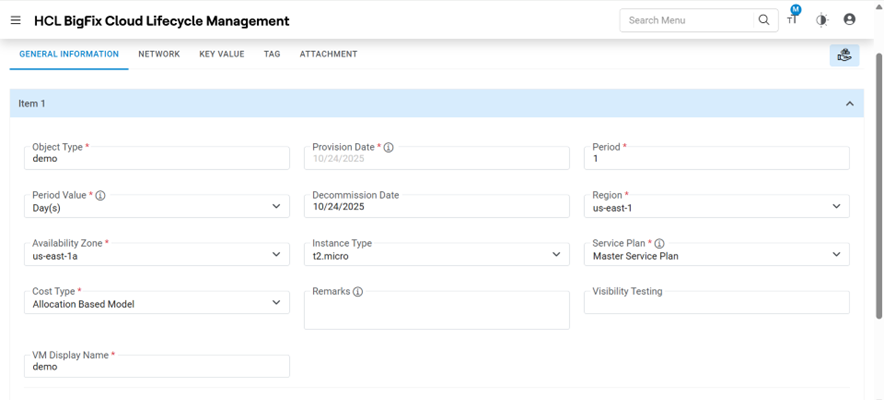
General Information
This tab allows the user to manage the general configuration.
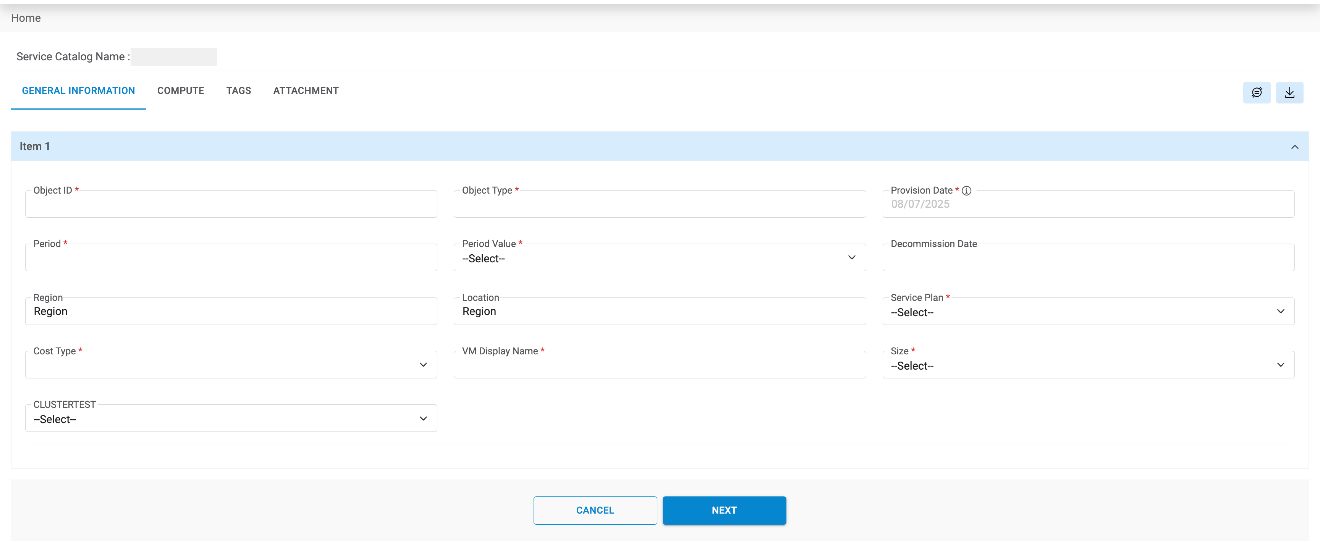
Refer to the below table to understand the fields mentioned in the above figure.
| Fields | Description |
|---|---|
| Provision Date | The date on which a resource is required |
| Period | The lease period for which a resource is required |
| Period Value | Time period for the selected resource i.e., months, days, weeks or years |
| Region | The Region is Geographical Region at which Private DCs are located |
| Location | The locations at which Private DCs are located, and resources are getting consumed |
| Service Plan | Selecting the resource category created by the provider i.e. platinum, gold or bronze |
| Cost Type | Cost model as Pay as you go, or allocation based |
| VM Display Name | Name to be displayed against the Resource being created |
| Remarks | Provide additional requests, if any |
| Size | Need to mention the size |
| Network IP | It is the IP address of the server |
- Select Provision Date and Period .
- Select Period Value.
- Enter Region.
- Enter Location .
- Select Service Plan and Cost Type.
- Enter VM Display Name.
- Enter Remarks and select Size.
- Enter Network IP.
Figure 16. Request Service Catalog (Cont.) 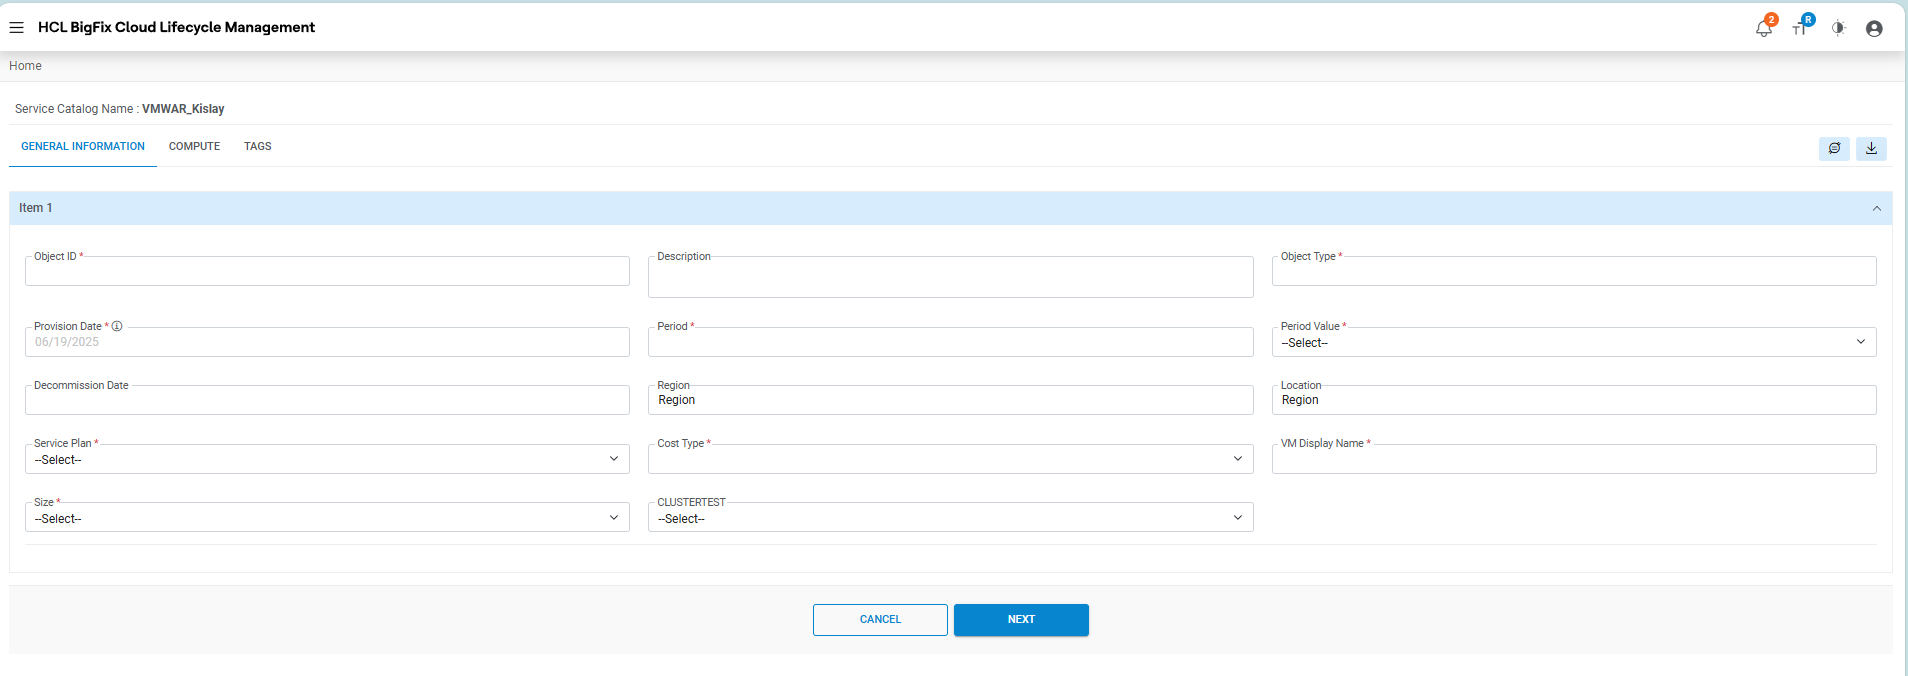
- If a user has selected no. of instances, then the same no. of item information appears on the screen in the form of Item number (s).
- Users need to provide details for another Item in another form, or a user may simply
copy the Details from one Item form to another Item by using Copy From and Copy
To menu.
- Select Copy From (Item No.).
- Select Copy To (Item No.).
- Click Next
Note:All the fields marked with an asterisk (*) are mandatory and UI fields vary as per configured by provider admin from UI creation section.Figure 17. Request Service Catalog (Cont.) 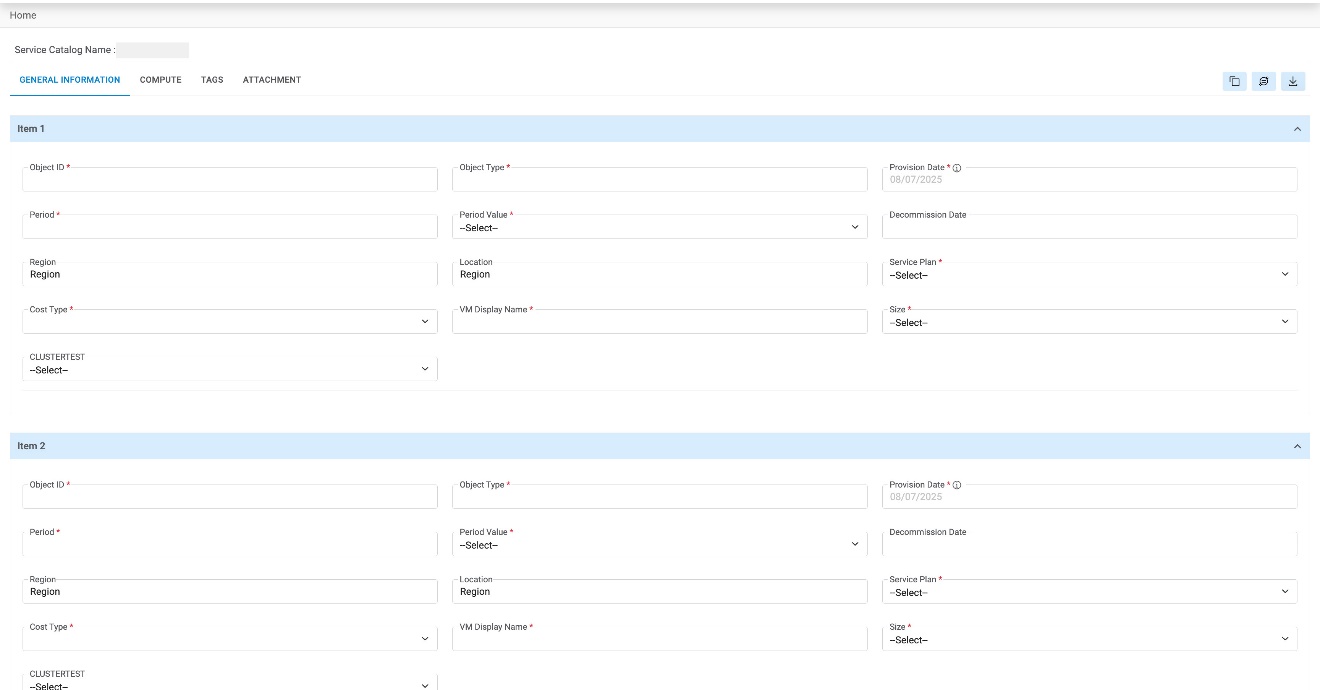
- Once the form is filled, go to Compute tab.
Compute
This tab allows the requester to configure the hardware required. It is an optional tab.
Fill the following details in the Compute form:
- Enter Additional Storage.
- Click Add
Figure 18. Request Service Catalog (Cont.) 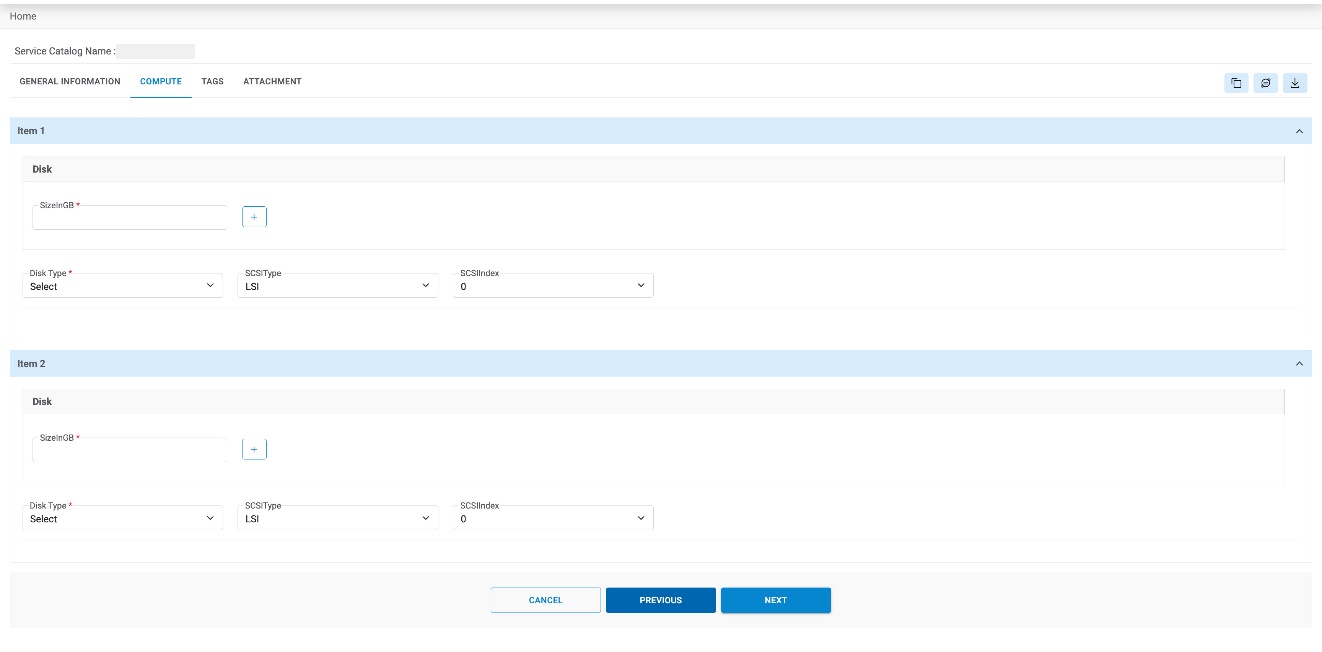
- If a user has selected no. of instances, then the same no. of item information appears on the screen in the form of Item number(s)
- Users need to provide the details for another Item in another form, or a user may copy
the Details from one Item form to another Item by using Copy From and Copy
To menu.
- Select Copy From (Item No.).
- Select Copy To (Item No.).
- Click Next
- Once the form is filled, click Submit.
- The Order Summary screen appears as shown in Figure 62 - Request Service Catalog (Cont.) .
- Scroll down and click Confirm.
-
Figure 19. Request Service Catalog (Cont.) 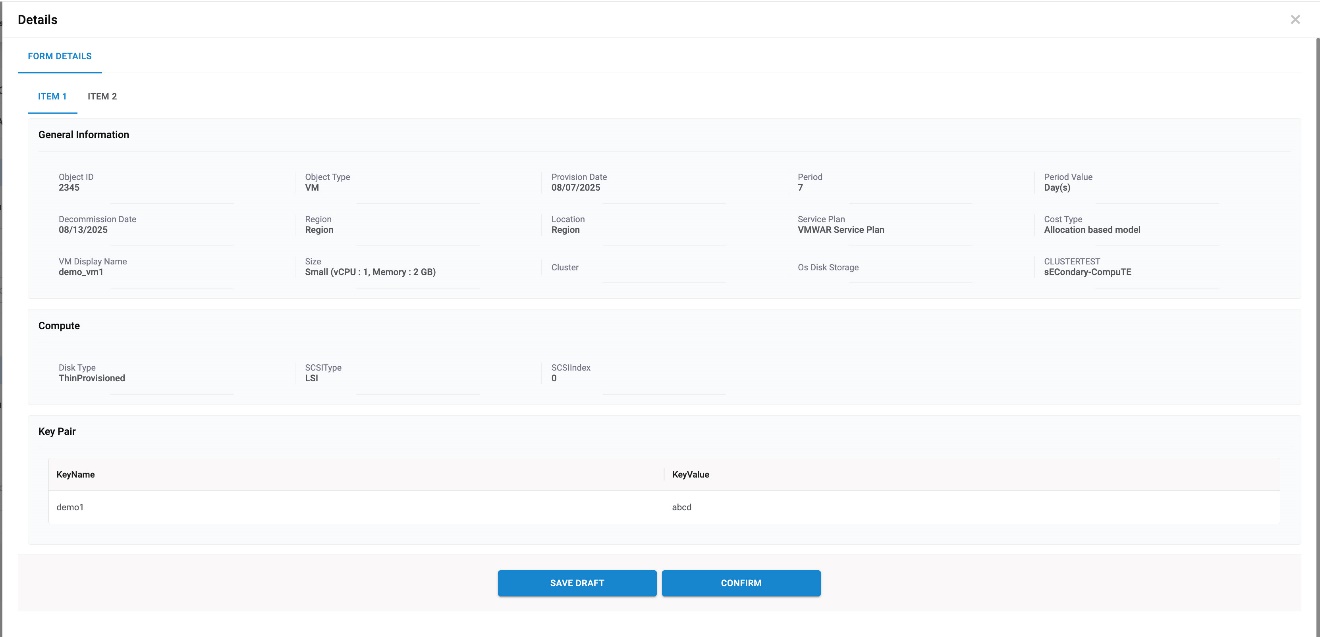
- The order confirmation window appears with BigFix CLM Request Number.
- User requests for a new service request by clicking New Request.
- Click Close to close the pop-up window.
Figure 20. Request Service Catalog (Cont.) 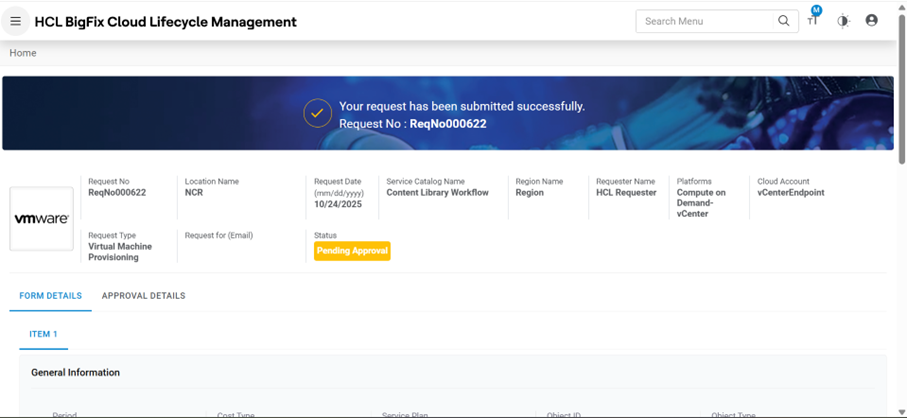
Amazon Web Services (AWS)
To proceed with Amazon Service Request (AWS), a user needs to follow the steps below:
- Select Cloud Account. Only the endpoints which are tagged in RBAC group of User configuration are enabled to Provider admin.
- Select Region, (Lists the geographical presence of native cloud providers).
- Select Service from All Service option.
- Click Request.
Figure 21. Request Service Catalog (Cont.) 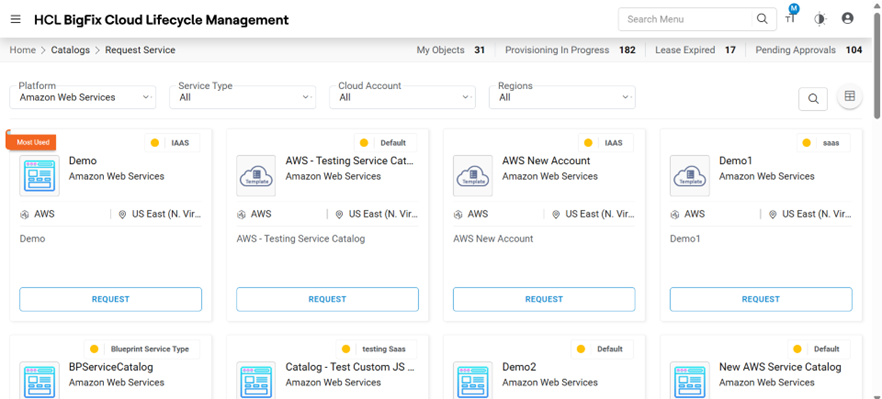
- Select number of Instance required.
- Click Proceed.
Figure 22. Request Service Catalog (Cont.) 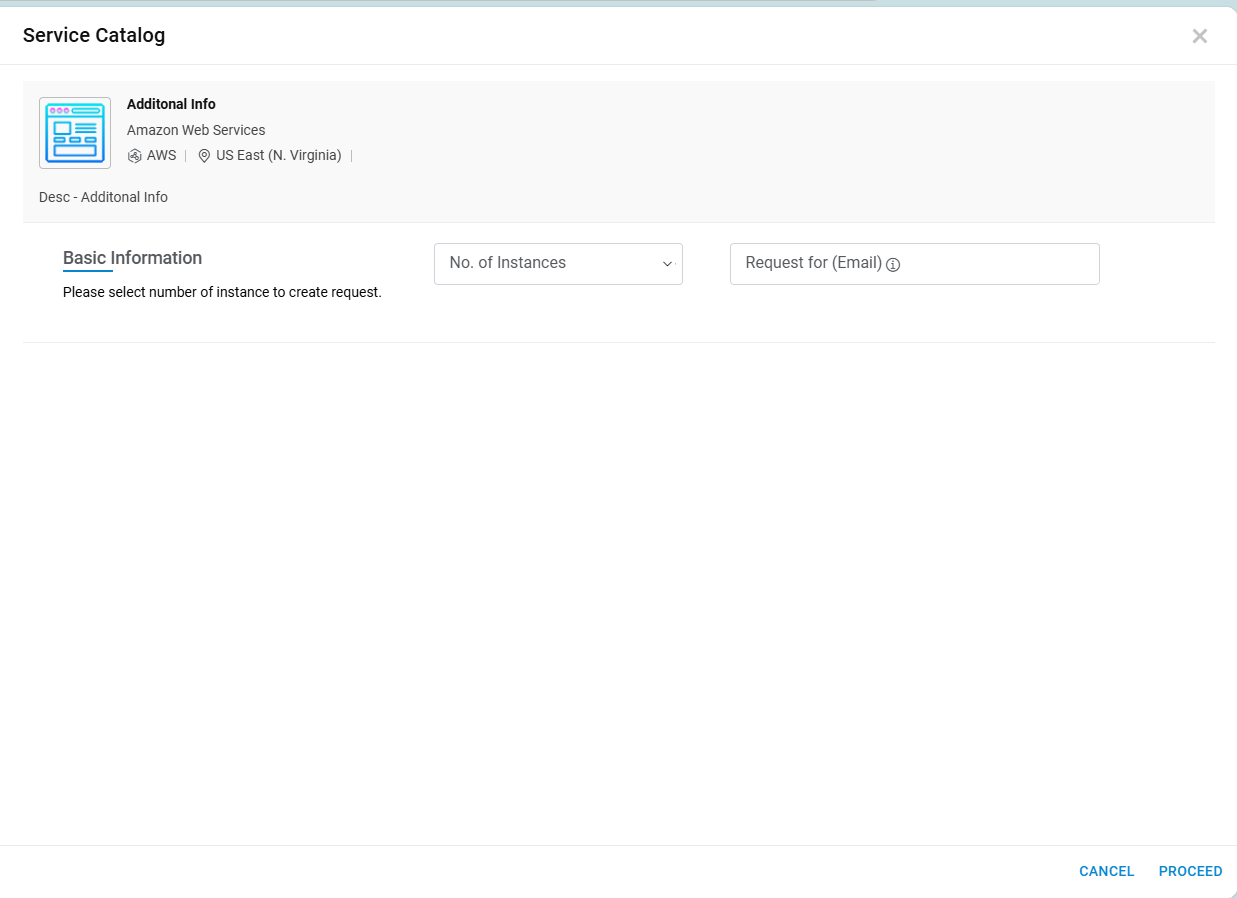
- The Request Service Catalog form appears. The form is categorized into four categories:
General Information
This tab allows the user to manage the general configuration required for requesting cloud services.
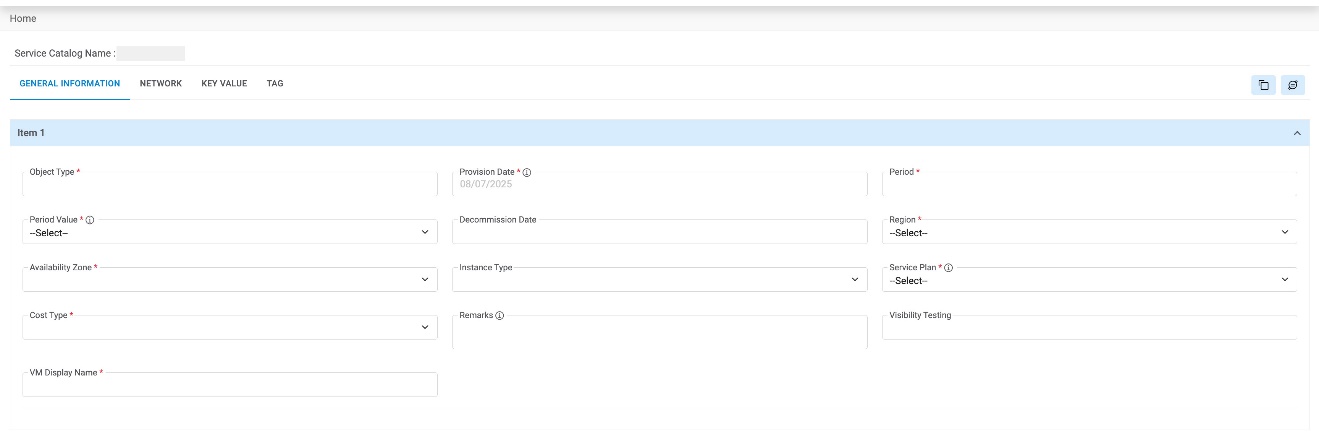
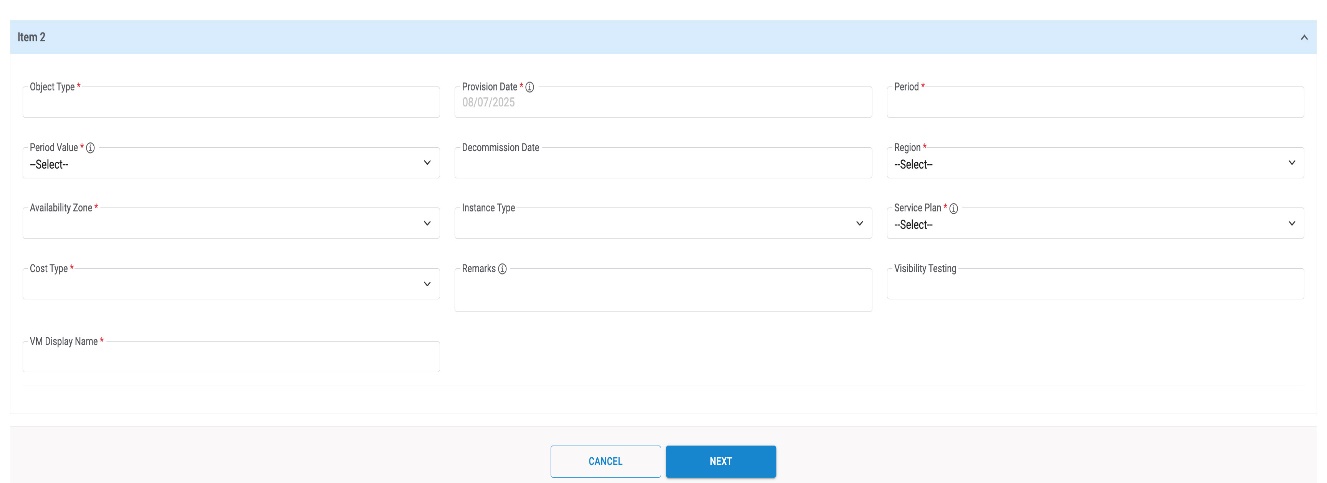
Refer to the following table to understand the fields mentioned in the above figure.
| Fields | Description |
|---|---|
| Provision Date | The date on which the resource gets provisioned |
| Period | The time of a resource that is required to get consumed by an organization |
| Period Value | Time period of a resource expressed in months, days, weeks or years |
| Region | It is the geographical region of Native Cloud Provider |
| Availability Zone | Each region consists of multiple independent locations known as availability zones |
| Instance type | Each instance type offers different compute, memory and storage |
| VM Display Name | Name to be displayed against the Resource that has been created |
| Service Plan | Select the category of plans that have been created by provider, i.e. platinum, gold or bronze |
| Cost Type | Select the Cost model as Pay as you go, or allocation based |
| Remarks | Additional comments/ descriptions/ information, if any |
Region and Location pre-populates based on the selection made on the previous screen as shown in the Figure 67 - Request Service Catalog (Cont.)
- Enter Provision Date and Period.
- Select Period Value.
- Select Availability Zone.
- Select Instance Type.
- Enter VM Display Name .
- Select Service Plan and Cost Type.
- Enter the additional information in Remarks.
- If a user has selected no. of instances, then the same no. of item information appears on the screen in the form of Item number(s).
- Users need to provide the details for another Item in another form, or a user may copy
the Details from one Item form to another Item by using Copy From and Copy
To menu.
- Select Copy From (Item No.).
- Select Copy To (Item No.).
- Click Next
- Once the form is filled, click on VPC.
Network
This tab allows the user to configure the Virtual Private Cloud (VPC) by provisioning a logically isolated section in Amazon Web Services cloud.

Refer to the below table to understand the fields mentioned in the above figure.
| Fields | Description |
|---|---|
| Subnet ID | Network range within an availability zone |
| Tenancy | Default tenancy leverages shared resources whereas dedicated tenancy leverages dedicated resources |
| Assign New NIC | Number of network interface cards |
| Security Group | Provides security at Protocol and Port Access level |
- Select the Subnet ID.
- Select the Tenancy.
- Select Security Group from the list.Note:Security Group appears based on the Subnet ID selected.
- If a user has selected <<n>> no. of instances, then the same no. of item information appears on the screen in the form of Item number(s).
- Users need to provide the details for another Item in another form, or a user may copy
the Details from one Item form to another Item by using Copy From and Copy
To menu.
- Select Copy From (Item No.).
- Select Copy To (Item No.).
- Click Next
- Once the form is filled, then click General Details.
Key Value
This tab allows the user to manage the general configuration required. It is an optional tab.
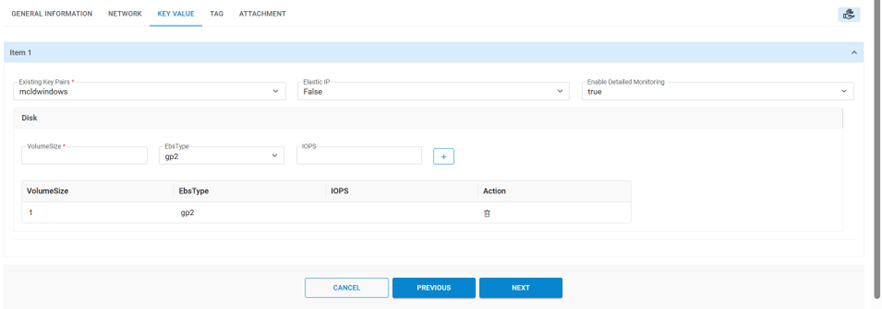
Refer to the following table to understand the fields mentioned in the above figure.
| Fields | Description |
|---|---|
| EBS Volume | Block level storage volumes to be associated with instances |
| Existing Key Pairs | Authenticate users associated with instance |
| Volume Type | Type of EBS Supported by AWS. This can be Standard, IOPS, General Purpose 2 |
| IOPS | In case of IOPS Type EBS Number of IO per second requested |
| Elastic IP | If public IP needs to attach with instance |
| Enable Detailed Monitoring | In case of detailed monitoring needs to be enabled |
- Enter EBS Volume.
- Select Existing Key Pairs.
- Select Volume Type.
- Enter IOPS.
- Select Elastic IP.
- Select Enable Detailed Monitoring.
- If a user has selected<<n>> no. of instances, then the same no. of item information appears on the screen in the form of Item number(s)
- Users need to provide the details for another Item in another form, or a user may copy
the Details from one Item form to another Item by using Copy From and Copy
To menu.
- Select Copy From (Item No.).
- Select Copy To (Item No.).
- Click Next.
Tags
Tags are the name-value pair; they are used to organize resources in AWS portal. A user applies tags for individual resources.
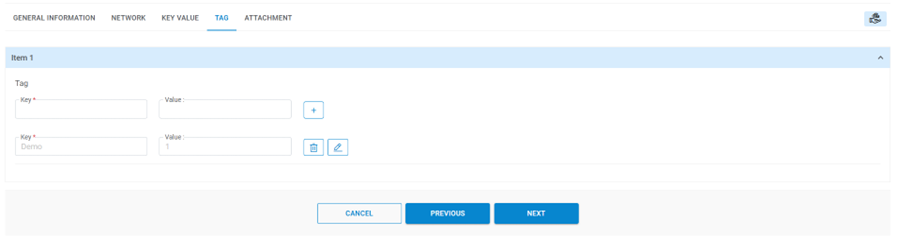
- Enter Key and value for the tag being created.
- Enter Value to determine whether the machine belongs to test, QA or production environment.
- Click Add (
.png) )
) - Click Submit.
- The Request Summary pop-up window appears on the screen.Note:All fields marked with an asterisk (*) are mandatory.
- Click Confirm.
Figure 29. Request Service Catalog (Cont.) 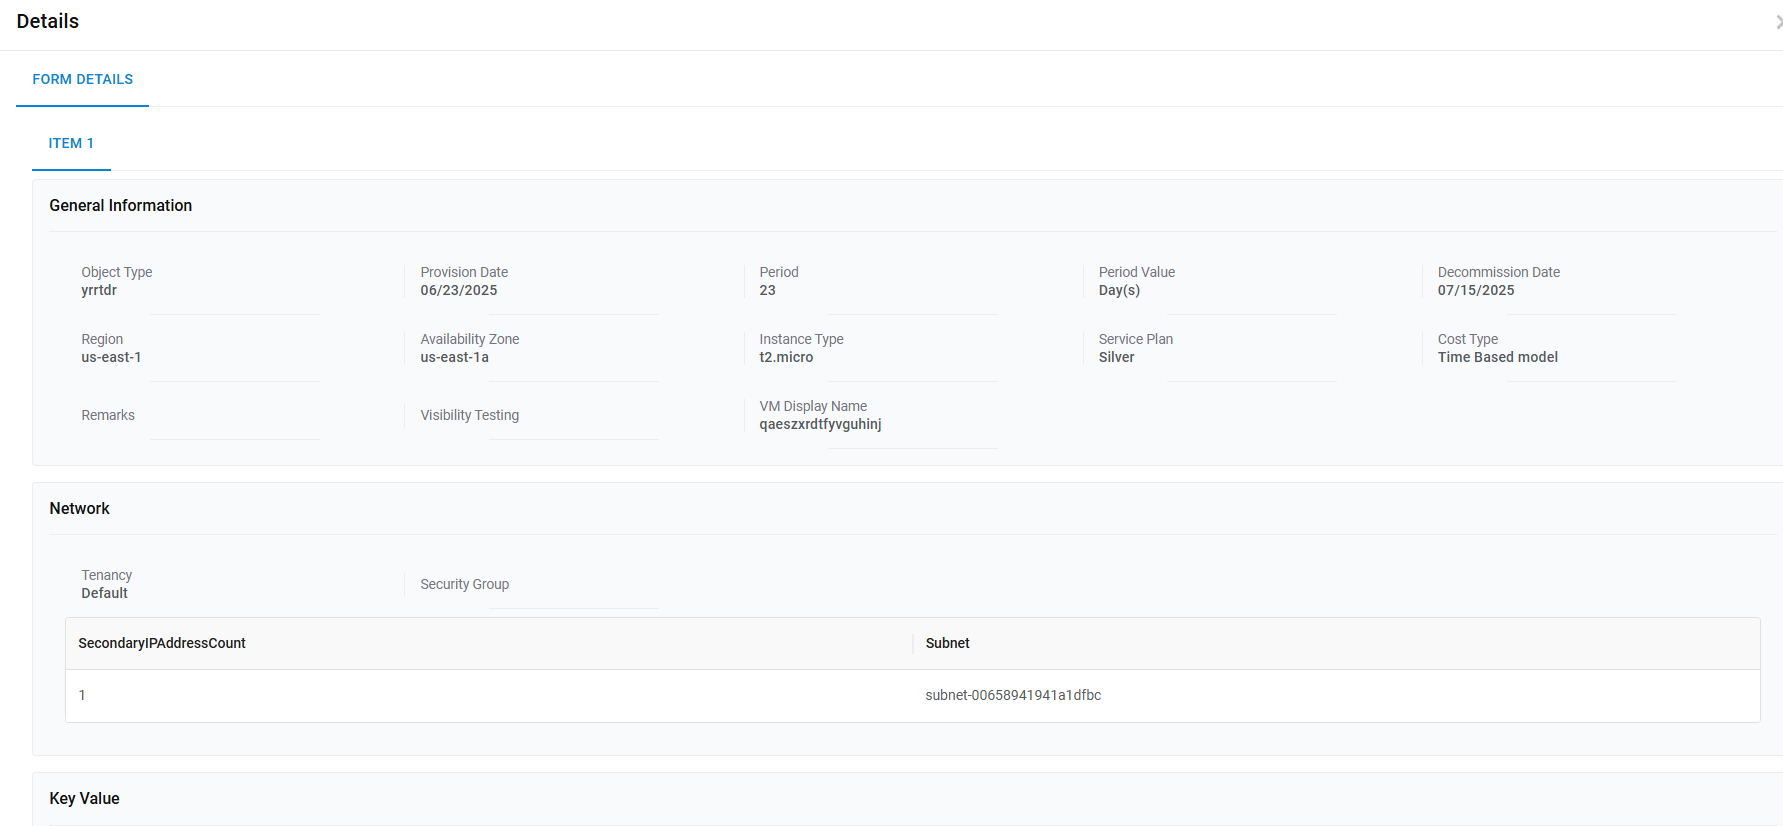
Figure 30. Request Service Catalog (Cont.) 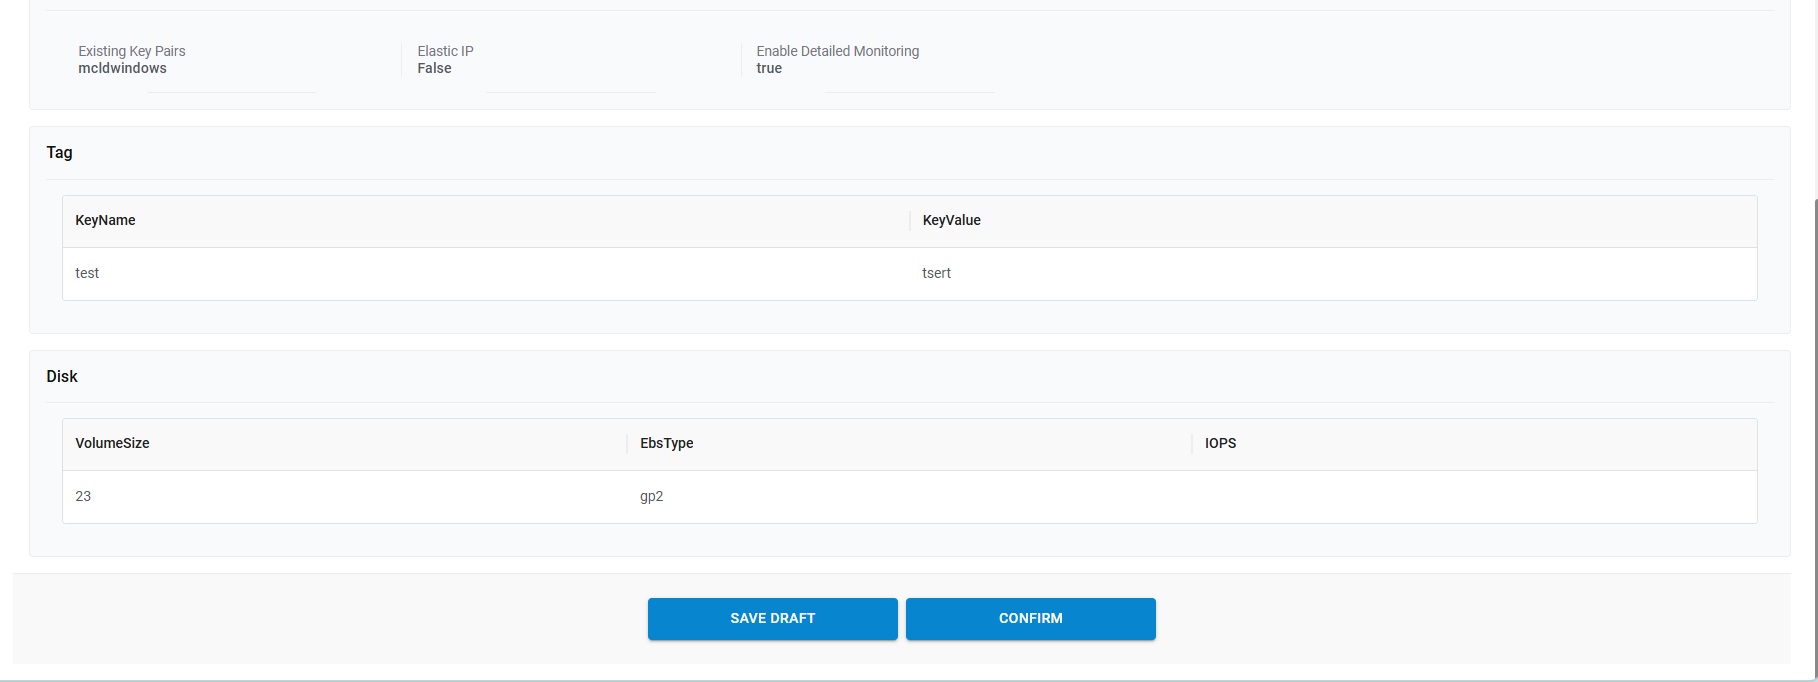
- The order confirmation window appears on the screen.
- Users can request a new service request by clicking New Request.
- Click Close to close the pop-up window.
Figure 31. Request Service Catalog (Cont.) 
Figure 32. Request Service Catalog (Cont.) 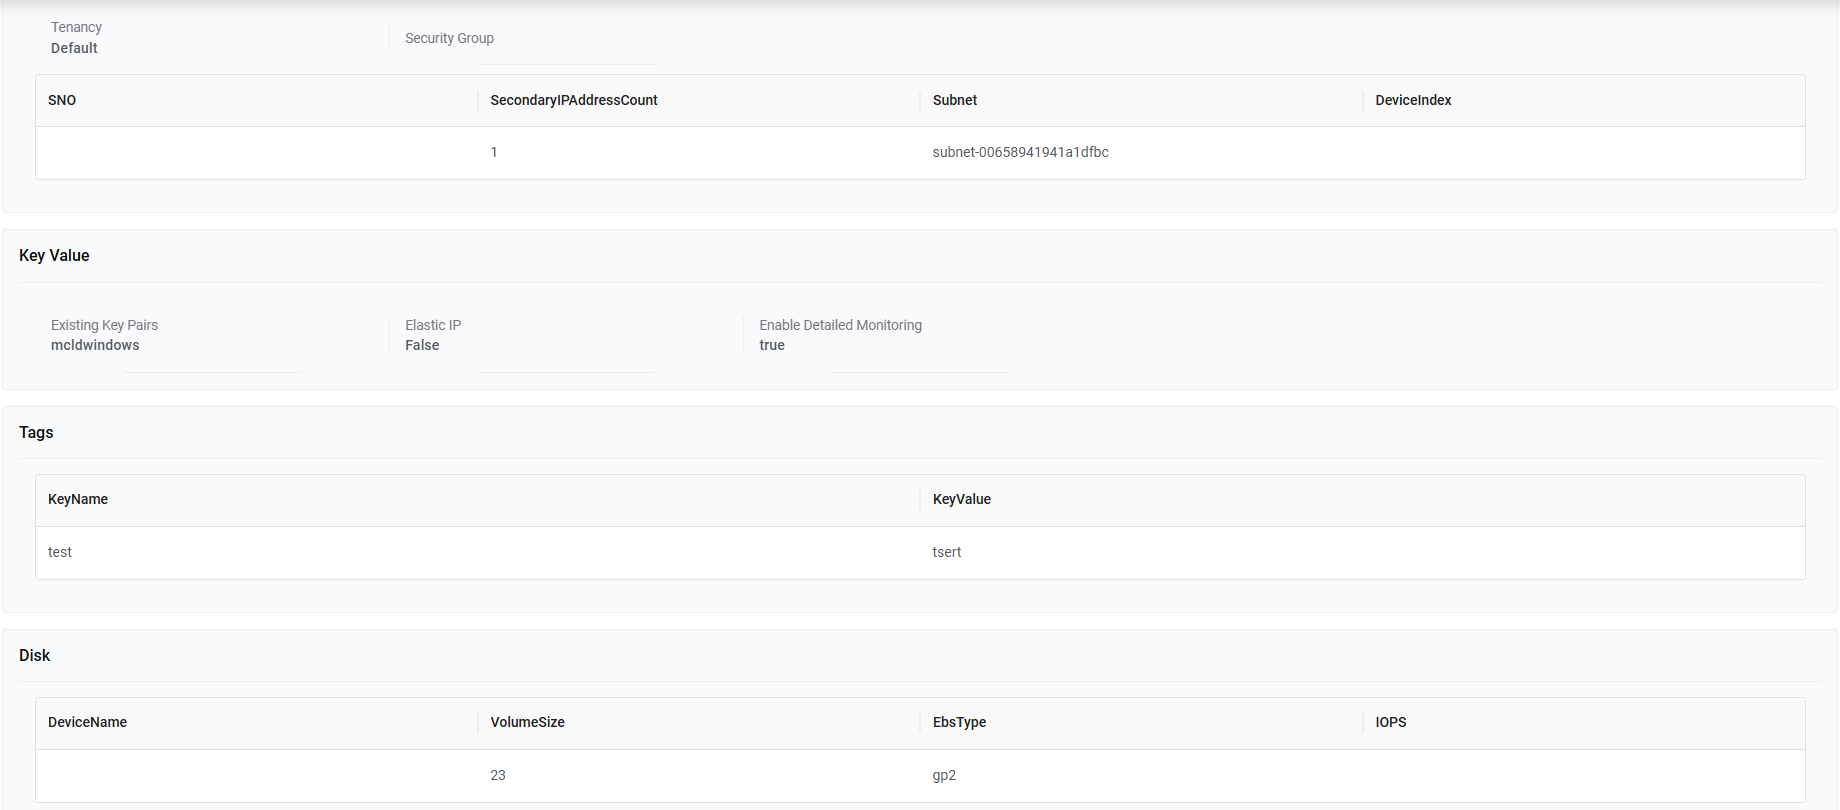
Refer to the following table to understand the Approval History mentioned in the above figure.
Table 6. New Request Fields Description Activity Displays the activity performed by the user Request ID ID generated after submitting the request Date Approval date gets displayed post approver’s action. Status Status of the request placed
Click Expand (+) to expand the fields and all the fields marked with asterisk (*) are mandatory.
Azure
- Select Cloud Account. Only those endpoints will show which are tagged in RBAC group of User configuration are enabled to Provider admin.
- Select Region.
- Select Service from All Services option on the left pane. (All Services options include all the services given in the other catalog).
- Click Request .
Figure 33. Request Service Catalog (Cont.) 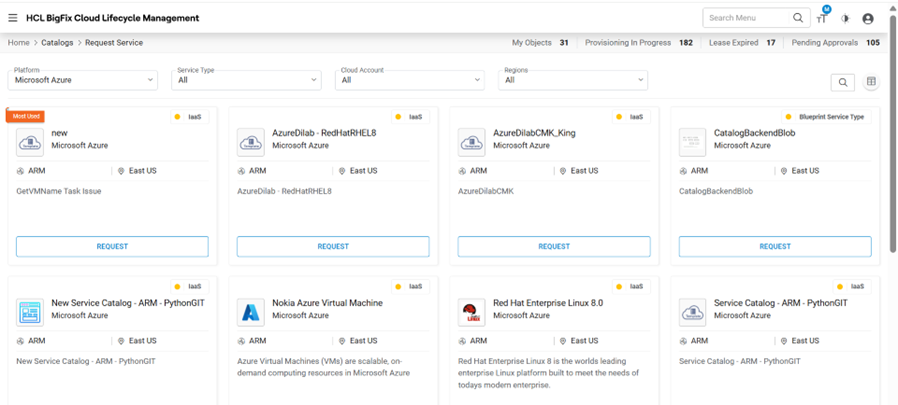
- Select Number of Instances, and then click Proceed.
Figure 34. Request Service Catalog (Cont.) 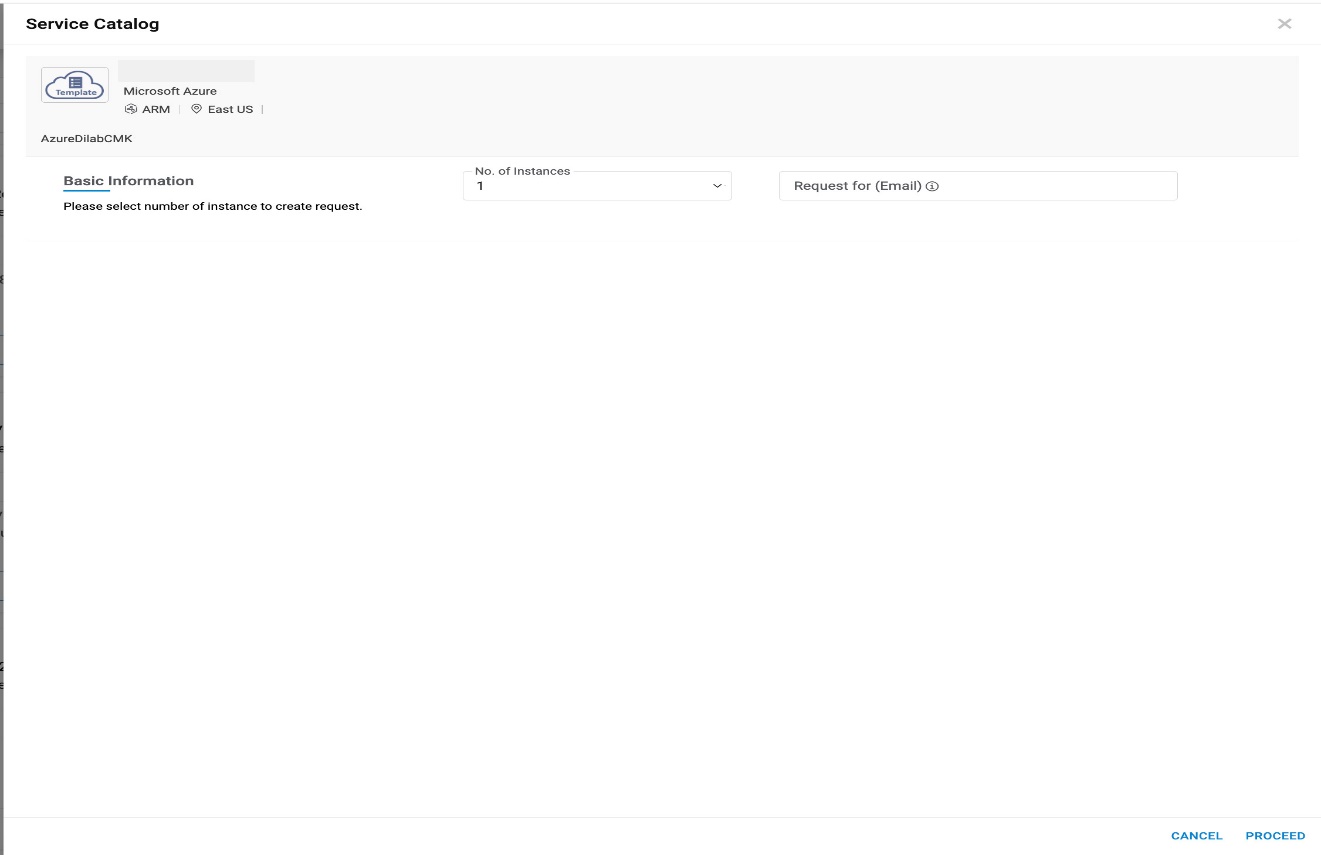
- The Request Service Catalog form appears. The form is categorized into four
categories:
- General Information
- Instance Details
- Additional Storage
- Tags
General Information
This tab allows the user to manage the general configuration required for requesting cloud services.
- Select Provision Date and Period for which the user requires the
services.
Figure 35. Request Service Catalog (Cont.) 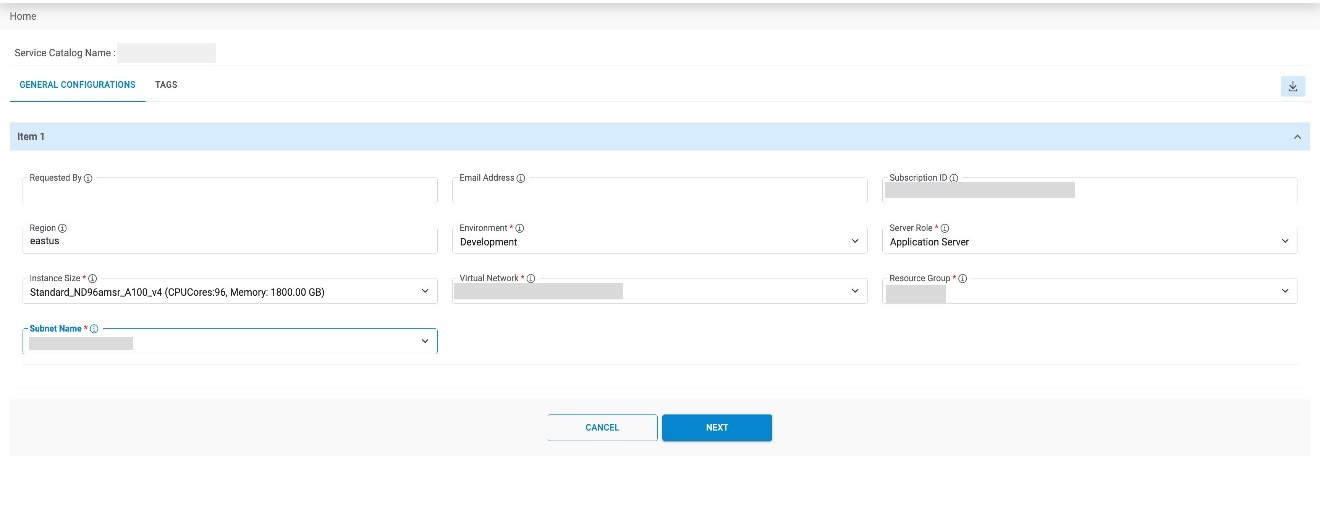
- Refer to the table below to understand the fields mentioned in the above figure.
Table 7. Request Service Catalog: Azure General Information Fields Fields Description Provision Date The date on which a resource gets provisioned Period The time of a resource that is required to get consumed by an organization Period Value Time period of a resource expressed in months, days, weeks or years Location The locations at which Public Cloud services are getting consumed Service Plan Select the category of plans that have been created by provider, i.e. platinum, gold or bronze Cost Type Select the Cost model as Pay as you Go VM Display Name Name of the Resource that has been created Remarks Provide any additional comments/ descriptions/ information Server Name Name to be displayed on the server and to be used as a hostname - Select Period Value.
- Enter Location .
- Select Service Plan and Cost Type.
- Enter VM Display Name.
- Enter the additional information in the Remarks box.
- Enter Server Name.
- If a user has selected <<n>> no. of instances, then the same no. of item information appears on the screen in the form of Item number(s).
- Users need to provide the details for another Item in another form, or a user may copy
the Details from one Item form to another Item by using Copy From and Copy
To menu.
- Select Copy From (Item No.).
- Select Copy To (Item No.).
- Click Next.
- Once the form is filled, then click Instance details.
Tags
To add Tags, users need to follow the below-mentioned steps:
GCP
To proceed with service requests that have GCP as a cloud provider, end-user needs to follow the steps below:
- Select Cloud Account. Only those endpoints will show which are tagged in RBAC group of User configuration are enable to Provider admin.
- Select Region.
- Click Request.
Figure 39. Request Service Catalog (Cont.) 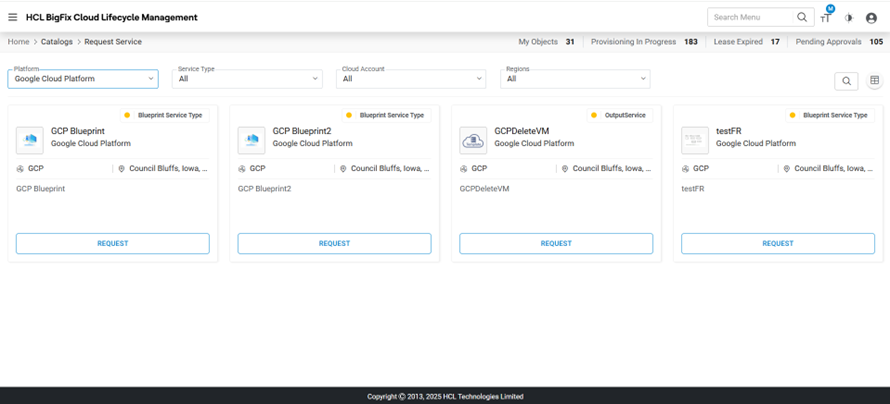
- Select Number of Instances, and then click Proceed.
Figure 40. Request Service Catalog (Cont.) 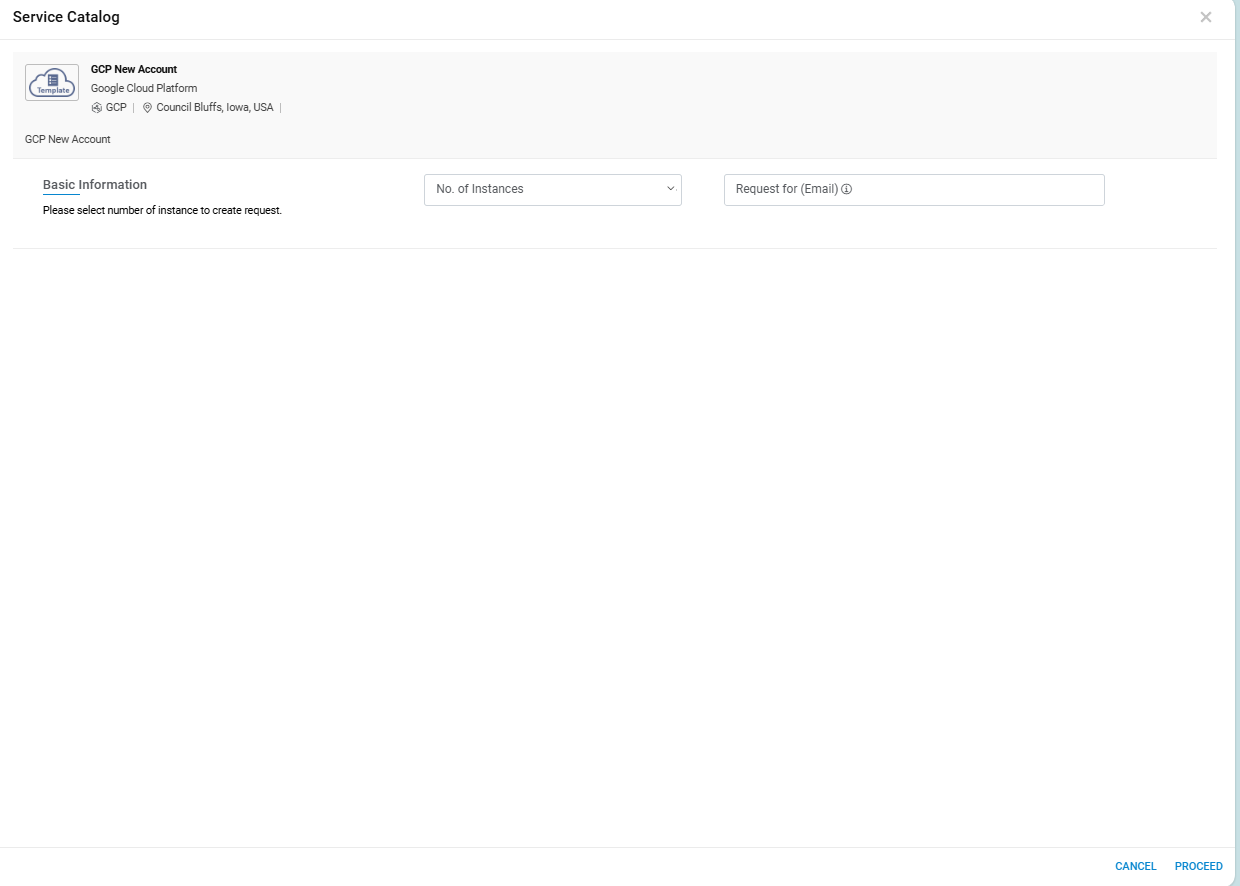
- The request service catalog form appears. The form is categorized into three categories:
General Information
This tab allows the user to manage the general configuration required for requesting cloud services.
- Select Machine Name, Zone, Size, Network
Interface, and SubNetworkInterfacefor which the user requires the services.
Figure 41. Request Service Catalog (Cont.) 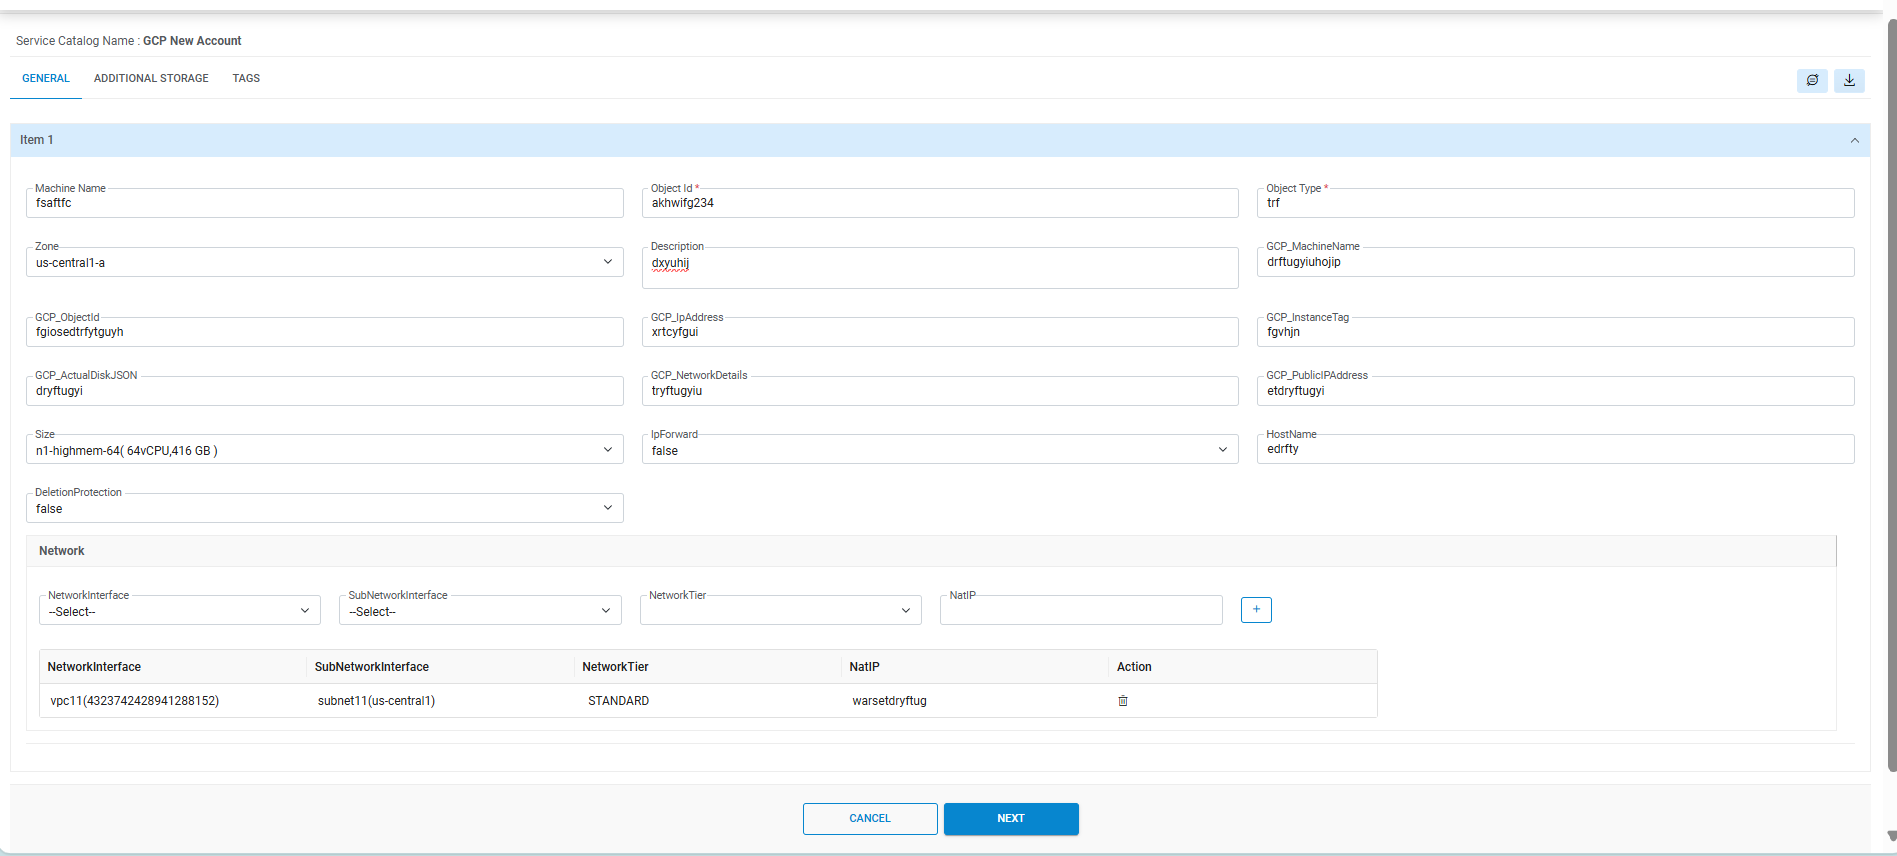
- Refer to the table below to understand the fields mentioned in the above figure.
Table 8. Request Service Catalog: GCP General Fields Fields Description Machine Name The name which is used to provision the machine Zone The zone where machines are to be provisioned Description Description of the resource. Size It is a set of virtualized hardware resources available to a virtual machine. IpForward Allows this instance to send and receive packets with non-matching destination or source IPs HostName The hostname of the instance Deletion Protection The resource should be protected against deletion Network Interface The network configurations for the instance SubNetwork Interface The Subnetwork configurations for the instance Network Tier The networking tier used for configuring this access configuration. It is used to provide an external IP address to the instance NatIP The external IP address associated with this instance - Enter Machine Name.
- Select Zone
- Enter Description.
- Select Size.
- Select IpForward.
- Enter HostName.
- Select DeletionProtection.
- Select Network, SubNetwork, NetworkTier and NatIP and then
click on (
.png) ) to add selected
values fields. We can add multiple values by clicking on (
) to add selected
values fields. We can add multiple values by clicking on (.png) ).
). - Users need to provide the details for another Item in another form, or a user may copy the Details from one Item form to another Item by using Copy From and Copy To menu.
- Select Copy From (Item No.).
- Select Copy To (Item No.).
- Click Next
- Once the form is filled, then click Additional Storage.
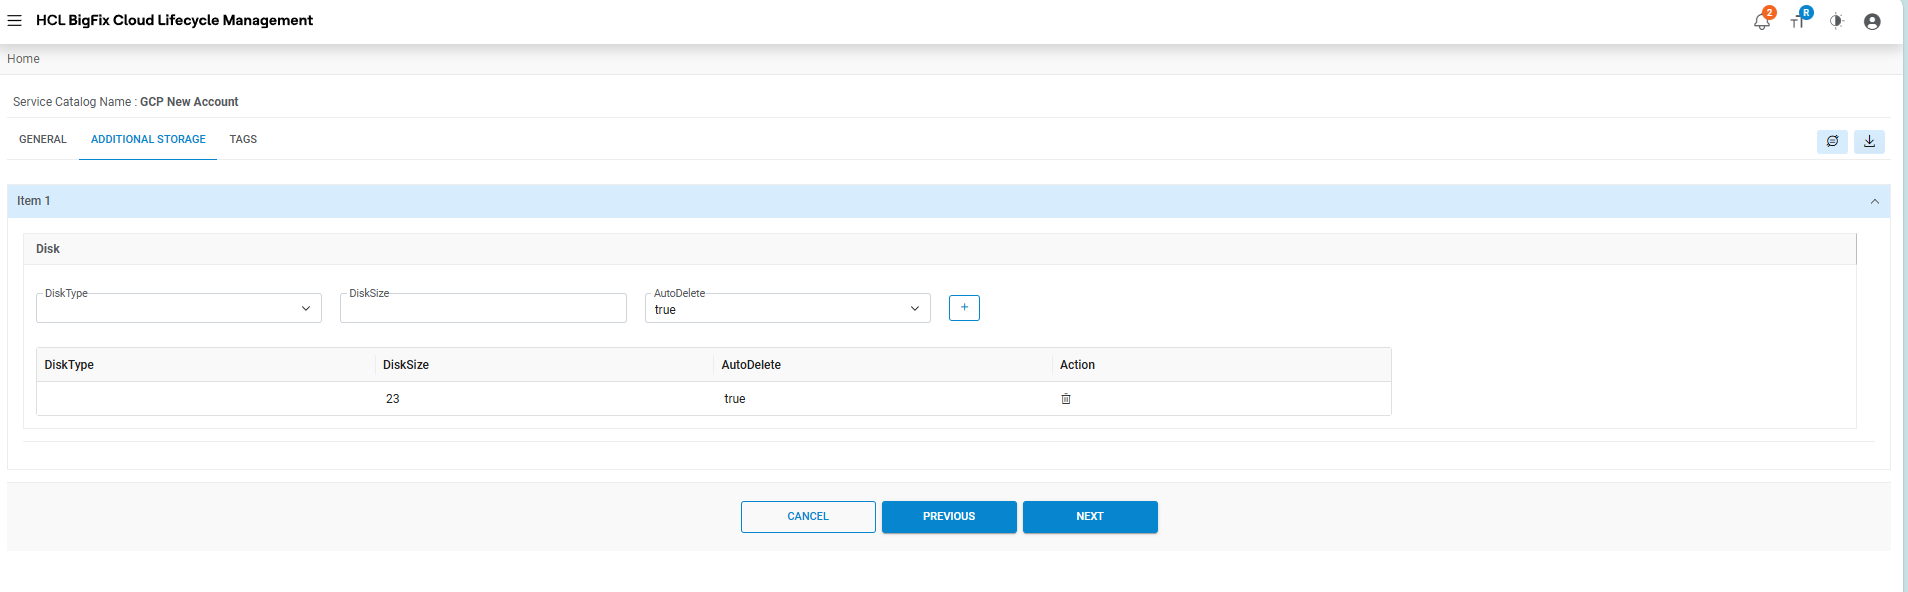
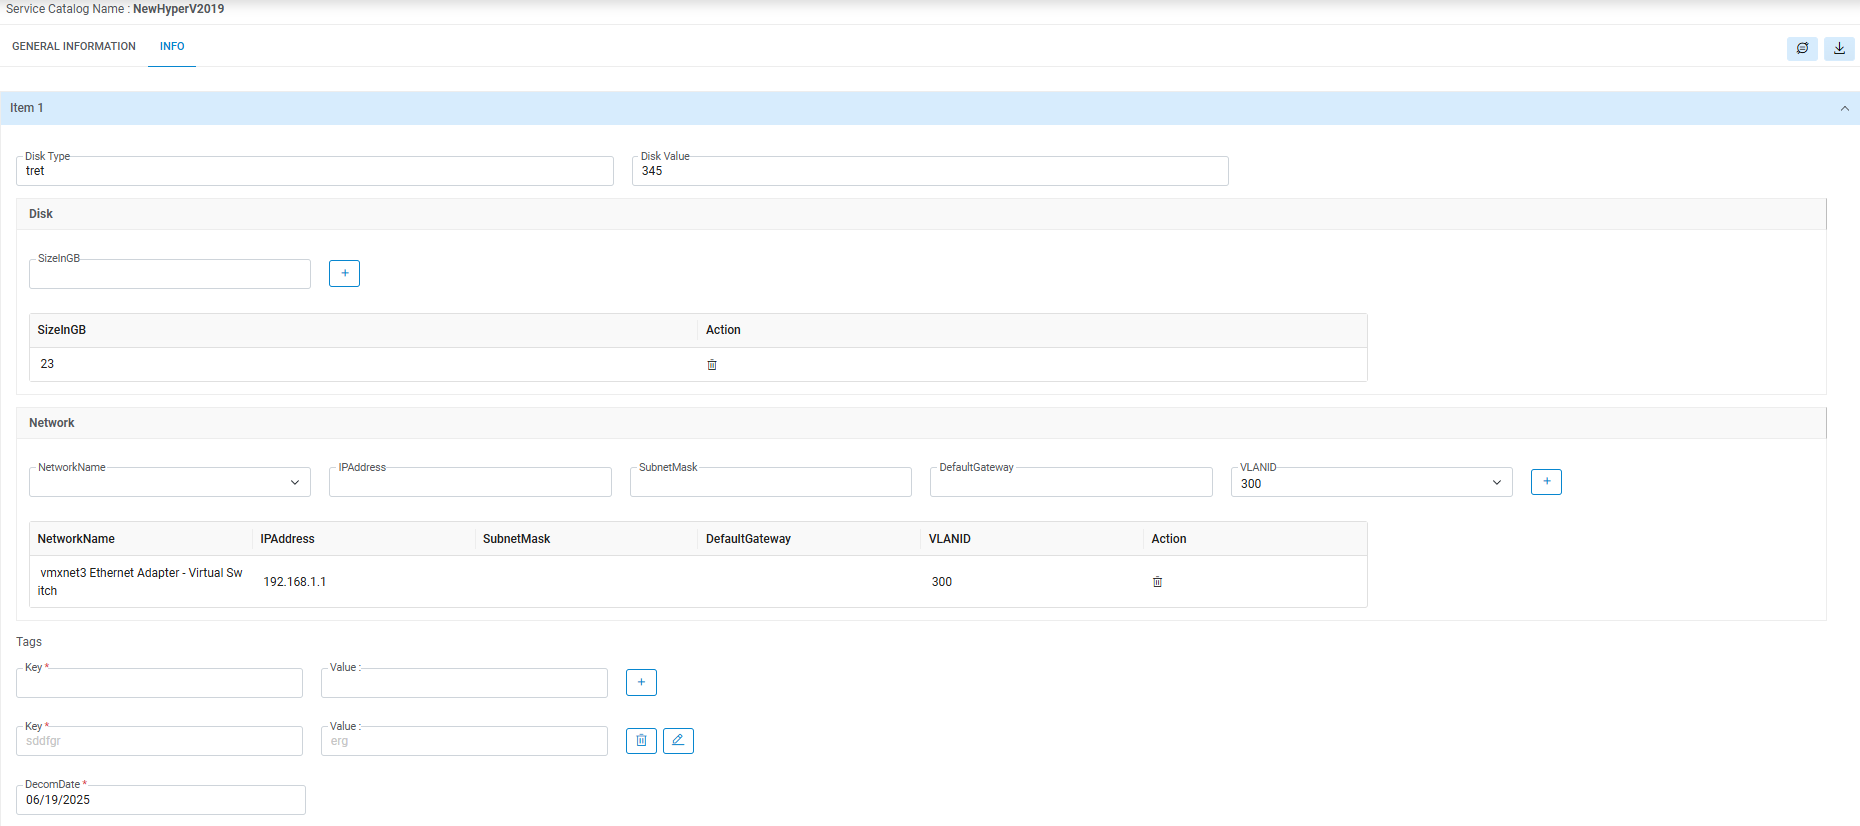
Additional Storage
To add Additional Storage, users need to follow the below-mentioned steps:
- Select the DiskType.
- Provide the DiskSize
- Select AutoDelete.
- Click (
.png) ) to add storage
details.
) to add storage
details.
The user has the option to add Multiple storage details.
Tags
To add Tags, users need to follow the following steps:
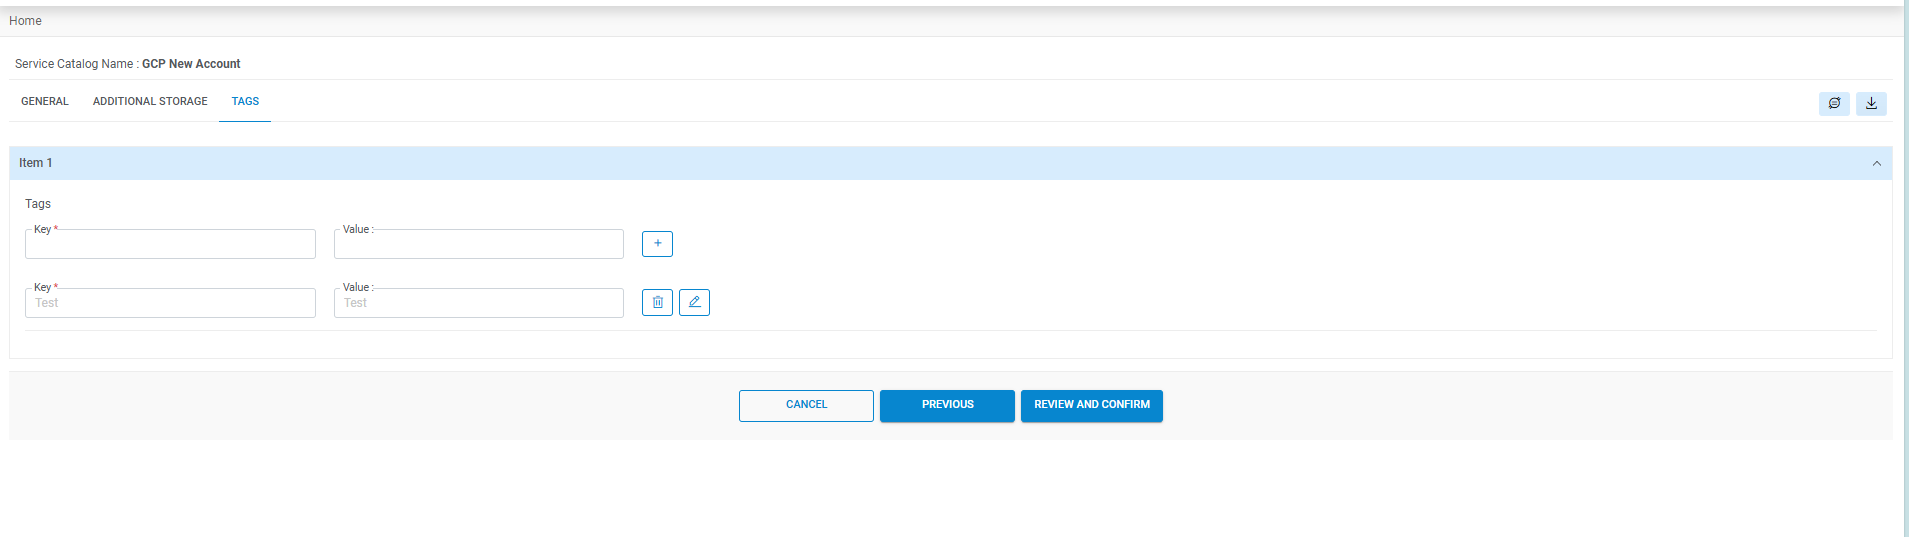
- Enter Key name for the tag being created.
- Enter Value, to determine whether the machine belongs to test, QA, or production environment.
- Click Add (
.png) ).
). - Click Submit.
- The Request summary screen appears.
- Click Confirm.
Figure 44. Request Service Catalog (Cont.) 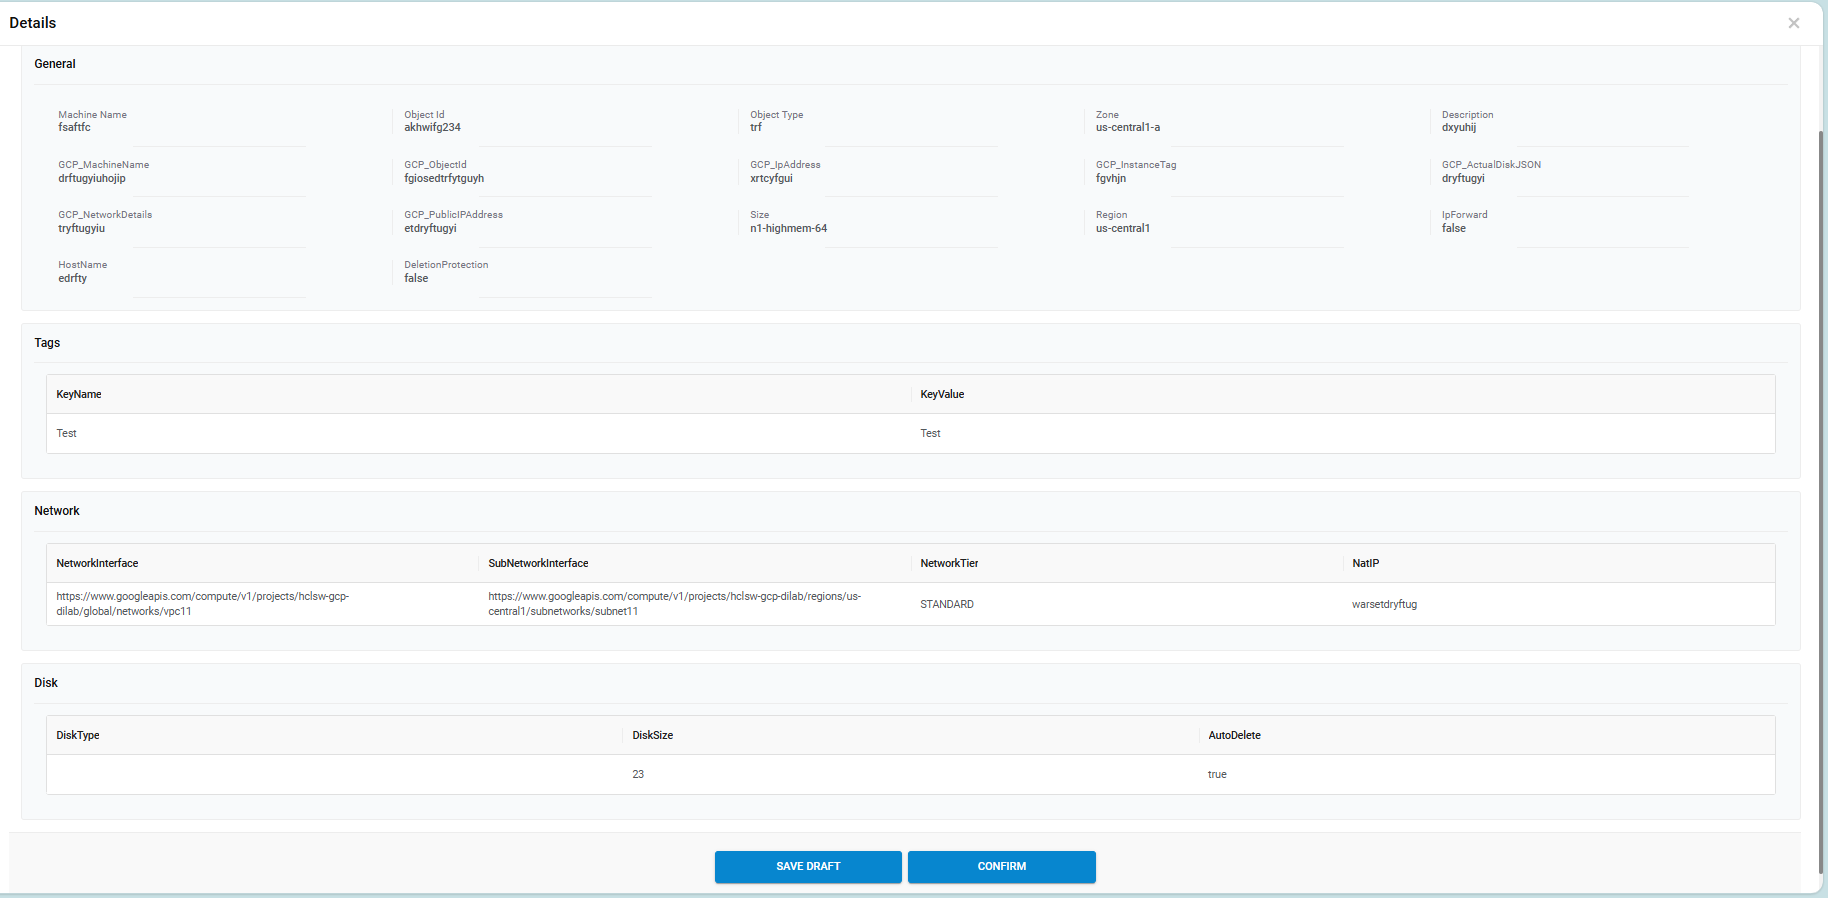
- The order confirmation pop-up window appears.
- Users can request a new service request by clicking New Request.
- Click Close to close the pop-up window.
Figure 45. Request Service Catalog (Cont.) 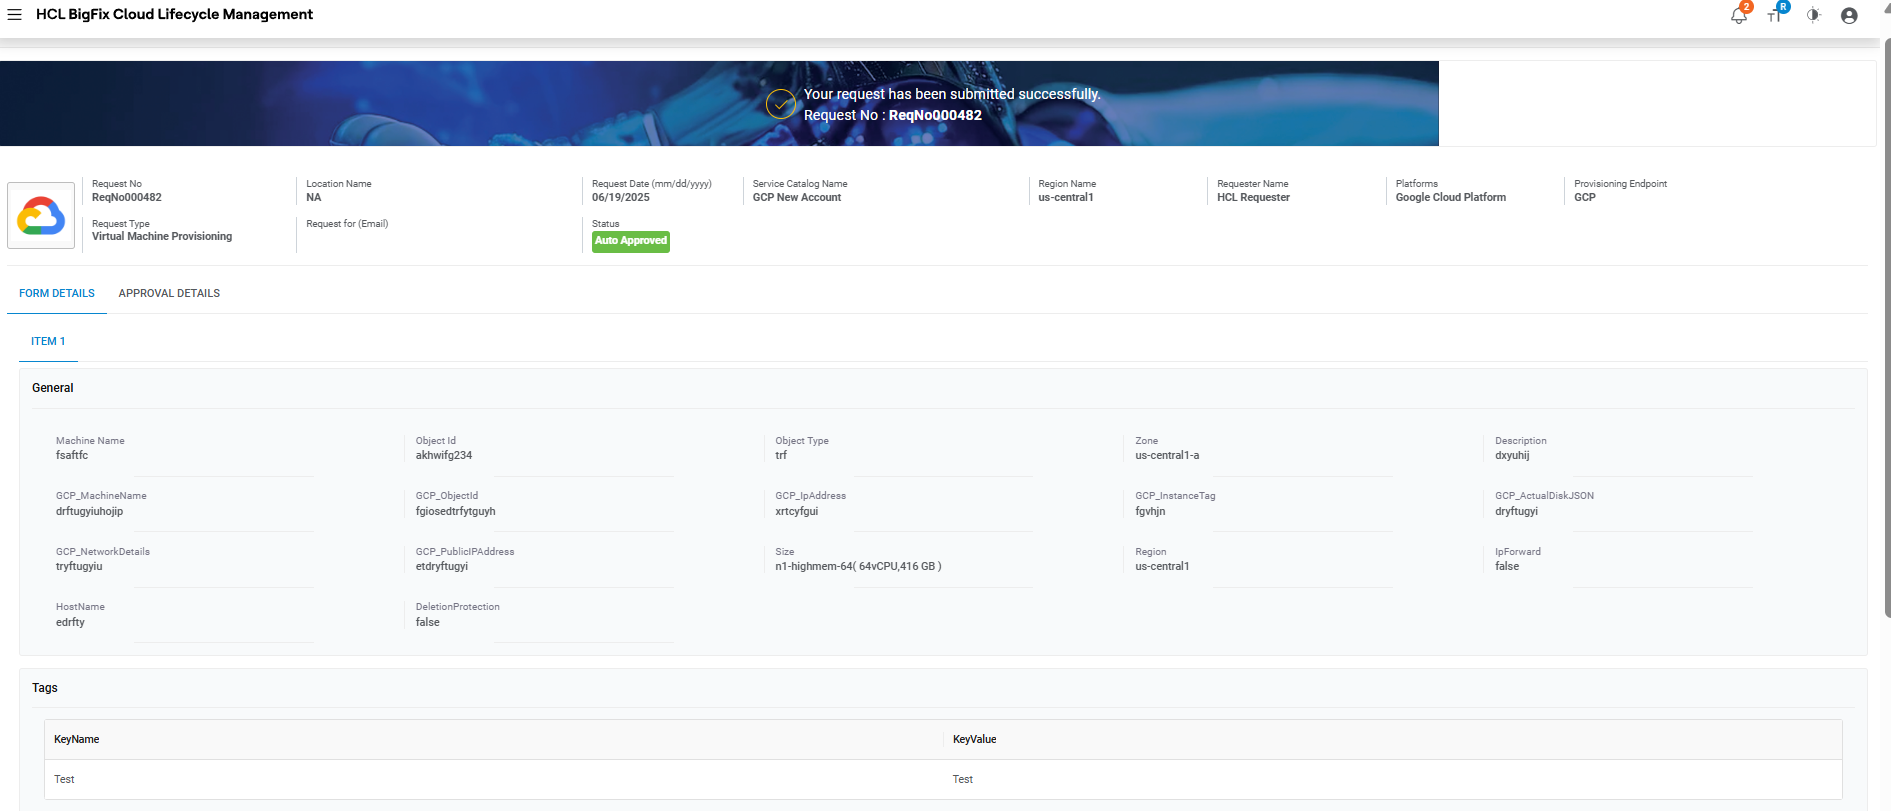
Figure 46. Request Service Catalog (Cont.) 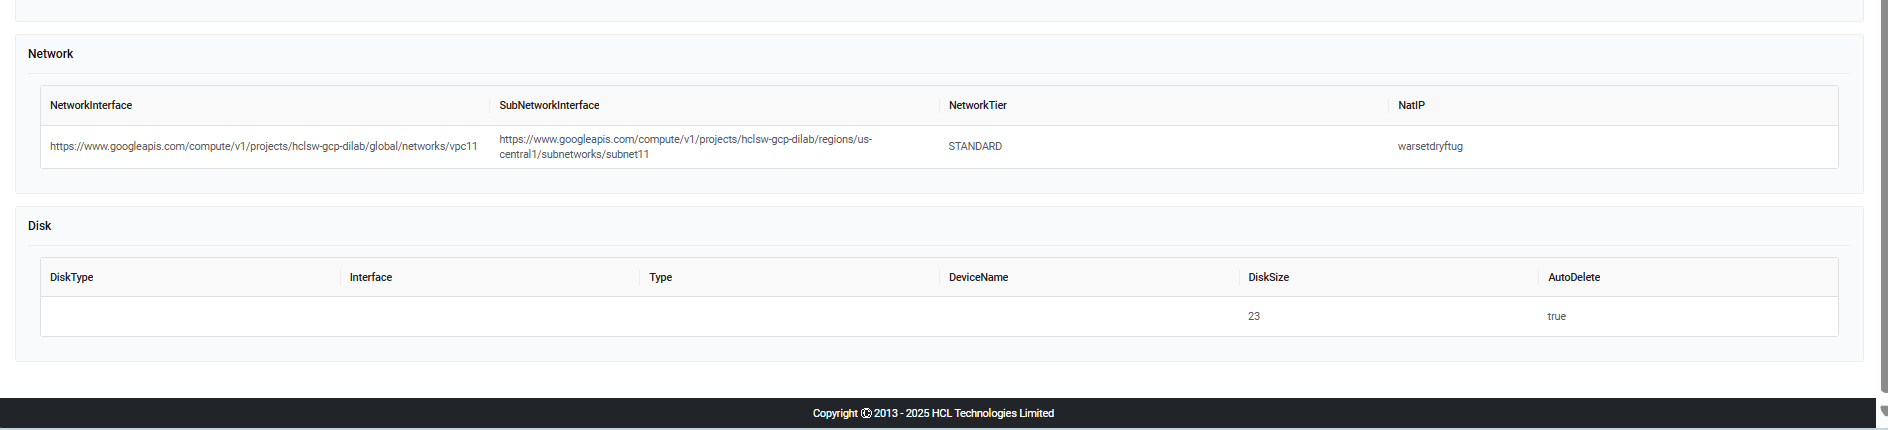
- Refer to the following table to understand the Approval History mentioned in the above
figure.
Table 9. Approval History Fields Description Request ID ID generated after submitting the request Date Approval date gets displayed post approver’s action. Status Status of the request placed
HyperV 2012
To proceed with service requests that HyperV 2012 have a cloud provider, end-user needs to follow the steps below:
- Select Cloud Account. Only those endpoints are tagged in RBAC group of User and configuration are enabled to Provider admin.
- Select Region.
- Click Request.
Figure 47. Request Service Catalog (Cont.) 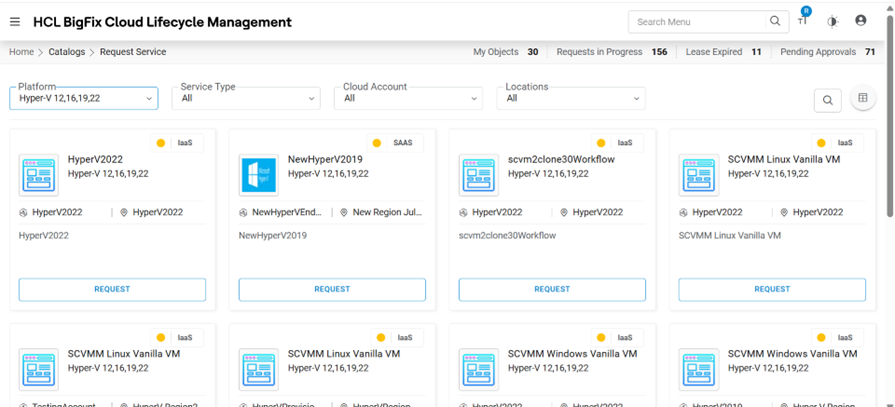
- Select the number of Instances and click Proceed.
General Information
This tab allows the user to manage the general configuration.

- Select all the fields visible in UI .
- Click on Submit.Note:All the fields marked with an asterisk (*) are mandatory and UI fields vary as per configure by provider admin from UI creation section.
Cisco Intersight
To proceed with service requests that have Cisco Intersight as a cloud provider, the end user needs to follow the steps below:
- Select Cloud Account. Only the Cloud Account are tagged in RBAC group of users and configurations are enabled to Provider admin.
- Select Region.
- Click Request.
Figure 51. Cloud Provider Selection (Cont.) 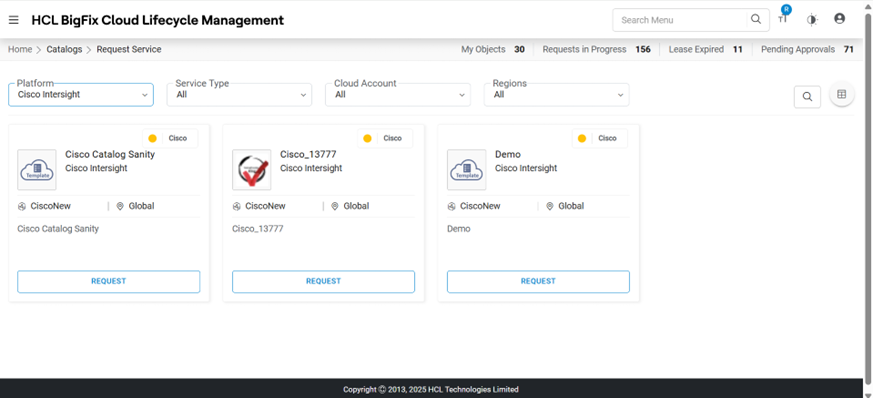
- Select Number of Instances, and then click Proceed.
Figure 52. Request Service Catalog (Cont.) 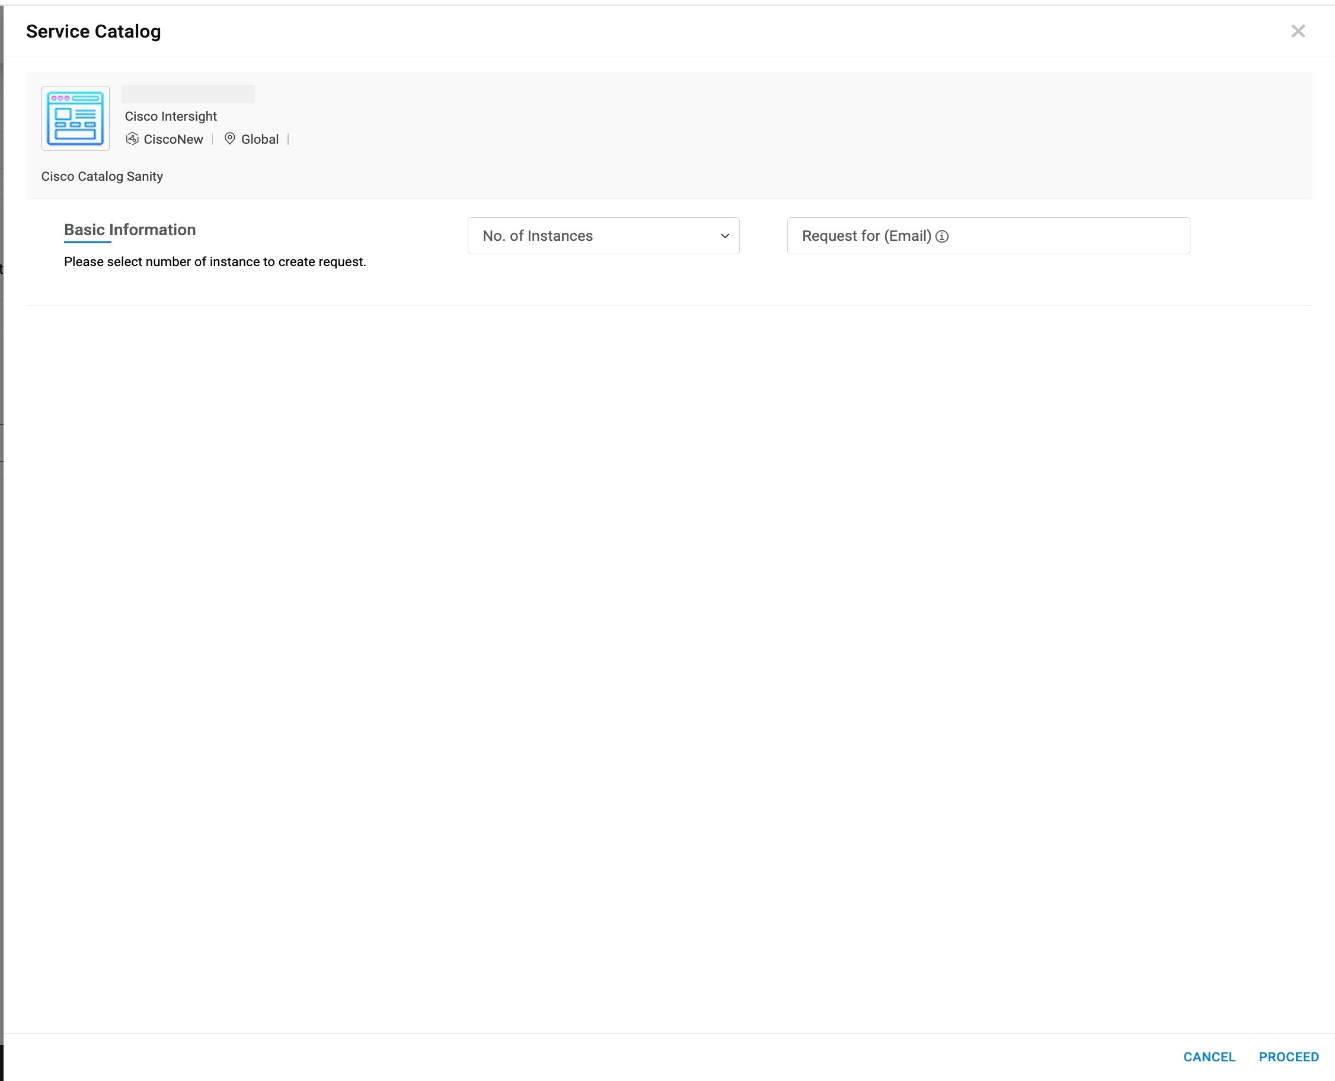
- The request service catalog form appears. The form contains the following tab:
- General Info
General Information
This tab allows the user to manage the general configuration required for requesting cloud services.
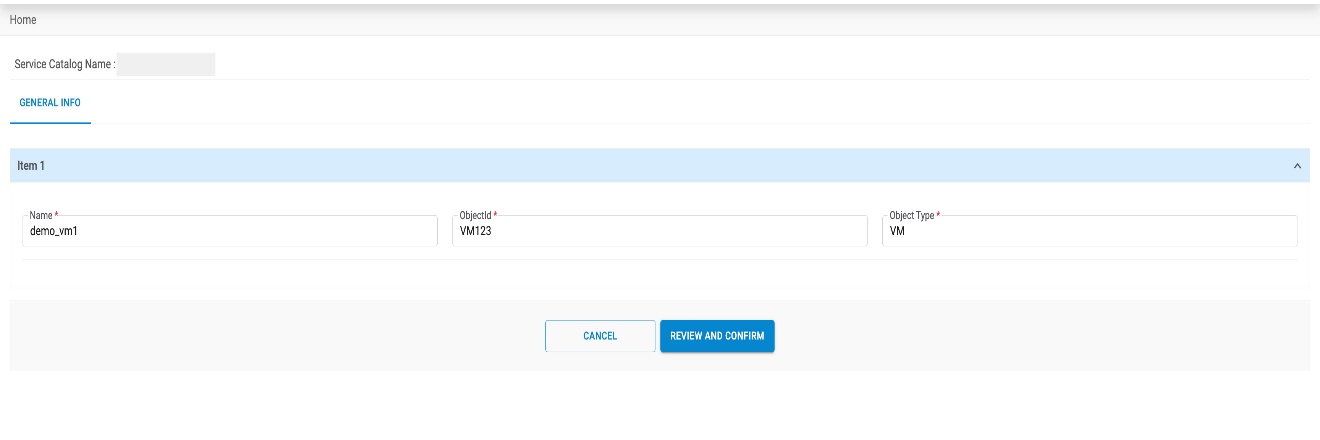
Select all the fields visible in UI and click on Submit.
MultiHyper-Visor
To proceed with service requests that have multi-Hypervisor as a cloud provider, end-user needs to follow the steps below:
- Select Cloud Account. Only the Cloud Account are tagged in RBAC group of users and configurations are enabled to Provider admin.
- Click Request.
- Select Number of Instances, and then click Proceed.
Figure 54. Request Service Catalog (Cont.) 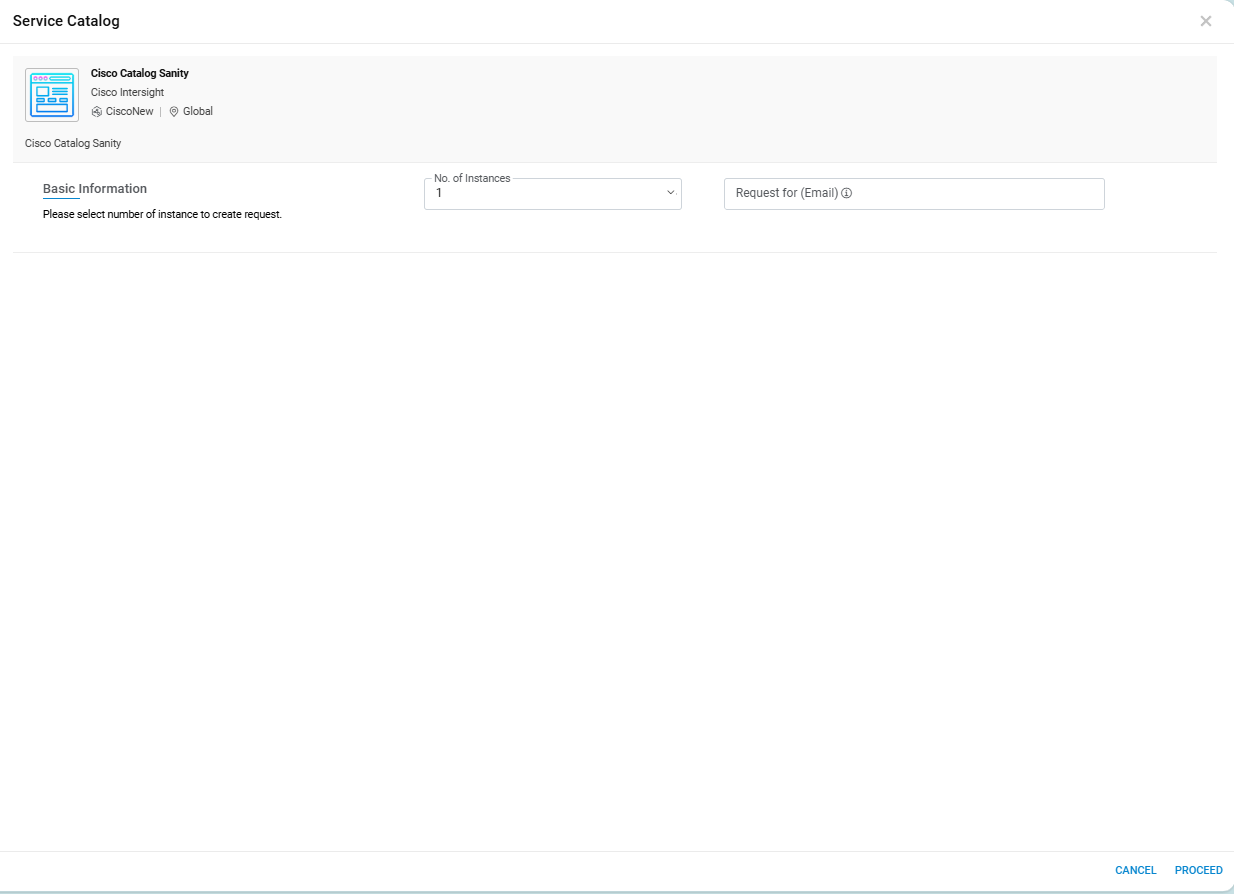
- The request service catalog form appears. The form contains the following tab:
- General Info
General Information
This tab allows the user to manage the general configuration required for requesting cloud services.
.png)
Select all the fields visible in UI and click on Submit.
Red Hat OpenShift (OCP)
To proceed with service requests that have OCP as a cloud provider, the end-user needs to follow the steps below:
- Select Cloud Account.
- Only the endpoints which are tagged in RBAC group of User configuration are enabled to Provider admin.
- Select Region.
- Select Service from the options being displayed, i.e. All Service (it includes all the services given in the catalog), Service Type created by provider and mapped with service catalog.
- Click Request.
Figure 56. Request Service Catalog (Cont.) 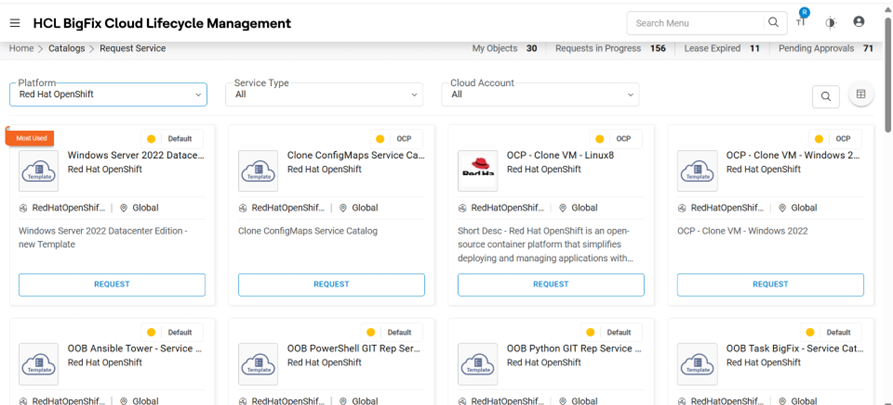
- Select the Number of Instances and click Proceed.
Figure 57. Request Service Catalog (Cont.) 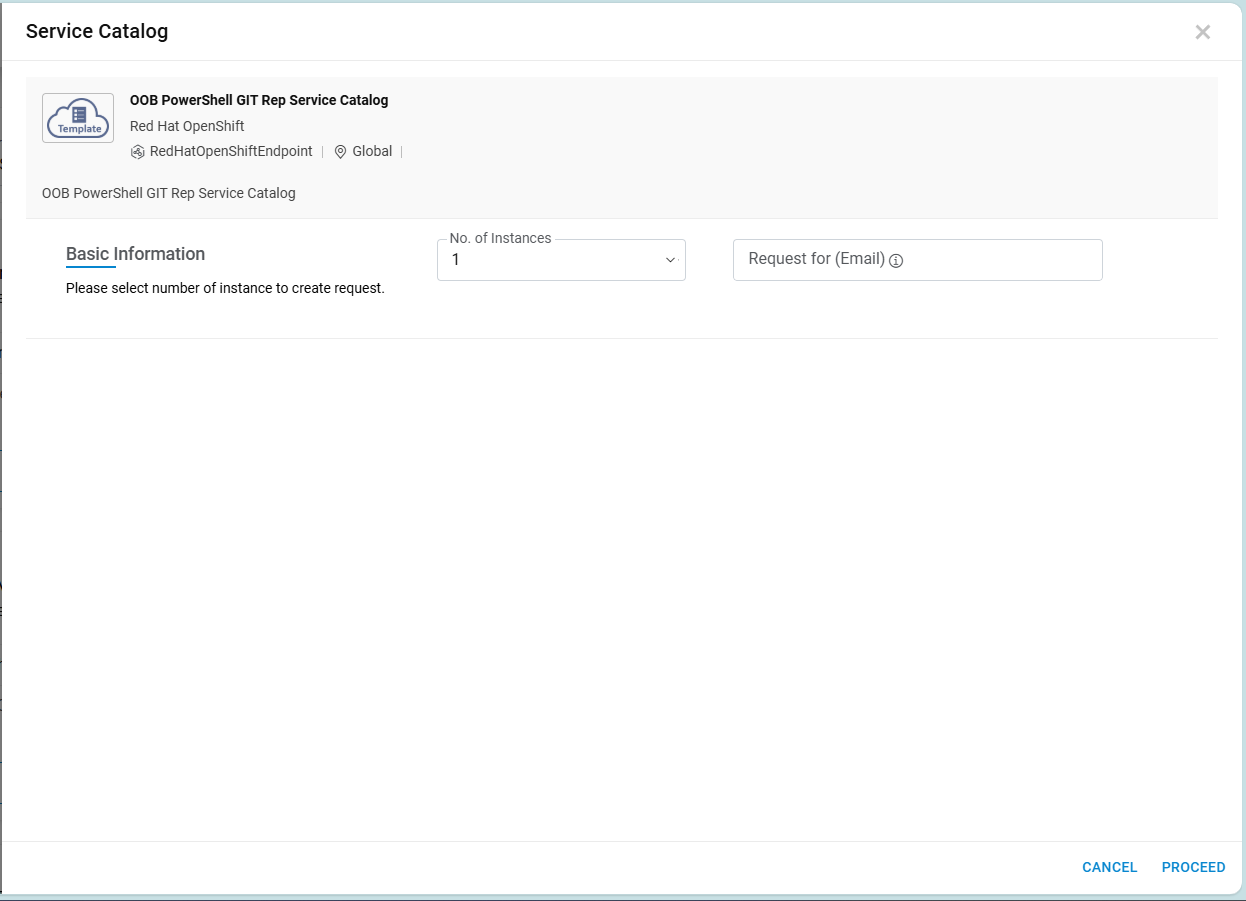
- This displays the Request Form associated with the service catalog to fill in the Information.
- The request service catalog form appears. The form is categorized into two
categories:Note:These categories vary from one Service Catalog to another. Fields are totally dependent on UI created by Provider and associated with Service Catalog.
General Information
This tab allows the user to manage the general configuration.
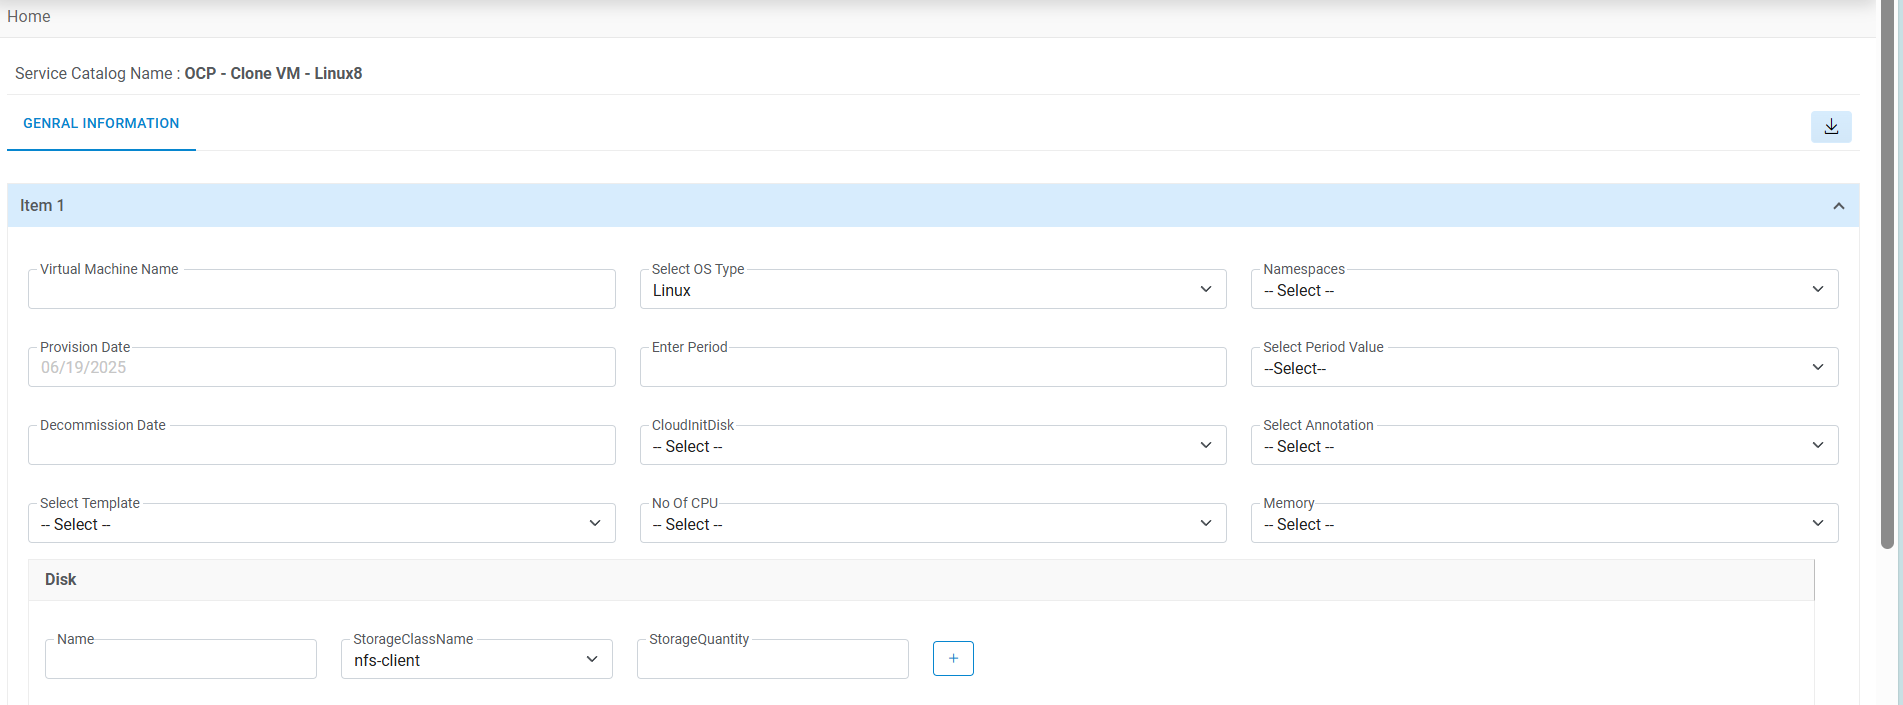
Refer to the following table to understand the fields mentioned in the above figure.
| Fields | Description |
|---|---|
| Provision Date | The date on which a resource is required |
| Enter Period | The lease period for which a resource is required |
| Select Period Value | Time period for the selected resource i.e., months, days, weeks or years |
| Virtual Machine Name | Name to be displayed against the Resource being created |
| Select OS Type | Provide additional requests, if any |
- Select Provision Date and Period .
- Select Period Value.
- Enter Region.
- Enter Location .
- Select Service Plan and Cost Type.
- Enter VM Display Name .
- Enter Remarks and select Size.
- Enter Network IP.
Figure 59. Request Service Catalog (Cont.) 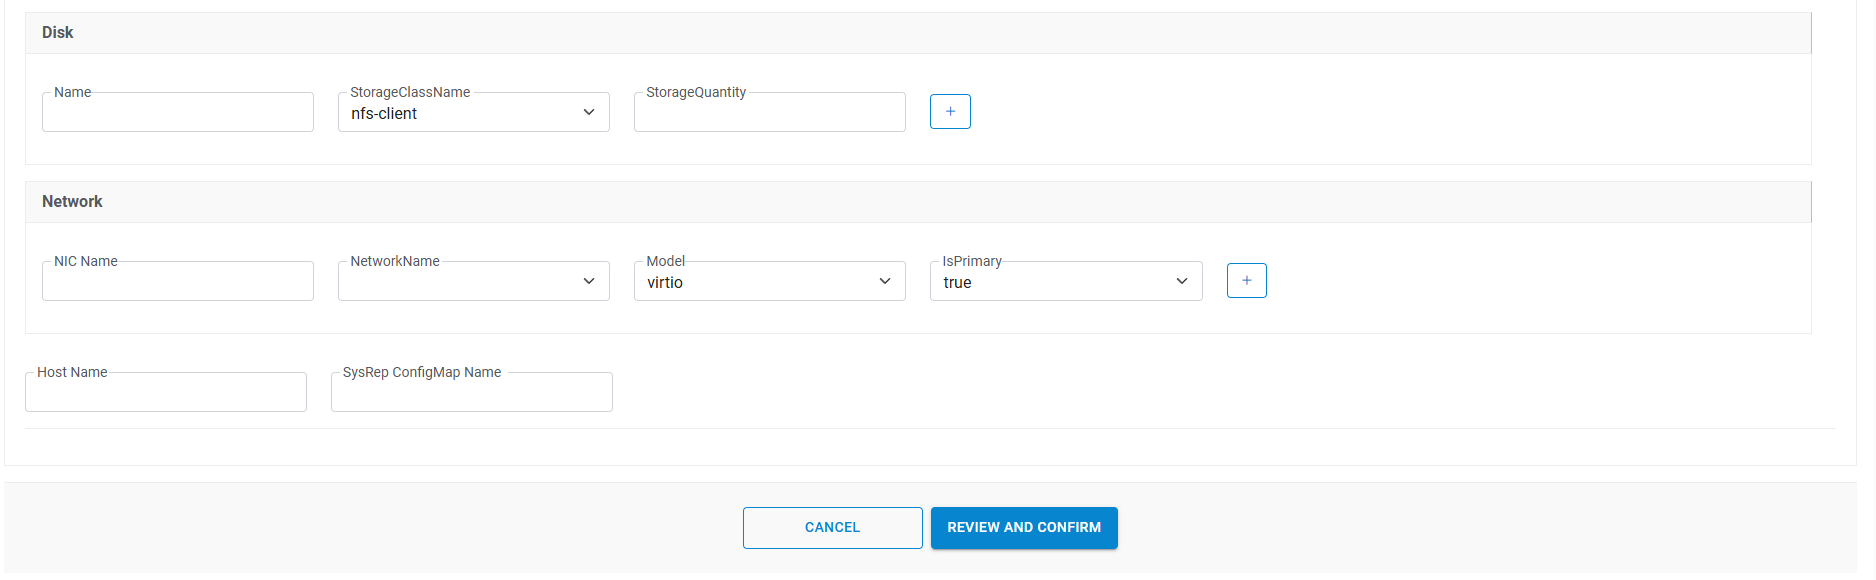
- If a user has selected <<n>> no. of instances, then the same no. of item information appears on the screen in the form of Item number (s).
- User needs to provide the details for another Item in another form, or a user may simply
copy the Details from one Item form to another Item by using Copy From and Copy
To menu.
- Select Copy From (Item No.).
- Select Copy To (Item No.).
- Click Next.
Note:All the fields marked with an asterisk (*) are mandatory and UI fields vary as per configured by provider admin from UI creation section. - Once the form is filled, go to Compute tab.
Attachment
This tab will be displayed, if Document Upload is enabled for service catalog by selecting “Allow Document Upload” setting to true on publish service catalog screen.
- If a user has selected <<n>> no. of instances, then the same no. of item information appears on the screen in the form of Item number(s)
- Users need to provide the details for another Item in another form, or a user may copy
the Details from one Item form to another Item by using Copy From and Copy
To menu.
- Select Copy From (Item No.).
- Select Copy To (Item No.).
- Click Next.
- Once the form is filled, click Submit.
- The Order Summary screen appears as shown in Figure 62 - Request Service Catalog (Cont.) .
- Scroll down and click Confirm.
Figure 61. Request Service Catalog (Cont.) 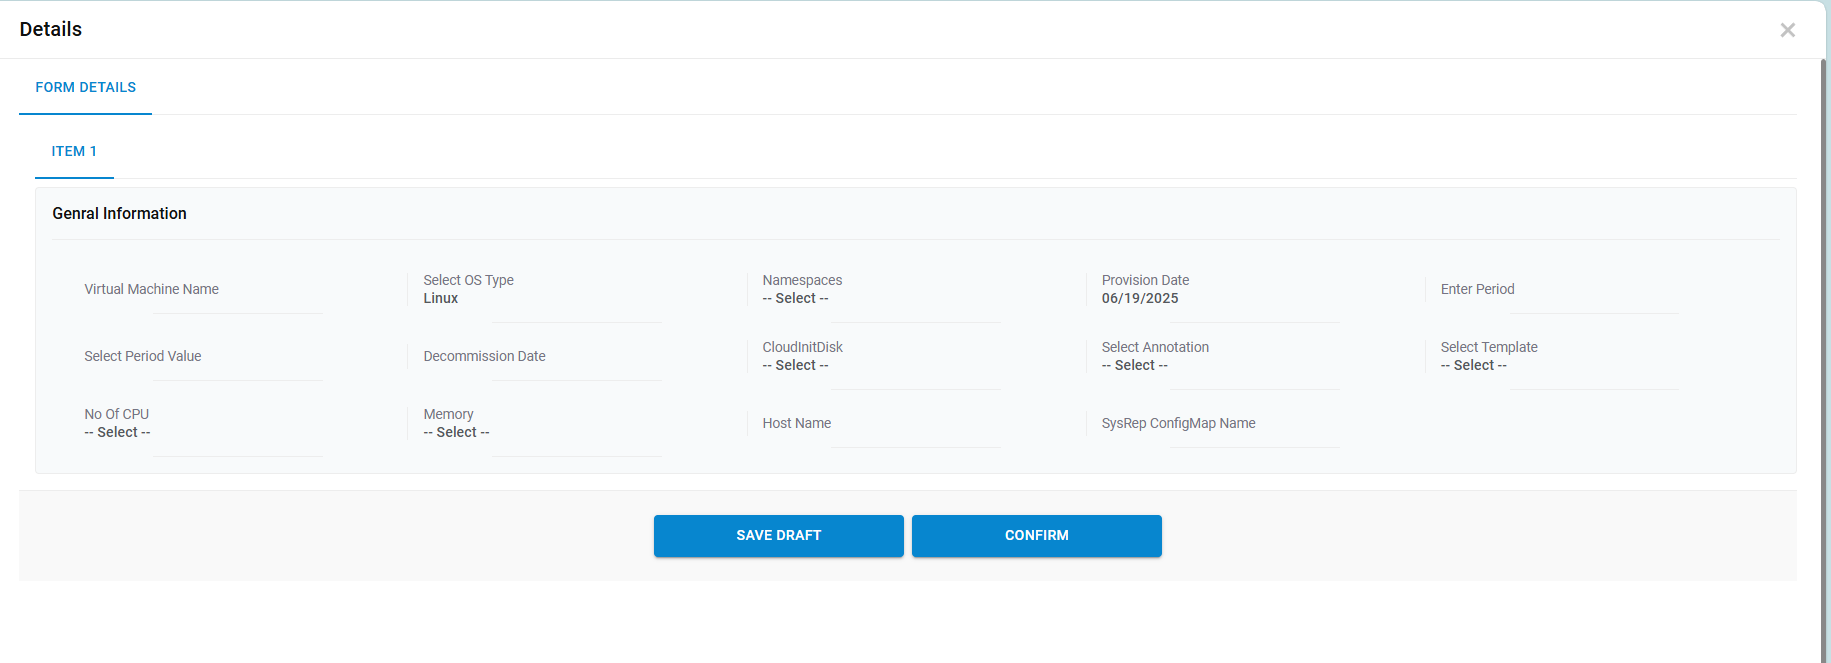
- The order confirmation window appears with BigFix CLM Request Number.
- User requests for a new service request by clicking New Request.
- Click Close to close the pop-up window.
Figure 62. Request Service Catalog (Cont.) 
Figure 63. Request Service Catalog (Cont.) 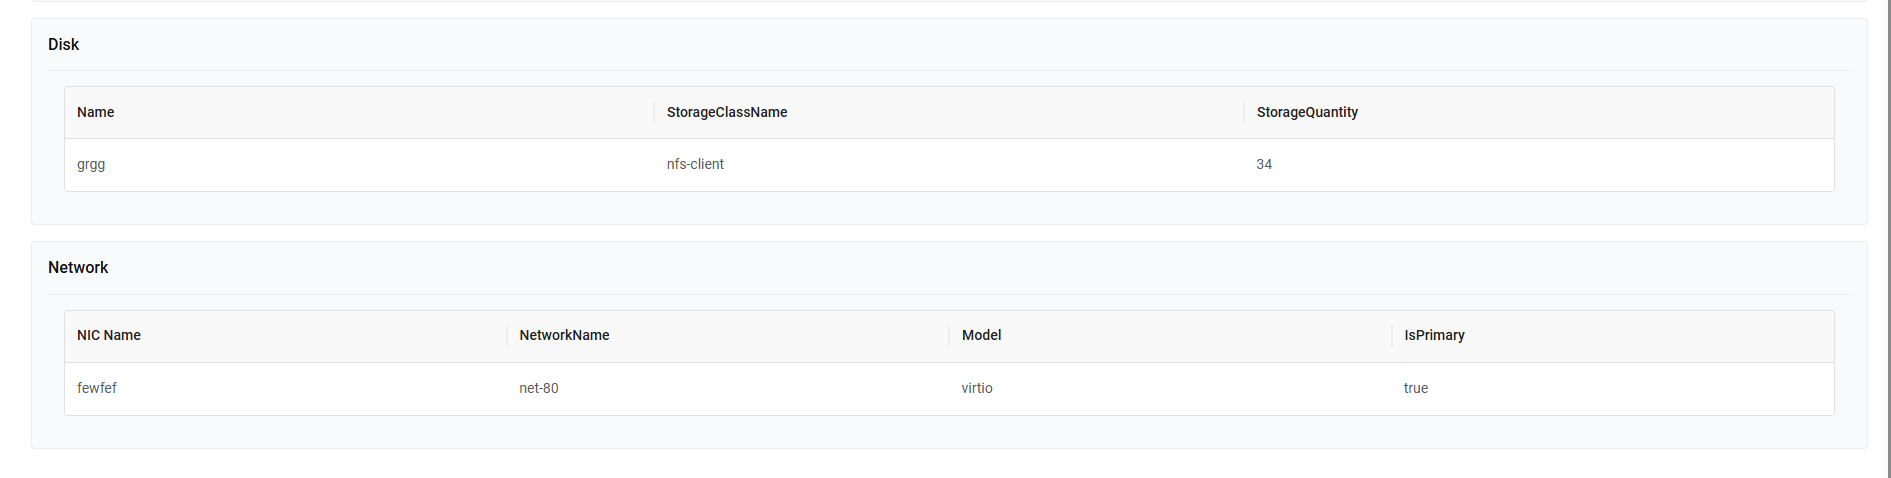
Schedules
Through this module, the user can schedule Action(s) on object(s) in an organization. Pre-requisites of using My Schedules:
- Organization should have “Action Scheduling Enabled” in the Organization Module.
- At least one Action should be active for respective object.
- UI associated with Action should not have Approval associated with it.
- Controls used in UI should be Textbox and Hidden Controls Only.
It has the following options:
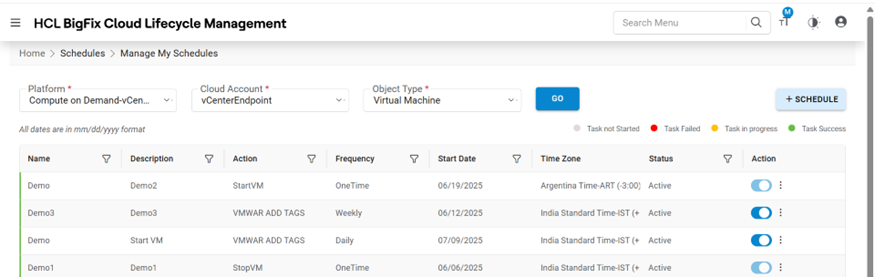
Create Schedules
To create a schedule of an Action in an organization, login user needs to follow the steps below:
- Click on My Schedules menu option and then click Create
Schedule.
Figure 65. Create Schedule catalogsrequest_CreateSchedules1.png)
- Refer to the table below to understand the fields mentioned in the above figure.
Table 11. Create Schedule Fields Fields Description Organization Select the name of the organization (Business units/ divisions in organizations) Platform The field lists down the cloud service provider. Cloud Account Displays the name of the environment (cloud endpoint) Object Type Name of the infrastructure resource. Action Displays the list of Action(s) associated with Object. Name This is a unique name for Schedule Action. Description Description of Schedule Action. Time Zone This field represents the Time Zone of Start Time. Start Time The field represents when to start/schedule the Action. Frequency Interval at which the Action can be schedules Action Parameter(s) List of Parameters depends on selected Action - Select Organization.
- Select Platform and Provisioning Endpoint.
- Select Object Type.
- Select Action.
- Enter the Name and Description of Schedule.
- Select Time Zone and Start Time.
- Select Frequency .
- Now the map of the Parameters of Action. Parameter Data Type supports two types:
- Static – User can provide the Static value of a control.
- SQL Function – An SQL function can be used to find the dynamic value of a control.\
- Click Save.
Figure 66. Create Schedule (Cont.) 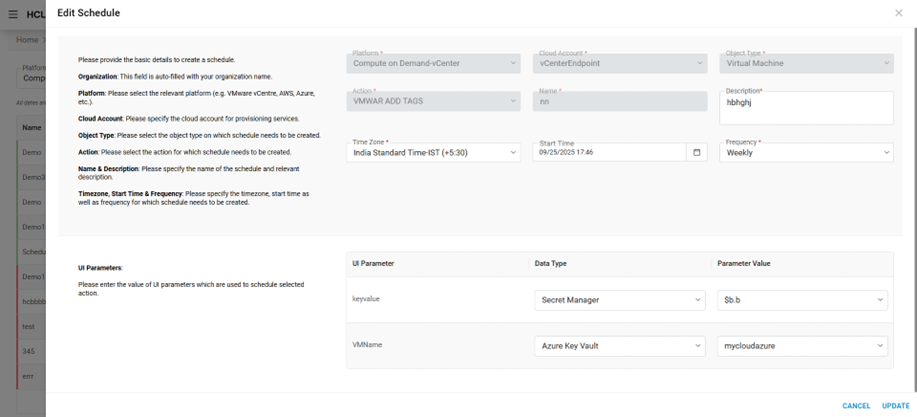
Figure 67. Create Schedule (Cont.)  Note:All fields marked with an asterisk (*) are mandatory.
 - A success message box appears on the screen.
Figure 68. Create Schedule (Cont.) 
- Now click Ok. A Popup will open containing the relevant Object(s).
- You can select the appropriate Object(s), on which Action needs to be scheduled.
Figure 69. Create Schedule (Cont.) 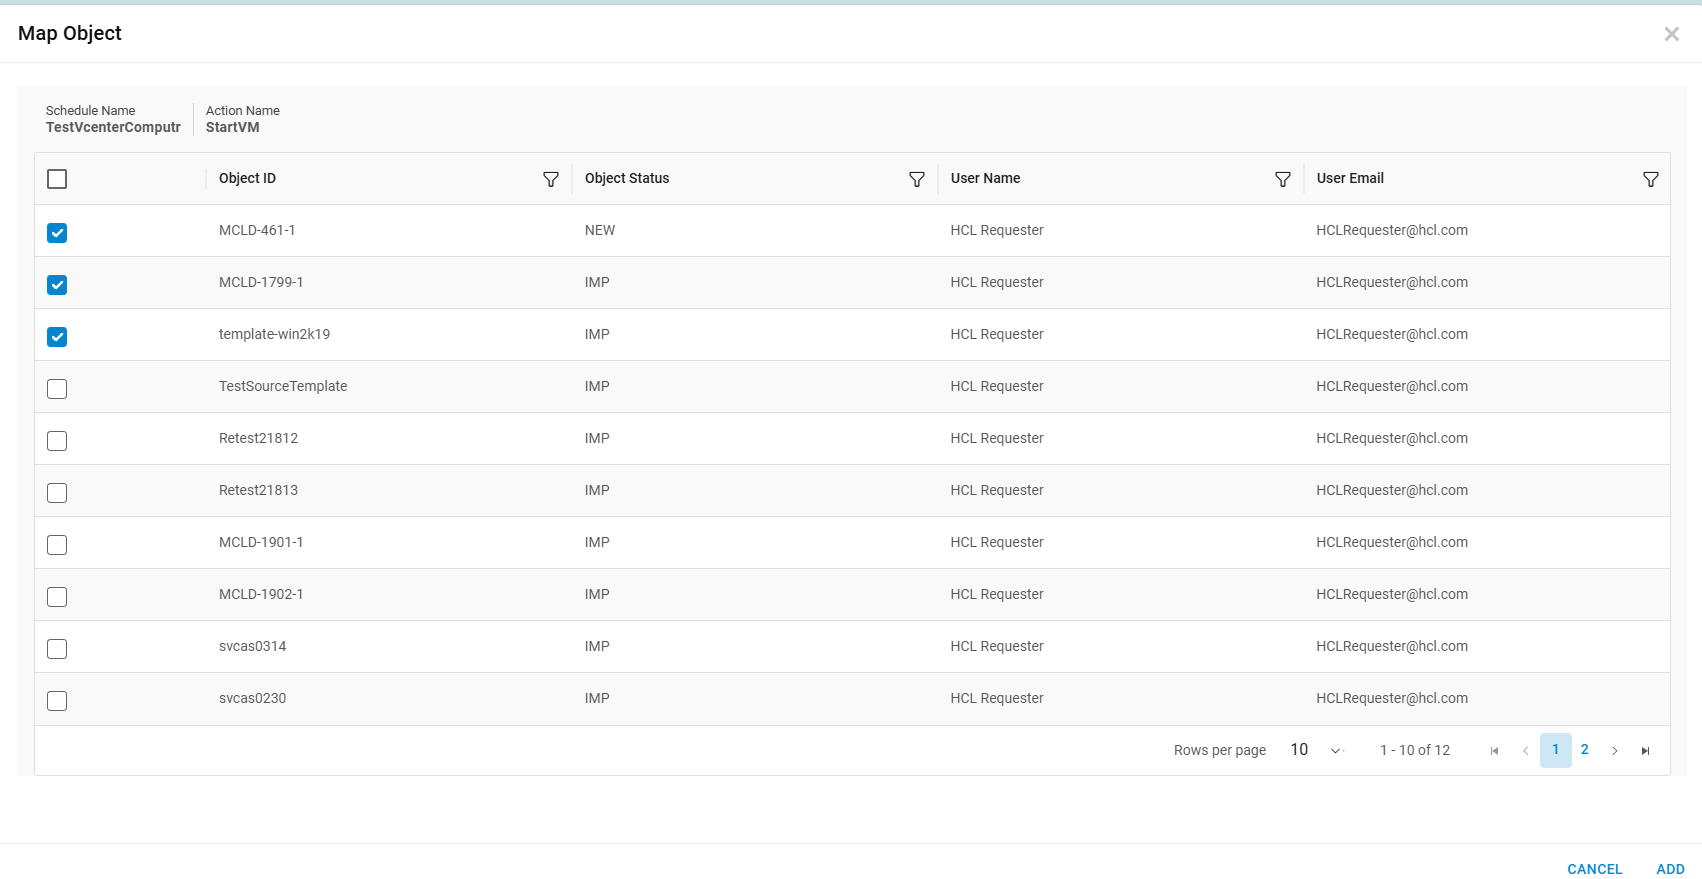
- Now click on the Map button.
- A success message box appears on the screen.
Figure 70. Create Schedule (Cont.) catalogsrequest_Success.png)
- The action scheduled successfully.
View Schedules
This section lists all the Schedules that have been created by an organization admin.

Refer to the following table to understand the fields mentioned in the above figure.
| Fields | Description |
|---|---|
| Organization | Select the name of the organization (Business units/ divisions in organizations) |
| Platform | The field lists down the cloud service provider. |
| Provisioning Endpoint | Displays the name of the environment (cloud endpoint) |
| Object Type | Name of the infrastructure resource. |
| Action | Displays the list of Action(s) associated with Object. |
| Name | This is a unique name for Schedule Action. |
| Description | Description of Schedule Action. |
| Action Name | Name of Action for which Schedule has been created |
| Frequency | Interval at which the Action can be schedules |
| Start Date | The field represents when to start/schedule the Action. |
| Time Zone | This field represents the Time Zone of Start Time. |
| Start Date (UTC) | The field represents when to start/schedule the Action in UTC time zone |
| Next Run Date | The field represents the next schedule time of the Action |
| Status | The status of the Schedule |
| Action | User to take actions like Edit, Change Status, Map Objects, history, Delete against the listed schedules |
It also comprises the following actions:
- Edit: To modify the details of Schedule.
- Change Status (
 ): To change the
status of Schedule.
): To change the
status of Schedule. - Map Objects: To map objects to Schedule.
- History: To check the history of Schedule.
- Delete: To delete the Schedule.
- Execute Now: To execute the schedule immediately.
Schedule History
This section lists all the History of Schedules Actions.
To view the schedule history, follow the following steps:
- Click on (
 ) icon in the grid
records on View Schedule tab.
) icon in the grid
records on View Schedule tab. - On clicking this icon, the Schedule History tab will open.
Figure 72. Schedule History 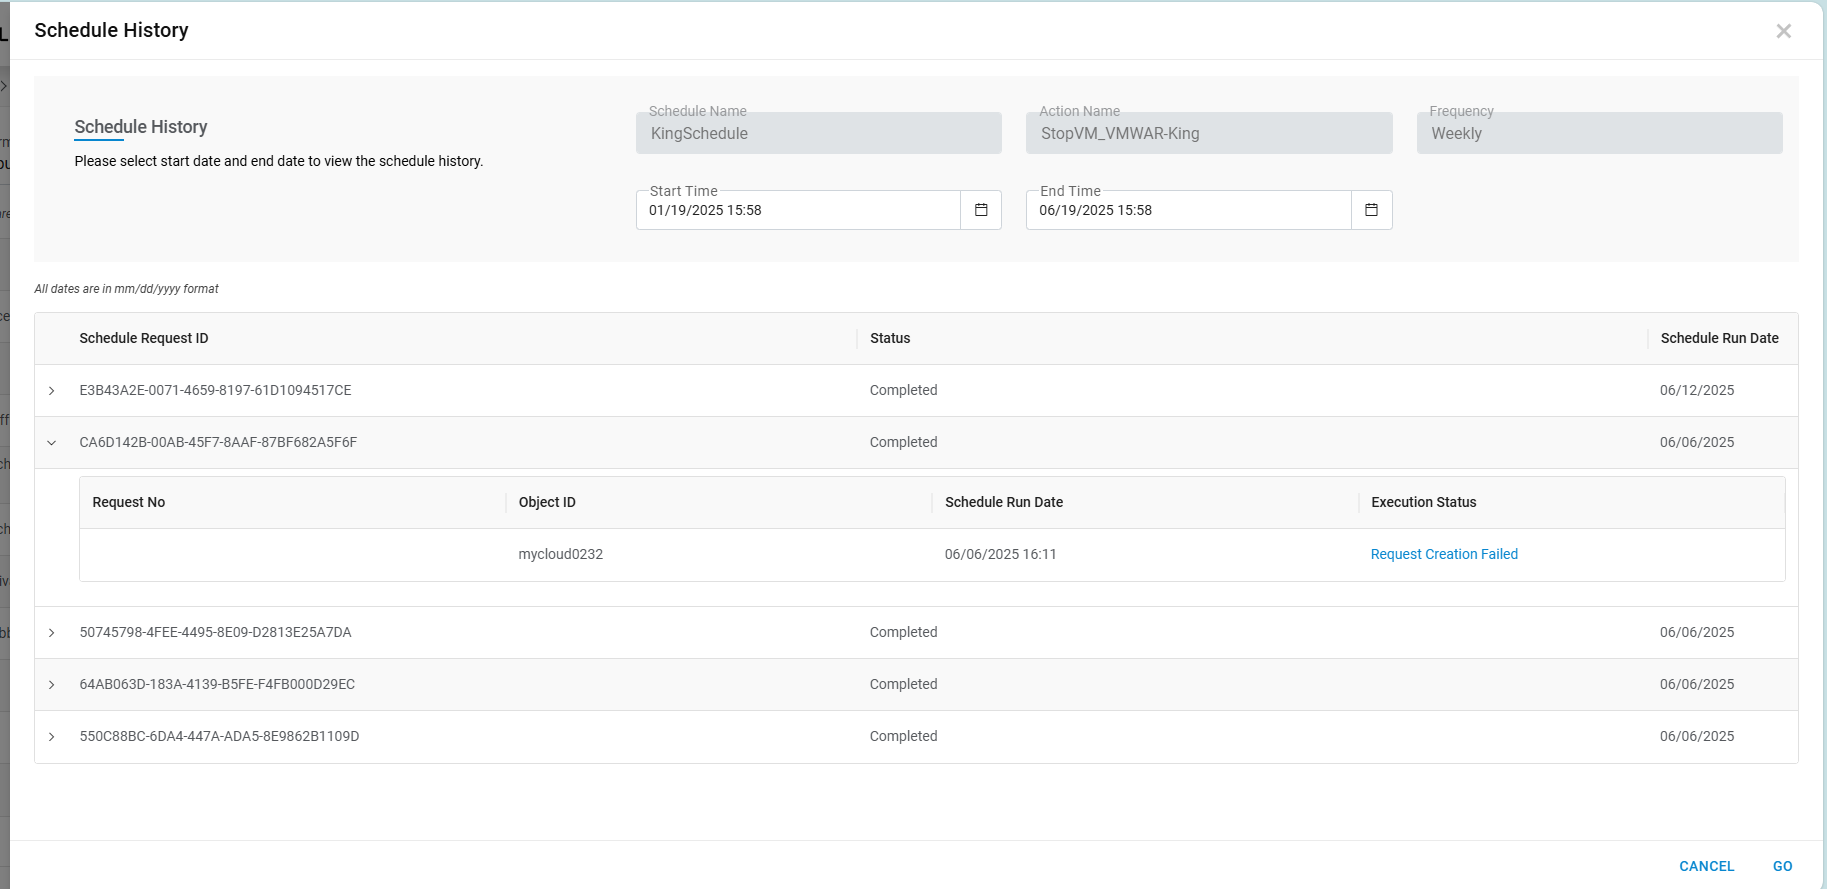
Refer to the following table to understand the fields mentioned in the above figure.
| Fields | Description |
|---|---|
| Schedule Name | This is a unique name for Schedule Action. |
| Action Name | Name of Action for which Schedule has been created |
| Frequency | Interval at which the Action can be schedules |
| Start Date | Start Time, to filter the history of Schedules from this time |
| End Date | End Time, to filter the history of Schedules till this time |
| Status | InProgress, Completed, Failed filter status |
| Schedule Request Id | Unique GUID for the schedule instance. |
| Status | Status of the scheduled instance |
| Schedule Run Date | Run date of the scheduled instance |
| Request No | Request Tracking Request Number created by Schedule Request Id. |
| Object Id | Object Id, Unique Id of the object on which Action is performed. |
| Schedule Run Date | Run date of the scheduled instance |
| Execution Status | Status of the Request Execution |
Request
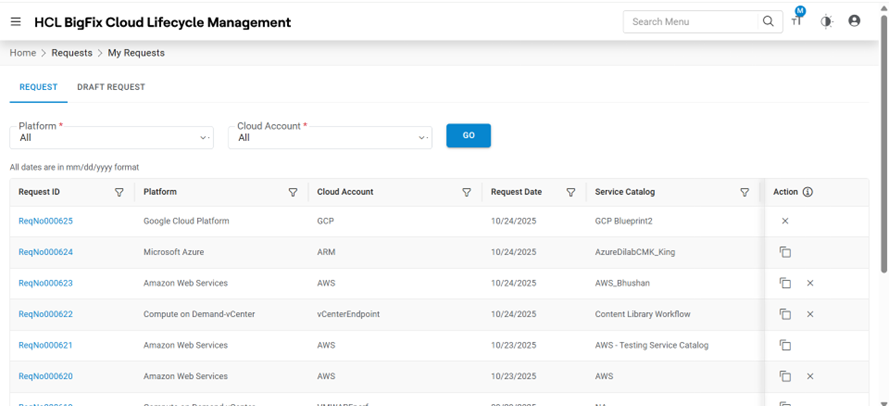
This section explains the steps to view and manage service requests. It allows the user to Edit/Cancel request if it is not yet approved/rejected.
- On the main menu bar, click Request.
- Upon clicking, the following options appear on the screen:
Managing My Request

Refer to the following table to understand the fields mentioned in the above figure.
| Fields | Description |
|---|---|
| Request ID | Displays the ID-number of the request created |
| Platform | The name of Cloud service providers |
| C;loud Account | Displays the name of environment (cloud endpoint) |
| Request Date | Displays the date of the request created |
| Service Catalog | The interface for IT service consumers that is used to request or manage the services |
| Requested Action | The type of request against an infrastructure resource |
| Object Type | Name of the object against which the request was raised |
| Status | Displays the status of the request |
| Comments | Displays the comments/inputs shared by the approver |
| Action | It allows the user to take actions like Edit, Cancel the request and Clone Request |
Submitted request can be edited only if it is Referred back by the Approver.
Clone Request
To make a new request, like existing requests, requester needs to follow the below-mentioned steps:
- Click Clone Request icon (
 ).
).Figure 75. Clone Request (Cont.) 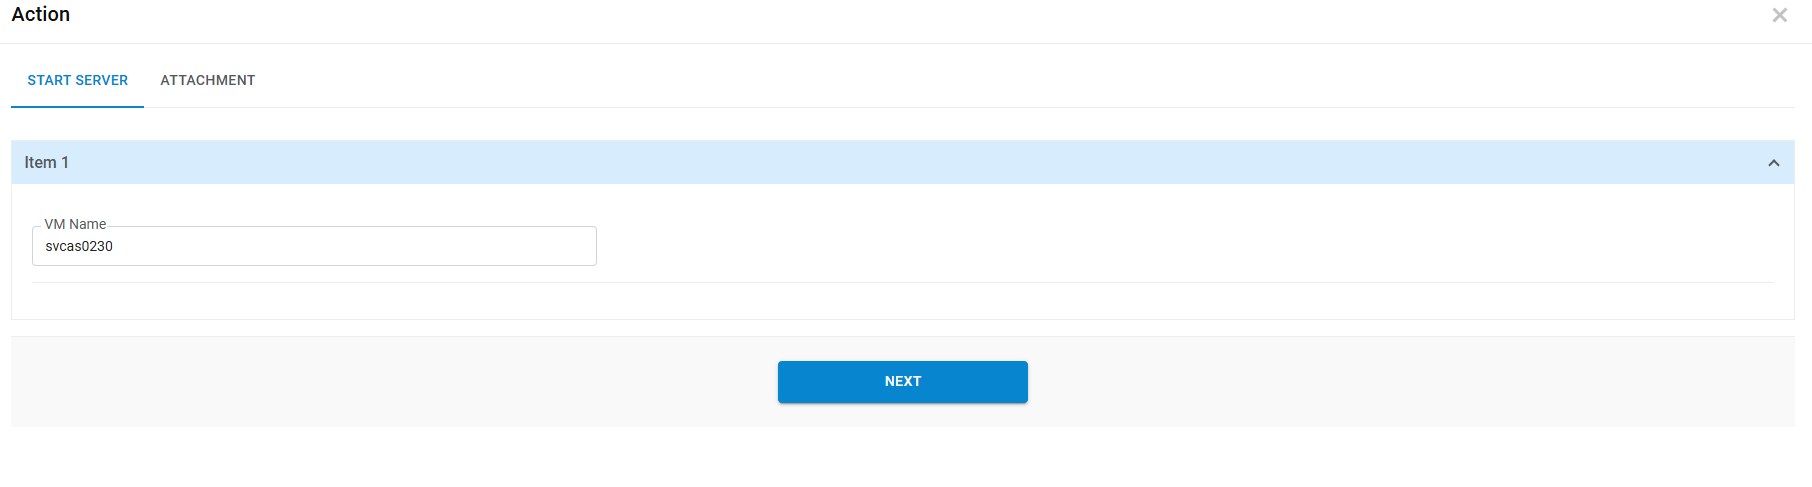
- Popup will open with filled in details of existing requests, User can change any details as desired and click Save Draft.
- Click Cancel to discard all changes.
- To submit the request, click Submit.
- A success message appears on the following screen.
Figure 76. Clone Request (Cont.) 
- The new request is saved and appears in a tabular view.
Managing My Drafts
To save the service request without submitting them, Requester needs to follow the below steps:
- On the My Request screen, click My Drafts.
Figure 77. Managing My Drafts 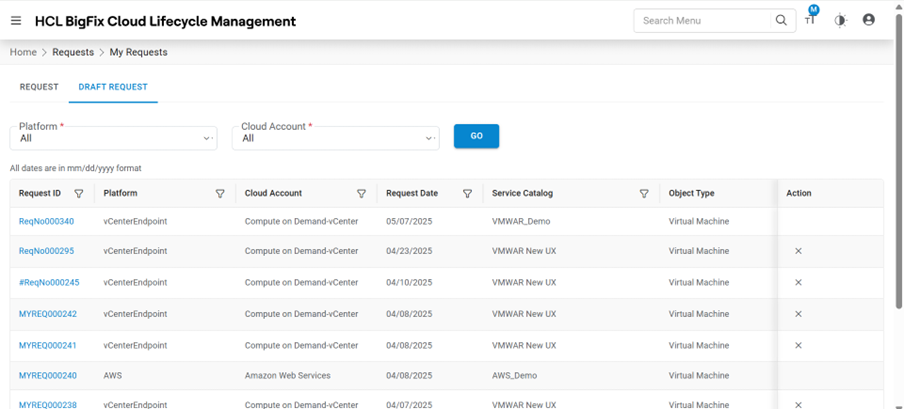
Refer to the following table to understand the fields mentioned in the above figure.
| Fields | Description |
|---|---|
| Request ID | ID-number of the request created |
| Platform | Name of Cloud service providers |
| Cloud Account | Name of environment (cloud endpoint). |
| Request Date | Date of the request created |
| Service Catalog | The interface for IT service consumers that is used to request or manage the services |
| Object Type | Object against which the request was raised |
| Comments | Comments/inputs related to a service request |
| Action | It allows the user to take actions like Edit or Delete the request |
Edit Drafts
To edit/modify the saved service request, requester needs to follow the below steps.

- Click Edit (
 ).
).Figure 79. Edit Drafts (Cont.) 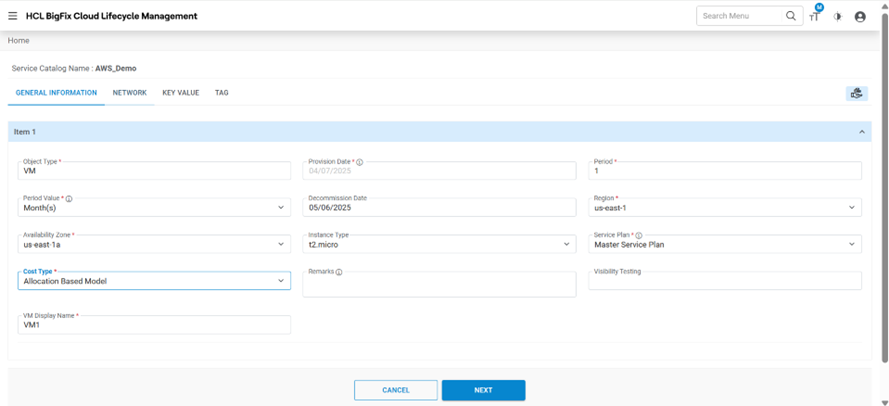
- Modify the details as desired and click Save Draft.
- Click Cancel to discard all the changes.
- To submit the request, click Submit.
- A success message box appears on the screen.
Figure 80. Edit Drafts (Cont.) 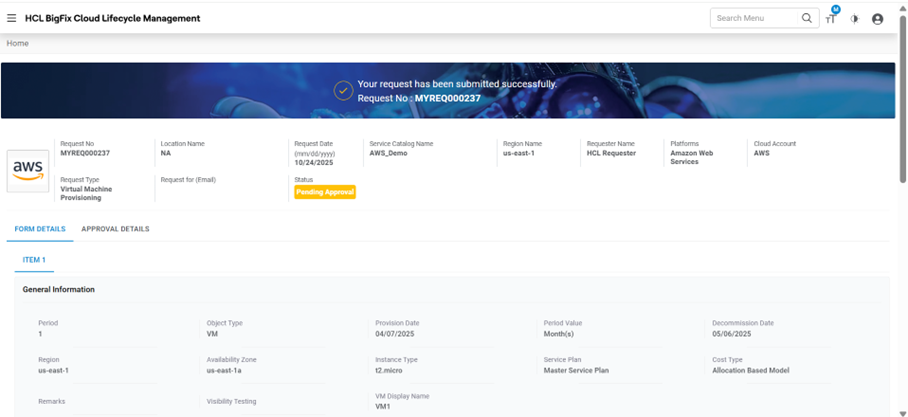
The new draft is saved and appears in a tabular view as shown in Figure 121 - Edit Drafts.
Delete Drafts
To delete a service request, Requester needs to follow the below steps.
- On the My Drafts pane, click Cancel (
 ).
).Figure 81. Delete Drafts 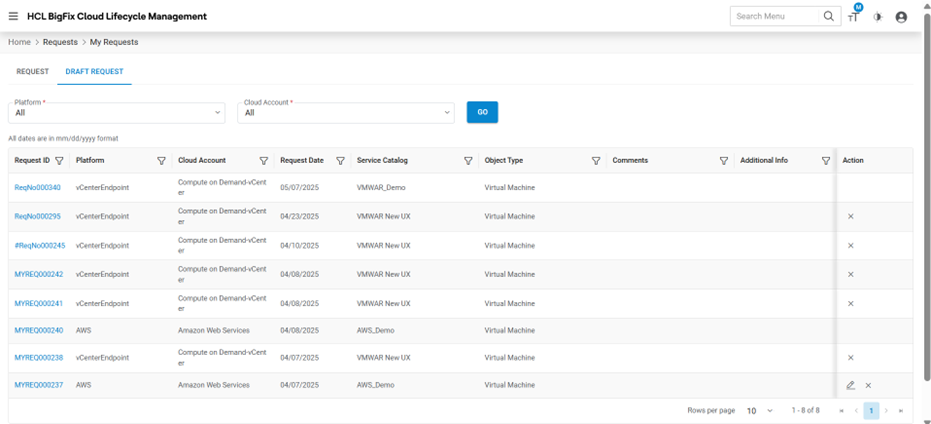
- To delete the request, click OK.
Figure 82. Delete Drafts (Cont.) 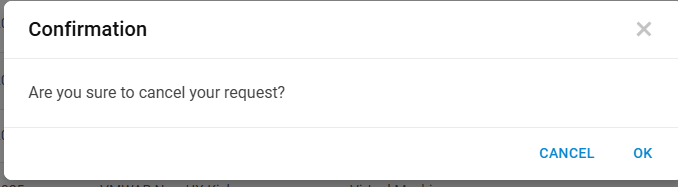
- A success message box appears on the following screen.
Figure 83. Delete Drafts (Cont.) 
Track Requests
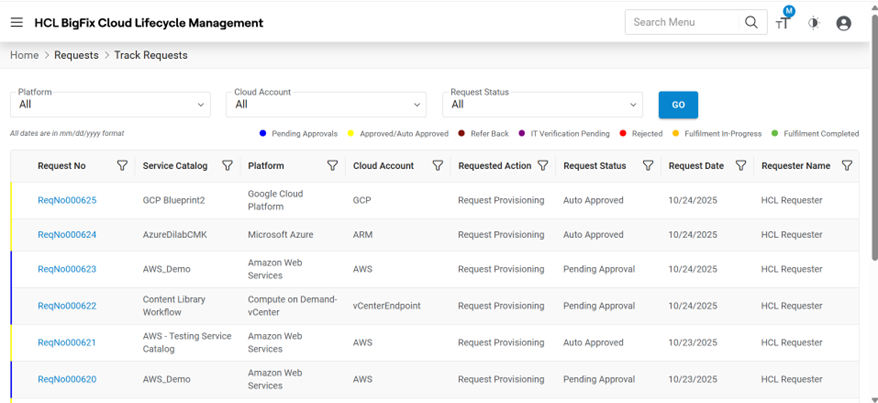
Refer to the below table to understand the fields mentioned in the above figure.
| Fields | Description |
|---|---|
| Request No | Displays the ID-number of the request created |
| Platform | The name of Cloud service providers |
| Endpoint | Displays the name of environment (cloud endpoint) |
| Request Date | Displays the date of the request created |
| Service Catalog | The interface for IT service consumers that is used to request or manage the services |
| Requested Action | The type of request against an infrastructure resource |
| Request Status | Displays the status of the request |
| Requester Name | Name of the object against which the request was raised |