Design Process Template
The section explains the detailed steps to create Process Templates using the graphical method within HCL BigFix CLM. It uses drag and drop method to create a process templates.
To create a process template, the provider user needs to follow these steps:
- On the Workflow, click Process Template tab.
Figure 1. Manage Process Template Screen 
- The Process Template Details form appears.
Figure 2. Process Template Details 
- Refer to the below table to understand the fields mentioned in the above figure:
Table 1. Fields to Create Process Template using Process Template Designer Fields Description Organization Name of the Organization (Business Units/ Divisions in Organizations). The Provider User needs to choose the Organization for which they want to create the Process Template. This ensures that the Template is associated with the correct Organization and can be accessed by the appropriate users within that Organization. Platform Name of the Cloud Service Provider. The provider User selects a Platform. This could refer to a pre-designed layout or structure that serves as the basis for the Process Template. UI Template A Template that is used to design the service Request Form in HCL BigFix CLM. Select the UI Template from the drop down. The UI Template provides a framework for organizing and presenting the Task, Inputs, Outputs, and other relevant information. Template Name This is the name of the Template as per the Provider User. The Provider User assigns Template Name to the Process Template. The name should be descriptive and easily identifiable. Template Description Describe the Template and its purpose. The Provider User assigns Template Description to the Process Template. The Description provides additional context or details about the Template's purpose, usage etc. Add Template This is an option to add all the above information - By populating the above-mentioned fields, the Provider User can create a Process Template that is tailored to the specific Organization, utilizes a predefined UI Template for consistency, and is appropriately named and described. This Template can then be used as a Blueprint for creating and managing processes Task within the Organization.
- After successfully saving the Process Template, a confirmation message should be displayed
to indicate that the operation was successful.
Figure 3. Confirmation Message 
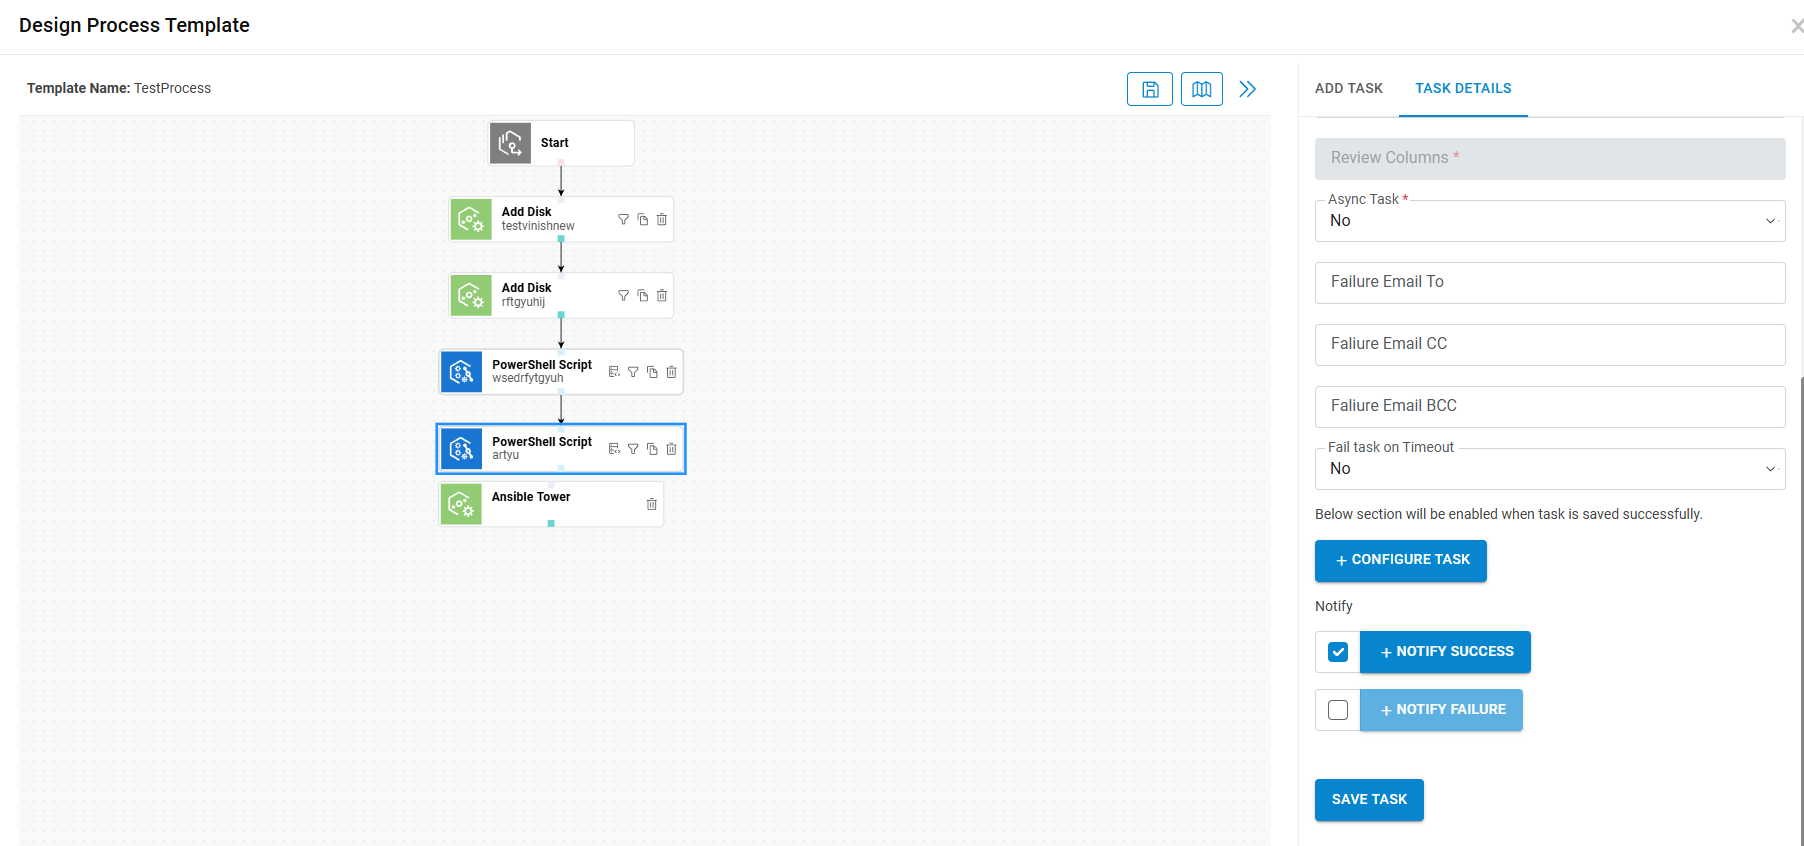
- The next action in the workflow is to populate a Task View form. This form is used to create Tasks/Groups that will be executed at the Orchestrator level.
-
Task View: After the Designer Process Template is saved, the user is presented with a
screen displaying a Canvas. Here's how the layout and default setup could be organized:
- Canvas Displayed on Left Side: The Canvas, where users can design and visualize the process flow, occupies the left side of the screen. This canvas provides a graphical representation of the process flow, allowing users to drag and drop elements to create and connect/link the Tasks.
- Task Palette Displayed on Right Side: On the right side of the screen, the Task Palette is displayed. This Palette contains a collection of Task elements or Components that users can use to build their process flow. It typically includes various types of Tasks.
- Start Task Visible on Canvas by Default: Upon opening the Canvas, the "Start Task" element is already visible and positioned as the starting point of the process flow. This allows users to immediately start designing their process from the beginning, connecting subsequent tasks and elements as needed.
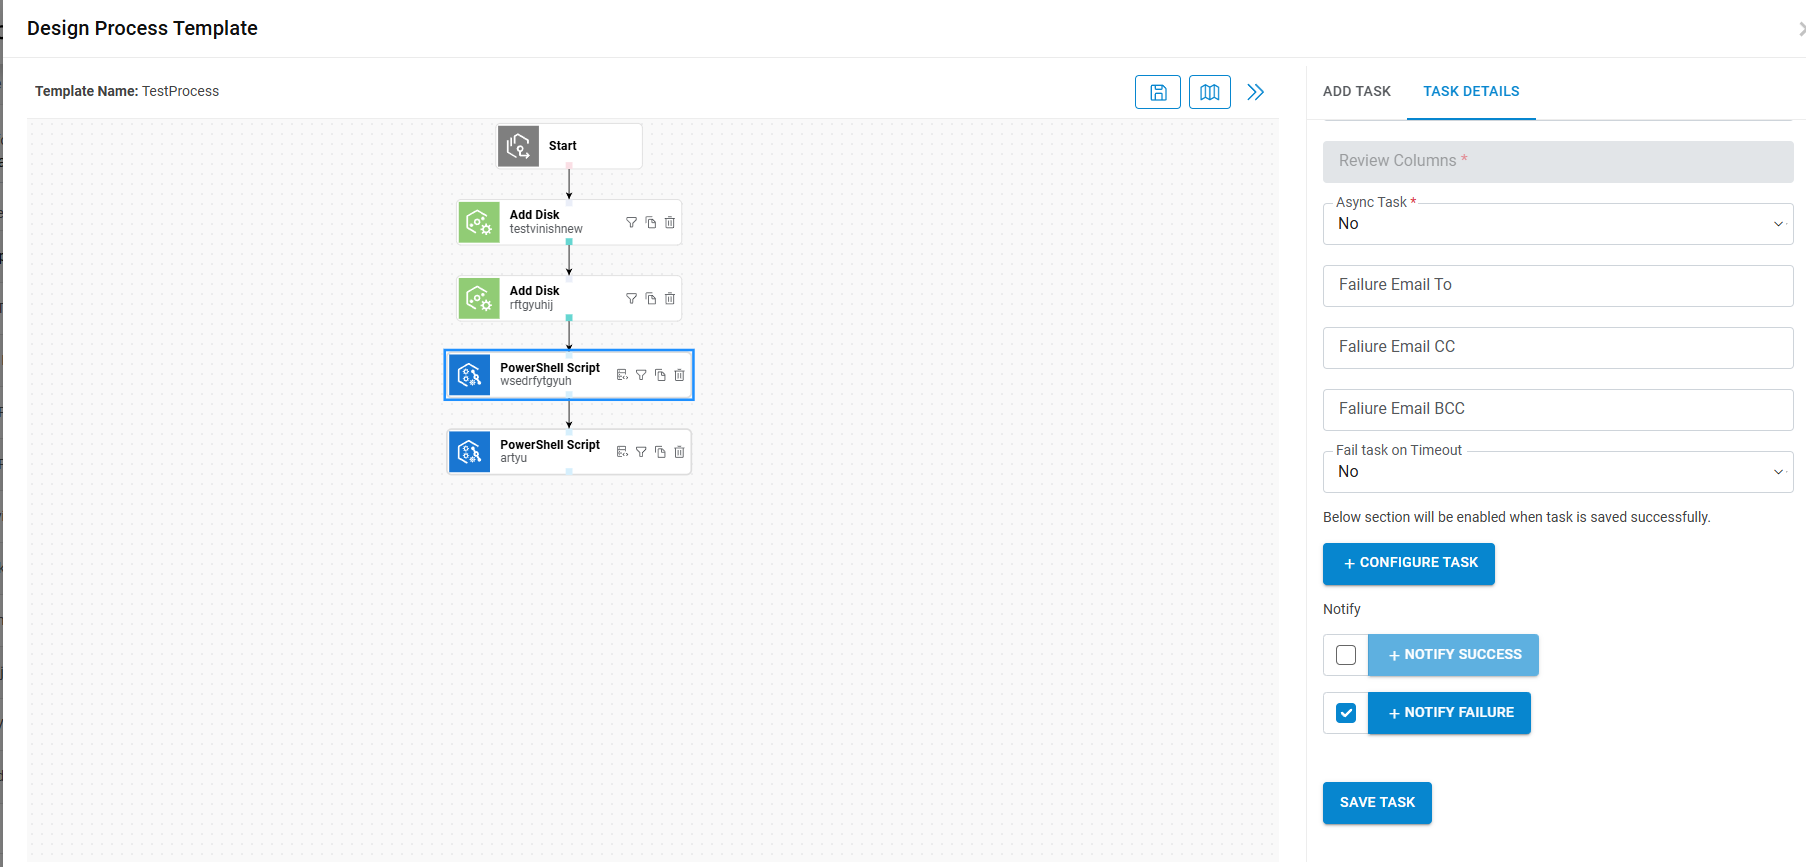
Figure 4. Task View 
- Add Task:
-
Task Palette (Right Side): The following task types are available on the task
palette.
- Generic Task: Represents Out-of-the-Box Tasks provided by HCL BigFix CLM with predefined processes to execute in the Orchestrator Engine. These Tasks typically encapsulate common functionalities or integrations available within the HCL BigFix CLM Platform.
- Custom Task: Allows users to add PowerShell and Python Scripts to execute Tasks in the Orchestrator Engine of HCL BigFix CLM. Users can define custom logic and operations tailored to their specific requirements using Scripting Languages.
-
Script Library Task: Consists of a pre-defined library of reusable Custom
Scripts. When users define a Process Workflow using the Script Library option, they
can add existing Custom Scripts from the repository.
Users can modify selected Custom Scripts using the " Manage Task” action, allowing for customization, and fine-tuning as needed.
- Process Template Task: This section allows users to choose existing tasks from a process template, including both generic and custom tasks.
Figure 5. Task Palette 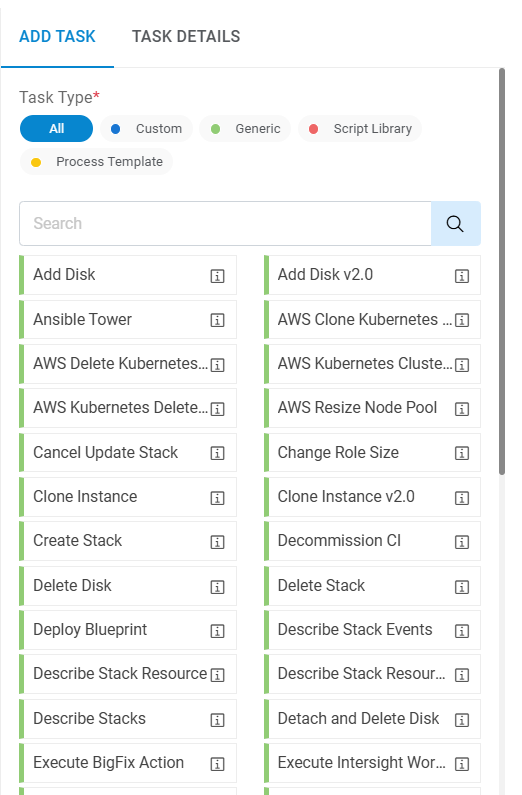
-
Task Palette (Right Side): The following task types are available on the task
palette.
- To add a new task to the Canvas, users need to follow these steps:
- Locate the Add Task Panel: On the left side of the screen, users can find the Task Palette, which contains different types of Tasks such as Generic Task, Custom Task, Script Library Task and Process Template Tasks.
- Select the Desired Task Type: Depending on the requirements of the process being designed, users can choose the appropriate Task Type from the Task palette. This could be a Generic Task, Custom Task, or a task from the Script Library and Process Template Tasks.
- Drag the Task onto the Canvas: Once the desired Task Type is selected, users can simply click and drag the Task from the Task palette onto the Canvas.
- Position the Task on the Canvas: After dragging the Task onto the Canvas, users can position it at the desired location within the Process flow. They can place it before or after existing tasks, as well as connect it with other tasks using connectors or flow arrows.
- Configure the Task: Once the Task is placed on the Canvas, users can configure its settings, such as Task Name, Short Name, and other mandatory details. This ensures that the Task is properly defined and aligned with the overall process flow.
Figure 6. Add Task to Canvas 
- By following these steps, users can seamlessly add new Tasks to the Canvas and incorporate
them into the process flow, enabling them to design and visualize complex workflows
efficiently.
Figure 7. Add Task to Canvas (Cont.) .png)
- Refer the below table to understand the fields mentioned in the above figure:
Table 2. Fields to Create Process Template using Process Template Designer (Cont.) Fields Description Task Type Provide the Task Type Task The field highlights the tasks that need to be added in the process template. If provider user selects generic task under task type, then HCL BigFix CLM out of box tasks (like Clone, add disk etc.) are populated and if user selects Custom task in task type, then following tasks are populated:
- Call PowerShell script: Provider can write PowerShell scripts to execute tasks and map PowerShell variables from the Dynamic UI form values and can also use HCL BigFix CLM predefined functions to execute the script.
- Call Python script: Provider can write Python scripts to execute tasks and map Python variables from the Dynamic UI form values and can also use HCL BigFix CLM predefined functions to execute the script.
Script This option is enabled when task type is Script library. The user can add existing Custom Script (PowerShell and Python) from repository in workflow. Task Name It highlights the name of the task and is used with ITSM tool for integration purposes. Short Name Provide a Short Name for the ease of usage Task execution Type Defines execution type of Tasks. This can be auto or manual,
- Auto: Orchestrator Engine executes the task in HCL BigFix CLM for submitted Service Requests.
- Manual: The respective support team manually executes and updates the status in ITSM tool. Simultaneously, ITSM Tool will notify HCL BigFix CLM and update the status of task.
Retry Count Number of times a Task will be retried for execution upon getting failed. Timeout (In Mins) Time limit before the task becomes inactive. Review Task In Process Workflow, if the user wants UI Templates columns to be reviewed before marking that task as completed, user can opt for Review Task option and Mark the columns to be reviewed. In Request Task Tracking Report, the user can validate the Pending Review task for the Request and perform appropriate action.
Review Task -Yes (signifies user opts in for Review) Review Task -No (signifies user opts out for Review)
Review Columns Define the list of columns from UI Template chosen to create Process Workflow. (Enable only when Review Task marked as Yes otherwise disable. Async Task Using this Task type the user can configure task that need to be executed asynchronously. At the time of execution, HCL BigFix CLM triggers the task and save the acknowledgement number. Once task is completed third party tool will invoke HCL BigFix CLM API to close the task Success/Failure. Failure Email To This field will be used to send "To" Email notification, in case of Task Failure. Please use comma (,) to add multiple emails in this fields. Failure Email CC This field will be used to send "CC" Email notification, in case of Task Failure. Please use comma (,) to add multiple emails in this fields. Failure Email BCC This field will be used to send "BCC" Email notification, in case of Task Failure. Please use comma (,) to add multiple emails in this fields. Fail task on Timeout This is to be used in case of timeout whether task needs to be marked as failed or not. Task Code It’s a code in HCL BigFix CLM that has been assigned to each of the tasks. Notify success Notify to ITSM tool when the task has been executed successfully. Notify Failure Notify to ITSM tool when the task has failed to be executed. -
Link the Task on Canvas: Drag first Task onto Canvas and link with Start Task, this
is to signify that it's the initial step in the process.
Figure 8. Link the Task on Canvas 
- Click on Task Node to Access Details: After connecting the task click directly on the task node to access its properties.
-
Fill Task Details: Within the Task properties panel or Dialog box, fill in following
details:
- Task Name: A descriptive name for the task.
- Short Name: Optionally, a shorter identifier for the task.
- Task Count: Specifies the number of times this task should be executed.
- Retry Count: Indicates how many times the task should be retried if it fails.
- Other Parameters: Additional parameters specific to the task, such as timeout duration, priority level, etc.
-
Save Task Details: Once all the necessary details are entered, save the task
properties by using the Save button to apply the changes. By following these steps, you can
seamlessly add tasks to the process flow.
Figure 9. Save Task Details 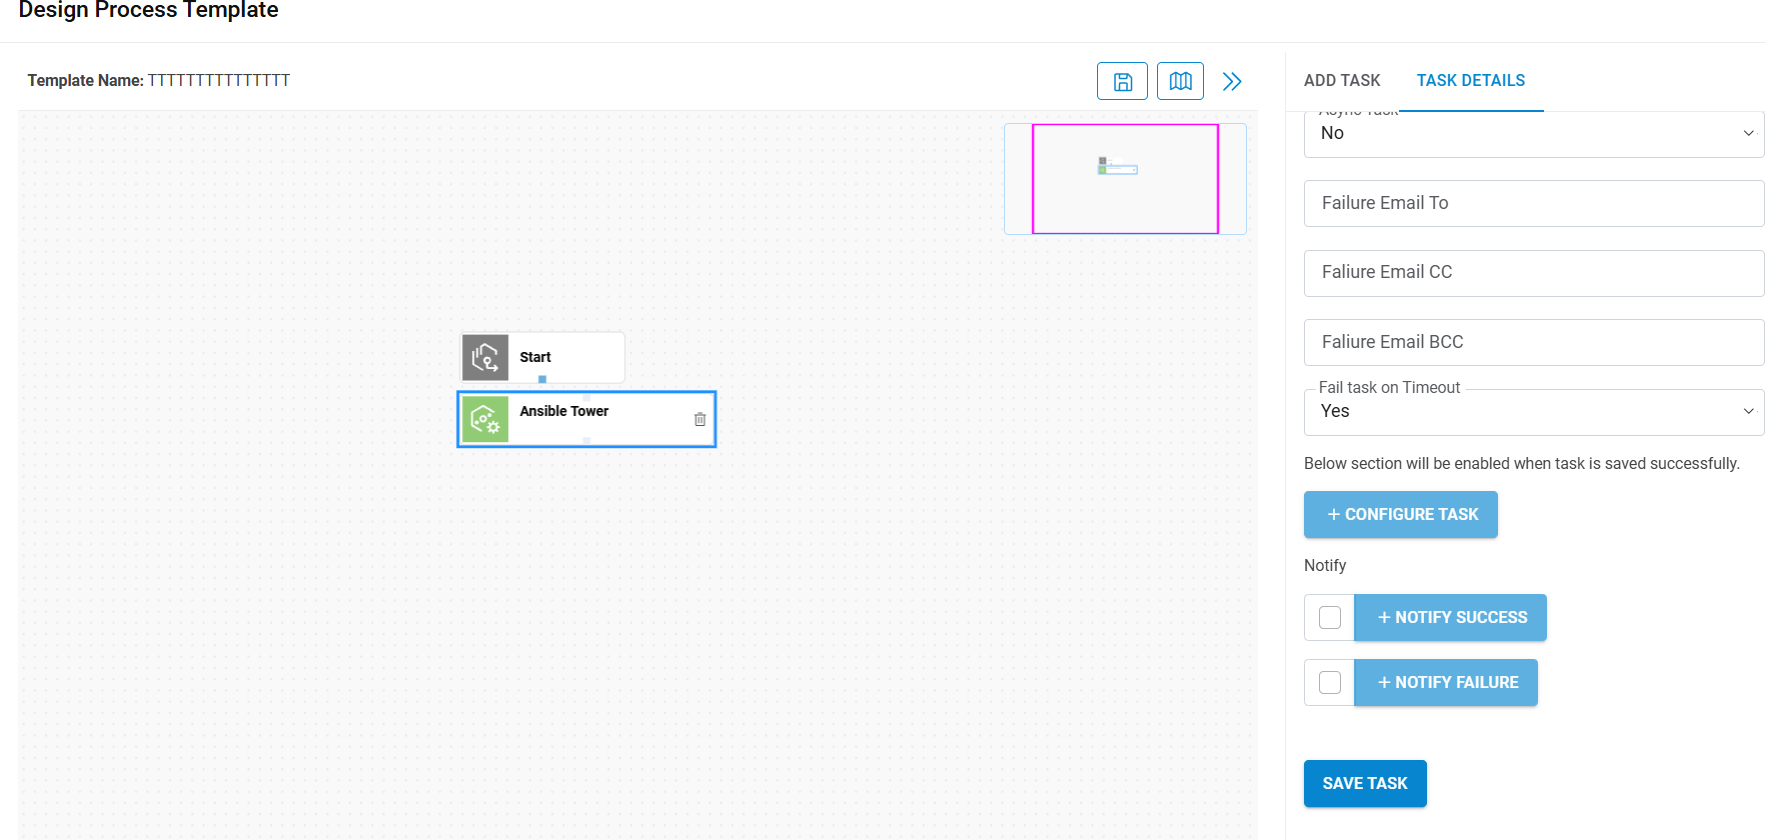
-
Subsequent Task Sequencing: Each subsequent task added to the Canvas should be
assigned a sequence number that reflects its intended execution order in the process flow.
For example, if a task is added after the "Start Task" and is the first task to be executed
after the start, it should be assigned a sequence number of 1. Subsequent tasks would then
be assigned sequential numbers accordingly.
- Handling Single Child Tasks: If a task has only one child task, the system should automatically link the child task to its parent task and assign it the next sequential number.
-
Recognition of Shared Parent: When multiple tasks share the same parent task and
are intended to execute in parallel, the system should recognize this shared
parent-child relationship. All tasks that are intended to execute in parallel under the
same parent should be assigned the same sequence number.
This ensures that these tasks are part of the same "group” of parallel-executing tasks within the process flow. We can also drag task in existing group also we can drag task group to canvas.
Figure 10. Tasks with Shared Parent 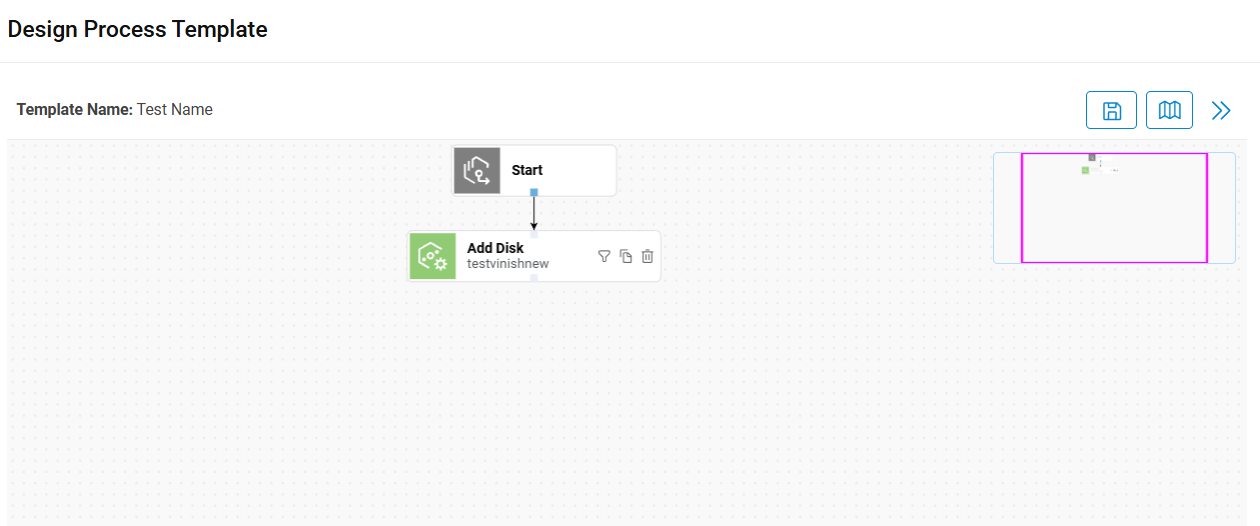
The following actions can be performed on a task:
- Delete:

The Delete option allows users to delete a Task from the Canvas. When users drag any Task on Canvas, the delete icon appears.
Users can click on the Delete icon to remove the Task from the Canvas. If the Task is saved, a confirmation prompt is displayed to ensure that the deletion is intentional.
- Filter: Once a Generic Task is saved, then along with Delete, the Filter is displayed to scale down the search for a Task.

- Refer to the below table to understand the fields mentioned in the above figure:
Table 3. Fields to Apply Filter to Task Fields Description Table Name This task filter will work on table where Dynamic data are saved (RequestDetailExtended) in the form of keyName and key value Column Name User can apply filter on KeyName or KeyValue of selected table if we consider domain join example; like the KeyName will be “IsDomain Join” and KeyValue should be “yes” or “no” selected by the requester Operator Apply operator on task filter like “Not In”, “In”,” CONTAINS”,” EQUALS” etc. Column Value Provides the value of column name based on task filter. If we consider domain join example, then Column value will be “yes” or “no” Clause Helps to apply more than one condition “OR” and “AND” operators. - Configure the Filter as per the Task.
- If filter is applied on any Task, then filter icon gets changed as
.png) to notify filter applied.
to notify filter applied.
Add to Script Library:
To add Script Library, perform the following steps:

- Once Custom Task is getting saved, along with Delete icon, Filter, and Add to Script Library icons are getting displayed.
- Click Add to Script Library, a window pops up to add custom script to script library for reuse in another task/process workflow.
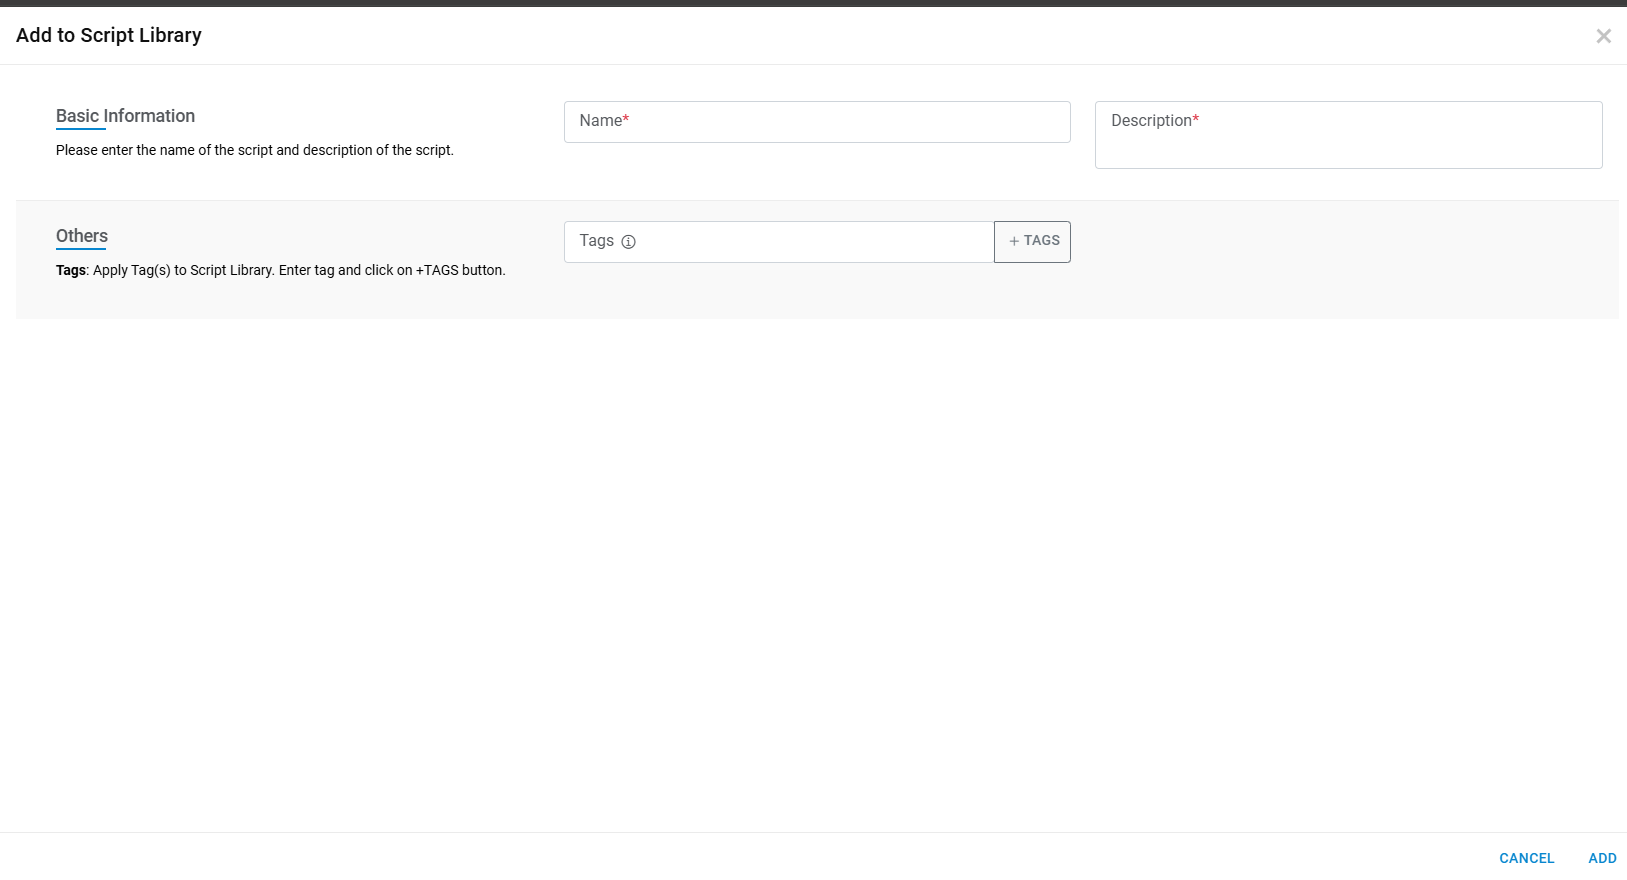
- Enter Name, Description and Tags.
- Click Add to Script Library. A success message box appears.

- Click OK.
Copy Task:
- To Copy task, perform the following steps:
.png)
- Click Copy Task, a window pops up to Copy Task to create new task.
Figure 17. Copy Task 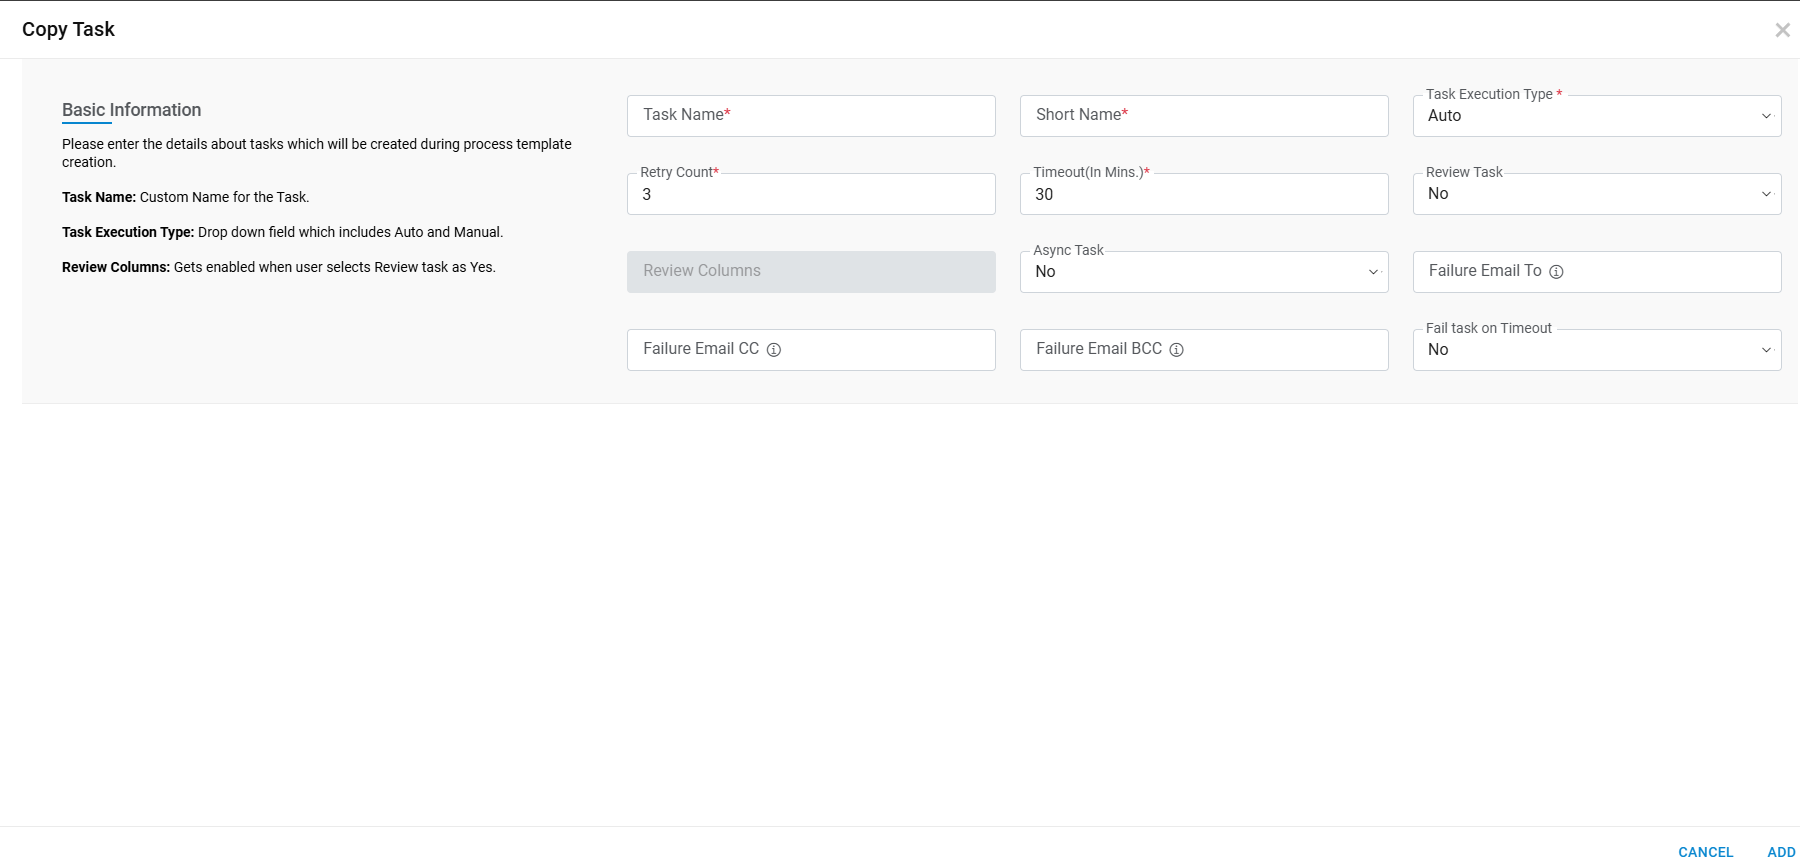
| Task Name | It highlights the name of the task and use with ITSM tool for
integration purpose. All the task details shown on hover of task
name inside table help icon (.png) )
like short name, execution type etc. )
like short name, execution type etc. |
| Short Name | Provide a short name for the ease of usage |
| Task execution Type |
Defines execution type of tasks. This can be auto or manual, Auto: Auto task execution type executed by orchestrator engine in HCL BigFix CLM for submitted service requests Manual: Manual task execution will be executed by respective support team manually and update the status in ITSM tool. Simultaneously, ITSM tool will notify HCL BigFix CLM and update the status of task. |
| Retry Count | Number of times a task will be retried for execution upon getting failed. |
| Timeout (In Mins) | Time limit before the task becomes inactive. |
| Review Task |
In Process Workflow if user wants UI Templates columns to be reviewed before marking that task as completed, user can opt for Review Task option and Mark the columns to be reviewed. In Request Task Tracking Report user can validate the Pending Review task for the Request and perform appropriate action. Review Task -Yes (signifies user opts in for Review) Review Task -No (signifies user opts out for Review) |
| Review Columns | Define the list of columns from UI Template chosen to create Process Workflow. (Enable only when Review Task marked as Yes otherwise disable. |
| Async Task | Using this task type we can configure task that need to be executed asynchronously. At the time of execution HCL BigFix CLM triggers the task and save the acknowledgemeOnceo. once task is completed third party tool will invoke HCL BigFix CLM API to close the task success/failure. |
| Failure Email To | This field will be used to send "To" Email notification, in case of Task Failure. Please use comma (,) to add multiple emails in this fields. |
| Failure Email CC | This field will be used to send "CC" Email notification, in case of Task Failure. Please use comma (,) to add multiple emails in this fields. |
| Failure Email BCC | This field will be used to send "BCC" Email notification, in case of Task Failure. Please use comma (,) to add multiple emails in this fields. |
| Fail task on Timeout | This is to be used in case of timeout whether task needs to be marked as failed or not. |
- Enter Task Name and Short Name.
- Click Add to Copy Task. A success message box appears.

- Click OK.
Configure Task
- This section explains the process to customize the Task type parameters of a selected Task. Once a task is saved, the Configure Task icon is enabled.
-
Generic Task: When the task type is selected as Generic.
- On clicking the Configure Task icon, a window pops up where Provider maps HCL BigFix CLM’s out of the box Tasks.
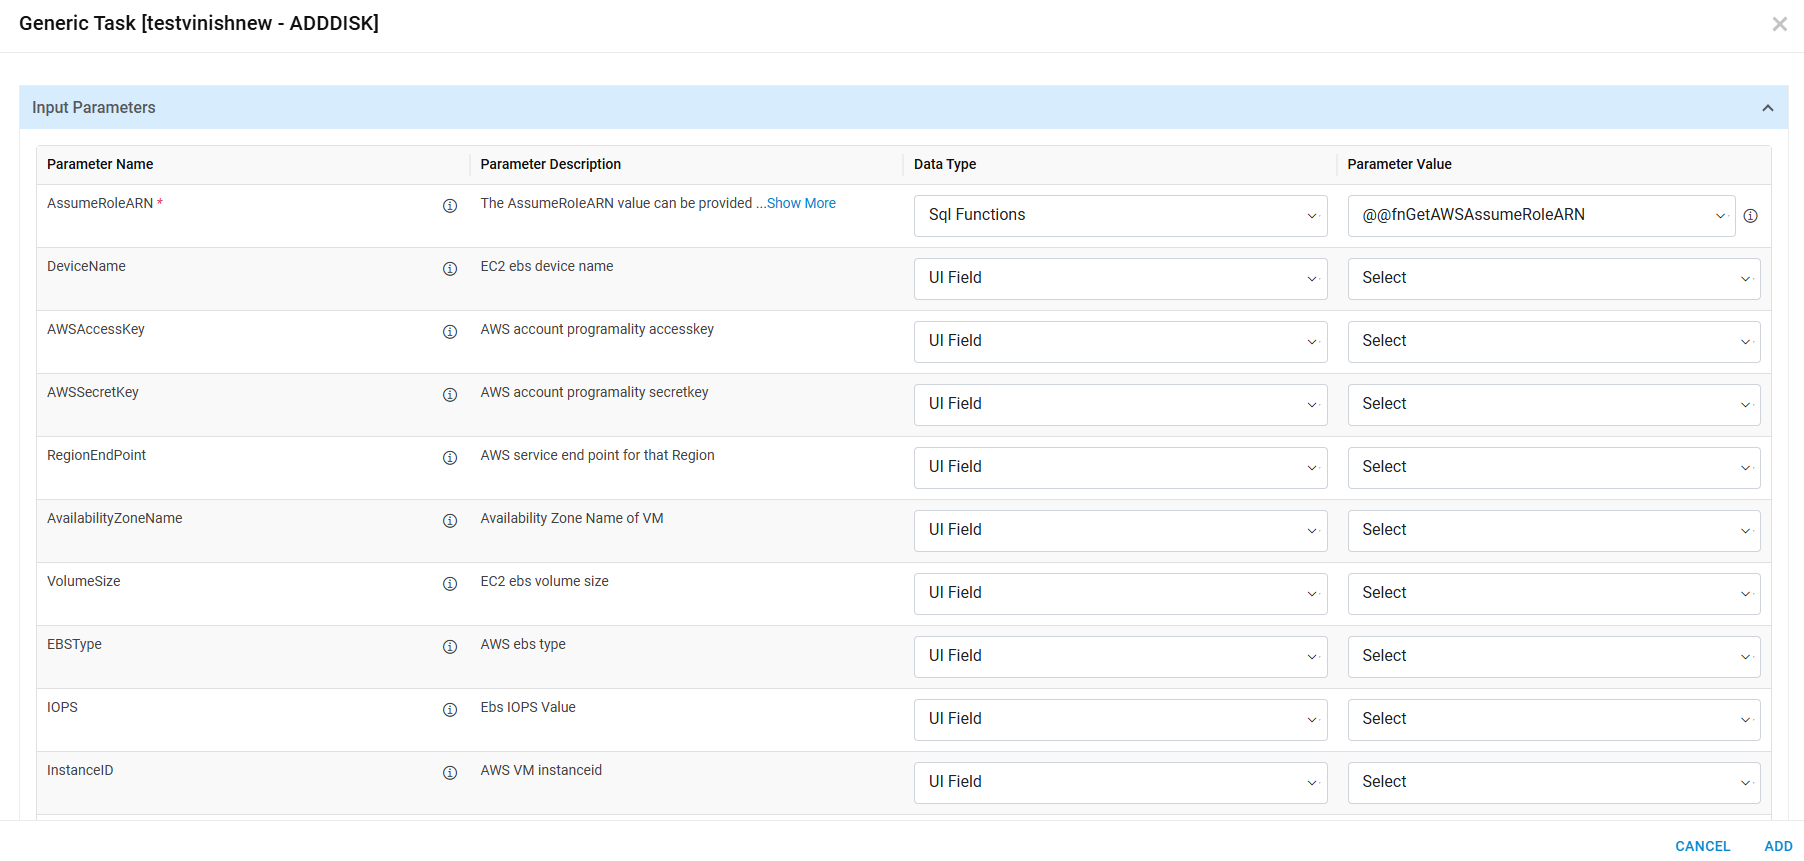
Refer to the below table to understand the fields mentioned in the above figure:
| Fields | Description |
| Parameter mapping | This icon highlights the output parameters of current generic tasks. |
| Parameter Name | These are predefined parameters to execute generic task within HCL BigFix CLM. |
| Parameter Description | Parameter description contains all the information about the parameter. |
| Datatype |
Type of data to map parameter Name except for e.g., string, xml
SQL function etc. HCL BigFix CLM Predefined SQL Function List is a list of HCL BigFix CLM predefined functions that are used for mapping sensitive data to parameter name that are not present in dynamic UI. e.g., Azure subscription details etc. Below are the datatypes which provides parameters values which are not present in dynamic UI. For example: Static: To specify the fix hard coded parameter value to workflow task. Secret Key: It populates all the keys which is defined in secret manager screen and takes the value of key on workflow task execution. Secret key value displayed format is $ConfigurationName.KeyName
Key value: it shows Map key value button (
|
| Parameter value |
Parameter Value contains all control fields of dynamic UI associated with a process template. Mainly, it contains 2 unique fields of HCL BigFix CLM which are RequestDetailID and RequestmasterNo. It is used in various APIs which HCL BigFix CLM supports for e.g., GetVMname, Update CI etc. For SQL function datatype all HCL BigFix CLM predefined SQL functions will populate to map parameter names. |
 icon shows the
type of data that is required for corresponding
parameters.
icon shows the
type of data that is required for corresponding
parameters.  )
option to add parameter values. On click of Map Key value below popup opens.
)
option to add parameter values. On click of Map Key value below popup opens. 
 ).
). - Populate the fields and click Submit.
-
Custom Task: When the task type is selected as Custom.
- On clicking the Configure Task icon, a window pops up where provider user writes the PowerShell or Python Script to execute a task.
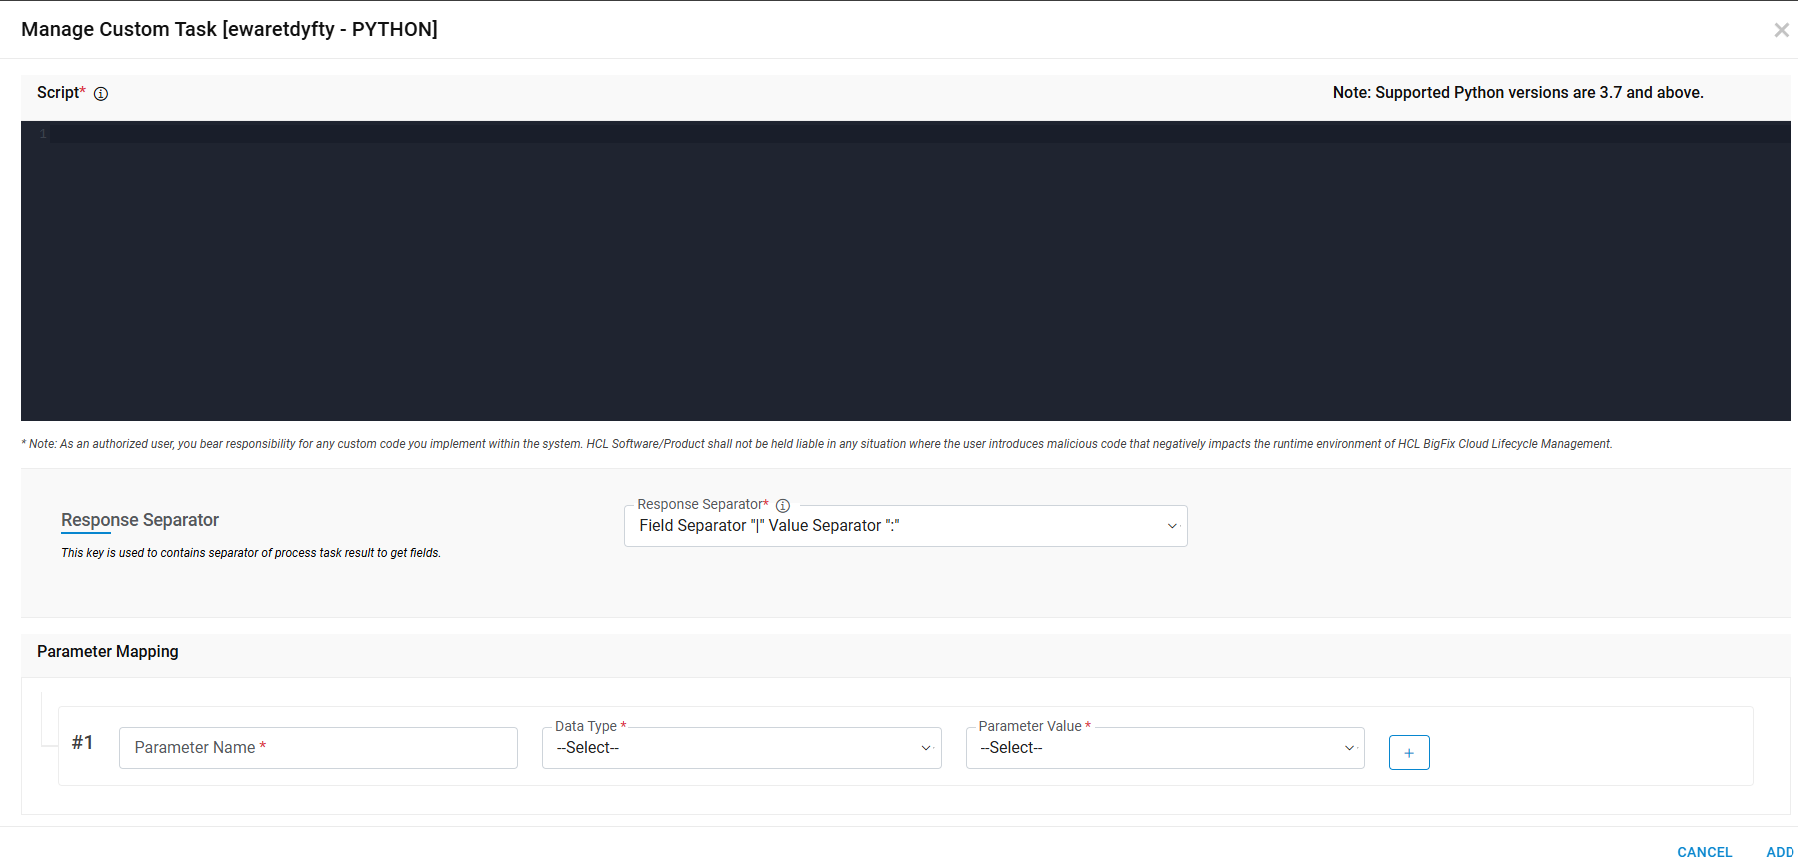
- With the help of
 icon, the
Provider user adds all the dynamic variables of PowerShell with dynamic UI control values
and
HCL BigFix CLM Predefined SQL Function List.
icon, the
Provider user adds all the dynamic variables of PowerShell with dynamic UI control values
and
HCL BigFix CLM Predefined SQL Function List. - Click Submit to save the details. Click Close to discard the changes.
- A success message box appears if you choose to discard the changes. Click Ok
.png)
- On clicking Submit, the following screen appears.

- Click Save. A confirmation message appears as below:

- Click OK.
All the fields marked with asterisk (*) are mandatory.
-
Success notification:
In case of integration with the third party ITSM tools, you can configure success of each selected task to make it ITIL compliant integration process.
Notify Success function will help to notify the enterprise tool (e.g., itsm tool) about the success of the task. Notify success will notify ITSM tool that the task is successfully executed by HCL BigFix CLM and can be closed by ITSM.
- Click on the Success Notification icon (
 ) to execute it on the successful completion of the task in
orchestrator engine of HCL BigFix CLM.
) to execute it on the successful completion of the task in
orchestrator engine of HCL BigFix CLM. The following window pops up where a user can configure the request and response in JSON through which HCL BigFix CLM notifies the ITSM tool regarding the completion of a specific task.
Figure 26. Notify Success .png)
- Enter the Name of the configuration.
- Select the Service Name from the drop-down.
The drop-down lists all the ITSM configuration end points.
- Request JSON: Populate the field with a valid Request JSON.
It is a mandatory field and accepted by ITSM tool to close the task at its end. If it is a dynamic value (dynamic UI and captured by requester) then it needs to get communicated between HCL BigFix CLM and ITSM tool. In such a case, request JSON values need to be mentioned with prefix “@”.
Request JSON format example:
{ "Kye1":"@Value1", "Key2":[{"k1":"@v1"}], "Key3":{"k2":"@v2"}, "Key4":"@OperationRequestDetailId" } - After adding Valid Request JSON, click on Configure Request Parameter.
- All dynamic parameters will get displayed under Request Parameter Mapping.
Figure 27. Request Parameter Mapping .png)
- Configure the Parameter Values.
- Response JSON: Populate the field with a valid Response JSON.
It is an optional parameter and provided by ITSM tool (JSON) to HCL BigFix CLM. Through this, HCL BigFix CLM understands whether a task has been completed or not.
Example of Response JSON:
{
 "Key1":"@Value1",
 "Key2":[{"k1":"@v1"}],
 "Key3":{"k2":"@v2"}
} - Click on Configure Response Parameter.
Figure 28. Configure Response Parameter .png)
- Clicking on Configure Response Parameter button displays the Success Criteria section and all the dynamic parameters prefixed with “@” in response JSON are displayed under Parameter Mapping.
- Success Criteria: In this section, user defines, which parameter and corresponding value of HCL BigFix CLM can mark task as completed from ITSM engine response.
-
Response Type: There are two types of response:
- Static: In case of Static response, predefined key, and its value for e.g., “Status” =” OK” of ITSM engine response will communicate to HCL BigFix CLM to mark ITSM task (success/Failure) in HCL BigFix CLM to close the task.
- Dynamic: In case of Dynamic response, ITSM tool will use the incident number to communicate with HCL BigFix CLM for marking the ITSM task as closed.
- Value: Enter the Parameter Value.
- Click Submit
Failure Notification
In case of integration with third party ITSM Tools, configuring notification around “Failure of Tasks” will make the integration process an ITIL compliant.
This option is being used for notifying the ITSM Tools to act when a task fails in HCL BigFix CLM.
- Clicking the checkbox ensures that it will get executed on the failure of added tasks.
- Clicking on icon (
 ) results
in a window that pops up where a user can Add/Configure the process which will get executed
in ITSM tool.
) results
in a window that pops up where a user can Add/Configure the process which will get executed
in ITSM tool. - Please follow the similar steps as explained for Success Notification to configure Notify Failure.