IVR v.4 setup process
This section provides information on setting up the IVR v.4.
About this task
Procedure
-
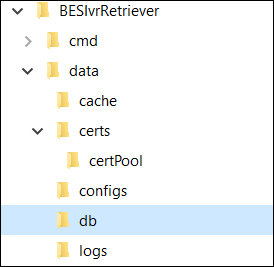
Once the .exe file is downloaded to the C:\Program Files (x86)\BigFix
Enterprise\BESIvrRetriever location, open Command Prompt as an
Administrator and navigate to the folder where the executable is located. Run
the setup command:
ivrNext.exe --setupOnce the setup command starts running, you will be able to access the IVR Configuration Manager Page.
-
Sign in to IVR Configuration Manager Page
Enter the BigFix server URL with Port, BigFix username and BigFix password.
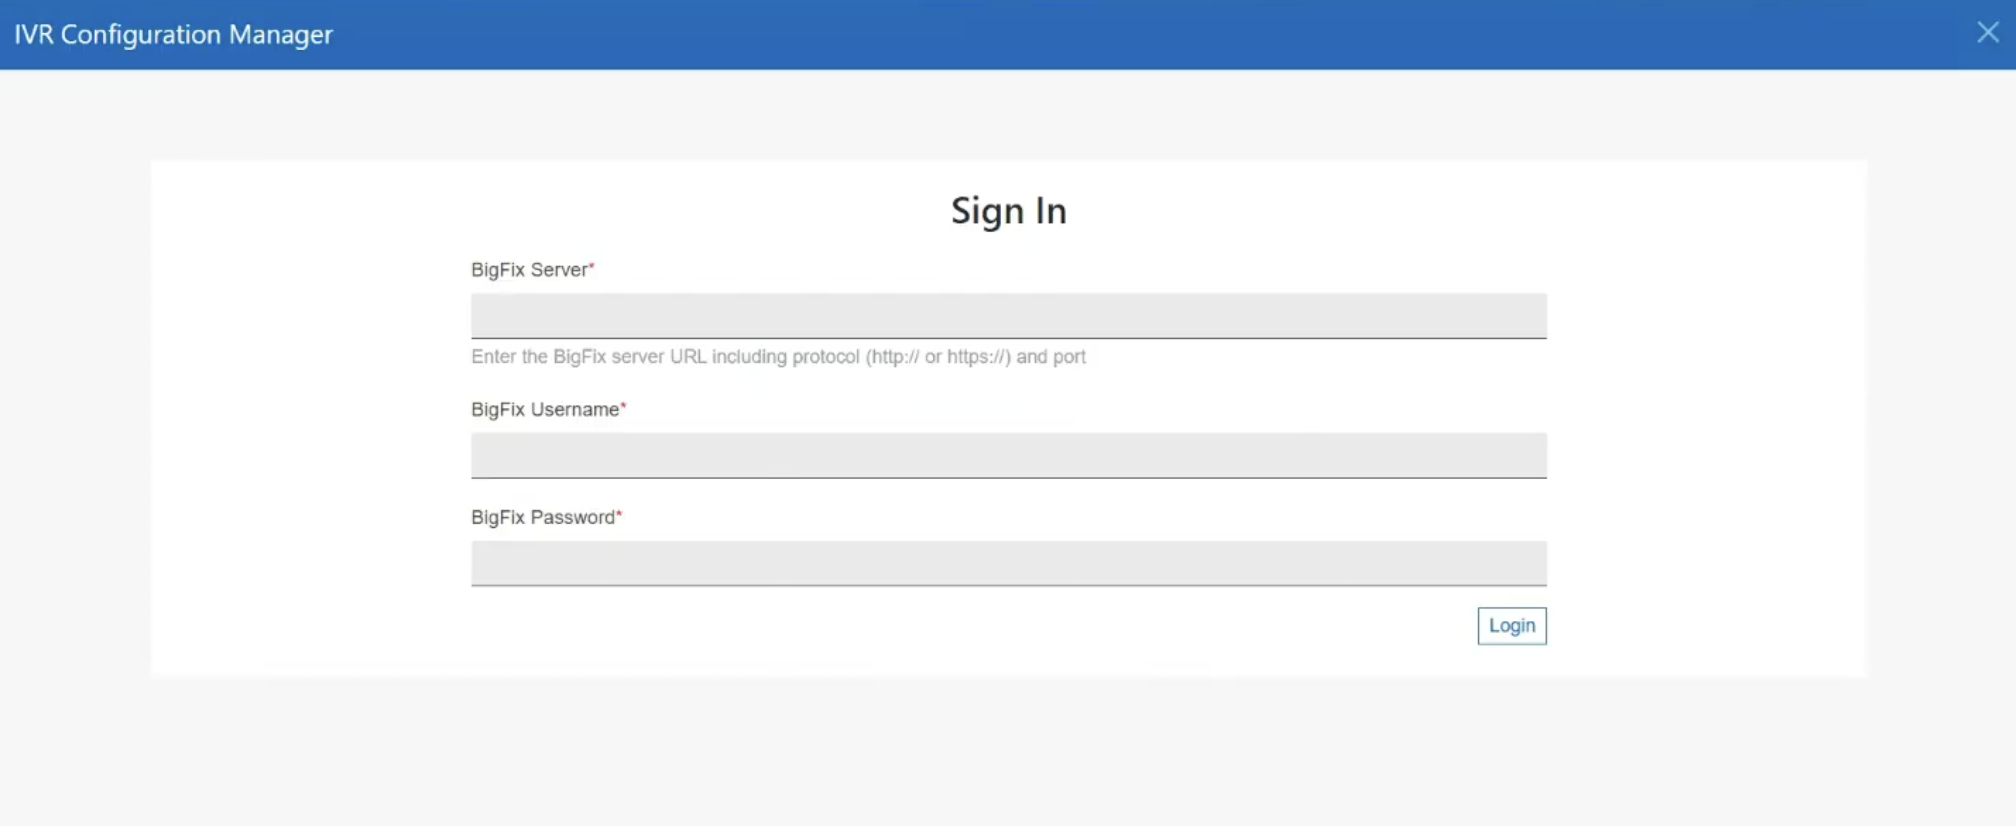 Note:Users with REST API access can log in to the Setup screen.
After you log in successfully, you will receive a notification and be redirected to the Database Configuration tab.

-
Database configuration tab
Note:After successful log in, the Database Configuration tab becomes accessible.
Enter the required information in the Database Configuration tab to unlock the next tab, Certificate Configurations.
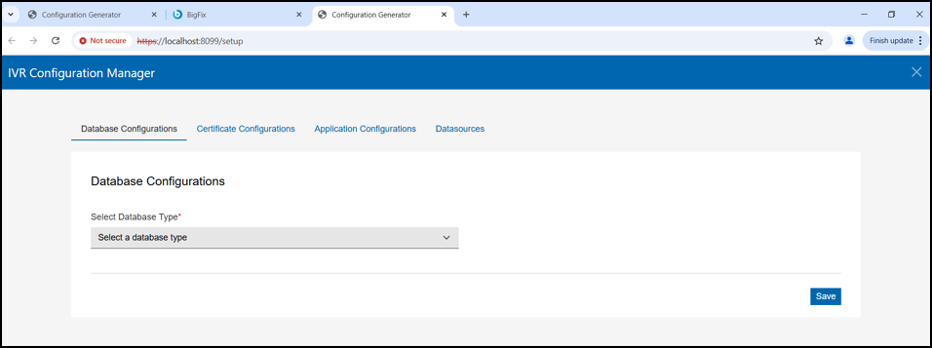
- Database Selection: You will be prompted to select the type of database.
You can either:
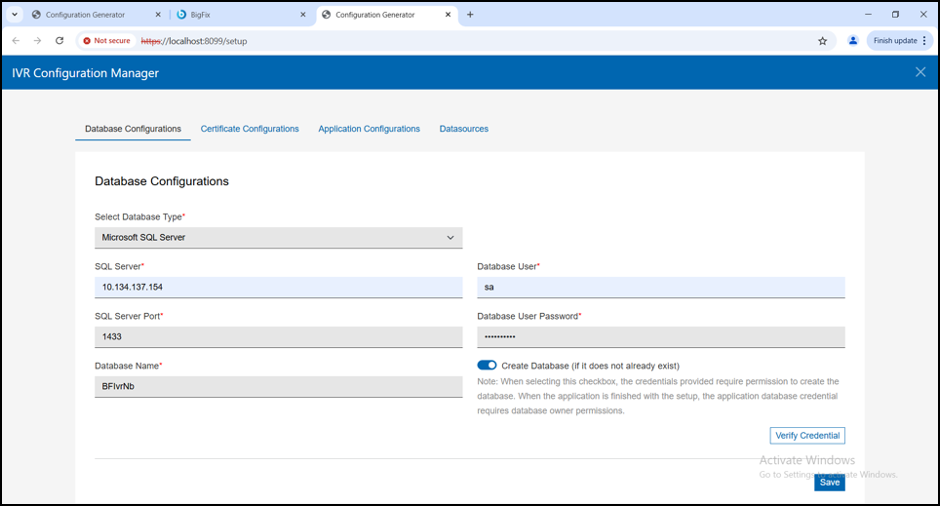
- Choose Microsoft MS SQL Server, or
- Select Provide your own DSN if you already have a data source name configured.
- While selecting the MS SQL Server, update the following fields with your
MS SQL Server credentials.
Ensure that the database user you specify during the setup has the necessary permissions to create a new database on the server.
You have the option to create a new schema or use an existing schema during the setup process. If you already have an existing schema you can use that schema for the OnPrem database setup. Ensure that the schema is correctly configured and is compatible with your system's requirements.
-
When selecting Provide your own DSN during the IVR4 setup, you need to provide a DSN (Data Source Name) string that allows the application to connect to your database server. The format of the sample DSN is given in the below screenshot.
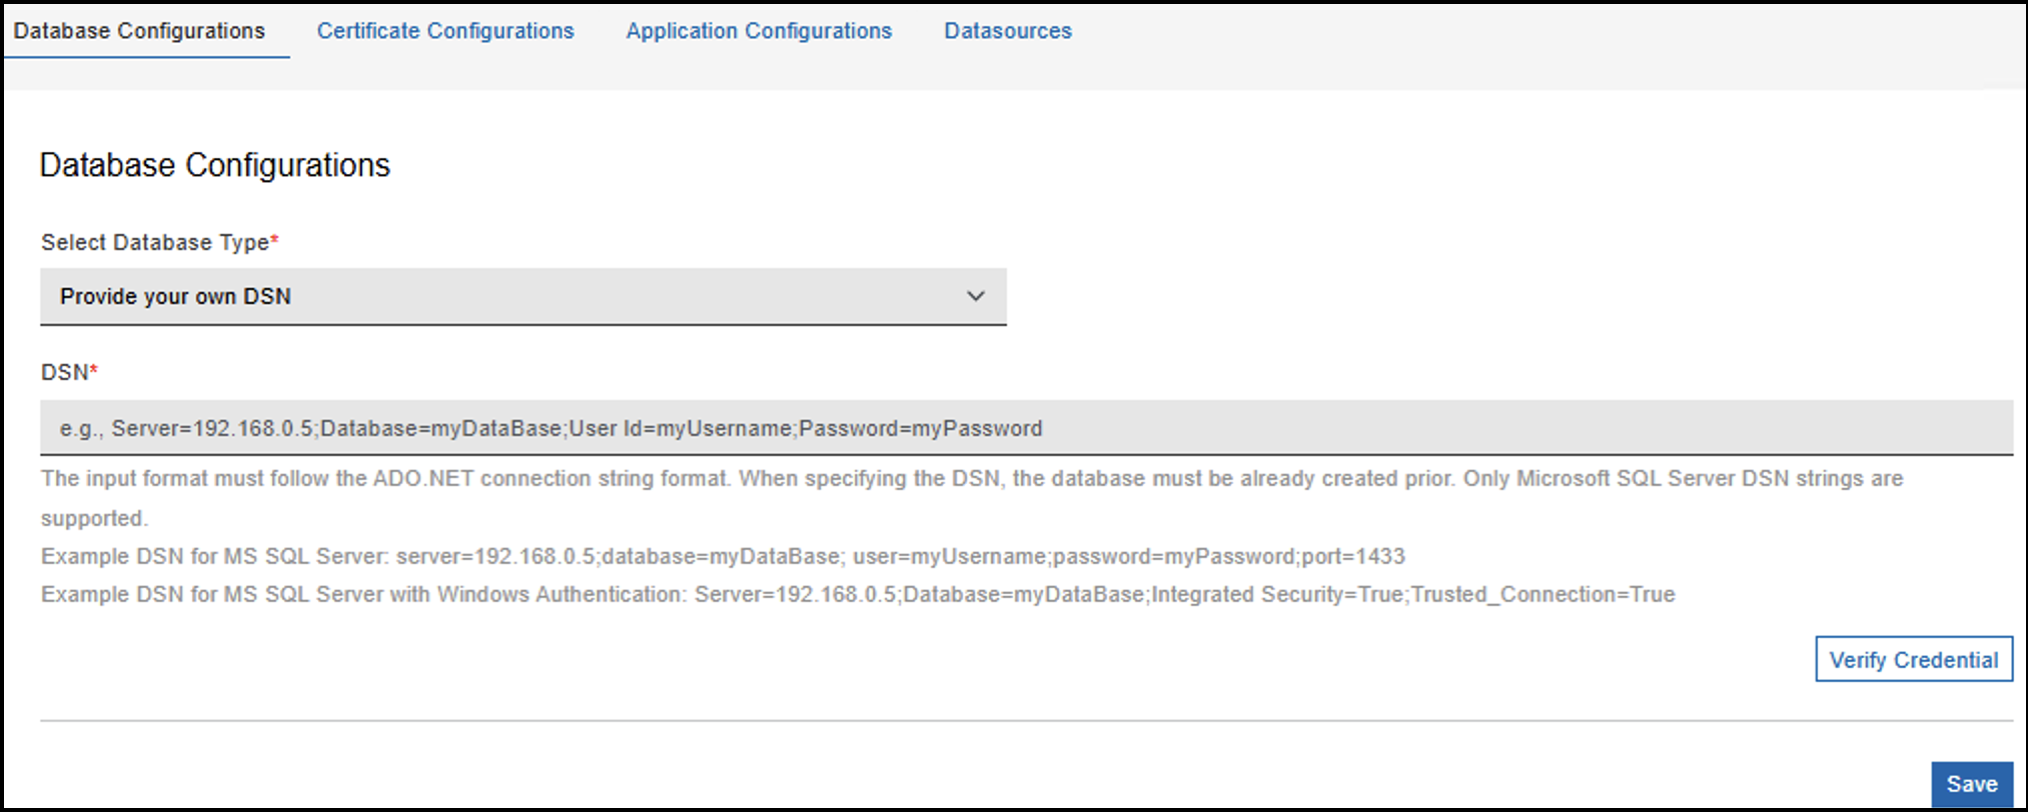
Example DSN for MS SQL Server:
server=192.168.0.5;database=myDataBase; user=myUsername;password=myPassword;port=1433
Example DSN for MS SQL Server with Windows Authentication (Integrated Authentication):
Server=192.168.0.5;Database=myDataBase;Integrated Security=True;Trusted_Connection=True
-
The Windows user account that you use must have sufficient permissions in SQL Server, specifically:
-
The user must have the necessary database creation permissions.
-
It should be able to read/write and administer the database.
Once the database details are entered, verify the credentials.
Once the credentials are verified, click Save to store the database configuration.
-
- Database Selection: You will be prompted to select the type of database.
You can either:
-
Certificate Configuration Tab
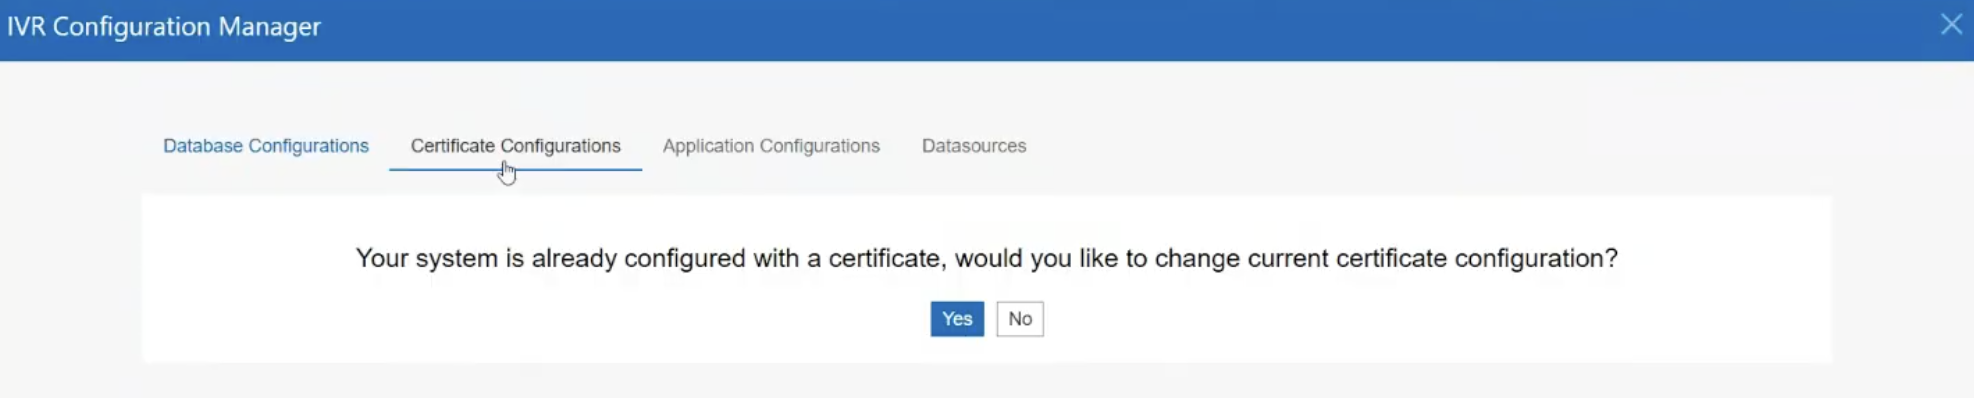
Note:The following steps apply when you access the Certificate Configurations for the first time. After you have configured your IVR, you will receive a notification and be asked if you want to keep the current certificate configuration.
 The below screenshot is for the use of a self-signed certificate:Note:During setup, please ensure you enter a valid Fully Qualified Domain Name (FQDN). For example, hostname.domain.com.
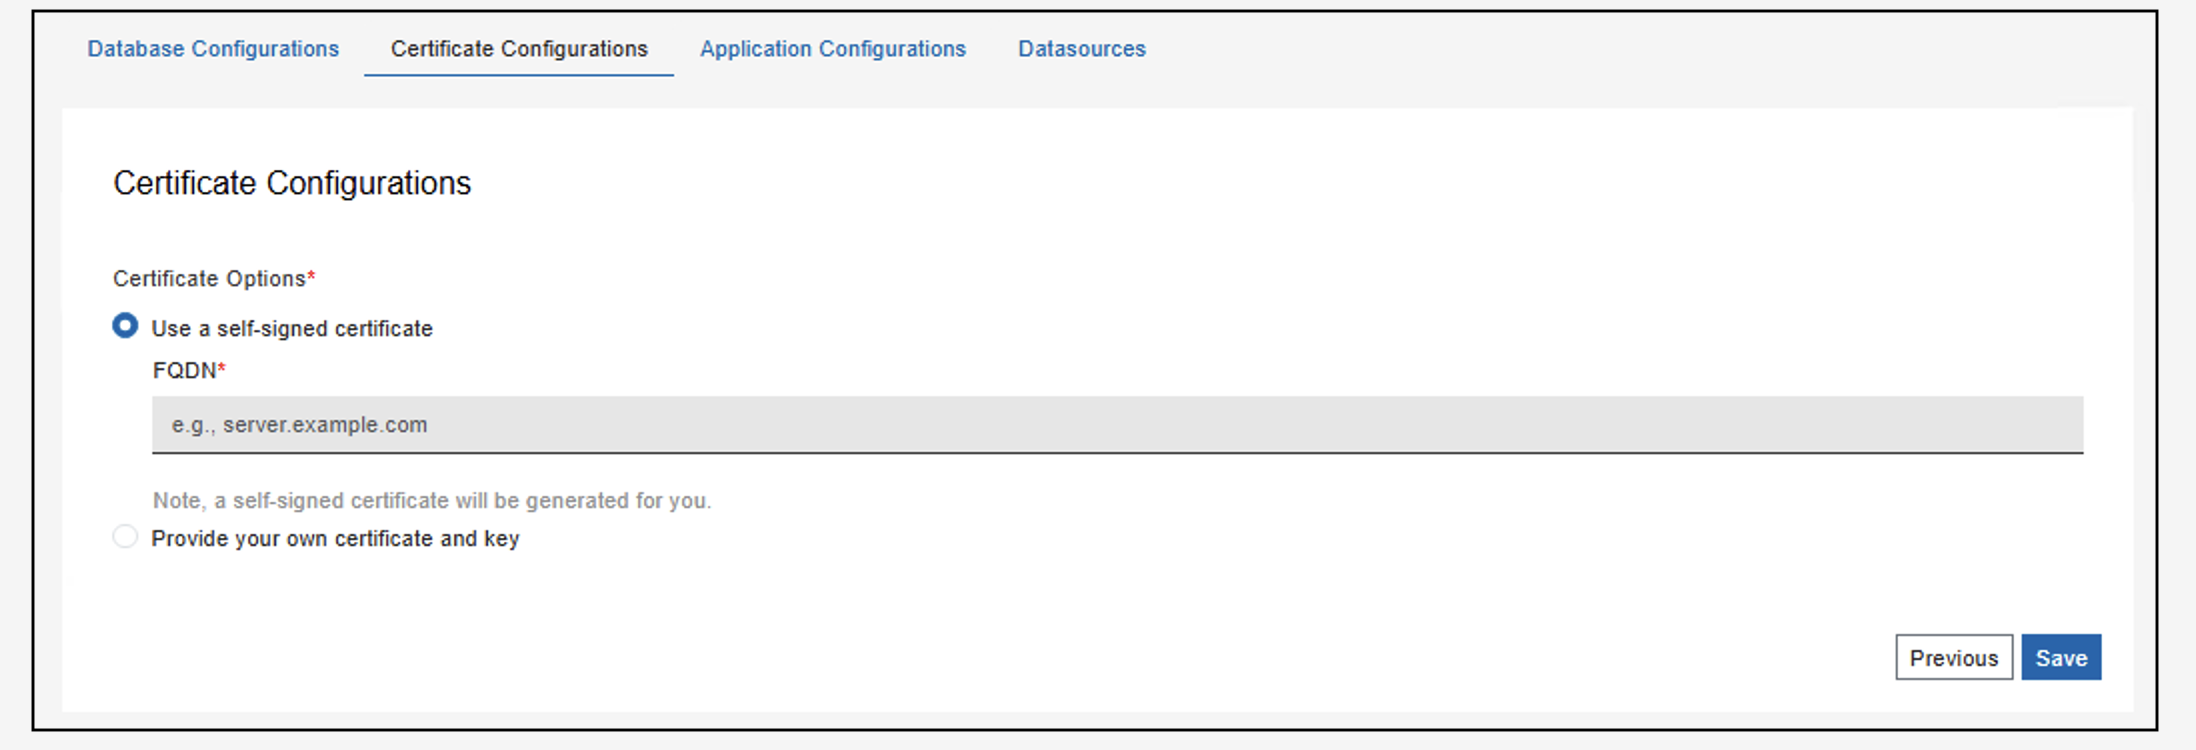
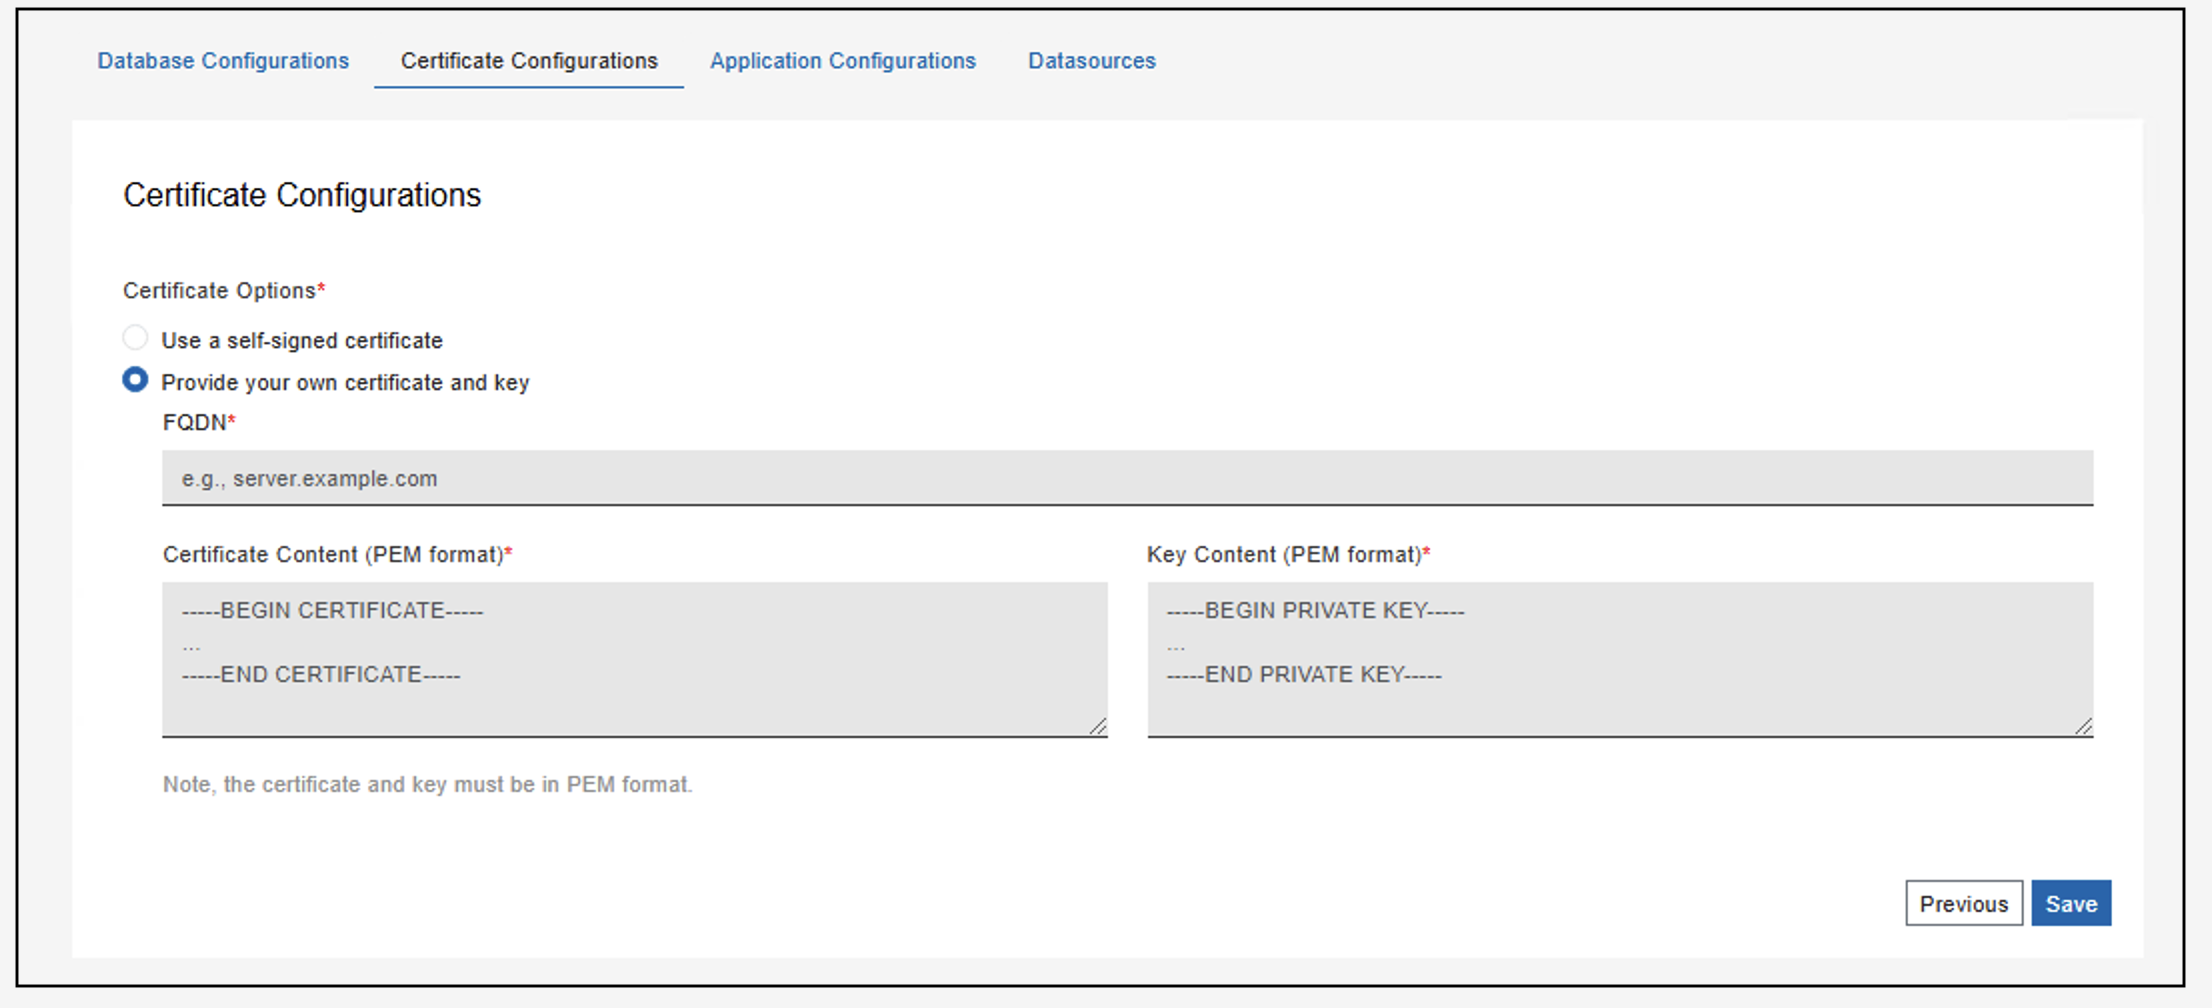
The below screenshot shows the second option: Provide your own certificate and key. Here the certificate and the key content should be given in the PEM format.
-
Application Configurations Tab

In this tab, provide the port where the exe file has to run. Additionally, this tab gives an option to install the application as a Windows Service.
Enter the port number on which the application will run. This port will be used by the IVR4 service to listen for incoming requests. Ensure the port number you choose is not already in use by another service and is open in your firewall. The default port is 9011 and in case it is used the user must specify another port that can be used.
There is also an option to install the application as a Windows Service. Once the setup is done and complete the application will run in the background as a service.
After installation, open Services.msc by typing services in the Windows search bar or running services.msc in the Run dialog (Win + R). In the Services window, you should see the BES IVR Retriever Service listed. You can start, stop, or configure the service from this page as needed.
-
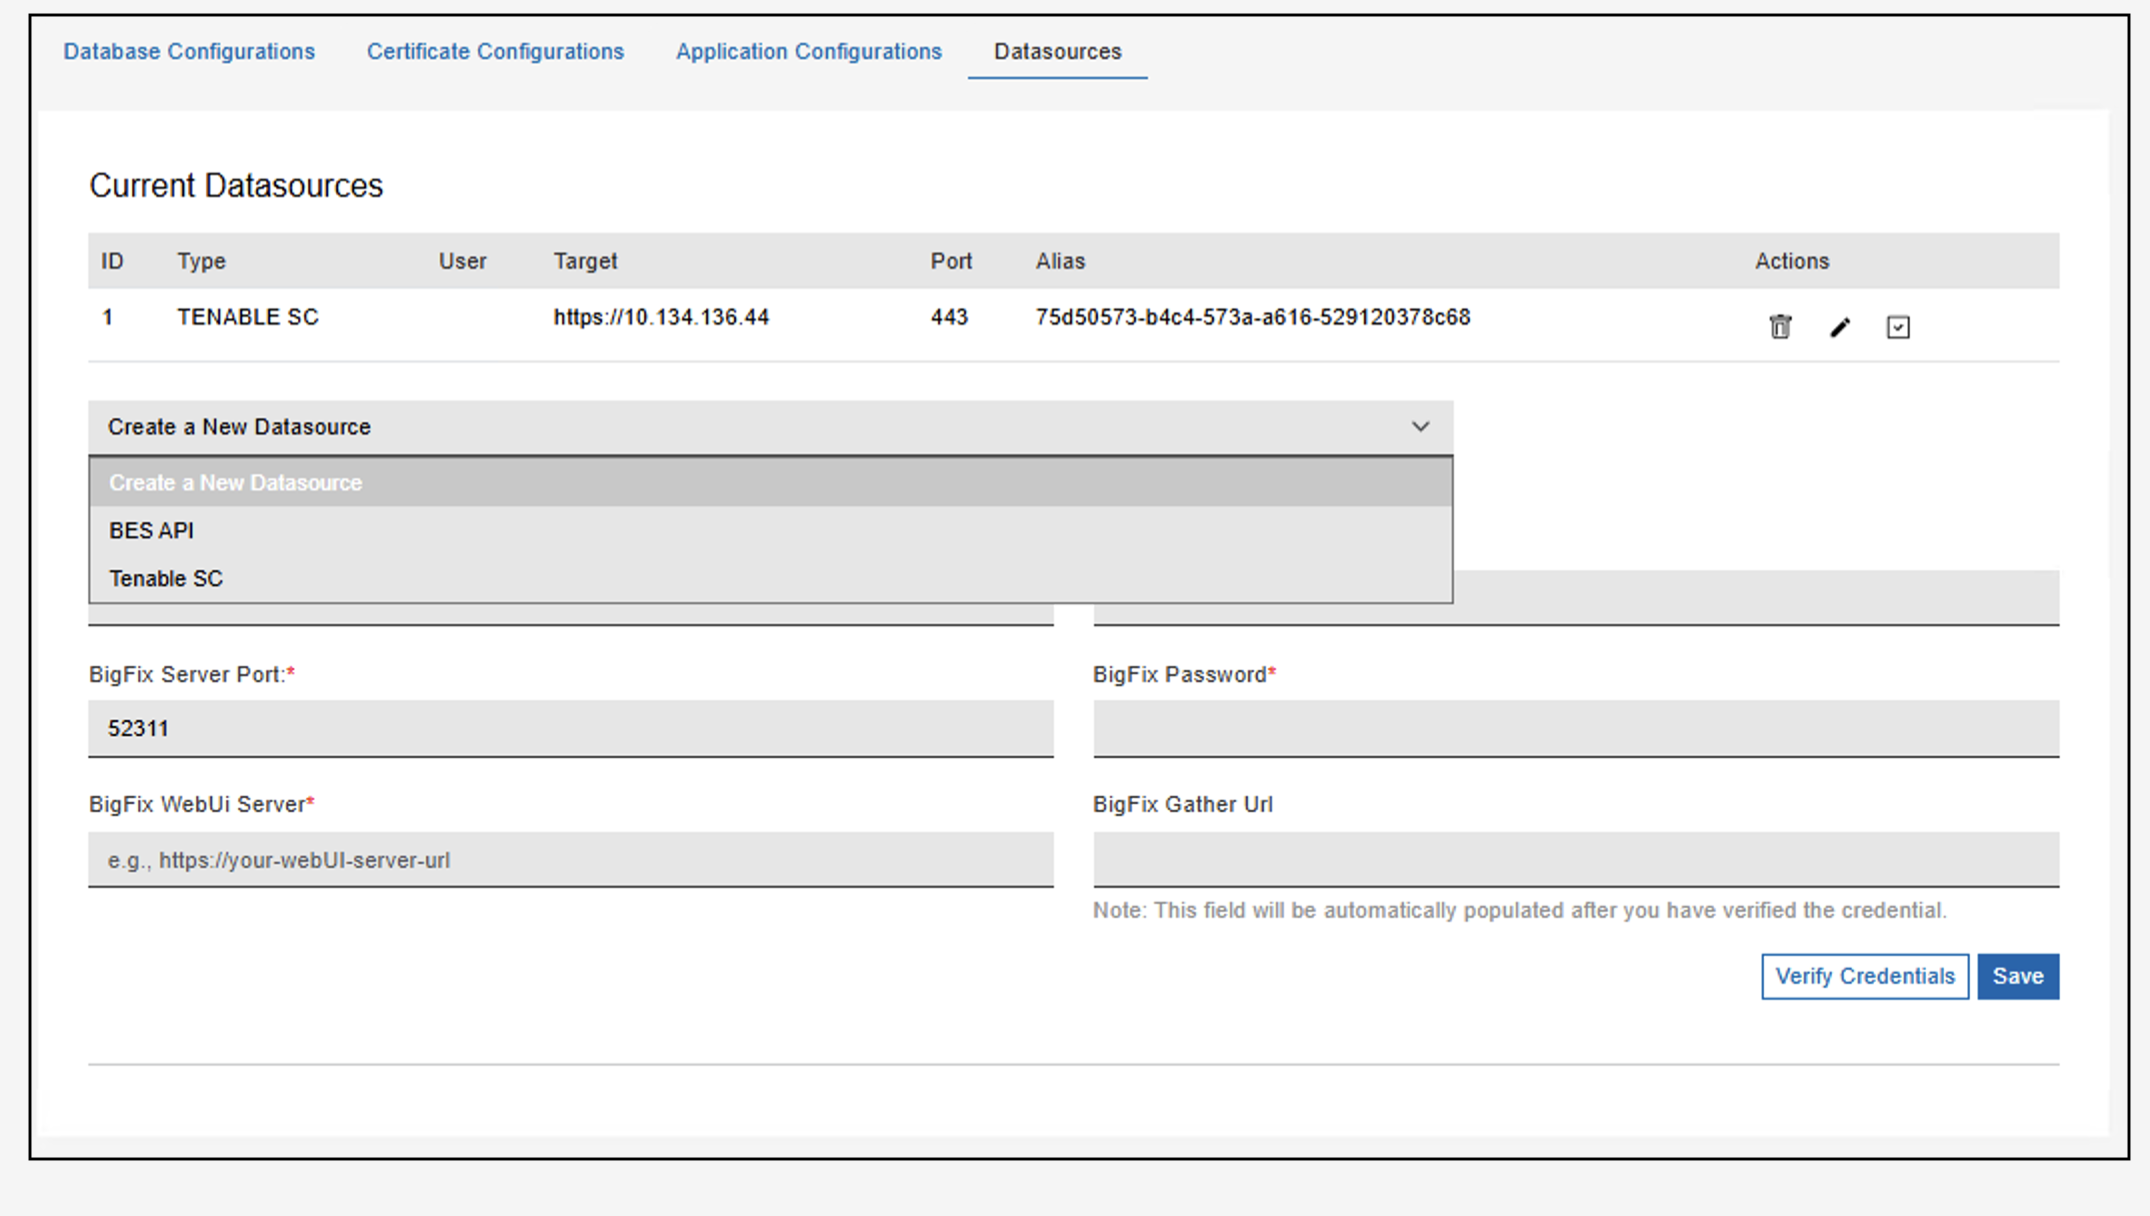
DataSources Tab
You can enter the Vulnerability Management Platform Credentials Configuration (Tenable IO API, Tenable SC API, or Qualys API) and Bigfix API Credentials Configuration.Note:Before you configure the BES data source, ensure that PowerShell is accessible on the WebUI host machine.Note:
- The BigFix API Credentials Configuration supports both IPv4 and IPv6.
- IPv6 addresses used in URL fields (BigFix Server
or BigFix WebUI Server) must be enclosed in square
brackets (e.g.,
https://[IPv6-address]:443/).
Verify the credentials and click Save.Note:For Tenable, it is required to use the administrator user role within Tenable to enable the generation of API keys used by IVR to maintain the interface with Tenable. For Qualys, ensure your user account has API Access enabled. Additionally, please note that the BigFix API credentials must have master operator permissions.Note:BES data sources can be created only by Master account operators.Note:The Tenable Cloud URL and Qualys API URL are editable fields.Note:For a first installation of IVR v.4.3, it is mandatory to include the BES API to support the Import feature. This is a required field. Ensure to include the BES API resource at this step.Enabling the Tenable (Tenable SC and Tenable IO) or Qualys data sources is not required for the import and will be ignored by the system if already configured.
Note:Switching the scanner type between Tenable SC, Tenable IO, and Qualys requires deleting existing database tables or creating a new database.Important:In Tenable.io and Qualys, only one datasource can be configured per instance. However, in Tenable.sc, multiple datasources can be configured.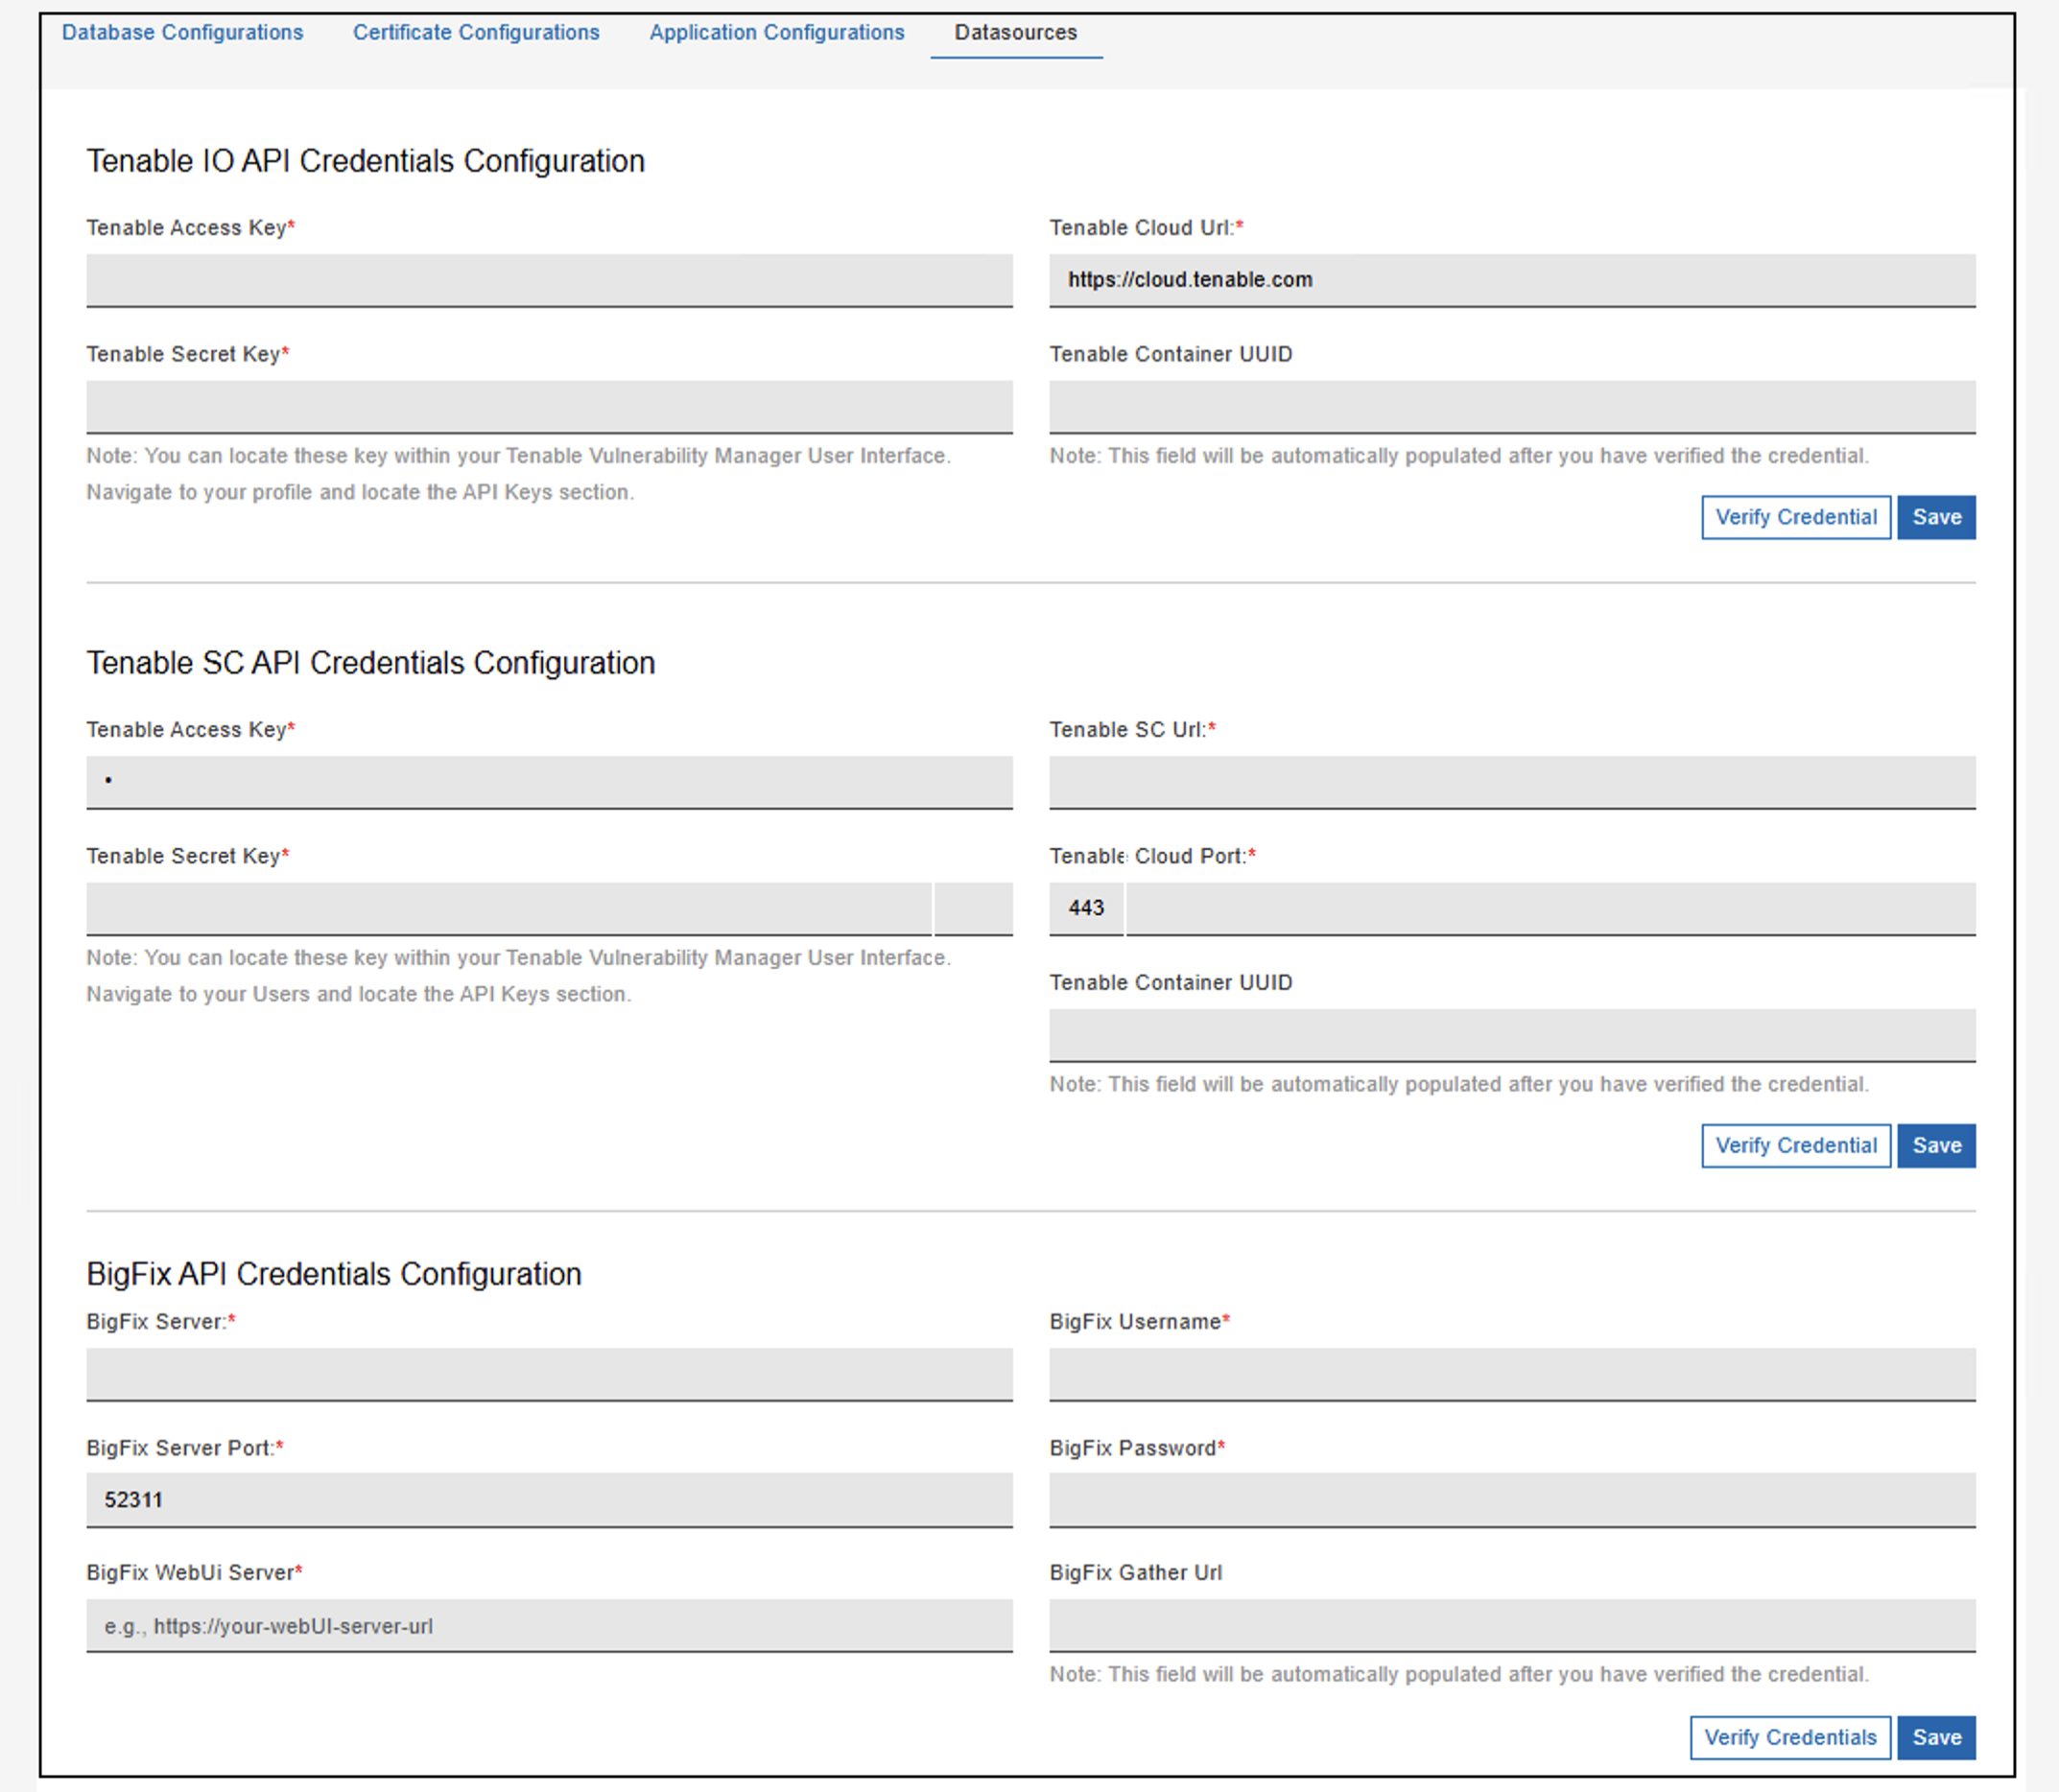
When you finish configuring Tenable and the BES API, a summary notification will be displayed on the right side.
When you finish configuring your VM platform (Tenable or Qualys) and the BES API, a summary notification will be displayed on the right side.
To create a new VM datasource, verify and save the Tenable or Qualys credentials first.
Once the setup is complete, the certificates, configurations and lockbox db get created.
If the setup configuration remains in an incomplete state, the Fixlet WARNING: BigFix IVR Retriever has an incomplete configuration from the site BigFix Insights for Vulnerability Remediation will be relevant to the machine.
