
Deploy Script
Run your own scripts to quickly remediate devices. Supported script types include Bash, PowerShell, and BigFix Action Script within the BigFix UI. Target specific devices or OS families for fast and flexible deployments.
The Deploy Script feature under Custom Remediation lets advanced users (power users) deploy scripts directly to targeted devices for custom remediation. This tool is intended for users who need more control and flexibility than standard remediation tools provide.
From the Custom Remediation app, select Deploy on the Deploy Script card to open the Deploy Script wizard. The wizard guides you through five steps: Script, Devices, Behavior, Schedule, and Summary. A footer link, Create custom remediation script with N applicable devices, shows the current count of applicable devices on every step.
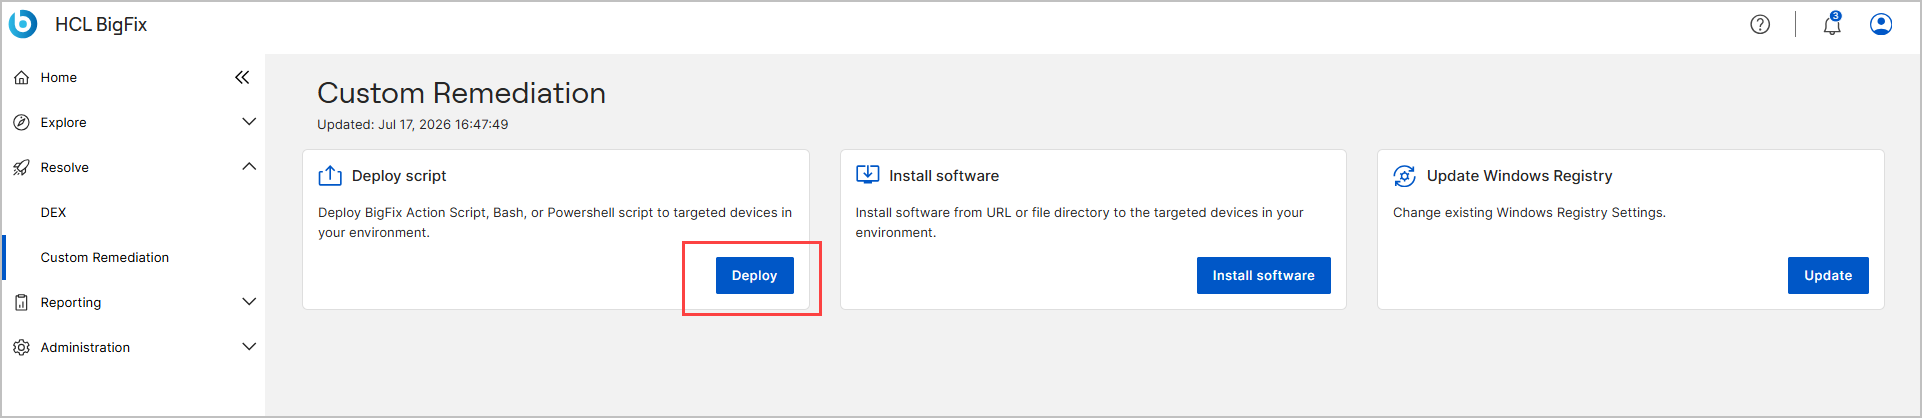
Deploy a script
- On the Script step (Create custom remediation
script), define the script, and then select Next:
- From Select the script type you want to use, select a script type, such as Powershell, bash, or BigFix Action Script.
- For How do you want to create the script?, select
Upload File to upload a script file, or Input
Script to enter the script in the Type your script
here box.
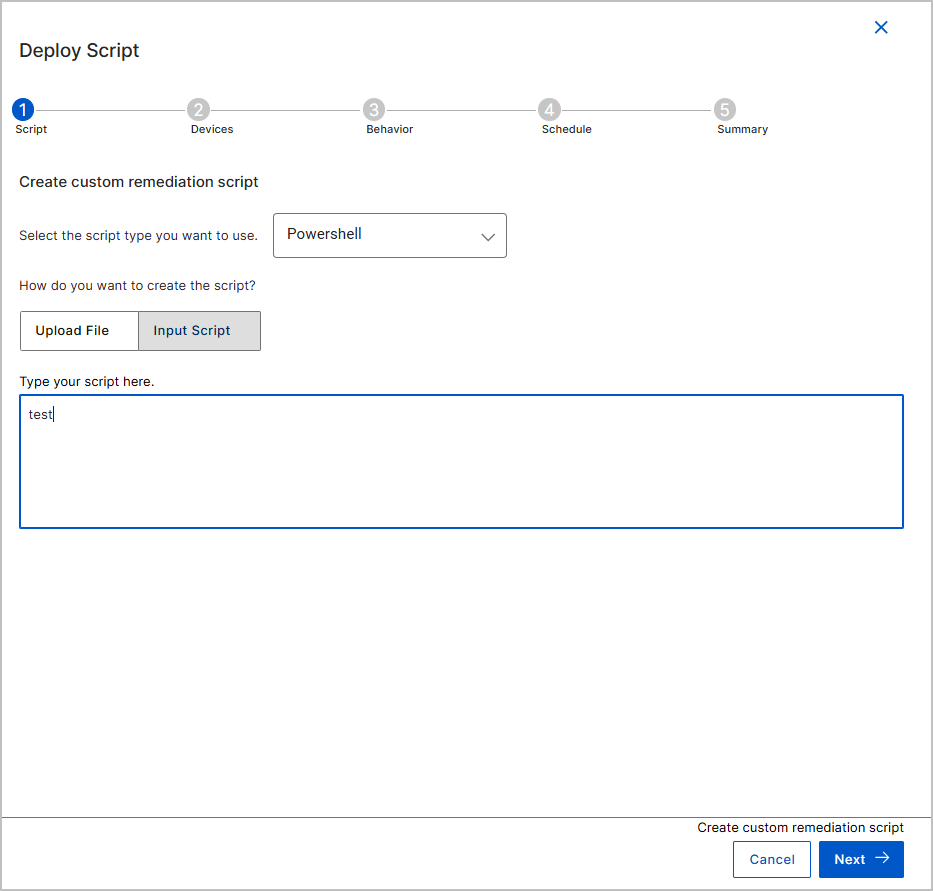
Note: Supported script types include Bash, PowerShell, and BigFix Action Script. - On the Devices step (Filter the devices
below), specify how devices are selected, and then select
Next. For Filter By, choose one of the
following methods:
-
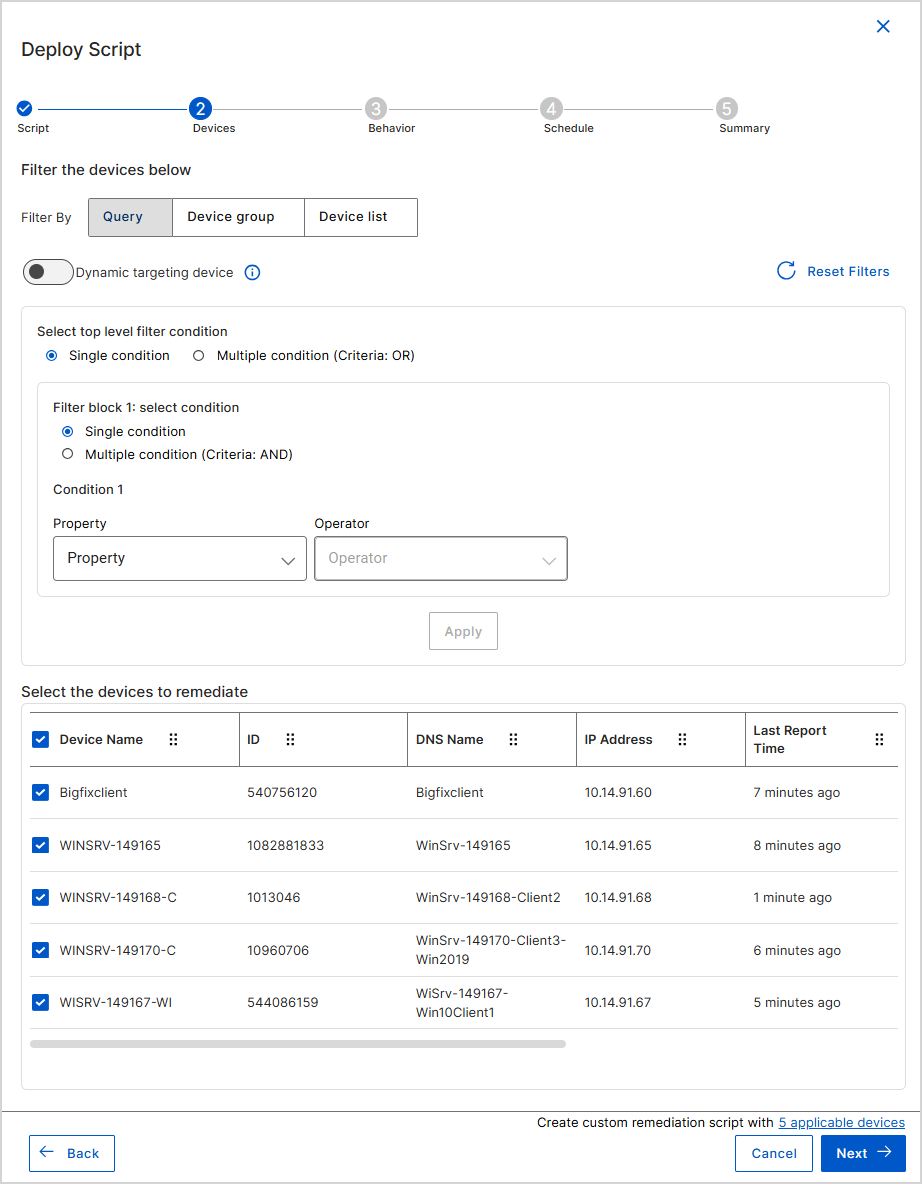
Query - Create dynamic filters based on device properties.
- Apply filters using Single condition or Multiple condition (Criteria: AND/OR) options. For more information, see Filter by query.
- For each condition, select a Property, Operator, and Value.
- Select Reset Filters to clear the filters.
-
(Optional) Turn on Dynamic targeting device toggle button to continuously re-evaluate the targeted devices so that devices matching the criteria are included as they report in.
- Select Apply to evaluate the filters, and then review the Select the devices to remediate table to verify which devices match the criteria. The table shows the Device Name, ID, DNS Name, IP Address, and Last Report Time for each device.
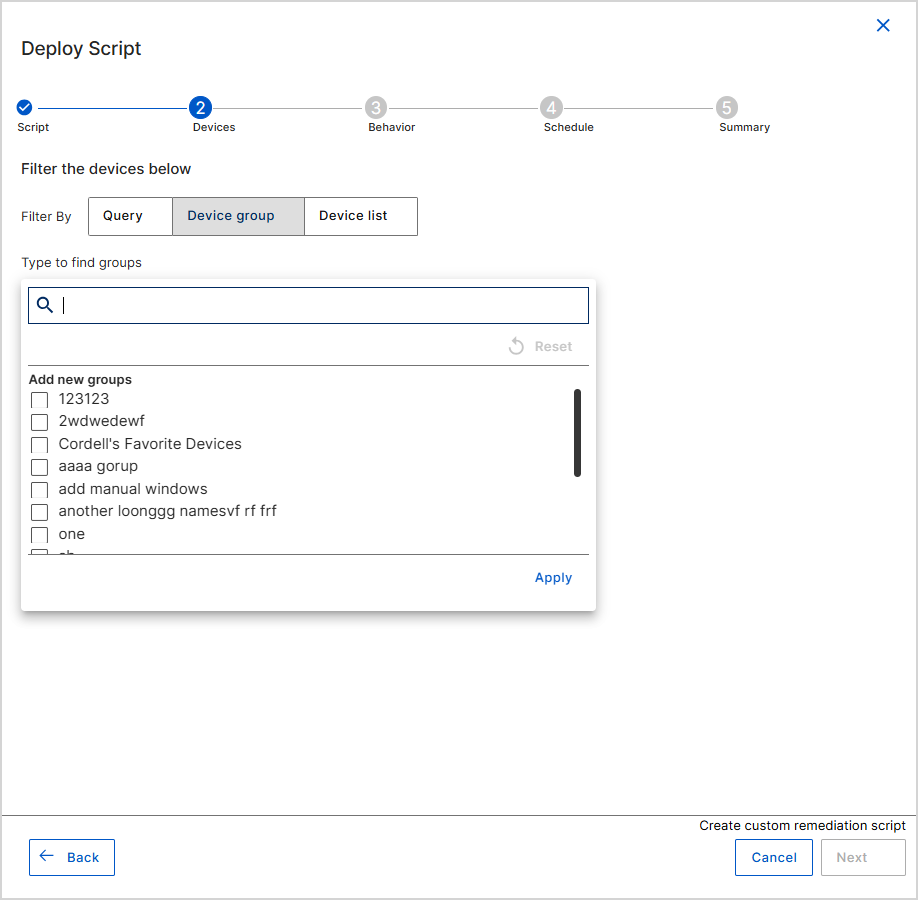
- Device group - Target an existing device group.
- In Type to find groups, search for a group.
- Select one or more groups under Add new groups.
- Select Apply. Select Reset to clear the selection.
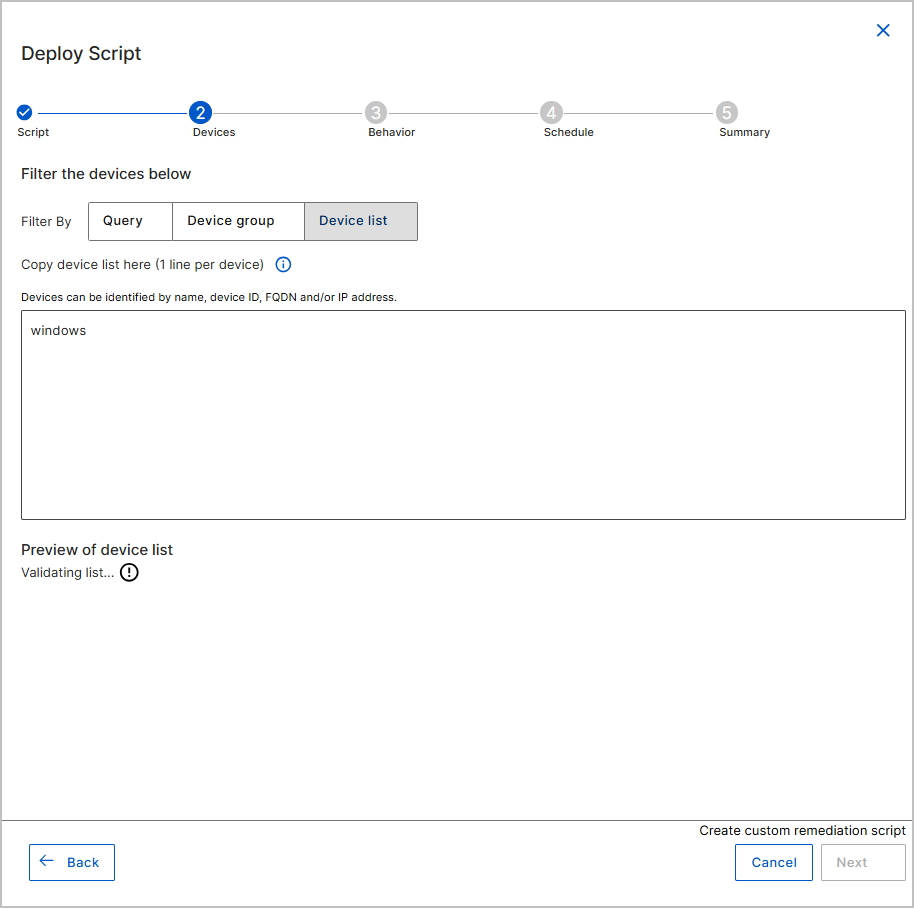
- Device list - Select devices manually from the list. This
option allows to input a fixed list of devices where the deployment will be applied.
Devices can be identified using their name, DNS, and IP address.
- Identified by name, DNS, or IP address, with each device on a separate row.
- A maximum of 1,000 devices can be added in a single device list. If you intend to target more than 1,000 devices using device lists for filtering, create separate deployments.
- Select Verify List to confirm the entries, and review the preview of the device list to be targeted.
-
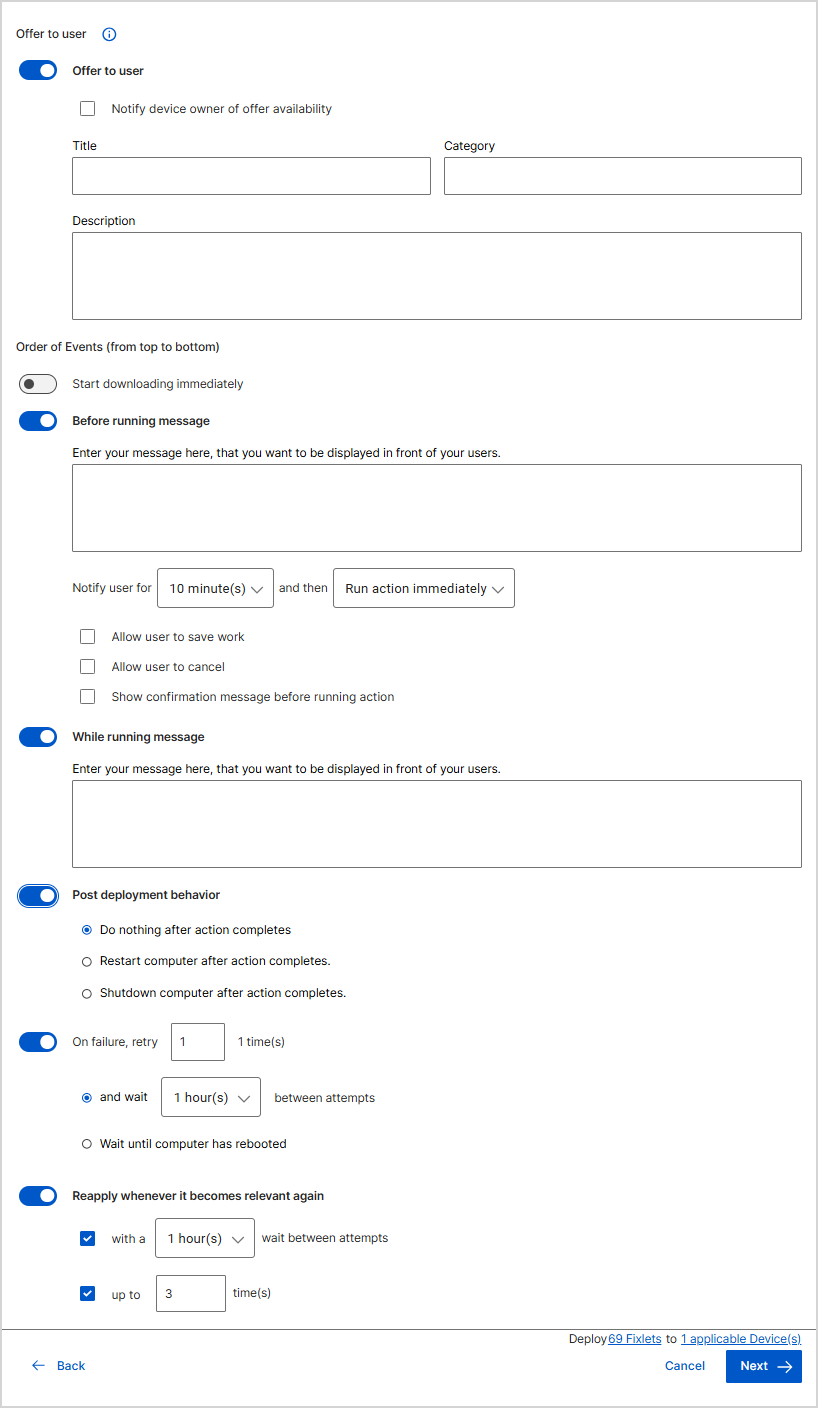
- On the Behavior step, configure how the deployment is delivered,
how users are informed, and how failures are handled, and then select
Next. The options under Order of Events (from top to
bottom) are processed sequentially:
-
Offer to user - Turn on this toggle to deploy the action as a BigFix Offer.Note: An Offer lets end users choose and install software, patches, or other actions themselves through a self-service application, instead of having them deployed automatically by an administrator.
When you turn on this toggle, set the following options:
- Notify device owner of offer availability - Select this checkbox to alert the device owner when the offer becomes available.
- Title - Enter the title that identifies the offer to the user.
- Category - Enter the category that groups the offer in the self-service application.
- Description - Enter the text that explains what the offer does.
- Start downloading immediately - Some Fixlets contain large files. This option controls whether all applicable devices begin downloading the Fixlet as soon as the deployment is created.
-
Before running message - A device might become unresponsive while a Fixlet is deployed. Turn on this option to display a warning for a set time before the Fixlet is applied, which is also useful when a restart is required so users can save their work. Enter the message text, and then set the following options:
- In Notify user for, select how long to show the message (for example, 10 minutes), and in the and then list, select the follow-up action, such as Run action immediately.
- Allow user to save work - Select this checkbox to let users save open work before the action runs.
- Allow user to cancel - Select this checkbox to let users cancel the action.
- Show confirmation message before running action - Select this checkbox to prompt users to confirm before the action runs. In Confirmation message, keep the default text or enter your own, for example Are you sure you want to run this action now?
- While running message - Turn on this option to display a message on the device until the deployment is complete, and then enter the message text to display to the user.
-
Post deployment behavior - Turn on this option to control what happens on the device after the action completes, and then select one of the following:
- Do nothing after action completes - The device stays in its current state.
- Restart computer after action completes - The device restarts when the action finishes.
- Shutdown computer after action completes - The device shuts down when the action finishes.
If you select Restart computer after action completes or Shutdown computer after action completes, configure the message shown to the user:
- In Message title (required), enter a short title, for example Shutdown now.
- In Message text (required), enter the message body that asks users to save any unsaved work.
- In Notify user for, select how long to show the message, and in the and then list, select what happens when that time ends, such as Shutdown automatically or Restart automatically.
- Allow user to cancel shutdown or Allow user to cancel restart - Select this checkbox to let users cancel the shutdown or restart.
-
On failure, retry - Turn on this option to have BigFix try the deployment again if it fails. Enter the number of retries, and then select one of the following options:
- and wait - Select this option and set the interval (for example, 1 hour) that BigFix waits between attempts.
- Wait until computer has rebooted - Select this option to retry the action only after the device restarts.
- Reapply whenever it becomes relevant again - Turn on this
option to reapply the Fixlet automatically if it becomes relevant again after the
initial deployment. Select with a to set the wait time between
attempts, and up to to set the maximum number of times. Tip: This setting increases the success rate by accounting for temporary issues such as device disconnection or network latency.
-
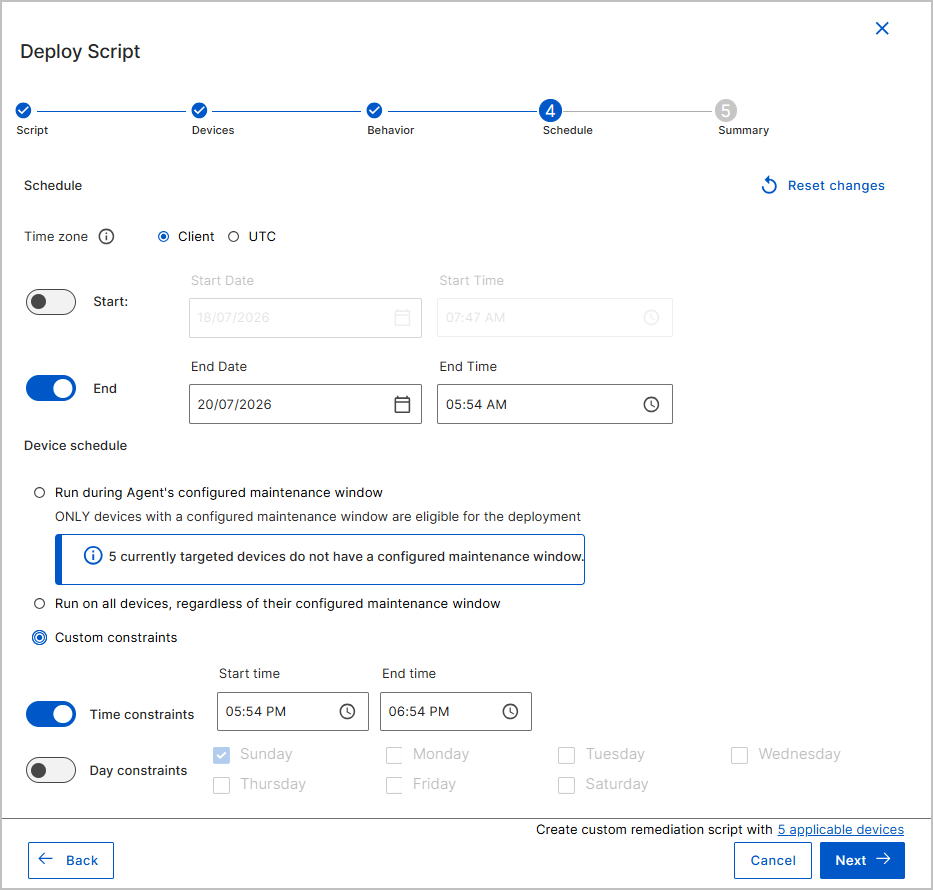
- On the Schedule step, define the window during which the
deployment remains in effect, and then select Next. For the
settings, see Schedule
settings. Select Reset changes to clear all scheduling
fields and restore the defaults.
- On the Summary step, review a consolidated, read-only view of
every option you selected - device criteria, start and end time, before-deployment
settings, behavior, time constraints, and after-deployment settings. This is the final
checkpoint before deployment.
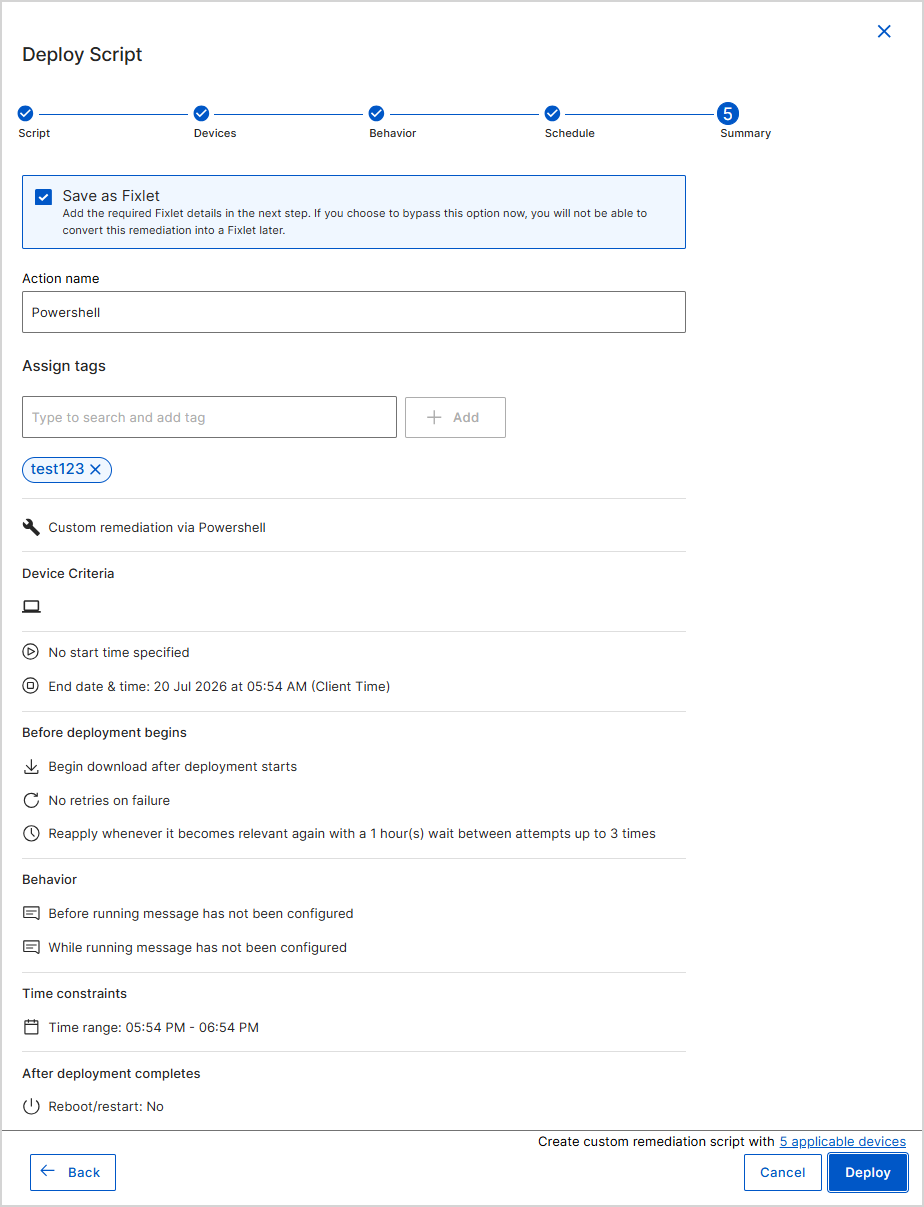
- The Behavior section confirms the message and notification
options that you set on the Behavior step, for example:
- A message will be displayed before deployment begins.
- Notify user for 10 minute(s), and then run action immediately.
- A confirmation message will be displayed before deployment begins.
- No message will be displayed while deployment is running.
- To convert this remediation into a Fixlet, select Save as
Fixlet, and provide the Fixlet details after the deployment succeeds
(see step 7). Important: If you clear Save as Fixlet now, you can't convert this remediation into a Fixlet later.
- Action name is auto-populated with a default name that you can edit on the Summary step. Keep the default, or enter a unique, meaningful name that describes the purpose of the action. This name appears in action history, logs, and dashboards, which helps you and your team identify and differentiate actions. Use descriptive terms, such as "Critical patch - May 2026 - Windows devices", for clarity and traceability.
- In Assign tags, add one or more tags:
- To add an existing tag, type to search for it, select it from the list, and then select Add.
- To create a new tag, type the tag name, and then select Add.
- The Behavior section confirms the message and notification
options that you set on the Behavior step, for example:
- Select Deploy to deploy the action.
- If you selected Save as Fixlet, the Save as
Fixlet dialog opens after the message Custom remediation deployed
successfully appears. Provide the Fixlet details, and then select
Save as Fixlet. The Name is auto-populated with the same name
entered for the action; the remaining fields start blank:
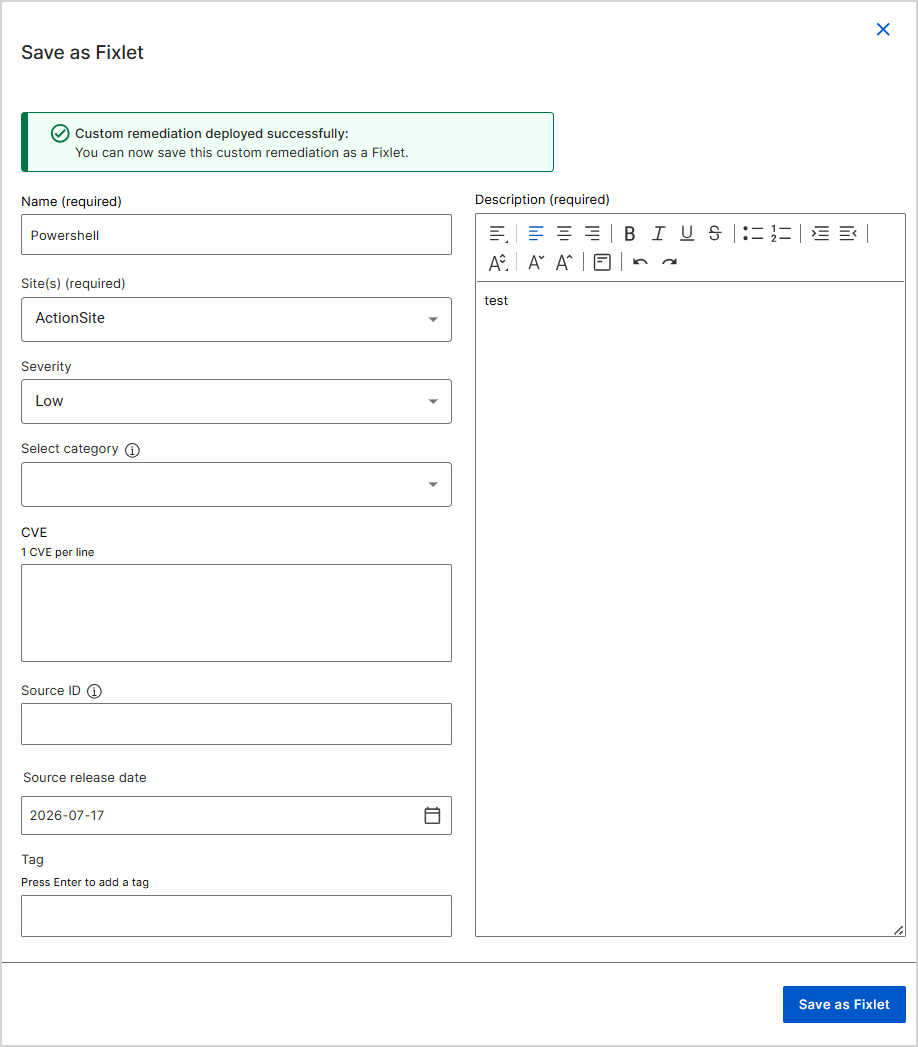
- In Name (required), keep the auto-populated action name or enter a different name.
- In Description (required), enter a description. Use the formatting toolbar to style the text.
- From Site(s) (required), select the site that the Fixlet belongs to, such as ActionSite.
- Optional: set Severity, Select category, CVE (one CVE per line), Source ID, Source release date, and Tag (press Enter to add each tag).
- Select Save as Fixlet. A success message reading "Your custom fixlet has been successfully created." will appear in the top-right corner.
Schedule settings
Use the following settings on the Schedule step to control when the deployment runs.
| Setting | Description |
|---|---|
| Time zone | Select the time zone that applies to the start and end times: Client uses each endpoint's local time; UTC uses Coordinated Universal Time. |
| Start | Turn on Start to set when the deployment begins, and then select the Start Date and Start Time. If Start is off, the deployment can begin immediately. |
| End | Turn on End to set when the deployment window closes, and then select the End Date and End Time. |
| Run during Agent's configured maintenance window | Restrict the deployment to devices that have a configured maintenance window. The deployment runs only within those windows. The wizard notes how many currently targeted devices don't have a configured maintenance window; those devices are excluded. |
| Run on all devices, regardless of their configured maintenance window | Override maintenance window restrictions. The deployment runs on all targeted devices, whether or not they have a maintenance window configured. |
| Custom constraints | Control when a deployment can run by defining specific times and days. Turn on Time constraints to specify a Start time and End time when the deployment is allowed to run. Turn on Day constraints to limit the deployment to one or more days of the week. |