Service Request Task Management
To create a data source for Service Request Task Management, perform the following steps:
- On the left menu bar, click Configuration 🡪 Manage Data Sources.
- The Create Data Source page appears with the following tabs:
- Organization
- Fetch Data
- Release Rules
Figure 1. Create Data Source  Note:Release Rules are only applicable for the following Module types- Incident Management, Change Request Task and Service Request Task. This tab will not be activated for other module types.
 - On the Organization tab,
- In the Module field, select Service Request Task, since we are configuring this data source for pulling the service request task tickets.
- In the Service field, select Cherwell Tool as we are configuring the data source for Cherwell.
- In the Integration Type field, select REST, since we will be integrating through REST APIs.
- Select the Timezone to specify the time zone of the selected data source.
- Select Timestamp to view the present data with date and time.
- Click Next.
Figure 2. Create Data Source (Cont.) 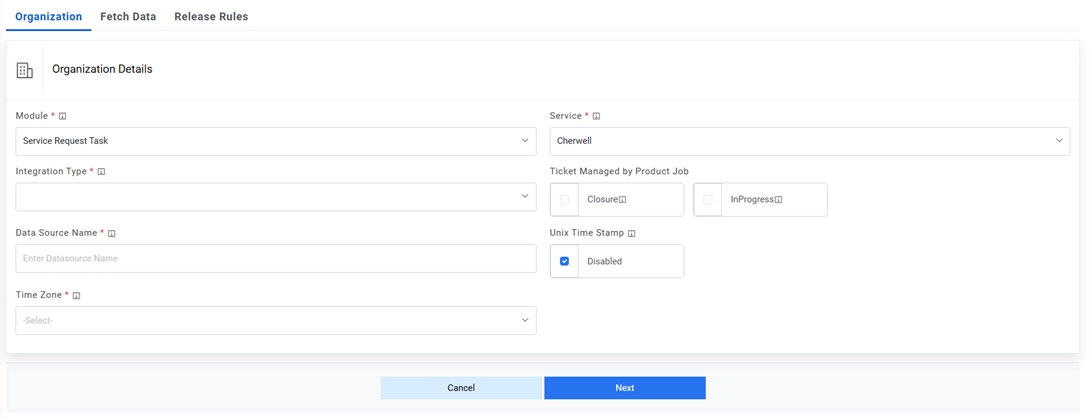
- On the Fetch Data tab, populate the details as per the environment.
- In the Connection Details section enter the following details:
-
URL – Type the URL which contains the
placeholders that display the parameters based on
the applied clause such as the number of records to be fetched, query type, date on
which the data is fetched, and the order by and so on. It depends on the URL or API
provided by the tool.
Sample URL
http://<iAutomate_API_URL>/iAutomateAPI/Request/GetSRTicketData/<Org_ID>?start_date>=#Start_Date#&end_date<=#End_Date#&
Here, < iAutomate_API_URL > is the API URL of iAutomate where Push APIs are present and <Org_ID> is the OrgID for the organization for which you are creating the data source. It is available in Organization Master in Database
-
Authentication Type – Select one of the Authentication Types from Basic /
Windows, OAuth 2.0Note:The user details that are entered here should be an API User
- Selection of Basic / Windows requires you to enter -
- User Id
- Password
- Selection of OAuth 2.0 requires you to enter -
- User Id
- Password
- Authentication URL
- Selection of Basic / Windows requires you to enter -
- Proxy Required – Check Proxy Required, if the environment needs access to content from data sources outside the firewall.
- Click on Test Connection to check accessibility of URL from service. Testing
the connection is not mandatory, you can still create Data source.
Figure 3. Create Data Source (Connection Details) 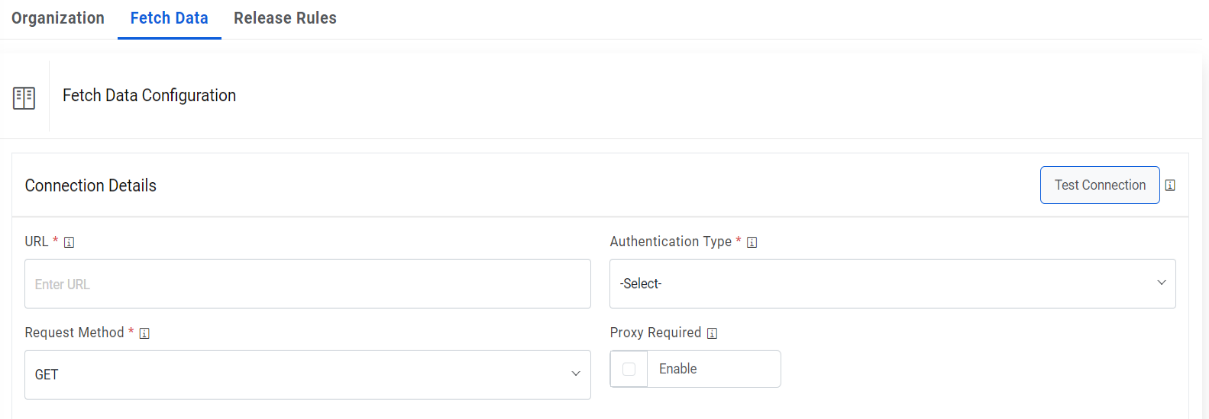
-
URL – Type the URL which contains the
placeholders that display the parameters based on
the applied clause such as the number of records to be fetched, query type, date on
which the data is fetched, and the order by and so on. It depends on the URL or API
provided by the tool.
- For Password, click on icon next to it. If the password is available in plaintext,
then select Input type as Input Text and enter the password in Value field. Else if it is
available in Azure Key Vault then select Input Type as Azure Key Vault and then select any
of the configured details from the value field. Else if it is available in any Key Vault
such as CyberArk or Secret Manager then select Input Type as CyberArk or Secret Manager
respectively and then select any of the configured details from the value field.
Figure 4. Password in Plaintext 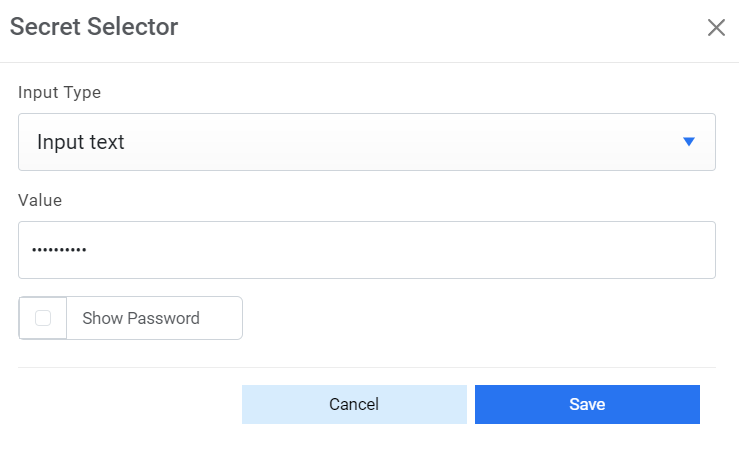
Figure 5. Password from Key Vault (CyberArk) 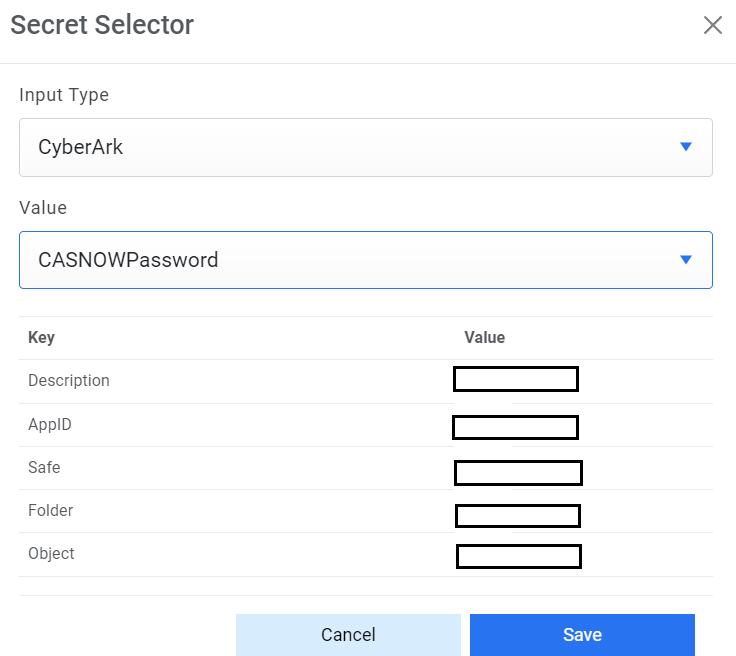
Figure 6. Password from Secret Manager 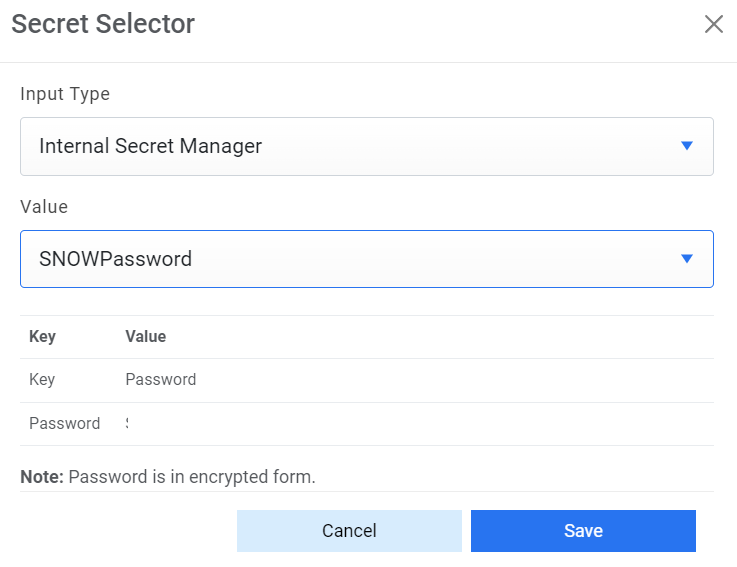
Figure 7. Password from Azure Key Vault 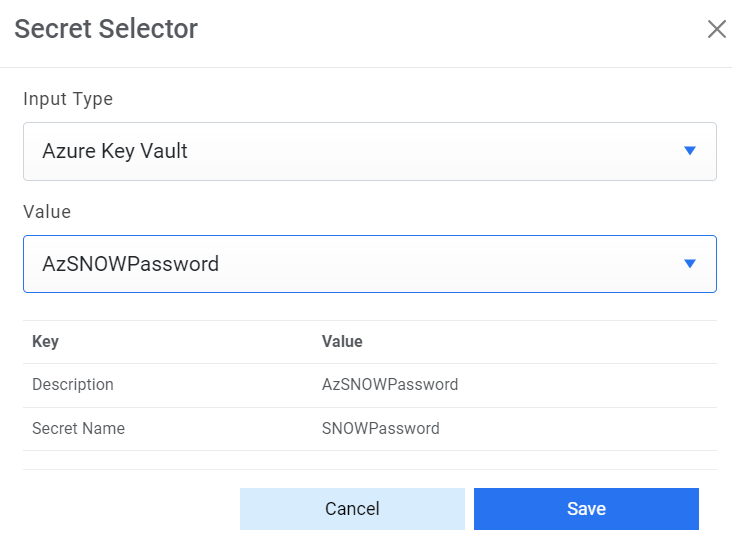
- Request Authentication Parameters – If the user has additional parameters, click Add Authentication Parameters under the Request Authentication Parameters tab.
- Based on the Authentication Type, add the parameters mentioned in the table
below.
Sample Authentication Parameters
Authentication Type Key Value Is Encrypted? Is Key? OAuth2.0 username <username> NO YES OAuth2.0 password <password> YES YES OAuth2.0 AuthMethod POST NO NO OAuth2.0 AuthPrefix Bearer NO NO OAuth2.0 client_id <clientID> YES YES OAuth2.0 client_secret <clientsecret> YES YES OAuth2.0 TokenKey access_token NO NO OAuth2.0 ResponseType JSON NO NO OAuth2.0 grant_type Password NO YES Figure 8. Create Data Source (Request Authentication Parameters for OAuth2.0) .png)
-
URL Path Parameters – Based on the URL entered earlier, please map the values to the
URL Path Parameters. E.g., for the URL entered earlier, please populate the below
inputs:
Key: #StartDate#
ValueType: SQL UDF
VALUE: @@GetFromDateTimeUsingSRTaskPushStagingModifiedDate
Key: #EndDate#
ValueType: SQL UDF
VALUE: @@GetToolCurrentDateTime
Figure 9. URL Path Parameters 
- Request Header Parameters – Please enter the request header parameters as required.
-
Response Body – In this section, please enter the output of URL query for one of the
incidents in JSON format. A sample response is mentioned below.
Response Body – {"result": [{ "TicketNumber": "SRTask0303863", "Summary": "testing", "Description": "testing data", "RequestItemId": "12345", "SRId": "2b535ab3dbc988506d7550d3dc96190e", "AssignedGroup": "", "StatusCode": "1", "CreationDate": "2020-05-07 05:06:05.000", "LastModifiedDate": "2020-05-07 05:54:54.000", "sys_id": "", "Col1": "", "Col2": "", "Col3": "", "Col4": "", "Col5": "", "iAutomate_CreatedDateInGMT": "2020-05-08 09:14:24.903", "iAutomate_UpdatedDateInGMT": "2020-05-08 09:14:24.903" } ]} - After entering the response, click Extract Keys to add the parameters in the Mandatory Parameter Mapping section.
-
Mandatory Parameter Mapping – Please map the mandatory parameters to the respective
values as mentioned in the screenshot below:
Sample Mandatory Parameter Mapping
Key Value Type Value TicketNumber JSON.Keys result.0.TicketNumber Summary JSON.Keys result.0.Summary Description JSON.Keys result.0.Description StatusCode JSON.Keys result.0.StatusCode LastModifiedDate JSON.Keys result.0.LastModifiedDate RequestItemId JSON.Keys result.0.RequestItemId SRId JSON.Keys result.0.SRId CreationDate JSON.Keys result.0.CreationDate Figure 10. Mandatory Parameter Mapping 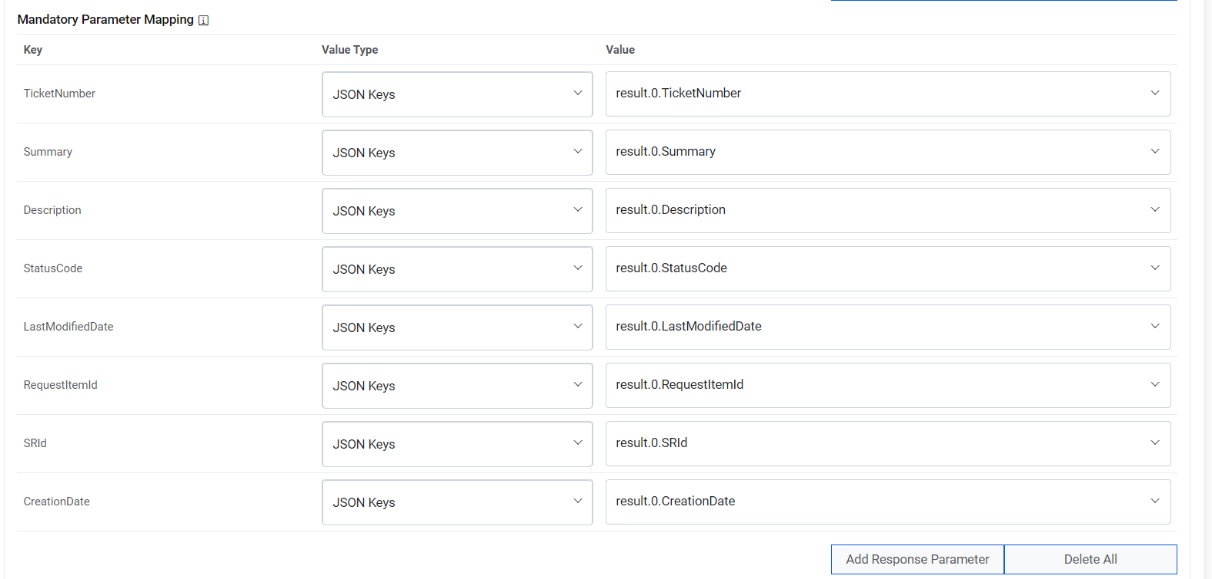
- If you need to add Optional parameters, click Add Response Parameter to add
more parameters. For our purpose, we will be adding a couple of extra parameters, as
mentioned below, as we need them in the later section.
Sample Optional Parameters
Key Value Type Value AssignedGroup JSON.Keys result.0. AssignedGroup Col1 JSON.Keys result.0.sys_id Figure 11. Optional Parameter Mapping 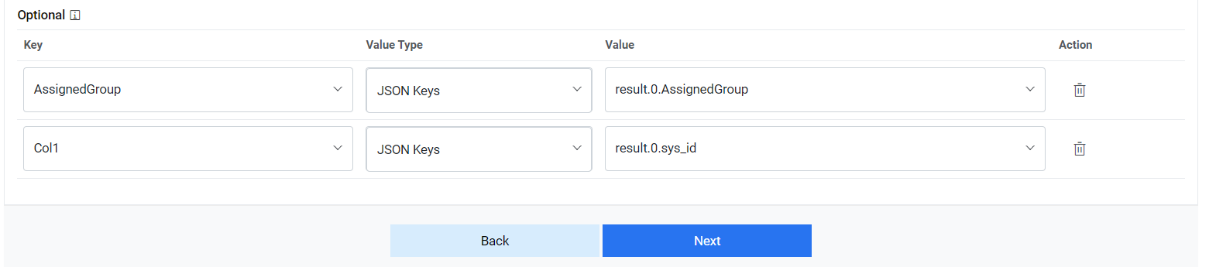
- Click Next to proceed to Release Rules.
- On the Release Rules tab, type in the details as per the requirement.
- In the Connection Details section, enter the following details:
-
URL – Type the URL of the selected service type to release the ticket. It
contains the placeholders that display the parameters
based on the applied clause and is dependent on the URL or API provided by the tool.
Sample URL https://url.servicenow.com/api/now/v1/table/sc_request?sysparm_fields=#Columns
- Authentication Type – Please enter the information in line with the Authentication type configured for fetching data configuration previously.
- Request Method – Select Request Method as POST from the drop-down.
- Proxy Required – Check Proxy Required, if the environment needs access to content from data sources outside the firewall.
- Click on Test Connection to check accessibility of URL from service. Testing
the connection is not mandatory, you can still create Data source.
Figure 12. Release Rules (Connection Details) 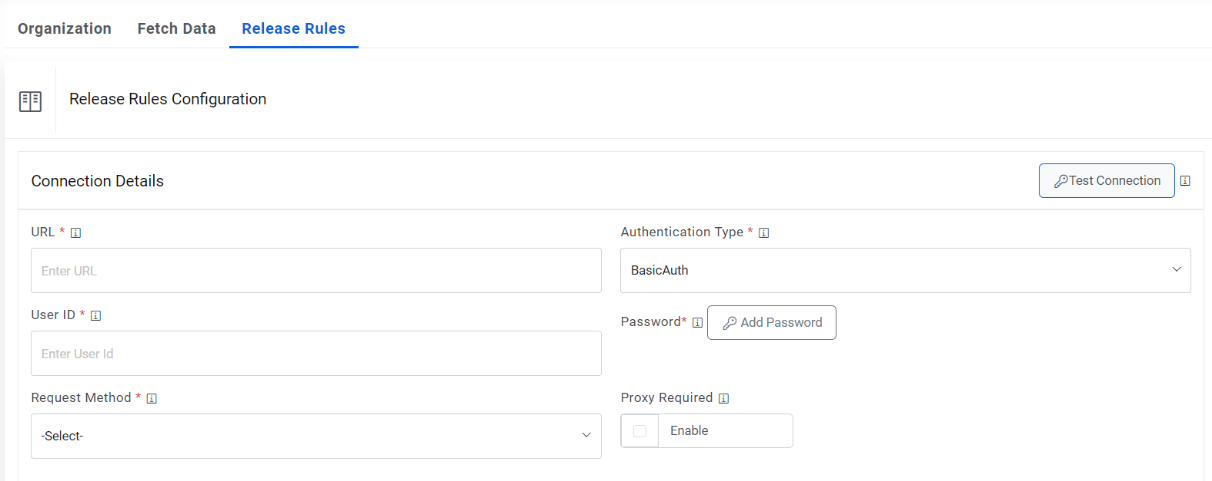
-
URL – Type the URL of the selected service type to release the ticket. It
contains the placeholders that display the parameters
based on the applied clause and is dependent on the URL or API provided by the tool.
- For Password, click on icon next to it. If the password is available in plaintext,
then select Input type as Input Text and enter the password in Value field. Else if it is
available in Azure Key Vault then select Input Type as Azure Key Vault and then select any
of the configured details from the value field. Else if it is available in any Key Vault
such as CyberArk or Secret Manager then select Input Type as CyberArk or Secret Manager
respectively and then select any of the configured details from the value field.
Figure 13. Password in plaintext 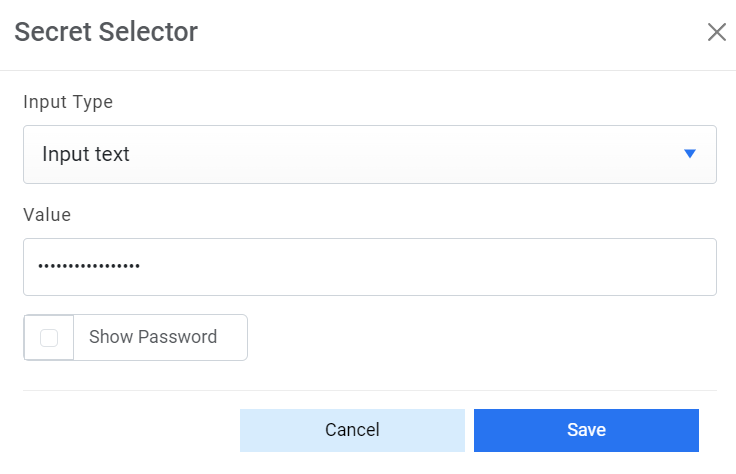
Figure 14. Password from Key Vault (CyberArk) 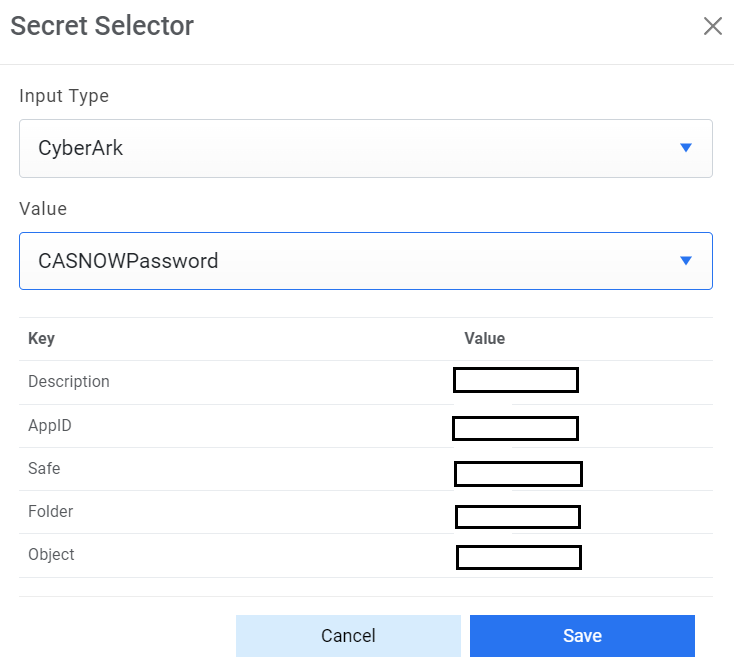
Figure 15. Password from Secret Manager 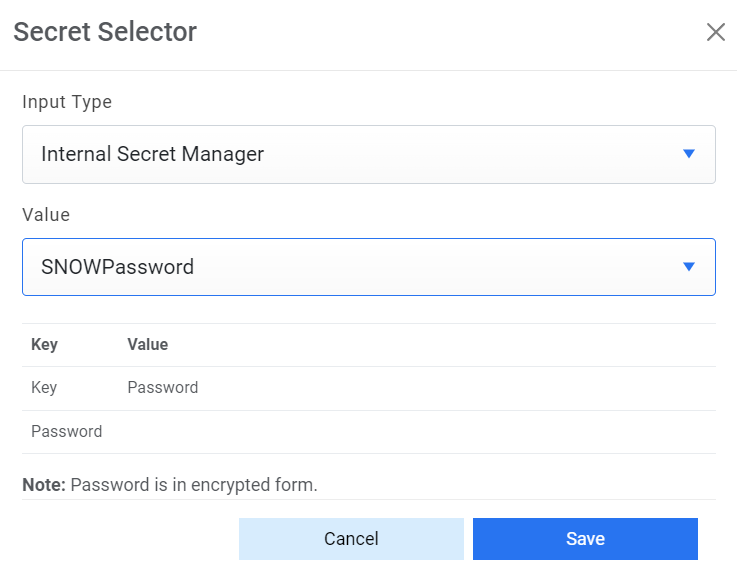
Figure 16. Password from Azure Key Vault 
- Request Authentication Parameters - If the user has additional parameters, click Add Authentication Parameters under the Request Authentication Parameters tab.
- Based on the Authentication Type, add the parameters mentioned in the table below
Sample Authentication Parameters
Key Value Is Encrypted? Is Key? grant_type password N Y username <username> N Y Password <password> Y Y client_id <client_id> N Y AuthPrefix Bearer N N AuthMethod POST N N ResponseType JSON N N TokenKey access_token N N Figure 17. Create Data Source (Request Authentication Parameters) .png)
-
Request Body - In this section, please enter the request body in JSON format. A
sample request is mentioned below:
Request Body –
{
"busObId": "946004f5f680a57b6747774eda9a6fa2f5d0e73db1",
"cacheScope": "Tenant",
"fields": [
{
"dirty": true,
"displayName": "Task RecID",
"fieldId": "946005353974025498ed1d4068936d72c8992d015c",
"value": "#sys_id#"
},
{
"dirty": true,
"displayName": "Parent RecID",
"fieldId": "9460053dd53d9888efddc34d3db0360cc5be25f567",
"value": "#SR_sys_id#"
},
{
"dirty": true,
"displayName": "Journal Details",
"fieldId": "946005008899c5f5c31caa43c99083519668f0ff33",
"value": "#reassign_comment#"
},
{
"dirty": true,
"displayName": "Ticket Number",
"fieldId": "94602e208e8947bff420df4016b30962152556d5e2",
"value": "#ticket_number#"
},
{
"dirty": true,
"displayName": "Assignment Team",
"fieldId": "946005013472134fdc1b0649a685d41a4c73f6e179",
"value": "Service Desk"
},
{
"dirty": true,
"displayName": "Status",
"fieldId": "946004ff47672c8cda67da43a1945ce56f2f617855",
"value": "New"
},
{
"dirty": true,
"displayName": "Task Type",
"fieldId": "946004feb10853e55a192849c780773b2133028cc0",
"value": "SR Task"
},
{
"dirty": true,
"displayName": "Reassigning",
"fieldId": "946005a199ecde0a9cf0b748bb94e4040c2007540f",
"value": "True"
}
],
"persist": true
}
Figure 18. Release Rules (Request Body) 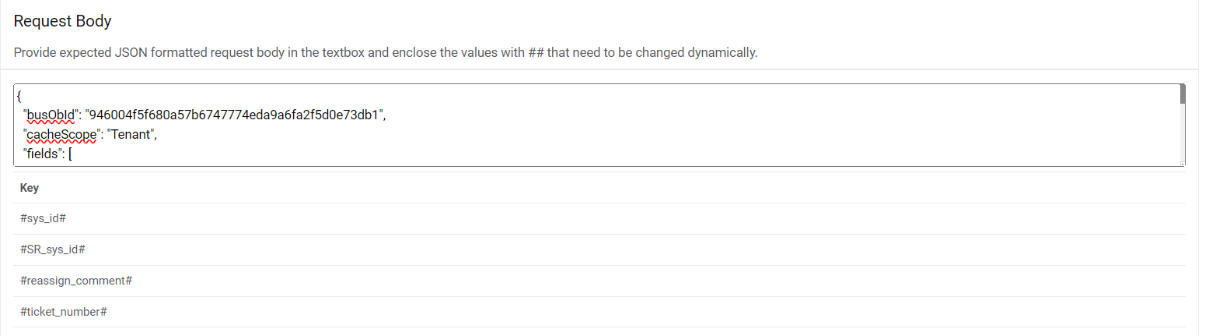
-
Response Body – In this section, please enter the response body in JSON format. A
sample request is mentioned below.
Response Body –
{ "result" : "#success#" }
Figure 19. Release Rules (Response Body) 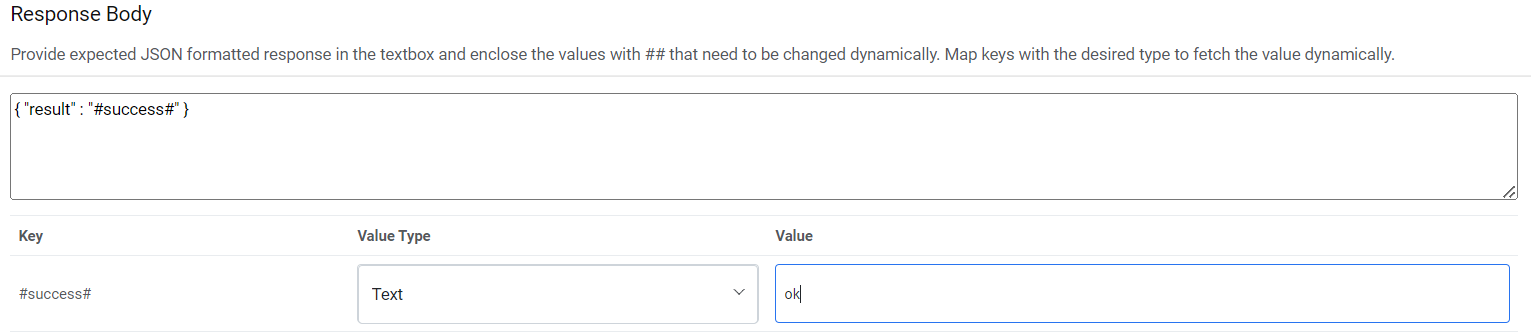
-
Response Key Value mapping can be done as per the table below.
Sample Response Key Value Mapping
#success# Text OK - Click Save to add the data source.
- To bring the tickets within iAutomate scope, a specific queue needs to be configured in
the ITSM tool and same must be configured in iAutomate. This is achieved through Manage
the Entry Criteria. Please follow the following steps:
- Go to Configuration and click Manage Data Sources.
- On the Data Sources tab, click
 next to the data source
user wants to manage. Manage Entry Criteria screen appears.
next to the data source
user wants to manage. Manage Entry Criteria screen appears.Figure 20. Manage Entry Criteria 
- Select ‘AssignedGroup’ for the Column field and ‘equals to’ for the Operator field.
- Enter the sys_id of the assignment group in Cherwell in the Value field.
-
Clause and Sub-Clause fields can also be added based on requirement.
Figure 21. Manage Entry Criteria (Cont.) 
- Click Save.
- To configure the Release rules for the data source created earlier, perform the below
steps:
- Go to Runbooks and click Manage Rules.
- Select the data source created from Data Source dropdown.
Figure 22. Manage Release Rules 
- Click on
 corresponding to
–No Rule—.
corresponding to
–No Rule—. - Map the parameters #sys_id# to the column in which sys_id was mapped while performing the mandatory parameter mapping while data source creation.
- Mention the reason for releasing ticket in #reassigncomments#.
- Map # SR sys_id # again to the column in which SRId was mapped while performing the
mandatory parameter mapping while data source creation.
Figure 23. Manage Release Rules (Cont.) 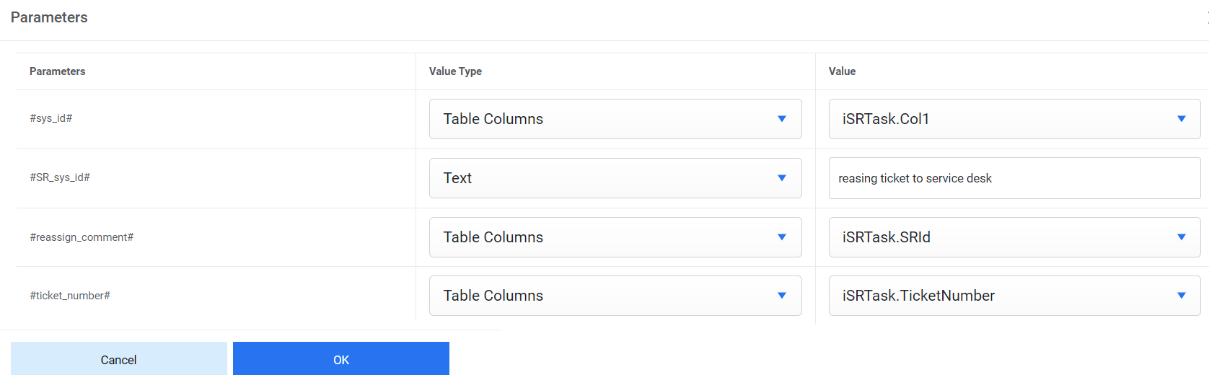
- Click OK.
Figure 24. Manage Release Rules (Cont.) 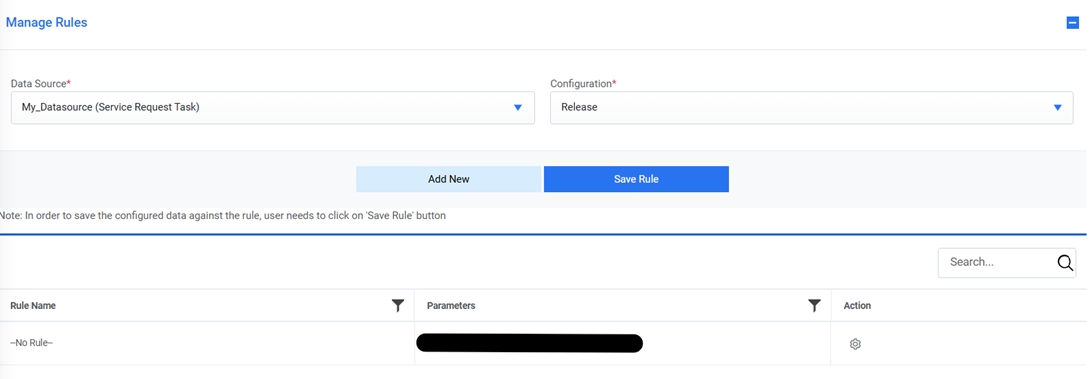
- Click Save Rule.