Integration with Zenoss
This scenario is applicable when the ITSM tools is not available in the client environment and event management tool and iAutomate are tightly integrated directly. The event data or the probable root cause identified flows to iAutomate which then performs the appropriate action for resolution.
To create a data source, perform the following steps:
- On the left menu bar, click Configuration 🡪 Manage Data Source.
- The Create Data Source page appears with the following tabs:
- Organization
- Fetch Data
- Release Rules
- Close Rules (Optional – applicable only when the issue closure status update is managed by iAutomate directly instead of RBA tool)
- InProgress Rules (Optional – applicable only when the issues in progress status updates are managed by iAutomate directly instead of RBA tool)
Figure 1. Create Data Source 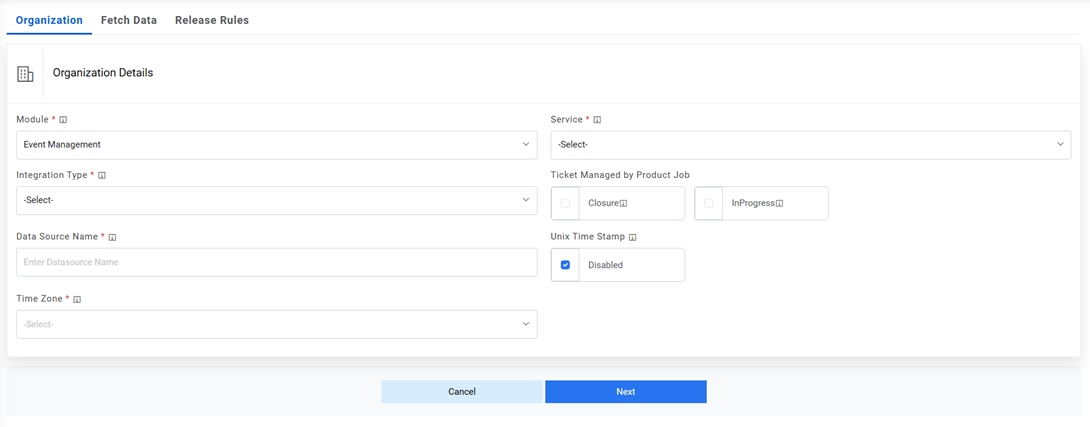
- On the Organization tab,
- Select the Module as Event Management, since we are configuring this data source for pulling the event data.
- Select the Service as Zenoss Tool as we are configuring the data source for Zenoss
- Select the Integration Type as REST, since we will be integrating through REST APIs.
- Check Is Ticket Closure Managed by iAutomate job if you want iAutomate to manage the issue closure updates instead of the RBA tool. In this scenario, an additional tab Close Rules Configuration will be activated to provide further details, steps for which are mentioned later.
- Check “Is ticket InProgress Managed by iAutomate job” if you want iAutomate to manage the issues in progress status updates instead of the RBA tool. In this scenario, an additional tab “InProgress Rules Configuration” will be activated for providing further details, steps for which are mentioned later.
- Select the Timezone to specify the time zone of the selected data source.
- Select Timestamp to view the present data with date and time.
- Click Next.
Figure 2. Create Data Source (Cont.) 
Figure 3. Create Data Source (Cont.) 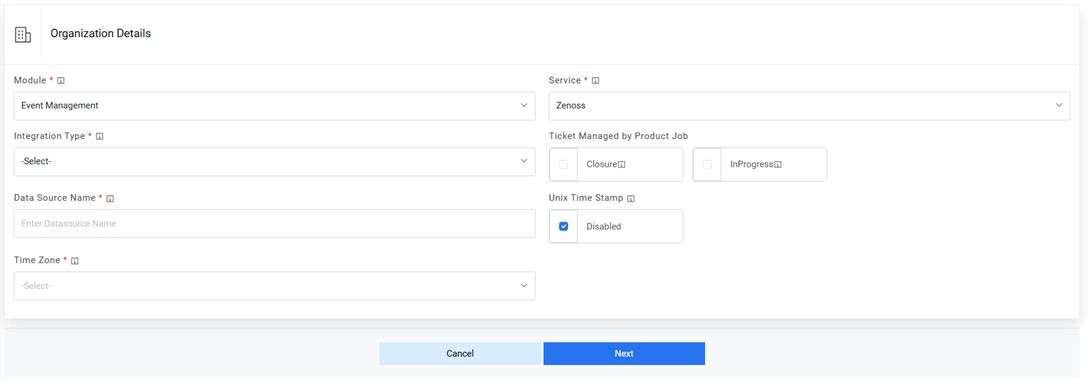
- On the Fetch Data tab, type in the details as per the environment.
- In the Connection Details section, enter the following details:
-
URL – Type the URL which contains the
placeholders that display the parameters based on
the applied clause such as the number of records to be fetched, query type, date on
which the data is fetched, and the order by and so on. It depends on the URL or API
provided by the tool.
Sample URL - https://url.servicenow.com/api/now/v1/table/sc_request?sysparm_fields=#Columns
-
Authentication Type - Select one of the Authentication Types from NoAuth / Basic
/ Windows
- Selection of Basic / Windows requires you to enter -
- User Id
- Password
- Selection of Basic / Windows requires you to enter -
- Request Method - Select Request Method as POST from the drop-down.
- Proxy Required - Check Proxy Required, if the environment needs access to content from data sources outside the firewall.
- Click on Test Connection to check accessibility of URL from service. Testing the connection is not mandatory, you can still create Data source.
Figure 4. Create Data Source (Connection Details) 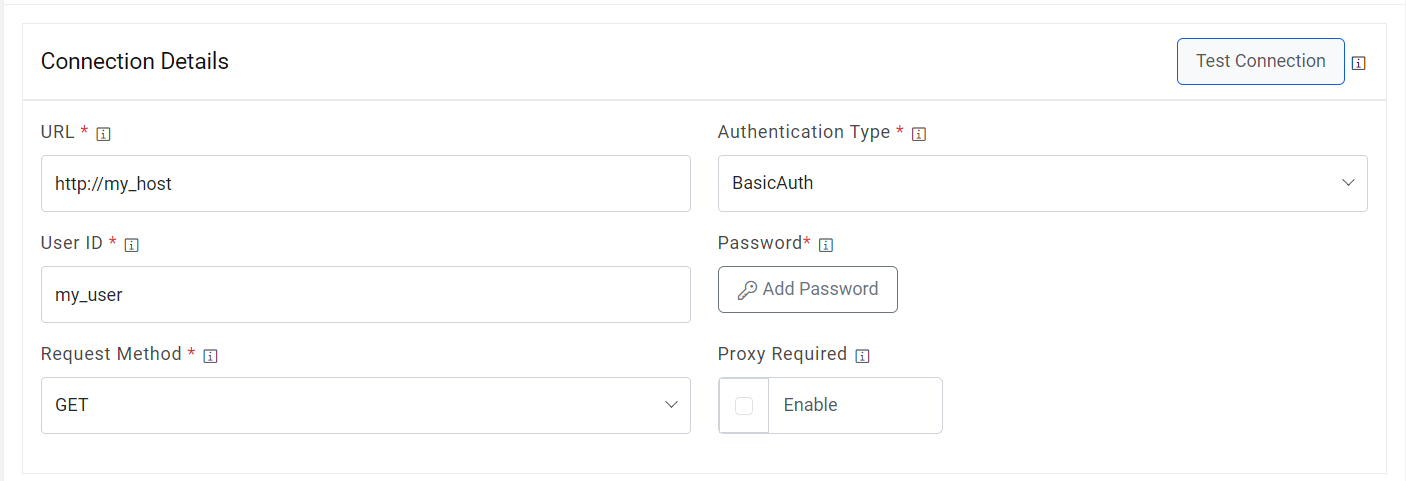
-
URL – Type the URL which contains the
placeholders that display the parameters based on
the applied clause such as the number of records to be fetched, query type, date on
which the data is fetched, and the order by and so on. It depends on the URL or API
provided by the tool.
- Request Header Parameters – Please enter the request header parameters as required.
-
Request Body - As request method selected earlier is POST, please enter the
body of URL. A sample response is mentioned below
-
Request Body –
{"action": "EventsRouter","method": "query",
"data": [{
"keys": ["evid", "summary", "eventState", "severity", "eventClass", "ownerid", "firstTime", "lastTime", "count", "eventClassKey", "message"],
"params": {
"eventState": [0, 1], "severity": [5],
"excludeNonActionables": false,
"firstTime": "#firstTime# TO #lastTime#","eventClass": []},
"limit": 200,
"sort": "firstTime",
"dir": "ASC",
"start": 0,
"uid": "/cz0/zport/dmd"
}],
"type": "rpc",
"tid": 2
}
Figure 5. Create Data Source (Connection Details) 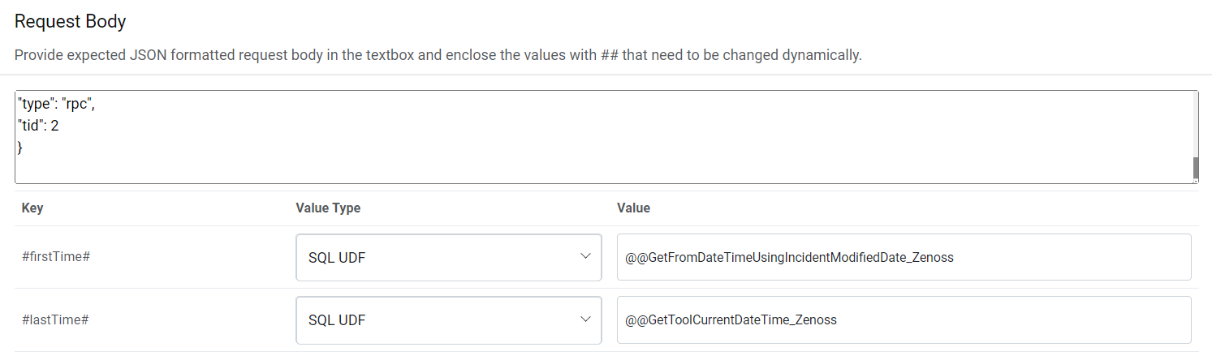
-
Response Body – In this section, please enter the output of URL query for one of the
incidents in JSON format. A sample response is mentioned below
-
Response Body – { "result": { "totalCount": 1, "events": [ { "count": 1, "firstTime": 1600874287.072, "severity": 5, "evid": "0242ac11-000c-b913-11ea-fdaffba5ea6f", "eventClassKey": "", "summary": "xxxxxxxx | manageIP: xxxxxxxx", "eventState": "New", "ownerid": null, "eventClass": { "text": "/App", "uid": "/zport/dmd/Events/App" }, "lastTime": 1600874287.072, "message": "xxxxxxxx" } ], "success": true, "asof": 1601266658.118566 } } - After entering the response, click Extract Keys to add the parameters in the Mandatory Parameter Mapping section.
-
Mandatory Parameter Mapping – Please map the mandatory parameters to the respective
values as mentioned in the screenshot below:
Sample Mandatory Parameter Mapping
Key Value Type Value TicketNumber JSON.Keys result.0.evid Summary JSON.Keys result.events.0.summary Description JSON.Keys result.events.0.message CreationDate JSON.Keys result.events.0.firstTime StatusCode JSON.Keys result.events.0.eventState ResolvedDate JSON.Keys result.events.0.lastTime LastModifiedDate JSON.Keys result.events.0.lastTime Figure 6. Mandatory Parameter Mapping 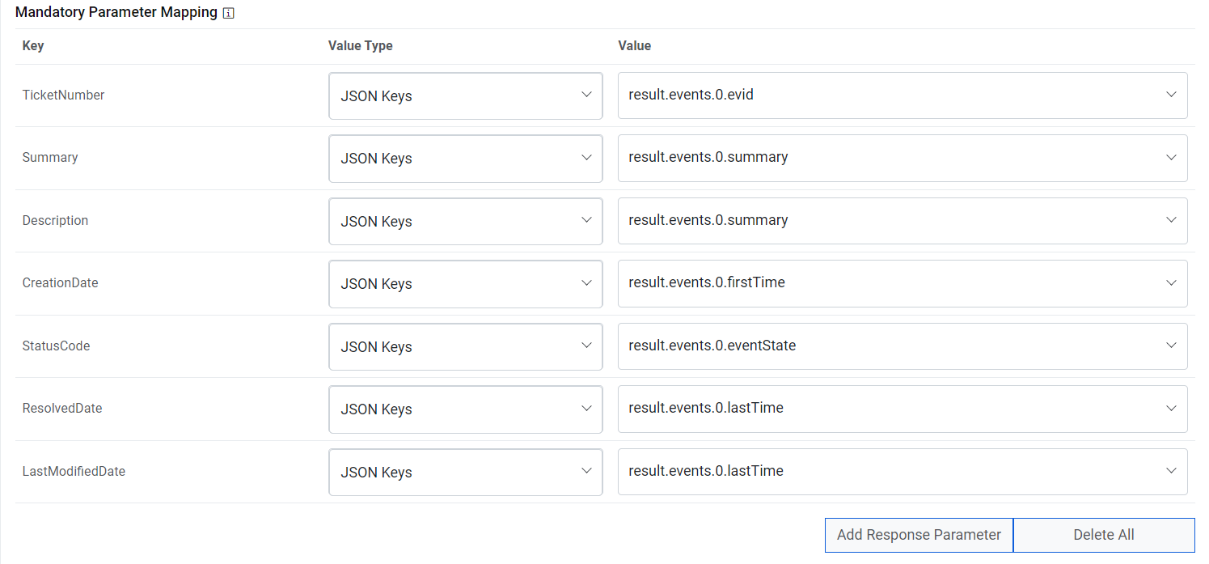
- If you need to add Optional parameters, click Add Response Parameter to add
more parameters. For our purpose, we will be adding a couple of extra parameters, as
mentioned below, as we need them in the later section.
Sample Optional Parameters
Key Value Type Value Col1 JSON.Keys result.0.evid Figure 7. Optional Parameter Mapping 
- Click Next to proceed to Release Rules.
- On the Release Rules tab, type in the details as per the requirement.
- In the Connection Details section, enter the following details:
-
URL – Type the URL of the selected service type to release the ticket. It
contains the placeholders that display the parameters
based on the applied clause and is dependent on the URL or API provided by the tool.
Sample URL https://url.servicenow.com/api/now/v1/table/sc_request?sysparm_fields=#Columns
- Authentication Type – Please enter the information in line with the Authentication type configured for fetching data configuration previously.
- Request Method – Select Request Method as POST from the drop-down.
- Proxy Required – Check Proxy Required, if the environment needs access to content from data sources outside the firewall.
- Click on Test Connection to check accessibility of URL from service. Testing the connection is not mandatory, you can still create Data source.
Figure 8. Release Rules Configuration (Connection Details) 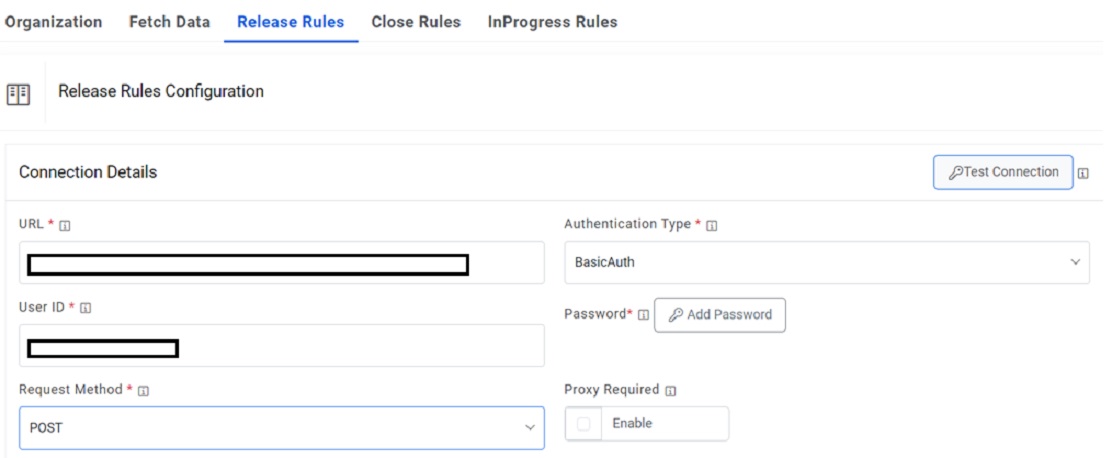
-
URL – Type the URL of the selected service type to release the ticket. It
contains the placeholders that display the parameters
based on the applied clause and is dependent on the URL or API provided by the tool.
- Request Header Parameters – Please enter the request header parameters as required.
-
Request Body – In this section, please enter the request body in JSON format. A
sample request is mentioned below -
Request Body –
{
"action": "EventsRouter",
"method": "write_log",
"data": [{
"evid": "#evid#",
"message": "#message#"
}],"tid":2
}
Figure 9. Release Rules (Request Body) 
-
Response Body – In this section, please enter the response body in JSON format. A
sample response is mentioned below -
Response Body –
{
"uuid": "xxxxxxxx",
"action": "EventsRouter",
"result": {
"success": true
},
"tid": 2,
"type": "rpc",
"method": "write_log"
}
Figure 10. Release Rules Configuration (Response Body) 
- On Close Rules tab, type in the details as per the requirement. Check Same as Release if similar configurations as mentioned in “Release Rules Configuration” are required, else proceed ahead.
- In the Connection Details section, enter the following details:
-
URL – Type the URL of the selected service type to release the ticket. It
contains the placeholders that display the parameters
based on the applied clause and is dependent on the URL or API provided by the
tool.
Sample URL - https://<url>
- Authentication Type – Please enter the information in line with the Authentication type configured for fetching data configuration previously.
- Request Method – Select Request Method as POST from the drop-down.
- Proxy Required – Check Proxy Required, if the environment needs access to content from data sources outside the firewall.
- Click on Test Connection to check accessibility of URL from service. Testing the connection is not mandatory, you can still create Data source.
Figure 11. Release Rules Configuration (Connection Details) 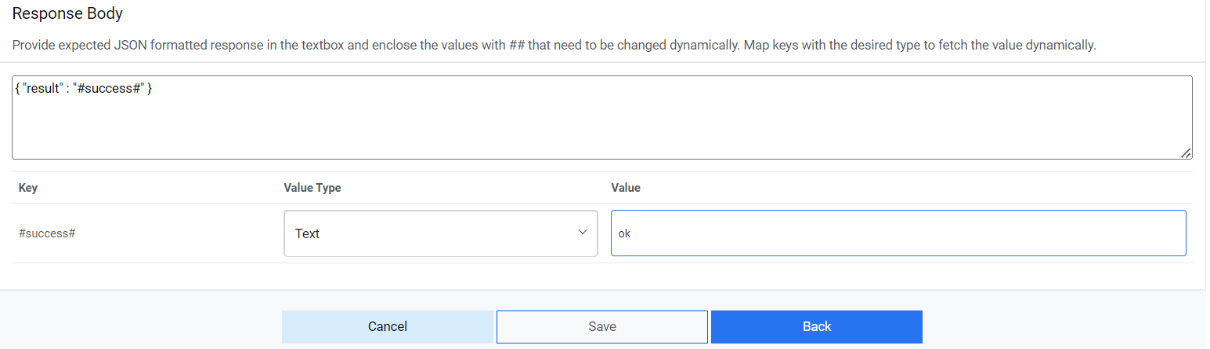
-
URL – Type the URL of the selected service type to release the ticket. It
contains the placeholders that display the parameters
based on the applied clause and is dependent on the URL or API provided by the
tool.
- Request Header Parameters – Please enter the request header parameters as required.
-
Request Body – In this section, please enter the request body in JSON format. A
sample request is mentioned below.
Request Body –
{
"action": "EventsRouter",
"method": "close",
"data": [{
"evids": "#evids#"
}],"tid":2
}
Figure 12. Release Rules (Request Body) 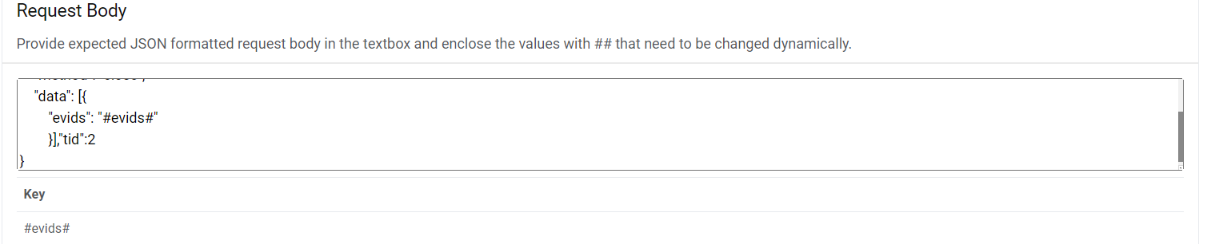
-
Response Body – In this section, please enter the response body in JSON format. A
sample response is mentioned below -
Response Body –
{
"uuid": "xxxxxxxx",
"action": "EventsRouter",
"result": {
"data": {
"updated": 31,
"total": 3670
},
"success": true
},
"tid": 2,
"type": "rpc",
"method": "acknowledge"
}
Figure 13. Release Rules Configuration (Response Body) 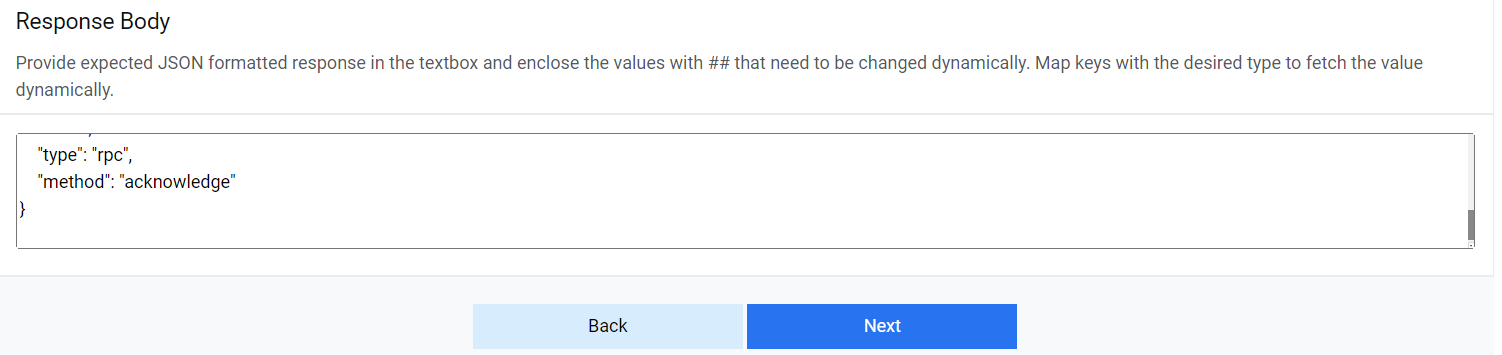
- On InProgress Rules tab, type in the details as per the requirement. Check Same as Release if similar configurations as mentioned in “Release Rules Configuration” are required, else proceed ahead.
- In the Connection Details section, enter the following details:
-
URL – Type the URL of the selected service type to release the ticket. It
contains the placeholders that display the parameters
based on the applied clause and is dependent on the URL or API provided by the tool.
Sample URL https://url.servicenow.com/api/now/v1/table/sc_request?sysparm_fields=#Columns
- Authentication Type – Please enter the information in line with the Authentication type configured for fetching data configuration previously.
- Request Method – Select Request Method as POST from the drop-down.
- Proxy Required – Check Proxy Required, if the environment needs access to content from data sources outside the firewall.
- Click on Test Connection to check accessibility of URL from service. Testing the connection is not mandatory, you can still create Data source.
Figure 14. Release Rules (Connection Details) 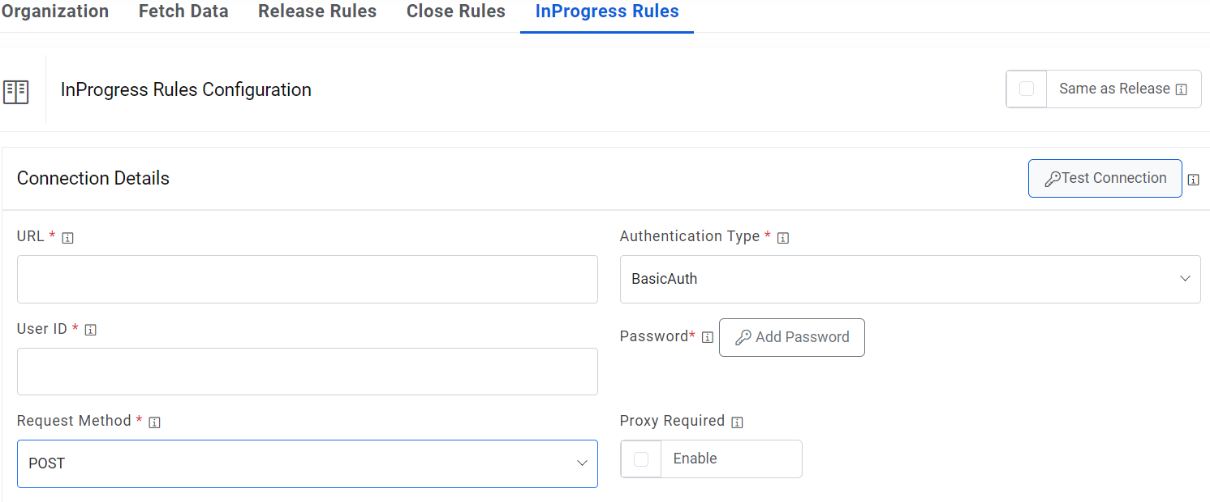
-
URL – Type the URL of the selected service type to release the ticket. It
contains the placeholders that display the parameters
based on the applied clause and is dependent on the URL or API provided by the tool.
- Request Header Parameters – Please enter the request header parameters as required.
-
Request Body – In this section, please enter the request body in JSON format. A
sample request is mentioned below -
Request Body –
{
"action": "EventsRouter",
"method": "acknowledge",
"data": [{
"evids": "#evids#"
}],"tid":2
}
Figure 15. Release Rules Configuration (Request Body) 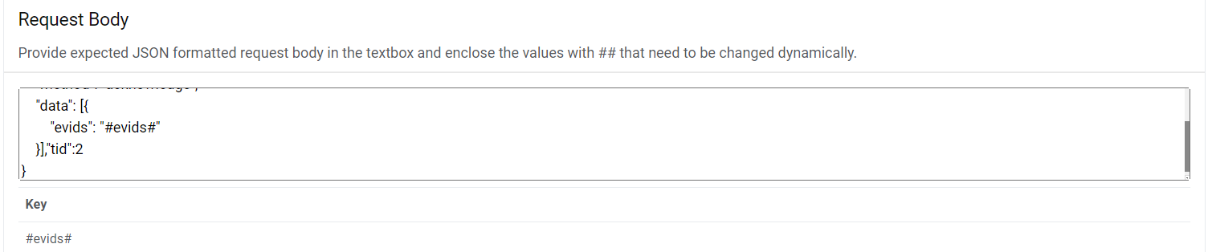
-
Response Body – In this section, please enter the response body in JSON format. A
sample response is mentioned below -
Response Body –
{
"uuid": "xxxxxxxx",
"action": "EventsRouter",
"result": {
"data": {
"updated": 31,
"total": 3670
},
"success": true
},
"tid": 2,
"type": "rpc",
"method": "acknowledge"
}
Figure 16. Release Rules Configuration (Response Body) 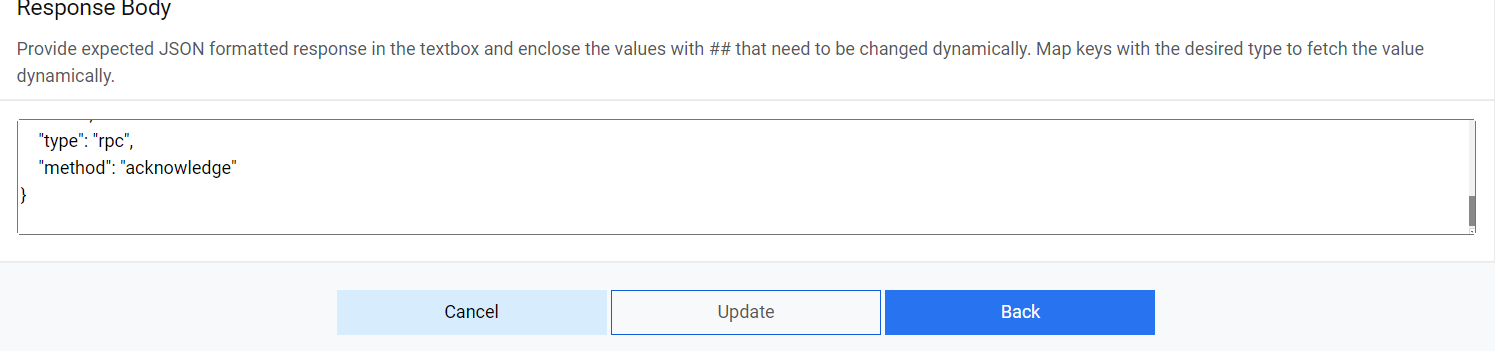
- Click Save to add the data source.