In this lesson, you configure the connector that you created in the previous step
using NiFi.
About this task
Use the following link for NiFi:
http://hostname/IP:30600/nifi/
Note:
- This lesson uses the connector name "custom". Ensure that you replace
"custom" with the name of the connector that you created in the previous
step.
- If you are on the NiFi home page where you can view all the processors, you
might have to scroll to the right of the pipeline and zoom in to find the
required processors.
Procedure
To configure the connector in NiFi, complete the following
steps.
-
Update the properties for the processor
custom-_Template-Schema.
-
Go to the new "custom" pipeline and double-click
custom-_Template-Schema.
-
Double-click Schema Update process group.
-
Find the Setup Elasticsearch Index Schema
process group.
-
Find and right-click Specify Schema to Update
and stop the processor.
-
Double-click the processor to modify the settings.
-
Go to the Properties tab and update the property
param.schema with the value
product.
-
Click Apply.
-
Start the processor by right-clicking and selecting
Start.
-
Update Processor Populate Index Schema.
-
Stop processor.
-
Double-click the processor to modify the settings.
-
Update the property Replacement Value with
following value:
{
   "properties":{
      "custom":{
         "properties":{
            "x_profitMargin":{
               "type":"float",
               "coerce":"true",
               "doc_values":"true",
               "ignore_malformed":"false",
               "index":"true",
               "store":"true"
            }
         }
      }
   }
}
-
Start processor.
-
Update processor Define custom SQL and index name.
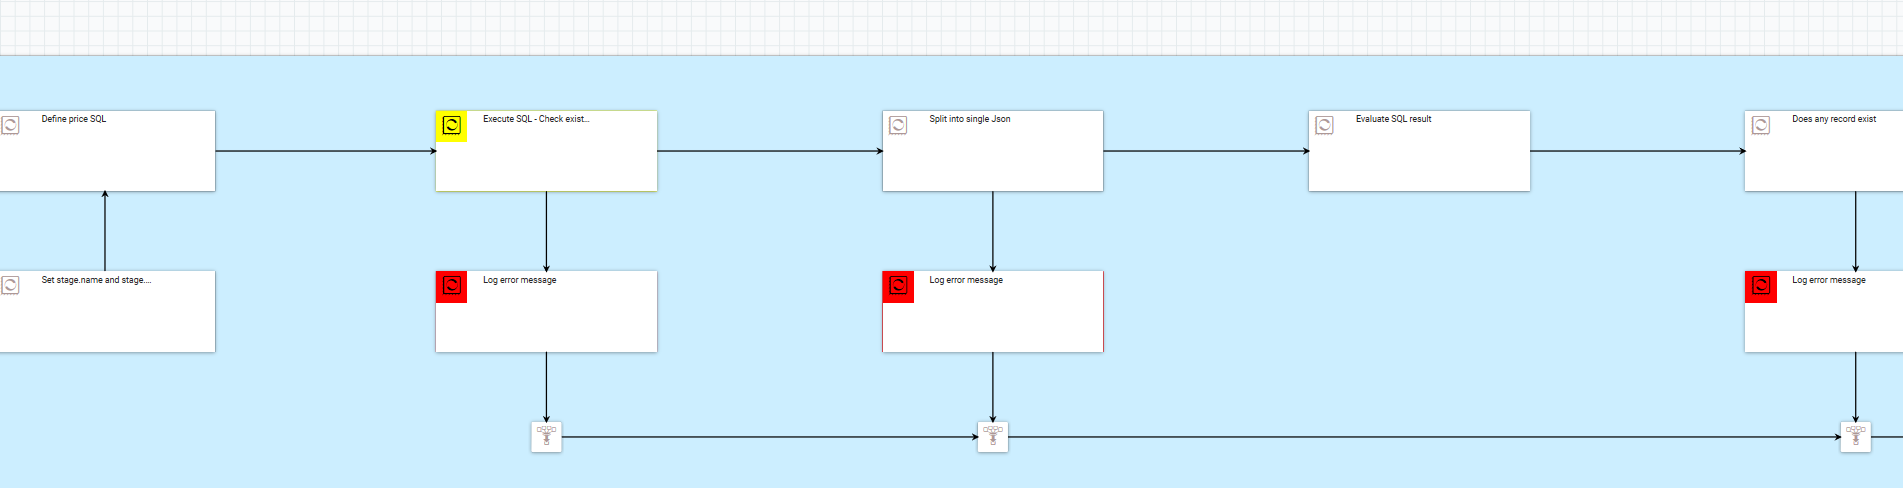
Note: Ensure that cost price data is available in your database. This connector
does not verify if the SQL returns any results. If the cost price data is
not available in the database, the data returned for the SQL is empty and
results in errors. To verify that the cost price data is present in the
database, check the indexing connector at auth.reindex > DatabasePriceStage1
> Find Prices > Execute SQL with Precheck.
-
Go to the new custom pipeline and double-click
custom -_Template -DatabaseETL.
-
Go to Custom Connector Pipe > Execute SQL.
-
Inside the
Execute SQL process group find the process
Define custom SQL.
-
Right-click on Define custom SQL and stop the
processor.
-
Double-click the processor to modify the settings.
-
Update the property ingest.database.sql (or the
property Custom SQL if you are using HCL Commerce Search Version 9.1.15 or later) with the following
value:
SELECT
    OP.CATENTRY_ID,
    CASE
        WHEN OP.PRICE <> 0
        THEN (OP.PRICE - CP.PRICE) / OP.PRICE * 100
        ELSE NULL
    END AS PROFIT_MARGIN
FROM
    (SELECT O.CATENTRY_ID CATENTRY_ID, P.PRICE PRICE
      FROM OFFER O
         INNER JOIN OFFERPRICE P ON (O.OFFER_ID = P.OFFER_ID AND P.CURRENCY = 'USD')
         INNER JOIN TRADEPOSCN ON (O.TRADEPOSCN_ID = TRADEPOSCN.TRADEPOSCN_ID AND TRADEPOSCN.NAME = 'Extended Sites Catalog Asset Store')
      WHERE (O.STARTDATE IS NULL OR CURRENT_TIMESTAMP > O.STARTDATE)
       AND (O.ENDDATE IS NULL OR O.ENDDATE > CURRENT_TIMESTAMP)
       AND O.PUBLISHED = 1
    ) OP
    LEFT OUTER JOIN
        (SELECT OFFER.CATENTRY_ID CATENTRY_ID, OFFERPRICE.PRICE PRICE
         FROM OFFER
         INNER JOIN OFFERPRICE ON (OFFER.OFFER_ID = OFFERPRICE.OFFER_ID AND OFFERPRICE.CURRENCY = 'USD')
         INNER JOIN TRADEPOSCN ON (OFFER.TRADEPOSCN_ID = TRADEPOSCN.TRADEPOSCN_ID AND TRADEPOSCN.NAME = 'My Company Cost Price List' )) CP
    ON (CP.CATENTRY_ID = CP.CATENTRY_ID)
INNER JOIN CATENTRY C ON C.CATENTRY_ID = CP.CATENTRY_ID
WHERE OP.CATENTRY_ID = CP.CATENTRY_ID ${extCatentryAndSQL}
-
Change the value of the property Use Custom SQL
from
No to Yes.
-
Click Apply.
-
Start the processor by right-clicking it and selecting
Start from the context menu.
-
Update the processor Transform Document - Map Index Fields From
Database.
-
Navigate to .
-
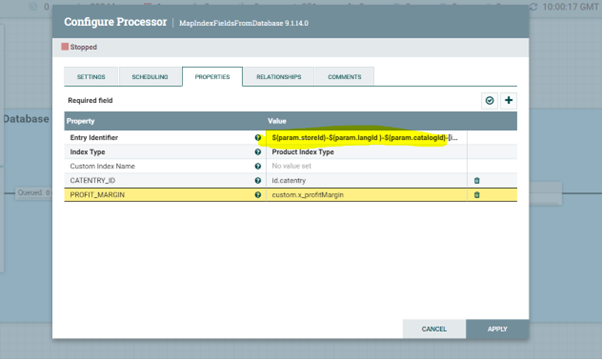
Right-click on the processor and stop it.
-
Double-click the processor to modify its settings. The
Configure Processors window opens.
-
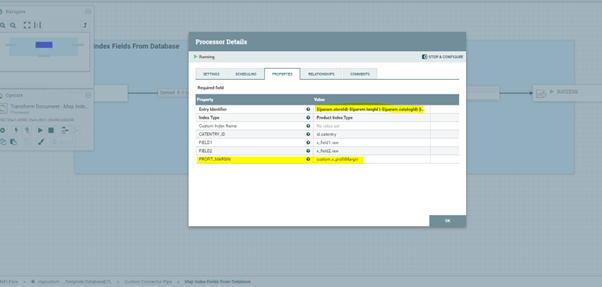
Under the Properties tab of the
Configure Processors window, update the
property Entry Identifier with the value
${param.storeId}-${param.langId
                                }-${param.catalogId}-[id.catentry]
.
-
Add a new property named PROFIT_MARGIN and give it
the value
custom.x_profitMargin.
Your
Configure Processors window will look
similar to the following:
-
Click Apply.
-
Open the Processor Details window, remove the
properties FIELD1 and FIELD2
from the Properties tab. Click OK.
-
Create a new version for the
custom-_Template-Schema
-
Right-click the process group,
custom-_Template-Schema.
-
Click .
-
Right-click the process group,
custom-_Template-Schema.
-
Click .
-
Add the required Flow Name and
Save.
In this tutorial, the Flow Name =
ProfitMarginSchemaUpdateConnector.
-
Create a new version for the
custom-_Template-DatabaseETL.
-
Right-click the process group,
custom-_Template-DatabaseETL.
-
Click .
-
Right-click the process group,
custom-_Template-DatabaseETL.
-
Click .
-
Add the required Flow Name and
Save.
In this tutorial, the Flow Name =
ProfitMarginDatabaseConnectorPipe.
 Join the custom connector to your auth.postindex
or live.postindex using the following steps:
Join the custom connector to your auth.postindex
or live.postindex using the following steps:
-
Using the Swagger User Interface, navigate to .
-
Click on Try it out.
-
Enter id as
auth.postindex.
-
For the API body, use the following code.
{
    "Licensed Materials": "Property of HCL Technologies Limited. (c) Copyright HCL Technologies Limited 1996, 2023.",

    "_name": "Post re-indexing connector descriptor for HCL Commerce Ingest service to be used with the Authoring environment",
    "_usage": {
        "// This is the connector descriptor of a post reindexing connector to be used with HCL Commerce Ingest service.": "",
        "// It is designed for performing a list of post indexing operations after the main part of a full re-indexing is completed.": ""
    },
    "name": "auth.postindex",
    "environment": [ "auth", "data", "toolkit", "live" ],
    "description": "This is the connector for customization to perform a post re-indexing operation.",
    "pipes": [
        {
            "// ": "-------------         Preparation Stage         -------------",

            "// Preparing database specific settings for this indexing pipeline": "",
            "name": "ReindexLink",
            "label": "ReindexLink"
        },
        {

            "name": "ProfitMarginSchemaUpdateConnector",
            "label": "ReindexLink-ProfitMarginSchemaUpdateConnector"
        },
        {

            "name": "ProfitMarginDatabaseConnectorPipe",
            "label": "ReindexLink-ProfitMarginDatabaseConnectorPipe"
        },


        {
            "// ": "-------------         End of dataflow         -------------",

            "// The connector dataflow terminates here by generating a log summary through the Logging Service": "",
            "name": "Terminal",
            "label": "Terminal"
        }
    ]
}
-
Click Execute.
 Update the process group auth.reindex - SplitLink -
Post-Index.
Update the process group auth.reindex - SplitLink -
Post-Index.
Go to the auth.reindex pipeline and double-click on auth.reindex -
SplitLink - Post-Index. Double click on Launch
Connector. Right-click on a blank area of the window and select
Variables from the context menu. Update the attribute
split.connector.name to custom.
-
Update the process group auth.reindex - WaitLink - Post
Index.
Go to the auth.reindex pipeline and double-click on
auth.reindex - WaitLink - Post Index. Double click on
Wait for Completion. Right-click on a blank area of the
window and select Variables from the context menu. Update
the attribute wait.connector.name to custom.
-
Extract the versioned connector.
-
Run the following commands:
Note: The docker container name used in this example is
commerce_registry_1. Replace it with the actual
name of the docker container.
docker exec -it commerce_registry_1 bash/opt/nifi-registry/scripts/export_flow.sh
ProfitMarginSchemaUpdateConnector>/opt/nifi-registry/flows/ProfitMarginSchemaUpdateConnector.json/opt/nifi-registry/scripts/export_flow.sh
ProfitMarginDatabaseConnectorPipe>/opt/nifi-registry/flows/ProfitMarginDatabaseConnectorPipe.jsonexitdocker cp
commerce_registry_1:/opt/nifi-registry/flows/ProfitMarginDatabaseConnectorPipe.json
./ProfitMarginDatabaseConnectorPipe.jsondocker cp
commerce_registry_1:/opt/nifi-registry/flows/ProfitMarginSchemaUpdateConnector.json
./ProfitMarginSchemaUpdateConnector.json
Alternatively, you can extract the connector pipe through the NiFi
Registry interface.
- Launch the NiFi Registry interface and locate the flow name
that you want to export, for example
ProfitMarginSchemaUpdateConnector
or
ProfitMarginDatabaseConnectorPipe.
- Click the Action button and select
Export Version.
- Choose the latest version and click
Export.
-
Copy ProfitMarginSchemaUpdateConnector.json and
ProfitMarginDatabaseConnectorPipe.json to your
runtime environment.