
Product display page
The product display page helps you select whether you want to choose the Pickup or delivery options for the selected items.
Procedure
- Select the product category from the Next.js store. All the products in the selected category are listed on the landing page.
- Click the product image to view the product display page.
- You can select the product quantity on this page. For the out of stock products, There is an insufficient inventory to purchase [XXX.0] units of [XX-XXX-0001-0001] message is shown.
-
You can choose one of the following options:
- Pickup: You can pick up the product from the
already selected store or click Select a store button
to select a store for pickup.
- A Pickup drawer is shown on the right side of the screen.
- If you have not selected a store, click the Find Nearest
Store button. All the nearby stores are listed with
the distance and inventory count details.
- If there are no stores available nearby, No Results Found Near You message is displayed on the screen.
- To search for the store, enter the name of the city, state, or ZIP
code in the Search Store text box. Select the
store from the search results. The newly selected store becomes the
default store.
- Clear Search Results will clear all the listed stores from the Pickup drawer.
- You can enable the toggle button in front of the Show
in-stock locations. The page lists all the stores
where the product is in stock.Note: If Enable show inventory count is disabled from the Management Center then In stock at is shown with the store name for the Pickup option.
- Show Info dropdown displays the details of the stores such as Address, Phone Number, and Working Store Hours.
- Click Set As My Store button, the selected store is displayed at the top on Pickup drawer (highlighted as grey color) with the Current Selected Store label.
- You must click the Pickup box to choose Pickup option. If you directly click on Select a Store button, it still shows the Delivery box selected until you click on the Pickup box.
- Delivery: You can choose a delivery option for
your products. By default Delivery option is
selected.Note: If Enable show inventory count is disabled from the Management Center then Available is shown for the Delivery option.
- Inventory availability changes for both, Pickup and Delivery based on the selection of attribute on the product detail page.
- In case you have already selected the store, the number of units available for Pickup and Delivery are displayed.
- Pickup: You can pick up the product from the
already selected store or click Select a store button
to select a store for pickup.
-
Click Add to Cart to add the product to the cart.
Note: If the store is not selected and you are clicking the Add to Cart button for the Pickup option, Please select a store for pickup message is shown.
-
If more than one product defining attributes are available, you see the
Choose Options button on the Product listing page. You are directed to the product display page when
you click product image from the product landing page. On this page you are
allowed to select multiple attributes before adding product to the cart.
Note: While placing an order for kits or bundle products:
- For Kits: On the product details page, the description for items
included in the kit are shown at the bottom of the page. You cannot
update the quantity from from the description.
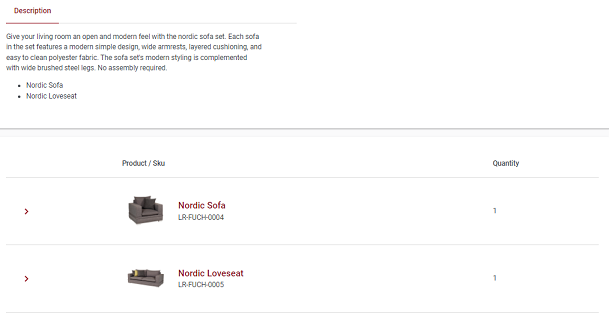
- For Bundles: On the product details page, the description for items
included in the bundle are shown at the bottom of the page. You can
update the quantity and attributes for all the items in the bundle
as shown in the following image:
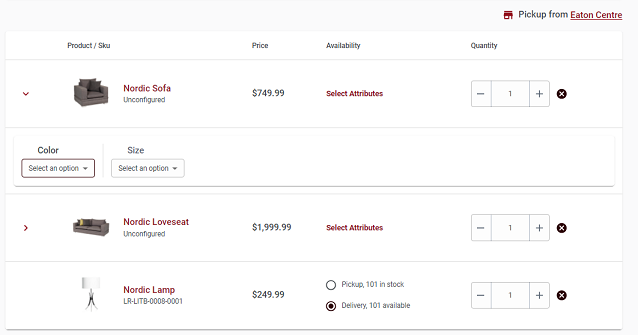
- If you have selected a store, it is shown in the
Pickup from option. You can also
click on the pre-selected store name, then you are directed
to the Store
locator page.Note: If no store is selected, Select a store button is shown besides Pickup from option.
- If you have selected a store, it is shown in the
Pickup from option. You can also
click on the pre-selected store name, then you are directed
to the Store
locator page.
- For Kits: On the product details page, the description for items
included in the kit are shown at the bottom of the page. You cannot
update the quantity from from the description.
-
If you have logged in as a registered user, click the Add to Wish
List button to add the item to the existing Wish List.
Note: If you don't have an already-created wish list, click the drop-down menu next to the Add to Wish List button to Create new Wish List. See Creating a Wish List to know more.
- If the guest shopping option is disabled from the Management Center, instead of add to cart, it shows Please Sign-in to Shop option. See Enabling guest shopping for the Next.js store to enable the guest user to shop.