Adding custom or new mock data
Refer to the following two examples to add new mock data for GET and POST REST API call.
- For GET REST API call:
GET /search/resources/api/v2/categories?storeId=11&depthAndLimit=11%2C11&contractId=-11005&langId=-1 - For POST REST API call:
POST /wcs/resources/store/12/loginidentity?langId=-1
Creating mock data for GET REST API call
This section describes the steps to be followed to create mock data for the following GET REST call:
https://<hostname>:<port>/search/resources/api/v2/categories?storeId=11&depthAndLimit=11%2C11&contractId=-11005&langId=-1- After ignoring
https://<hostname>:<port>, the rest of the URL is directly mapped to the folders under mocks folder. The mock files naming conventions are based on the response that they are going to serve:$REQUEST-PATH/$HTTP-METHOD.mock - For this example, you can create the new mock file in the mocks/ search/resources/api/v2/categories folder. The content of the mock files must be a valid HTTP response.
- For HCL Commerce version prior to 9.1.8.0, create a mock file
matching the request REST URL as
below:
GET--storeId=11&depthAndLimit=11%2C11&contractId=-11005&langId=-1.mock  The query parameters of the REST API call are sorted in
ascending order to avoid duplication of newly created mock files for the
same rest API and the following mock request URL is displayed in the VScode
console/terminal, where the REST API call is
made.
The query parameters of the REST API call are sorted in
ascending order to avoid duplication of newly created mock files for the
same rest API and the following mock request URL is displayed in the VScode
console/terminal, where the REST API call is
made.Mock request url: /search/resources/api/v2/categories?contractId=-11005&depthAndLimit=11%2C11&storeId=11&langId=-1 Create a mock file matching this request REST URL as
shown in the following code
snippet:
Create a mock file matching this request REST URL as
shown in the following code
snippet:GET--contractId=-11005&depthAndLimit=11%2C11&storeId=11&langId=-1.mock- You can directly add the HTTP response in the file created above. For cleaner and easy maintenance, in the React store application, by adding the HTTP response in another JSON file from the data folder and importing it in the mock file.
- The contents of the mock file will look like below:
- The next step is to create the topCategories_11.mock.json file inside the data folder.
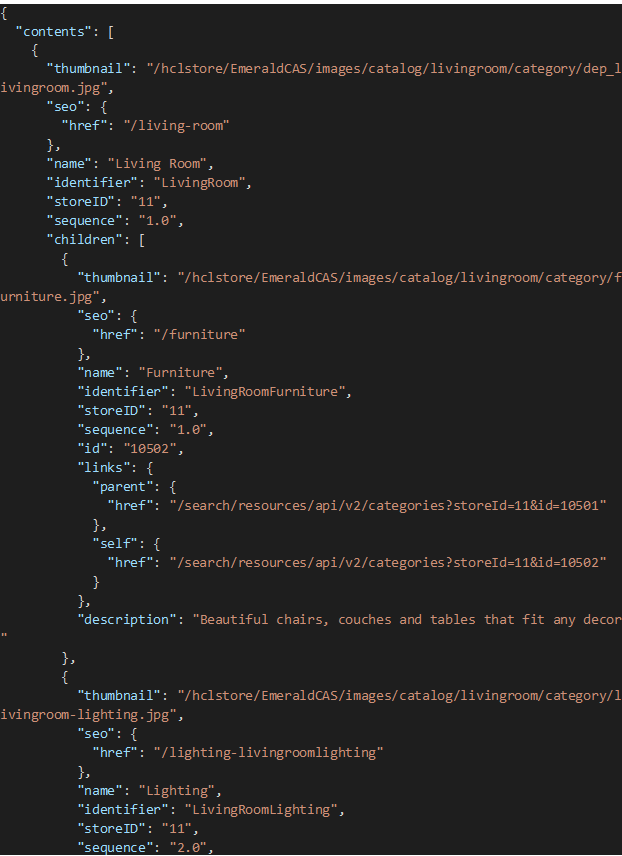
- After the creation of the file in the previous step, provide the actual JSON
response in the file. Here is a sample response for file
topCategories_11.mock.json and is mentioned in the
below screenshot: Note: This JSON response can differ based on the actual REST API call response. If the REST API endpoints are not available, input the mock JSON response in the file.

- The mock data file is created for the REST call mentioned at the beginning.
Creating mock data for POST REST API call
This section enables you to create mock data for the following POST REST API call:
https://<hostname>:<port>/wcs/resources/store/12/loginidentity?langId=-1As per the previous example, create a mock file inside
mocks/wcs/resources/store/12/loginidentity.
Note: If the
folder doesn’t exist, please create the folder for the same.
- Create a POST--langId=-1.mock file. The content of
the file will look like below:
- The next step is to create the registered.12.mock.json file inside the data folder.
- After the creation of the file in the previous step, input the actual
JSON response in the file. Here is a sample response for file
registered.12.mock.json. Refer to the following
screenshot: Note: This JSON response can differ based on the actual REST API call response. If the REST API endpoints are not available, input the mock JSON response into the file.

Now, re-run the npm run mock command, so that mock server will take the latest changes from the mocks folder.

Checking the mock checkout flow
Note:
- Mock checkout flow is only available for Flared Accent Chair in Emerald store and for T-Hand Bolt in Sapphire store.
- If you click any other option apart from these two then the system displays a message below the category menu bar stating Sorry, we couldn't find what you are looking for. . Additionally, the mock server displays Not Mocked as an API response in the Network tab of browser developer tools.
In order to check the mock checkout flow for Emerald and Sapphire react-based
stores:
- Use the mock URL created for the newly modified checkout flow and sign-in using any dummy user name and password.
- Go to:
- , for Emerald react-based store.
- , for Sapphire react-based store.
- Click the Add to Cart button and follow the normal checkout process.
- Click the Place Order button and the system displays the Order Confirmation page signifying a correct checkout flow using the mock URL.

