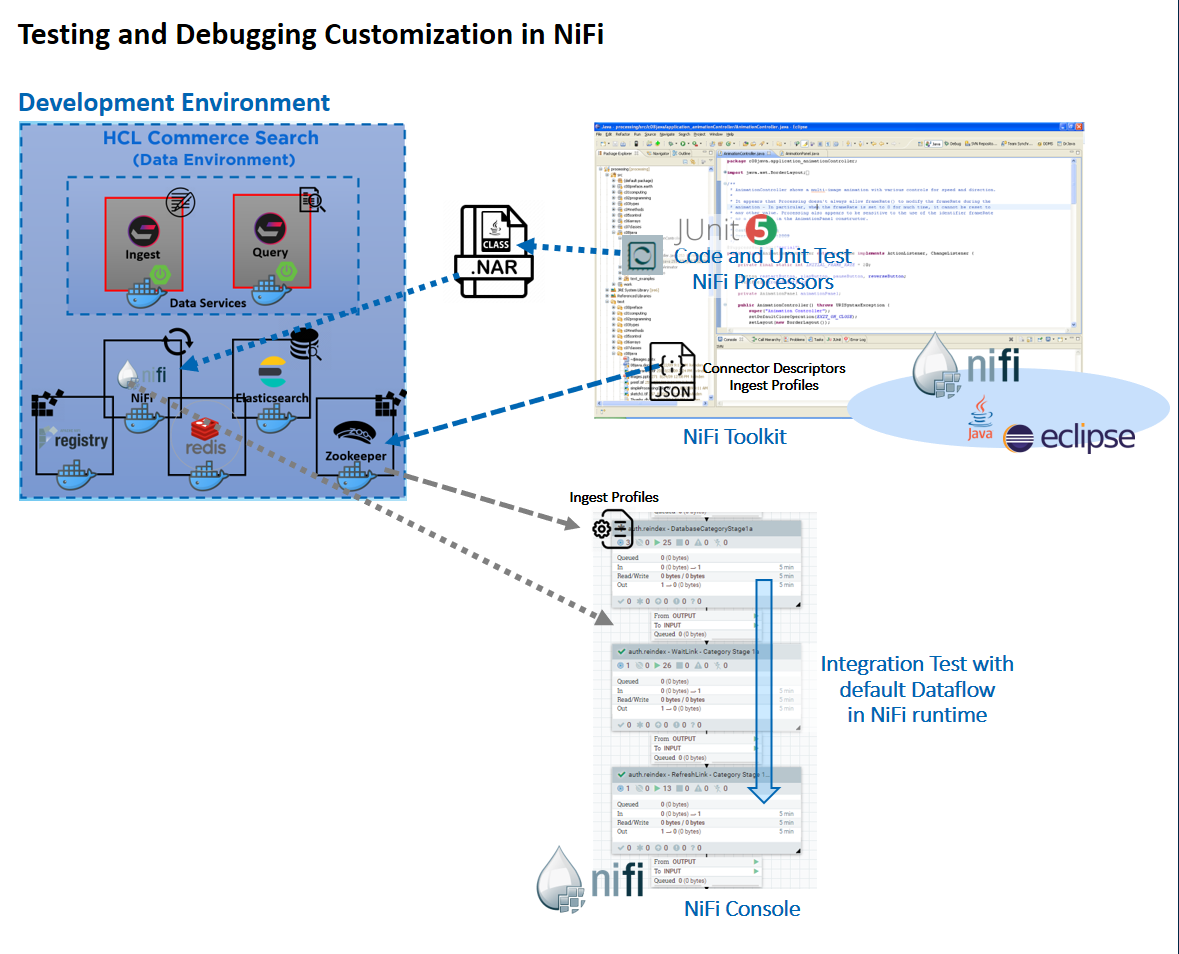
Deploying an Ingest profile
After developing and testing your Ingest profile in your development environment, you can deploy it using the NiFi toolkit.
Before you begin
- Ensure that you have installed the Eclipse-based NiFi Toolkit. You can find this toolkit in the archive commerce-custom-search-bundles-9.1.10.0.zip. For more information, see Setting up the HCL Commerce Developer Search environment.
- Java 8 is required to build the .jar files in the tutorial.
 Apply fix HC-17918 to the NiFi container. For more
information, see Fixes that are included in HCL Commerce releases.
Apply fix HC-17918 to the NiFi container. For more
information, see Fixes that are included in HCL Commerce releases.- Prepare the development toolkit for NiFi following the instructions in Custom NiFi processors.
- Copy the ingest-api.jar file from /opt/nifi/nifi-current/lib in the NiFi container, and place it in the libs directory in the root of the project.
About this task
For a detailed tutorial on how to customize, test and deploy your customizations via Ingest profiles, see Tutorial: Customizing default connectors with Ingest Profile. This tutorial covers topics such as development environment prerequisites, building and transfering custom .jar files into your environment.
Procedure
- Follow the instructions in Custom NiFi processors to build a custom NiFi Archive (NAR) file for your project.
- Build your project. In the Project Explorer, right-click on the name of the project and select . For more information, see Custom NiFi processors.
-
Transfer the JAR files produced by the build to the lib directory of the NiFi container, using syntax similar to the following
example.
docker cp "/root/myproject.jar" NIFI_CONTAINER_ID:/opt/nifi/nifi-current/lib -
Create an Ingest profile with a name of your choosing, using the Query service
profile endpoint as below.
POST http://QUERY_HOST:QUERY_PORT/search/resources/api/v2/documents/profiles/myingestprofile?profileType=Ingest Note: The
/profiles endpoint contains a directory,
custom, with three further subdirectories in it:
ingest, nlp, and
search. You can place custom profiles in the
appropriate subdirectory. Doing this allows your custom Data Query images to
include their own custom configurations. These can then be built using your
own CI / CD pipeline. In this way, your images can be reused in multiple
environments, without requiring you to use configurations from the
environment-specific ZooKeeper.
 - Bind the Ingest profile to the connector pipe whose properties you are going to extend. Use the following steps. For instructions on how to use an Ingest endpoint to update the Ingest profile binding as a variable to a connector pipe, see Updating NiFi process group, processor, controller service using Ingest connector descriptor.
- Restart the Nifi container.
-
Once the NiFi user interface is running and there are no errors or invalid
components, trigger a full index for
storeId=31. This can be done using the following ingest endpoint.POST http://INGEST_HOST:INGEST_PORT/connectors/auth.reindex/run?storeId=31 - Restart the Query service container.
Results
What to do next
You can perform coding and unit testing inside of the Eclipse based NiFi Toolkit using mock data, using the JUnit testing option provided by Maven. Two unit test examples are provided for you in the commerce-custom-search-marketplace-seller.zip file. These files are ComposeDatabaseSQLTest.java, and CreateProductDocumentFromDatabaseTest.java.

- ChangeSQL is an Ingest profile expression provider. You can use this sample reference to learn how to modify SQL used in the default Extract, Transform, and Load (ETL) stages. ComposeDatabaseSQLTest is the JUnit test that can be used for verifying the code logic inside of ChangeSQL.
- ChangeDocument is an Ingest profile post-processor
extension that demonstrates how you can perform further data manipulation
following the default transformation, in one of the Product related Ingest
stages.
CreateProductDocumentFromDatabaseTestis the JUnit test that can be used to verify the code logic inside of ChangeDocument.
Once custom configurations and Java extension logics are ready, they can be exported into a custom NiFi NAR file and added to the NiFi container. This allows you to test the custom logic with the default data flow in the NiFi runtime.
To run the JUnit test, right-click on the chosen JUnit Test class and choose either Run As... or .