Defining the imports and exports
The imports and exports are defined and initially connected for the mediation modules.
Procedure
- Select .
- Select and click Next.
- Click Browse... and locate the component
services WSDL directory:
 WC_eardir/WebServicesRouter.war/component-services/wsdl
 WCDE_installdir/workspace/WebServicesRouter/WebContent/component-services/wsdl
- Select OrderServices.wsdl and select ExtOMSSimModule as the target module.
- Click Finish.
- Select the Physical Resources tab and expand .
- Right-click BaseTypes.xsd and select .
- Select the Source tab and locate
the following snippet:
<complexType ecore:instanceClass="java.util.Map$Entry" name="NameValuePairType"> <annotation> <documentation>The type definition of a NameValuePair.</documentation> </annotation> <simpleContent> <extension base="string"> <attribute ecore:name="key" name="name" type="string" use="required"> <annotation> <documentation>Name of the NameValuePair.</documentation> </annotation> </attribute> </extension> </simpleContent> </complexType> - Replace it with the following snippet to remove the EMF
annotations from the XSD:
<complexType name="NameValuePairType"> <annotation> <documentation>The type definition of a NameValuePair.</documentation> </annotation> <simpleContent> <extension base="string"> <attribute name="name" type="string" use="required"> <annotation> <documentation>Name of the NameValuePair.</documentation> </annotation> </attribute> </extension> </simpleContent> </complexType> - Save the changes and close the file.
- Select .
- Select and click Next.
- Click Browse... and locate the DOM
integration WSDL directory:
 WC_eardir/WebServicesRouter.war/dom-integration/wsdl
 WCDE_installdir/workspace/WebServicesRouter/WebContent/dom-integration/wsdl
- Select InventoryServices.wsdl and select ExtOMSSimMediationModule as the target module. Ignore any file dependency warnings that appear.
- Click Finish.
- Select .
- Select and click Next.
- Click Browse... and locate the External
OMS Simulator WSDL directory:
 ExtOMSSim_eardir/ExtOMSSimWeb.war/wsdl/test
 WCDE_installdir/workspace/ExtOMSSimWeb/WebContent/wsdl/test
- Select ExtOMSSim.wsdl and select ExtOMSSimMediationModule as the target module.
- Click Finish.
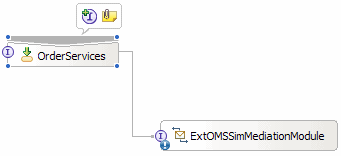
- In the ExtOMSSimMediationModule Assembly Diagram view, right-click a blank spot in the assembly diagram and select . An export named Export1 is added to the assembly diagram.
- Select the export and select the Properties tab.
- In the Properties view, change the name of the export to OrderServices.
- In the assembly diagram, right-click the export and select Add Interface.
- Select OrderServicesPortType and click OK.
- Navigate your mouse cursor over the export's border where its connector and the Add wire tooltip are visible. Drag the connector to ExtOMSSimMediationModule.
- Click OK to confirm the action.
A connection between the export and ExtOMSSimMediationModule is created.

- Repeat steps 21 through 27 to create another export with
the following name and interface:
Option Description Name InventoryServices Interface InventoryServicesPortType Connect the export to ExtOMSSimMediationModule. - In the assembly diagram, right-click a blank spot and select . An import named Import1 is added to the assembly diagram.
- Select the import and select the Properties tab.
- In the Properties view, change the name of the import to ExtOMSSim.
- In the assembly diagram, right-click the import and select Add Interface.
- Select ExtOMSSim and click OK.
- In the assembly diagram, select ExtOMSSimMediationModule. Navigate your mouse cursor over its border where its connector and the Add wire tooltip are visible.
- Drag the connector to the import and click OK to
confirm the action. A connection between ExtOMSSimMediationModule
and the import is created.

- Select to save your changes.