Setting up remediation flow
The remediation process in BigFix SaaS is designed to simplify and streamline patch management and vulnerability remediation.
To set up your custom remediation flow and initiate remediation, complete the following steps.
1. Accessing the Remediate widget
-
Logging in
Log in to BigFix SaaS using your Admin credentials.
-
Go to the Device Explorer Section
- In the BigFix SaaS application, from the left pane expand Explore and select Devices.
- Click the
 List button to view the devices in
list view.
List button to view the devices in
list view. - Select the devices that you want to target; the Remediate button becomes active.
- Click the Remediate button to open the Remediate widget.
2. Setting up remediation flow
-
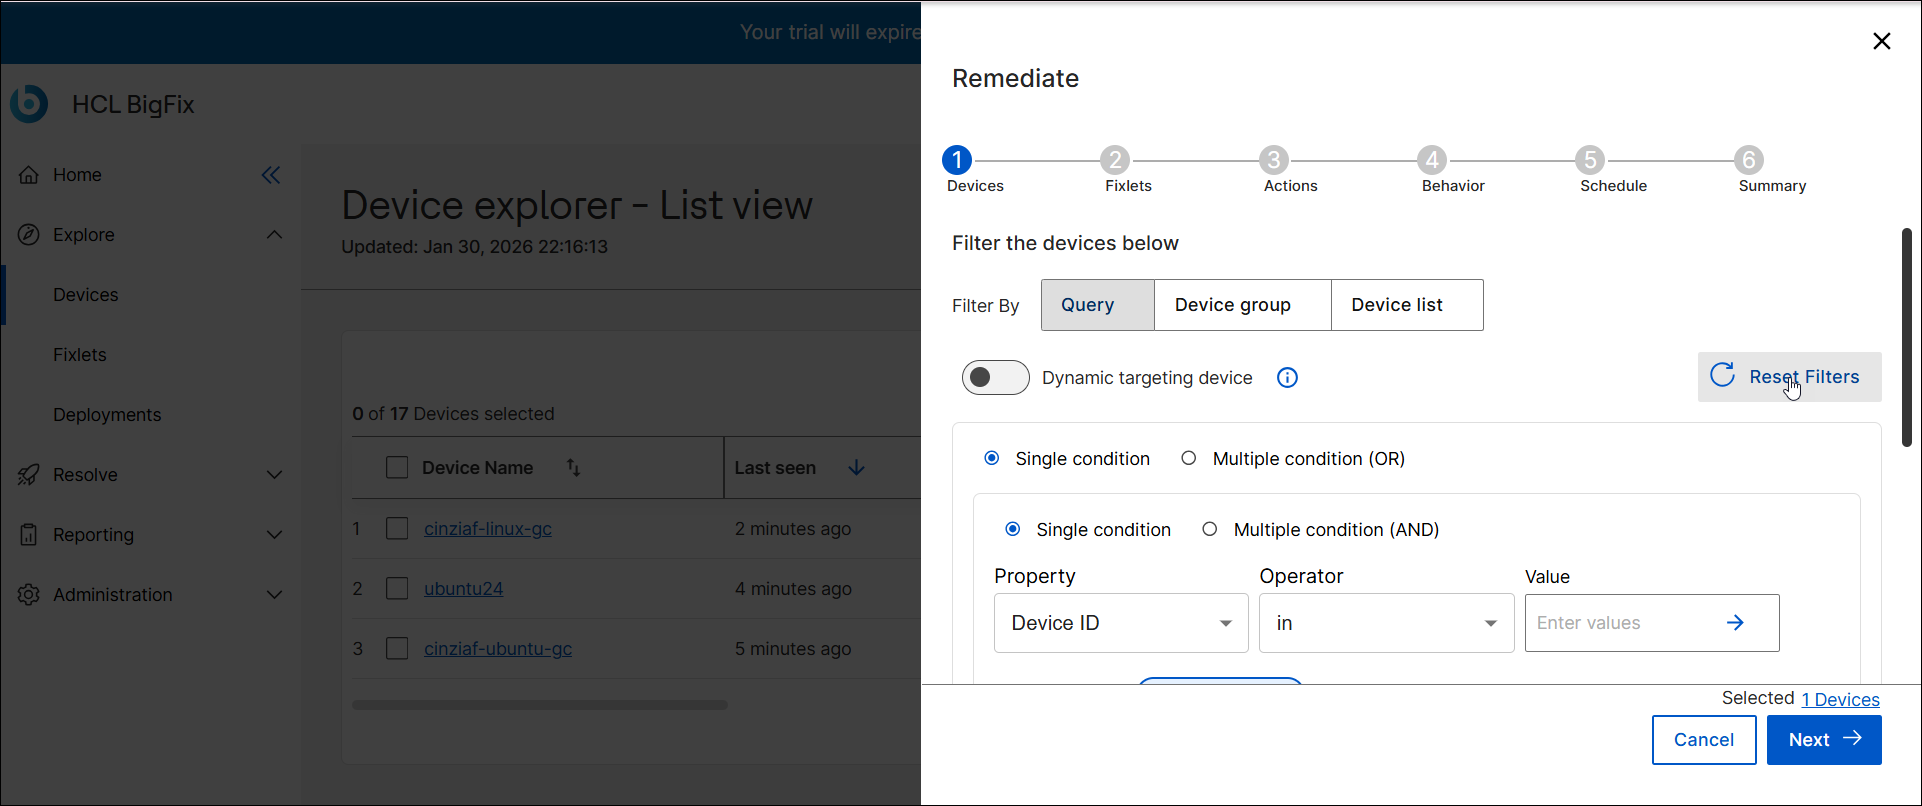
Devices: You can modify the target devices selection using a query to apply the remediation or filter target devices from the list displayed.
-
Filter Devices
-
Filter by query:
- Dynamic or static targeting device:
Toggle the option to select static or dynamic
targeting devices.
-
Static: This is the default option. Applies the deployment to devices that match the defined filters at the time of deployment creation.
-
This list remains unchanged for the duration of the deployment.
-
Devices that match the filter after deployment creation will not be included.
-
Devices that stop matching the filter will still receive the deployment.
- Best for predictable targeting where the scope should not change.
-
- Dynamic:
-
Defines matching criteria that is continuously evaluated for the entire duration of the deployment.
-
Devices that match the filter at any time while the deployment is active will automatically be included.
-
Ideal for ongoing remediation where new or reclassified devices need to be captured.
-
-
- Single condition: Enables you to define one condition.
- Multiple condition (OR):The device group
that meets at least one condition will qualify for
subscription.
- Add Group: Creates a nested group of conditions. Useful for combining AND/OR logic together.
-
Example:
-
Match any:
-
Group 1 (Match all):
-
OS = Windows
-
Device ID contains "abc"
-
-
Group 2 (Match all):
-
OS = macOS
-
Device ID contains "xyz"
Matches devices that are either Windows with a Device ID containing "abc" or macOS with a Device ID containing "xyz".
-
-
-
- Multiple condition (AND): Filters devices
that meet every condition specified based on the
following parameters.
- Attribute: Device attributes like OS, RAM, software version.
- Condition: Criteria such as equals, greater than, contains.
- Value: The specific value for the
condition. Example: To subscribe all Windows
devices, set the attribute to "OS", the condition
to "equals", and the value to "Windows".
- Add Condition: You can Add
multiple conditions to ensure that
they reflect the criteria relevant to your
deployment needs. For example, you can add
conditions based on geography, software version,
or device type. Example:
-
Condition 1: Operating System equals Windows
-
Condition 2: Device ID contains 1234
Only devices that are Windows and with device ID that contains 1234 will match.
-
- Add Condition: You can Add
multiple conditions to ensure that
they reflect the criteria relevant to your
deployment needs. For example, you can add
conditions based on geography, software version,
or device type. Example:
- Filter by Device List: Alternatively, you can also select devices from Filter by device list to select the target devices.
- Dynamic or static targeting device:
Toggle the option to select static or dynamic
targeting devices.
-
-
-
Fixlets: Configure conditions to filter and select Fixlets to deploy or select the Fixlets from the displayed Fixlets list.
- Click the Attribute dropdown to choose an
attribute. For each attribute, specify a condition and add a value.
You can define multiple conditions.
- CVE: Add relevant CVEs by typing them and click
Add.Note:
- To enter multiple CVE entries at once, you can copy paste a list of CVEs separated by comma, semicolon or a space. For example: CVE-123-1234,CVE-123-1256, CVE-123-1278
- View All button is displayed when there are more than eight CVE values. Click the View All button to view the list in detail, review, search, or remove a specific CVE.
- Category: Select categories from the list of categories dynamically displayed based on your system’s database and click Add. This displays all the available categories with the ones that you have selected in blue. You can also modify your selection from here.
- Name: Select the "contains" or "not contains" condition and for the value, enter your string, and click Add. This displays all the strings that you have entered. You can also modify your selection from here, inserting or deleting values.
- Severity: Select the "in" or "not in" condition; for the value, choose the level of severity for the Fixlet. Modify selection by adding or removing as required.
- Source: Select the "in" or "not in" condition; for the value, select one or more vendors from the available option, and click Add. This displays all the available options for vendors with the ones that you have selected in blue. You can also modify your selection from here.
Note:- To remove all entries in a section, click
 .
. - The Attribute dropdown dynamically displays the attributes available to you.
- The Value text box dynamically fetches data from your database for you to select.
- CVE: Add relevant CVEs by typing them and click
Add.
- Once the conditions are defined, click Next to proceed.
- Click the Attribute dropdown to choose an
attribute. For each attribute, specify a condition and add a value.
You can define multiple conditions.
-
Actions: You can review and update the actions for the set of Fixlets with default action and without default action.
-
Behavior: You can configure the options to deploy the Fixlets from here.
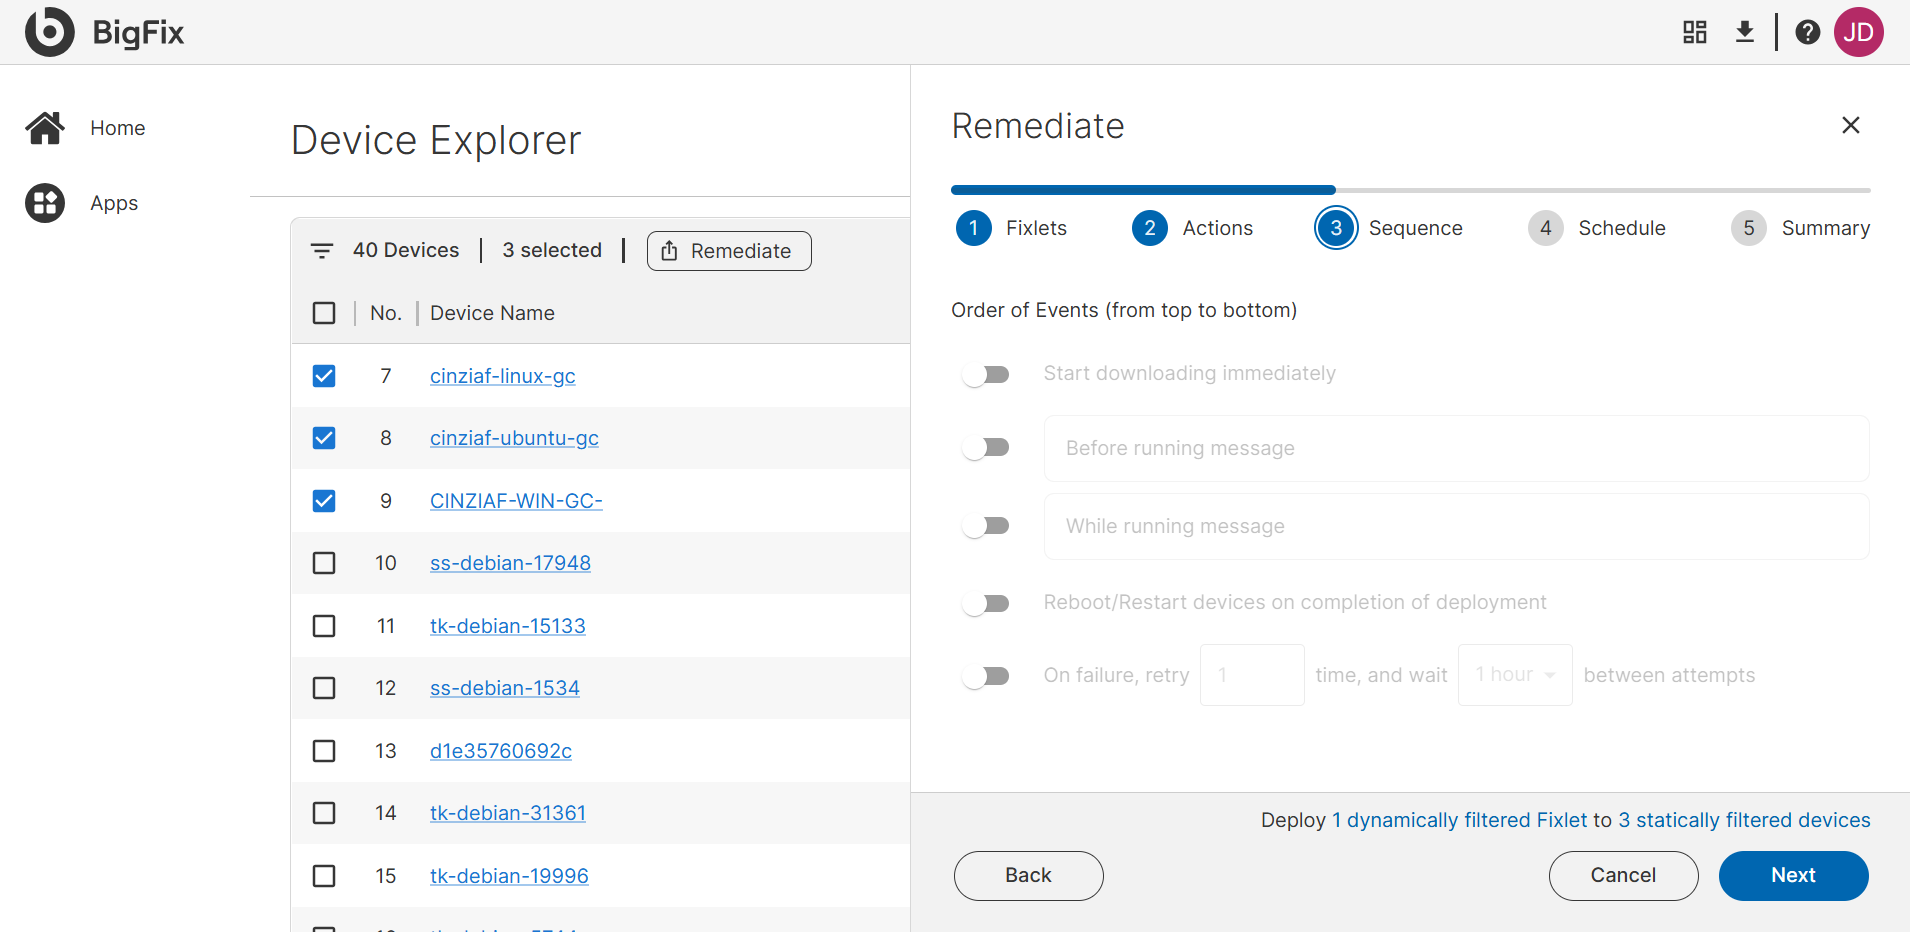
You can control the sequence by selecting which events to run. The system follows the list from top to bottom, running only the selected ones.-
Start downloading immediately: Select this option to download deployment files immediately regardless of the start time schedule. Pre-cache deployment-related files, transferring them from a vendor's server to a BigFix server before deployment. You can save time when working with large files or a tight maintenance window by completing this part of the job first.
-
Before running message: To display a message on target computers before the deployment runs, select this option and enter your message.
-
While running message: Select this option to display the message on targeted computers while the deployment is running.
-
Reboot/Restart devices on completion of deployment: Select this option to restart the computer after the action is run.
-
On failure, retry: Select this option to configure when to retry deployment on failure.
-
Reapply: Select this option to reapply the action. By default, whenever it becomes relevant again, you can reapply with 1-hour wait between attempts, up to 3 times. You can configure the wait time and the number of attempts as needed.
-
-
Schedule: Configure start date and end date.
Run during agent’s configured maintenance window: Select this option, if you want to deploy the remediation during the set maintenance window.
-
Summary: Shows all the configured remediation flow settings. Provide a unique Deployment Name.
Review the configurations and click Deploy to submit the action.
Result: The remediation flow is created and saved.
What to do next: Go to Deployment Manager and you can see that the action is deployed. It also displays all the configured remediation flow settings. It shows the devices on which the deployment is being done, and the Fixlets that are deployed.