Load Balancer Configuration
This section describes the steps for making the required configurational changes if, iAutomate is installed in High Availability mode.
To make the configuration changes, please follow the below steps:
- Press Win+R and type services.msc.
- Click OK to open IIS.
Figure 1. Load Balancer Configuration .png)
- Expand Sites under Connections and click HCLiAutomateBaseUI.
Figure 2. Load Balancer Configuration (cont.) .png)
- Click on Bindings in the Edit Site section.
Figure 3. Load Balancer Configuration (cont.) .png)
Figure 4. Load Balancer Configuration (cont.) .png)
- Ensure that the value of Port mentioned is same as configured in Load Balancer. If that is not the case, click Edit to change the Port value.
- Right-click on HCLiAutomateBaseUI and click Explore.
- Find Web.config file and open it in a Notepad.
Figure 5. Load Balancer Configuration (cont.) .png)
- Within the Web.config file, search for the key ‘URL’ and replace the
‘<ip>:<portnumber>’ with the Load balancer IP and Web API
Port.
Figure 6. Load Balancer Configuration (cont.) 
- Save the file to implement the changes.
- Select the service and click Restart to restart the services.
- Expand Sites in Connections section and click HCLiAutomateWEBAPI.
Figure 7. Load Balancer Configuration (cont.) .png)
Figure 8. Load Balancer Configuration (cont.) 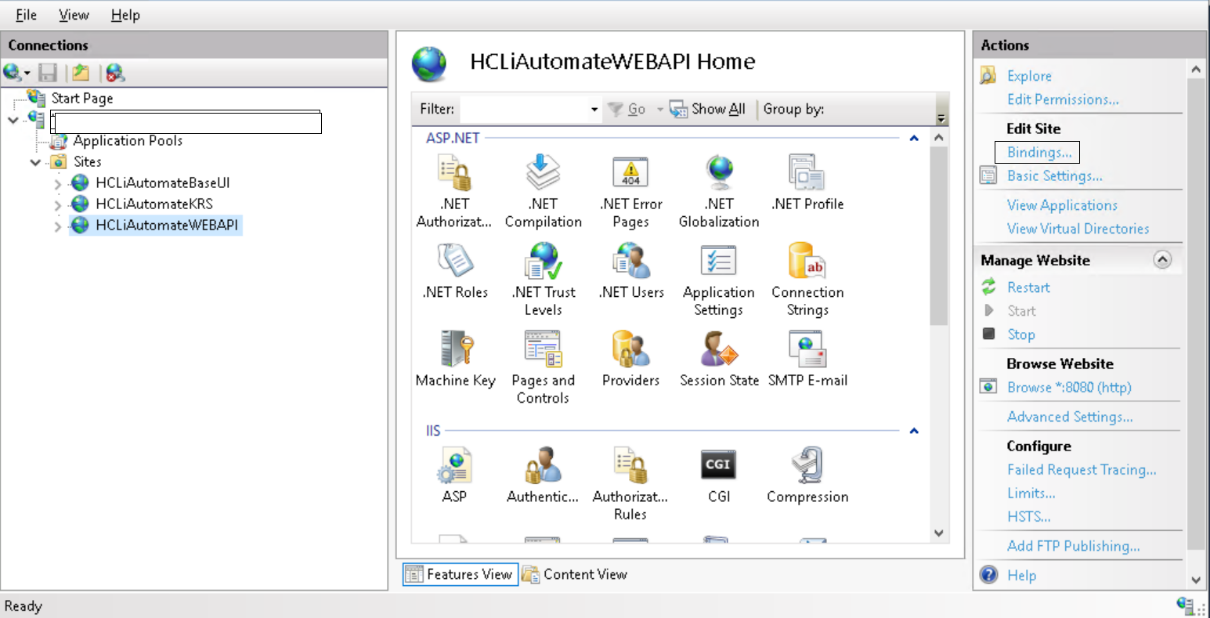
- Right-click on HCLiAutomateWEBAPI and click Explore.
- Find Web.config file and open it in a Notepad.
Figure 9. Load Balancer Configuration (cont.) .png)
- Within the Web.config file, search for the key ‘URL’ and replace the
‘<ip>:<portnumber>’ with the Load balancer IP and Web API
Port.
Figure 10. Load Balancer Configuration (cont.) .jpg)
- Save the file to implement the changes.
- Select the service and click Restart to restart the services.
- Press Win+R and type services.msc.
Figure 11. Load Balancer Configuration (cont.) .png)
- Click OK to open Windows Services.
Figure 12. Figure 295 - Load Balancer Configuration (cont.) .png)
- Search for HCL.iAutomate.Listener service and right-click on it.
- Click Properties.
Figure 13. Load Balancer Configuration (cont.) .png)
- Copy the value mentioned in Path to executable as shown in the image below.
Figure 14. Load Balancer Configuration (cont.) .png)
- Open File Explorer , then paste the copied path and press Enter to open the desired folder.
- Search for HCL.iAutomate.Listner.Service.Host config file
and open it in a Notepad.
Figure 15. Load Balancer Configuration (cont.) .png)
- Within the HCL.iAutomate.Listner.Service.Host config file, search for the key
‘URL’ and replace the ‘<ip>:<portnumber>’ with the Load
balancer IP and Web API Port.
Figure 16. Load Balancer Configuration (cont.) 
- Save the file to implement the changes.
- Select the service and click Restart to restart the services.Note:Repeat the steps mentioned above on all the load balanced servers.
- Login to iAutomate using the Super Admin credentials.
- Roll-over Environment and click iAutomate Configuration.
- Select Component Name as ‘Web API’. Change the Load Balancer URL to
the Load Balancer IP.
Figure 17. Load Balancer Configuration (cont.) 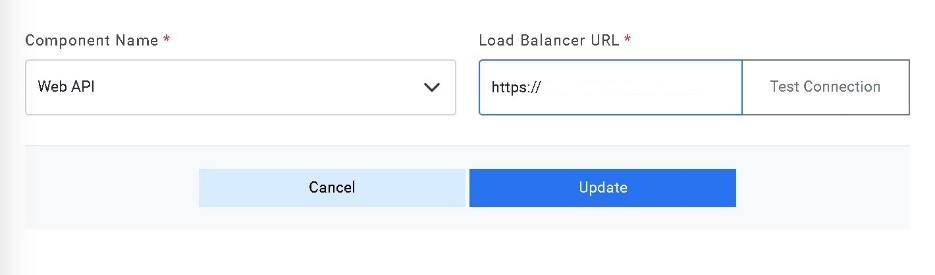
- Click Update to save the changes.
- Above step must be repeated for all the components. Additionally, for the Component
Name ‘iRecommend’, provide the path of the shared drive location in the
‘iRecommend Model Location’ field.
Figure 18. Load Balancer Configuration (cont.) 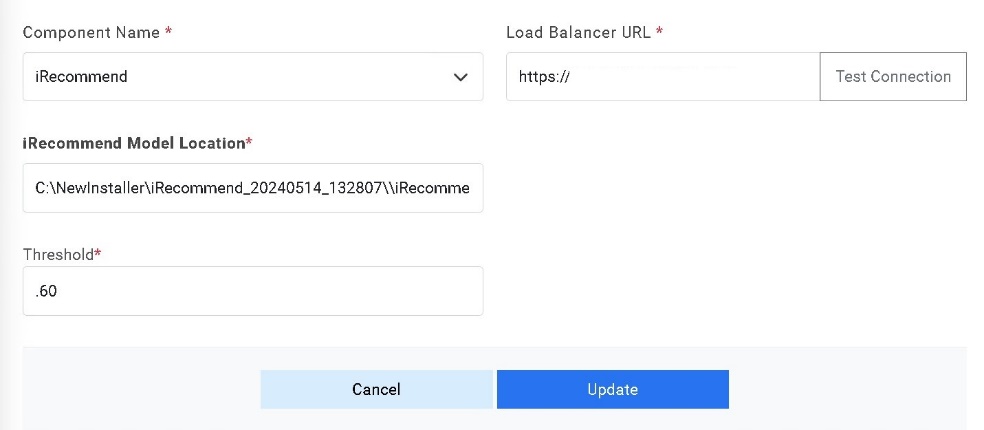
- Click Update to save the changes.
- Additionally, for the Component Name Entity Model, provide the path of the shared drive location in the EntityModel
Model Location field.
Figure 19. Load Balancer Configuration (cont.) 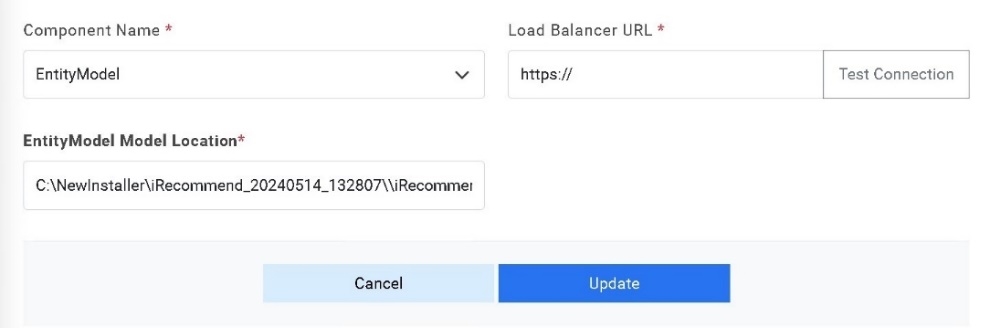
- Click Update to save the changes.
- Additionally, for the Component Name given as Crawler, provide the path of
the shared drive location in the Data Directory Location field.
Figure 20. Load Balancer Configuration (cont.) 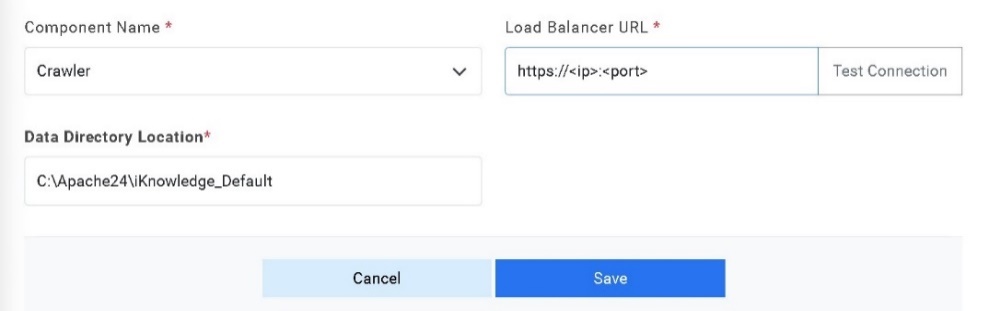
- Click Update to save the changes.