iOS SDK
This page provides a comprehensive guide on the HCL CDP iOS SDK to send data from your iOS apps to your destinations via HCL CDP.
Overview of the HCL CDP iOS SDK?
The HCL CDP iOS SDK is designed to track user event data from the iOS app. The SDK can be easily imported into any iOS app. Based on the data it receives from the user activity, it sends real-time personalized push notifications to the users about the services and products that our clients provide.
Installing and using the HCL CDP iOS SDK
Prerequisites
- HCL CDP Account Id
- HCL CDP Server URL
cert.pemkey.pem- Passphrase
- Bundle identifier of the app
Integration through CocoaPods
Cocoa Pods is a dependency manager for Objective C & Swift projects that make integration easier. Follow the below steps to integrate the SDK with CocoaPods.
- In the terminal, run following line to install Cocoa
Pods.
sudo gem install cocoapods - Next, add the HCL CDP SDK to your
Podfile. Copy-paste the below snippet in yourPodfile.If you are using SDK version <= 3.8.5 then add the extensions as mentioned below.
platform :ios, 'YOUR_TARGET_PLATFORM_VERSION'

target 'YOUR_TARGET_NAME' do
    # HCL CDP SDK
    pod 'HCLCDP', '3.8.5'
end

target 'NotificationContentExtension' do
  use_frameworks!

  # HCL CDP Notification Content Extension
  pod 'HCLCDP-NotificationContent', '3.8.5'
end

target 'NotificationServiceExtension' do
  use_frameworks!
;
  # HCL CDP Notification Service Extension
  pod 'HCLCDP-NotificationService', '3.8.5'
end
If you are using SDK version >= 3.8.6 then add the extensions as mentioned below.
platform :ios, 'YOUR_TARGET_PLATFORM_VERSION'

target 'YOUR_TARGET_NAME' do
    # HCL CDP SDK
    pod 'HCLCDP', '3.8.6'
end


target 'NotificationContentExtension' do
  use_frameworks!

  # HCL CDP Notification Content Extension
  pod 'HCLCDP', '3.8.6'
end

target 'NotificationServiceExtension' do
  use_frameworks!

  # HCL CDP Notification Service Extension
  pod 'HCLCDP', '3.8.6'
end
- Run the following command to install the
SDK.
pod install --repo-update
Configuration
App configuration
- Please enable Push Notifications (You can ignore if you aren't using Push Notification from HCL CDP) and AppGroup capability from our Xcode Signing & Capabilities Tab and use the Same AppGroup for all the 3 targets (App, Notification Service Extension and Notification Content Extension).
- Call the
setAppGroupIDmethod to set the AppGroup selected in the Xcode's Signing & Capabilities. - Then call the
configure()method to initialize the SDK. It will initialize the iOS SDK withwriteKey,serverUrlandlaunchOptions.
Usage:
SwiftHclcdp.shared.setAppGroupID(groupId: "co.Hclcdp.app.ios.bankingdemo")
Hclcdp.shared.configure(writeKey: "ABC2rj2", serverUrl: "https://xx-pl.Hclcdp.co", launchOptions: launchOptions)Objective C
// Set AppGroup only if you are using Push Notifications from HCL CDP, this will be something like co.Hclcdp.app.ios.bankingdemo
[[Hclcdp shared] setAppGroupIDWithGroupId:@"your app groupid"];
// Initialize HCLCDP SDK
[[Hclcdp shared] configureWithWriteKey:@"writeKey" serverUrl:@"xx-pl.Hclcdp.co" launchOptions:launchOptions];
Example:
SwiftHclcdp.shared.setAppGroupID(groupId: "co.Hclcdp.app.ios.bankingdemo")
Hclcdp.shared.configure(writeKey: "ABC2rj2", serverUrl: "https://xx-pl.Hclcdp.co", launchOptions: launchOptions)// Set AppGroup only if you are using Push Notifications from HCL CDP , this will be something like co.Hclcdp.app.ios.bankingdemo
[[Hclcdp shared] setAppGroupIDWithGroupId:@"co.Hclcdp.app.ios.bankingdemo"]; // This will be something like co.Hclcdp.app.ios.bankingdemo
// Initialize HCLCDP SDK
[[Hclcdp shared] configureWithWriteKey:@"ABC2rj2" serverUrl:@"https://xx-pl.Hclcdp.co" launchOptions:launchOptions];| Parameter | Type | Description |
writeKey |
String | (Mandatory) Write key of the iOS source |
serverUrl |
String | (Mandatory) Server URL |
launchOptions |
[UIApplication.LaunchOptionsKey: Any] | (Mandatory) launchOptions at "didFinishLaunchingWithOptions" method |
Enabling Debug Logs
Hclcdp.shared.setLogLevel(HclcdpLogLevel.debug.rawValue)Now, whenever you want to show the Push Notification Authorization prompt to the user, you can call the following HCL CDP SDK method.
Hclcdp.shared.registerForPushNotifications()Objective C
[[Hclcdp shared] registerForPushNotifications];In your AppDelegate, you need to disable swizzling and then only call registerForPushNotifications.
// Your code
    Hclcdp.shared.setSwizzle(state: false)
    Hclcdp.shared.setSwizzleForAll(state: false)
    Hclcdp.shared.registerForPushNotifications()
// Your code// your code
[[Hclcdp shared] setSwizzleWithState:NO];
[[Hclcdp shared] setSwizzleForAllWithState:NO];
[[Hclcdp shared] registerForPushNotifications];
// your codeAfter you add above code, you need to call our HCL CDP methods in your UIApplicationDelegate methods as mentioned below:
func application(_ application: UIApplication, didRegisterForRemoteNotificationsWithDeviceToken deviceToken: Data) {
    // Your code
    Hclcdp.shared.application(application, didRegisterForRemoteNotificationsWithDeviceToken: deviceToken)
    // Your code
}

func application(_ application: UIApplication, didFailToRegisterForRemoteNotificationsWithError error: Error) {
    // Your code
    Hclcdp.shared.application(application, didFailToRegisterForRemoteNotificationsWithError: error)
    // Your code
}

func application(_ application: UIApplication, didReceiveRemoteNotification userInfo: [AnyHashable: Any], fetchCompletionHandler completionHandler: @escaping (UIBackgroundFetchResult) -> Void) {
    // Your code
    Hclcdp.shared.application(application, didReceiveRemoteNotification: userInfo, fetchCompletionHandler: completionHandler)
    // Your code
}// Your code
- (void)application:(UIApplication *)application didRegisterForRemoteNotificationsWithDeviceToken:(NSData *)deviceToken {
// Your code
[[Hclcdp shared] application:application didRegisterForRemoteNotificationsWithDeviceToken:deviceToken];
// Your code
}
- (void)application:(UIApplication *)application didFailToRegisterForRemoteNotificationsWithError:(NSError *)error {
// Your code
[[Hclcdp shared] application:application didFailToRegisterForRemoteNotificationsWithError:error];
// Your code
}
- (void)application:(UIApplication *)application didReceiveRemoteNotification:(NSDictionary *)userInfo fetchCompletionHandler:(void (^)(UIBackgroundFetchResult))completionHandler {
// Your code
[[Hclcdp shared] application:application didReceiveRemoteNotification:userInfo fetchCompletionHandler:completionHandler];
// Your code
}
// Your codeRich Push Setup
From iOS 10+, we can show rich media Push Notifications with images, video, audio and carousel. So please configure the below 2 extensions in your project if you don't have them already and configure HCL CDP SDK in them.
Notification Service Extension
We use Notification Service Extension to track the delivery of Push Notifications as well as downloading the Rich Media Push Notification attachments (image/video/audio etc)
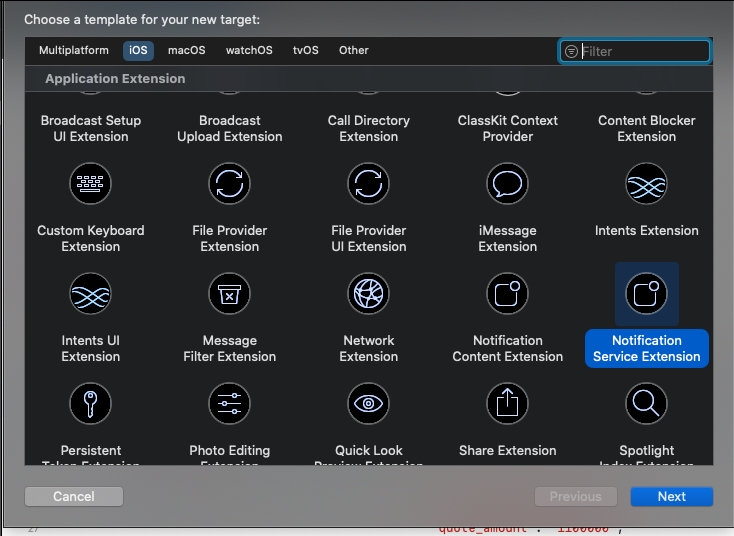
- Add a Notification Service Extension target to your project (File -> New ->
Target -> Notification Service Extension).
- Define the name for the Notification Service Extension in the next
step.

- Now please enable the AppGroup capability from our Xcode Signing & Capabilities Tab and use the same AppGroup for all the 3 targets (App, Notification Service Extension and Notification Content Extension). You can find the documentation on how to enable App Groupif you aren't familiar with this.
- Now modify the
NotificationService.swiftto look like the following code. - If you are using SDK version below 3.8.5 then use the below
code
import UserNotifications import HclcdpRichNotification class NotificationService: HclcdpNotificationService { public override func didReceive(_ request: UNNotificationRequest, withContentHandler contentHandler: @escaping (UNNotificationContent) -> Void) { super.setAppGroupID(groupId: "your app groupid") // This will be something like co.Hclcdp.app.ios.bankingdemo that you have created above super.didReceive(request, withContentHandler: contentHandler) } public override func serviceExtensionTimeWillExpire() { super.serviceExtensionTimeWillExpire() } } - If you are using version 3.8.5 and above modify the
NotificationService.swiftto look like the following code.import UserNotifications //if SDK version <= 3.8.5 import HclcdpRichNotification // else if SDK version >= 3.8.6 import Hclcdp class NotificationService: UNNotificationServiceExtension { public override func didReceive(_ request: UNNotificationRequest, withContentHandler contentHandler: @escaping (UNNotificationContent) -> Void) { HclcdpNotificationService.shared.setAppGroupID(groupId: "your app groupid") // This will be something like co.Hclcdp.app.ios.bankingdemo that you have created above HclcdpNotificationService.shared.didReceive(request, withContentHandler: contentHandler) } public override func serviceExtensionTimeWillExpire() { super.serviceExtensionTimeWillExpire() } }If you have multiple push providers and using sdk version >= 3.8.6 you can implement NotificationService as mentioned below.
import UserNotifications
import Hclcdp

class NotificationService: UNNotificationServiceExtension {

    var bestAttemptContent: UNMutableNotificationContent?
    var isHclcdpPush: Bool?

    public override func didReceive(_ request: UNNotificationRequest, withContentHandler contentHandler: @escaping (UNNotificationContent) -> Void) {

        self.bestAttemptContent = (request.content.mutableCopy() as? UNMutableNotificationContent)
        self.isHclcdpPush = false

        var userInfo: [String: Any]? = bestAttemptContent?.userInfo as? [String: Any]

        if Hclcdp.shared.isHclcdpPush(userInfo: userInfo) {
            self.isHclcdpPush = true
            HclcdpNotificationService.shared.setAppGroupID(groupId: "your app groupid")
            HclcdpNotificationService.shared.didReceive(request, withContentHandler: contentHandler)
        }
        else{
            //other push provider code
        }
    }

    public override func serviceExtensionTimeWillExpire() {
        if(self.isHclcdpPush == true){
            super.serviceExtensionTimeWillExpire()
        }
        else{
            //other push provider code
        }
    }
}
This extension can be used if you want to show a carousel slider in a Push Notification.
- Add a Notification Content Extension target to your project (File -> New
-> Target -> Notification Content Extension).
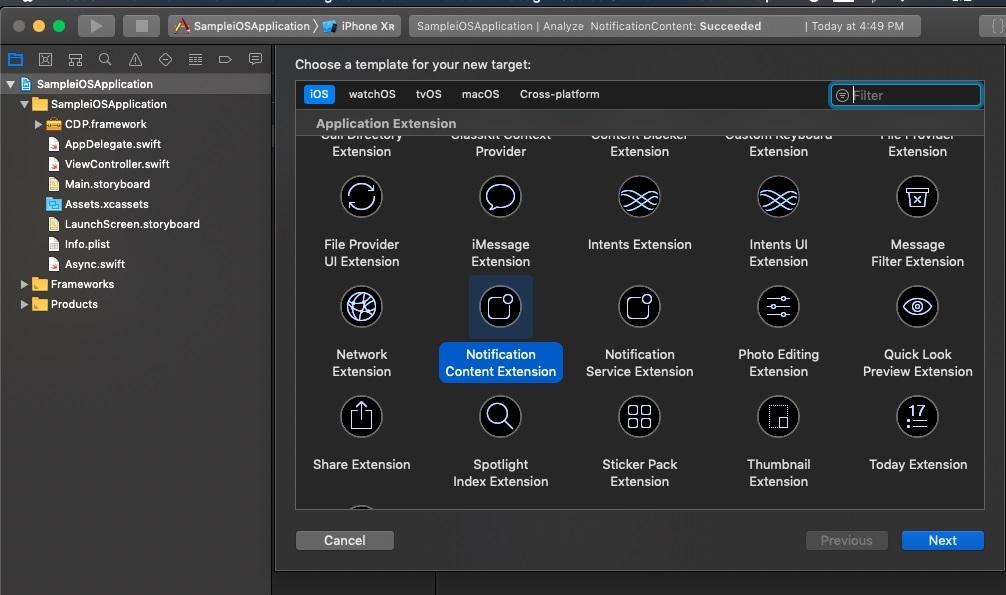
- Define the name for the Notification Content Extension in the next step.
- Make sure the deployment target for notification content is set to iOS 10.
- Now enable the AppGroup capability from our Xcode Signing & Capabilities Tab and use the same AppGroup for all the 3 targets (App, Notification Service Extension and Notification Content Extension).
- Modify the
NotificationViewController.swiftto look like the following code.import UIKit import UserNotifications import UserNotificationsUI // if sdk version <= 3.8.5 import HclcdpNotificationContent // else if sdk version >= 3.8.6 import Hclcdp class NotificationViewController: HclcdpNotificationViewController { override func viewDidLoad() { super.viewDidLoad(); } override func didReceive(_ notification: UNNotification) { super.setAppGroupID(groupId: "your app groupid") // This will be something like co.Hclcdp.app.ios.bankingdemo that you have created above super.didReceive(notification) } } - Then run
pod install. If you are running this for the first time then you may need to update the pod repositories by using runningpod install --repo-update. This would install the HCL CDP framework along with the required dependencies for your app extension targets.
Please follow the following procedure if you are using the Xcode Auto Sign, otherwise please scroll below to add the App Groups manually via the Apple Developer Console.
- Go to
App Groupscapability from the Xcode’sSinging & Capabilitiesfor all the targets (App,NotificationServiceExtension and NotificationContentExtension) as shown in the following screenshot.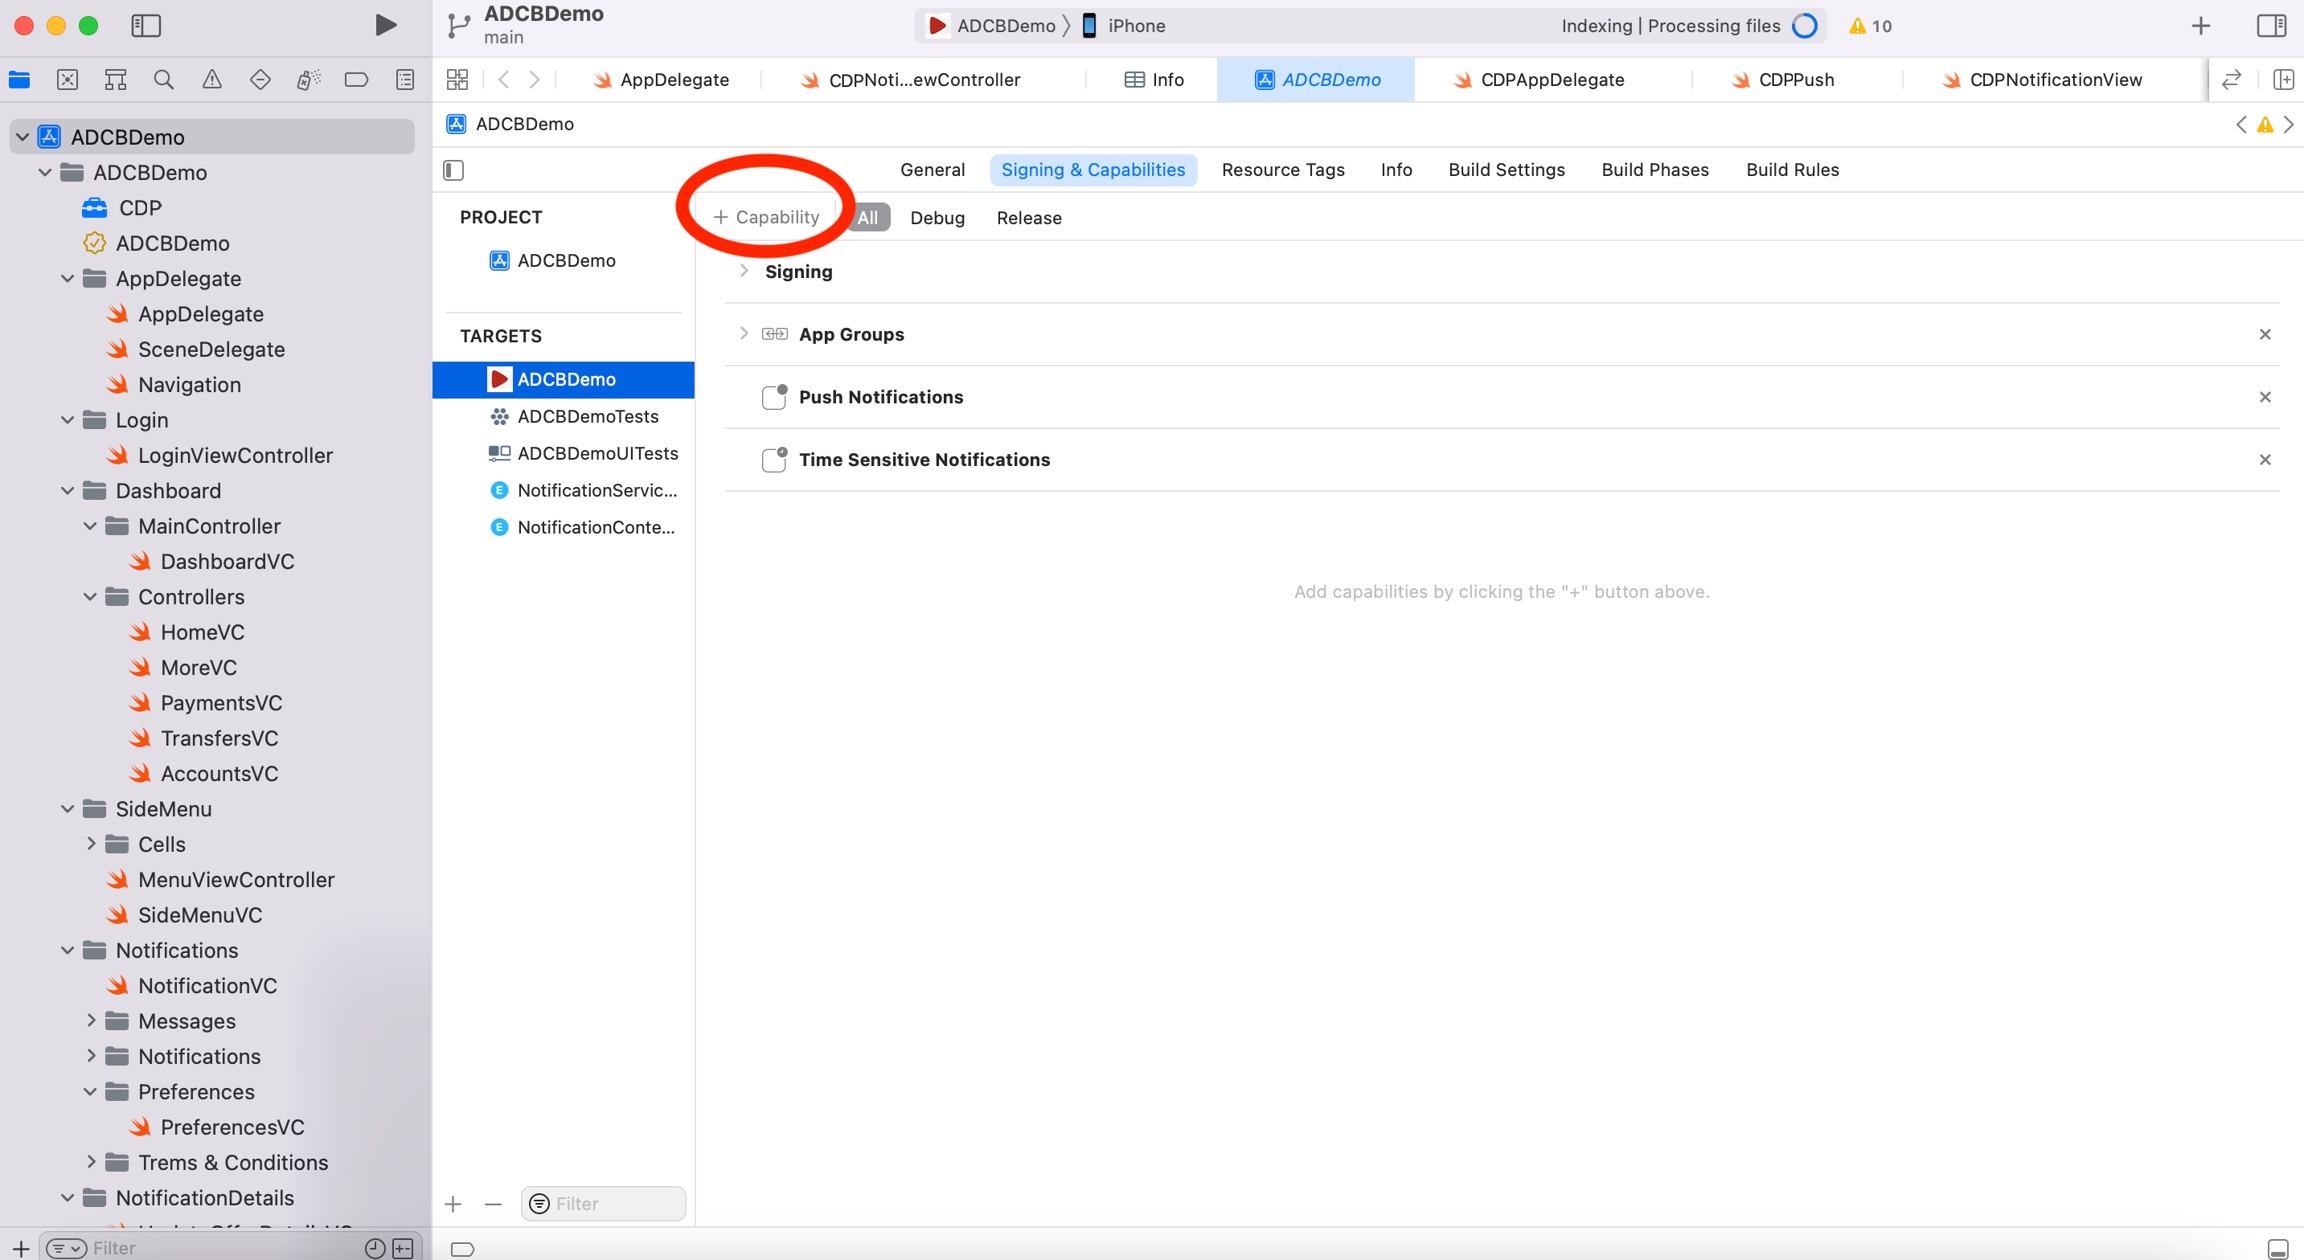
- Now search for App
groupand selectApp Groups.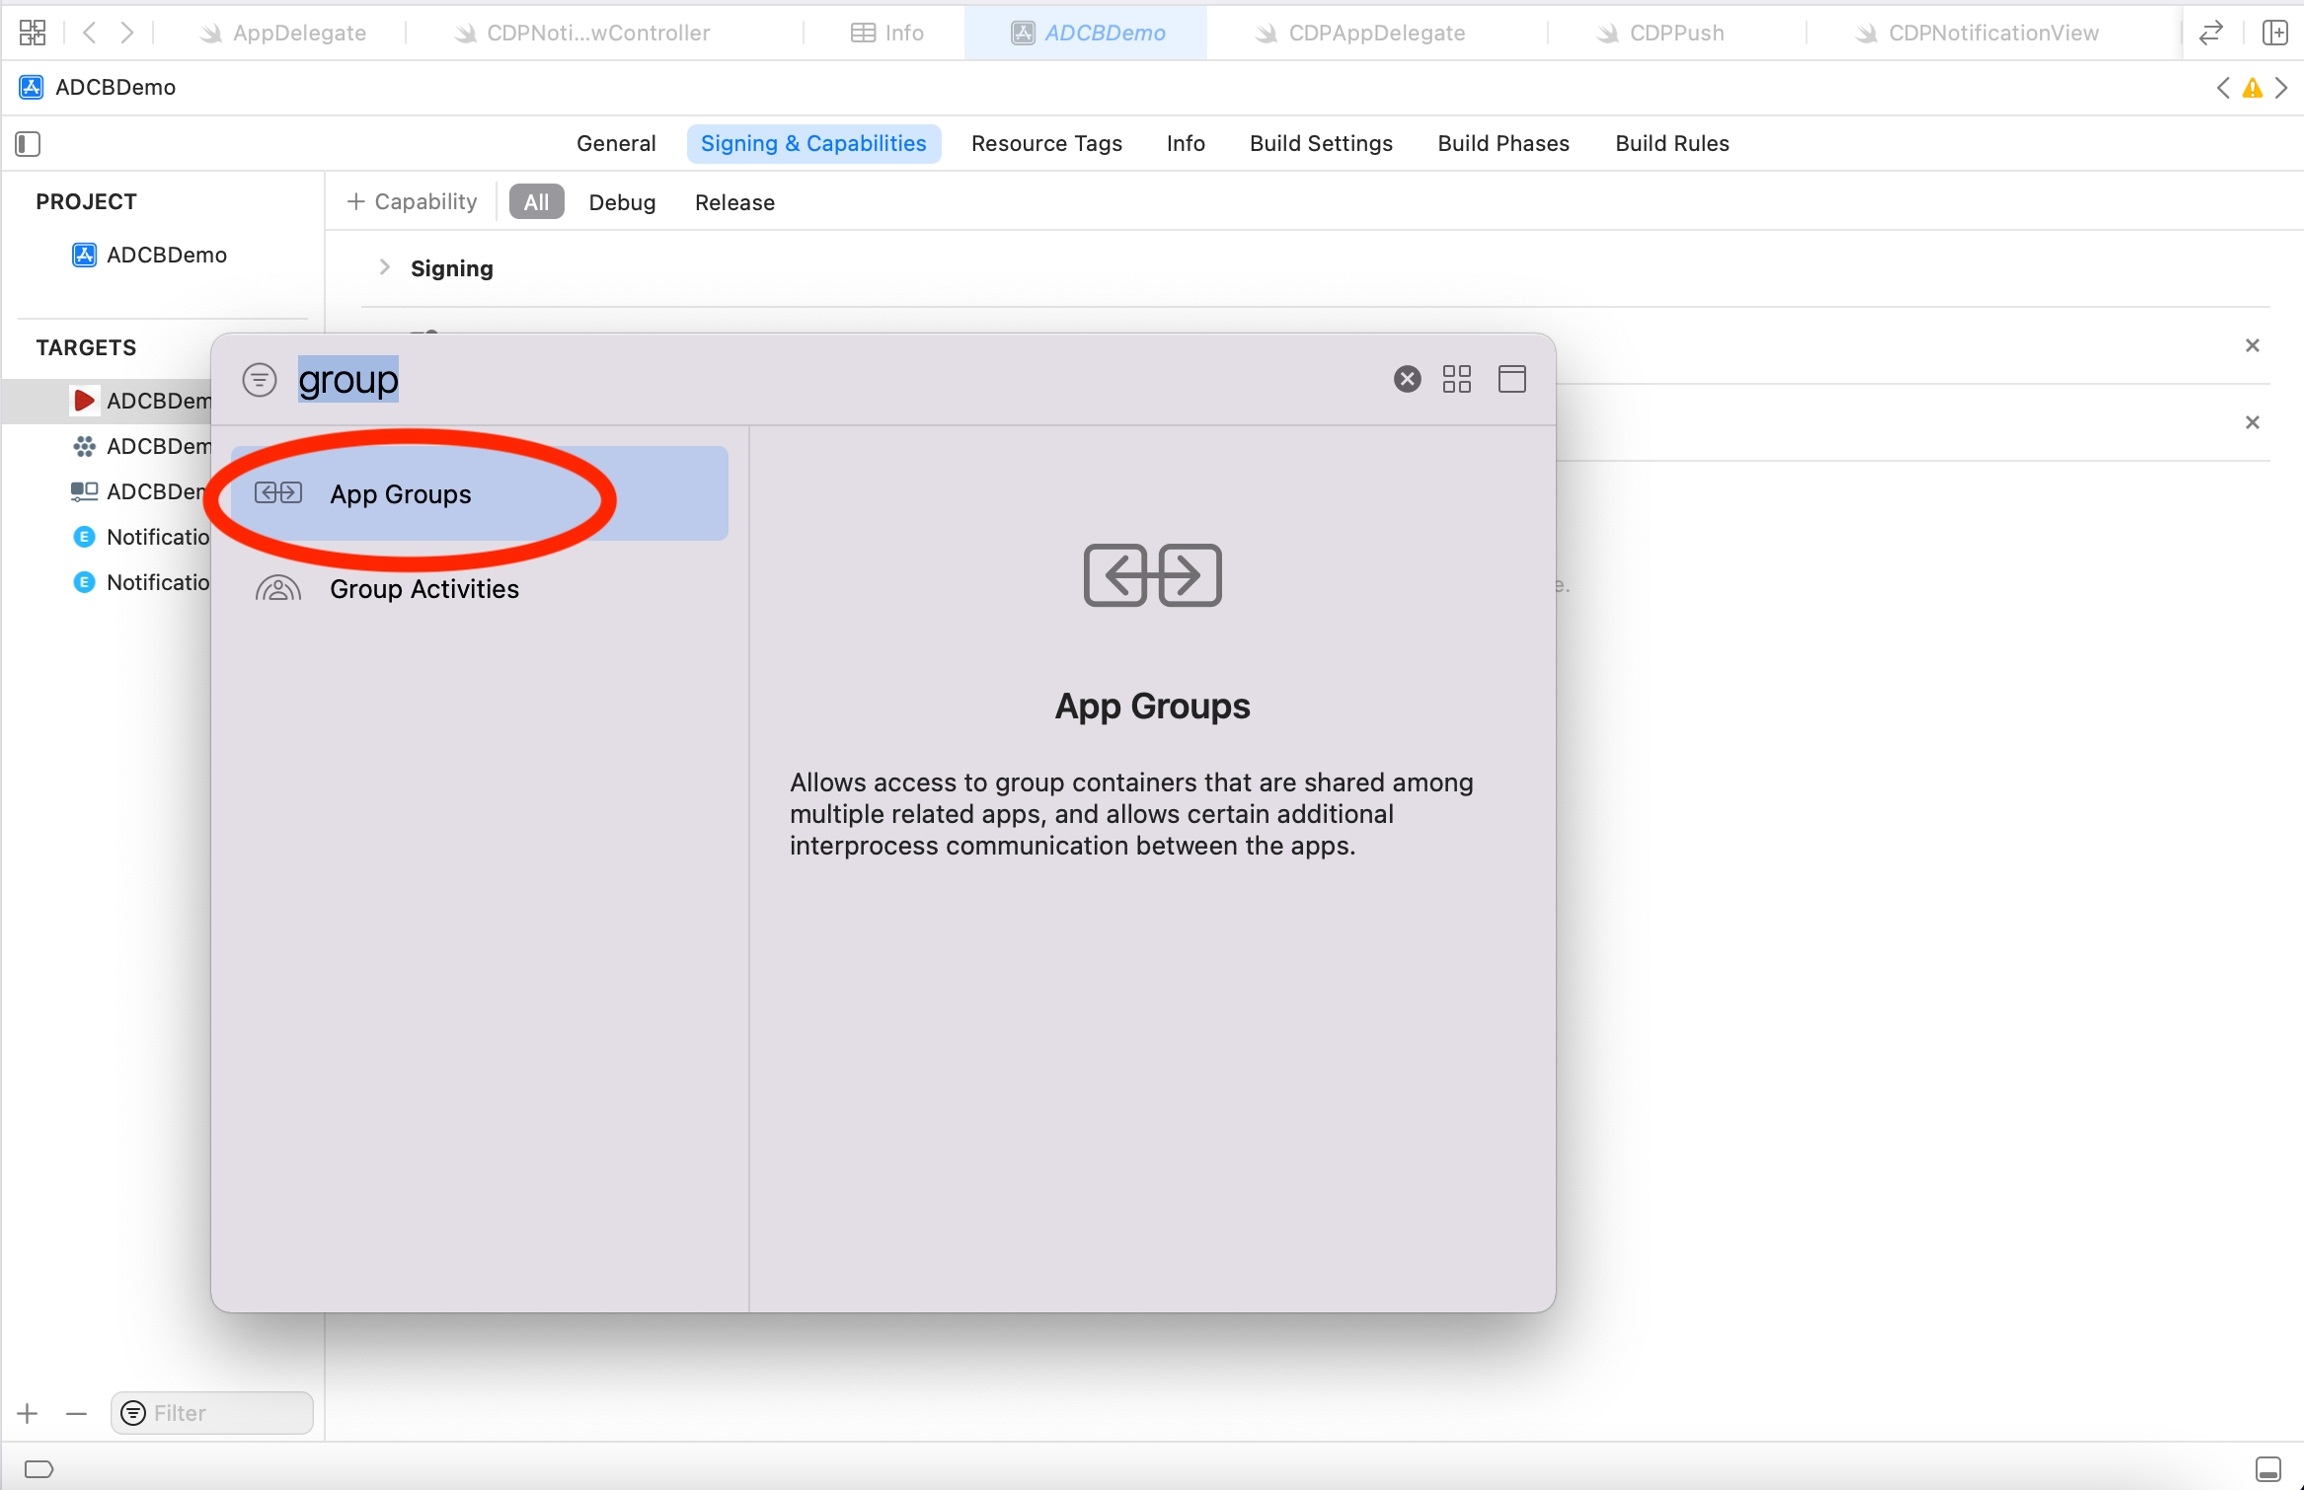
- Now create the required
App GroupsId by inputting a value similar to your Bundle Id (need not be the same as BundleId) which will havegroup.as the prefix.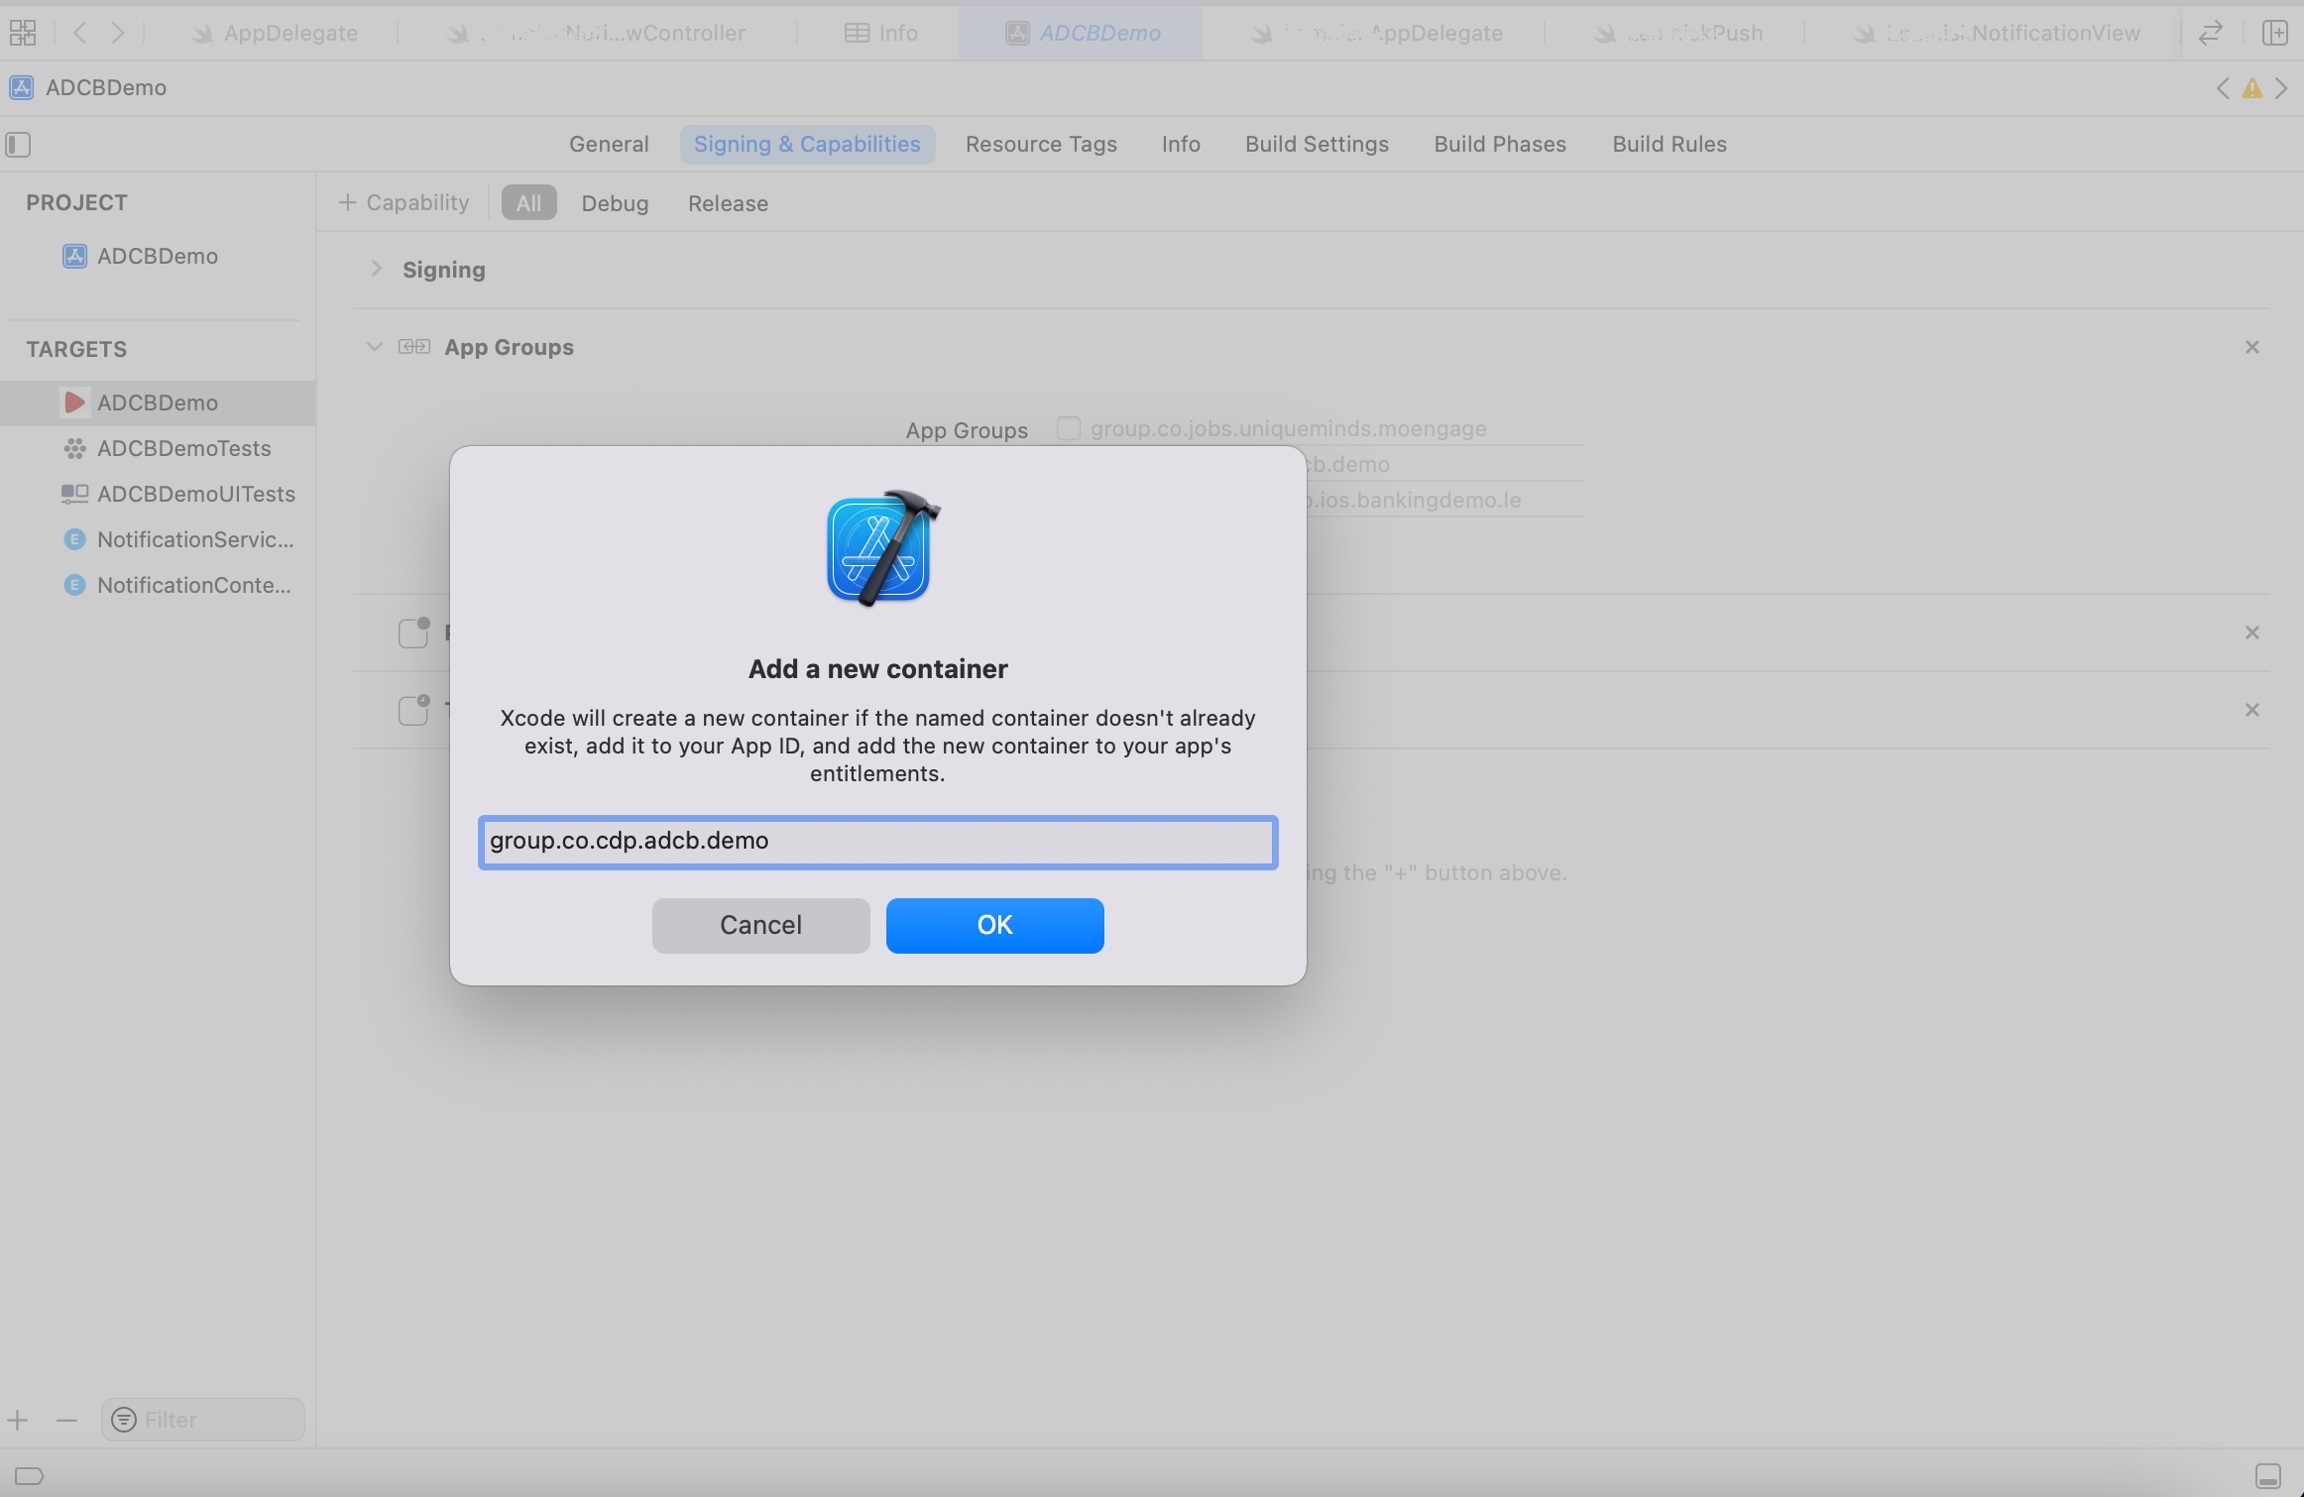
- Select
group idthat we have just created. - Similarly, select the already created same AppGroup for the other two targets - Notification Service Extension and Notification Content Extension.
- Go to the
Identifierstab in the Apple Developer Console and click App Groups as shown in the below screenshot.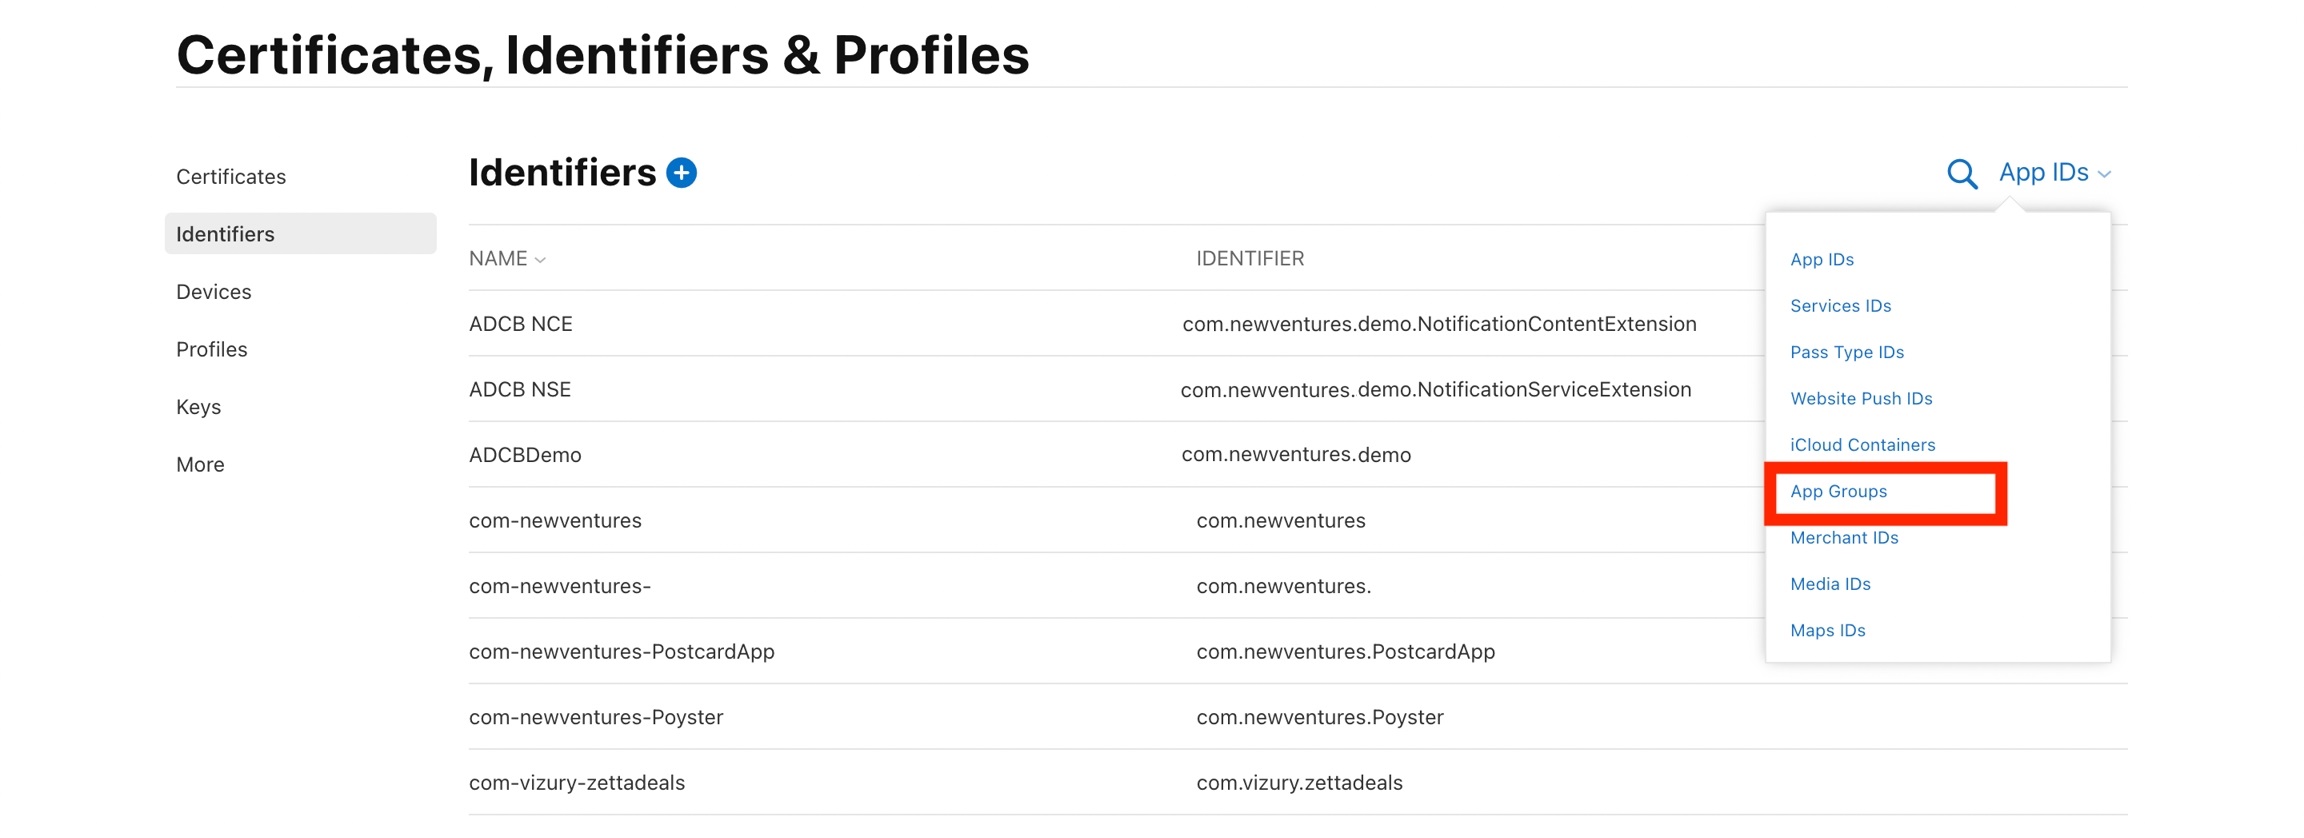
- Now click + to create a new App Group.
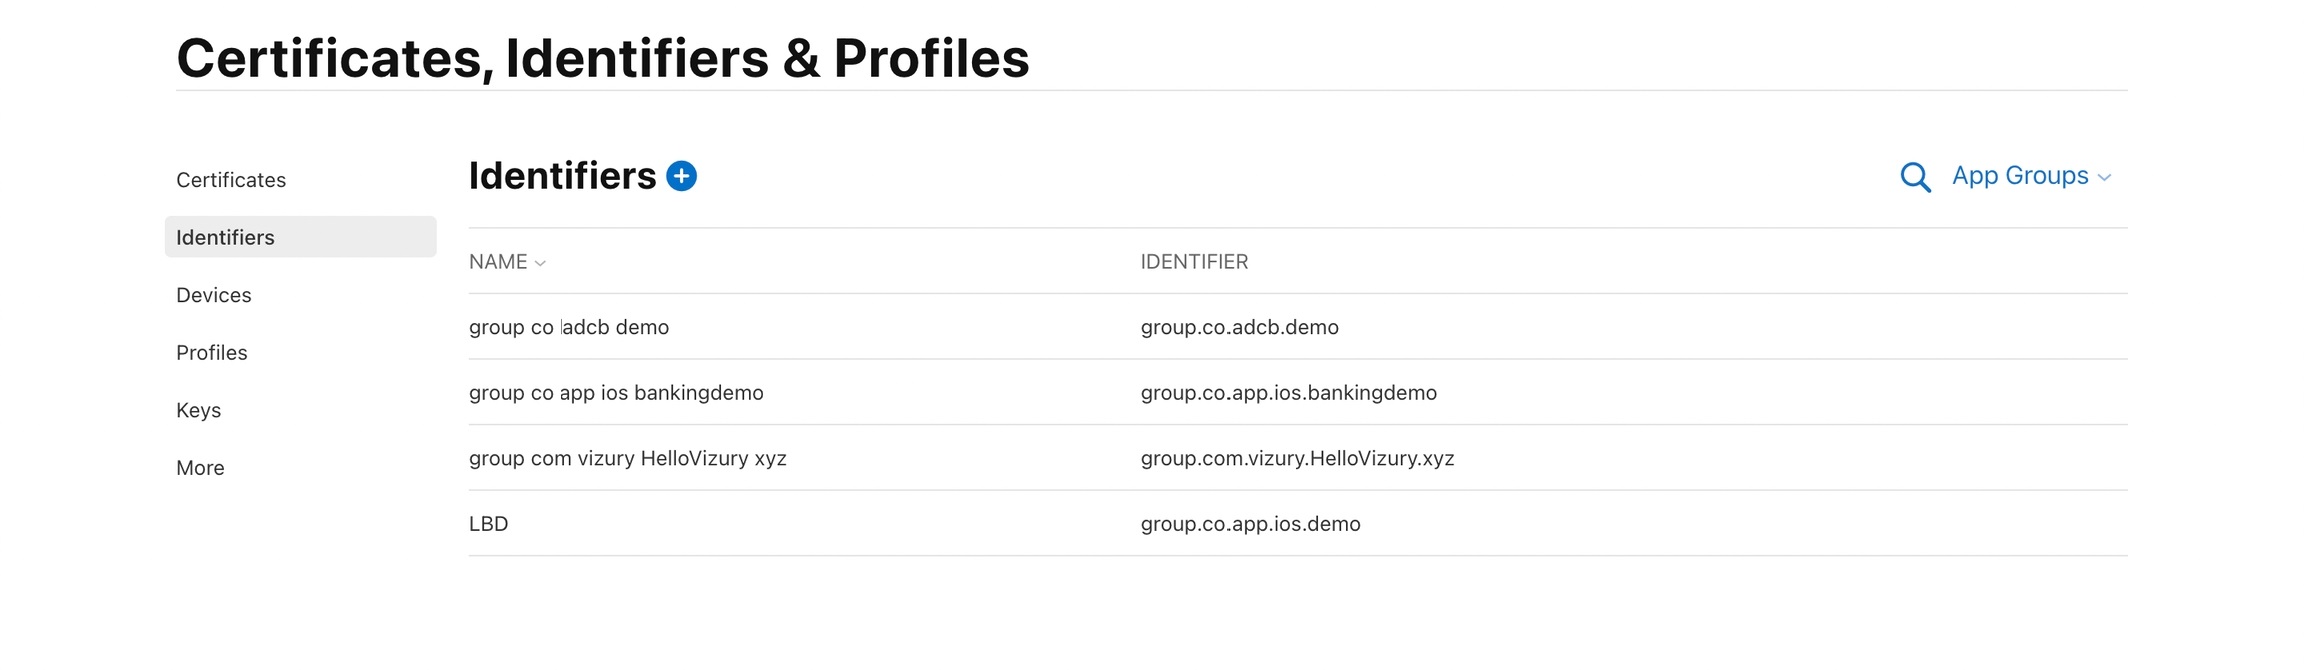
- Select App Groups on the next screen as shown below.
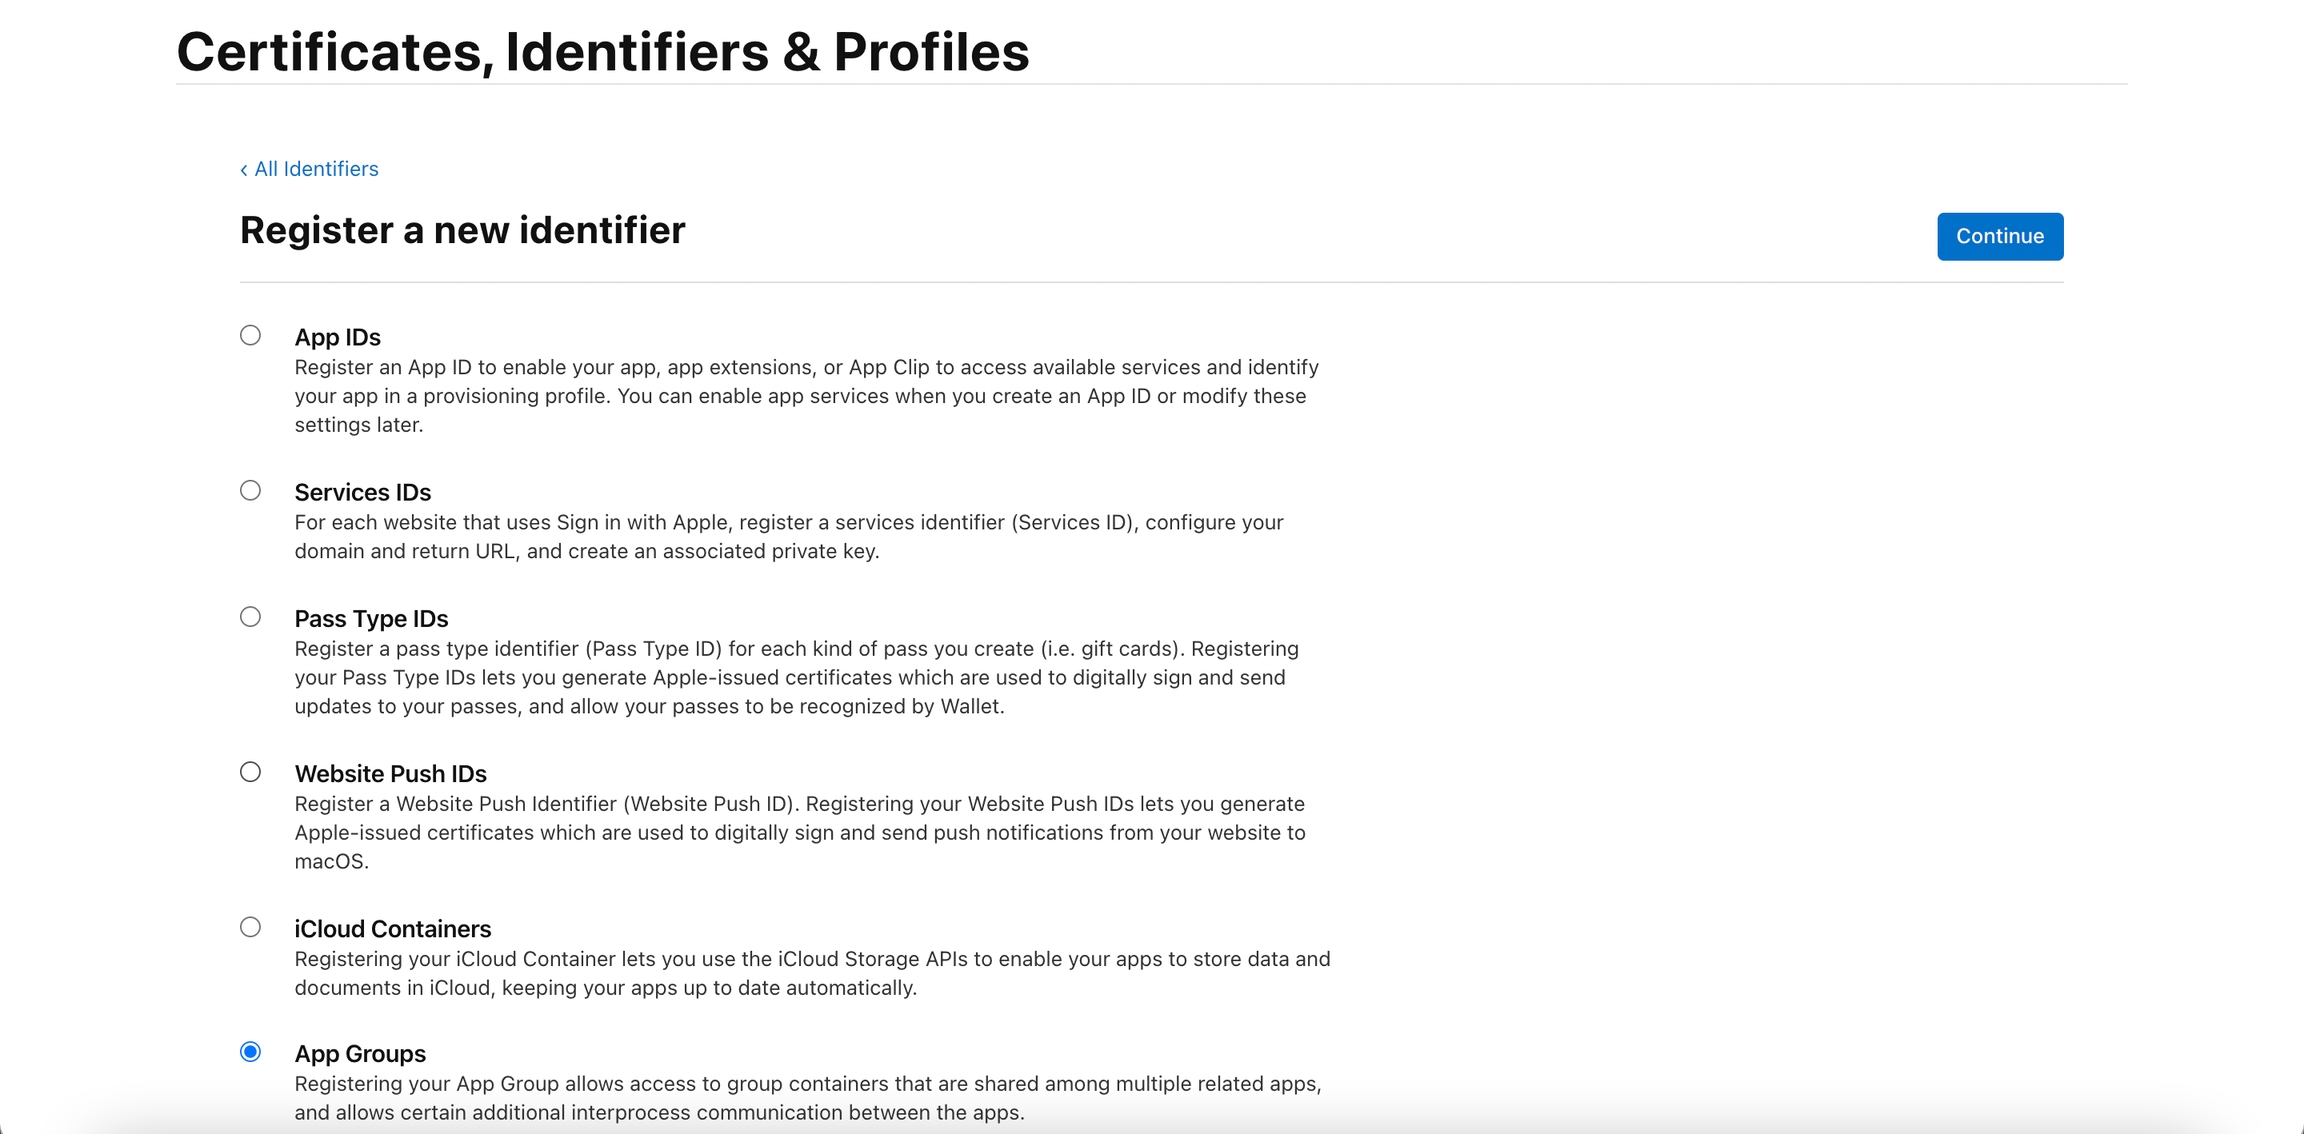
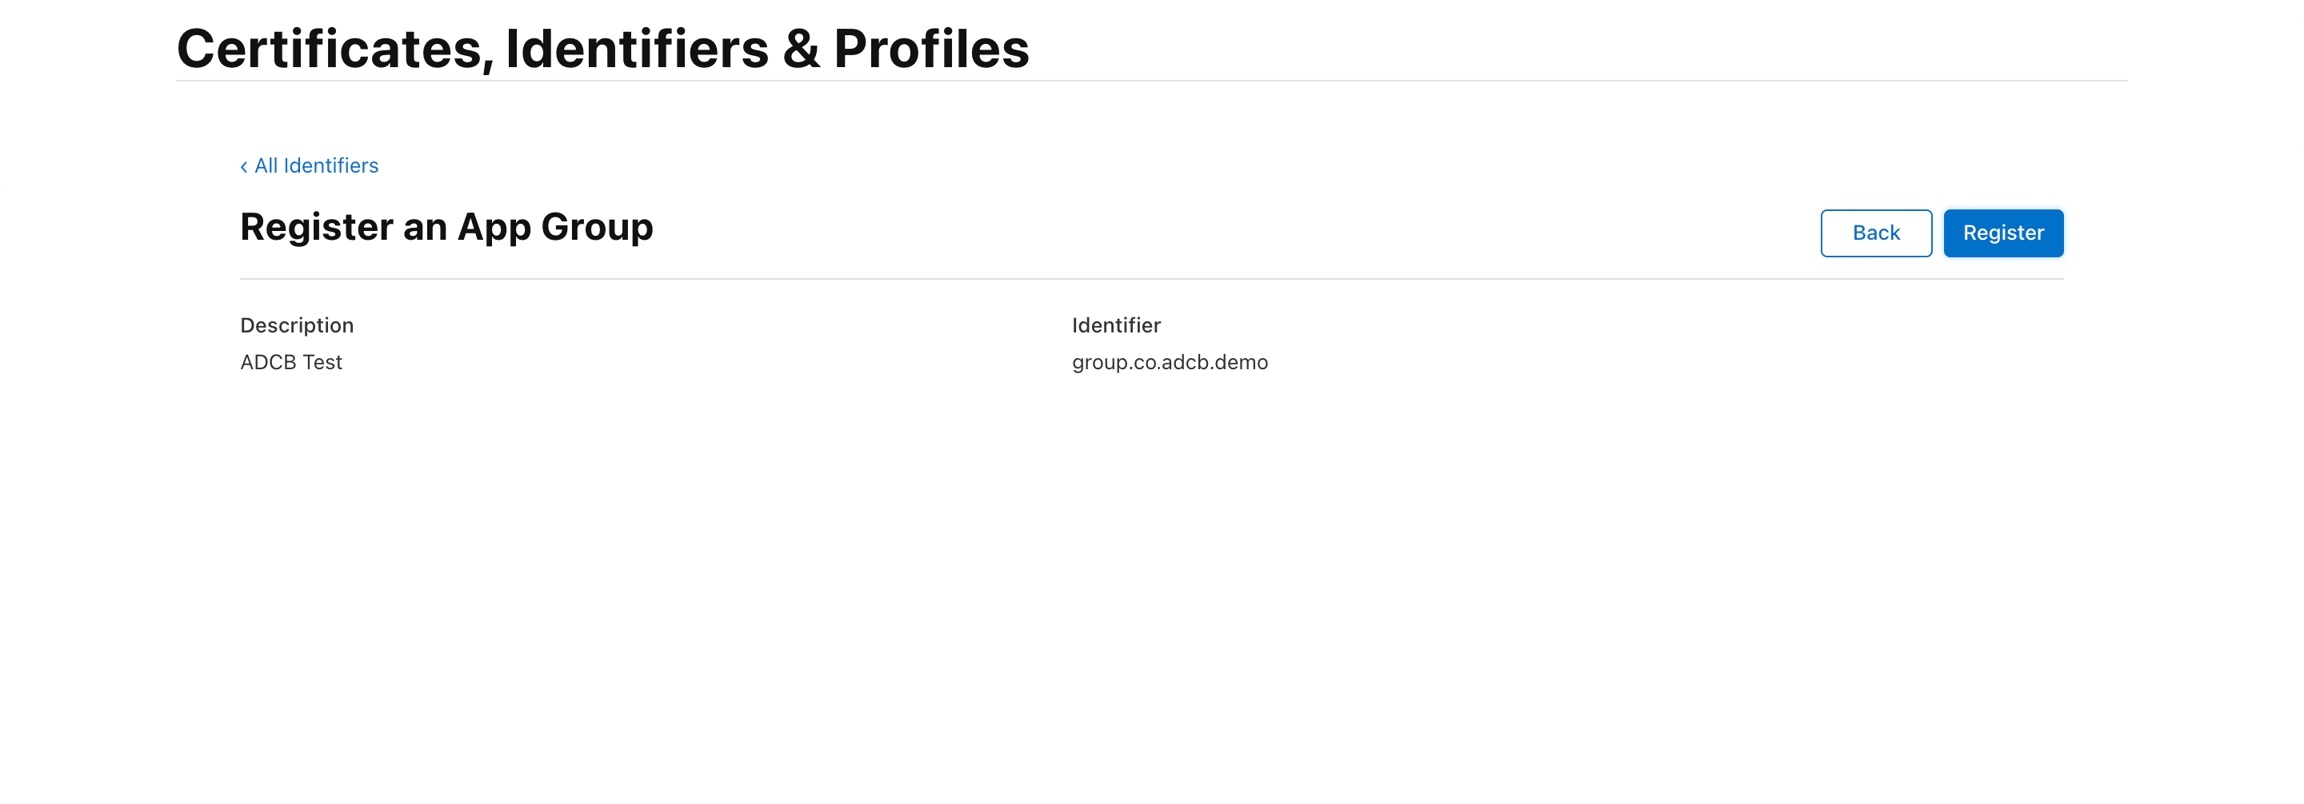
- Now fill the Description and the Identifier (App Group
name), and click Continue.

- On the next screen, click Register.
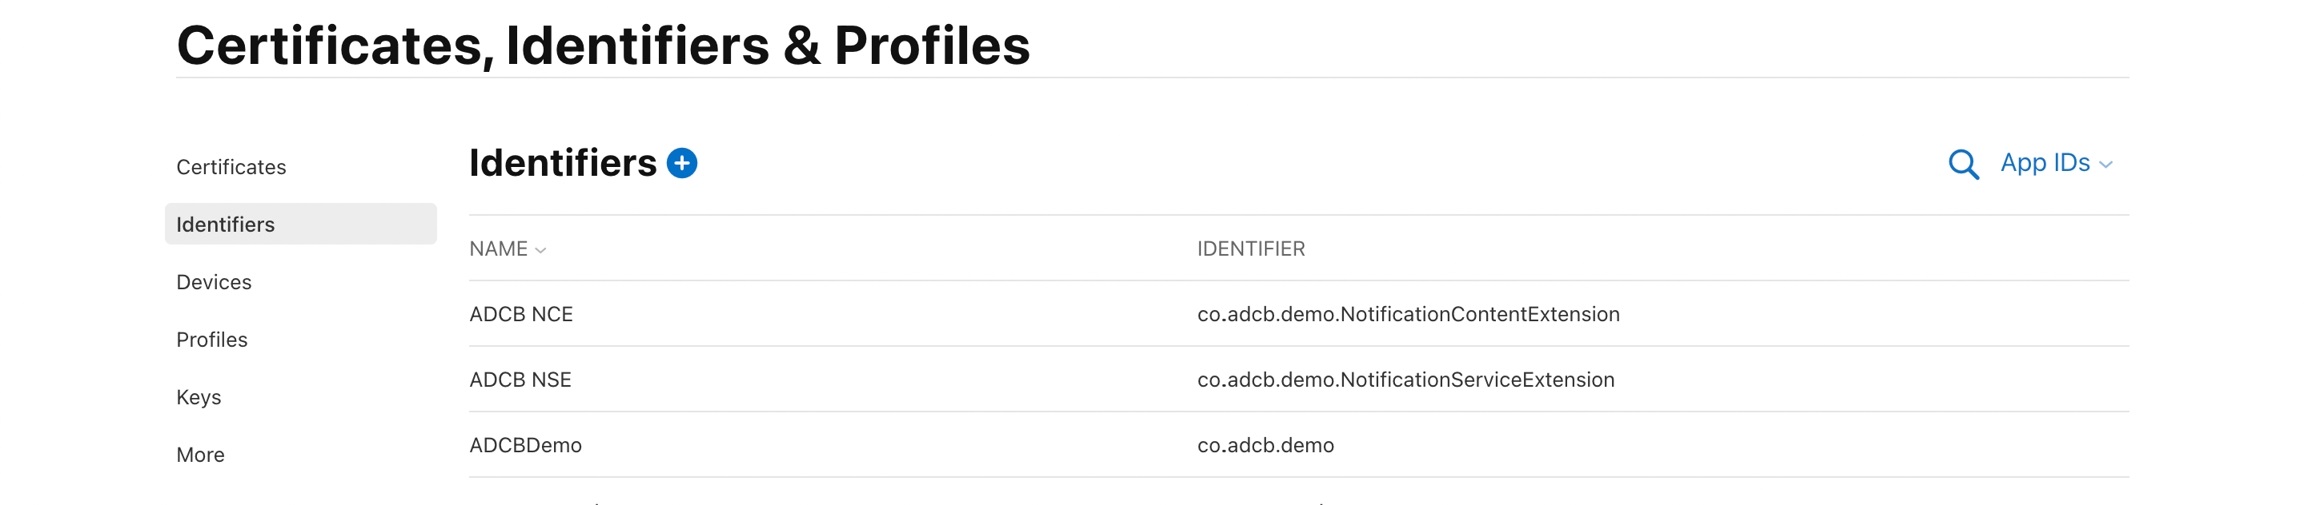
- Now, go to the Identifiers tab, click your App Bundle
identifier.
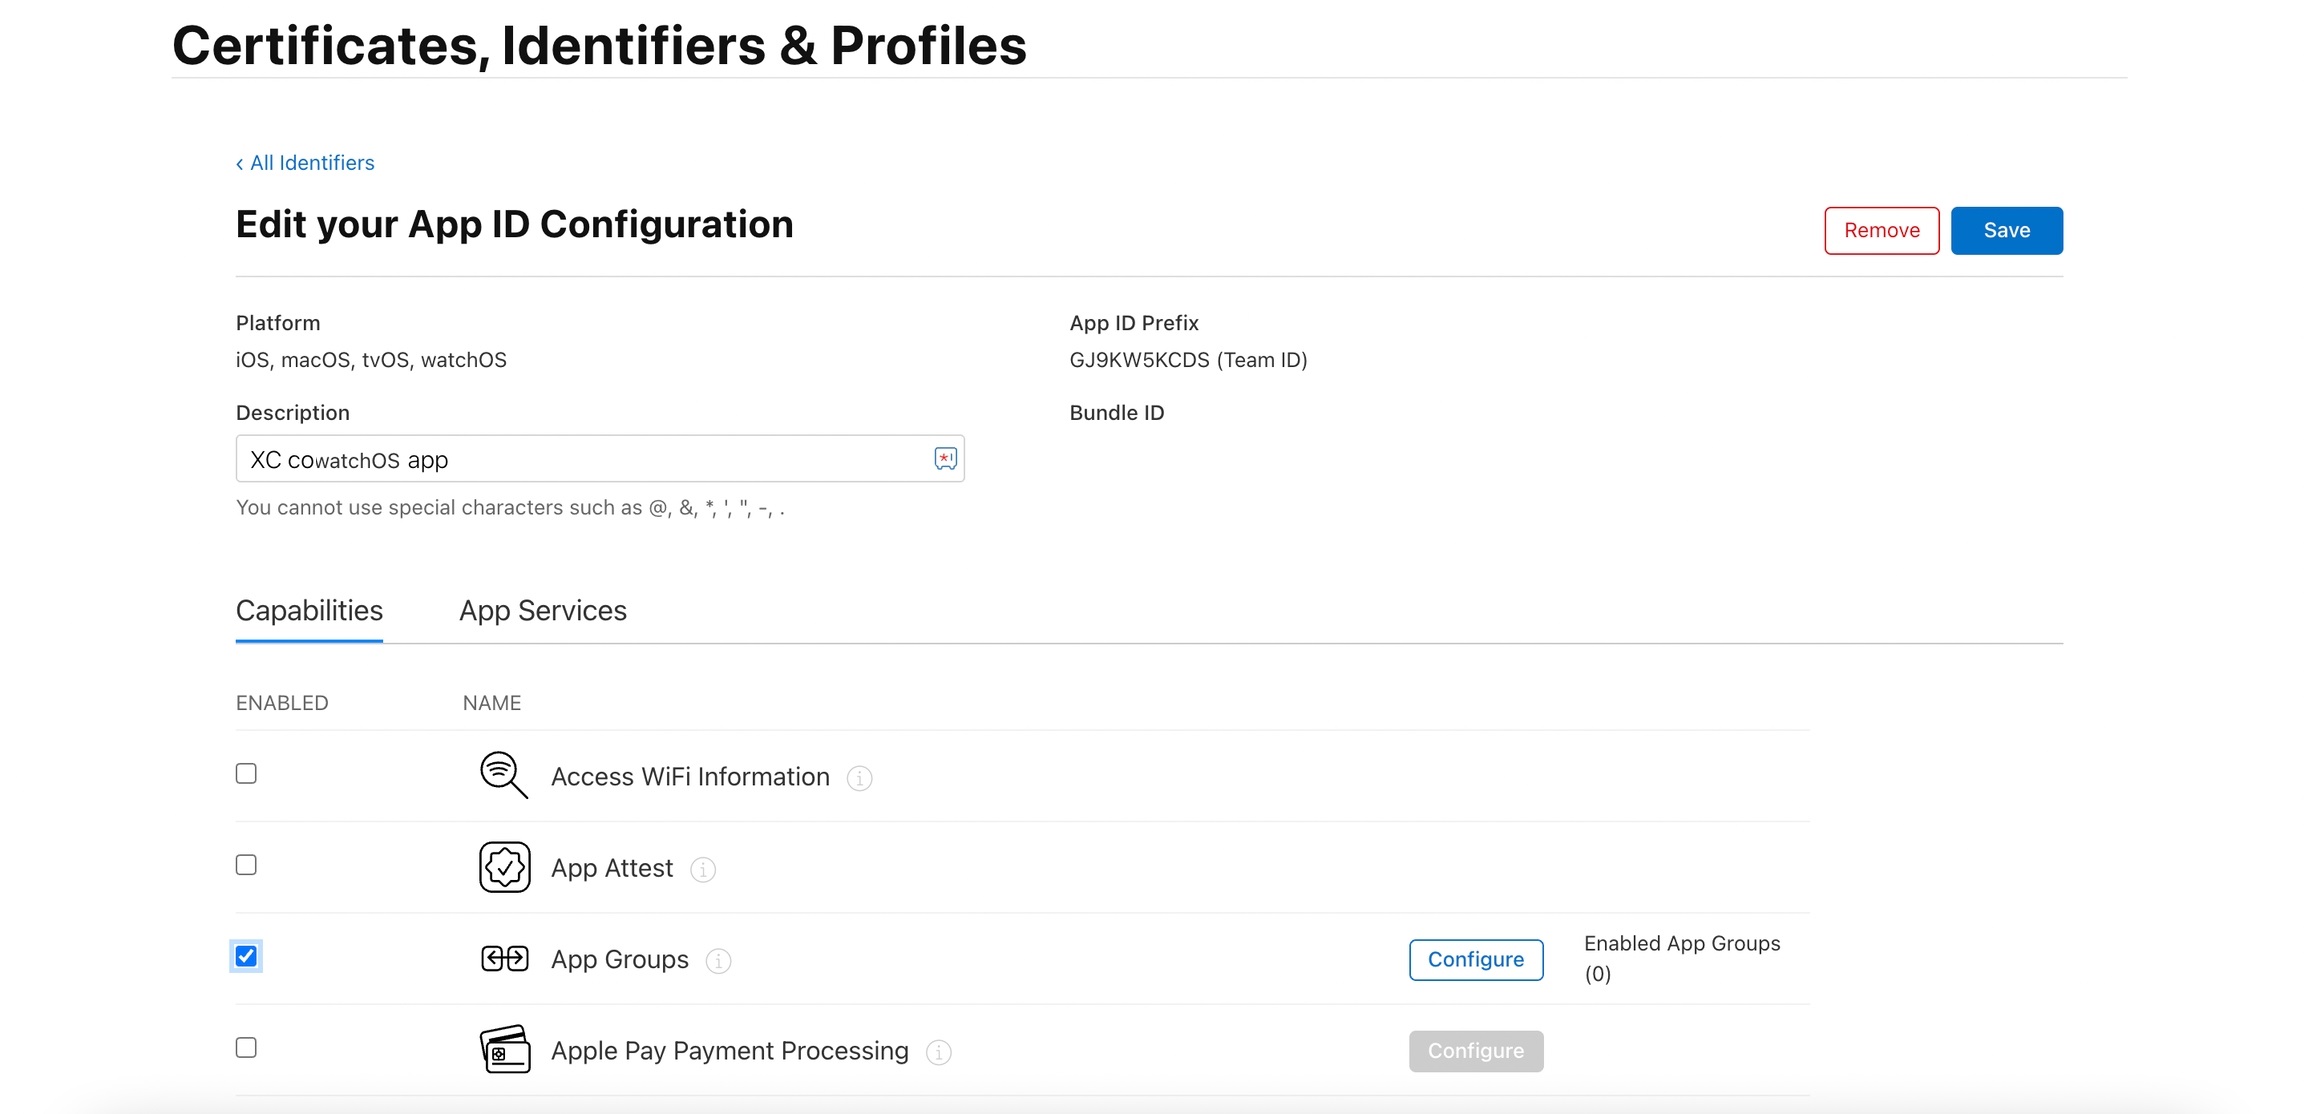
- Check App Groups and click configure.
- In the next step, select the group we have created in the previous step
and click
continueand thenSave.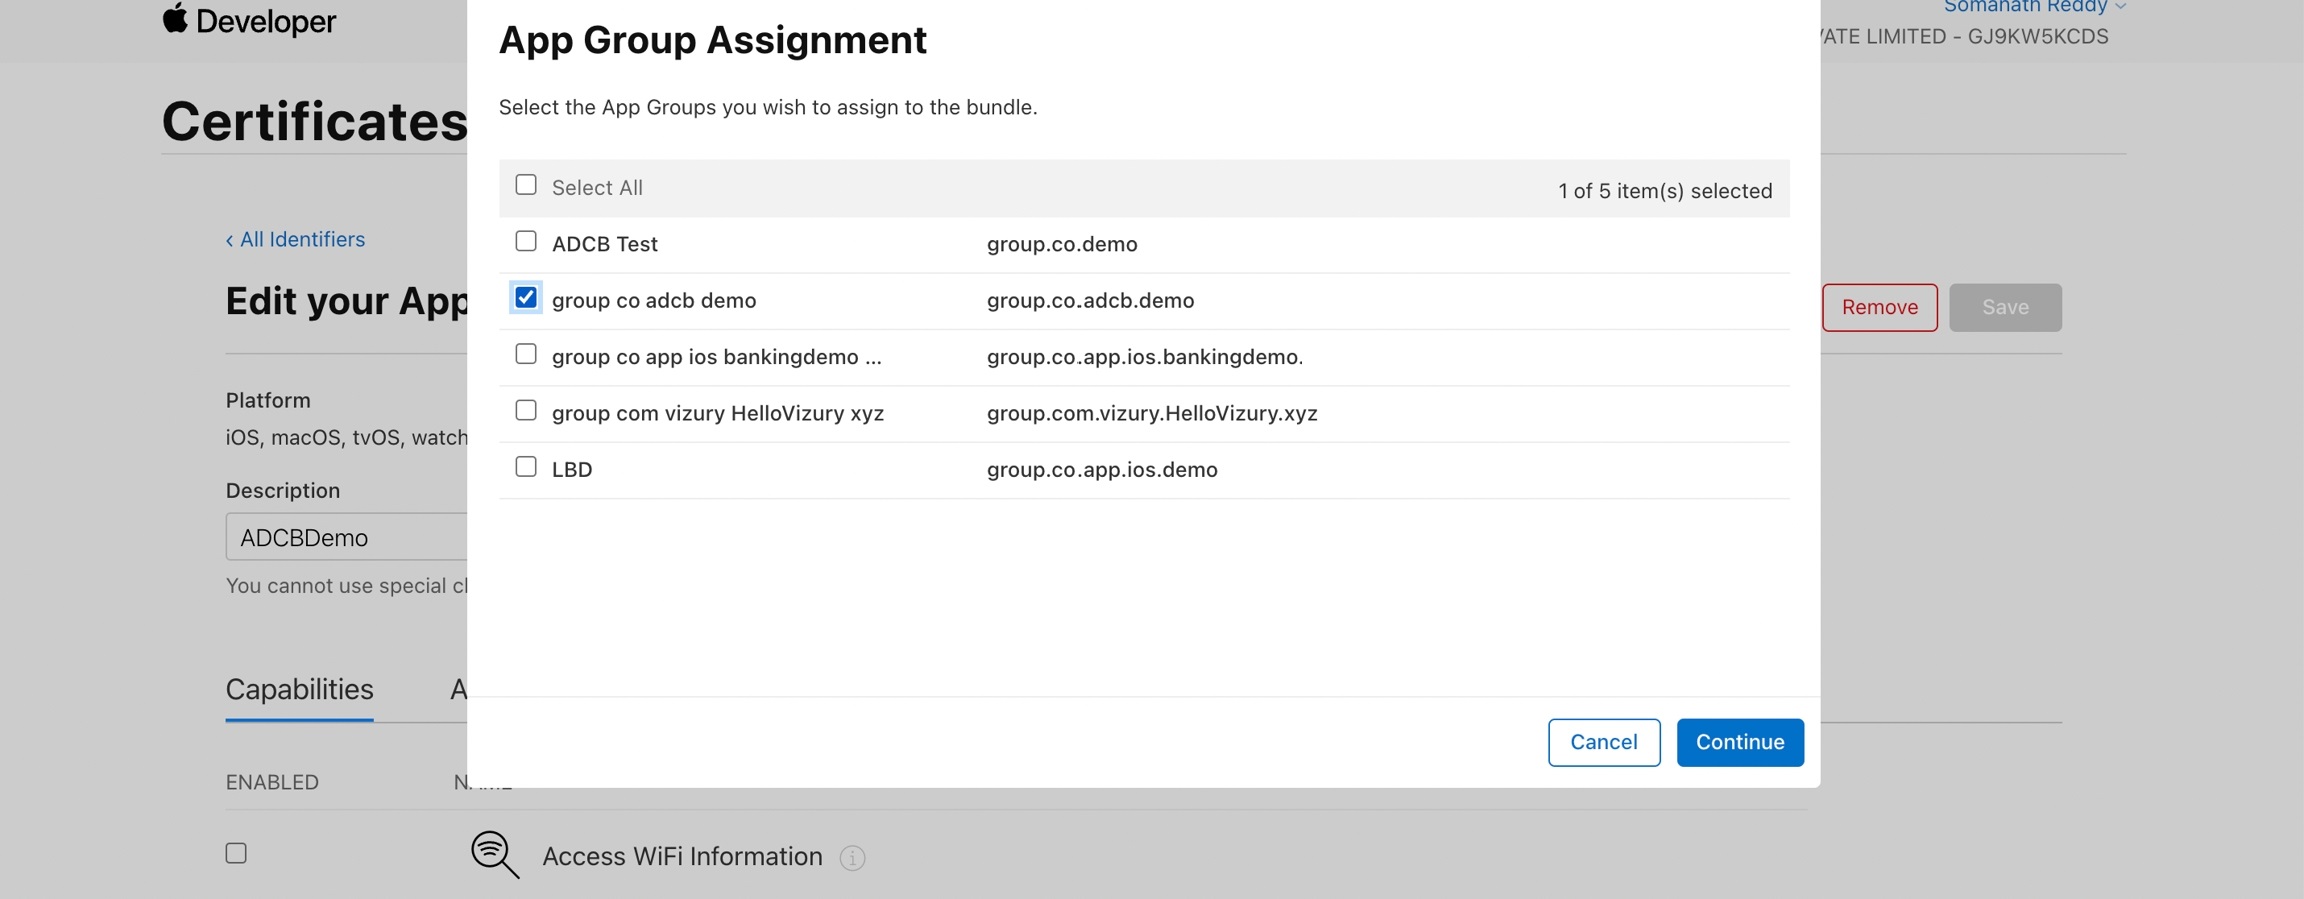
- Now go to
Profiletab and select your profile, if it showsinvalidthen clickEditandSave. Then download the file and use it in the Xcode. - Finally in the Xcode, go to
Singing & Capabilitiesas shown in the following screenshot.
- Now search for App
groupand selectApp Groups.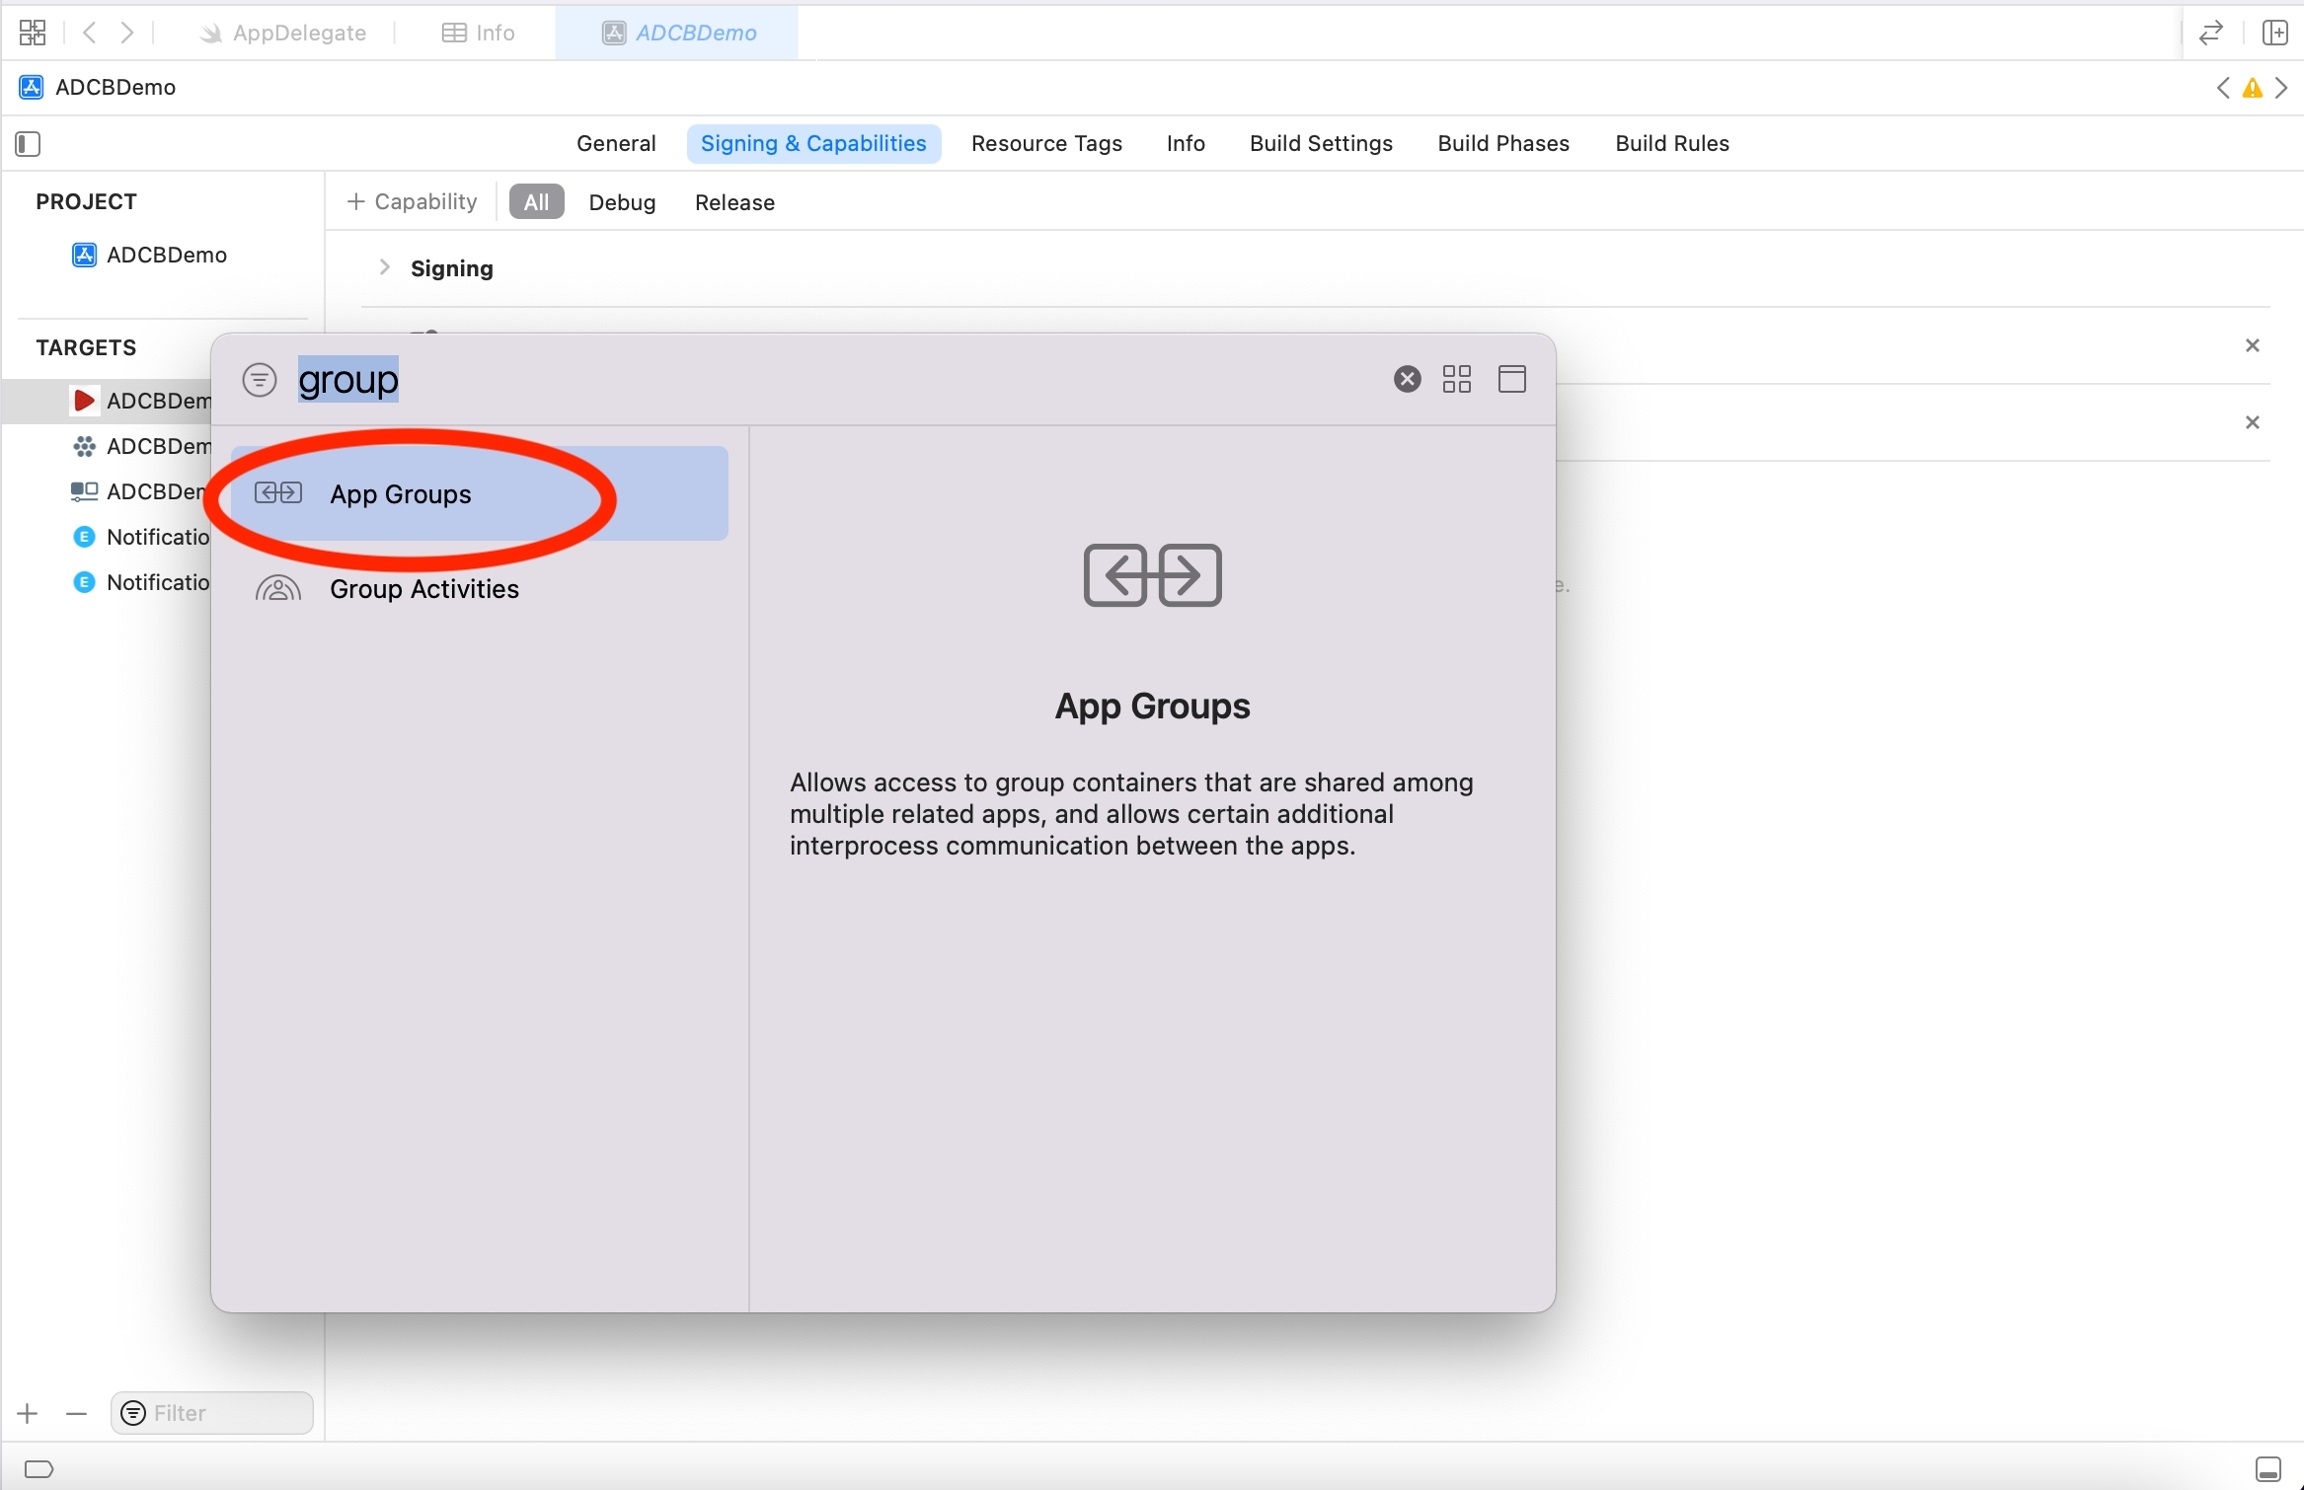
- Now select the
App groupthat we have created earlier in the Apple Developer Console.
- Now repeat steps 6-12 for App extension targets as well (From
theNow go to
Identifiersstep above).
With iOS 15 and iPadOS 15, Focus Mode lets you stay in the moment when you need to concentrate or step away from your device. You can customize Focus settings and choose when you want to receive alerts and notifications, while letting other people and apps know when you’re busy. For more information, refer https://support.apple.com/en-in/HT212608
- active (default)
- Active is the default interruption level.
- Sounds and vibrations can be played and the screen will light up upon delivery.
- These notifications cannot break through Focus modes.
- passive
- Passive notifications are the notifications that do not require immediate attention.
- No sound or vibration is played when the notification is delivered.
- Examples for passives are such as restaurant recommendations or upcoming sports game updates.
- timeSensitive
- Time sensitive notifications behave similarly to Active notifications.
- Time Sensitive are displayed with a yellow Time Sensitive banner.
- These notifications can break through scheduled delivery and Focus modes.
- Time Sensitive notifications are only be used for notifications that require immediate attention such as an account security or package delivery alerts.
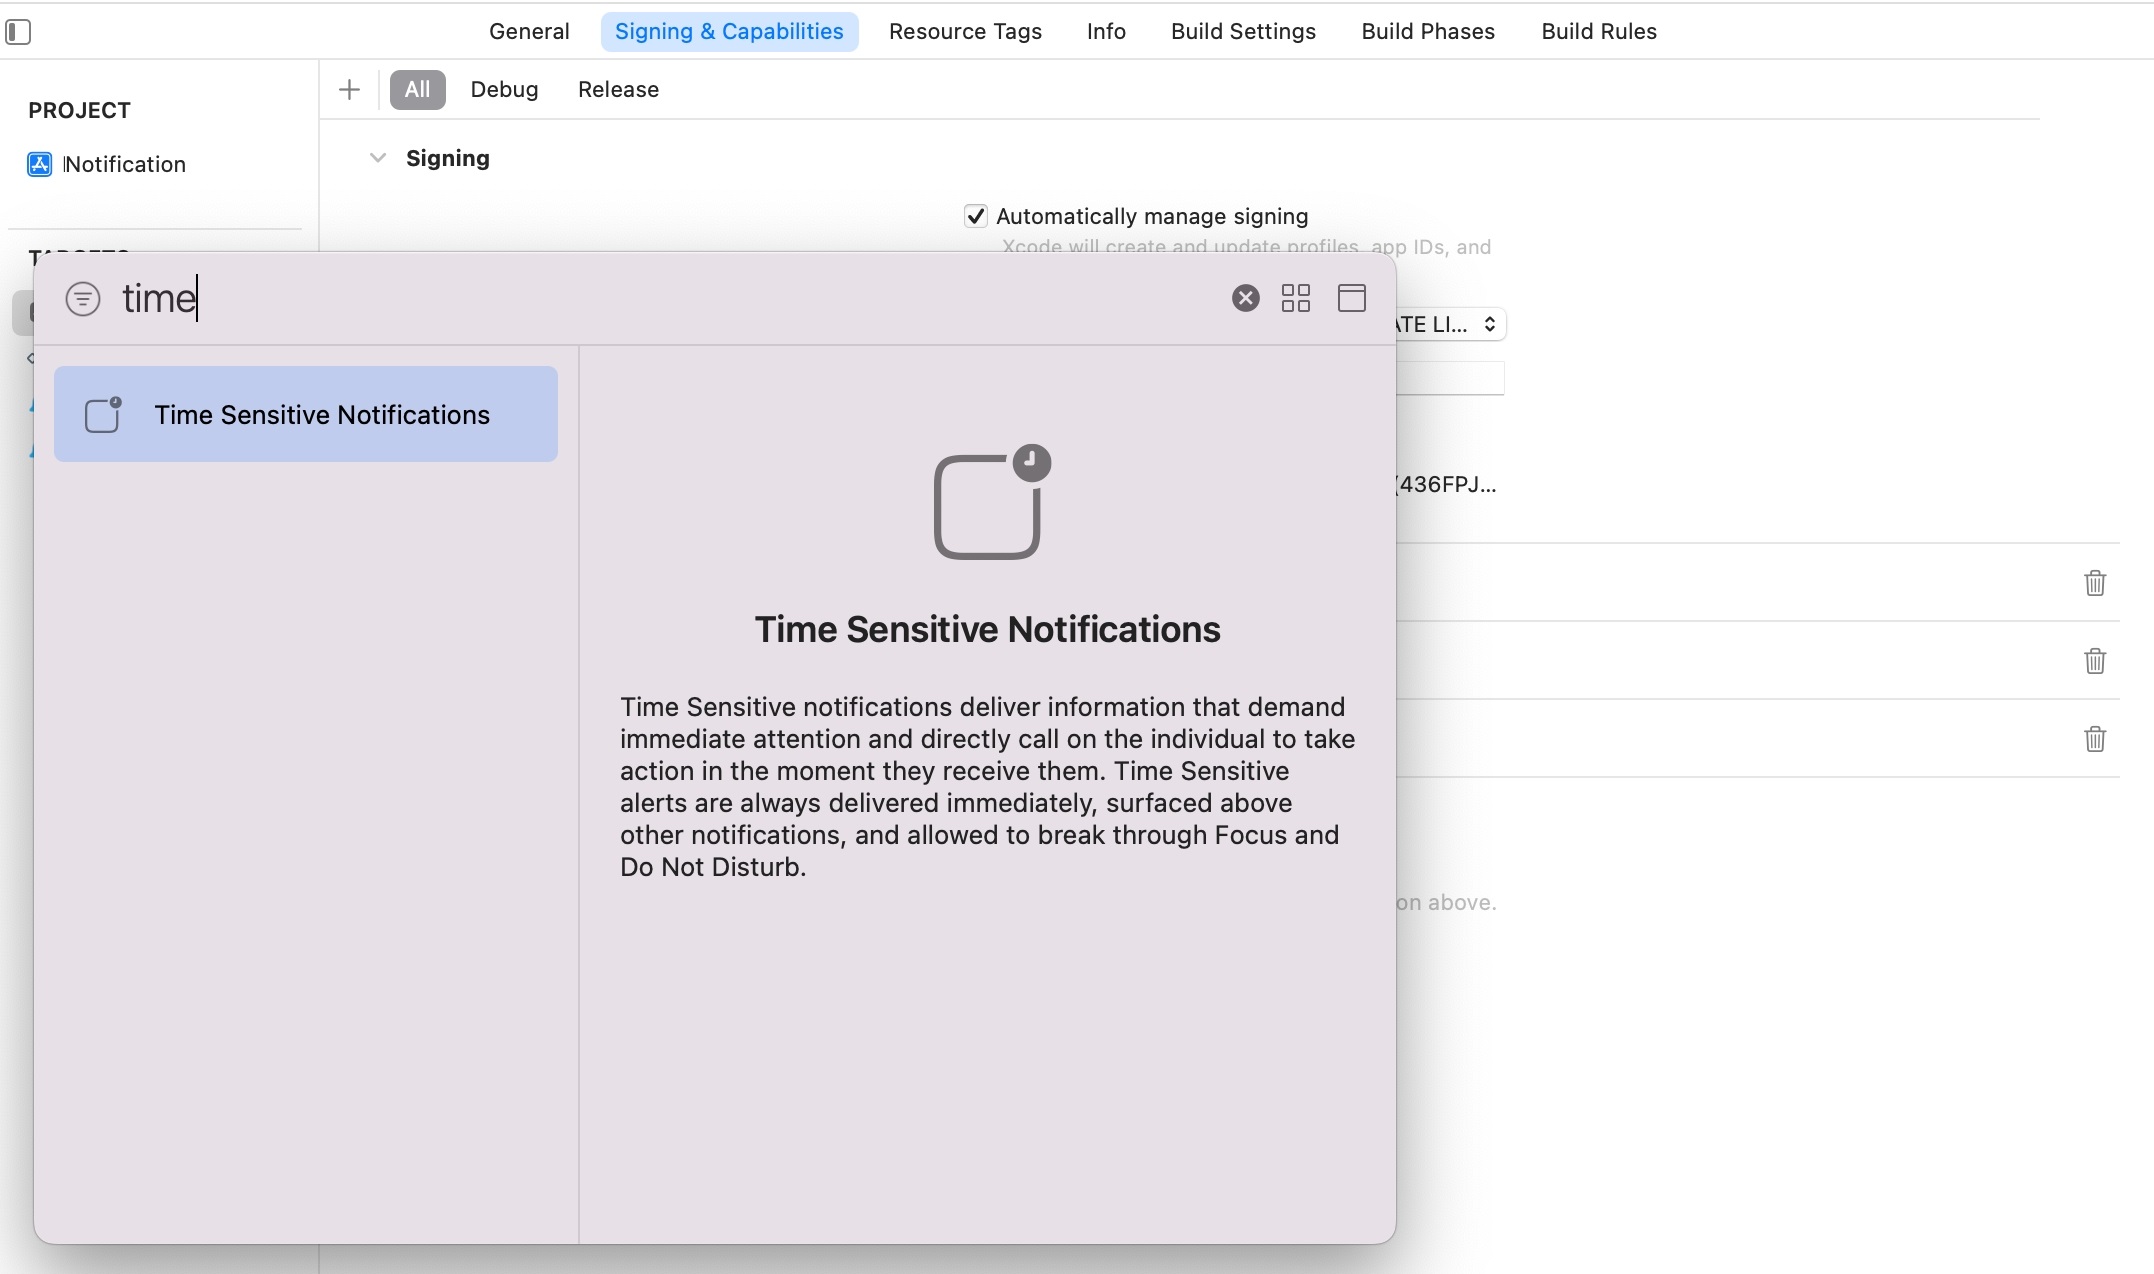
- To enable Time Sensitive notifications, we need to add the xcode capability to our App in Xcode (Time Sensitive Notifications capability) Users can turn off time sensitive notifications for an app.
- critical
- Critical notifications are always delivered immediately and bypass the silent ringer switch.
- These are only available with an approved entitlement and are used for severe weather and local safety alerts .
- The interruption level can be set on the UNNotificationContent object or in the APN's payload with key interruption-level at the apps level.
- Apps are able to change the interruption level prior to delivery by using a Notification Service Extension.
Apple will provide you with an entitlement file for critical push notifications once it is approved. Link to the form: https://developer.apple.com/contact/request/notifications-critical-alerts-entitlement/
Build changes
Following capability needs to be added to your Xcode project during the build to enable the time-sensitive notifications.
Payload Change
The string values “passive”, “active”, “time-sensitive”, or “critical” correspond to the UNNotificationInterruptionLevel enumeration cases.
Info.plist Configuration
App
- Please add the
Privacy - Tracking Usage Description(NSUserTrackingUsageDescription) key in your main appInfo.plistas this will be used as a description while showing the Tracking description if you would want to enable theIDFAtracking. - To enable/disable the IDFA tracking you can do so by adding the properties
HclcdpUseIDFAandHclcdpShowIDFAPromptasBooleanto your main app'sInfo.plistfile.
Please find the description of above HclcdpUseIDFA and
HclcdpShowIDFAPrompt below.
HclcdpUseIDFA- Will grant IDFA usage to HCL CDP.HclcdpShowIDFAPrompt- To whether ask the user for Tracking permission or not.
Notification Content Extension
- Please update the Notification Content Extension
Info.plist'sUNNotificationExtensionCategorytoArrayand add the required categories from the following entries.i. carousel
- Add the following properties under
NSExtensionAttributes:- Add property
UNNotificationExtensionDefaultContentHiddenas String and set its value toYES - Add property
UNNotificationExtensionUserInteractionEnabledas Boolean and set its value totrue
- Add property
Events
Now you can use HCL CDP SDK to send events to HCL CDP.
screen
The screen() method is used to record the screen details
whenever a user sees any screen on the application.
Usage:
Hclcdp.shared.screen(screenName, properties, otherIds)[[Hclcdp shared] screen:name properties:properties otherIds:otherIds];Example:
Hclcdp.shared.screen("home_screen",
  properties: [
    "variation": "carousel",
    "buttons": 2
  ],
  otherIds: [
    "trackerId": "6791c47a-0178-47bc-8711-86a2c67b2255",
    "email":"john.doe@gmail.com",
    "phone":"9848012345"
])[[Hclcdp shared]
screen:@"home_screen"
properties:@{
@"variation": @"carousel",
@"buttons": @2
}
otherIds:@{
@"trackerId":@"6791c47a-0178-47bc-8711-86a2c67b2255",
@"email":@"john.doe@gmail.com",
@"phone":@"9848012345"
}
];identify
The identify call lets you tie a user to their actions and
record traits about them. It includes a unique User ID and any optional traits
you know about the user, like their email, mobile, any other id etc.
Usage:
Hclcdp.shared.identify(userId, traits, otherIds)[[Hclcdp shared] identify:userId traits:traits otherIds:otherIds];Example:
Hclcdp.shared.identify("cid123",
  traits: [
    "firstName": "John",
    "lastName": "Doe",
    "gender": "Male",
    "age": "27",
    "city": "Mumbai"
  ],
  otherIds: [
    "trackerId": "6791c47a-0178-47bc-8711-86a2c67b2255",
    "email":"john.doe@gmail.com",
    "phone":"9848012345"
])d[[Hclcdp shared]
identify:@"cid123"
traits:@{
@"firstName": @"John",
@"lastName": @"Doe",
@"gender": @"Male",
@"age": @"27",
@"city": @"Mumbai"
}
otherIds:@{
@"trackerId":@"6791c47a-0178-47bc-8711-86a2c67b2255",
@"email":@"john.doe@gmail.com",
@"phone":@"9848012345"
}
];track
The track call lets you record any actions your users perform,
along with any properties that describe the action.
Usage:
Hclcdp.shared.track(eventName, properties, otherIds) [[Hclcdp shared] track:eventName properties:properties otherIds:otherIds];Example:
Hclcdp.shared.track("cid123",
  properties: [
    "activityName": "Subscribe",
    "activityType": "buttonClick"
  ],
  otherIds: [
    "trackerId": "6791c47a-0178-47bc-8711-86a2c67b2255",
    "email":"john.doe@gmail.com",
    "phone":"9848012345"
])[[Hclcdp shared]
track:@"subscribte_button_click"
properties:@{
@"activityName":@"Subscribe",
@"activityType":@"buttonClick"
}
otherIds:@{
@"trackerId":@"6791c47a-0178-47bc-8711-86a2c67b2255",
@"email":@"john.doe@gmail.com",
@"phone":@"9848012345"
}
];| Parameter | Type | Description |
eventName |
String | The name of the event you’re tracking |
App Events
Following are some of the standard events that HCL CDP SDK collects
automatically when you initialize the HCL CDP SDK which has
Manual Firing Required as No below.
| Event Name | Description | Manual Firing Required |
|---|---|---|
| Application Installed | This event is automatically fired when the user installs an application. | No |
| Application Opened | This event is automatically fired when the user opens an application. | No |
| Application Updated | This event is automatically fired when the application gets updated. | No |
| Application Backgrounded | This event should be sent when a user backgrounds the application. | No |
| Application Crashed | This event should be sent when you receive a crash notification from your app. | Yes (You have to call this explicity from wherever you are handling the crash in your App) |
| Application Uninstalled | This event should be sent when you receive a user uninstalls the application. | Yes (Generated from Backend) |
| Application Session Started | This event is automatically fired when a user spends over 10 seconds on the app. | No |
| Application Session Concluded | This event is automatically fired when a user is inactive for 20 minutes on the app. | No |
Application Crashed
Usage
Hclcdp.shared.trackAppCrashedEvent("Crash message here");[[Hclcdp shared] trackAppCrashedEvent:@"Crash message here"];Configuring APNS Certificates
Generating .p8 certificate
- Go to the Apple developer account > Certificates, Identifiers & Profiles.
- Go to the Keys section, and click + to create a new
key..
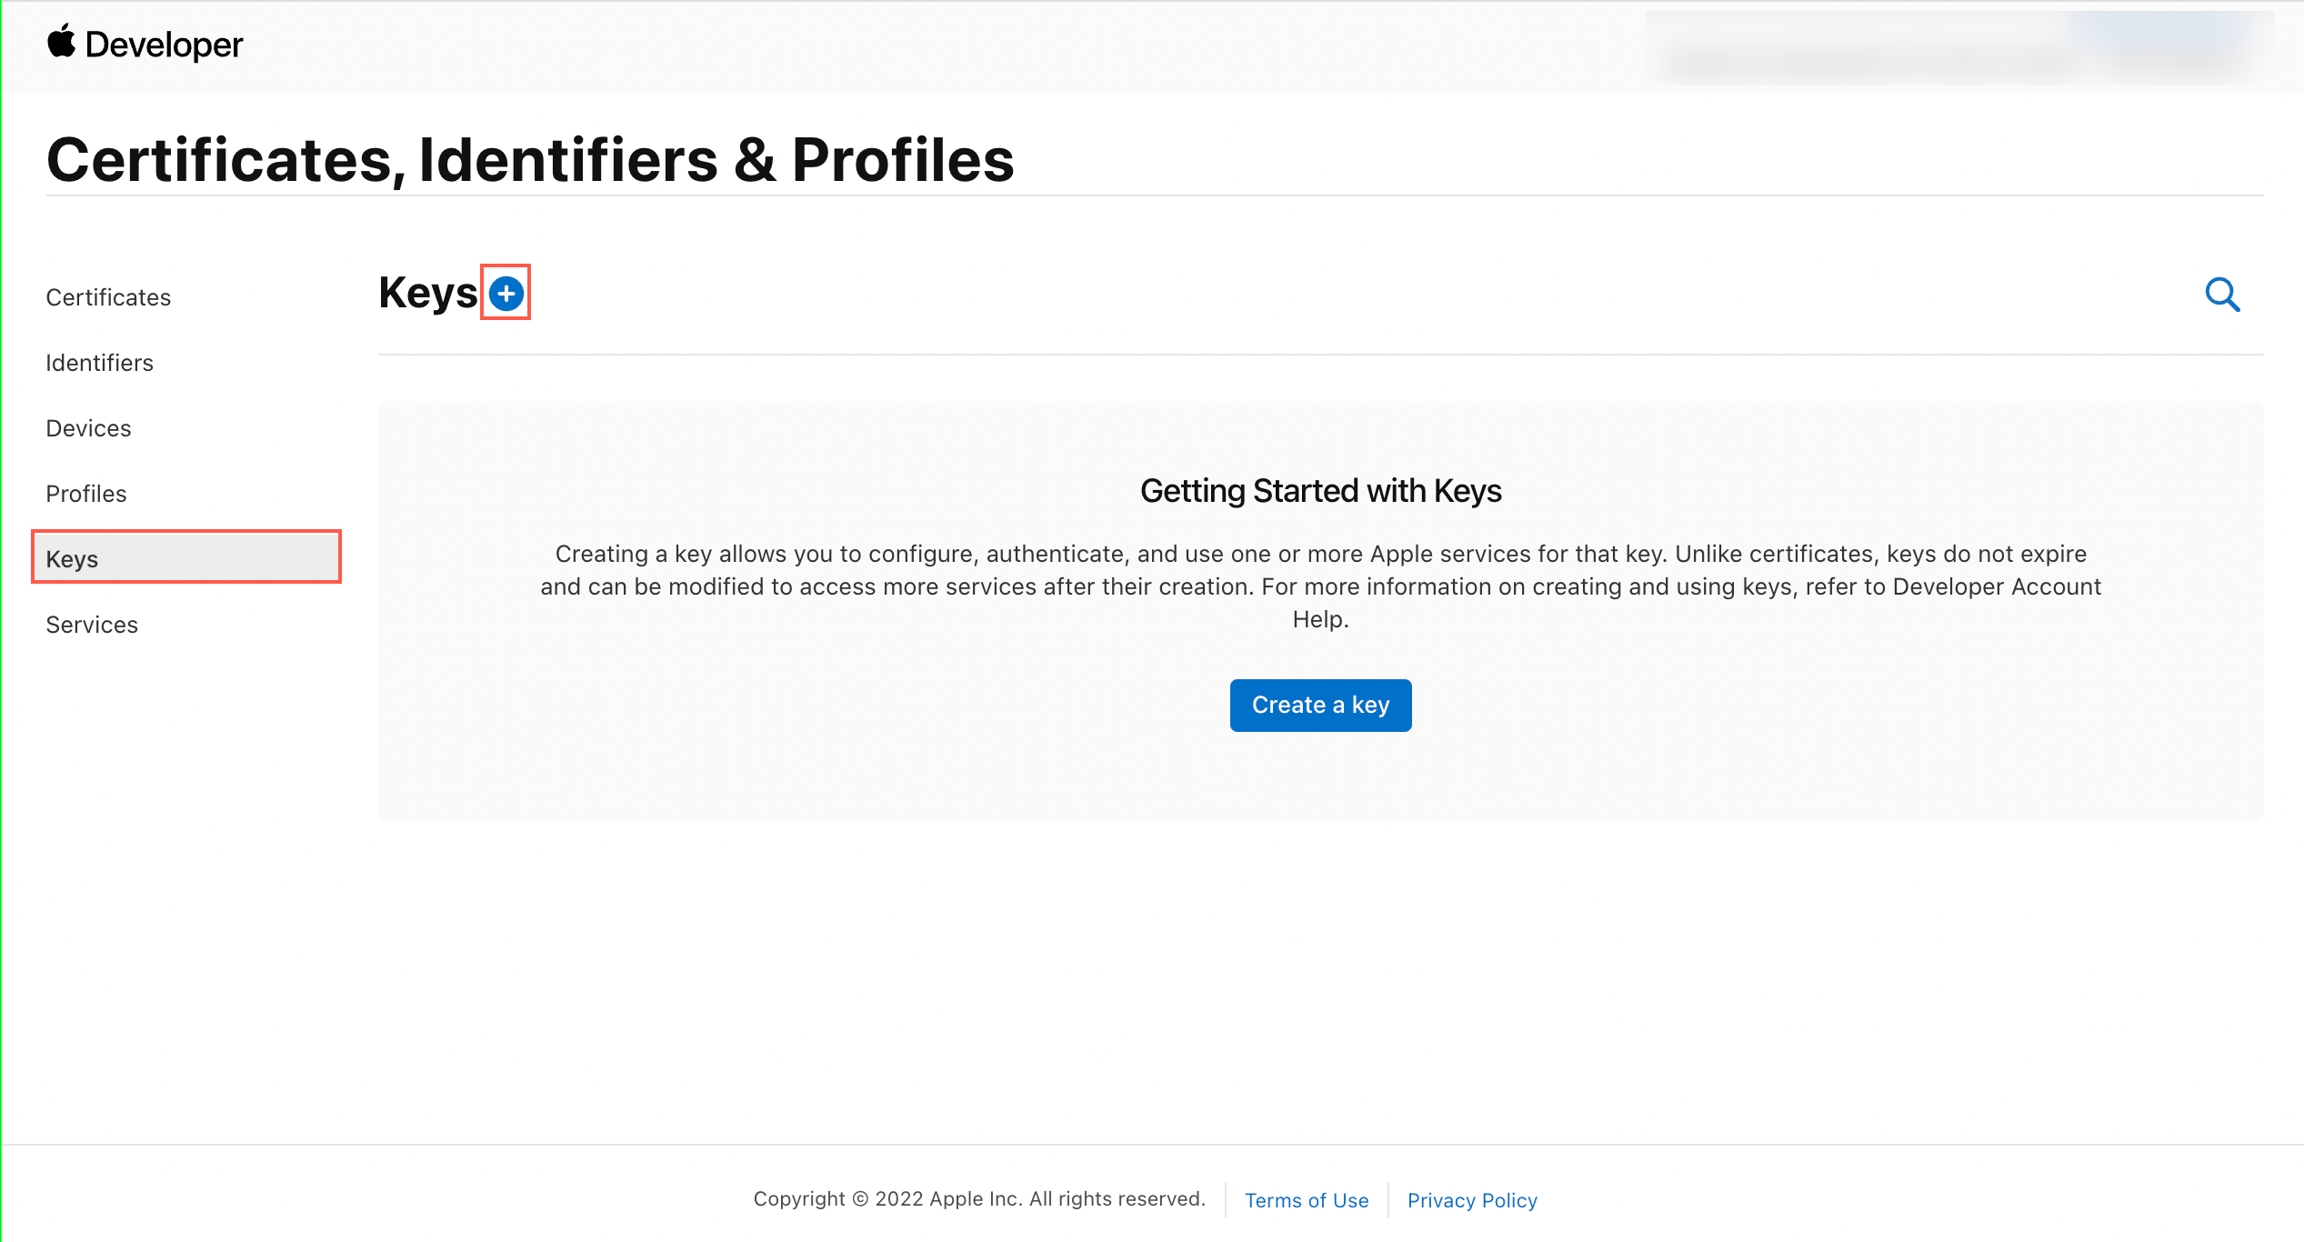
- Choose a unique name for the key and select the Apple Push Notification service(APNs) checkbox. Click continue and then confirm.
- Note and save the key ID. Click Download to generate and save the key.
- Now share the above Downloaded file along with the Team ID and App Bundle Id.
- Save the above Download key in a secure place because you can't download the key more than once. Do not rename the Auth key file, and provide it to HCL CDP as is.
- Get your Team ID from the Apple Developer Account. Go to Membership tab and get your Team ID visible under Membership details. Your app's bundle ID can be found in Xcode.
Generating .p12 certificate
HCL CDP needs the cert.pem and key.pem files generated for your application to send the App Push Notifications.
To generate the cert.pem and key.pem files, follow the steps below:
Generating the CSR and p12
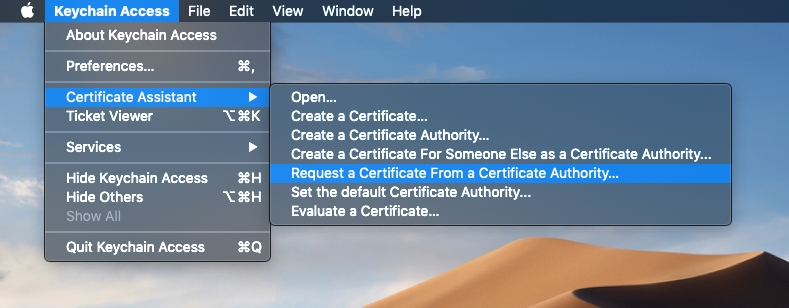
- Open Keychain Access on your Mac (it is in Applications/Utilities) and
choose the menu option Request a Certificate from a Certificate
Authority.
- In the Certificate Assistant window, update the following:
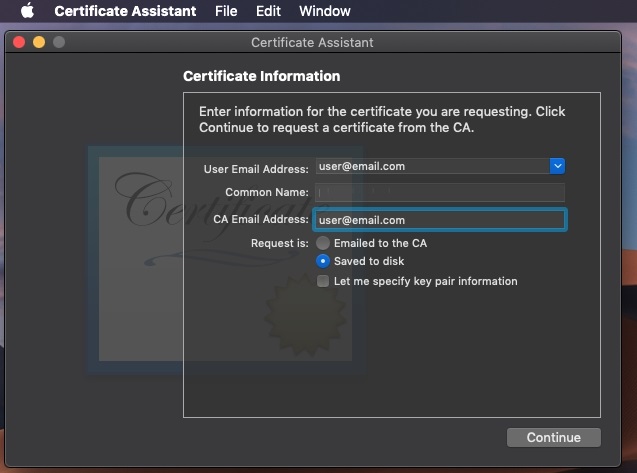
- Enter your email address.
- Enter your application name here, for example, I have entered "Demo". You can type anything you want here, but choose something descriptive. This allows us to easily find the private key later.
- Check Saved to disk and click Continue.
- If you go to the Keys section of Keychain Access, you will see that a new private key has appeared in your keychain.
- Right-click the new private key and choose Export.
- Save the private key as DemoKey.p12 and enter a passphrase. (Do choose a passphrase that you can recall! Or you won’t be able to use the private key later.)
Generating the aps cert
- Assuming you have already created the Identifier for your app bundle id,
now navigate to the Certificates section in the developer console. Click
the
+next to Certificates.
- Choose the
Apple Push Notification service SSL (Sandbox &
                                Production)
option and click Continue.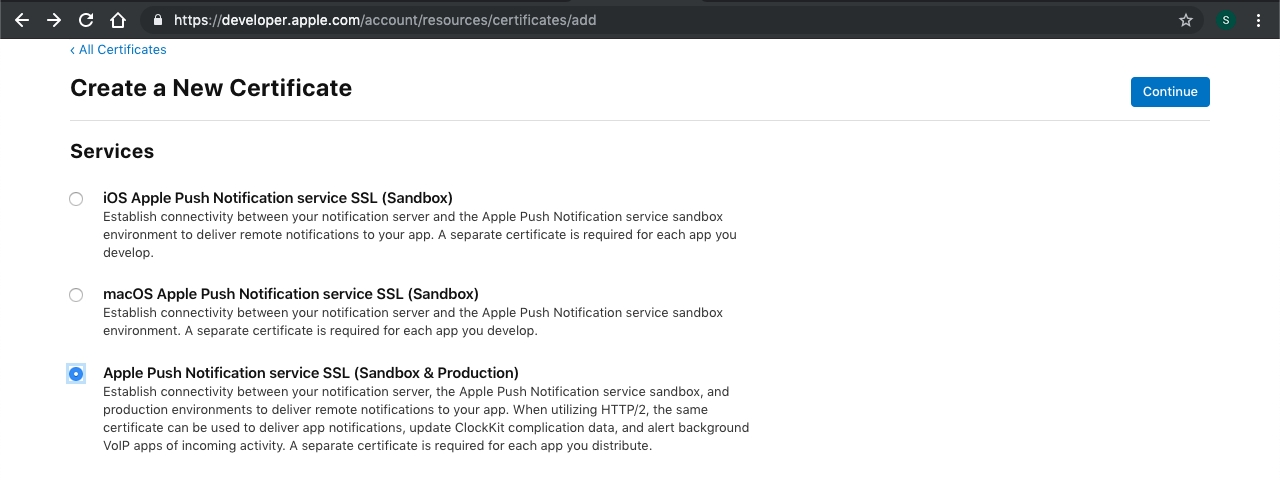
- Now select the
App Idfrom the already registered (of your app) list in theIdentifiersection and then click Continue.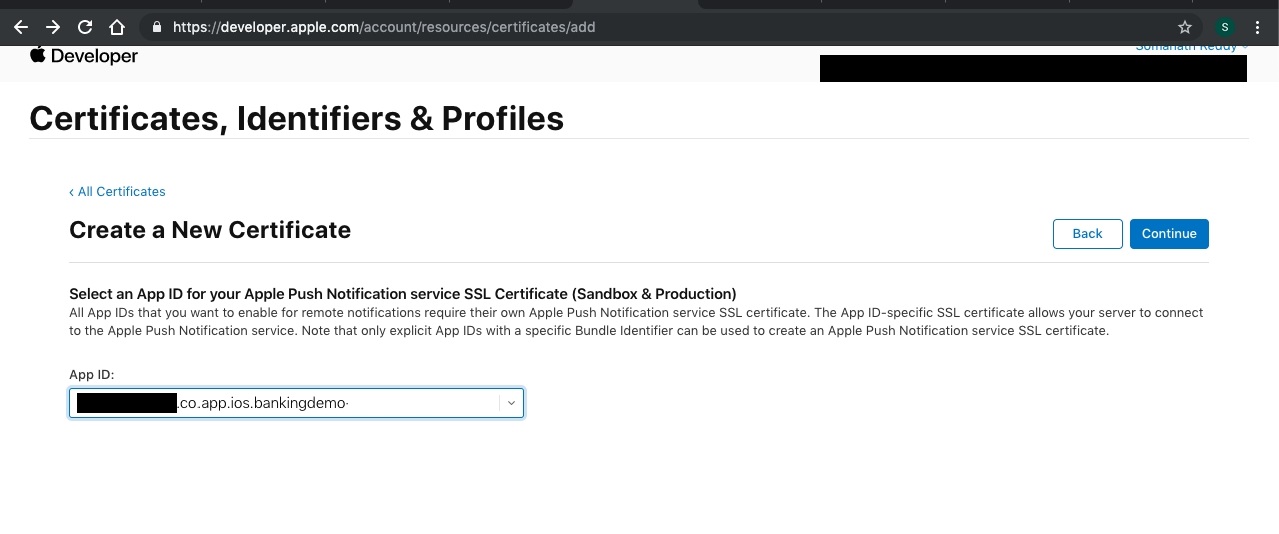
- Now click on
Choose Fileand select the CSR file that we have generated above and click on Continue.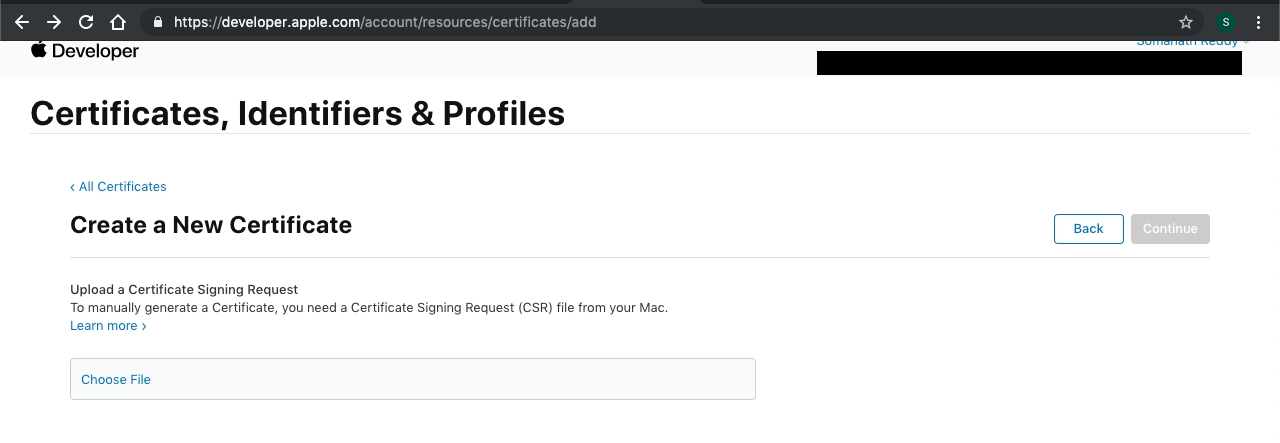
- Now we have successfully generated the
aps.cerfile, click the Download button to download the cer file. Let’s say the downloaded file name is aps.cer.
Generating the PEM file
Now, we have three files:
- The CSR
- The private key as a p12 file (HclcdpDemoKey.p12)
- The SSL certificate (aps.cer)
You have to convert the certificate and private key into a format that is more usable. Because our server will need the cert.pem and key.pem file to deliver the push notification, now we will generate them by using the following procedure.
We are going to use the command-line OpenSSL tools for this. Open a Terminal and execute the following steps.
- Convert the .cer file into a .pem
file:
$ openssl x509 -in aps.cer -inform der -out HclcdpDemoCert.pem - Convert the private key’s .p12 file into a .pem file:
$ openssl pkcs12 -nocerts -out HclcdpDemoKey.pem -in HclcdpDemoKey.p12Enter Import Password: MAC verified OK Enter PEM pass phrase: Verifying - Enter PEM pass phrase: - You first need to enter the passphrase for the .p12 file so that openssl
can read it. Then you need to enter a new passphrase that will be used
to encrypt the PEM file.Note: If you don't enter a PEM passphrase, openssl will not give an error message but the generated .pem file will not have the private key in it.
- Now let’s try to test whether the certificate works, by using our SSL
certificate and private
key:
$ openssl s_client -connect gateway.push.apple.com:2196 -cert HclcdpDemoCert.pem -key
         HclcdpDemoKey.pem
Enter pass phrase for HclcdpDemoCert.pem:
Now please share the following with your account manager for us to be able to send push notifications
- cert.pem and key.pem (Generated above)
- passphrase (if any given in the above steps)
- bundle identifier of the app
FAQs
1. What is the minimum iOS version supported by the HCLCDP iOS App SDK?
Ans: iOS 13 or higher is supported.
2. Can I install the HCLCDP SDK via Carthage?
Ans: No, as of now we only support integration via Cocoapods.
3. How does the SDK handle different client/server errors?
Ans: Our SDK isolates any errors that occur internally and wouldn't affect your App.