Configuring HA and DR on Windows
How to set up a BigFix Server for High Availability (HA) and Disaster Recovery (DR) on Windows.
The BigFix Server can be installed on more than one Windows Server computer and configured to leverage a set of Microsoft technologies to provide HA and DR.
This is an example HA configuration that will serve as a reference. It can be adapted and expanded to provide DR.
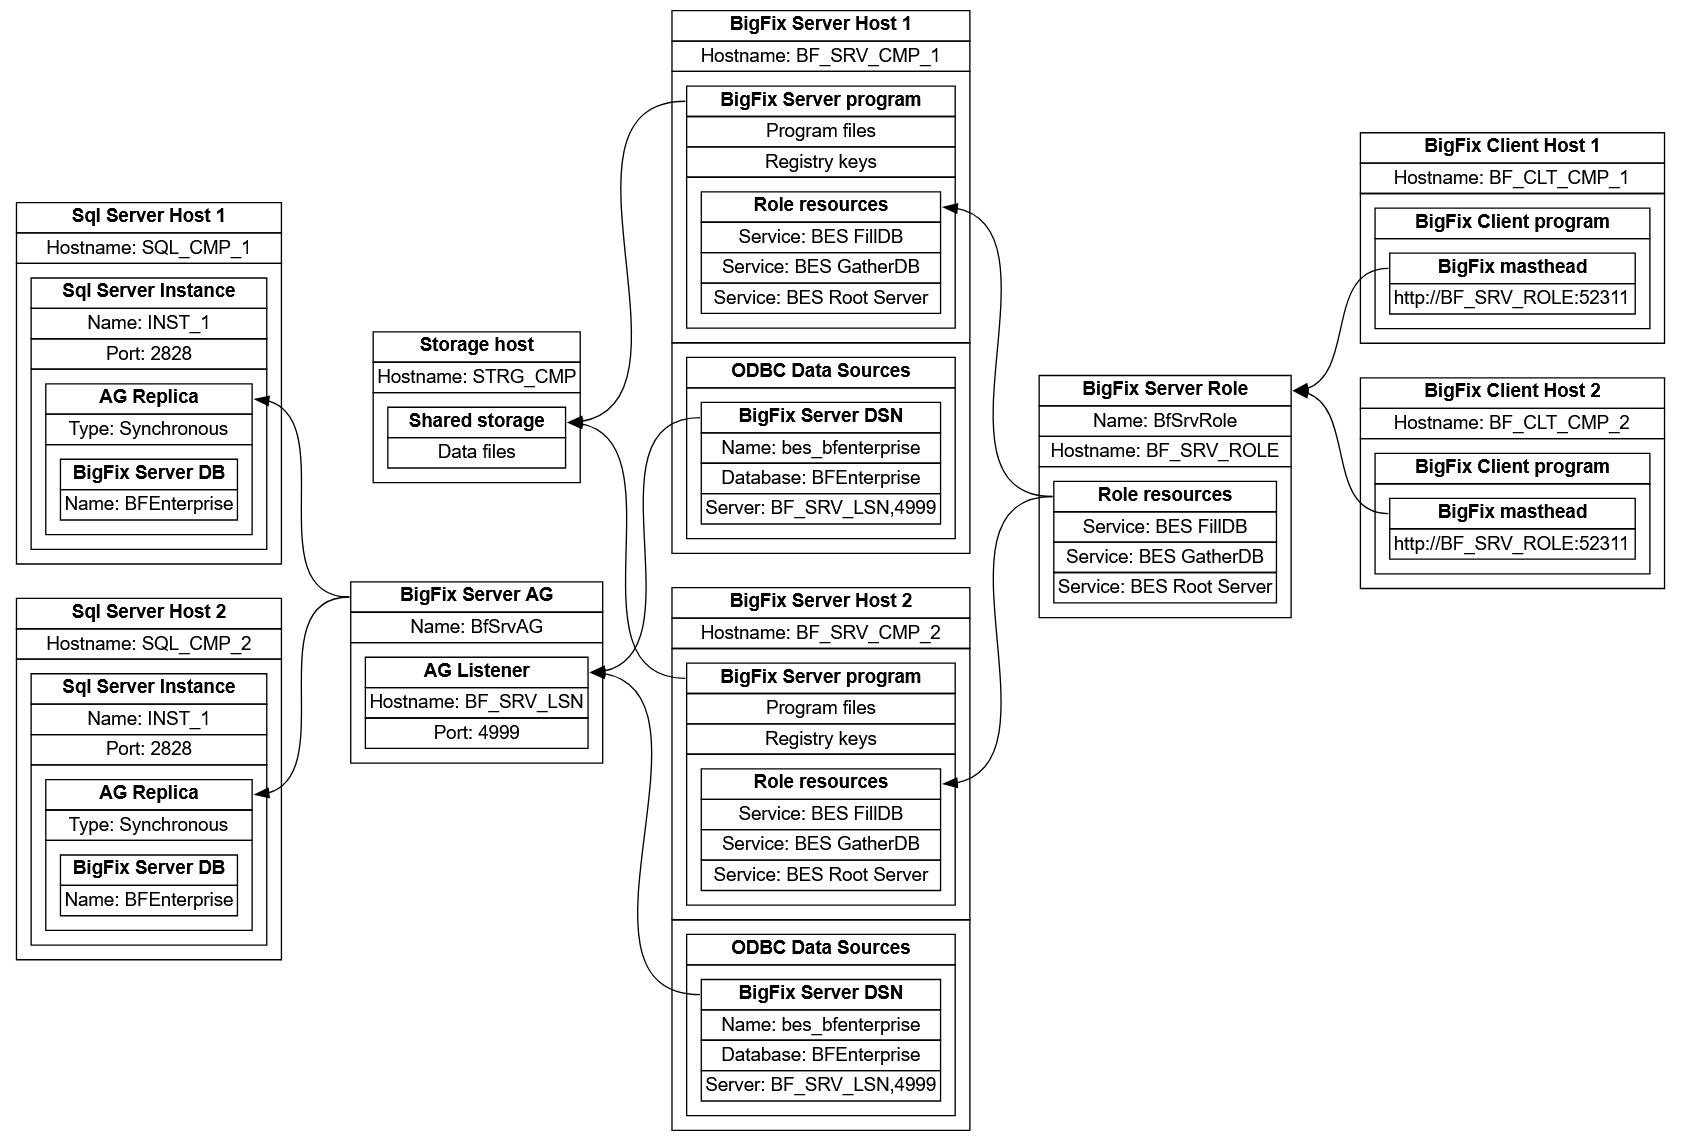
The following picture shows BigFix HA configuration on Windows using a shared storage for data files.
Basic requirements
If you are starting from scratch, we recommend using BigFix Platform version 11.0.4 or greater.
If you already have a BigFix Server installation that you want to use as part of this configuration, we recommend upgrading it to version 11.0.4 or greater.
- two computers, one for each BigFix Server installation we will configure
- two SQL Server Enterprise edition instances, installed and ready to use
- a Windows Server Failover Cluster (WSFC), that we will create and configure
- a shared storage, preferably a Cluster Shared Volume, on another computer
The computers hosting the two SQL Server instances can be the same computers we will use to host our two BigFix Server installations, or separate ones.
In this guide, we assume that all computers hosting a BigFix Server and/or a SQL Server instance are part of the same Active Directory domain and can become part of a single failover cluster.
The computer hosting the shared storage should be part of the same Active Directory domain, but it will not need to become part of our cluster.
We will mention possible variations compared to the environment above, but just for comparison.
The hostname or IP in the BigFix masthead
The hostname (or IP) that appears in the BigFix masthead is a key resource to consider.
Open the ActionSite.afxm file in your BigFix Server folder and look at the value of the X-Fixlet-Site-Gather-URL field. If it is, for example, http://bfserver.domain.test:52311/cgi-bin/bfgather.exe/actionsite, then bfserver.domain.test is the hostname we refer to.
That hostname (or IP) cannot be changed. If it currently belongs to a computer, you must be able to free it in order to properly set up this configuration.
After completing this configuration, the hostname (or IP) in your masthead file cannot belong to any specific computer as it will be used to redirect the BigFix network traffic to the currently active BigFix Server.
Instead of corresponding to a specific computer, that hostname (or IP) will be associated to a "cluster role" we are going to create in a failover cluster.
For the correct functioning of the BigFix environment we are configuring, it is fundamental that the hostname (or IP) in the masthead becomes exclusively associated to a "cluster role" we are going to create.
At any time, the "cluster node" (a computer) that is running the BigFix Server will be the "owner node" of that cluster role, but it will still have its own hostname and IP.
The mentioned cluster role must not be confused with the entire failover cluster or with the single cluster nodes.
The hostname (or IP) in the BigFix masthead must remain distinct from those used by: the cluster as a whole, the computer hosting the SQL Server instances, and the Availability Group listener we will discuss later.
Freeing the BigFix masthead hostname
If you already consumed your BigFix license authorization (.BESLicenseAuthorization) file and the hostname (or IP) in your BigFix masthead file is in use, you must free it before continuing.
For example, if your masthead contains the hostname bfserver.domain.test and you have a computer whose fully qualified domain name (FQDN) is also bfserver.domain.test, you should rename that computer from bfserver to something else, like bfhost1.
Make sure there are no DNS entries mapping the masthead hostname to a specific computer.
On the Windows Server computer acting as your Active Domain controller, open the "DSN Manager" application, expand the tree with your NetBIOS domain name (e.g. DOMAIN), then the "Forward Lookup Zones", then your DNS domain name (e.g. domain.test) and look at the entries.
If there are other devices that may act as DNS on your network, verify them as well.
If you renamed a computer to free the masthead hostname, make sure there are no leftover entries in your Active Directory referencing the old computer name.
On the Windows Server computer acting as your Active Domain controller, open the "Active Directory Users and Computers" application, expand the tree with your DNS domain name (e.g. domain.test), select the "Computers" item and look at the entries.
Creating a Windows Server Failover Cluster
A Windows Server Failover Cluster has its own hostname and IP, which the BigFix Platform components will not make direct use of. Do not confuse them with the hostname and IP we will assign to the cluster role we will create later.
Before continuing, make sure the firewalls of your cluster nodes are configured to allow the kind of network traffic necessary for them to communicate with each other and for the cluster management tools to coordinate them.
Install the "Failover Clustering" Windows Server feature on the computers where you already installed or plan to install the BigFix Server. You can do that by running the following PowerShell command on them.
Install-WindowsFeature -Name Failover-Clustering -IncludeManagementToolsThe "-IncludeManagementTools" part is optional, but you will need to include it on at least one computer in order to be able to use the cluster management tools.
If possible, also install that feature on the computers hosting the SQL Server instances containing your BigFix databases or that you want to use as a replica.
We suggest restarting the computers you install the "Failover Clustering" feature on.
We will now create a failover cluster, making the computers we mentioned part of it and turning them cluster nodes.
In the following steps, we will assume you are using the Failover Cluster Manager, but the same operations can be performed via PowerShell commands.
Open the Failover Cluster Manager, right click on the "Failover Cluster Manager" tree item, then click "Create Cluster...". This opens the "Create Cluster Wizard".
In the "Select Servers" page, add the computers you installed the "Failover Clustering" feature on.
If the next page is titled "Validation Warning", perform the suggested configuration validations tests and remediate any issues they find.
In the "Access Point for Administering the Cluster" page, specify the "Cluster Name" and an IP address, remembering not to use the ones we kept free for the cluster role.
Follow the wizard until completion.
Creating a cluster role with network resources
In this section, we assume that you added the computers hosting the BigFix Server to the same Windows Server Failover Cluster. If that is not the case, make them part of the same cluster before proceeding.
In the following steps, we will assume you are using the Failover Cluster Manager, but the same operations can be performed via PowerShell commands.
Create an empty cluster role. To do so, expand the tree with the cluster name, right click on the "Roles" tree item, then click "Create Empty Role".
To rename the role, right click on it, then click Properties. In the "General" tab, edit the "Name" field and then confirm.
In the same tab, you can assign one or more "Preferred Owner Nodes". Specifying this preference is optional. For example, you can set the first computer you installed the BigFix Server on as your only preferred owner node.
Make sure the "Status" of the new cluster role is "Stopped". To do so, right click on the cluster role you created, then click "Stop Role".
Assign a hostname and an IP to the cluster role. Make sure to assign the same hostname (or IP) that appears in the BigFix masthead. To do so, right click on the cluster role, select "Add Resource", then click "Client Access Point". Specify the hostname in the "Name" field and the IP in the "Address" field. Then proceed and complete the procedure.
Redirecting traffic via a cluster role
As a temporary measure, you might need to redirect the traffic meant for the hostname (or IP) in the BigFix masthead to a computer where you installed the BigFix Server or to one you want to install it on.
To do that, you can use the BigFix Server cluster role, assuming you associated the masthead hostname and IP to it, as we suggested.
In the following steps, we will assume you are using the Failover Cluster Manager, but the same operations can be performed via PowerShell commands.
In the "Roles" view of the Failover Cluster Manager, right click on the cluster role you created, select "Move", then click "Select Node...".
Select the cluster node where you are going to install the BigFix Server, then confirm.
The redirection will only be active if the cluster resources corresponding to the hostname and IP are online. To ensure that, you can start the whole role, or just bring online its network resources.
Using a new license authorization file
If you have a new BigFix license authorization (.BESLicenseAuthorization) file, follow this procedure.
We recommend that the computer on which you are going to install your BigFix Server is part of a Windows Server Failover Cluster. Make sure you already created an empty cluster role and associated a free hostname and a free IP to it.
Make the cluster role redirect traffic from its hostname (or IP) to the computer where you want to install the BigFix Server. For more details, see the "Redirecting traffic via a cluster role" section.
Go to the BigFix Download Center Platform Release page, find the version you want to install (11.0.4 or later), and visit to the corresponding download page. Then download the "Installer Generator" setup file.
Run the BigFix Installation Generator on the computer where you want to install the first BigFix Server.
When you reach the "Setup Type" dialog, choose the option "I want to install with a BigFix license authorization file".
In the "Request License" series of dialogs, when you reach the dialog asking "Please enter the DNS name of your BigFix Server", write the hostname (or IP) that you assigned to your cluster role.
Continue the BigFix Installation Generator setup procedure until completion.
Considerations about the first BigFix Server
Consider how you want your BigFix Server to access its SQL Server database.
If you want to use Windows authentication for database access, you should run the BigFix Server installer as an Active Domain administrator that is also an SQL Server user with sufficient privileges. Do not use a local Windows user for database access, even if the database is local.
If you want to use SQL Server authentication for database access, later on you may have to re-create the login user to ensure it can access all the SQL Server instances you want to use.
After installing the BigFix Installation Generator, run the BigFix Server installer on the same computer.
At the "Select Database Replication" dialog, select the "Single or Master Database" option.
At the "Select Database" dialog, select the "Use Remote Database" option, even if your SQL Server instance is local.
At the "Choose Destination Location" dialog, specify a folder local to the computer that you are installing on.
At the "Installation Wizard Complete" dialog, choose not to start your BigFix Server service.
Preparing to create an SQL Server Availability Group
After the first BigFix Server is installed, you can set up an SQL Server Always On Availability Group (AG) for its database.
To create an Availability Group, you need two computers with the same version of SQL Server Enterprise edition. We recommend that the computers hosting those database instances are part of the same Windows Server Failover Cluster, because it makes achieving HA easier.
One of those SQL Server instances must be the one hosting the database of the BigFix Server. If you installed Web Reports on the same computer as the BigFix Server, you can put their databases in the same AG. This is not mandatory, but it can avoid potential issues.
Before creating the AG, make sure the firewalls of those computers are configured to allow the kind of network traffic necessary for them to communicate with each other and to synchronize their databases.
On each computer hosting an SQL Server instance you want to use for your AG, perform the following steps.
Open the SQL Server Configuration Manager and view the "SQL Server Services" page. Right click the "SQL Server" entry corresponding to main service of your instance, then click "Properties".
In the "Always On Availability Groups" tab, make sure that "Enable Always On Availability Groups" is checked.
In the "Log On" tab, if the computer is part of a cluster, make sure that an Active Directory user is running the service. You should configure the same user for all the SQL Server instances you want to use for your AG.
Click "OK" to confirm your changes and close the dialog. If you get a message stating that you need to restart the SQL Server instance for your changes to take effect, restart it.
Now, connect to the SQL Server instance containing your BigFix databases.
Make sure that the BigFix databases you want to put in your AG are in full recovery mode. To verify this, you can connect to the instance hosting it and run the following query.
SELECT name, recovery_model_desc
FROM sys.databases
WHERE name = 'BFEnterprise'
   OR name = 'BESReporting';
GO
If your BigFix databases are not in full recovery mode, you can set that mode by running the following commands.
ALTER DATABASE BFEnterprise
SET RECOVERY FULL;
GO
ALTER DATABASE BESReporting
SET RECOVERY FULL;
GO
You are required to perform a full backup of the databases that you are going to put into your AG. To ensure this, you can connect to the instance hosting them, make sure they are not being written to and then run the following commands.
BACKUP DATABASE BFEnterprise
TO DISK = 'C:\Path\To\ExistingFolder\BFEnterprise.bak'
WITH FORMAT, INIT;
GO
BACKUP DATABASE BESReporting
TO DISK = 'C:\Path\To\ExistingFolder\BESReporting.bak'
WITH FORMAT, INIT;
GO
Make sure that the database user you are choosing exists on both SQL Server instances and that it has sysadmin privileges.
If you want to access via Windows authentication, this user should be the same Active Domain administrator that installed the BigFix Server and that runs its services.
If you want to access via SQL Server authentication, the login user should have the same name, password and security identifier (SID) on both instances. To verify this, you can run this query on each instance.
SELECT name, sid
FROM syslogins
WHERE name = 'YourUser';
GO
If your SQL Server user has the same name but a different SID, you can delete that user on an instance and create it again with the same SID it has on the other instance. To specify the SID when creating a user, do as follows.
USE master;
GO
CREATE LOGIN 'SameUserName'
WITH PASSWORD = N'SamePassword',
sid=<SameSID>;
GO
Creating an SQL Server Availability Group
To create the AG, connect to the SQL Server instance where the database of the BigFix Server is on. In the following steps, we will assume you are using SQL Server Management Studio, but the same operations can be performed via PowerShell commands.
Right click on the "Always On High Availability" icon and run the "New Availability Group Wizard".
In the "Specify Options" page, specify the "Availability group name", which can be anything you want. This name will not be used to connect to your AG. Then, choose the "Cluster type". If your SQL Server instance is installed on a computer that is part of a failover cluster, that field should default to "Windows Server Failover Cluster". Otherwise, you can set it to "NONE".
In the "Select Databases" page, select the BigFix Server database. If you also see a Web Reports database, you have the option to select it as well.
Note: If you installed both the BigFix Server and Web Reports on the same computer, putting their databases in the same AG will prevent potential issues when upgrading BigFix. On the computer where they are installed, there is pair of OBDC data sources named "enterprise_setup", one 32-bit and the other 64-bit, that is used by the BigFix Server installer during the upgrade. That data source assumes both databases can be accessed the same way.
In the "Specify Replicas" page, there are several things to set. In the "Replicas" tab, there should be one entry in the "Availability Replicas" table, the one that hosts the BigFix Server database. Set its "Availability Mode" to "Synchronous commit".
Click "Add Replica", which opens a "Connect to Server" popup. Use it to connect to the other instance. Now there should be two entries in the table. If you want to use the instance you just added for HA, set its "Availability Mode" to "Synchronous commit". If you want to use it for DR, set it to "Asynchronous commit".
Note that you can configure the "Readable Secondary" property of each replica. You can set that field to "Yes" to increase your database reading performances. You can also configure this later, along with the "Read-Only Routing" options. For more information, see Types of client connections to replicas.
We recommend creating an Availability Group listener. You can create it now or later, as long as you configure it following our recommendations. For more details, see the "Creating an Availability Group listener" section.
In the "Select Data Synchronization" page, choose how the initial data synchronization will occur. The "Automatic seeding" option is probably the most convenient option, provided your SQL Server instances satisfy its requirements. In the "Validation" page, verify that all entries have "Success" as their "Result". Follow the wizard until completion.
To verify that the Availability Group is working as intended, you can right click on it and then click "Show Dashboard". The "Availability group state" should be "Healthy". The "Synchronization State" of the primary replica should be "Synchronized". The "Synchronization State" of the secondary replica should be "Synchronizing" at first and then become "Synchronized" once the database replication is complete.
Creating an Availability Group listener
After creating an Availability Group (AG) for your BigFix Server database, we recommend creating a listener for it. If you used a separate AG for the Web Reports database, we recommend creating a listener for it too.
If you set your AG to act as part of a Window Server Failover Cluster (WSFC), its listener will be able to receive database connections, which it will then forward to one of the database replicas. By default, the Availability Group listener will redirect its connections to the current primary replica. In addition to that, it can be configured to redirect read-only queries to a secondary replica, distributing the load and increasing performances.
We recommend assigning the listener its own hostname and IP. The listener also needs a port, which can be different from the one used by the SQL Server instances hosting its database.
When creating the listener for an AG whose cluster type is WSFC, SQL Server will try to associate it with the hostname and IP you specify. In order to do that, the user running the SQL Server instance you are connected to needs the permissions to create objects in the Active Directory.
In the following steps, we will assume you are using SQL Server Management Studio, but the same operations can be performed via PowerShell commands.
You can create an AG listener when creating the AG via the "New Availability Group Wizard" procedure, or after that. If you want to create it after, right click on the AG you created, then click on "Add Listener...". In the "DNS Listener Name", enter a free hostname. Fill the "Port" field. Click "Add...", which opens a dialog named "New IP Address". Specify a free IP address and its subnet, which should be the same as that of your SQL Server instances. Confirm and complete the procedure.
If you are setting up a clusterless Availability Group, the listener cannot automatically redirect your traffic to a replica, nor can it receive traffic on its own IP. These limitations make it difficult to achieve HA with such a configuration.
On a clusterless AG, a possible workaround is setting the IP and port of the listener to match the IP and port of the primary replica and finding a way to map the listener hostname to that IP. On failover, such a workaround requires destroying the listener, recreating it with the IP and port of the new primary replica and mapping the listener hostname to the new IP. We recommend finding a more robust solution instead.
Using an Availability Group listener
After creating an Availability Group (AG) and a listener for it, we recommend using that listener to connect to the BigFix databases contained in that group.
However, the first BigFix Server you installed is likely configured to connect directly to an SQL Server instance. To make it use the Availability Group listener, you need to modify its ODBC data sources.
On the computer where you installed the BigFix Server, there are four or six ODBC data sources to update, depending on whether you installed Web Reports alongside it or not. For more information, see Configuring ODBC data sources.
If you configured your BigFix Server to use a local database when you installed it, do the following. Open the Registry Editor. Navigate to the registry key HKEY_LOCAL_MACHINE\SOFTWARE\Wow6432Node\BigFix\Enterprise Server. Set the registry key value named UseRemoteDB of type REG_SZ to 1.
You should update your ODBC data sources on all computers that use them to connect to the BigFix databases.
If you are not accessing the BigFix databases by specifying a data source name (DSN), update your connection strings to specify the hostname (or IP) and the port of the AG listener.
Installing an additional BigFix Server
This section explains how to install an additional BigFix Server, configuring it to use an SQL Server Always On Availability Group (AG) that you already set up.
We recommend that the computer on which you are going to install your BigFix Server is part of the same Windows Server Failover Cluster as the computer hosting your other BigFix Server(s).
We assume you created an SQL Server Availability Group (AG) for the BigFix Server database and set up a listener for it.
Make sure that any program that may access the BigFix databases or change the BigFix data files is stopped.
On the first computer you installed the BigFix Server on, follow the backup procedure (Server Backup) but skip the database backup steps and ignore the step about avoiding client duplication.
Make the cluster role redirect traffic from its hostname (or IP) to the computer where you want to install the BigFix Server. For more details, see the "Redirecting traffic via a cluster role" section.
On the computer you want to install the BigFix Server on, follow the restore procedure (Server Recovery) but skip the database recovery steps and, during the installation, take the following steps instead of their equivalent in the other guide.
At the "Select Database Replication" dialog, select the "Single or Master Database" option.
At the "Select Database" dialog, select the "Use Remote Database" option, even if you have a local SQL Server instance.
At the "Database Server" dialog, in the "Specify a database engine" field, specify the hostname (or IP) and port of the Availability Group listener.
At the "Choose Destination Location" dialog, specify a folder local to the computer that you are installing on.
At the last dialog, choose not to start the BigFix Server services nor, if present, the Web Reports service.
Ignore the step about avoiding client duplication.
Completing the BigFix Server cluster role
Make sure all BigFix services on the computers where you installed the BigFix Server or the WebUI are stopped.
Make sure that any program that may access the BigFix databases or change the BigFix data files is stopped.
In the following steps, we will assume you are using the Failover Cluster Manager, but the same operations can be performed via PowerShell commands.
One by one, add the BigFix Server services (BES Root Server, BES FillDB, BES GatherDB) to the cluster role.
In the "Roles" view of the Failover Cluster Manager, right click on the cluster role you created, select "Add Resource", then click "Generic Service". Select the "BES Root Server" service, then proceed and complete the procedure.
Repeat the same procedure to add the "BES FillDB" service and the "BES GatherDB" service to the same cluster role.
If you installed Web Reports on the same computers as the BigFix Server, you may also add the "BES Web Reports Server" service to the same cluster role. Otherwise, you could create another cluster role, provide it with a free hostname and a free IP, then add its service to it.
Since BigFix Platform version 11.0.4, the BigFix Client does not need its own role.
The WebUI service, even if installed on the same computer as the BigFix Server, should not be mapped to the same cluster role.
Managing clustered BigFix services
After putting a service in a cluster role, you should no longer start or stop it directly. You should only start and stop those services as part of their role.
You can stop a clustered service by stopping its entire role, or take it offline via the cluster manager. For example, using the Failover Cluster Manager, you can right click on the role and then click "Stop Role", or view the "Resources" tab of the role, right click on the service and then click "Take Offline".
Stopping a service that is part of a cluster role without involving the cluster manager can cause a failover.
Warning: at no point should a BigFix service that is part of a failover cluster role be running on two computers. In a worst-case scenario, this can lead to data corruption.
Configuring the BigFix Client on BigFix Server computers
On each computer where you installed the BigFix Server, add the _BESClient_RelaySelect_UseMastheadRootServer client setting and set it to 1. Then start (or restart) the BigFix Client. This will make it use the hostname (or IP) written in the masthead to try and connect to the right BigFix Server, instead of assuming the local one is always running. For more information, see List of settings and detailed descriptions.
Moving data files to shared storage
A possible solution to implement HA in your BigFix infrastructure is configuring the BigFix Server to use shared storage for its data files.
The BigFix Server program files, like the executables (.exe) and other files that do not change after the installation, should remain local.
The data files that are created by the program after the installation can be moved to a storage shared by all computers the BigFix Server is installed on.
Before continuing, make sure that any program that may access the BigFix databases or change the BigFix data files is stopped.
The path of most BigFix data folders can be configured by editing the corresponding settings. In the following, we will show how to use a BESAdmin command to change the location of the BigFix Server data folders to a common parent folder on a shared storage.
We suggest choosing a destination folder on a Cluster Shared Volume, which looks and acts like a local folder, but is actually located on a different storage volume.
On the first computer you installed the BigFix Server on, run the BESAdmin /setshareableserverdatapath command with the /copydata option to make it copy the local data files to the shared folder. For example.
.\BESAdmin.exe /setshareableserverdatapath /topath=<shared storage dir> /copydata
/sitePvkFile=<path+license.pvk> /sitePassword=<password>
BESAdmin writes the location of the copied files and folders to its log, named BESAdminDebugOut.txt. After you verify the file copy is successful, you can delete the local copy of the data, but keep the folders used by the log files. For more information, see BESAdmin Windows Command Line.
The command will not change the location of the log files. You can configure your log locations to use the shared storage, but it is entirely optional.
On the other computers you installed the BigFix Server on, run the same command without the /copydata option.
Upgrading a clustered BigFix environment
Before upgrading a BigFix Server whose services are part of a cluster role, make sure that any program, local or remote, that may access the BigFix databases or change the BigFix data files is stopped.
Before starting the BigFix Server, Web Reports, or the WebUI in a cluster environment, you need to upgrade all those components on all computers they are installed on. Since BigFix Platform version 11.0.4, you can choose not to start those components at the end of their installation and upgrade.