Credentials
The Credentials page provides a centralized hub for managing all your authentication details required for your HCL UnO Agentic AI Builder solutions. These credentials enable secure, seamless connections between your AI agents and external services such as APIs, databases, and cloud platforms.
This interface allows users to efficiently view, search, add, edit, and delete credentials - ensuring that your agents can operate securely across different environments.
Credential Cards
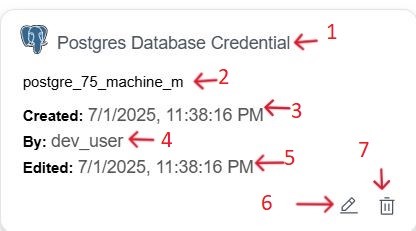
Each credential is represented by a tile (card), providing a quick overview and action controls. A typical credential card includes the following fields:
-
Credential Type: Displays the type of service or account (for example, Postgres Database Credential, OpenAI account).
-
Credential Name: The specific name given to this instance of the credential (for example, postgre_75_machine_m, openai).
-
Created: The date and time when the credential was initially created.
-
By: The user who created the credentials.
-
Edited: The date and time of last modification.
-
Edit: Modify credential details.
-
Delete: Remove the credentials from the library.
Adding Credentials
Before your AI agents can interact with external services, databases, or third-party APIs, you must configure the necessary authentication details. Adding credentials in this section enables agents to securely access and interact with these external resources.
To add a new credential:
-
Click the Add credentials button located next to the search bar. The Add new credential dialog box will appear.
-
From the Credentials type dropdown menu, select the type of credential you want to add (for example, Postgres Database Credential).
-
Fill in all the required fields for the selected credential type. Required fields are marked with an asterisk (*). Example: For a "Postgres Database Credential," you will need to provide the Password, Host, Port, and Database. Optional fields like SSL and Pool Size can also be configured.
Note: Detailed information about each credential type and its specific configuration options can be found in the Credential Library section of this documentation. - Click the Add credentials button to save the new credential.
Result:The newly added credential will now appear as a card on the Credentials page.