This section describes the configuration changes required for the Components in
case the SSL Certificate name is other than
HclTech.iAutomate.Web .
Following changes are required in the underlying components:
Listener
To make changes for the Listener, please follow the below
steps:
Press Win+R and type services.msc.Figure 1. Certificate Name Change – Listener
Click OK to open Windows Services.Figure 2. Certificate Name Change – Listener (cont.)
Search for HCL.iAutomate.Listener service and right-click on it.
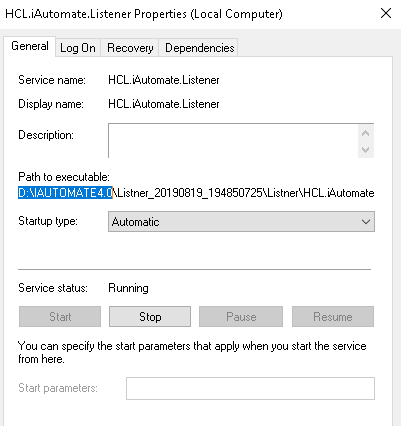
Click Properties.Figure 3. Certificate Name Change – Listener (cont.)
Copy the value in Path to executable as shown in the image below.Figure 4. Certificate Name Change – Listener (cont.)
Open File Explorer then paste the copied path and press Enter to open the
desired folder.
Search for HCL.iAutomate.Listner.Service.Host config file and open it in a
Notepad.Figure 5. Certificate Name Change – Listener (cont.)
Within the HCL.iAutomate.Listner.Service.Host config file, find the key
‘CertificateName_KRS’ and change its value with the new Certificate
Name.Figure 6. Certificate Name Change – Listener (cont.)
If the certificate is self-signed, find the key ‘IsSelfSigned_KRS’ and change its
value to ‘Y’. Else the value will be ‘N’.Figure 7. Certificate Name Change – Listener (cont.)
Save the file for changes to be reflected.
Select the service and click Restart to restart the services.
Data Collector
To make changes for the Data Collector, please follow the below steps:
Press Win+R and type services.msc.Figure 8. Certificate Name Change – Data Collector
Click OK to open Windows Services.Figure 9. Certificate Name Change – Data Collector (Cont.)
Search for HCL.iAutomate.DC service and right-click on it.
Click on Properties.Figure 10. Certificate Name Change – Data Collector (Cont.)
Copy the value mentioned in Path to executable as shown in the image below.Figure 11. Certificate Name Change – Data Collector (Cont.)
Open File Explorer, then paste the copied path and press Enter to
open the desired folder.
Search for HCL.iAutomate.DataCollector.Service.Host.exe config file and open it
in a Notepad.Figure 12. Certificate Name Change – Data Collector (Cont.)
Within the HCL.iAutomate.DataCollector.Service.Host.exe config file, find the key
'CertificateName_KRS’ and change its value with the new Certificate Name.Figure 13. Certificate Name Change – Data Collector (Cont.)
If the certificate is self-signed, find the key ‘IsSelfSigned_KRS’ and change its
value to ‘Y’. Else the value will be ‘N’.Figure 14. Certificate Name Change – Data Collector (Cont.)
Save the file for changes to be reflected.
Select HCL.iAutomate.DC service and click Restart to restart the
service.Figure 15. Certificate Name Change – Data Collector (Cont.)
Generic Service
To make changes for the Generic Service, please follow the below
steps:
Press Win+R and type services.msc.Figure 16. Certificate Name Change – Generic Service
Click OK to open Windows Services.Figure 17. Certificate Name Change – Generic Service (cont.)
Search for HCL.iAutomate.GenericExecutor service and right-click on it.
Click on Properties.Figure 18. Certificate Name Change – Generic Service (cont.)
Copy the value in Path to executable as shown in the image below.Figure 19. Certificate Name Change – Generic Service (cont.)
Open File Explorer and paste the copied path and press Enter to
open the desired folder.
Search for HCL.iAutomate.Generic.Host.exe config file and open it in a
Notepad.Figure 20. Certificate Name Change – Generic Service (cont.)
Within the HCL.iAutomate.Generic.Host.exe config file, find the key
‘CertificateName_KRS’ and change its value with the new Certificate Name.Figure 21. Certificate Name Change – Generic Service (cont.)
If the certificate is self-signed, find the key ‘IsSelfSigned_KRS’ and change its
value to ‘Y’. Else the value will be ‘N’.Figure 22. Certificate Name Change – Generic Service (cont.)
Save the file for changes to be reflected.
Select HCL.iAutomate.GenericExecutor service and click Restart to restart
the service.Figure 23. Certificate Name Change – Generic Service (cont.)
RBA Component
To make changes for the RBA component, please follow the
below steps:
Press Win+R and type services.msc.Figure 24. Certificate Name Change – RBA Component
Click OK to open Windows Services.Figure 25. Certificate Name Change – RBA Component (cont.)
Search for HCL.iAutomate.RBAComponent service and
right-click on it.
Click Properties.Figure 26. Certificate Name Change – RBA Component (cont.)
Copy the value mentioned in Path to executable as shown in the image below.Figure 27. Certificate Name Change – RBA Component (cont.)
Open File Explorer, then paste the copied path and press Enter to
open the desired folder.
Search for HCL.RbaService.Component.Host.exe config file and open it in a
Notepad.Figure 28. Certificate Name Change – RBA Component (cont.)
Within the HCL.RbaService.Component.Host.exe config file, find the key
‘CertificateName_KRS’ and change its value with the new Certificate
Name.Figure 29. Certificate Name Change – RBA Component (cont.)
If the certificate is self-signed, find the key ‘IsSelfSigned_KRS’ and change its
value to ‘Y’. Else the value will be ‘N’.Figure 30. Certificate Name Change – RBA Component (cont.)
Save the file for changes to be reflected.
Select HCL.iAutomate.RBAComponent service and click Restart to restart the
service.Figure 31. Certificate Name Change – RBA Component (cont.)
Release Service
To make changes for the Release Service, please follow the below
steps:
Press Win+R and type services.msc.Figure 32. Certificate Name Change – Release Service
Click OK to open Windows Services.Figure 33. Certificate Name Change – Release Service (cont.)
Search for HCL.iAutomate.ReleaseService and right-click on it.
Click Properties.Figure 34. Certificate Name Change – Release Service (cont.)
Copy the value mentioned in Path to executable as shown in the image below.Figure 35. Certificate Name Change – Release Service (cont.)
Open File Explorer , then paste the copied path and press Enter to
open the desired folder.
Search for HCL.iAutomate.Release.Host.exe config file and open it in a
Notepad.Figure 36. Certificate Name Change – Release Service (cont.)
Within the HCL.iAutomate.Release.Host.exe config file, find the key
‘CertificateName_KRS’ and change its value with the new Certificate
Name.Figure 37. Certificate Name Change – Release Service (cont.)
If the certificate is self-signed, find the key ‘IsSelfSigned_KRS’ and change its
value to ‘Y’. Else the value will be ‘N’.Figure 38. Certificate Name Change – Release Service (cont.)
Save the file for changes to be reflected.
Select HCL.iAutomate.ReleaseService service and click Restart to restart
the service.Figure 39. Certificate Name Change – Release Service (cont.)
AD Sync
To change the configuration of AD Sync from HTTP to HTTPS,
please follow the below steps:
Press Win+R and type services.msc.Figure 40. Certificate Name Change – AD Sync Service
Click OK to open Windows Services.Figure 41. Certificate Name Change – AD Sync Service (cont.)
Search for HCL.iAutomate.ADSyncService and right-click on it.
Click Properties.Figure 42. Certificate Name Change – AD Sync Service (cont.)
Copy the value mentioned in ‘Path to executable’ as shown in the image below.Figure 43. Certificate Name Change – AD Sync Service (cont.)
Open File Explorer and paste the copied path and press Enter to
open the desired folder.
Search for HCL.iAutomate.Service.AD.exe config file and open it in a Notepad.Figure 44. Certificate Name Change – AD Sync Service (cont.)
Within the HCL.iAutomate.Service.AD.exe config file, find the key
‘CertificateName_KRS’ and change its value with the new Certificate
Name.Figure 45. Certificate Name Change – AD Sync Service (cont.)
If the certificate is self-signed, find the key ‘IsSelfSigned_KRS’ and change its
value to ‘Y’. Else the value will be ‘N’.Figure 46. Certificate Name Change – AD Sync Service (cont.)
Save the file for changes to be reflected.
Select HCL.iAutomate.ADSyncService service and click Restart to restart
the service.Figure 47. Certificate Name Change – AD Sync Service (cont.)
Email Service
To change the configuration of Email Service from HTTP to HTTPS,
please follow the below steps:
Press Win+R and type services.msc.Figure 48. Certificate Name Change – Email Service
Click OK to open Windows Services.Figure 49. Certificate Name Change – Email Service (cont.)
Search for HCL.iAutomate.EmailService and right-click on it.
Click Properties.Figure 50. Certificate Name Change – Email Service (cont.)
Copy the value mentioned in ‘Path to executable’ as shown in the image below.Figure 51. Certificate Name Change – Email Service (cont.)
Open File Explorer and paste the copied path and press Enter to
open the desired folder.
Search for HCL.iAutomate.EmailService.Service.Host.exe config file and open it in
a Notepad.Figure 52. Certificate Name Change – Email Service (cont.)
Within the HCL.iAutomate.EmailService.Service.Host.exe config file, find the key
‘CertificateName_KRS’ and change its value with the new Certificate Name.Figure 53. Certificate Name Change – AD Sync Service (cont.)
If the certificate is self-signed, find the key ‘IsSelfSigned_KRS’ and change its
value to ‘Y’. Else the value will be ‘N’.Figure 54. Certificate Name Change – Email Service (cont.)
Save the file for changes to be reflected.
Select HCL.iAutomate.EmailService service and click Restart to restart the
service.Figure 55. Certificate Name Change – Email Service (cont.)
DAG Service
To change the configuration of DAG Service from HTTP to HTTPS,
please follow the below steps:
Press Win+R and type services.msc.Figure 56. Certificate Name Change – DAG Service
Click OK to open Windows Services.Figure 57. Certificate Name Change – DAG Service (cont.)
Search for HCL.iAutomate.DAGService and right-click on it.
Click Properties.Figure 58. Certificate Name Change – DAG Service (cont.)
Copy the value mentioned in ‘Path to executable’ as shown in the image below.Figure 59. Certificate Name Change – DAG Service (cont.)
Open File Explorer and paste the copied path and press Enter to
open the desired folder.
Search for HCL.DagService.Component.Host.exe config file and open it in a
Notepad.Figure 60. Certificate Name Change – DAG Service (cont.)
Within the HCL.DagService.Component.Host.exe config file, find the key
‘CertificateName_KRS’ and change its value with the new Certificate Name.Figure 61. Certificate Name Change – DAG Service (cont.)
If the certificate is self-signed, find the key ‘IsSelfSigned_KRS’ and change its
value to ‘Y’. Else the value will be ‘N’.Figure 62. Certificate Name Change – DAG Service (cont.)
Save the file for changes to be reflected.
Select HCL.iAutomate.DAGService service and click Restart to restart the
service.Figure 63. Certificate Name Change – DAG Service (cont.)
Assignation Service
To change the configuration of Assignation Service from HTTP to
HTTPS, please follow the following steps:
Press Win+R and type services.msc.Figure 64. Certificate Name Change – Assignation Service
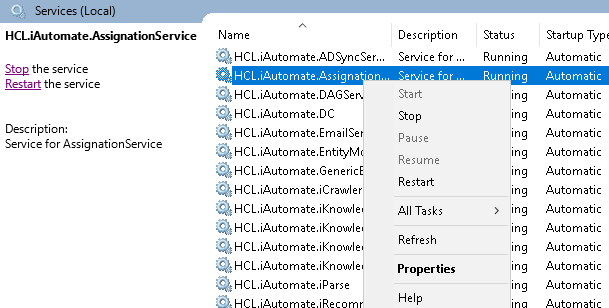
Click OK to open Windows Services.Figure 65. Certificate Name Change – Assignation Service (cont.)
Search for HCL.iAutomate.AssignationService and right-click on it.
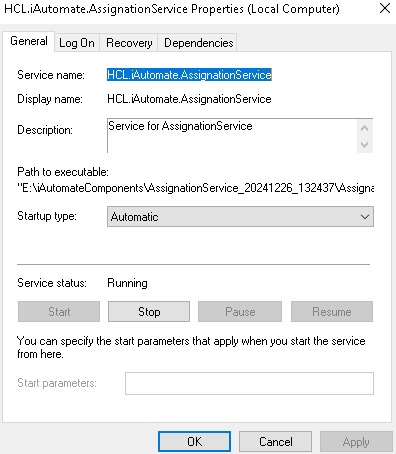
Click Properties.Figure 66. Certificate Name Change – Assignation Service (cont.)
Copy the value mentioned in ‘Path to executable’ as shown in the image below.Figure 67. Certificate Name Change – Assignation Service (cont.)
Open File Explorer and paste the copied path and press Enter to open the desired
folder.
Search for Assignation.Service.Host.exe config file and open it in a Notepad.Figure 68. Certificate Name Change – Assignation Service (cont.)
Within the Assignation.Service.Host.exe config file, find the key ‘CertificateName_KRS’
and change its value with the new Certificate Name.Figure 69. Certificate Name Change – Assignation Service (cont.)
If the certificate is self-signed, find the key ‘IsSelfSigned_KRS’ and change its value
to ‘Y’. Else the value will be ‘N’.Figure 70. Certificate Name Change – Assignation Service (cont.)
Save the file for changes to be reflected.
Select HCL.iAutomate.AssignationService service and click Restart to restart the
service.Figure 71. Certificate Name Change – Assignation Service (cont.)
iRecommend
To make changes for iRecommend service, please follow the below
steps:
Press Win+R and type services.msc.Figure 72. Certificate Name Change – iRecommend
Click OK to open Windows Services.Figure 73. Certificate Name Change – iRecommend (Cont.)
Search for HCL.iAutomate.Listener service and right-click on it.
Click on Properties.Figure 74. Certificate Name Change – iRecommend (Cont.)
Copy the value mentioned in Path to executable as shown in the image below.Figure 75. Certificate Name Change – iRecommend (Cont.)
Open File Explorer and paste the copied path and press Enter to
open the desired folder.
Go to iRecommend folder. Locate irecommend.config file.
Open irecommend.config in a Notepad and search for below line.Figure 76. Certificate Name Change – iRecommend (Cont.)
Change Certificate_Name and the value from HclTech.iautomate.Web to the
new Certificate name.
Save the file to implement the changes.
Go to iRecommend config folder.
Locate entity.config file.
Open entity.config in a Notepad and search for below line.Figure 77. Certificate Name Change – iRecommend (Cont.)
Change Certificate_Name and the value from HclTech.iautomate.Web to the
new Certificate name.
Save the file for changes to get reflected.
iParse
To make changes for iParse service, please follow the
below steps:
Press Win+R and type services.msc.Figure 78. Certificate Name Change – iParse
Click OK to open Windows Services.Figure 79. Certificate Name Change – iParse (Cont.)
Search for HCL.iAutomate.Listener service and right-click on it.
Click on Properties.Figure 80. Certificate Name Change – iParse (Cont.)
Copy the value mentioned in Path to executable as shown in the image below.Figure 81. Certificate Name Change – iParse (Cont.)
Open File Explorer and paste the copied path and press Enter to
open the desired folder.
Go to \iParse\IParse\iparse\config folder.
Locate parse_config.config file.
Open parse_config.config in a Notepad and search for below line.Figure 82. Certificate Name Change – iParse (Cont.)
Change Certificate_Name and the value from HclTech.iautomate.Web to the
new Certificate name.
Save the file to implement the changes.
iScrape
To make changes for iScrape service, please follow the
below steps:
Go to the folder where user has installed knowledge
components.
Go to \iScript\IScript\iScript\config folder.
Locate iScrape.cfg file.
Open iScrape.cfg in a Notepad and search for below line.Figure 83. Certificate Name Change – iScrape
Change Certificate_Name and value from HclTech.iautomate.Web to the
new Certificate name.
Save the file to implement the changes.
iUnique
To make changes for iUnique service, please follow the
below steps:
Press Win+R and type services.msc.Figure 84. Certificate Name Change – iUnique
Click OK to open Windows Services.Figure 85. Certificate Name Change – iUnique
Search for HCL.iAutomate.Listener service and right-click on it.
Click on Properties.Figure 86. Certificate Name Change – iUnique
Copy the value in ‘Path to executable ’ as shown in the image below.Figure 87. Certificate Name Change – iUnique
Open File Explorer , then paste the copied path and press Enter to open the
desired folder.
Go to \iUnique\IUnique\iUnique_final\config folder.
Locate iUnique.cfg file.
Open iUnique.cfg in Notepad and search for below lineFigure 88. Certificate Name Change – iUnique.
Change Certificate_Name and the value from HclTech.iAutomate.Web to the new Certificate
Name.
Save the file to implement the changes.
Knowledge
To make changes for Knowledge service, please follow the
below steps:
Go to the folder where user has installed knowledge
components.
Go to \KnowledgeRating\KnowledgeRating\iKnowledge_Rating folder.
Locate rating.cfg file.
Open rating.cfg in a Notepad and search for below line.Figure 89. Certificate Name Change – Knowledge
Change Certificate_Name and the value from HclTech.iautoate.web to the new
Certificate name.
Save the file for changes to get reflected.
Go to the folder where user has installed knowledge components.
Go to \ AdvanceKnowledge\Crawler\crawler_v5\config folder. Locate icrawler.cfg
file.
Open indexer.cfg in a Notepad and search for below line.Figure 90. Certificate Name Change – Knowledge (Cont.)
Change Certificate_Name and their value from HclTech.iautomate.web to the new
Certificate name.
Save the file for changes to get reflected.
Go to the folder where user has installed knowledge components.
Go to \ AdvanceKnowledge\iKnowledge_Indexer folder. Locate indexer.cfg file.
Open indexer.cfg in a Notepad and search for below line.Figure 91. Certificate Name Change – Knowledge (Cont.)
Change Certificate_Name and their value from HclTech.iautomate.Web to the new
Certificate name.
Save the file for changes to get reflected.
Go to the folder where user has installed knowledge components.
Go to AdvanceKnowledge\iKnowledge_Screen folder.
Locate iKnowledge_Screen.cfg file.
Open iKnowledge_Screen.cfg in a Notepad and search for below line.Figure 92. Certificate Name Change – Knowledge (Cont.)
Change Certificate_Name and the value from HclTech.iautomate.Web to the new Certificate
name.
Save the file for changes to get reflected.
Go to the folder where user has installed knowledge components.
Go to \AdvanceKnowledge\iKnowledge_Search folder.
Locate iKnowledge_Search file.
Open iKnowledge_Search in a Notepad and search for below line.Figure 93. Certificate Name Change – Knowledge (Cont.)
Change Certificate_Name and the value from HclTech.iautomate.Web to the new
Certificate name.
Save the file for changes to get reflected.
Go to the folder where user has installed knowledge components.
Go to iKnowledge\iKnowledge\knowledge_v4 folder.
Locate iKnowledge.cfg file.
Open iKnowledge.cfg in a Notepad and search for below line.Figure 94. Certificate Name Change – Knowledge (Cont.)
Change Certificate_Name and the value from
HclTech.iautomate.Web to the new Certificate name.
.png)
.png)
.png)
.png)
.png)
.png)
.png)
.png)
.png)
.png)
.png)
.png)
.png)
.png)
.png)
.png)
.png)
.png)
.png)
.png)
.png)
.png)
.png)
.png)
.png)
.png)
.png)
.png)
.png)
.png)
.png)
.png)
.png)
.png)
.png)
.png)
.png)
.png)
.png)
.png)
.png)
.png)
.png)
.png)
.png)
.png)
.png)
.png)
.png)
.png)
.png)
.png)
.png)
.png)
.png)
.png)
.png)
.png)
.png)
.png)
.png)
.png)
.png)
.png)
.png)


.png)
.png)
.png)

.png)
.png)
.png)
.png)
.png)
.png)
.png)
.png)
.png)
.png)
.png)
.png)
.png)
.png)
.png)
.png)
.png)
.png)