SOLR as a Service
This section describes the procedure for enabling Solr as a service.
Please follow the following steps:
- Download nssm-2.24.zip file from the path mentioned in the source field of Apache SOLR Requirements and unzip it.
- Copy nssm.exe from nssm-2.24\win64 to SOLR_HOME\bin.
- Open the Command Prompt as Administrator and navigate to SOLR_HOME\bin.
- Execute the command
below:
nssm install solrserviceThe window shown in the image below appears.
Figure 1. Enabling Solr as Windows Service .png)
- Click Application tab and enter the information as mentioned below:
- Path: C:\solr-9.7.0\bin\solr.cmd
- Startup Directory: C:\solr-9.7.0\bin
- Arguments: <Enter values as mentioned below>
start -m 2g -cloud --host <SOLR_IP> -f -p <SOLR_PORT> -s <SOLR_HOME\server\solr>
e.g.
start -m 2g -cloud --host 10.x.x.x -f -p 8983 -s C:\solr-9.7.0\server\solr
Figure 2. Enabling Solr as Windows Service (cont.) 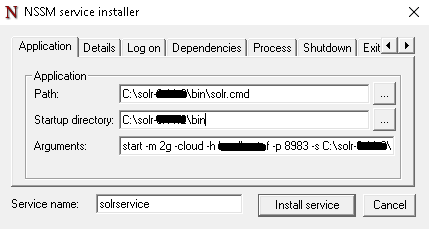
- Click the Details tab and enter the information as displayed in the image
below:
Figure 3. Enabling Solr as Windows Service (cont.) .png)
- Click Install service.
Upon successful installation, the following message will appear.
Figure 4. Enabling Solr as Windows Service (cont.) .png)
- Press Win+R, type services.msc and press Enter.
Figure 5. Enabling Solr as Windows Service (cont.) .png)
- Search for Solr Server service and click on it.
- Click Start the
service on the left panel to start the service.
Figure 6. Enabling Solr as Windows Service (cont.) .png)
- Check the URL below in browser:
http://<SOLR IP>:<SOLRPORT>/solr
- Enter the username and password on Solr Portal Login Page.
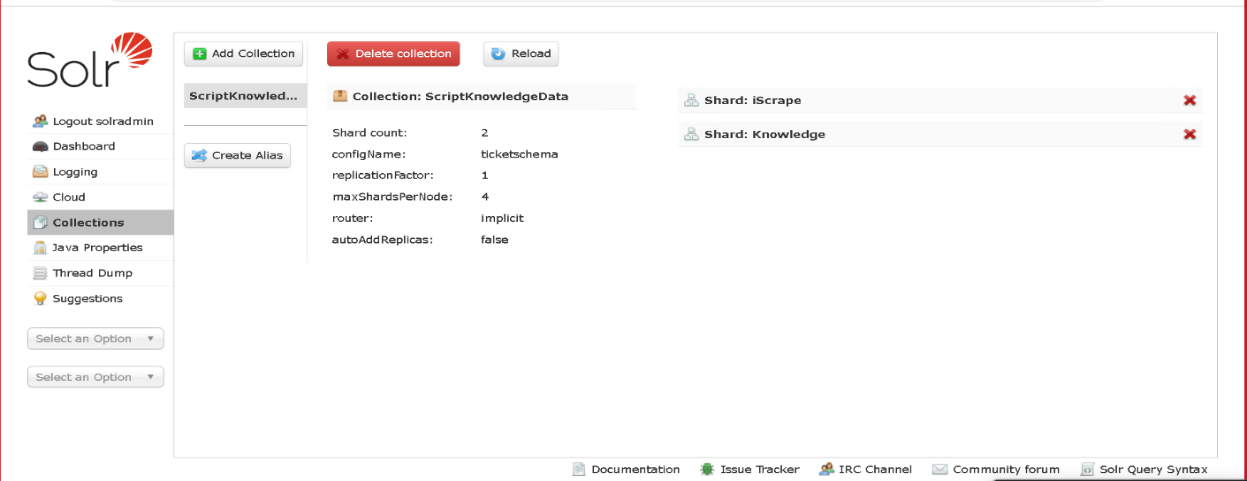
- Create collection named as ‘ScriptKnowledgeData’ in Solr for Basic Knowledge and
iScrape using the below
URL:
 http://<SOLR_IP>:<SOLR_PORT>/solr/admin/collections?action=CREATE&name=ScriptKnowledgeData&router.name=implicit&shards=iScrape,
Knowledge&replicationFactor=1&maxShardsPerNode=4&collection.configName=ticketschema&router.field=shardType
On successful creation of the collection, the following response is received:
{ "responseHeader":{ "status":0, "QTime":3373}, "success":{ "<SOLR_IP>:<SOLR_PORT>_solr":{ "responseHeader":{ "status":0, "QTime":2464}, - "core":"ScriptKnowledgeData_iScrape_replica_n1"},
"<IP>:<PORT>_solr":{ "responseHeader":{ "status":0, "QTime":2737}, "core":"ScriptKnowledgeData_Knowledge_replica_n2"}}} - To check the Successful creation of collection in Solr. Navigate to Solr Home Page as mentioned in Enabling Solr below figure. as Windows Service (cont. . On Left Pane Select “Collections” tab and verify "ScriptKnowledgeData” collection is present and in the solr Dashboard page the solr and java version will be found.