Upgradation Procedure
Note:
Before upgrading Apache make sure to upgrade to the latest
nltk_data. For upgrading nltk_data, refer to section 2.5.2
- Download the latest file Apache24.zip from above Path mentioned in source field table above.
- Press “Win+R”, type “services.msc” and press Enter.
Figure 1. Apache Server Upgradation .png)
- Click on “Apache2.4” service and then click “Stop” the service on the left panel to stop
the service.
Figure 2. Apache Server Upgradation (Cont.) 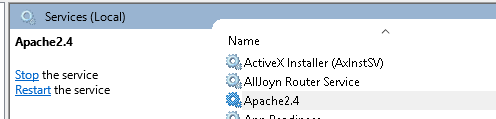
- Stop all the services created using older version of Apache. You can find them by looking at the description pane of the service.
- The description would start with “Apache/2.4.x….”.(e.g., “HCL.iAutomate.EntityModel”, “HCL.iAutomate.iCrawler”, “HCL.iAutomate.iKnowledge”, “HCL.iAutomate.iKnowledgeIndexer”, “HCL.iAutomate.iKnowledgeScreen”, “HCL.iAutomate.iKnowledgeSearch”, “HCL.iAutomate.iParse”, “HCL.iAutomate.iRecommend”, “HCL.iAutomate.iScript” , “HCL.iAutomate.iUnique”, “HCL.iAutomate.RatingMongo”).
Figure 3. Apache Server Upgradation (Cont.) .png)
- Go to “C:\” in the file explorer. Take backup of the previous version by renaming the folder from “Apache24” to “Apache24_Old”.
- Extract the downloaded Zip file named “Apache24.zip” mentioned in the step 1.
- Open the extracted folder and COPY the folder name “Apache24” to the desired
location.
e.g.: C:\Apache24
- Go to Control Panel🡪 System and Security 🡪 System 🡪 Advanced System Settings. Click Environment Variables. A new dialog box appears. Check the Variable name ANT_HOME and variable path is set to current Apache24 path.
- If you are upgrading the whole iAutomate application, then skip the next two steps (Steps 11 &12). If only the Apache version is upgraded, then continue with step 11.
- Navigate to the path “Apache24_Old\bin” and COPY the dlls named “HCL.iAutomate.EncryptDecrypt.dll”, “BouncyCastle.Crypto.dll”,” Newtonsoft.Json.dll”
- Navigate to the folder path “Apache24\bin” and PASTE all the dll files copied from older
Apache folder.
e.g., C:\Apache24\bin
- After pasting the dll files in bin folder, follow the steps below,
- Right-click on each dll file.
- Choose Properties from the context menu.
- Under the General tab, scroll to the bottom where it says "Security" or "Attributes."
- If the file is blocked, you'll see an option labeled "Unblock."
- Tick the "Unblock" checkbox.
- Click Apply, then press OK to confirm.
This will unblock the file and remove any security restrictions. Refer below screenshot.
Figure 4. Apache Server Upgradation - Unblock DLL file 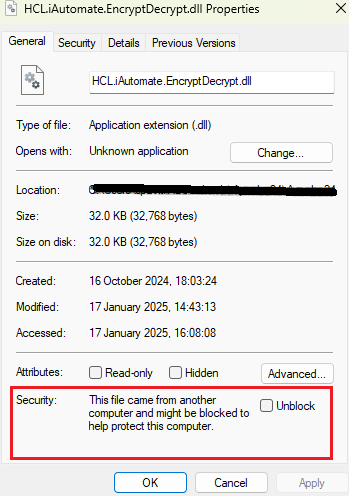
- Navigate to the folder path “Apache24_Old \conf” and COPY all the “.conf” files
except httpd.conf (e.g., Entity.conf, iKnowledge.conf, iknowledgeCrawler.conf,
iKnowledgeIndexer.conf, iKnowledgeScreen.conf, iKnowledgeSearch.conf, iParse.conf,
iRecommend.conf, iScript.conf, iUnique.conf, ratingMongo.conf).Note:Don’t COPY any folder.
Figure 5. Apache Server Upgradation (Cont.) 
- Navigate to the folder path “Apache24\conf” and PASTE all the files copied from older
Apache folder.
e.g., C:\Apache24\conf
- Open all the .conf files mentioned in point 5 in notepad++ and add the below lines if they
are not already present. These lines can be found between line no 553 to
558.
<IfModule mpm_winnt_module>
 ThreadStackSize 393216
 </IfModule>
Figure 6. Apache Server Upgradation (Cont.) 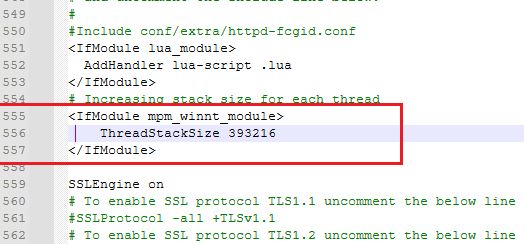
- Open the .conf files in notepad++ and check for the below lines to see if they are
present or not. These lines can be found between line no 564 to 568. Note:Check for the below 3 Lines, if these have a path other than ‘PythonCertificate’, then only follow the next 2 steps (Steps 16 and 17) else skip these steps.
SSLCertificateFile "${PythonCertificate}/server.crt"
SSLCertificateKeyFile "${PythonCertificate}/server.key"
 SSLCACertificateFile "${PythonCertificate}/ca.pem"
Old lines:
Figure 7. Apache Server Upgradation (Cont.) 
Replace with updated lines and add the variable name by performing the following two steps (Steps 17 & 18):
Figure 8. Apache Server Upgradation (Cont.) 
- Find the current location where the certificates are located. e.g.: (C:/Program Files/Certificate or E:/certificate)
- Create system environment variable name PythonCertificate with path value as the above
path where certificates are located. In below figure we pasted the documents in
E:/certificate which can be any path
Figure 9. Apache Server Upgradation (Cont.) .png)
- Open the .conf files in notepad++ and check for the below lines present or not. If not,
add these lines between line no 35 to
40.
Define SRVROOT "/Apache24" ServerRoot "${SRVROOT}" PidFile "${SRVROOT}/httpd.pid" - By default, TLS1.3 will be enabled on Apache, if needed go with any specific version by
following these steps else continue with the step 21:
- Check for the version which needs to be enabled, from the
lines.
# To enable SSL protocol TLS1.1 uncomment the below line #SSLProtocol -all +TLSv1.1 # To enable SSL protocol TLS1.2 uncomment the below line #SSLProtocol -all +TLSv1.2 # To enable SSL protocol TLS1.3 uncomment the below line #SSLProtocol -all +TLSv1.3 # To enable and integrate SSL protocol TLS1.2 and TLS1.3 uncomment the below line #SSLProtocol -all +TLSv1.2 +TLSv1.3 # To enable SSL protocol till TLS1.2 uncomment the below line #SSLProtocol +SSLv2 +SSLv3 +TLSv1 +TLSv1.1 +TLSv1.2 - If needed to go with TLS1.2 then uncomment, and copy paste the line in the specified
conf file just below the line “SSLEngine on” and save the file. E.g.: TLS 1.2 enabled in
the below screenshot.
Figure 10. Apache Server Upgradation (Cont.) .png)
- Check for the version which needs to be enabled, from the
lines.
- Follow these steps for all the components that are specified in Step 5.
- Press “Win+R”, type “services.msc” and press Enter.
Figure 11. Apache Server Upgradation (Cont.) .png)
- Click on “Apache2.4” service and then click START the service on the left panel to start
the service.
Figure 12. Apache Server Upgradation (Cont.) 
- You can validate the Apache version from the description of the service.
- Similarly, start all the Apache services that you stopped in step 4. If the services are not getting started, then follow the below section.