Managing Providers
The SSO needs to be activated for the provider to log on to the global admin console. The super admin requires a provider’s SAML metadata file, including the information listed in the Table - Create Provider and Manage SSO before they can add them.
- In the left navigation bar, click Providers Management.
- It redirects you to the Providers screen.
Figure 1. Managing Provider 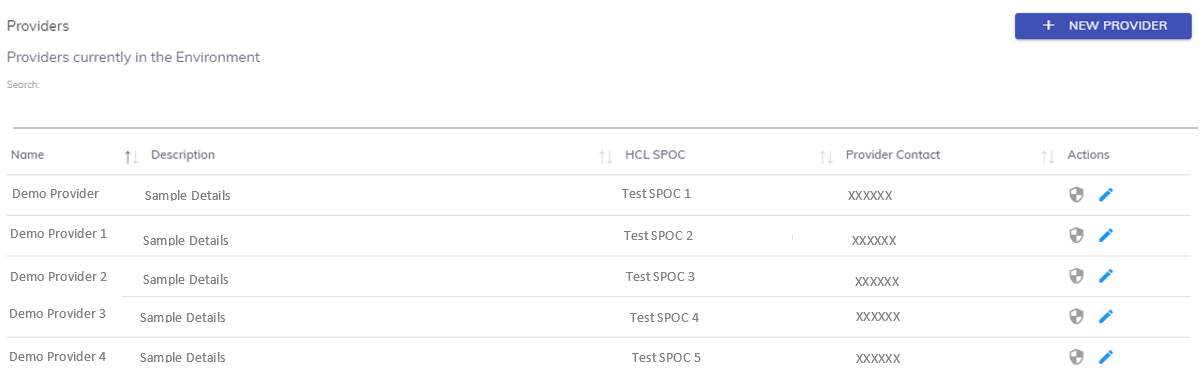
- The screen includes the list of existing providers in the environment and
 button to create a new provider.
 - Listed below are the details of the columns displayed in the figure Managing Provider
- Name - Name of the provider
- Description - A brief explanation about the provider
- HCL SPOC - Name of the HCL employee aligned with the provider
- Provider Contact - Contact details of the provider
- Action - Option to configure SSO or edit the provider .
Adding Provider
- On the Providers screen, click
.png) .
. - It redirects you to the Create Provider screen.
Figure 2. Adding Provider 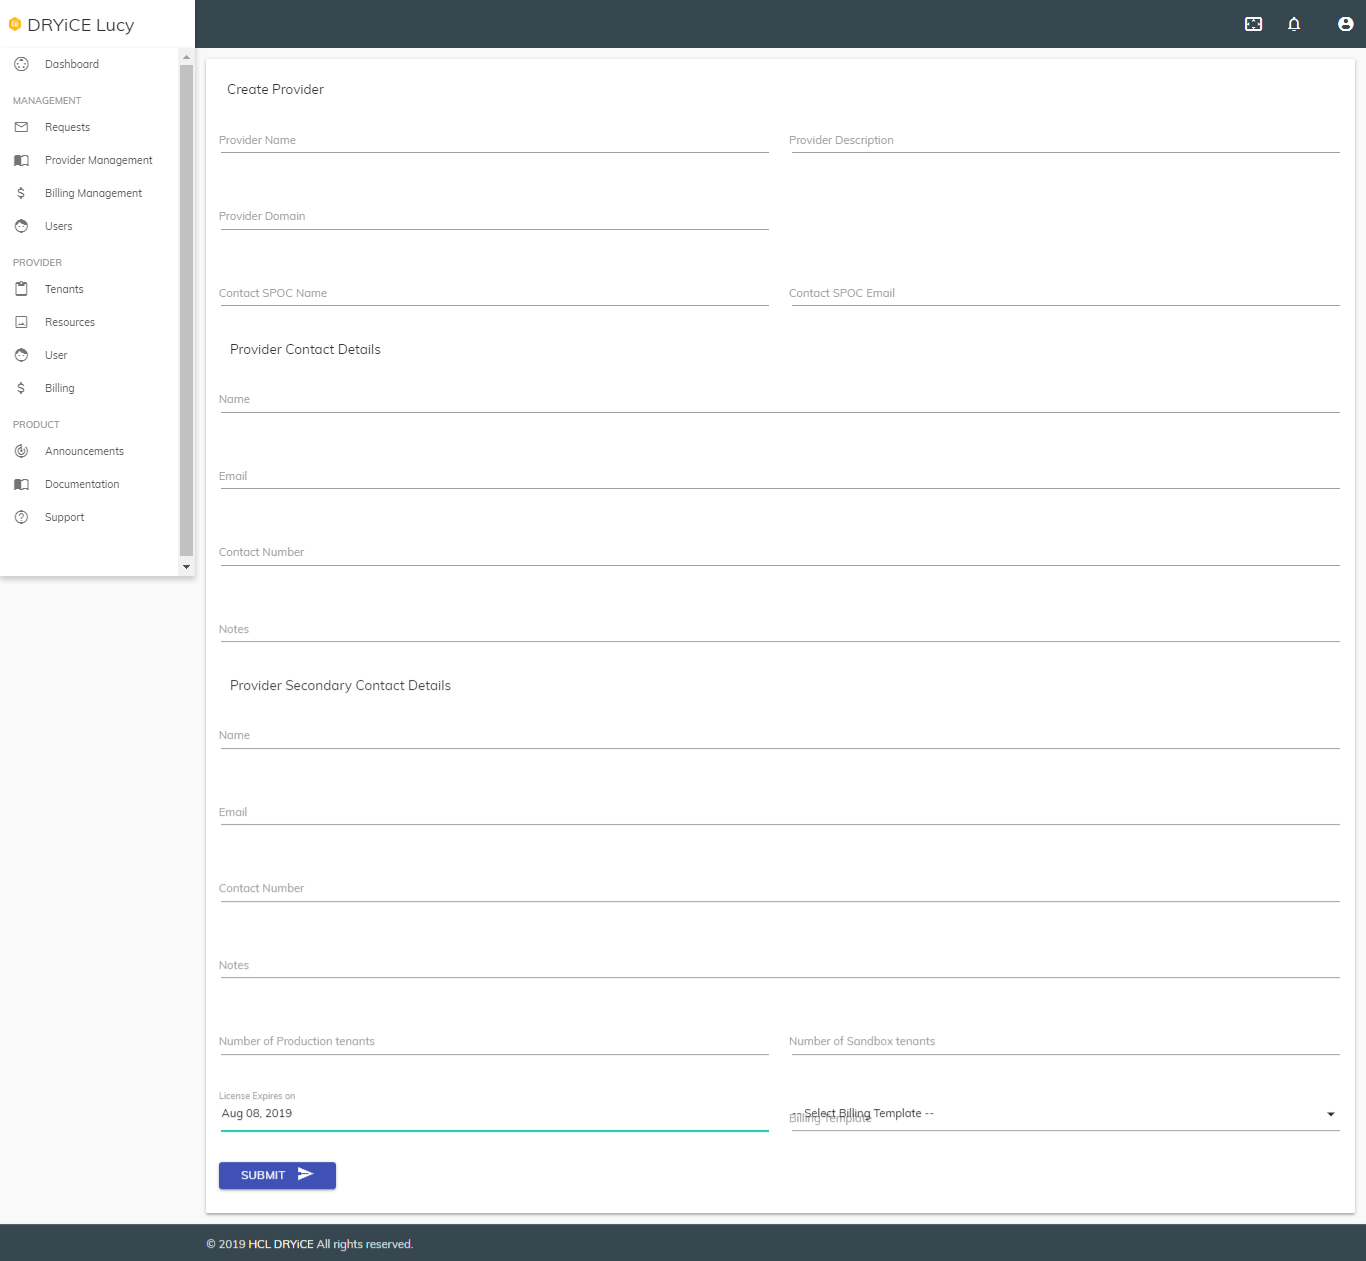
- In the Create Provider screen, specify the following information:
Table 1. Create Provider Fields Sub-Fields Description Create Provider Provider Name Name of the provider Provider Description Brief details of the provider Provider Domain The domain name used by a provider for SSO authentication.
For example, if the provider belongs to a company ABC and has the email ID john.doe@abcmail.com , then “abcmail” becomes the domain name. This needs to be unique for each provider.
Contact SPOC Name Name of a person from the provider who is aligned with the HCL for support. Contact SPOC Email Email ID of a person from the provider who is aligned with the HCL for support. Provider Contact Details Name Name of the primary provider. Email Email address of the primary provider. Contact Number Contact number of the primary provider. Notes Any additional information you want to add for the primary provider. Provider Secondary Contact Details Name Name of the secondary provider. Email Email address of the secondary provider. Contact Number Contact number of the secondary provider. Notes Any additional information you want to add for the secondary provider. No. of Production Tenants Number of BigFix AEX instances a provider can create. No. of Sandbox Tenants Number of sandbox tenants a provider can create. License Expiry Date Tenant’s license expiry date for a provider. Billing Template Billing template to be applied to generate invoices. Remember:A provider can create up to 100 production tenants in an environment. - To create a provider, click Submit.
Simultaneously, the super admin must complete the SSO setup so that the new provider can login. Else, access will remain granted, but new SPOCs will not be able to sign in.
The new provider is listed in the provider’s list, as shown in the figure Managing Provider.
Search/ Sort Providers
- Type the keyword for your search in the Search field visible on top of the providers list, as shown in the figure -Managing Provider.
- The users/groups matching the search criteria are displayed.
- Click
.png) next to a column
heading to sort the provider’s parameters under each column in alphabetical order.
next to a column
heading to sort the provider’s parameters under each column in alphabetical order.
Managing SSO
This section describes how to create a provider record in the environment and manage the provider's identity and integration with Single Sign On (SSO).
- On the Providers screen, click
 . It redirects you to the Register SSO screen.
Figure 3. Register SSO 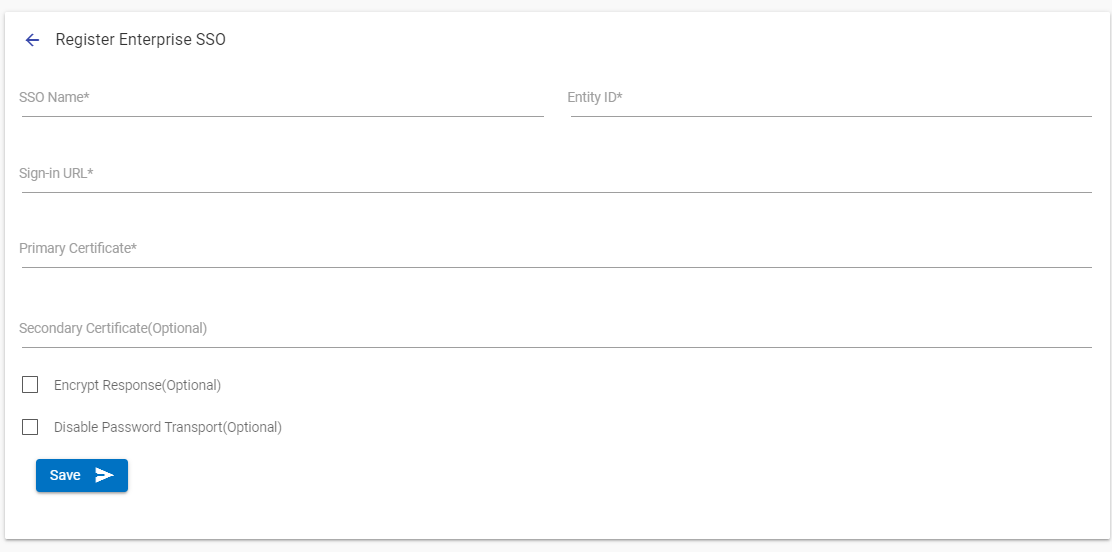
- In the Register SSO section, specify the following information:
Table 2. Manage SSO Field Description SSO Name The name you assign to your SAML configuration. Entity ID The globally unique name for an SAML identity provider. Sign-In URL The URL that the user is redirected to for authentication. It is hosted by your SAML identity provider. Primary Certificate The certificate that is issued by your SAML identity provider. It is used for signing and validating SAML assertions. All providers are different, but you might download the signing certificate from your identity provider. The certificate must be in pem format. Secondary Certificate (Optional) The backup certificate that is issued by your SAML identity provider. It is used if signature validation fails with the primary certificate.
If the signing key remains the same, App ID does not block authentication for expired certificates.
Encrypt Response (Optional) This will perform additional encryption over the SAML request on the SP side. This is optional, and a certificate of the encryption can be found in the SP metadata that can be downloaded after the submission of the form. Disable Password Transport (Optional) This feature disables the recognition authentication class on Password Transport. - To configure SSO with an instance, click Submit.
Editing Provider
To edit a provider,
- On the Providers screen, click Edit (
.png) ) icon.
The below screen shows the details of the selected provider:
) icon.
The below screen shows the details of the selected provider: Figure 4. Editing Provider 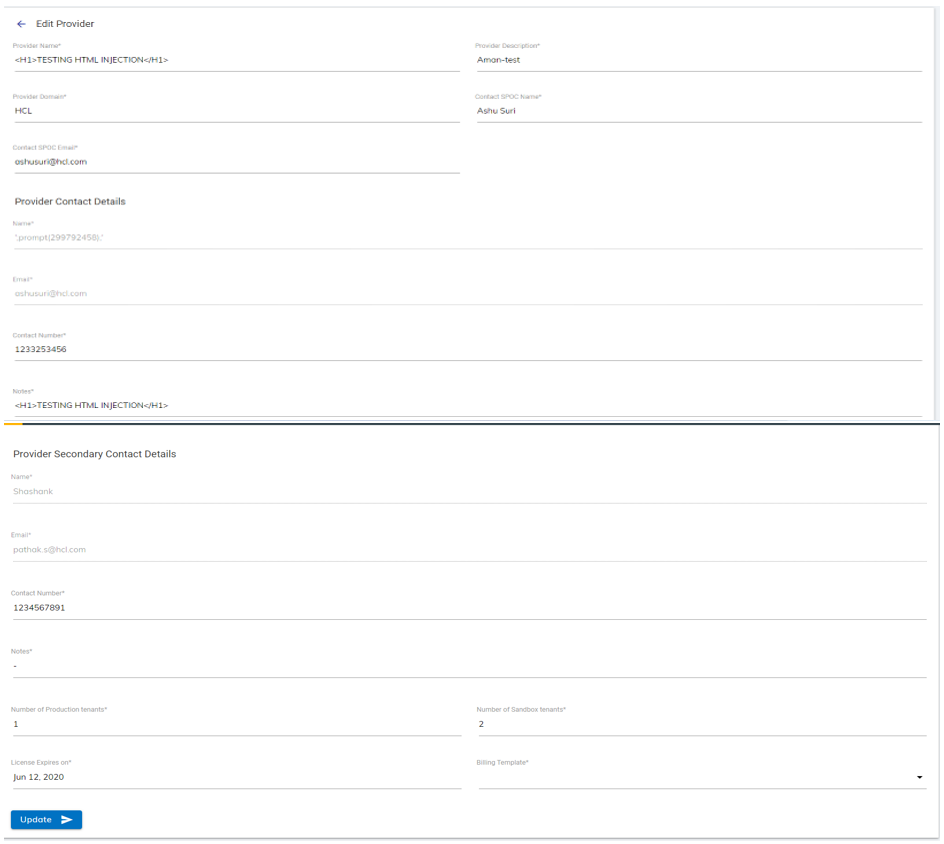
- Update the changes and click Update to commit the changes.
Managing Users
This section describes how a super admin can create a new Super Admin and delete an existing super admin or a provider SPOC.
User Consoles rendition changes as per the access level of the user. For example, a super user can only add another super user and can delete other users. A provider SPOC can only view, add, or delete other provider SPOCs under the same provider.
To manage a super admin,
- In the left navigation bar, click Users. The User’s screen is displayed in the
following figure.
Figure 5. Managing Users 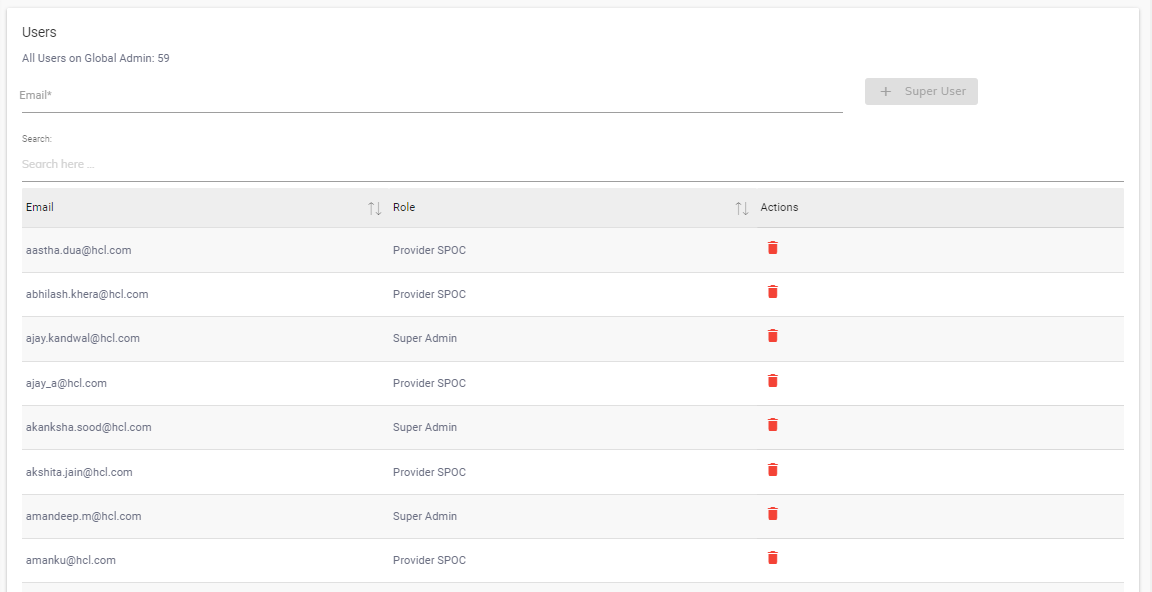
- The screen includes the list of existing super admin and provider SPOCs and a
 button to create a super admin.
 - Listed below are the details of the columns displayed in the figure – Managing Users.
- Email ID: Email ID of the users
- Roles: Role assigned to a user
- Action: Delete the user
Adding Super Admin
To add a super admin,
- On the Users screen, enter the email address of the super admin to be created in
the Email field.
Figure 6. Adding Super Admin 
- Click
.png) .
.
A confirmation mail is sent to the super admin’s email ID. After the confirmation of the email, a new super admin is added to the User list, as shown in the figure – Managing Users.
Search/Sort Super Admin/Provider SPOC
Use the Search field to scale down your search for a super admin or provider SPOC as shown in the figure – Managing Users.
- Type the keyword for your search in the Search field on top of the users list, as shown in the figure – Managing Users.
- The user matching the search criteria is displayed.
- Click
.png) next to a column
heading to sort the user’s parameters under each column in alphabetical order.
next to a column
heading to sort the user’s parameters under each column in alphabetical order.
Delete Super Admin/Provider SPOC
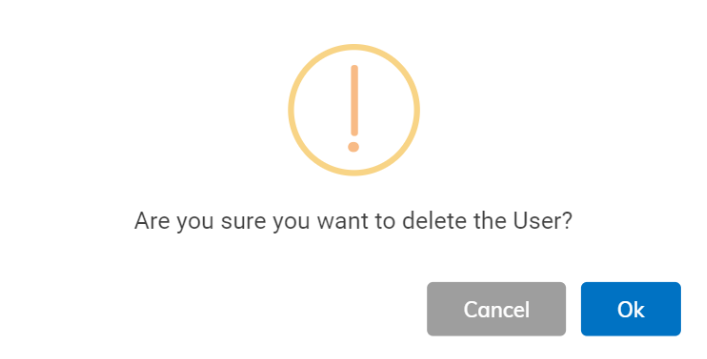
- On the User screen, click Delete (
.png) ) icon next to the user you want to delete.
) icon next to the user you want to delete. - When prompted to confirm that you want to delete the selected user, click YES.
Figure 7. Deleting Super Admin/ Provider SPOC