
Managing Real-time Segments
This topic explains how to create, manage, and publish real-time segments in the Marketing Automation Platform. It covers segment creation workflows, status definitions, rule configuration, editing, duplication, archiving, and integration with external systems.
Segments allow marketers to target specific groups of users based on defined criteria, automate campaigns and analyze performance. A real-time segment allows you to target users based on their immediate, ongoing behavior and historical data.
When creating or updating a real-time segment, particularly one that incorporates data from other data sources, the system initiates a background workflow involving data processing, synchronization, and activation. This topic describes the segment statuses you will see in the UI and outlines the workflow from creation to activation.
The status updates provide visibility into the background processes, such as event creation in Detect, synchronization of data between Athena and MongoDB, and final activation via the Core API. During certain "in progress" statuses, user ability to edit the segment is temporarily restricted.
Real-time segment statuses
The following table describes the statuses you will see in the UI and the background processes they represent:
| Status | Description |
|---|---|
| Draft | The initial state when a segment is created or moved back for editing. This state is required before any modifications to segment filters or conditions can be made. |
| Published | The segment is live and enabled. In this state, direct editing is restricted; the user must first select "Redraft" to make changes. |
| Publishing | Specifically used for Real-Time Segmentation (RTS) during the activation/enablement process. |
| Failed Publish | The segment failed to transition to a live state after a "Publish" action was initiated. |
| Failed Draft | A new status specifically for RTS when technical processes like data sync or preparation fail during the drafting phase. |
| In Progress | A technical UI state used during RTS for backend processes like "Data Preparation" or "Data Sync". |
| Archive | Segment is stored and not actively used. While Segment Central uses "Retire," CDP will retain "Archive" as it allows for an "Unarchive" action, which "Retire" doesn't support. |
Create a Real-time Segment
To create a real-time segment, follow the steps below:
- In the HCL CDP Landing page, on the left pane, click Segments.
OR
In the Unica Platform Landing page, on the left pane, click Central > Segment Central > Realtime Segment. - On the Segments page, click + Create and select Real-Time Segment option to create a new segment.
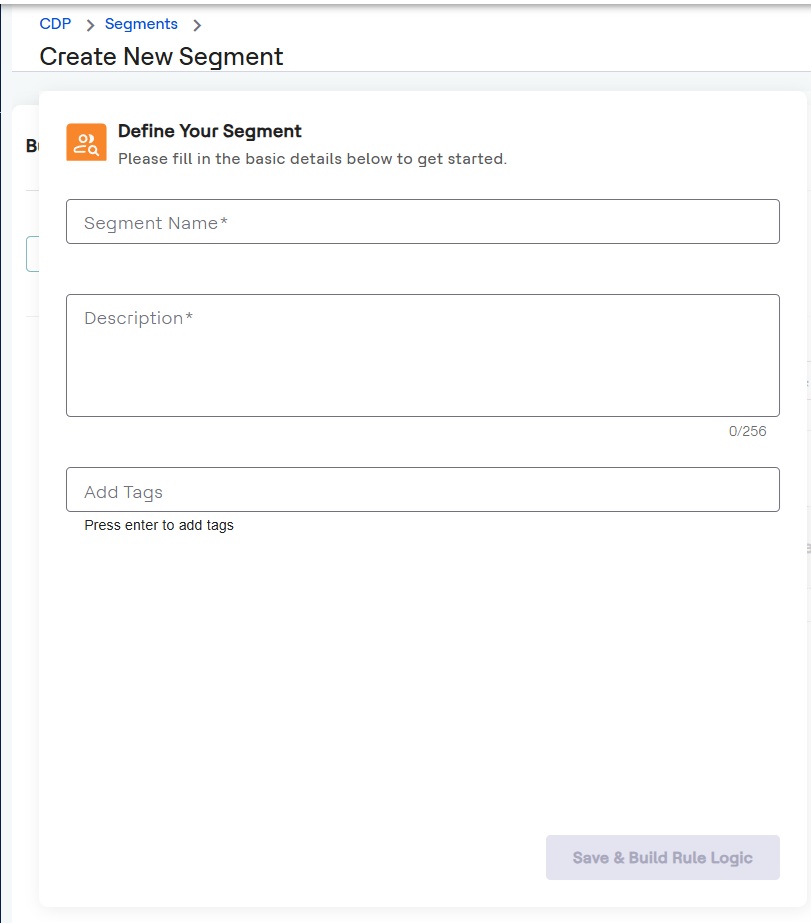
- In the Create New Segment screen, enter the following segment details:
- Segment Name: Enter a unique name with atleast 6 characters and above.
- Description: Provide a brief description (at least 6 characters).
- Tags: Add descriptive keywords to organize and analyze the segment. You can add multiple tags to a segment. For more information about adding tags, refer Add a Tag.
- Click Save & Build Rule Logic.
- In the Build the Segment Logic Rules section, define your audience:
- By default, the first parent group is created with the Customer Event data source.
- To add a different data source, click + Customer Insights Group.
Data sources include Demographics, Transactions, Behaviour, and
Conversions.Note: You can't delete the default first parent group.
- Add conditions to the group based on the selected data source:
- Customer Demographics: Define conditions based on attributes like City, Country, or profile information. To know more, refer Define Segment Logic.
- Customer Events: Define conditions using properties from user actions. Choose between Multi-Event Flow or Action & Inaction Event Flow.
- In the Operator drop-down list, select appropriate available option. For more information about data type and operators, refer Data Types and Operators.
- Set the logical relationship for your conditions:
- AND: Includes only users who meet all conditions in the group.
- OR: Includes users who meet at least one condition in the group.
- To create complex logic, use the following options:
- Add Condition: Click to add another rule to the current group.
- Add Group: Click to create a nested group.
- Exclude Users: To exclude users based on specific criteria,
create a group and set its logic to
NOT. For example, a group with the ruleChannel = 'WhatsApp'can be used to exclude all users who interacted via WhatsApp.Remember:- Ensure that the exclude condition is placed at the end of a group or subgroup.
- An exclude condition should be between two groups.
- In a subgroup, if you want to exclude records, the exclude condition must be the last one in that subgroup.
- Avoid placing exclude conditions between more than two parallel groups as it leads to an invalid scenario.
- An "or" condition can be applied to children within an exclude group.
- To manage complex segment views, use the following features:
- Move: Drag and drop a rule or group using the grip dots
icon to reorder it or move it to a different parent group. All
conditions and values within the group will be moved to the new
group.Note: You can't move any group to the main parent group.
- Clone: Hold the
Ctrlkey and drag the grip dots icon of a group to create a duplicate of that group and all its conditions. - Collapse: Click the collapse (-) icon on a group to hide its details and see a summary of its logic.
- Move: Drag and drop a rule or group using the grip dots
icon to reorder it or move it to a different parent group. All
conditions and values within the group will be moved to the new
group.
- After applying or changing conditions, click the Refresh Count button to
view the updated Segment Audience count.Note: A segment count of zero may indicate that the conditions are logically contradictory (e.g.,
Age > 30ANDAge < 20). Review your conditions to correct any contradictions. - Manage your conditions using the UI controls:
- Move: Drag and drop a rule or group using the grip dots icon to reorder it.
- Clone: Hold Ctrl and drag the grip dots icon to duplicate a group.
- Collapse: Click the minus (-) icon to hide its detail configuration, and display a summary of the group's logic in textual format. For example, a collapsed group using CustomerEvents will show the specific event name, time window, and aggregation criteria in a single line.
- Click Save Segment to save the Segment.
Define Segment Logic
You can define targeting conditions in the Build the segment logic section by selecting a data source. The available data sources are Customer Demographics and Customer Events. The options and configuration steps vary depending on the data source you choose.
To define conditions to the real-time segment, follow the steps below:
- Customer Demographics: Allows you define conditions based on demographic attributes such as city, country, and other profile information.
- Customer Events: Allows you define conditions using properties from user events, such as actions or behaviors.
- Behaviour: Allows you to define conditions based on ongoing user patterns and engagement levels over time
- Conversations: Allows you to define conditions based on user interactions across communication channels, such as chat or support logs.
- Transactions: Allows you to define conditions based on purchase history, order values, and specific transactional behaviors.
To define conditions using Customer Demographics
- In the Data Source drop-down, select Customer Demographics.
- In the Dimension drop-down list, choose a dimension such as Country,
City, or other profile attributes.
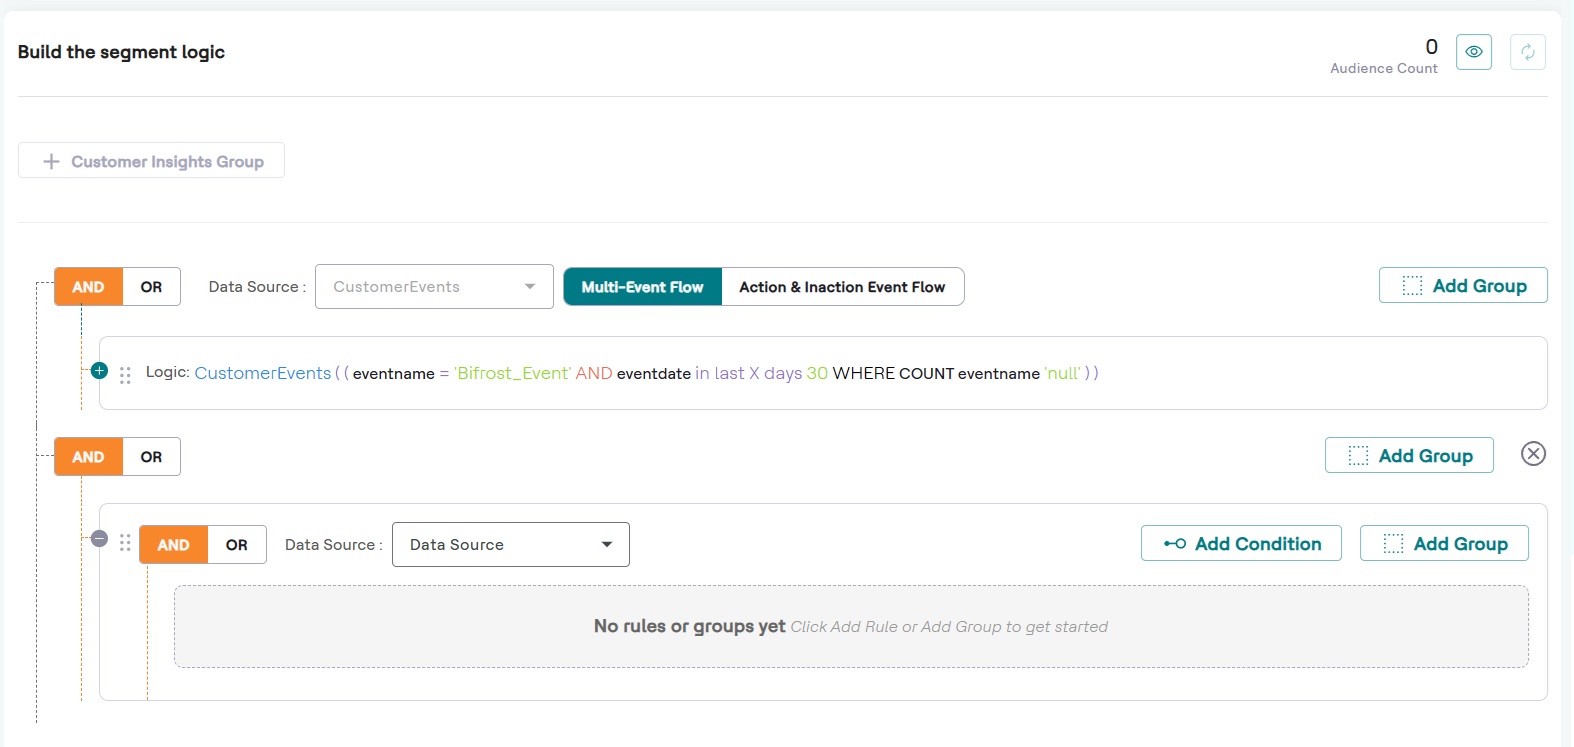
- Select an operator (for example, equals to, contains, etc.).
- Enter the dimension value like Chennai.
To define conditions using Customer Events
- In the Data Source drop-down, select Customer Events.
- Choose one of the following event flow types:
- MULTI-EVENT FLOW
- ACTION & INACTION EVENT FLOW
- In the Events drop-down list, select an event, and in the in last
x days field, set a time window (for example, in the last 7
days).
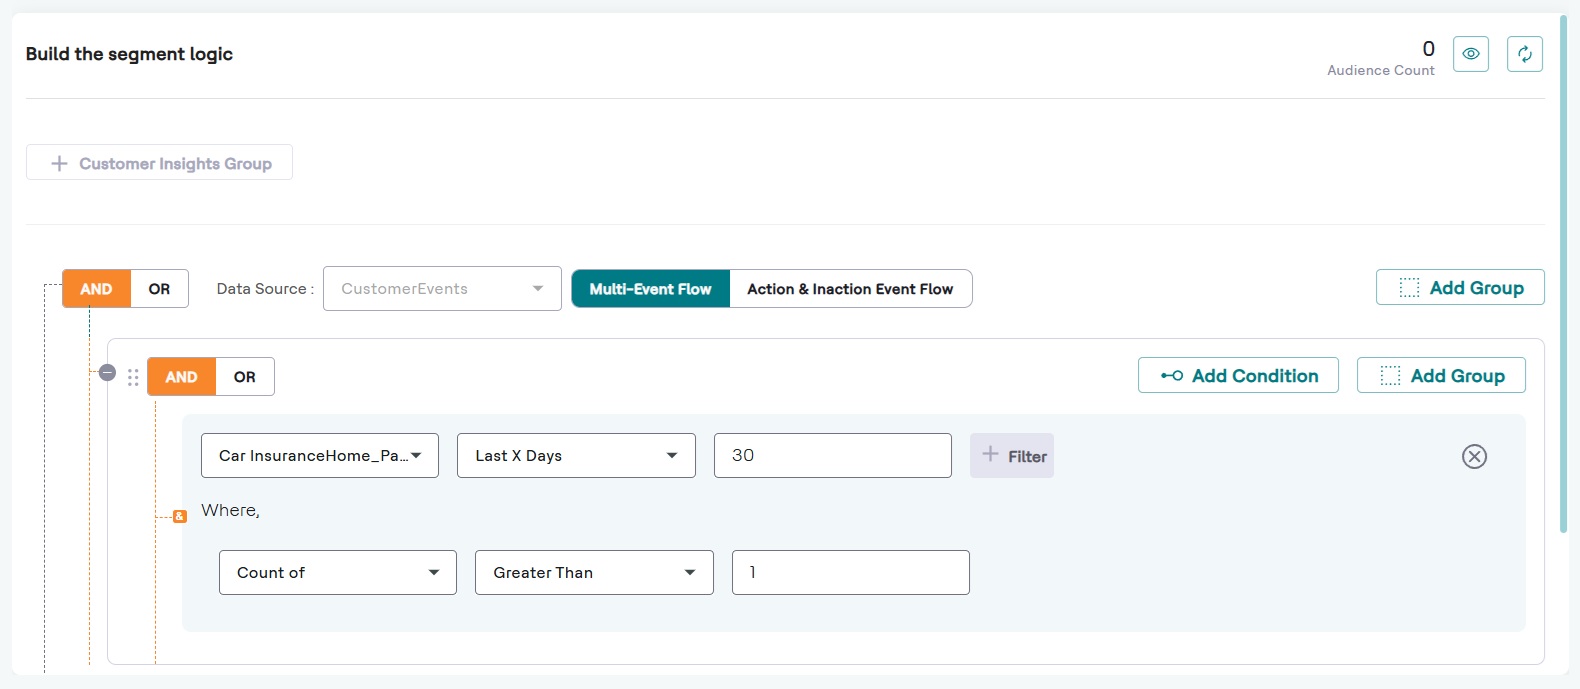
- Click + Filter By to add event properties, and in the Where section, aggregate the event properties.
- Click Add Group and Add Condition to add multiple groups and conditions using the above steps.
- From the As soon as user does drop-down, select an
event.
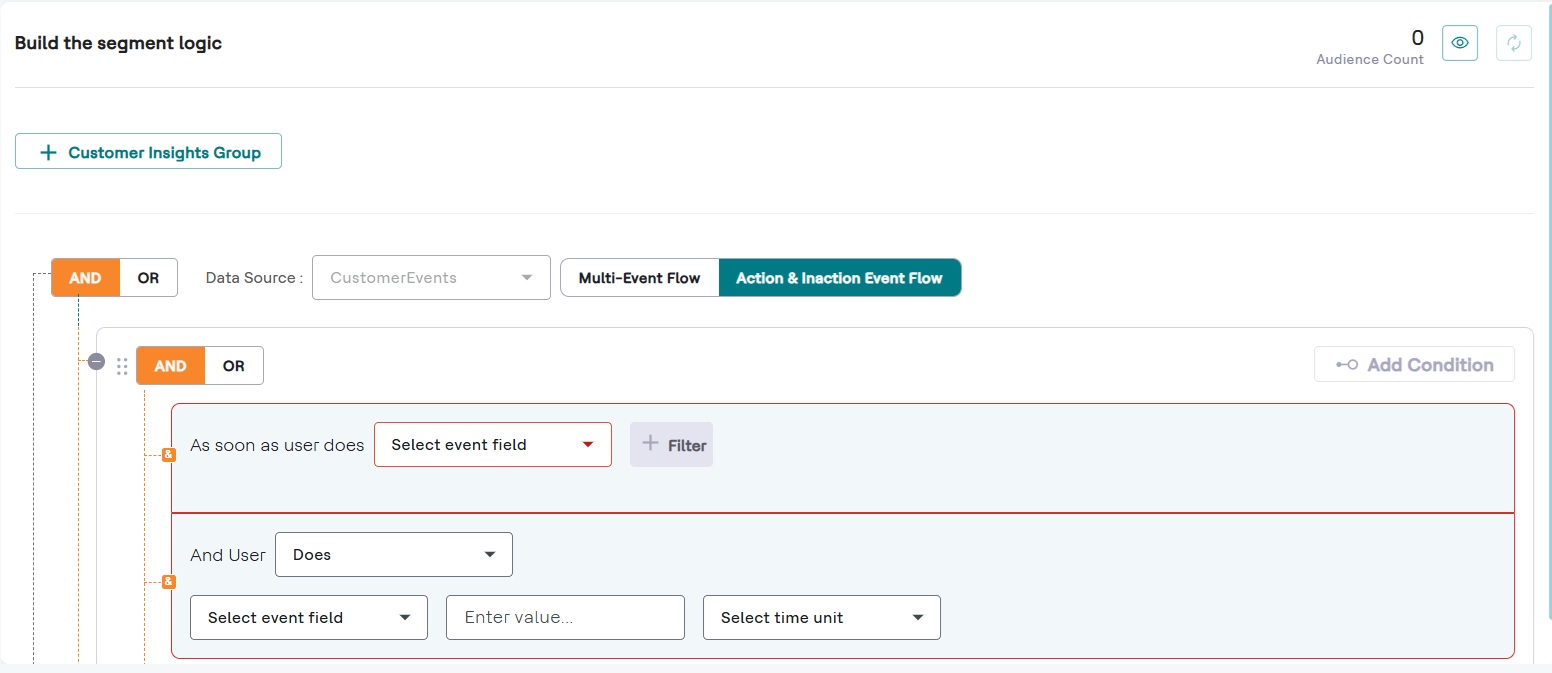
- Click + Filter to apply event property filters to narrow down the event.
- In the And User section, choose either Does or Does Not option.
- Select another event that falls under this category, and set a time duration with units. For example, 2 days).
Edit a Real-time Segment
To edit the real-time segment and make changes to it, follow the steps below:
- In the HCL CDP Landing page, on the left pane, click Segments.
OR
In the Unica Platform Landing page, on the left pane, click Central > Segment Central > Realtime Segment. - On the Segments page, click the name of the segment, and click View Segment
Details.Note: Only segments in draft state can be edited.
- To edit the published segment, click Actions > Re-Draft, and click Rule Builder.
- To edit the segments in draft state, click Rule Builder.Note: Only segments in draft state can be edited.
- Click the edit icon next to audience count, to start the editing, and implement changes to the Segment.
- Click Save & Publish to apply the changes made.
- The published Segment will be listed in the Segments page.
Add a Tag
You can add multiple tags to a segment in the HCL CDP Marketing Automation platform to categorize and organize it effectively. These tags can be edited for existing segments as well.
To add a tag, in the Tags drop-down, enter the tag name and click Add tag name.