Registering a new OAuth client
Each application or website seeking to use a Domino OIDC provider for authentication must be registered as an OAuth client in idpcat.nsf.
This requirement corresponds to configuring the IdP side of a SAML partnership. One Domino OIDC provider can be configured to provide authentication services to any number of applications, including third party applications that support OIDC as well as HCL applications like Nomad and Verse, and Domino web server features like Web login with OIDC and Web federated login with OIDC.
All of the fields in the Basic section of the Registered OAuth Client form are mandatory. The first three fields in the Advanced section are used to configure OIDC Relying Party-Initiated Logout and OIDC Back-Channel Logout, collectively and colloquially referred to as "Single Logout." The rest of the fields in the Advanced section can be safely left with their default values, unless an application has specific requirements.
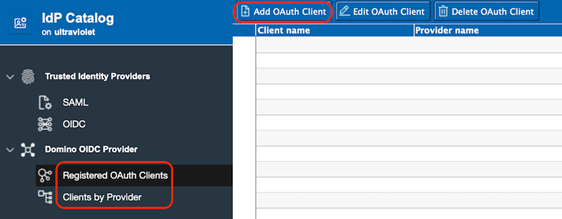
- Open the IdP Catalog application (idpcat.nsf)
- Click the Registered OAuth Clients tab or the
Clients by Provider tab in the navigation, and then
click the Add OAuth Client button in the header.
- Click the button beside the Domino OIDC provider field
and select the host name of the OIDC Provider that you just created.
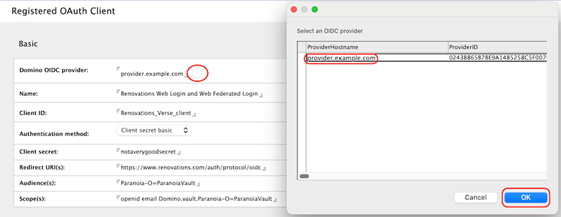
- Enter a user friendly (display) name for this client.
- Enter the OAuth client_id for this application. The client_id is required and is limited to alphanumeric characters, plus "-" dash, "." dot, and "_" underscore. The Domino OIDC provider supports client_ids up to 255 characters long.
- Client secret field:
- The Client secret basic option is the most widely supported authentication method. The Client secret basic and Client secret post options use password-equivalent values. For client_secret_basic and client_secret_post the client_secret is limited alphanumeric characters, plus "-" dash, "." dot, and "_" underscore. The Domino OIDC provider supports client secrets up to 255 characters long.
- The Private key JWT option uses a PEM or JWK-encoded public key.
Note: The numbering in the screenshot's callouts corresponds to the steps in this procedure.
- Enter one or more allowed redirect URIs. For Domino's Web login with OIDC, this will consist of the base server URL (for example, https://www.renovations.com) plus the path component "/auth/protocol/oidc" as shown in the screenshot. Starting in 14.5.1, this field also supports dynamic ephemeral ports when using the loopback device per RFC 8252 sections 7.3 and 8.3 to better support mobile and native clients. For example, a configured loopback redirect URI in the pattern of "http://127.0.0.1/my/redirect/uri" will match against any dynamic port "http://127.0.0.1:{port}/my/redirect/uri". Note that the OAuth client must send the full redirect URI, including the port in the redirect_uri parameter, and that the registered redirect URI must begin with "http://127.0.0.1/". Per the RFC, neither "https" nor "localhost" will be accepted with dynamic ports.
- Enter one or more allowed audience values. These will be application-specific. Applications requesting access tokens for use against Domino HTTP should include the Domino HTTP server's base URL (https://apps.renovations.com) in this list. When configuring Web federated login with OIDC, the first audience must be the ID vault server's Org name plus "-O=" plus the name of the ID vault. For example, with a vault server named ultraviolet/Paranoia and a vault named ParanoiaVault, the first audience value should be Paranoia-O=ParanoiaVault. See the doc for Web Federated Login with OIDC for more information on how to configure that feature.
- Enter one or more scope values. Unlike the other lists, this list must be
separated by spaces. The "openid" scope is required for OIDC login, such as
Domino's Web Login with OIDC feature. For Web Federated Login with OIDC, this
list must include a specially constructed scope starting with "Domino.vault."
and followed by the vault audience from step 8 above. For example, with a vault
server named ultraviolet/Paranoia and a vault named ParanoiaVault, the list of
scopes must include Domino.vault.Paranoia-O=ParanoiaVault. See Enabling federated login with OIDC for more
information on how to configure that feature. Note: The next three steps are used to configure Single Logout and Back-channel logout if supported by this client application.
- Configure one or more URLs to which this OAuth client is allowed to redirect web browsers after logout from the end_session endpoint.
- Configure a single URI to which back-channel logout requests should be sent for this OAuth client.
- Configure a trusted certificate for the above back-channel logout endpoint.Note: The rest of these steps are optional and might not be needed in all environments.
-
- The Require user consent field defaults to No for administrative consent, which is typical of a corporate environment. For external-facing applications where end users might want to approve or reject individual client applications themselves, set this value to Yes.
- If user consent is required, the Custom consent text field can be used to override the default text presented to the end user.
- Configure the JWS signing algorithms used for:
- Access tokens
- ID tokens
If an old OAuth client cannot verify the tokens issued by the Domino OIDC provider, setting one or both of these values to RS256 might work around that limitation.
- PKCE is a critical component of the security of OAuth and OIDC and is required by default. We highly recommend against making PKCE optional.
- Some authenticating proxies do not generate or use tokens of their own, but are capable of introspecting tokens passing through them to block unauthenticated traffic. These proxies can be configured as a registered OAuth client with Introspection only set to Yes in order to limit their access to the introspection endpoint.
- The lifetimes or durations of tokens issued by the Domino OIDC provider can be configured in the Maximum session lifetime field. Current security best practices call for using short-lived (5-15 minutes) access tokens. The maximum session lifetime setting configures the maximum amount of time that a client can remain authenticated before needing to acquire a new authorization grant. Setting this value to 0 allows unlimited duration sessions.
- Configure CORS allowed web origins for this OAuth client.
- By default, the Domino OIDC provider's logout endpoint requires end-user
verification of logout if a valid id_token_hint was not received, and does not
require end-user verification if a valid id_token_hint was received. This
drop-down can be used to require end-user verification even if a valid
id_token_hint was received.Note: The following step is required for everyone.
- Save and close the document.