Converting Category Landing page into Page Composer-enabled page
In the Page Composer-enabled pages introduced in HCL Commerce
Version 9.1.7.0., the layouts and the widgets used within them can be managed through the
.The following topic describes the steps to convert a Category page into Page
Composer-enabled page.
Procedure
- Create a layout for the category-landing-page identifier under the path src/components/commerce-layouts with the name category-landing-page.tsx.
-
This layout should ideally reference the withLayout
higher-order component invoked with a component that references two widgets in
the layout.
This layout can be similar to the following code snippet:
/*
 *==================================================
 * Licensed Materials - Property of HCL Technologies
 *
 * HCL Commerce
 *
 * (C) Copyright HCL Technologies Limited 2020,2021
 *
 *==================================================
 */
//UI
import { CategoryLandingPageLayout } from "@hcl-commerce-store-sdk/react-component";
//Foundation
import { withLayout } from "../../_foundation/hooks/use-layout";

export default withLayout(CategoryLandingPageLayout);
Similarly, the CategoryLandingPageLayout component can be similar to the following code snippet./* *================================================== * Licensed Materials - Property of HCL Technologies * * HCL Commerce * * (C) Copyright HCL Technologies Limited 2021 * *================================================== */ //Standard libraries import React from "react"; //UI import { StyledGrid, StyledContainer } from "../../elements"; //types import { PageLayoutProps } from "../.."; /** * Category Landing Page Layout * @description Two rows layout. * @param cid Unique identifier for this component. * @param slots All the slots containing commerce widgets in this layout. */ export const CategoryLandingPageLayout: React.FC<PageLayoutProps> = ({ cid, slots = [], ...props }) => { const SlotOne = () => { return ( <> {slots["1"] && ( <StyledGrid container> <StyledGrid item xs={12}> {slots["1"].map((e: any) => { const CurrentComponent = e.CurrentComponent; return <CurrentComponent key={e.key} />; })} </StyledGrid> </StyledGrid> )} </> ); }; const SlotTwo = () => { return ( <> {slots["2"] && ( <StyledGrid container> {slots["2"].map((e: any) => { const CurrentComponent = e.CurrentComponent; return ( <StyledGrid item key={e.key} xs={12}> <CurrentComponent /> </StyledGrid> ); })} </StyledGrid> )} </> ); }; return ( <StyledContainer id={cid}> {slots["1"] ? <SlotOne /> : null} {slots["2"] ? <SlotTwo /> : null} </StyledContainer> ); }; -
Refer to the PLWIDGETDEF table of HCL Commerce as shown
in below image.
 Note: Here, pure widgets are identified with WIDGETTYPE value as 1, whereas containers are identified with WIDGETTYPE value as 2
 - Create two widgets that are to be referenced in the newly created layout and place them under the path src/components/commerce-widgets with the names e-marketing-spot-widget.tsx and child-category-grid-widget.tsx. These names correspond to the IDENTIFIER column of the PLWIDGETDEF table with .tsx suffix.
-
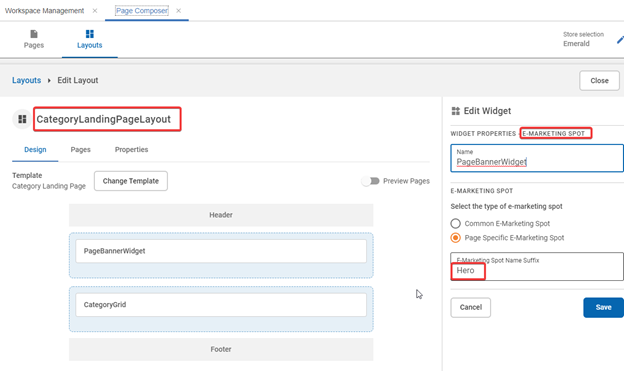
Create a layout for Category Landing Page in CMC and assign
the two widget types in both the layout slots as shown in the image below.
 Note: The above image depicts the assignment of the E-marketing Spot widget to the Category Landing Page layout using Suffix-based page-specific e-marketing.Note: In the absence of any valid layouts, default layouts are used. These are provided in version 9170 under the src/configs/default-layout folder. Their naming (without the file extension) matches the IDENTIFIER column of the PLWIDGETDEF table.