Defining the storefront assets for a site-level widget
In this lesson, you use an existing store JSP file as a model to define the storefront
assets for a new Commerce Composer widget. You use the existing store page JSP file to define the
data provider, UI provider, and top-level JSP file for your new site-level widget.
About this task
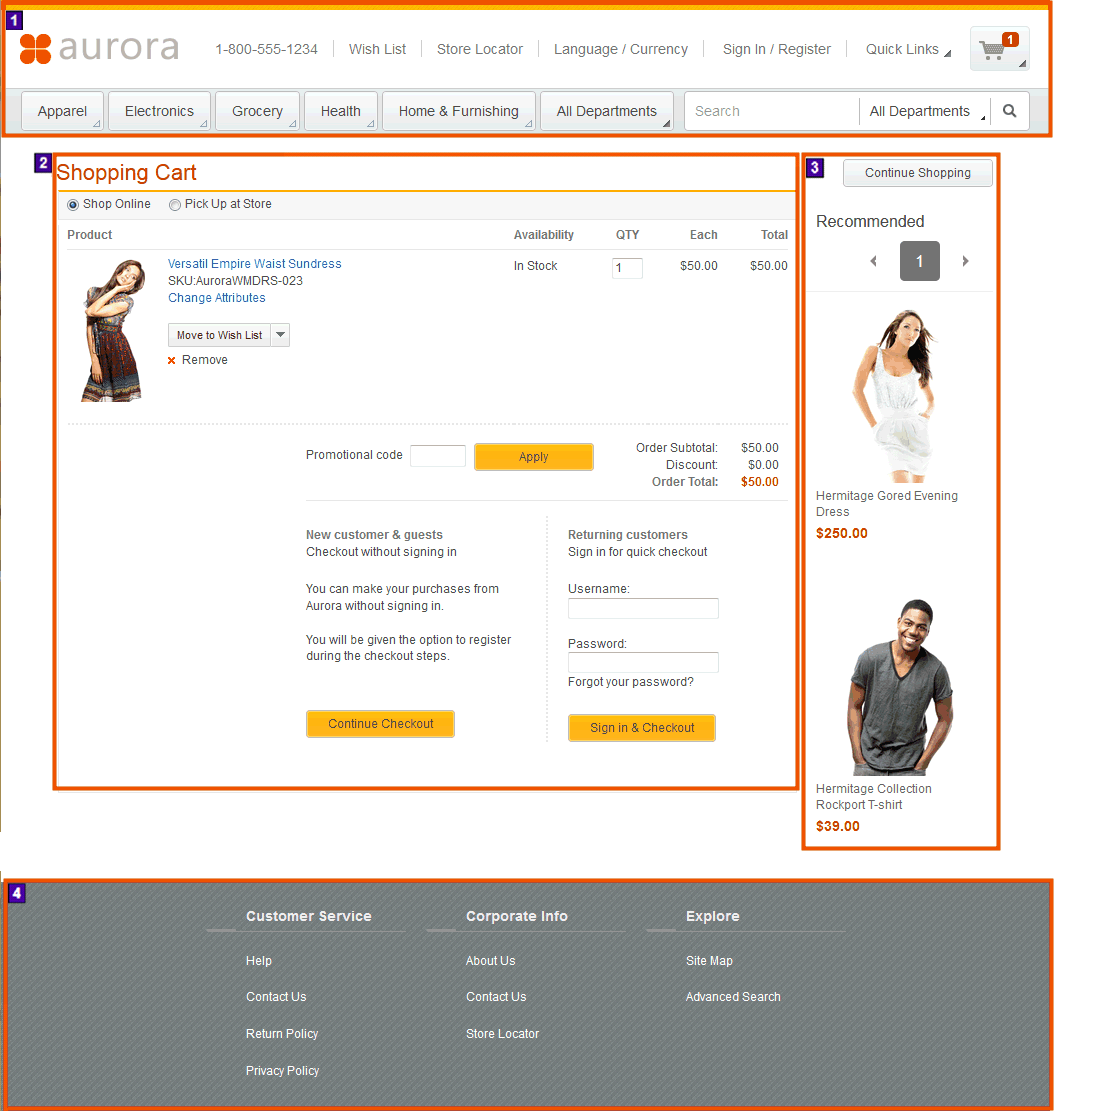
As an example, this tutorial uses the Aurora starter store Shopping Cart
page JSP file as the model for defining the storefront assets. To view the existing
Shopping Cart page, open the Aurora starter store in a web browser. Add a
product to your Shopping Cart, and go to your cart to view the
Shopping Cart page. Your Shopping Cart page can resemble
the following image.
The page is composed of four sections:
1 - Header section of the page
2 - Shopping Cart body, which includes list of
products within the cart, order calculation, checkout option
3 - Catalog entry recommendations
4 - Footer section of the page
By default, WebSphere Commerce provides site-level widgets to retrieve and display the
content for the header, footer, and catalog entry recommendations sections. To use the Commerce
Composer tool to compose the Shopping Cart page, you must create a widget that
retrieves and displays the data for the body of the Shopping Cart page.
Using your web browser, view the source for the Shopping Cart page and
review the code. The Shopping Cart details section of the Shopping Cart page,
which displays the order items, is defined by the ShopCartDisplay.jsp file. The
ShopCartDisplay.jsp JSP file is imported by the
OrderItemDisplay.jsp file, which is the JSP file for the full
Shopping Cart page. The OrderItemDisplay.jsp file imports
the ShopCartDisplay.jsp file with the following
code:
The
ShopCartDisplay.jsp file is located within the
workspace_dir\Stores\WebContent\AuroraStorefrontAssetStore\ShoppingArea\ShopcartSection
directory. You must create a site level widget for the Shopping Cart page by
converting the existing ShopCartDisplay.jsp file.
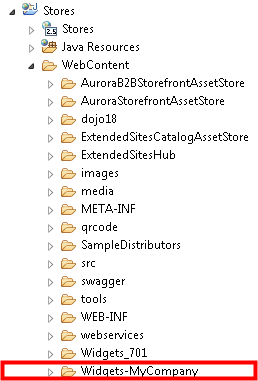
Copy the generated source code files for your widget storefront assets from your project folder
to the appropriate location within the default Stores project.
Open WebSphere Commerce Developer and switch to the Enterprise
Explorer view.
Expand your new project directory, go to Stores\WebContent.
Right-click the Widgets-MyCompany directory. Select to
Copy the directory.
Go to the default Stores\WebContent directory.
Paste the copied Widgets-MyCompany directory within the default
WebContent directory.
Your file structure can resemble the file structure within the following image:
Update the generated code to define the data provider for your new widget. Use the
ShopCartDisplay.jsp file to identify the data-related code for your
widget.
A data provider handles the data retrieval aspects for your widget. The provider is used to
fetch the data that is required for use in the widget. Each widget can have only one data provider.
Each data provider is modeled as an independent JSPF file. For this tutorial, the data provider for
your widget must fetch the order detail data for use in the Aurora starter store.
Go to the
Stores\WebContent\AuroraStorefrontAssetStore\ShoppingArea\ShopcartSection
directory.
Open the ShopCartDisplay.jsp file for editing and review the code within
the file to identify the data-related code for your widget. Copy the data-related code.
Go to the
Stores\WebContent\Widgets-MyCompany\com.mycompany.commerce.store.widgets.ShoppingCartDetail
directory.
Open the ShoppingCartDetail_Data.jspf file for editing.
Add the data-related code that you copied into your
ShoppingCartDetail_Data.jspf file.
For example, to create the widget for this tutorial, copy the following code into your
ShoppingCartDetail_Data.jspf file. This code is modeled after the code within
the ShopCartDisplay.jsp file and defines the data retrieval for the body of the
Shopping Cart
page.
<!-- Get order Details using the ORDER SOI -->
<c:set var="pageSize" value="${WCParam.pageSize}" />
<c:if test="${empty pageSize}">
	<c:set var="pageSize" value="${maxOrderItemsPerPage}"/>
</c:if>

<c:set var="beginIndex" value="${WCParam.beginIndex}" />
<c:if test="${empty beginIndex}">
	<c:set var="beginIndex" value="0" />
</c:if>

<fmt:formatNumber var="currentPage" value="${(beginIndex/pageSize)+1}"/>
<fmt:parseNumber var="currentPage" value="${currentPage}" integerOnly="true"/>

<c:if test="${CommandContext.user.userId != '-1002'}">
  <flow:ifEnabled feature="BOPIS">
    <c:set var="order" value="${requestScope.orderInCart}"/>
    <c:set var="shippingInfo" value="${requestScope.shippingInfo}"/>
    <c:if test="${empty order || order == null}">
      <wcf:rest var="order" url="store/{storeId}/cart/@self" scope="request">
        <wcf:var name="storeId" value="${WCParam.storeId}" encode="true"/>
        <wcf:param name="pageSize" value="${pageSize}"/>
        <wcf:param name="pageNumber" value="${currentPage}"/>
        <wcf:param name="sortOrderItemBy" value="orderItemID"/>
      </wcf:rest>
    </c:if>
    <c:if test="${empty shippingInfo || shippingInfo == null}">
      <c:set var="shippingInfo" value="${order}" scope="request"/>
    </c:if>
  </flow:ifEnabled>
</c:if>

<c:if test="${CommandContext.user.userId != '-1002' && empty order}">
  <%-- When BOPIS is not enabled, this block gets executed. --%>
  <%-- This service is mainly to check if order is empty or not --%>
  <wcf:rest var="order" url="store/{storeId}/cart/@self" scope="request">
    <wcf:var name="storeId" value="${WCParam.storeId}" encode="true"/>
    <wcf:param name="sortOrderItemBy" value="orderItemID"/>
    <wcf:param name="pageSize" value="${pageSize}"/>
    <wcf:param name="pageNumber" value="${currentPage}"/>
    <wcf:param name="sortOrderItemBy" value="orderItemID"/>
  </wcf:rest>
</c:if>

<c:if test="${CommandContext.user.userId != '-1002'}">
  <c:if test="${empty order.orderItem && beginIndex >= pageSize}">
    <fmt:parseNumber var="recordSetTotal" value="${ShowVerbCart.recordSetTotal}" integerOnly="true" />
    <fmt:formatNumber var="totalPages" value="${(recordSetTotal/pageSize)}" maxFractionDigits="0"/>
    <c:if test="${recordSetTotal%pageSize < (pageSize/2)}">
      <fmt:formatNumber var="totalPages" value="${(recordSetTotal+(pageSize/2)-1)/pageSize}" maxFractionDigits="0"/>
    </c:if>
    <fmt:parseNumber var="totalPages" value="${totalPages}" integerOnly="true"/>
    <c:set var="beginIndex" value="${(totalPages-1)*pageSize}" />
    <wcf:rest var="order" url="store/{storeId}/cart/@self" scope="request">
      <wcf:var name="storeId" value="${WCParam.storeId}" encode="true"/>
      <wcf:param name="sortOrderItemBy" value="orderItemID"/>
      <wcf:param name="pageSize" value="${pageSize}"/>
      <wcf:param name="pageNumber" value="${currentPage}"/>
      <wcf:param name="sortOrderItemBy" value="orderItemID"/>
    </wcf:rest>
  </c:if>
</c:if>
<wcf:url var="currentShoppingCartLink" value="ShopCartPageView" type="Ajax">
  <wcf:param name="storeId"   value="${WCParam.storeId}"  />
  <wcf:param name="catalogId" value="${WCParam.catalogId}"/>
  <wcf:param name="langId" value="${WCParam.langId}" />
</wcf:url>

<c:set var="numberOfOrderItems" value="0" />
<c:set var="numEntries" value="0" />

<c:if test="${!empty order.orderItem}">
  <c:forEach var="orderItem" items="${order.orderItem}" varStatus="status">
    <c:set var="numberOfOrderItems" value="${numberOfOrderItems + orderItem.quantity}"/>
  </c:forEach>
  <fmt:formatNumber value="${numberOfOrderItems}" var="numberOfOrderItems"/>
  <fmt:parseNumber var="numEntries" value="${order.recordSetTotal}" integerOnly="true" />
</c:if>
<script type="text/javascript">
  dojo.addOnLoad(
    function(){
      CommonControllersDeclarationJS.setControllerURL('ShopCartPaginationDisplayController','<c:out value="${currentShoppingCartLink}"/>');
      ShipmodeSelectionExtJS.setOrderItemId('${order.orderItem[0].orderItemId}');

      var numberOfOrderItems = "0";
      if ("${numberOfOrderItems}" != "") {
        numberOfOrderItems = "${numberOfOrderItems}";
      }
      var numberOfOrderItemsDisplayedInMSC = "0";
      if (document.getElementById("minishopcart_total") != null) {
        numberOfOrderItemsDisplayedInMSC = document.getElementById("minishopcart_total").innerHTML.trim();
      }

      // check if number of order items and matches the number showed on mini-shop cart, if not match, refresh mini-shop cart
      if ((numberOfOrderItems != numberOfOrderItemsDisplayedInMSC) || (${numEntries} > ${pageSize})) {
        //var param = [];
        //param.deleteCartCookie = true;
        if (dijit.byId("MiniShoppingCart") != null) {
          //dijit.byId("MiniShoppingCart").refresh(param);
          setDeleteCartCookie();
          loadMiniCart("<c:out value='${CommandContext.currency}'/>","<c:out value='${langId}'/>")
        }
      }
    }
  );
</script>
<c:set var="showTax" value="false"/>
<c:set var="showShipping" value="false"/>
<c:choose>
  <c:when test="${empty param.orderId}">
    <c:choose>
      <c:when test="${!empty WCParam.orderId}">
        <c:set var="orderId" value="${WCParam.noElementToDisplay}" />
      </c:when>
    </c:choose>
  </c:when>
  <c:otherwise>
    <c:set var="orderId" value="${param.orderId}" />
  </c:otherwise>
</c:choose>

<jsp:useBean id="itemDetailsInThisOrder" class="java.util.HashMap" scope="request"/>
Save and close the file.
Update the generated code to define the User Interface (UI) provider for your new widget. Use
the ShopCartDisplay.jsp file to identify the UI rendering-related code for your
widget.
The UI provider for a widget defines how the data that the widget retrieves renders within the
storefront. A widget can be rendered in multiple ways and can support multiple UI providers. The UI
provider handles the sizing and positioning aspects for the data within the widget.
As an example, your new widget separates the shopping_cart_product_table_tall
div code division into separate rendering styles. The division is separated into UI
providers for when a shopper selects to Shop Online or Pick up at
store. The UI providers define how to render the corresponding functions for the
Shopping Cart page and the list of order items. The UI providers define that
the list of order items is to render as a flat view with pagination support.
Go to the
Stores\WebContent\AuroraStorefrontAssetStore\ShoppingArea\ShopcartSection
directory.
Open the ShopCartDisplay.jsp file for editing and review the code within
the files. Identify the UI rendering code for the Shopping Cart page and copy
this code.
Go to the
Stores\WebContent\Widgets-MyCompany\com.mycompany.commerce.store.widgets.ShoppingCartDetail
directory.
Open the ShoppingCartDetail_UI.jspf file for editing.
Add the code that you copied from the ShopCartDisplay.jsp file into your
ShoppingCartDetail_UI.jspf file. This code defines the UI rendering style for
the body of the Shopping Cart page.
Save the file. Keep the file open. You must edit the file again in later steps.
Optional: If IBM Customer Service for WebSphere Commerce is enabled for your store, add the code to support the solution
with your Shopping Cart widget.
Go to the
Stores\WebContent\AuroraStorefrontAssetStore\ShoppingArea\ShopcartSection
directory.
Copy the following files.
ShopCartOnBehalfOfLock.jsp
ShopCartOnBehalfOfLock_Data.jspf
ShopCartOnBehalfOfLock_UI.jspf
Go to the
Stores\WebContent\Widgets-MyCompany\com.mycompany.commerce.store.widgets.ShoppingCartDetail
directory. Add the copied files into this directory.
Update the generated code to define the top-level entry point JSP for your new widget.
This JSP file is started when your widget is imported on a store page. When a layout that
includes your widget is assigned to a store page, this top-level JSP file is used to call the
functions of your widget.
Go to the
Stores\WebContent\Widgets-MyCompany\com.mycompany.commerce.store.widgets.ShoppingCartDetail
directory.
Open the ShoppingCartDetail.jsp file for editing.
The code that is generated by the JET Transformation defines how to create this entry point
JSP file. Review the generated code to learn how a top-level entry point JSP file for a widget is
constructed. The generated file resembles the following code:
<%-- BEGIN ShoppingCartDetail.jsp --%>

<%@include file="/widgetdir/Common/EnvironmentSetup.jspf"%>
<fmt:setBundle basename="/Widgets-MyCompany/Properties/mywidgettext" var="mywidgettext" />
<c:set var="widgetPreviewText" value="${mywidgettext}"/>
<c:set var="emptyWidget" value="false"/>

<%@include file="ShoppingCartDetail_Data.jspf"%>
<%@ include file="/widgetdir/Common/StorePreviewShowInfo_Start.jspf" %>
<%@ include file="ShoppingCartDetail_UI.jspf"%>
<%@ include file="/widgetdir/Common/StorePreviewShowInfo_End.jspf" %>

<%-- END ShoppingCartDetail.jsp --%>
Close the file.
Create a common directory to contain the common JSP and JSPF that your widget must use.
Go to the Stores\WebContent\Widgets-MyCompany\Common directory.
Right-click the Common directory. Select New > Folder. Name your new folder ShoppingCart. Click
Finish.
Go to the
Stores\WebContent\AuroraStorefrontAssetStore\ShoppingArea\ShopcartSection
directory.
Open the ShopCartDisplay.jsp file for editing and identify all of the JSP
and JSPF files that are referenced within the ShopCartDisplay.jsp file. The
files are referenced with either an include or an import statement.
As an example, the EmptyShopCartDisplay.jspf and
OrderItemDetail.JSP files are referenced with the following include and import
statements:
<%@ include file="../../Snippets/ReusableObjects/EmptyShopCartDisplay.jspf"%>

<c:import url="/${sdb.jspStoreDir}/Snippets/Order/Cart/OrderItemDetail.jsp">
Locate all of the referenced JSP and JSPF files in the ShopCartDisplay.jsp
within your workspace file structure. Copy all of the files. If the files that you copy include or
import extra files, locate and copy the additional files.
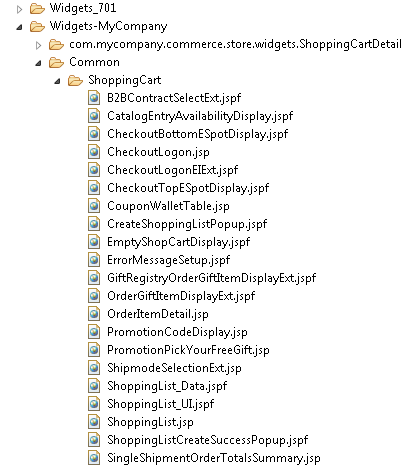
Paste all of the referenced JSP and JSPF files into the
Stores\WebContent\Widgets-MyCompany\Common\ShoppingCart directory. Copying the
files into this directory, adds the files to the site-level so that your widget can use these files.
Some of the files that you located might exist at the site-level
Stores\WebContent\widgetdir\Common directory. If the files
are located within the Stores\WebContent\widgetdir\Common
directory, do not copy your located files into
Stores\WebContent\Widgets-MyCompany\Common\ShoppingCart directory.
Your Stores\WebContent\Widgets-MyCompany\Common\ShoppingCart
directory can resemble the following directory structure:
By default the
Stores\WebContent\widgetdir\Common includes the
EnvironmentSetup.jspf file, which your widget files must be updated to
reference.
In your ShoppingCartDetail_UI.jspf file, update the file to point to the
new filepaths for the files that you copied into the Common/ShoppingCart
directory.
For example, to update the references to the EmptyShopCartDisplay.jspf
and OrderItemDetail.jsp files, change the include and import statements from
the following
statements:
<%@ include file="../../Snippets/ReusableObjects/EmptyShopCartDisplay.jspf"%>

<c:import url="/${sdb.jspStoreDir}/Snippets/Order/Cart/OrderItemDetail.jsp">
To
be the following include and import
statements:
<%@ include file="../Common/ShoppingCart/EmptyShopCartDisplay.jspf"%>

<c:import url="/Widgets-MyCompany/Common/ShoppingCart/OrderItemDetail.jsp"></c:import>
Open all of the JSP and JSPF files that you copied into the
Stores\WebContent\Widgets-MyCompany\Common\ShoppingCart directory for
editing.
Update all of the files to point to the new filepaths for your copied files and for the common
files that are within the Stores\WebContent\widgetdir\Common
directory structure.
For example, to update the file path to the EnvironmentSetup.jspf
within the Stores\WebContent\widgetdir\Common directory in
the copied OrderItemDetails.jsp file, change the following
code
<%@ include file="../../../Common/EnvironmentSetup.jspf"%>
to be the
following
code
<%@ include file="/widgetdir/Common/EnvironmentSetup.jspf"%>
Note: The
EnvironmentSetup.jspf file includes the following tags. Since this file
includes the tags, copied common files only need to include the
EnvironmentSetup.jspf file, and not the individual tags. If a file that you
copied includes the following tags and the EnvironmentSetup.jspf file, you can
remove the following
tags:
You
can review the sample code that is provided in the compressed file that you previously downloaded
and extracted for this tutorial. Use the provided sample code to help you update the reference paths
for your common files.
Copy the images that are required by your custom widget into the images
directory within the Widgets-MyCompany directory.
Go to the
Stores\WebContent\Widgets-MyCompany\com.mycompany.commerce.store.widgets.ShoppingCartDetail
directory.
Open the ShoppingCartDetail_UI.jspf file to view the source code.
Search for the string img within the file to identify the referenced images
within this file.
Go to the Stores\WebContent\Widgets-MyCompany\Common\ShoppingCart
directory.
Open all of the files within this directory to view the source code. Search for the string
img within all of the files to identify all of the referenced images for your
widget.
Locate all of the referenced images within your workspace file structure. Copy all of the
files.
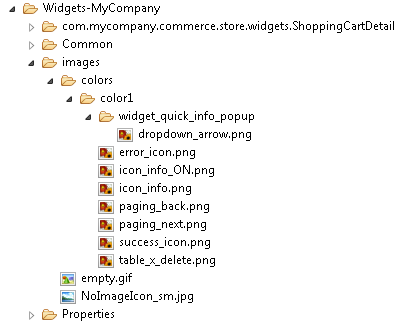
Paste all of the referenced images into the
Stores\WebContent\Widgets-MyCompany\images directory. Including the images
within this directory, adds the images to the site-level so that your widget and the widget common
files can use these images.
Your Stores\WebContent\Widgets-MyCompany\images directory can
resemble the following directory structure:
Go to the
Stores\WebContent\Widgets-MyCompany\com.mycompany.commerce.store.widgets.ShoppingCartDetail
directory.
Open the ShoppingCartDetail_UI.jspf file for editing.
Update the UI provider JSPF file to point to the new filepaths for the images that you copied
into the Widgets-MyCompany/images directory.
For example, to update the references to the info.png images, change
the following
statement:
Update all of the files within the Widgets-MyCompany\Common\ShoppingCart
directory that include references to images to reference the new filepaths to these images.
You can review the sample code that is provided in the compressed file that you previously
downloaded and extracted for this tutorial. Use the provided sample code to help you update the
filepaths for the images within your common files.
Define the translatable text that is to display in the storefront for your widget. Since the
code for the existing JSP and JSPF files for the Shopping Cart page is stored
at the store level, you must copy the text to site-level. The original code for the translatable
text that is used by the files is located within the Stores\Java
Resources\src\AuroraStorefrontAssetStore\storetext_v2.properties file when you are
working in the WebSphere Commerce Developer Enterprise Explorer view.
Go to the
Stores\WebContent\Widgets-MyCompany\com.mycompany.commerce.store.widgets.ShoppingCartDetail
directory.
Open the ShoppingCartDetail_UI.jspf file to view the source code.
Search for all instances of the string message in the file.
The translatable text properties are defined with the format
<fmt:message key="text_property_key"/>
Record the value of the
text_property_key for all message keys.
For example, if the message key is the following
statement:
<fmt:message key="WHAT_IS_REC_ORDER"/>
Record the value
WHAT_IS_REC_ORDER.
Open all of the JSP and JSPF files that you added to the
Stores\WebContent\Widgets-MyCompany\Common\ShoppingCart directory to view the
source code in the files. Search for the string message key in the files and record
the value for the text_property_key within all files.
Go to the Stores\Java Resources\src\Aurora directory.
Open the storetext_v2.properties file for editing.
Search for the text_property_key values that you recorded. Copy the line of
code that defines the translatable text for all of the values that you recorded.
For example, if the properties line for the text_property_key is
WHAT_IS_REC_ORDER, the translatable text property definition is
WHAT_IS_REC_ORDER = What is a recurring order?
Go to the Stores\WebContent\Widgets-MyCompany\Properties directory.
Open the mywidgettext_en_US.properties and
mywidgettext.properties files for editing.
Paste the copied translatable text property definitions into the files.
Note: This tutorial creates translatable text for English language properties files. You can
populate properties files with translatable text for multiple languages. For more information about
the languages that are supported by WebSphere Commerce, see Supporting globalization.
In the ShoppingCartDetail.jsp file, the generated code points to the
site-level mywidgettext resource bundle. Update the
ShoppingCartDetail_UI.jspf file and all of the JSP and JSPF files that you
found the string message key within to point to the text in the
mywidgettext resource bundle.
In the files, search for the message strings. Update the value for the message
key to specify the resource bundle. For example,
In all of the JSP and JSPF files that you found the string message within, add
the following code to each file to predefine the resource bundle name and variable at site level:
You can review the sample code that is provided in the compressed file that you previously
downloaded and extracted for this tutorial. Use the provided sample code to help you update the
message statements within your common files.
After you update the ShoppingCartDetail_UI.jspf file with all of
your changes, your file can resemble the following
code:
<c:if test="${!empty order.orderId && userType ne 'G'}" >
  <%-- Lock / Unlock order is of no use for Guest Orders.
       CSR cannot unlock cart and hand it over back to guest users --%>
  <%@ include file="ShopCartOnBehalfOfLock_Data.jspf"%>
  <%@ include file="ShopCartOnBehalfOfLock_UI.jspf"%>
</c:if>

<div id="box" class="shopping_cart_box">
  <div class="myaccount_header bottom_line" id="shopping_cart_product_table_tall">

    <%-- Split the shopping_cart_product_table_tall div in order to move the online
         and pick up in store choice and maintain function --%>
    <c:choose>
      <c:when test="${!empty order.orderItem }" >
        <%out.flush();%>
        <c:import url="/Widgets-MyCompany/Common/ShoppingCart/ShipmodeSelectionExt.jsp"/>
        <%out.flush();%>
  </div>

        <div class="body" id="WC_ShopCartDisplay_div_5">
          <input type="hidden" id="OrderFirstItemId" value="${order.orderItem[0].orderItemId}"/>
          <flow:ifEnabled feature="RecurringOrders">
            <%-- Moved to here from ShipmodeSelectionExt.jsp in order to move
                 shipping selection into the header --%>
            <c:set var="cookieKey1" value="WC_recurringOrder_${order.orderId}"/>
            <c:set var="currentOrderIsRecurringOrder" value="${cookie[cookieKey1].value}"/>
            <div id="scheduling_options" style="display: block;">
              <span id="recurringOrderAcceText" style="display:none">
                <fmt:message bundle="${mywidgettext}" key="WHAT_IS_REC_ORDER"/>
                <fmt:message bundle="${mywidgettext}" key="REC_ORDER_POPUP_DESCRIPTION"/>
              </span>
              <form name="RecurringOrderForm">
                <input name="recurringOrder" id="recurringOrder" class="radio" type="checkbox"
                  <c:if test="${currentOrderIsRecurringOrder == 'true'}">checked="checked"</c:if>
                  onclick="javascript:ShipmodeSelectionExtJS.hideShowNonRecurringOrderMsg(<c:out
                  value="${order.orderId}" />)" >
                <label for="recurringOrder"><fmt:message bundle="${mywidgettext}"
                  key="RECURRING_ORDER_SELECT"/></label>
                <span class="more_info_icon verticalAlign_middle"
                  id="recurringOrderInfo"
                  tabindex="0"
                  onmouseover="javascript: this.title = '';"
                  onmouseout="javascript: this.title = document.getElementById('recurringOrderAcceText').innerHTML;"
                  title="<fmt:message bundle="${mywidgettext}" key='WHAT_IS_REC_ORDER'/><fmt:message
                    bundle="${mywidgettext}" key='REC_ORDER_POPUP_DESCRIPTION'/>"
                  >
                  <img class="info_on" src="<c:out
                   value='${env_imageContextPath}/Widgets-MyCompany/images/colors/color1/icon_info_ON.png'/>" alt=""/>
                  <img class="info_off" src="<c:out
                   value='${env_imageContextPath}/Widgets-MyCompany/images/colors/color1/icon_info.png'/>" alt=""/>
                </span>

                <div id="recurringOrderInfoPopUp" dojoType="wc.widget.Tooltip" connectId="recurringOrderInfo"
                  class="recurring_orderdesc_popup_main_div">
                  <div id="recurringOrderInfoPopUp_div1" class="widget_site_popup">
                    <div class="top">
                      <div class="left_border"></div>
                      <div class="middle"></div>
                      <div class="right_border"></div>
                    </div>
                    <div class="clear_float"></div>
                    <div class="middle">
                      <div class="content_left_border">
                        <div class="content_right_border">
                          <div class="content">
                            <div class="header" id="recurringOrderInfoPopUp_div4">
                            <span id="recurringOrderInfoPopUp_title">
                              <fmt:message bundle="${mywidgettext}" key="WHAT_IS_REC_ORDER"/>
                            </span>
                            <div class="clear_float"></div>
                          </div>
                          <div class="body" id="recurringOrderInfoPopUp_div7">
                            <fmt:message bundle="${mywidgettext}" key="REC_ORDER_POPUP_DESCRIPTION"/>
                          </div>
                          <div class="clear_float" id="recurringOrderInfoPopUp_div8"></div>
                        </div>
                      </div>
                    </div>
                  </div>
                  <div class="clear_float"></div>
                  <div class="bottom">
                    <div class="left_border"></div>
                    <div class="middle"></div>
                    <div class="right_border"></div>
                  </div>
                  <div class="clear_float"></div>
                </div>
              </div>
            </form>
          </div>
        </flow:ifEnabled>
        <span id="ShopCartPagingDisplay_ACCE_Label" class="spanacce"><fmt:message bundle="${mywidgettext}"
          key="ACCE_Region_Order_Item_List"/></span>
        <div dojoType="wc.widget.RefreshArea" widgetId="ShopCartPagingDisplay" id="ShopCartPagingDisplay"
          controllerId="ShopCartPaginationDisplayController" ariaMessage="<fmt:message bundle="${mywidgettext}"
          key="ACCE_Status_Order_Item_List_Updated"/>" ariaLiveId="${ariaMessageNode}" role="region"
          aria-labelledby="ShopCartPagingDisplay_ACCE_Label">
          <%out.flush();%>
          <c:import url="/Widgets-MyCompany/Common/ShoppingCart/OrderItemDetail.jsp">
            <c:param name="catalogId" value="${WCParam.catalogId}" />
            <c:param name="langId" value="${WCParam.langId}" />
            <c:param name="storeId" value="${WCParam.storeId}" />
          </c:import>
          <%out.flush();%>
        </div>
        <div class="free_gifts_block">
          <%out.flush();%>
          <c:import url="/Widgets-MyCompany/Common/ShoppingCart/PromotionPickYourFreeGift.jsp"/>
          <%out.flush();%>
        </div>
        <%out.flush();%>
        <c:import url="/Widgets-MyCompany/Common/ShoppingCart/SingleShipmentOrderTotalsSummary.jsp">
          <c:param name="returnView" value="AjaxOrderItemDisplayView"/>
          <c:param name="fromPage" value="shoppingCartDisplay"/>
        </c:import>
        <%out.flush();%>
        <br clear="all" />
        <%out.flush();%>

        <c:import url="/Widgets-MyCompany/Common/ShoppingCart/CheckoutLogon.jsp"/>
        <%out.flush();%>
      </div>
    </c:when>
    <c:otherwise>
  </div>
      <div class="body" id="WC_ShopCartDisplay_div_6">
        <%@ include file="../Common/ShoppingCart/EmptyShopCartDisplay.jspf"%>
      </div>
    </c:otherwise>
  </c:choose>
  <div class="footer" id="WC_ShopCartDisplay_div_7">
    <div class="left_corner" id="WC_ShopCartDisplay_div_8"></div>
    <div class="left" id="WC_ShopCartDisplay_div_9"></div>
    <div class="right_corner" id="WC_ShopCartDisplay_div_10"></div>
  </div>
</div>
After you copy the translatable text for your widget into the
mywidgettext_en_US.properties and mywidgettext.properties,
the contents of your properties files can resemble the following code:
Note: Some of the values for
the property keys are split over multiple lines for readability. Within your file, ensure that the
values are not split over multiple lines.
# Recurring order popup on shop cart
RECURRING_ORDER_SELECT = Schedule this order as a recurring order
RECURRING_ORDER_INFO = recurring order information icon
WHAT_IS_REC_ORDER = What is a recurring order?
REC_ORDER_POPUP_DESCRIPTION = A recurring order allows you to schedule repeat orders automatically instead of re-ordering
    the same item over and over again. For example, instead of logging on to re-order milk every time you run out, simply
    set up a recurring order so that milk is delivered to your home every week, or any time period between orders suits
    you best. <br/>Selecting the check box turns your entire shopping cart into a recurring order. On the next page,
    you can select when the order starts and how often it repeats.

ACCE_Region_Order_Item_List=Order Item List
ACCE_Status_Order_Item_List_Updated=Order Item List Updated

# CheckoutLogon.jsp
SHOPCART_TEXT3 = Returning customers
SHOPCART_TEXT4 = Sign in for quick checkout
SHOPCART_USERNAME = Username:
SHOPCART_PASSWORD = Password:
SHOPCART_FORGOT = Forgot your password?
SHOPCART_NEW_CUSTOMER = New customer & guests
SHOPCART_CHECKOUT_WITHOUT_SIGNING = Checkout without signing in
SHOPCART_TEXT1 = You can make your purchases from Aurora without signing in.
SHOPCART_TEXT2 = You will be given the option to register during the checkout steps.
SHOPCART_SIGNIN = Sign in & Checkout
SHOPCART_CONTINUE = Continue Checkout
SHOPCART_CHECKOUT = Checkout
QUICKCHECKOUT = Quick Checkout
SHOPCART_UPDATE = Update

# EmptyShopCartDisplay.jspf
CART_EMPTY = Your shopping cart is empty. If you see something you would like to add to your shopping cart when shopping,
    click Add to shopping cart.
CART_EMPTY_IMAGE = empty shopping cart image

#Shipping/Billing Page Order Item Details
MOVE_TO_WISH_LIST=Move to Wish List
CHANGE_ATTRIBUTES = Change Attributes
REMOVE=Remove
CATEGORY_RESULTS_DISPLAYING = Displaying products {0} - {1} of {2}
CATEGORY_RESULTS_PAGES = {0} of {1}
CATEGORY_PAGING_LEFT_IMAGE = Go to previous page
CATEGORY_PAGING_RIGHT_IMAGE = Go to next page
CATEGORY_IMAGE_VIEW = grid view
CATEGORY_DETAILED_VIEW = list view
CATEGORY_PAGING_FIRST_IMAGE = Go to first page
CATEGORY_PAGING_LAST_IMAGE = Go to last page
FF_VIEWICONS = View Icons
FF_VIEWDETAILS = View Details
CATEGORY_RESULTS_PAGES_DISPLAYING = {0} - {1}

# OrderItemDetailSummary, OrderItemDetail.jsp
SHOPCART_TABLE_SUMMARY=This table contains details about your current order. It contains product details, availability,
    quantity, unit price and total price of each item in the current order. You can change quantity or remove the item
    from current order by navigating through this table.
SHOPCART_HAS_NON_RECURRING_PRODUCTS = One or more items in your shopping cart can't be included in a recurring order.
    To continue, either remove any such items or check out normally without selecting the recurring order option.
SHOPCART_TABLE_CONFIRM_SUMMARY=This table contains details about your current order. It contains product details,
    availability, quantity, unit price and total price of each item in the current order.
PRODUCT=Product
AVAILABILITY=Availability
QUANTITY1 = Quantity
QTY=Qty
UNIT_PRICE = Unit Price
EACH=Each
TOTAL_PRICE = Total Price
TOTAL=Total
Checkout_ACCE_for = for
CurrentOrder_SKU = SKU:
CONFIGURATION = Configuration
ITEM_COMPONENT_QUANTITY_NAME = {0} x {1}
Free=Free

SHOPCART_PRODUCT = Product
SHOPCART_AVAILABILITY = Availability
SHOPCART_QTY = QTY
SHOPCART_EACH= Each
SHOPCART_TOTAL = Total
SHOPCART_REMOVE = Remove
SHOPCART_FREEGIFT = Free Gift
CHANGE_CONFIGURATION = Change configuration
OrderSummary_SHOPCART_FREE = Free
Checkout_ACCE_prod_discount = product discount for

# PromotionPickYourFreeGift.jsp
PROMOTION_PICK_FREE_GIFT = Select your free gift
PROMOTION_PICK_FREE_GIFTS = Select your free gifts
PROMOTION_CHANGE_FREE_GIFT = Change your free gift
PROMOTION_CHANGE_FREE_GIFTS = Change your free gifts
PROMOTION_CODE=Promotional code
PROMOTION_DETAILS=Promotion Details
PROMO_NO_DESC=Promotion details not available
PROMOTION_CODE_REMOVE = Remove
PROMOTION_FREE_GIFTS_POPUP_PICK_GIFT = Select your free gift
PROMOTION_FREE_GIFTS_POPUP_PICK_GIFTS = Select your free gifts
PROMOTION_FREE_GIFTS_POPUP_PICK_ONE_GIFT = I would like the following free gift
PROMOTION_FREE_GIFTS_POPUP_PICK_MULTIPLE_GIFTS = I would like the following free gifts (choose up to {0} gifts)
PROMOTION_FREE_GIFTS_POPUP_PICK_NO_GIFTS = I do not want any free gifts
PROMOTION_FREE_GIFTS_POPUP_PICK_NO_GIFT = I do not want the free gift
PROMOTION_FREE_GIFTS_POPUP_NUMBER_OF_SELECTIONS = You have selected {0} free gifts
PROMOTION_FREE_GIFTS_POPUP_NUMBER_OF_SELECTIONS_ONE = You have selected 1 free gift
PROMOTION_FREE_GIFTS_POPUP_ERROR_EXCEED_GIFT_QUANTITY = You have selected more free gifts than this promotion allows
PROMOTION_FREE_GIFTS_PROMOTION_UNAVAILABLE = We're sorry, this promotion is no longer available

Checkout_ACCE_promo_free_gifts_pick = select to view the free gift choices
Checkout_ACCE_promo_free_gifts_apply = apply the free gifts selections to the shopping cart
Checkout_ACCE_promo_free_gifts_cancel = cancel to close the pop-up and not apply any selections to the shopping cart
Checkout_ACCE_promo_code_apply = apply promotional code

# ShippingMethodDetails.jsp
SHIP_MULTIPLE_SHIPMENT_MESSAGE=Click multiple shipments if shipping to more than one address
SHIP_SINGLE_SHIPMENT_MESSAGE=Click single shipment if shipping to one address
SHIP_MULTIPLE_SHIPMENTS=Multiple Shipments
Checkout_ACCE_Multi_Shipping = select to use multiple shipments to ship to more than one address
SHIP_SINGLE_SHIPMENT=Single Shipment
Checkout_ACCE_Single_Shipping = select to use single shipment to ship to one address
SHIP_ADVANCE_SHIP_OPTIONS=Advanced Shipping Options
SHIP_SHIPPING_ADDRESS_CAPS=SHIPPING ADDRESS
SHIP_SHIPPING_METHOD_CAPS=SHIPPING METHOD
SHIP_SHIPPING_INSTRUCTIONS_ADD = Add Shipping Instructions
SHIP_SHIPPING_INSTRUCTIONS_LABEL = Specify additional shipping instructions
SHIP_REQUESTED_DATE_UPPER_CASE = REQUESTED SHIPPING DATE
SHIP_REQUESTED_DATE_ADD = Request Shipping Date
SHIP_REQUESTED_DATE_LABEL=The date format should be month/day/year, therefore m m/d d/y y y y
SHIP_REQUESTED_ERROR=Invalid date. Use mm/dd/yyyy format
SHIP_PICKUP_LOCATION = Store pick up location:
SHIP_ITEM_AVAILABILITY = Show availability
SHIP_INV_STATUS_AVL = In Stock
SHIP_INV_STATUS_BO = Backordered
SHIP_INV_STATUS_UAVL = Out of Stock
SHIP_INV_STATUS_NA = Status Not Available
SHIP_TO_STORE = Pick up in store
SHIP_ONLINE = Shop On-Line
NO_OF_SHIP_OPTIONS = Two radio buttons for selecting the purchase option, first Shop On-Line option and second
    Pick up in store option.
SHIP_EXPEDITE_SHIPPING = Expedite

# ShipmodeSelectionExt.jsp
BOPIS_SHIPMODE_ONLINE = Shop Online
BOPIS_SHIPMODE_STORE = Pick Up at Store

MO_ORDERSUBTOTAL = Order Subtotal:
MO_TAX = Tax:
MO_SHIPPING = Shipping:
MO_SHIPPING_TAX = Shipping Tax:
MO_ORDERTOTAL = Order Total:
MO_BILLINGINFO = Billing Information
MO_PAYMENT = Payment
MO_BILLINGADDR = Billing Address
MO_BILLINGMETHOD = Billing Method
MO_AMOUNT = Amount:

#-------------------------------------------------------------------------
# CSR on-behalf
#-------------------------------------------------------------------------
TAKE_OVER_ORDER = Take Over Lock
TAKE_OVER_ORDER_MESSAGE = This order is locked by another administrator with the logon ID "{0}".
    Click Take Over Lock to take over the order, or click Unlock to unlock the order.
UNLOCK_ORDER = Unlock
UNLOCK_ORDER_MESSAGE = When you are finished making changes, click Check Out,
    or click Unlock to hand over cart back to shopper.
LOCK_ORDER = Lock
LOCK_ORDER_MESSAGE = Lock the order before making any changes to the shopping cart. Click Lock to lock the order.
CURRENTORDER_LOCKED = This order is locked. To unlock the order, contact an administrator from your organization.
ACCE_STATUS_ORDER_LOCK_STATUS_UPDATED = Status of Order lock is updated.
ACCE_ORDER_LOCK_STATUS_CONTENT = Status of Order lock
REGISTERED_CUSTOMER_SEARCH_RESULTS_TABLE_SUMMARY = This table contains a search box to search registered customers.
    It lists the search results with an option to view details about registered customers.
    Included with the results are options like accessing the account, and enabling / disabling the account.
#--------------------------------------------------------------------------
# B2B Sample Code
#--------------------------------------------------------------------------

PRICING_POPUP_LINK = Contract:
PRICING_POPUP_TITLE = Pricing
PRICING_POPUP_PRICE = PRICE
PRICING_POPUP_CONTRACT = CONTRACT
PRICING_POPUP_INVALID_CONTRACT = The contract originally selected is no longer available. Please re-select a contract.
PRICING_TABLE_SUMMARY = This table lists the available contracts and prices for the selected item.
    Shoppers can use this table to specify the contract they want to apply to an order item.
FF_PRICERANGE_TITLE = Price Range

HEADER_SAVED_ORDERS = Saved Orders
BREADCRUMB_SAVED_ORDERS = Saved Orders
CurrentOrder_NO_PRICE_AVAILABLE = No price available.

QuickInfo_Qty = Quantity
SHIPPING_PRICE=Price

# SingleShipmentOrderTotalsSummary.jsp
ORD_ORDER_DISCOUNTS_PRODUCTS=Product Discounts:
ORD_DISCOUNT_ADJUSTMENTS=Discount
ORD_DISCOUNT_DETAILS_TITLE=Order-Level Discount Details
DISCOUNT1 = Discount:
ORD_DISCOUNT_DETAILS_TITLE=Order-Level Discount Details
# CatalogEntryAvailableDisplay.jspf
SHIP_IN_STOCK=In-Stock
SHIP_OUT_OF_STOCK=Out of Stock
SHIP_BACKORDERED=Backordered ({0})

PROMOTION_CODE_EMPTY = Please enter the promotional code
APPLY=Apply
DETAILS = Details

# Dialogs Titles
DIALOG_TITLE_PRODUCT_COMPARE=Product Compare Dialog
DIALOG_TITLE_CREATE_WISHLIST=Create Wish List Dialog
DIALOG_TITLE_EDIT_WISHLIST=Update Wish List Name Dialog
DIALOG_TITLE_DELETE_WISHLIST=Delete Wish List Dialog
DIALOG_TITLE_MESSAGE=Message Dialog
DIALOG_TITLE_LANGUAGE_AND_CURRENCY=Language and Currency Dialog
#-------------------------------------------------------------------------
# Wish List Component
#-------------------------------------------------------------------------
SL_DEFAULT_WISH_LIST_NAME = Wish List
SL_CREATE_NEW_SHOPPING_LIST = Create a new Wish List
SL_NAME_NEW_LIST = Type a name for your new list.
SL_ADD_TO_SHOPPING_LIST = Add to Wish List
SL_MULTIPLE_SHOPPING_LIST_DD = Multiple shopping list drop down. Press enter and tab to display the drop down
SL_SIGN_IN_OR_REGISTER_TO_ACCESS_LIST = Sign In or Register to access your lists.
SL_SIGN_IN_OR_REGISTER = Sign In / Register
SL_ITEM_ADDED_SUCCESSFULLY = This item has been successfully added to your list.
SL_CONTINUE_SHOPPING = Continue Shopping
SL_SELECT_LIST = Select a list to Add to:
SL_CLOSE = Close
SAVE = Save
LIST_CREATED = Wish list created successfully.
CANCEL = Cancel
ACCE_WISHLIST_SELECT = Select a wish list to work on. The wish list section will display the wish list you selected.
# CouponWalletTable.jsp
NO_COUPON_MESSAGE = You currently have no coupons.
COUPON_WALLET_TABLE_SUMMARY=This table contains the coupons in your coupon wallet. From the shopping cart,
    you can add coupons to an order and remove coupons from an order. From the My Coupons section of your My Account page
    you can use this table to remove coupons from your coupon wallet if they have not already been applied to an order.
COUPON_EXPIRATION_DATE = EXPIRATION DATE
COUPON = COUPON
COUPON_APPLIED = Applied
COUPON_WALLET_ACCE_REMOVE = Remove coupon from coupon wallet.
COUPON_WALLET_ACCE_ACTION = Action
REMOVE=Remove
Checkout_ACCE_coupon_order_remove=Remove
Checkout_ACCE_coupon_apply=Apply

WidgetTypeDisplayText_ShoppingCartDetailWidget=Sample ShoppingCartDetail widget
Define or copy the error message prompt text from the store-level to site-level.
Go to the Stores\Java Resources\src\AuroraStorefrontAssetStore
directory.
Copy the storeErrorMessages.properties and
storeErrorMessages_en_US.properties resource bundles.
Go to the Stores\WebContent\Widgets-MyCompany\Properties directory.
Paste the storeErrorMessages.properties and
storeErrorMessages_en_US.properties files within the directory.
Go to the Stores\WebContent\Widgets-MyCompany\Common directory.
Open the ErrorMessageSetup.jspf file for editing.
Update the ErrorMessageSetup.jspf file to point to the new filepath for
the storeErrorMessages.properties and
storeErrorMessages_en_US.properties resource bundles.
Your updated ErrorMessageSetup.jspf file can resemble the following
code:
<fmt:setBundle basename="/Widgets-MyCompany/Properties/mywidgettext" var="mywidgettext"/>

<wcbase:useBean id="storeError" classname="com.ibm.commerce.common.beans.StoreErrorDataBean" scope="page">
  <c:set target="${storeError}" property="resourceBundleName" value="/Widgets-MyCompany/Properties/storeErrorMessages"/>
</wcbase:useBean>

<c:if test="${!empty storeError.key}">
  <c:set var="errorMessage" value="${storeError.message}" scope="request"/>
  <%--
  Special case: if key not found, fall back to ErrorDataBean.getMessage()
  --%>
  <c:if test="${empty errorMessage}">
    <wcbase:useBean id="error" classname="com.ibm.commerce.beans.ErrorDataBean" scope="page"/>
    <c:set var="errorMessage" value="${error.message}"/>
    <c:if test="${empty errorMessage}">
      <c:set var="errorMessage" value="${error.messageKey}" scope="request"/>
    </c:if>
  </c:if>
  <fmt:setBundle basename="/Widgets-MyCompany/Properties/storeErrorMessages" var="storeErrorMessageBundle"/>
</c:if>