Getting started with CarApp Development in Volt MX
When you create a new project or add to an existing project, a new CarApp folder option appears in the Modules section in Iris.
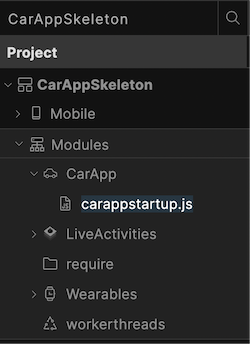
carappstartup.js file
Iris creates carappstartup.js automatically and includes skeleton callbacks for application events. The file is reserved for invocation of the voltmx.auto.setApplicationCallbacks() API. Do not insert any additional logic. In future releases, Iris will allow you to configure application-level events directly, for more flexible and customizable event handling. Keep this file minimal and focused on the API call, for compatibility with future updates.
Currently, to configure the lifecycle events of the CarApplication, you must modify carappstartup.js directly. A future release will support configuration through the Volt Iris user interface.
Here is the content of carappstsrtup.js:
function setCarAppCallbacks() {
  voltmx.auto.setApplicationCallbacks({
    "onCarAppInit": function() {
    },
    "onCarAppDataUpdated": function() {
    },
    "onCarAppForeground": function() {
    },
    "onCarAppBackground": function() {
    },
    "onCarAppTerminate": function() {
    }
  });
}
Configuring CarApp support in Iris
Adding Android Auto support
To add Android Auto support, create a manifest file called automotive_app_desc.xml and add the following snippet to it.
<?xml version="1.0" encoding="utf-8"?>
<automotiveApp>
    <uses name="template"/>
</automotiveApp>
Save the file to the resources/mobile/native/android/xml folder in your project workspace. (Create the folder if it does not already exist.)
Note: Currently, you must add the file manually. In future, Iris will provide a setting to add the file directly.
Add the following snippet to AndroidManifest.xml in the application element.
<meta-data
        android:name="com.google.android.gms.car.application"
        android:resource="@xml/automotive_app_desc" />
<meta-data
        android:name="androidx.car.app.minCarApiLevel"
        android:value="4" />

<service android:name="com.hcl.voltmx.androidauto.VoltMXCarService"
            android:exported="true">
<intent-filter>
        <action android:name="androidx.car.app.CarAppService" />
        <category android:name="androidx.car.app.category.POI" />
      </intent-filter>
</service>
Note the following in the service tag:
- The
<action>element allows host (and launcher) applications to find the app. - The
<category>element declares the app's category, The other possible value is androidx.car.app.category.IOT - The second
<meta-data>element declares the minimum required API level for the host (car) application to support the client. Currently Volt MX supports API level 4 and above.
Note: You must change the category name according to the type of the application.
To add the above content, follow this path in Iris:
Project Settings -> Native -> Android Mobile/Tablet -> Tags -> Child tag entries under <application> tag
Adding Apple CarPlay support
From IRIS, codegen generates isCarAppEnabled in the application.properties file with a value of true, if CarApp support is added.
Note: If CarApp is enabled for an iOS application, existing UIApplicationDelegate extensions won’t work. This is because the CarApp relies on the SceneDelegate lifecycle to manage the application’s state and events. To extend the lifecycle events of UISceneDelegate, you must update your implementation to extend UISceneDelegate and override the appropriate delegate methods.
For more details, please refer to the "Extending UISceneDelegate" section.
Capabilities
Add these capabilities as needed for your application type.
- EV Charging: com.apple.developer.carplay-charging
- Parking: com.apple.developer.carplay-parking
- Quick Food Ordering: com.apple.developer.carplay-quick-ordering
You can add these capabilities to the Flare-iOS project with the voltmx_iris_configuration.json file.
{
  "iOS": {
    "KRelease": {
      "Capabilities": {
        "com.apple.developer.carplay-charging": true
      },
      "BuildSettings": {}
    }
  },
  "Android": {}
}
Creating a CarForm and a Template
In the CarApp section, use New JS Module to create a new JavaScript file named ListScreen.js.
Creating a template
This example shows how to create a List template and attach data to it.
var dessertsTemplate = new voltmx.auto.ListTemplate({
  "id" : "dessertsTemplate",
  "title" : "Dessert list",
  "data" : [
            {
                "title": "Gulab Jamun",
                "image": "gulab_jamun.jpg",
                "description": "Sweet dumplings soaked in sugar syrup."
            },
            {
                "title": "Rasmalai",
                "image": "rasmalai.jpg",
                "description": "Soft cheese patties in sweetened milk."
            }
],
  "onRowClick" : onRowClick
});


function onRowClick(eventobject,rowIndex,sectionIndex){
    //handle the Row click event as per application logic
}
Creating a CarForm
With the template created, create the CarForm and attach the template to it. This snippet shows how to create a CarForm.
var dessertOptionForm = new voltmx.auto.CarForm({
 "id" : "dessertOptionForm",
 "template" : dessertsTemplate,//template must be attached to the CarForm
 "init" : function(){
 },
 "preShow" : function(){
 },
 "postShow" : function(){
 },
 "onHide" : function(){
 },
 "onDestroy" : function(){
// only available for Android.
 }

});
Showing the CarForm
The onCarAppInit callback function is the CarApp's entry point and is the first event executed on startup. In onCarAppInit, use the Carform show method to specify the first CarForm the application will display.
voltmx.auto.setApplicationCallbacks({

    "onCarAppInit": function(){
//show the desertOptionForm as the First form of the application.
desertOptionForm.show();
    },

    "onCarAppDataUpdated" : function(){
    },
    "onCarAppForeground" : function(){
    },
    "onCarAppBackground" : function(){
    },
    "onCarAppTerminate" : function(){
}

});
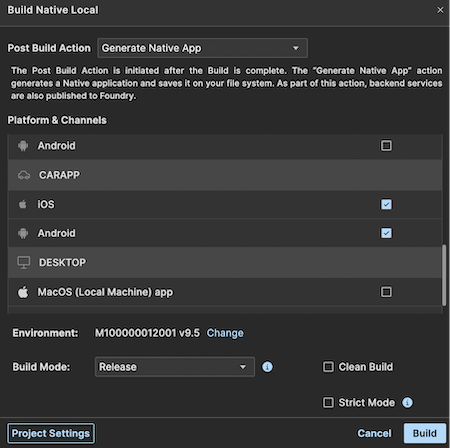
Building the Application
The "CARAPP" option in the build popup enables the creation of CarApplications, by generating the executables for both iOS and Android.
Note: There is no separate installer file for CarApp. The one for mobile works as a mobile application as well as CarApplication if you build for CarApplication.
Testing the CarApp on Android
To test the CarApp, Android provides a special emulator called Desktop Head Unit (DHU).
Installing DHU
Install the DHU from Android Studio. In the Android SDK, ins the SDK Tools section, choose Android Auto Desktop Head Unit Emulator.
Configuring Android Auto settings
Install the Android Auto application in the emulator or mobile device if not already installed.
Follow these steps to configure the Android Auto for testing.
- Enable developer mode on Android Auto
- Open the Android Auto settings.
- Android 10 or higher: on the device, tap Settings > Apps & notifications > See all apps > Android Auto > Advanced > Additional settings in the app.
- Android 9 or lower: in the Android Auto app, tap the menu, then tap Settings.
- Scroll to the About section near the bottom and tap Version to display the version and permission information.
- Tap the Version and permission info section 10 times.
The Allow development settings? dialog appears. - Tap OK.
- Open the Android Auto settings.
- Start the Head Unit Server.
- Click the three dots in Android Auto settings.
- Tap the Start head unit server option.
- Configuring the port.
To connect the emulator or mobile device to DHU, you must configure the port with this command.
adb forward tcp:5277 tcp:5277
This lets the DHU connect to the head unit server running on the mobile device over a TCP socket.
Starting DHU
Start the DHU by navigating to the auto folder in Android SDK and running the below commands.
cd SDK_LOCATION/extras/google/auto
desktop-head-unit.exe # Windows
./desktop-head-unit # macOS or Linux
For more information, refer to https://developer.android.com/training/cars/testing/dhu
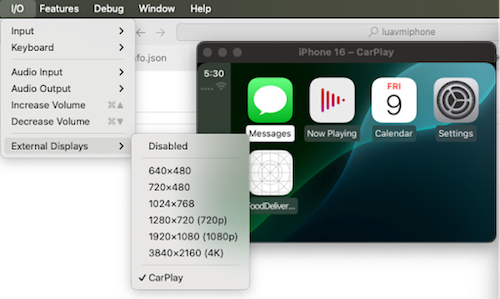
Testing the CarApp on iOS
To open the CarPlay simulator, select it and then click I/O -> External Displays -> Enable CarPlay.
Best Practices and Guidelines:
- Avoid frequent dynamic updates to template properties, to prevent driver distraction.
- Avoid creating multiple CarForms in a single JavaScript file, for better code readability.
- Prevent naming conflicts by avoiding identical variable names across different JS files, due to the global scope in CarApp development.
- Follow the guidelines in the API reference for images and other resources specific to templates.
- When using platform-specific templates or APIs, ensure they are initialized only for their intended operating system and platform. To prevent user blockage, provide alternative options for other platform as well.